Note
Abstract
This document describes situations which leads to issues
during build or boot time of the image build with KIWI NG.
The suggested solutions are considered best practice but
are just one out of other possible solution candidates.
5.1 Build Host Constraints #
For building images a host system is required that runs the build process.
Tools to create the image are used from that host and this creates an
indirect dependency to the target image. For example; Building an
Ubuntu image requires the apt and dpkg tools and metadata to be available
and functional on the host to build an Ubuntu image. There are many more
of those host vs. image dependencies and not all of them can be resolved
in a clear and clean way.
The most compatible environment is provided if the build host is of the same
distribution than the target image. In other cases our recommendation is that
the build host is of the same distribution than the target and near to the
major version (+-1) compared to the target. Such an environment can be
found in:
In general, our goal is to support any major distribution with KIWI NG. However
for building images we rely on core tools which are not under our control.
Also several design aspects of distributions like secure boot and working
with upstream projects are different and not influenced by us. There
are many side effects that can be annoying especially if the build host
is not of the same distribution vendor than the image target.
With regards to the information in Section 5.1, “Build Host Constraints”
one requirement between the build host and the image when it comes to
architecture support is, that the image architecture should match the
build host architecture. Cross arch building would require any core
tool that is used to build an image to be cross arch capable.
To patch e.g an x86_64 system such that it can build an
aarch64 image would require some work on binutils and hacks as well as
performance tweaks which is all not worth the effort and still can lead
to broken results. Thus we recommend to provide native systems for the
target architecture and build there. One possible alternative is to
use the kiwi boxed plugin as mentioned above together with a box
created for the desired architecture. However keep in mind the
performance problematic when running a VM of a different
architecture.
The majority of the image builds are based on the x86 architecture.
As mentioned KIWI NG also supports other architectures, shown in the
table below:
5.3 Host Security Settings Conflicts with KIWI #
Note
Abstract
This page provides further information how to solve
image build problems caused by selinux security
policies.
Linux systems are protected against write/read or other
operations depending on the application which wants to
access or modify data. The rules for this protection are
provided in security policies. There are several applications
enforcing these security settings, e.g apparmor or selinux.
In this troubleshooting chapter the focus is set on selinux
Protecting files, process groups, kernel filesystems, device
nodes and more from unauthorized access and restrict it to
a certain set of applications is a nice concept. However, if
taken serious no other application except the ones configured
in the security policy will function properly.
When building an appliance, the appliance builder has to have
access to a wide range of services. It must be able to
create a new package database elsewhere in the system. It must
be able to create, read and write device nodes, create filesystems,
partitions, bootloader configurations etc etc. The list is very
long and no security policy could cover this in a way that it
would not be open to everything which in the end leads to a
pointless exercise and no security at all.
This means for users who would like to keep the security settings
of the system enforced and unchanged, the only way to allow KIWI NG
to do its job is to run it through boxbuild as explained in
Section 6.1, “Building in a Self-Contained Environment”
For users who can afford to open the system security policy,
the following procedure will make KIWI NG to work:
This action disables selinux temporary. To disable selinux
permanently perform the following steps:
Open the SELinux configuration file: /etc/selinux/config
Locate the following line: SELINUX=enforcing
Change the value to disabled:
On the next reboot, SELinux is permanently disabled.
Note
similar instructions applies to other application security
subsystems like apparmor. Due to the complexity of these
systems this article just mentions the most common issue
people run into when building images on systems protected
through selinux.
5.4 Incompatible Filesystem Settings on Host vs. Image #
Note
Abstract
This page provides further information how to solve
image boot problems if the filesystem tool chain on
the image build host is incompatible with the
image target distribution
When KIWI NG builds an image which requests the creation of a
filesystem, the required filesystem creation tool, for
example mkfs.xfs, is called from the host on which KIWI NG
gets called. It is expected that the generated filesystem
is compatible with the image target distribution. This
expectation is not always correct and depends on the
compatibility of the filesystem default settings between
build host and image target. We know about the following
settings that causes an incompatible filesystem which
will not be able to be used on boot:
- Ext[2,3,4]
Check /etc/mke2fs.conf on the build host and make sure
the configured inode_size is the same as the setting used
for the target image. To solve an issue of this type use
the following filesystem creation option in your KIWI NG
image configuration:
<type fscreateoptions="-I inode-size"/>
- XFS
Check the XFS metadata setup on the build host and make sure
the settings are compatible with the target image. XFS has the
default settings compiled in, thus it might be needed to build
the image first and use the xfs_info tool in a disk.sh script
to fetch the settings at build time of the image. We know from
community reports that the setting sparse=1 will cause issues
on older versions of grub’s xfs module, which does not know how
to handle this setting properly. To solve an issue of this type
use the following filesystem creation option in your
KIWI NG image configuration:
<type fscreateoptions="-i sparse=0"/>
Note
There can be more inconsistencies in the area of filesystems
which we haven’t listed here. In general it’s advisable to
build the image in a compatible environment. At best the
build host distribution is of the same major Linux version
than the image target. For this purpose KIWI NG provides the
so called boxed-plugin. Further details can be found
in Section 6.1, “Building in a Self-Contained Environment”
Note
Abstract
The following sections describe the concept and general workflow
of building appliances with KIWI NG 9.25.12.
7.1 Host Requirements To Build Images #
When building OS images, several tools and sub-systems are used
and required on the host KIWI NG is called at. For example, to
build a virtual disk image, several tools needs to be available
on the host that builds the image. This includes tools for
partition table setup or tools to create filesystems.
The number of required components depends on the selected image
type and the features used with the image. We cannot expect
the users of KIWI NG to know about each and every component that
is needed to build the image. Therefore a concept to help with
the host requirements exists and is named kiwi-systemdeps
The kiwi-systemdeps concept consists out of a collection of
sub-packages provided with the python-kiwi main package. Each
individual package requires a number of tools and subsystem packages
which belongs to the package category. There are the following
systemdeps packages:
kiwi-systemdeps-core:kiwi-systemdeps-containers:Supports building OCI image types used with docker, podman.
Installs the distribution specific tool chain to build OCI
compliant container images.
kiwi-systemdeps-containers-wsl:kiwi-systemdeps-iso-media:Supports building iso image types and oem install media.
Installs all tools required to build ISO filesystems.
Depends on the -core, -filesystems and -bootloaders
kiwi-systemdeps packages.
kiwi-systemdeps-bootloaders:Supports building bootable oem and iso image types.
Installs all bootloader tools depending on the host architecture
to allow setup and install of the bootloader. The pulled in
components are required for any image that is able to boot
through some BIOS or firmware.
Depends on the -core kiwi-systemdeps packages.
Note
The iso type is an exception which might not require the
-bootloaders systemdeps. In case of the firmware attribute
to be set to bios, KIWI NG builds bootable ISO images still
based on isolinux which is provided with the -iso-media
systemdeps. However, by default, any KIWI NG created ISO image
is BIOS and EFI capable and based on the grub bootloader which
causes a requirement to the -bootloaders systemdeps.
kiwi-systemdeps-filesystems:Supports building fs-type, oem, pxe,
kis and live iso image types.
Installs all tools to create filesystems supported with KIWI NG.
The pulled in components are needed for any image type that
needs to create a filesystem. This excludes the archive based
image types like docker, appx or tbz. The package also
installs tools one level below the actual filesystem creation
toolkit. These are components to manage loop devices as well
as partition table setup and subsystem support like LVM and LUKS.
Depends on the -core kiwi-systemdeps packages.
kiwi-systemdeps-disk-images:Supports building the oem image type.
Installs all tools to create virtual disks. In KIWI NG, virtual disks
are created using the QEMU toolchain.
Depends on the -filesystems and -bootloaders kiwi-systemdeps
packages.
kiwi-systemdeps-image-validation:Installs the jing tool to validate the image description. This is
useful for detailed error reports from KIWI NG in case of an image
description validation error. In addition, the anymarkup Python
module is installed if the the option to install recommended packages
is set. With anymarkup available, KIWI NG can also handle image
descriptions in another format than the XML markup, like YAML.
Depending on the image type the kiwi-systemdeps packages can help
to setup the host system quickly for the task to build an image.
In case the host should support everything there is also the
main kiwi-systemdeps package which has a dependency on all other
existing systemdeps packages.
Note
Pulling in all kiwi-systemdeps packages can result in quite
some packages to become installed on the host. This is because
the required packages itself comes with a number of dependencies
like java for jing as one example.
7.2 Setting up Repositories #
A crucial part of each appliance is the repository
selection. KIWI NG allows the end user to completely customize the selection
of repositories and packages via the repository element.
7.2.1 Adding repositories #
KIWI NG installs packages into your appliance from the repositories defined in
the image description. Therefore at least one repository must be
defined, as KIWI NG will otherwise not be able to fetch any packages.
A repository is added to the description via the repository element,
which is a child of the top-level image element:
<image schemaversion="7.4" name="{exc_image_base_name}">
    <!-- snip -->
    <repository type="rpm-md" alias="kiwi" priority="1">
        <source path="obs://Virtualization:Appliances:Builder/openSUSE_Leap_15.3"/>
    </repository>
    <repository type="rpm-md" alias="OS" imageinclude="true">
        <source path="{exc_repo}"/>
    </repository>
</image>
In the above snippet we defined two repositories:
The repository belonging to the KIWI NG project:
obs://Virtualization:Appliances:Builder/openSUSE_Leap_15.3 at the Open Build Service (OBS)
The RPM repository belonging to the OS project:
{exc_repo}, at the Open Build Service (OBS). The translated
http URL will also be included in the final appliance.
The repository element accepts one source child element, which
contains the URL to the repository in an appropriate format and the
following optional attributes:
imageinclude: Specify whether this repository should be added to the
resulting image, defaults to false.
imageonly: A repository with imageonly="true" will not be available
during image build, but only in the resulting appliance. Defaults to
false.
priority: An integer priority for all packages in this repository. If
the same package is available in more than one repository, then the one
with the highest priority is used.
alias: Name to be used for this repository, it will appear as the
repository’s name in the image, which is visible via zypper repos or
dnf repolist. KIWI NG will construct an alias name as result of hex
representation from uuid4, if no value is given.
repository_gpgcheck: Specify whether or not this specific repository is
configured to to run repository signature validation. If not set, the
package manager’s default is used.
package_gpgcheck: Boolean value that specifies whether each package’s
GPG signature will be verified. If omitted, the package manager’s default
will be used
components: Distribution components used for deb repositories,
defaults to main.
distribution: Distribution name information, used for deb repositories.
profiles: List of profiles to which this repository applies.
customize: Script to run custom modifications to the repo file(s).
repo files allows for several customization options which not all of them
are supported to be set by kiwi through the current repository schema.
As the options used do not follow any standard and are not compatible
between package managers and distributions, the only generic way to handle
this is through a script hook which is invoked with the repo file as
parameter for each file created by KIWI NG.
An example for a script call to add the module_hotfixes option
for a dnf compatible repository configuration could look like
this
repo_file=$1
echo 'module_hotfixes = 1' >> ${repo_file}
Note
If the script is provided as relative path it will
be searched in the image description directory
7.2.1.1 Supported repository paths #
The actual location of a repository is specified in the source child
element of repository via its only attribute path. KIWI NG supports the
following paths types:
http://URL or https://URL or ftp://URL: a URL to the repository
available via HTTP(s) or FTP.
obs://$PROJECT/$REPOSITORY: evaluates to the repository $REPOSITORY
of the project $PROJECT available on the Open Build Service (OBS). By
default KIWI NG will look for projects on build.opensuse.org, but this can be overridden using the
runtime configuration file (see Section 7.7, “The Runtime Configuration File”).
Note that it is not possible to add repositories using the obs:// path
from different OBS instances (use direct URLs to the .repo
file instead in this case).
obsrepositories:/: special path only available for builds using the
Open Build Service. The repositories configured for the OBS project in
which the KIWI NG image resides will be available inside the appliance. This
allows you to configure the repositories of your image from OBS itself
and not having to modify the image description.
dir:///path/to/directory or file:///path/to/file: an absolute path to
a local directory or file available on the host building the
appliance.
iso:///path/to/image.iso: the specified ISO image will be mounted
during the build of the KIWI NG image and a repository will be created
pointing to the mounted ISO.
7.3 Adding and Removing Packages #
On top of the Section 7.2, “Setting up Repositories” setup the package setup is
required. KIWI NG allows the end user to completely customize the selection
of packages via the packages element.
<image schemaversion="7.4" name="{exc_image_base_name}">
    <packages type="bootstrap">
        <package name="udev"/>
        <package name="filesystem"/>
        <package name="openSUSE-release"/>
        <!-- additional packages installed before the chroot is created -->
    </packages>
    <packages type="image">
        <package name="patterns-openSUSE-base"/>
        <!-- additional packages to be installed into the chroot -->
    </packages>
</image>
The packages element provides a collection of different child elements
that instruct KIWI NG when and how to perform package installation or
removal. Each packages element acts as a group, whose behavior can be
configured via the following attributes:
type: either bootstrap, image, delete, uninstall or one of the
following build types: docker, iso, oem, kis, oci.
Packages for type="bootstrap" are pre-installed to populate the images’
root file system before chrooting into it.
Packages in type="image" are installed immediately after the initial
chroot into the new root file system.
Packages in type="delete" and type="uninstall" are removed from the
image, for details see Uninstall System Packages.
And packages which belong to a build type are only installed when that
specific build type is currently processed by KIWI NG.
profiles: a list of profiles to which this package selection applies
(see Section 7.4, “Image Profiles”).
patternType: selection type for patterns, supported values are:
onlyRequired, plusRecommended, see:
The product and namedCollection element.
The following sections describes the different child elements of
a packages group.
7.3.1 The package element #
The package element represents a single package to be installed (or
removed), whose name is specified via the mandatory name attribute:
<image schemaversion="7.4" name="{exc_image_base_name}">
    <!-- snip -->
    <packages type="bootstrap">
        <package name="udev"/>
    </packages>
</image>
which adds the package udev to the list of packages to be added to the
initial filesystem. Note, that the value that you pass via the name
attribute is passed directly to the used package manager. Thus, if the
package manager supports other means how packages can be specified, you may
pass them in this context too. For example, RPM based package managers
(like dnf or zypper) can install packages via their
Provides:. This can be used to add a package that provides a certain
capability (e.g. Provides: /usr/bin/my-binary) via:
<image schemaversion="7.4" name="{exc_image_base_name}">
    <!-- snip -->
    <packages type="bootstrap">
        <package name="/usr/bin/my-binary"/>
    </packages>
</image>
Whether this works depends on the package manager and on the environment
that is being used. In the Open Build Service, certain Provides either
are not visible or cannot be properly extracted from the KIWI NG
description. Therefore, relying on Provides is not recommended.
Packages can also be included only on specific host architectures via the
arch attribute. KIWI NG compares the arch attributes value with the host
architecture that builds the image according to the output of uname -m.
<image schemaversion="7.4" name="{exc_image_base_name}">
    <!-- snip -->
    <packages type="image">
        <package name="grub2"/>
        <package name="grub2-x86_64-efi" arch="x86_64"/>
        <package name="shim" arch="x86_64"/>
    </packages>
</image>
which results in grub2-x86_64-efi and shim being only installed if the
build host is a 64bit x86 machine, but grub2 will be installed independent
of the architecture.
7.3.2 The archive element #
It is sometimes necessary to include additional packages into the image
which are not available in the package manager’s native format. KIWI NG
supports the inclusion of ordinary tar archives via the archive element,
whose name attribute specifies the filename of the archive (KIWI NG looks
for the archive in the image description folder).
<packages type="image">
    <archive name="custom-program1.tgz"/>
    <archive name="custom-program2.tar"/>
</packages>
KIWI NG will extract the archive into the root directory of the image using
GNU tar, thus only archives
supported by it can be included. When multiple archive elements are
specified then they will be applied in a top to bottom order. If a file is
already present in the image, then the file from the archive will overwrite
it (same as with the image overlay).
7.3.3 Uninstall System Packages #
KIWI NG supports two different methods how packages can be removed from the
appliance:
Packages present as a child element of <packages type="uninstall">
will be gracefully uninstalled by the package manager alongside with
dependent packages and orphaned dependencies.
Packages present as a child element of <packages type="delete"> will
be removed by RPM/DPKG without any dependency check, thus potentially
breaking dependencies and compromising the underlying package database.
Both types of removals take place after config.sh is run in the
Section 7.10.1, “The Prepare Step”
(see also Section 7.6, “User Defined Scripts”).

Warning
An uninstall packages request deletes:
Use this feature with caution as it can easily cause the removal of
sensitive tools leading to failures in later build stages.
Removing packages via type="uninstall" can be used to completely remove a
build time tool (e.g. a compiler) without having to specify a all
dependencies of that tool (as one would have when using
type="delete"). Consider the following example where we wish to compile a
custom program in config.sh. We ship its source code via an
archive element and add the build tools (ninja, meson and clang) to
<packages type="image"> and <packages type="uninstall">:
<image schemaversion="7.4" name="{exc_image_base_name}">
    <!-- snip -->
    <packages type="image">
        <package name="ca-certificates"/>
        <package name="coreutils"/>
        <package name="ninja"/>
        <package name="clang"/>
        <package name="meson"/>
        <archive name="foo_app_sources.tar.gz"/>
    </packages>
    <!-- These packages will be uninstalled after running config.sh -->
    <packages type="uninstall">
        <package name="ninja"/>
        <package name="meson"/>
        <package name="clang"/>
    </packages>
</image>
The tools meson, clang and ninja are then available during the
Section 7.10.1, “The Prepare Step” and can thus be used in
config.sh (for further details, see
Section 7.6, “User Defined Scripts”), for example to build
foo_app:
pushd /opt/src/foo_app
mkdir build
export CC=clang
meson build
cd build && ninja && ninja install
popd
The <packages type="uninstall"> element will make sure that the final
appliance will no longer contain our tools required to build foo_app,
thus making our image smaller.
There are also other use cases for type="uninstall", especially for
specialized appliances. For containers one can often remove the package
shadow (it is required to setup new user accounts) or any left over
partitioning tools (parted or fdisk). All networking tools can be
safely uninstalled in images for embedded devices without a network
connection.
7.3.4 The product and namedCollection element #
KIWI NG supports the inclusion of openSUSE products or of namedCollections
(patterns in SUSE based distributions or groups for RedHat based
distributions). These can be added via the product and namedCollection
child elements, which both take the mandatory name attribute and the
optional arch attribute.
product and namedCollection can be utilized to shorten the list of
packages that need to be added to the image description tremendously. A
named pattern, specified with the namedCollection element is a
representation of a predefined list of packages. Specifying a pattern will
install all packages listed in the named pattern. Support for patterns is
distribution specific and available in SLES, openSUSE, CentOS, RHEL and
Fedora. The optional patternType attribute on the packages element allows
you to control the installation of dependent packages. You may assign one
of the following values to the patternType attribute:
onlyRequired: Incorporates only patterns and packages that the
specified patterns and packages require. This is a “hard dependency” only
resolution.
plusRecommended: Incorporates patterns and packages that are required
and recommended by the specified patterns and packages.
7.3.5 The ignore element #
Packages can be explicitly marked to be ignored for installation inside a
packages collection. This useful to exclude certain packages from being
installed when using patterns with patternType="plusRecommended" as shown
in the following example:
<image schemaversion="7.4" name="{exc_image_base_name}">
    <packages type="image" patternType="plusRecommended">
        <namedCollection name="network-server"/>
        <package name="grub2"/>
        <package name="kernel"/>
        <ignore name="ejabberd"/>
        <ignore name="puppet-server"/>
    </packages>
</image>
Packages can be marked as ignored during the installation by adding a
ignore child element with the mandatory name attribute set to the
package’s name. Optionally one can also specify the architecture via the
arch similarly to The package element.
Warning
Adding ignore elements as children of a <packages type="delete"> or
a <packages type="uninstall"> element has no effect! The packages will
still get deleted.
A profile is a namespace for additional settings that can be applied by
KIWI NG on top of the default settings (or other profiles), thereby allowing
to build multiple appliances with the same build type but with different
configurations.
The use of profiles is advisable to distinguish image builds of the same
type but with different settings. In the following example, two virtual
machine images of the oem type are configured: one for QEMU (using the
qcow2 format) and one for VMWare (using the vmdk format).
<image schemaversion="7.4" name="{exc_image_base_name}">
    <profiles>
        <profile name="QEMU" description="virtual machine for QEMU"/>
        <profile name="VMWare" description="virtual machine for VMWare"/>
    </profiles>
    <preferences>
        <version>15.0</version>
        <packagemanager>zypper</packagemanager>
    </preferences>
    <preferences profiles="QEMU">
        <type image="oem" format="qcow2" filesystem="ext4">
    </preferences>
    <preferences profiles="VMWare">
        <type image="oem" format="vmdk" filesystem="ext4">
    </preferences>
</image>
Each profile is declared via the element profile, which itself must be a
child of profiles and must contain the name and description
attributes. The description is only present for documentation purposes,
name on the other hand is used to instruct KIWI NG which profile to build
via the command line. Additionally, one can provide the boolean attribute
import, which defines whether this profile should be used by default when
KIWI NG is invoked via the command line.
A profile inherits the default settings which do not belong to any
profile. It applies only to elements that contain the profile in their
profiles attribute. The attribute profiles expects a comma separated
list of profiles for which the settings of this element apply.
Profiles can furthermore inherit settings from another profile via the
requires sub-element:
<profiles>
    <profile name="VM" description="virtual machine"/>
    <profile name="QEMU" description="virtual machine for QEMU">
        <requires profile="VM"/>
    </profile>
</profiles>
The profile QEMU would inherit the settings from VM in the above
example.
For further details on the usage of profiles see
Section 11.19, “Building Images with Profiles”
User accounts can be added or modified via the users element, which
supports a list of multiple user child elements:
<image schemaversion="7.4" name="{exc_image_base_name}">
    <users>
        <user
            password="this_is_soo_insecure"
            home="/home/me" name="me"
            groups="users" pwdformat="plain"
        />
        <user
            password="$1$wYJUgpM5$RXMMeASDc035eX.NbYWFl0"
            home="/root" name="root" groups="root"
        />
    </users>
</image>
Each user element represents a specific user that is added or
modified. The following attributes are mandatory:
name: the UNIX username
password: The password for this user account. It can be provided either
in cleartext form (pwdformat="plain") or in crypt’ed form
(pwdformat="encrypted"). Plain passwords are discouraged, as everyone
with access to the image description would know the password. It is
recommended to generate a hash of your password using openssl as
follows:
$ openssl passwd -1 -salt 'xyz' YOUR_PASSWORD
Additionally, the following optional attributes can be specified:
home: the path to the user’s home directory
groups: A comma separated list of UNIX groups. The first element of the
list is used as the user’s primary group. The remaining elements are
appended to the user’s supplementary groups. When no groups are assigned
then the system’s default primary group will be used.
id: The numeric user id of this account.
pwdformat: The format in which password is provided, either plain
or encrypted (the latter is the default).
7.6 User Defined Scripts #
Note
Abstract
This chapter describes the purpose of the user defined scripts
config.sh, image.sh, pre_disk_sync.sh
and disk.sh, which can be used to further customize an
image in ways that are not possible via the image description
alone.
KIWI NG supports the following optional scripts that it runs in a
root environment (chroot) containing your new appliance:
- post_bootstrap.sh
runs at the end of the bootstrap phase as part of the
Section 7.10.1, “The Prepare Step”. The script can be used to
configure the package manager with additional settings that
should apply in the following chroot based installation step
which completes the installation. The script is not dedicated to
this use and can also be used for other tasks.
- config.sh
runs at the end of the Section 7.10.1, “The Prepare Step”
and after users have been set and the overlay tree directory
has been applied. It is usually used to apply a permanent and final
change of data in the root tree, such as modifying a package provided
config file.
- config-overlay.sh
Available only if delta_root="true" is set. In this case the
script runs at the end of the Section 7.10.1, “The Prepare Step”
prior the umount of the overlay root tree. It runs after an
eventually given config.sh and is the last entry point to
change the delta root tree.
- config-host-overlay.sh
Available only if delta_root="true" is set. In this case the
script runs at the end of the Section 7.10.1, “The Prepare Step”
prior the umount of the overlay root tree. The script is called
NOT CHROOTED from the host with the image root directory as
its working directory. It runs after an eventually given
config.sh and is together with an eventually given
config-overlay.sh script, the last entry point to change the
delta root tree.
- images.sh
is executed at the beginning of the Section 7.10.2, “The Create Step”. It runs in the same image root tree
that has been created by the prepare step but is invoked any
time an image should be created from that root tree. It is usually
used to apply image type specific changes to the root tree such as
a modification to a config file that should be done when building
a live iso but not when building a virtual disk image.
- pre_disk_sync.sh
is executed for the disk image type oem only and runs
right before the synchronization of the root tree into the disk image
loop file. The pre_disk_sync.sh can be used to change
content of the root tree as a last action before the sync to
the disk image is performed. This is useful for example to delete
components from the system which were needed before or cannot
be modified afterwards when syncing into a read-only filesystem.
- disk.sh
is executed for the disk image type oem only and runs after the
synchronization of the root tree into the disk image loop file.
The chroot environment for this script call is the virtual disk itself
and not the root tree as with config.sh and images.sh.
The script disk.sh is usually used to apply changes at parts of
the system that are not an element of the file based root tree such as
the partition table, the contents of the final initrd, the bootloader,
filesystem attributes and more.
KIWI NG executes scripts via the operating system if their executable
bit is set (in that case a shebang is mandatory) otherwise they will be
invoked via the BASH. If a script exits with a non-zero exit code
then KIWI NG will report the failure and abort the image creation.
7.6.1 Developing/Debugging Scripts #
When creating a custom script it usually takes some iterations of
try and testing until a final stable state is reached. To support
developers with this task KIWI NG calls scripts associated with a
screen session. The connection to screen is only done if KIWI NG
is called with the --debug option.
In this mode a script can start like the following template:
# The magic bits are still not set

echo "break"
/bin/bash
At call time of the script a screen session executes and you get
access to the break in shell. From this environment the needed script
code can be implemented. Once the shell is closed the KIWI NG process
continues.
Apart from providing a full featured terminal throughout the
execution of the script code, there is also the advantage to
have control on the session during the process of the image
creation. Listing the active sessions for script execution
can be done as follows:
$ sudo screen -list

There is a screen on:
     19699.pts-4.asterix     (Attached)
1 Socket in /run/screens/S-root.
Note
As shown above the screen session(s) to execute script code
provides extended control which could also be considered a
security risk. Because of that KIWI NG only runs scripts through
screen when explicitly enabled via the --debug switch.
For production processes all scripts should run in their
native way and should not require a terminal to operate
correctly !
7.6.1.1 Script Template for config.sh / images.sh #
KIWI NG provides a collection of methods and variables that supports users
with custom operations. For details see Functions and Variables Provided by KIWI NG.
The following template shows how to import this information in your
script:
#======================================
# Include functions & variables
#--------------------------------------
test -f /.kconfig && . /.kconfig
test -f /.profile && . /.profile

...
Warning
Modifications of the unpacked root tree
Keep in mind that there is only one unpacked root tree the
script operates in. This means that all changes are permanent
and will not be automatically restored!
7.6.1.2 Functions and Variables Provided by KIWI NG #
KIWI NG creates the .kconfig and .profile files to be sourced
by the shell scripts config.sh and images.sh.
.kconfig contains various helper functions which can be used to
simplify the image configuration and .profile contains environment
variables which get populated from the settings provided in the image
description.
The .kconfig file provides a common set of functions. Functions
specific to SUSE Linux Enterprise and openSUSE begin with the name
suse, functions applicable to all Linux distributions start with the
name base.
The following list describes all functions provided by .kconfig:
- baseSetRunlevel {value}
Set the default run level.
- baseStripAndKeep {list of info-files to keep}
Helper function for the baseStrip* functions, reads the list of files
to check from stdin for removing
params: files which should be kept
- baseStripLocales {list of locales}
Remove all locales, except for the ones given as the parameter.
- baseStripTranslations {list of translations}
Remove all translations, except for the ones given as the parameter.
- baseStripUnusedLibs
Remove libraries which are not directly linked against applications
in the bin directories.
- baseUpdateSysConfig {filename} {variable} {value}
Update the contents of a sysconfig variable
- baseSystemdServiceInstalled {service}
Prints the path of the first found systemd unit or mount with name passed
as the first parameter.
- baseSysVServiceInstalled {service}
Prints the name ${service} if a SysV init service with that name is
found, otherwise it prints nothing.
- baseSystemdCall {service_name} {args}
Calls systemctl ${args} ${service_name} if a systemd unit, a systemd
mount or a SysV init service with the ${service_name} exist.
- baseInsertService {servicename}
Activate the given service via systemctl.
- baseRemoveService {servicename}
Deactivate the given service via systemctl.
- baseService {servicename} {on|off}
Activate or deactivate a service via systemctl.
The function requires the service name and the value on or off as
parameters.
Example to enable the sshd service on boot:
- suseInsertService {servicename}
Calls baseInsertService and exists only for
compatibility reasons.
- suseRemoveService {servicename}
Calls baseRemoveService and exists only for
compatibility reasons.
- suseService {servicename} {on|off}
Calls baseService and exists only for compatibility
reasons.
- suseSetupProduct
Creates the /etc/products.d/baseproduct link
pointing to the product referenced by either /etc/SuSE-brand or
/etc/os-release or the latest prod file available in
/etc/products.d
- baseVagrantSetup
Configures the image to work as a vagrant box by performing the following
changes:
add the vagrant user to /etc/sudoers
or /etc/sudoers.d/vagrant
insert the insecure vagrant ssh key, apply recommended
ssh settings and start the ssh daemon
create the default shared folder /vagrant
- Debug {message}
Helper function to print the supplied message if the variable DEBUG is
set to 1 (it is off by default).
- Echo {echo commandline}
Helper function to print a message to the controlling terminal.
- Rm {list of files}
Helper function to delete files and log the deletion.
7.6.1.2.2 Profile Environment Variables #
The .profile environment file is created by KIWI NG and contains a
specific set of variables which are listed below.
- $kiwi_compressed
The value of the compressed attribute set in the type element in
config.xml.
- $kiwi_delete
A list of all packages which are children of the packages element
with type="delete" in config.xml.
- $kiwi_drivers
A comma separated list of the driver entries as listed in the
drivers section of the config.xml.
- $kiwi_iname
The name of the image as listed in config.xml.
- $kiwi_iversion
The image version as a string.
- $kiwi_keytable
The contents of the keytable setup as done in config.xml.
- $kiwi_language
The contents of the locale setup as done in config.xml.
- $kiwi_profiles
A comma separated list of profiles used to build this image.
- $kiwi_timezone
The contents of the timezone setup as done in config.xml.
- $kiwi_type
The image type as extracted from the type element in
config.xml.
7.6.1.3 Configuration Tips #
Locale configuration:
KIWI in order to set the locale relies on systemd-firstboot,
which in turn writes the locale configuration file /etc/locale.conf.
The values for the locale settings are taken from the description XML
file in the <locale> element under <preferences>.
KIWI assumes systemd adoption to handle these locale settings, in case the
build distribution does not honor /etc/locale.conf this is likely to not
produce any effect on the locale settings. As an example, in SLE12
distribution the locale configuration is already possible by using the
systemd toolchain, however this approach overlaps with SUSE specific
managers such as YaST. In that case using systemd-firstboot
is only effective if locales in /etc/sysconfig/language are
not set or if the file does not exist at all. In SLE12
/etc/sysconfig/language has precendence over
/etc/locale.conf for compatibility reasons and management tools
could still relay on sysconfig files for locale settings.
In any case the configuration is still possible in KIWI by using
any distribution specific way to configure the locale setting inside the
config.sh script or by adding any additional configuration file
as part of the overlay root-tree.
Stateless systemd UUIDs:
Machine ID files (/etc/machine-id, /var/lib/dbus/machine-id)
may be created and set during the image package installation depending on
the distribution. Those UUIDs are intended to be unique and set only once
in each deployment.
If /etc/machine-id does not exist or contains the string
uninitialized (systemd v249 and later), this triggers firstboot behaviour
in systemd and services using ConditionFirstBoot=yes will run. Unless the
file already contains a valid machine ID, systemd will generate one and
write it into the file, creating it if necessary. See the machine-id man
page
for more details.
Depending on whether firstboot behaviour should be triggered or not,
/etc/machine-id can be created, removed or filled with
uninitialized by config.sh.
To prevent that images include a generated machine ID, KIWI will clear
/etc/machine-id if it exists and does not contain the string
uninitialized. This only applies to images based on a dracut initrd, it
does not apply for container images.
Note
rw might be necessary if /etc/machine-id does not exist
For systemd to be able to write /etc/machine-id on boot,
it must either exist already (so that a bind mount can be created) or
/etc must be writable.
By default, the root filesystem is mounted read-only by dracut/systemd,
thus a missing /etc/machine-id will result in an error on boot.
The rw option can be added to the kernel commandline to force the
initial mount to be read-write.
Note
Avoid inconsistent /var/lib/dbus/machine-id
Note that /etc/machine-id and /var/lib/dbus/machine-idmust contain the same unique ID. On modern systems
/var/lib/dbus/machine-id is already a symlink to
/etc/machine-id. However on older systems those might be two
different files. This is the case for SLE-12 based images. If you are
targeting these older operating systems, it is recommended to add the
symlink creation into config.sh:
#======================================
# Make machine-id consistent with dbus
#--------------------------------------
if [ -e /var/lib/dbus/machine-id ]; then
    rm /var/lib/dbus/machine-id
fi
ln -s /etc/machine-id /var/lib/dbus/machine-id
7.7 The Runtime Configuration File #
KIWI NG supports an additional configuration file for runtime specific
settings that do not belong into the image description but which are
persistent and would be unsuitable for command line parameters.
The runtime configuration file must adhere to the YAML syntax and can be provided via the global
--config option at call time of KIWI NG. If no config file is
provided at the commandline, KIWI NG searches for the runtime
configuration file in the following locations:
~/.config/kiwi/config.yml
/etc/kiwi.yml
A default runtime config file in /etc/kiwi.yml is provided with
the python3-kiwi package. The file contains all settings as comments
including a short description of each setting.
7.8 Customizing the Boot Process #
Most Linux systems use a special boot image to control the system boot process
after the system firmware, BIOS or UEFI, hands control of the hardware to the
operating system. This boot image is called the initrd. The Linux kernel
loads the initrd, a compressed cpio initial RAM disk, into the RAM and
executes init or, if present, linuxrc.
Depending on the image type, KIWI NG creates the boot image automatically during
the create step. It uses a tool called dracut to create this initrd.
Dracut generated initrd archives can be extended by custom modules to add
functionality which is not natively provided by dracut itself. In the scope
of KIWI NG the following dracut modules are used:
-
kiwi-dump
Serves as an image installer. It provides the
required implementation to install a KIWI NG image on a selectable target.
This module is required if one of the attributes installiso, installstick
or installpxe is set to true in the image type definition
-
kiwi-dump-reboot
Serves to boot the system into the installed image after installation is
completed.
-
kiwi-live
Boots up a KIWI NG live image. This module is required
if the iso image type is selected
-
kiwi-overlay
Allows to boot disk images configured with the
attribute overlayroot set to true. Such a disk has its root partition
compressed and readonly and boots up using overlayfs for the root filesystem
using an extra partition on the same disk for persistent data.
-
kiwi-repart
Resizes an OEM disk image after installation onto
the target disk to meet the size constraints configured in the oemconfig
section of the image description. The module takes over the tasks to
repartition the disk, resizing of RAID, LVM, LUKS and other layers and
resizing of the system filesystems.
-
kiwi-lib
Provides functions of general use and serves
as a library usable by other dracut modules. As the name implies, its
main purpose is to function as library for the above mentioned kiwi
dracut modules.
Note
Using Custom Boot Image Support
Apart from the standard dracut based creation of the boot image, KIWI NG
supports the use of custom boot images for the image types oem
and pxe. The use of a custom boot image is activated by setting the
following attribute in the image description:
<type ... initrd_system="kiwi"/>
Along with this setting it is now mandatory to provide a reference to
a boot image description in the boot attribute like in the
following example:
<type ... boot="netboot/suse-tumbleweed"/>
Such boot descriptions for the OEM and PXE types are currently still
provided by the KIWI NG packages but will be moved into its own repository
and package soon.
The custom boot image descriptions allows a user to completely customize
what and how the initrd behaves by its own implementation. This concept
is mostly used in PXE environments which are usually highly customized
and requires a specific boot and deployment workflow.
7.8.1 Boot Image Hook-Scripts #
The dracut initrd system uses systemd to implement a predefined workflow
of services which are documented in the bootup man page at:
http://man7.org/linux/man-pages/man7/dracut.bootup.7.html
To hook in a custom boot script into this workflow it’s required to provide
a dracut module which is picked up by dracut at the time KIWI NG calls it.
The module files can be either provided as a package or as part of the
overlay directory in your image description
The following example demonstrates how to include a custom hook script
right before the system rootfs gets mounted.
Create a subdirectory for the dracut module:
$ mkdir -p root/usr/lib/dracut/modules.d/90my-module
Register the dracut module in a configuration file:
$ vi root/etc/dracut.conf.d/90-my-module.conf

add_dracutmodules+=" my-module "
Create the hook script:
$ touch root/usr/lib/dracut/modules.d/90my-module/my-script.sh
Create a module setup file in root/usr/lib/dracut/modules.d/90my-module/module-setup.sh with the following content:
#!/bin/bash

# called by dracut
check() {
    # check module integrity
}

# called by dracut
depends() {
    # return list of modules depending on this one
}

# called by dracut
installkernel() {
    # load required kernel modules when needed
    instmods _kernel_module_list_
}

# called by dracut
install() {
    declare moddir=${moddir}
    inst_multiple _tools_my_module_script_needs_

    inst_hook pre-mount 30 "${moddir}/my-script.sh"
}
Note
Declaring Extra Tools for Hook Scripts
The install() function called by dracut can define extra tools needed by
a defined hook script. The “inst_multiple” command and its parameters
inform dracut to include these extra tools/items in the initrd.
The tools/items defined here can be any file, but are usually executables
and libraries needed by the hook script.
Each file MUST be included in the Kiwi description either in a
package, archive, or in the “root” tree in the image description
directory.
The parameters of the inst_multiple command are space separated.
Each parameter can be a single executable name if it exists in /bin,
/sbin, /usr/bin, or /usr/sbin directories.
Otherwise, a full pathname to the file is required. This is usually
true for libraries and other special files.
That’s it! At the time KIWI NG calls dracut the 90my-module will be taken
into account and is installed into the generated initrd. At boot time
systemd calls the scripts as part of the dracut-pre-mount.service.
The dracut system offers a lot more possibilities to customize the
initrd than shown in the example above. For more information, visit
the dracut project page.
7.8.2 Boot Image Parameters #
A dracut generated initrd in a KIWI NG image build process includes one or
more of the KIWI NG provided dracut modules. The following list documents
the available kernel boot parameters for this modules:
-
rd.kiwi.debug
Activates the debug log file for the KIWI NG part of
the boot process at /run/initramfs/log/boot.kiwi.
-
rd.kiwi.install.pxe
Tells an OEM installation image to lookup the system
image on a remote location specified in rd.kiwi.install.image.
-
rd.kiwi.install.image=URI
Specifies the remote location of the system image in
a PXE based OEM installation
-
rd.kiwi.install.pass.bootparam
Tells an OEM installation image to pass an additional
boot parameters to the kernel used to boot the installed image. This
can be used e.g. to pass on first boot configuration for a PXE image.
Note, that options starting with rd.kiwi are not passed on to avoid
side effects.
-
rd.kiwi.oem.maxdisk=size[KMGT]
Configures the maximum disk size an unattended OEM
installation should consider for image deployment. Unattended OEM
deployments default to deploying on /dev/sda (more exactly, the first
device not filtered out by oem-device-filter). With RAID
controllers, it can happen that your buch of big JBOD disks is for
example /dev/sda to /dev/sdi and the 480G RAID1 configured for
OS deployment is /dev/sdj. With rd.kiwi.oem.maxdisk=500G the
deployment will land on that RAID disk.
-
rd.live.overlay.size
Tells a live ISO image the size for the tmpfs filesystem that is used
for the overlayfs mount process. If the write area of the overlayfs
mount uses this tmpfs, any new data written during the runtime of
the system will fillup this space. The default value used is set
to 50% which means one half of the available RAM space can be used
for writing new data.
-
rd.live.overlay.persistent
Tells a live ISO image to prepare a persistent
write partition.
-
rd.live.overlay.cowfs
Tells a live ISO image which filesystem should be
used to store data on the persistent write partition.
-
rd.live.cowfile.mbsize
Tells a live ISO image the size of the COW file in MB.
When using tools like live-grub-stick the live ISO will be copied
as a file on the target device and a GRUB loopback setup is created
there to boot the live system from file. In such a case the
persistent write setup, which usually creates an extra write
partition on the target, will fail in almost all cases because
the target has no free and unpartitioned space available.
Because of that a cow file(live_system.cow) instead of a partition
is created. The cow file will be created in the same directory
the live iso image file was read from by grub and takes the
configured size or the default size of 500MB.
-
rd.live.dir
Tells a live ISO image the directory which contains
the live OS root directory. Defaults to LiveOS.
-
rd.live.squashimg
Tells a live ISO image the name of the squashfs
image file which holds the OS root. Defaults to squashfs.img.
If the boot process encounters a fatal error, the default behavior is to
stop the boot process without any possibility to interact with the system.
Prevent this behavior by activating dracut’s builtin debug mode in combination
with the kiwi debug mode as follows:
This should be set at the Kernel command line. With those parameters activated,
the system will enter a limited shell environment in case of a fatal error
during boot. The shell contains a basic set of commands and allows for a closer
look to:
less /run/initramfs/log/boot.kiwi
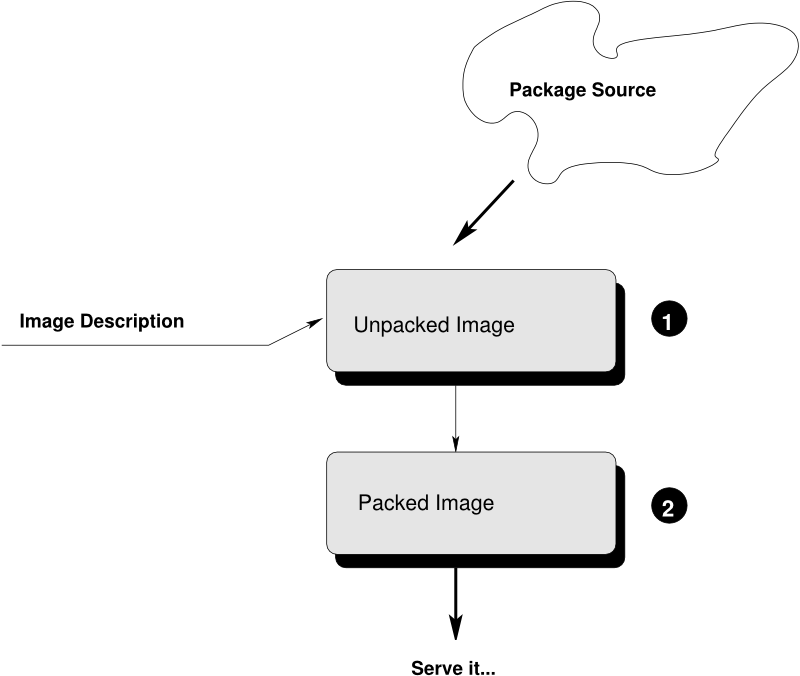
KIWI NG builds so-called system images (a fully installed and optionally
configured system in a single file) of a Linux distribution in two steps (for
further details, see Image Building Process):
Prepare operation: generate an unpacked image tree of your
image. The unpacked tree is a directory containing the future file
system of your image, generated from your image description.
Create operation: the unpacked tree generated in step 1 is packaged
into the format required for the final usage (e.g. a qcow2 disk
image to launch the image with QEMU).
KIWI NG executes these steps using the following components, which it expects
to find in the description directory:
- Chapter 8, Image Description:
The config.xml file contains the image description, which is a
collection of general settings of the final image, like the image layout
installed packages, present users, etc.
Note
The filename config.xml is not mandatory, the image description
file can also have an arbitrary name plus the *.kiwi extension.
KIWI NG first looks for a config.xml file. If it cannot be found,
it picks the first *.kiwi file.
- Section 7.6, “User Defined Scripts”:
If present, custom configuration shell scripts run at different
stages of the build process. They can be used to fine tune
the image in ways that are not possible via the settings provided in
config.xml.
- Overlay tree directory:
The overlay tree is a folder (called root) or a tarball
(called root.tar.gz) that contains files and directories that
will be copied into the unpacked image tree during the Prepare
operation.
The copying is executed after all the packages included in
config.xml have been installed. Any already present files are
overwritten.
- CD root user data:
For live ISO images and install ISO images an optional archive
is supported. This is a tar archive matching the name
config-cdroot.tar[.compression_postfix].
If present, the archive will be unpacked as user data on the ISO
image. For example, this is used to add license files or user
documentation. The documentation can then be read directly from the
CD/DVD without booting from the media.
7.10 Image Building Process #
KIWI NG creates images in a two step process: The first step, the prepare
operation, generates a so-called unpacked image tree (directory) using
the information provided in the config.xml configuration file
(see Chapter 8, Image Description)
The second step, the create operation, creates the packed image or
image in the specified format based on the unpacked image tree and the
information provided in the config.xml configuration file.
7.10.1 The Prepare Step #
As the first step, KIWI NG creates an unpackaged image tree, also called “root tree”. This
directory will be the installation target for software packages to be
installed during the image creation process.
For the package installation, KIWI NG relies on the package manager specified
in the packagemanager element in config.xml. KIWI NG supports the
following package managers: dnf, zypper (default) and apt.
The prepare step consists of the following substeps:
Create Target Root Directory
By default KIWI NG aborts with an error if the target root tree
already exists to avoid accidental deletion of an existing
unpacked image. The option --allow-existing-root can be used
to work based on an existing root tree
Bootstrap Target Root Directory
First, KIWI NG configures the package manager to use the repositories
specified in the configuration file, via the command line, or
both. After the repository setup, the packages specified in the
bootstrap section of the image description are installed in a
temporary directory external to the target root tree. This establishes
the initial environment to support the completion of the process in a
chroot setting. At the end of the bootstrap phase the script
post_bootstrap.sh is executed, if present.
Note
The essential bootstrap packages are usually filesystem and
glibc-locale to specify as part of the bootstrap. The dependency
chain of these two packages is usually sufficient to populate the
bootstrap environment with all required software to support the
installation of packages into the new root tree.
Install Packages
After the bootstrap phase all other <packages> sections are
used to complete the installation as chroot operation. KIWI NG uses
the package manager as installed in the bootstrap phase and
installs all other packages as configured.
Note
The installation of software packages through the selected package
manager may install unwanted packages. Removing these packages can be
accomplished by marking them for deletion in the image description, see
Section 7.3.3, “Uninstall System Packages”.
Apply the Overlay Tree
Next, KIWI NG applies all files and directories present in the overlay
directory named root or in the compressed overlay
root.tar.gz to the target root tree. Files already present in
the target root directory are overwritten. This allows you to
overwrite any file that was installed by one of the packages during the
installation phase.
Apply Archives
All archives specified in the archive element of the
config.xml file are applied in the specified order (top to
bottom) after the overlay tree copy operation is complete (see
Section 7.3.2, “The archive element”). Files and directories are
extracted relative to the top level of the new root tree. As with the
overlay tree, it is possible to overwrite files already existing in the
target root tree.
Execute the user-defined script
config.sh
At the end of the preparation stage the script config.sh is
executed (if present). It is run in the top level directory of the
target root tree. The script’s primary function is to complete the
system configuration. For more details about custom scripts
see Section 7.6, “User Defined Scripts”
Modify the Root Tree
The unpacked image tree is now finished to be converted into the final
image in the create step. It is possible to make manual modifications
to the unpacked tree before it is converted into the final image.
Since the unpacked image tree is just a directory, it can be modified
using the standard tools. Optionally, it is also possible to “change
root (chroot)” into it, for instance to invoke the package
manager. Beside the standard file system layout, the unpacked image tree
contains an additional directory named /image that is not
present in a regular system. It contains information KIWI NG requires
during the create step, including a copy of the config.xml file.
By default, KIWI NG will not stop after the prepare step and will
directly proceed with the create step. Therfore to perform manual
modifications, proceed as follows:
$ kiwi-ng system prepare $ARGS
$ # make your changes
$ kiwi-ng system create $ARGS
Warning
Modifications of the unpacked root tree
Do not make any changes to the system, since they are lost when
re-running the prepare step again. Additionally, you may
introduce errors that occur during the create step which are
difficult to track. The recommended way to apply changes to the
unpacked image directory is to change the configuration and re-run
the prepare step.
KIWI NG creates the final image during the create step: it converts the
unpacked root tree into one or multiple output files appropriate for the
respective build type.
It is possible to create multiple images from the same unpacked
root tree, for example, a self installing OEM
image and a virtual machine image from the same image description. The only
prerequisite is that both image types are specified in config.xml.
During the create step the following operations are performed by KIWI NG:
Execute the User-defined Script
images.sh
At the beginning of the image creation process the script named
images.sh is executed (if present). For more details about
custom scripts see Section 7.6, “User Defined Scripts”
Create the Requested Image Type
KIWI NG converts the unpacked root into an output format appropriate for
the requested build type.
10 Building Images for Supported Types #
Note
This document provides an overview how to build and use
the KIWI NG supported image types.
10.1 Build an ISO Hybrid Live Image #
A Live ISO image is a system on a removable media, e.g CD/DVD or USB stick.
Once built and deployed it boots off from this media without interfering
with other system storage components making it a useful pocket system for
testing and demo- and debugging-purposes.
To add a live ISO build to your appliance, create a type element with
image set to iso in your config.xml as shown below:
<image schemaversion="7.4" name="Tumbleweed_appliance">
  <!-- snip -->
  <preferences>
    <type image="iso" primary="true" flags="overlay" hybridpersistent_filesystem="ext4" hybridpersistent="true"/>
    <!-- additional preferences -->
  </preferences>
  <!-- snip -->
</image>
The following attributes of the type element are relevant when building
live ISO images:
flags: Specifies the live ISO technology and dracut module to use, can
be set to overlay or to dmsquash.
If set to overlay, the kiwi-live dracut module will be used to support a
live ISO system based on squashfs and overlayfs.
If set to dmsquash, the dracut standard dmsquash-live module will be
used to support a live ISO system based on squashfs and the device
mapper. Note, both modules support a different set of live features.
For details see Decision for a live ISO technology
hybridpersistent: Accepts true or false, if set to true then the
resulting image will be created with a COW file to keep data persistent
over a reboot
hybridpersistent_filesystem: The filesystem used for the COW
file. Possible values are ext4 or xfs, with ext4 being the default.
With the appropriate settings present in config.xml KIWI NG can now
build the image:
$ sudo kiwi-ng system build \
      --description kiwi/build-tests/x86/leap/test-image-live \
      --set-repo obs://openSUSE:Leap:15.3/standard \
      --target-dir /tmp/myimage
The resulting image is saved in the folder /tmp/myimage and can
be tested with QEMU:
$ sudo qemu -cdrom \
      kiwi-test-image-live.x86_64-1.15.3.iso \
      -m 4096 -serial stdio
The image is now complete and ready to use. See Section 11.1, “Deploy ISO Image on an USB Stick” and
Section 11.2, “Deploy ISO Image as File on a FAT32 Formated USB Stick” for further information concerning
deployment.
10.1.1 Decision for a live ISO technology #
The decision for the overlay vs. dmsquash dracut module depends on
the features one wants to use. From a design perspective the overlay
module is conceived for live ISO deployments on disk devices which
allows the creation of a write partition or cow file. The dmsquash
module is conceived as a generic mapping technology using device-mapper
snapshots. The following list describes important live ISO features and
their support status compared to the overlay and dmsquash modules.
- ISO scan
Usable in the same way with both dracut modules. This feature allows
to boot the live ISO as a file from a grub loopback configured bootloader.
The live-grub-stick tool is just one example that uses this feature.
For details how to setup ISO scan with the overlay module see
Section 11.2, “Deploy ISO Image as File on a FAT32 Formated USB Stick”
- ISO in RAM completely
Usable with the dmsquash module through rd.live.ram. The overlay
module does not support this mode but KIWI NG supports RAM only systems
as OEM deployment into RAM from an install ISO media. For details how
to setup RAM only deployments in KIWI NG see: Section 11.9, “Deploy and Run System in a RamDisk”
- Overlay based on overlayfs
Usable with the overlay module. A squashfs compressed readonly root
gets overlayed with a readwrite filesystem using the kernel overlayfs
filesystem.
- Overlay based on device mapper snapshots
Usable with the dmsquash module. A squashfs compressed readonly root
gets overlayed with a readwrite filesystem using a device mapper
snapshot. This method was the preferred one before overlayfs existed
in the Linux kernel.
- Media Checksum Verification
Boot the live iso only for ISO checksum verification. This is possible
with both modules but the overlay module uses the checkmedia tool
whereas the upstream dmsquash module uses checkisomd5. The activation
of the verification process is done by passing the kernel option
mediacheck for the overlay module and rd.live.check for
the dmsquash module.
- Live ISO through PXE boot
Boot the live image via the network. This is possible with both
modules but uses different technologies. The overlay module supports
network boot only in combination with the AoE (Ata Over Ethernet) protocol.
For details see Section 11.16, “Booting a Live ISO Image from Network”. The dmsquash module supports
network boot by fetching the ISO image into memory from root=live:
using the livenet module.
- Persistent Data
Keep new data persistent on a writable storage device. This can be done
with both modules but in different ways. The overlay module activates
persistency with the kernel boot parameter rd.live.overlay.persistent.
If the persistent setup cannot be created the fallback to the non persistent
mode applies automatically. The overlay module auto detects if it is
used on a disk or ISO scan loop booted from a file. If booted as disk,
persistency is setup on a new partition of that disk. If loop booted
from file, persistency is setup on a new cow file. The cow file/partition
setup can be influenced with the kernel boot parameters:
rd.live.overlay.cowfs and rd.live.cowfile.mbsize. The dmsquash
module configures persistency through the rd.live.overlay option
exclusively and does not support the automatic creation of a write
partition in disk mode.
10.2 Build a Virtual Disk Image #
A simple Virtual Disk Image is a compressed system disk with additional
metadata useful for cloud frameworks like Amazon EC2, Google Compute Engine,
or Microsoft Azure. It is used as the native disk of a system and does
not require an extra installation workflow or a complex first boot setup
procedure which is why we call it a simple disk image.
To instruct KIWI NG to build a simple disk image add a type element with
image="oem" in config.xml that has the oem-resize feature
disabled. An example configuration for a 42 GB large VMDK image with
512 MB RAM, an IDE controller and a bridged network interface is shown
below:
<image schemaversion="7.4" name="Tumbleweed_appliance">
  <!-- snip -->
  <preferences>
    <type image="oem" filesystem="ext4" format="vmdk">
      <bootloader name="grub2" timeout="0"/>
      <size unit="G">42</size>
      <oemconfig>
          <oem-resize>false</oem-resize>
      </oemconfig>
      <machine memory="512" guestOS="suse" HWversion="4">
        <vmdisk id="0" controller="ide"/>
        <vmnic driver="e1000" interface="0" mode="bridged"/>
      </machine>
    </type>
    <!-- additional preferences -->
  </preferences>
  <!-- snip -->
</image>
The following attributes of the type element are of special interest
when building simple disk images:
format: Specifies the format of the virtual disk, possible values are:
gce, ova, qcow2, vagrant, vmdk, vdi, vhd, vhdx and
vhd-fixed.
formatoptions: Specifies additional format options passed to
qemu-img. formatoptions is a comma separated list of format
specific options in a name=value format like qemu-img
expects it. KIWI NG will forward the settings from this attribute as a
parameter to the -o option in the qemu-img call.
The bootloader, size and machine child-elements of type can be
used to customize the virtual machine image further. We describe them in
the following sections: Setting up the Bootloader of the Image, Modifying the Size of the Image
and Customizing the Virtual Machine
Once your image description is finished (or you are content with a image
from the Section 2.4, “Example Appliance Descriptions” and use one of
them) build the image with KIWI NG:
$ sudo kiwi-ng system build \
     --description kiwi/build-tests/x86/leap/test-image-disk-simple \
     --set-repo obs://openSUSE:Leap:15.3/standard \
     --target-dir /tmp/myimage
The created image will be in the target directory /tmp/myimage with
the file extension .raw.
The live image can then be tested with QEMU:
$ sudo qemu \
    -drive file=kiwi-test-image-disk-simple.x86_64-1.15.3.raw,format=raw,if=virtio \
    -m 4096
For further information how to setup the image to work within a cloud
framework see:
For information how to setup a Vagrant box, see: Section 11.7, “Image Description for Vagrant”.
10.2.1 Setting up the Bootloader of the Image #
<preferences>
  <type>
     <bootloader name="grub2"/>
  </type>
</preferences>
The bootloader element defines which bootloader will be used in the
image and offers several options for customizing its configuration.
For details, see: Section 8.1.4.14, “<preferences><type><bootloader>”
10.2.2 Modifying the Size of the Image #
The size child element of type specifies the size of the resulting
disk image. The following example shows a image description where 20 GB are
added to the virtual machine image of which 5 GB are left unpartitioned:
<preferences>
  <type image="oem" format="vmdk">
    <size unit="G" additive="true" unpartitioned="5">20</size>
    <oemconfig>
        <oem-resize>false</oem-resize>
    </oemconfig>
  </type>
</preferences>
The following optional attributes can be used to customize the image size
further:
unit: Defines the unit used for the provided numerical value, possible
settings are M for megabytes and G for gigabytes. The default unit
are megabytes.
additive: boolean value that determines whether the provided value will
be added to the current image’s size (additive="true") or whether it is
the total size (additive="false"). The default is false.
unpartitioned: Specifies the image space in the image that will not be
partitioned. This value uses the same unit as defined in the attribute
unit or the default.
10.2.3 Customizing the Virtual Machine #
The machine child element of type can be used to customize the virtual
machine configuration which is used when the image is run, like the number
of CPUs or the connected network interfaces.
The following attributes are supported by the machine element:
ovftype: The OVF configuration type. The Open Virtualization Format is
a standard for describing virtual appliances and distribute them in an
archive called Open Virtual Appliance (OVA). The standard describes the
major components associated with a disk image. The exact specification
depends on the product using the format.
Supported values are zvm, powervm, xen and vmware.
HWversion: The virtual machine’s hardware version (vmdk and ova
formats only), see https://kb.vmware.com/s/article/1003746 for further
details which value to choose.
arch: the VM architecture (vmdk format only), possible values are:
ix86 (= i585 and i686) and x86_64.
xen_loader: the Xen target loader which is expected to load this guest,
supported values are: hvmloader, pygrub and pvgrub.
guestOS: The virtual guest OS’ identification string for the VM (only
applicable for vmdk and ova formats, note that the name designation
is different for the two formats).
min_memory: The virtual machine’s minimum memory in MB (ova format
only).
max_memory: The virtual machine’s maximum memory in MB (ova format
only).
min_cpu: The virtual machine’s minimum CPU count (ova format only).
max_cpu: The virtual machine’s maximum CPU count (ova format only).
memory: The virtual machine’s memory in MB (all formats).
ncpus: The umber of virtual CPUs available to the virtual machine (all
formats).
Additionally, machine supports additional child elements that are covered
in the following subsections.
10.2.3.1 Modifying the VM Configuration Directly #
The vmconfig-entry element is used to add entries directly into the
virtual machine’s configuration file. This is currently only supported for
the vmdk format where the provided strings are directly pasted into the
.vmx file.
The vmconfig-entry element has no attributes and can appear multiple
times, the entries are added to the configuration file in the provided
order. Note, that KIWI NG does not check the entries for correctness. KIWI NG only
forwards them.
The following example adds the two entries numvcpus = "4" and
cpuid.coresPerSocket = "2" into the VM configuration file:
<preferences>
  <type image="oem" filesystem="ext4" format="vmdk">
    <machine memory="512" guestOS="suse" HWversion="4">
      <vmconfig-entry>numvcpus = "4"</vmconfig-entry>
      <vmconfig-entry>cpuid.coresPerSocket = "2"</vmconfig-entry>
    </machine>
  </type>
</preferences>
10.2.3.2 Adding Network Interfaces to the VM #
Network interfaces can be explicitly specified for the VM when required via
the vmnic element. This can be used to add another bridged interface or
to specify the driver which is being used.
Note, that this element is only used for the vmdk image format.
In the following example we add a bridged network interface using the
e1000 driver:
<preferences>
  <type image="oem" filesystem="ext4" format="vmdk">
    <machine memory="4096" guestOS="suse" HWversion="4">
      <vmnic driver="e1000" interface="0" mode="bridged"/>
    </machine>
  </type>
</preferences>
The vmnic element supports the following attributes:
interface: mandatory interface ID for the VM’s network interface.
driver: optionally the driver which will be used can be specified
mac: this interfaces’ MAC address
mode: this interfaces’ mode.
Note that KIWI NG will not verify the values that are passed to these
attributes, it will only paste them into the appropriate configuration
files.
10.2.3.3 Specifying Disks and Disk Controllers #
The vmdisk element can be used to customize the disks and disk
controllers for the virtual machine. This element can be specified multiple
times, each time for each disk or disk controller present.
Note that this element is only used for vmdk and ova image formats.
The following example adds a disk with the ID 0 using an IDE controller:
<preferences>
  <type image="oem" filesystem="ext4" format="vmdk">
    <machine memory="512" guestOS="suse" HWversion="4">
      <vmdisk id="0" controller="ide"/>
    </machine>
  </type>
</preferences>
Each vmdisk element can be further customized via the following optional
attributes:
controller: The disk controller used for the VM guest (vmdk format
only). Supported values are: ide, buslogic, lsilogic, lsisas1068,
legacyESX and pvscsi.
device: The disk device to appear in the guest (xen format only).
diskmode: The disk mode (vmdk format only), possible values are:
monolithicSparse, monolithicFlat, twoGbMaxExtentSparse,
twoGbMaxExtentFlat and streamOptimized (see also
https://www.vmware.com/support/developer/converter-sdk/conv60_apireference/vim.OvfManager.CreateImportSpecParams.DiskProvisioningType.html).
disktype: The type of the disk as it is internally handled by the VM
(ova format only). This attribute is currently unused.
id: The disk ID of the VM disk (vmdk format only).
10.2.3.4 Adding CD/DVD Drives #
KIWI NG supports the addition of IDE and SCSCI CD/DVD drives to the virtual
machine using the vmdvd element for the vmdk image format. In the
following example we add two drives: one with a SCSCI and another with a
IDE controller:
<preferences>
  <type image="oem" filesystem="ext4">
    <machine memory="512" xen_loader="hvmloader">
      <vmdvd id="0" controller="scsi"/>
      <vmdvd id="1" controller="ide"/>
    </machine>
  </type>
</preferences>
The vmdvd element features just these two mandatory attributes:
id: The CD/DVD ID of the drive
controller: The CD/DVD controller used for the VM guest, supported
values are ide and scsi.
10.3 Build an Expandable Disk Image #
An expandable disk represents the system disk with the capability to auto
expand the disk and its filesystem to a custom disk geometry. This
allows deploying the same disk image on target systems with different
hardware setup.
The following example shows how to build and deploy such a disk image
based on openSUSE Leap using a QEMU virtual machine as the target
system:
Make sure you have checked out the example image descriptions,
see Section 2.4, “Example Appliance Descriptions”.
Build the image with KIWI NG:
$ sudo kiwi-ng --type oem system build \
    --description kiwi/build-tests/x86/leap/test-image-disk \
    --set-repo obs://openSUSE:Leap:15.3/standard \
    --target-dir /tmp/myimage
Find the following result images below /tmp/myimage.
The disk image with the suffix .raw is an expandable
virtual disk. It can expand itself to a custom disk geometry.
The installation image with the suffix install.iso is a
hybrid installation system which contains the disk image and is
capable to install this image on any target disk.
10.3.1 Deployment Methods #
The basic idea behind an expandable disk image is to provide the virtual
disk data for OEM vendors to support easy deployment of the system to
physical storage media.
There are the following basic deployment strategies:
Manual Deployment
Manually deploy the disk image onto the target disk.
CD/DVD Deployment
Boot the installation image and let KIWI NG’s installer
deploy the disk image from CD/DVD or USB stick onto the target disk.
Network Deployment
PXE boot the target system and let KIWI NG’s installer
deploy the disk image from the network onto the target disk.
10.3.2 Manual Deployment #
The manual deployment method can be tested using virtualization software
such as QEMU, and an additional virtual target disk of a larger size.
The following steps shows how to do it:
Create a target disk
$ qemu-img create target_disk 20g
Note
Retaining the Disk Geometry
If the target disk geometry is less or equal to the geometry of
the disk image itself, the disk expansion performed for a physical
disk install during the boot workflow will be skipped and the
original disk geometry stays untouched.
Dump disk image on target disk.
$ dd if=kiwi-test-image-disk.x86_64-1.15.3.raw of=target_disk conv=notrunc
Boot the target disk
$ sudo qemu -hda target_disk -m 4096 -serial stdio
At first boot of the target_disk the system is expanded to the
configured storage layout. By default the system root partition
and filesystem is resized to the maximum free space available.
10.3.3 CD/DVD Deployment #
The deployment from CD/DVD via the installation image can
also be tested using virtualization software such as QEMU.
The following steps shows how to do it:
Create a target disk
Follow the steps above to create a virtual target disk
Boot the installation image as CD/DVD with the
target disk attached.
$ sudo qemu -cdrom \
      kiwi-test-image-disk.x86_64-1.15.3.install.iso -hda target_disk \
      -boot d -m 4096 -serial stdio
Note
USB Stick Deployment
Like any other ISO image built with KIWI NG, also the installation
image is a hybrid image. Thus it can also be used on USB stick and
serve as installation stick image like it is explained in
Section 10.1, “Build an ISO Hybrid Live Image”
10.3.4 Network Deployment #
The deployment from the network downloads the disk image from a
PXE boot server. This requires a PXE network boot server to be setup
as explained in Section 11.13, “Setting Up a Network Boot Server”
If the PXE server is running the following steps shows how to test the
deployment process over the network using a QEMU virtual machine as
target system:
Make sure to create an installation PXE TAR archive along with your
disk image by replacing the following setup in
kiwi/build-tests/x86/leap/test-image-disk/appliance.kiwi
Instead of
<type image="oem" installiso="true"/>
setup
<type image="oem" installpxe="true"/>
Rebuild the image, unpack the resulting
kiwi-test-image-disk.x86_64-1.15.3.install.tar.xz
file to a temporary directory and copy the initrd and kernel images to
the PXE server:
Unpack installation tarball
mkdir /tmp/pxe && cd /tmp/pxe
tar -xf kiwi-test-image-disk.x86_64-1.15.3.install.tar.xz
Copy kernel and initrd used for pxe boot
scp pxeboot.kiwi-test-image-disk.x86_64-1.15.3.initrd PXE_SERVER_IP:/srv/tftpboot/boot/initrd
scp pxeboot.kiwi-test-image-disk.x86_64-1.15.3.kernel PXE_SERVER_IP:/srv/tftpboot/boot/linux
Copy the disk image, MD5 file, system kernel, initrd and bootoptions to
the PXE boot server:
Activation of the deployed system is done via kexec of the kernel
and initrd provided here.
Copy system image and MD5 checksum
scp kiwi-test-image-disk.x86_64-1.15.3.xz PXE_SERVER_IP:/srv/tftpboot/image/
scp kiwi-test-image-disk.x86_64-1.15.3.md5 PXE_SERVER_IP:/srv/tftpboot/image/
Copy kernel, initrd and bootoptions used for booting the system via kexec
scp kiwi-test-image-disk.x86_64-1.15.3.initrd PXE_SERVER_IP:/srv/tftpboot/image/
scp kiwi-test-image-disk.x86_64-1.15.3.kernel PXE_SERVER_IP:/srv/tftpboot/image/
scp kiwi-test-image-disk.x86_64-1.15.3.config.bootoptions PXE_SERVER_IP:/srv/tftpboot/image/
Note
The config.bootoptions file is used together with kexec to boot the
previously dumped image. The information in that file references the
root of the dumped image and can also include any other type of
boot options. The file provided with the KIWI NG built image is
by default connected to the image present in the PXE TAR archive.
If other images got deployed the contents of this file must be
adapted to match the correct root reference.
Add/Update the kernel command line parameters
Edit your PXE configuration (for example pxelinux.cfg/default) on
the PXE server and add these parameters to the append line, typically
looking like this:
append initrd=boot/initrd rd.kiwi.install.pxe rd.kiwi.install.image=tftp://192.168.100.16/image/kiwi-test-image-disk.x86_64-1.15.3.xz
The location of the image is specified as a source URI which can point
to any location supported by the curl command. KIWI NG calls curl to fetch
the data from this URI. This also means your image, MD5 file, system kernel
and initrd could be fetched from any server and doesn’t have to be stored
on the PXE_SERVER.
By default KIWI NG does not use specific curl options or flags. However it
is possible to add custom ones by adding the
rd.kiwi.install.pxe.curl_options flag into the kernel command line.
curl options are passed as comma separated values. Consider the following
example:
rd.kiwi.install.pxe.curl_options=--retry,3,--retry-delay,3,--speed-limit,2048
The above tells KIWI NG to call curl with:
curl --retry 3 --retry-delay 3 --speed-limit 2048 -f <url>
This is specially handy when the deployment infraestructure requires
some fine tuned download behavior. For example, setting retries to be
more robust over flaky network connections.
Note
KIWI NG just replaces commas with spaces and appends it to the
curl call. This is relevant since command line options including
commas will always fail.
Note
The initrd and Linux Kernel for pxe boot are always loaded via tftp
from the PXE_SERVER.
Create a target disk
Follow the steps above to create a virtual target disk
Connect the client to the network and boot QEMU with the target disk
attached to the virtual machine.
$ sudo qemu -boot n -hda target_disk -m 4096
Note
QEMU bridged networking
In order to let qemu connect to the network we recommend to
setup a network bridge on the host system and let qemu connect
to it via a custom /etc/qemu-ifup. For details see
https://en.wikibooks.org/wiki/QEMU/Networking
10.3.5 OEM Customization #
The deployment process of an oem image can be customized through
the oemconfig element which is a child section of the type
element like the following example shows:
<oemconfig>
  <oem-swapsize>512</oem-swapsize>
</oemconfig>
The following list of optional oem element settings exists:
- oemconfig.oem-resize Element
Specify if the disk has the capability to expand itself to
a new disk geometry or not. By default, this feature is activated.
The implementation of the resize capability is done in a dracut
module packaged as dracut-kiwi-oem-repart. If oem-resize is
set to false, the installation of the corresponding dracut package
can be skipped as well.
- oemconfig.oem-boot-title Element
By default, the string OEM will be used as the boot manager menu
entry when KIWI creates the GRUB configuration during deployment.
The oem-boot-title element allows you to set a custom name for the
grub menu entry. This value is represented by the
kiwi_oemtitle variable in the initrd
- oemconfig.oem-bootwait Element
Specify if the system should wait for user interaction prior to
continuing the boot process after the disk image has been dumped to
the designated storage device (default value is false). This value
is represented by the kiwi_oembootwait variable in the initrd
- oemconfig.oem-reboot Element
Specify if the system is to be rebooted after the disk image has
been deployed to the designated storage device (default value is
false). This value is represented by the kiwi_oemreboot
variable in the initrd
- oemconfig.oem-reboot-interactive Element
Specify if the system is to be rebooted after the disk image has
been deployed to the designated storage device (default value is
false). Prior to reboot a message is posted and must be
acknowledged by the user in order for the system to reboot. This
value is represented by the kiwi_oemrebootinteractive variable
in the initrd
- oemconfig.oem-silent-boot Element
Specify if the system should boot in silent mode after the disk
image has been deployed to the designated storage device (default
value is false). This value is represented by the
kiwi_oemsilentboot variable in the initrd
- oemconfig.oem-shutdown Element
Specify if the system is to be powered down after the disk image
has been deployed to the designated storage device (default value
is false). This value is represented by the kiwi_oemshutdown
variable in the initrd
- oemconfig.oem-shutdown-interactive Element
Specify if the system is to be powered down after the disk image
has been deployed to the designated storage device (default value
is false). Prior to shutdown a message is posted and must be
acknowledged by the user in order for the system to power off.
This value is represented by the kiwi_oemshutdowninteractive
variable in the initrd
- oemconfig.oem-swap Element
Specify if a swap partition should be created. By default no
swap partition will be created. This value is represented
by the kiwi_oemswap variable in the initrd
- oemconfig.oem-swapname Element
Specify the name of the swap space. By default the name is set
to LVSwap. The default already indicates that this setting
is only useful in combination with the LVM volume manager. In
this case the swapspace is setup as a volume in the volume
group and any volume needs a name. The name set here is used
to give the swap volume a name.
- oemconfig.oem-swapsize Element
Set the size of the swap partition. If a swap partition is to be
created and the size of the swap partition is not specified with
this optional element, KIWI will calculate the size of the swap
partition and create a swap partition equal to two times the RAM
installed on the system at initial boot time. This value is
represented by the kiwi_oemswapMB variable in the initrd
- oemconfig.oem-systemsize Element
Set the size the operating system is allowed to consume on the
target disk. The size limit does not include any consideration for
swap space or a recovery partition. In a setup without a
systemdisk element this value specifies the size of the root
partition. In a setup including a systemdisk element this value
specifies the size of the LVM partition which contains all
specified volumes. Thus, the sum of all specified volume sizes
plus the sum of the specified freespace for each volume must be
smaller or equal to the size specified with the oem-systemsize
element. This value is represented by the variable kiwi_oemrootMB
in the initrd
- oemconfig.oem-unattended Element
The installation of the image to the target system occurs
automatically without requiring user interaction. If multiple
possible target devices are discovered the image is deployed to
the first device. kiwi_oemunattended in the initrd
- oemconfig.oem-skip-verify Element
Do not perform the checksum verification process after install
of the image to the target disk. The verification process computes
the checksum of the image byte size installed to the target
and compares this value with the initrd embedded checksum
information at build time of the image. Depending on the size of
the image and machine power the computation can take some time.
10.4 Build a Container Image #
basic configuration explanation
how to build a Container Image
how to run it with a Container Runtime
KIWI NG is capable of building native Container Images from scratch and
derived ones. KIWI NG Container images are considered to be native since the
KIWI NG tarball image is ready to be loaded into a Container Runtime like
Podman, Docker or Containerd, including common container configurations.
The Container configuration metadata is provided to KIWI NG as part of the
Section 1.1.1, “Components of an Image Description” using the
<containerconfig> tag. The following configuration metadata can be
specified:
containerconfig attributes:
name: Specifies the repository name of the Container Image.
tag: Sets the tag of the Container Image.
maintainer: Specifies the author field of the container, this is
equivalent to the MAINTAINER directive in a Dockerfile.
user: Sets the user name or user id (UID) to be used when
running entrypoint and subcommand. Equivalent of the USER
directive of a Dockerfile.
workingdir: Sets the working directory to be used when running
cmd and entrypoint. Equivalent of the WORKDIR directive in a
Dockerfile.
containerconfig child tags:
subcommand: Provides the default execution parameters of the
container. Equivalent of the CMD directive in a Dockerfile.
labels: Adds custom metadata to an image using key-value pairs.
Equivalent to one or more LABEL directives in a Dockerfile.
expose: Define which ports can be exposed to the outside when
running this container image. Equivalent to one or more EXPOSE
directives in a Dockerfile.
environment: Sets environment variables using key-value pairs.
Equivalent to one or multiple ENV directives in a Dockerfile.
entrypoint: Sets the binary via which all commands inside the
container will be executed. Equivalent of the ENTRYPOINT directive
in a Dockerfile.
volumes: Create mountpoints with the given name and mark them to hold
external volumes from the host or from other containers. Equivalent to
one or more VOLUME directives in a Dockerfile.
Other Dockerfile directives such as RUN, COPY or ADD,
can be mapped to KIWI NG using the
Section 1.1.1, “Components of an Image Description” script file to run bash commands
or the Section 1.1.1, “Components of an Image Description” to include
additional files.
The following example illustrates how to build a Container Image based on
openSUSE Leap:
Make sure you have checked out the example image descriptions,
see Section 2.4, “Example Appliance Descriptions”.
Include the Virtualization/containers repository to your list:
$ zypper addrepo http://download.opensuse.org/repositories/Virtualization:/containers/<DIST> container-tools
where the placeholder <DIST> is the preferred distribution.
Install umoci and skopeo tools
Build the image with KIWI NG:
$ sudo kiwi-ng system build \
    --description kiwi/build-tests/x86/leap/test-image-docker \
    --set-repo obs://openSUSE:Leap:15.3/standard \
    --target-dir /tmp/myimage
Test the Container image.
First load the new image into your Container Runtime:
$ podman load -i kiwi-test-image-docker.x86_64-1.15.3.docker.tar.xz
and then run the image:
$ podman run --rm -it buildsystem /bin/bash
10.5 Build a WSL Container Image #
KIWI NG is capable of building WSL images using the appx
utility. Make sure you have installed a package that provides
this command on your build host.
Once the build host has the appx installed, the
following image type setup is required in the XML description
config.xml:
<type image="appx" metadata_path="/meta/data"/>
The /meta/data path specifies a path that provides
additional information required for the WSL-DistroLauncher.
This component consists out of a Windows(exe) executable file and
an AppxManifest.xml file which references other files
like icons and resource configurations for the startup of the
container under Windows.
Note
/meta/data
Except for the root filesystem tarball KIWI NG is not
responsible for providing the meta data required for
the WSL-DistroLauncher. It is expected that
the given metadata path contains all the needed information.
Typically this information is delivered in a package
provided by the Distribution and installed on the
build host
10.5.1 Setup of the WSL-DistroLauncher #
The contents of the AppxManifest.xml will be changed by KIWI NG
if a containerconfig section is provided in the XML description.
In the context of a WSL image the following container configuration
parameters are taken into account:
<containerconfig name="my-wsl-container">
    <history
        created_by="Organisation"
        author="Name"
        application_id="AppIdentification"
        package_version="https://docs.microsoft.com/en-us/windows/uwp/publish/package-version-numbering"
        launcher="WSL-DistroLauncher-exe-file"
    >Container Description Text</history>
</containerconfig>
All information provided here including the entire section is optional.
If not provided the existing AppxManifest.xml stays untouched.
- created_by
Provides the name of a publisher organisation. An appx container
needs to be signed off with a digital signature. If the image is
build in the Open Build Service (OBS) this happens automatically.
Outside of OBS one needs to make sure the given publisher organisation
name matches the certificate used for signing.
- author
Provides the name of the author and maintainer of this container
- application_id
Provides an ID name for the container. The name must start with
a letter and only allows alphanumeric characters. KIWI NG will not
validate the given name string because there is no common criteria
between the container architectures. KIWI NG just accepts any text.
- package_version
Provides the version identification for the container. KIWI NG
validates this against the Microsoft Package Version Numbering rules.
- launcher
Provides the binary file name of the launcher .exe file.
Warning
There is no validation by KIWI NG if the contents of AppxManifest.xml
are valid or complete to run the container. Users will find out at
call time, not before
The following example shows how to build a WSL image based on
openSUSE TW:
Make sure you have checked out the example image descriptions,
see Section 2.4, “Example Appliance Descriptions”.
Include the Virtualization/WSL repository to your list:
$ zypper addrepo http://download.opensuse.org/repositories/Virtualization:/WSL/<DIST> WSL
where the placeholder <DIST> is the preferred distribution.
Install fb-util-for-appx utility and a package that
provides the WSL-DistroLauncher metadata. See the
above note about /meta/data
$ zypper in fb-util-for-appx DISTRO_APPX_METADATA_PACKAGE
Note
If you are building in the Open Build Service make sure
to add the packages from the zypper call above to your
project config via osc meta -e prjconf and
a line of the form support: PACKAGE_NAME for
each package that needs to be installed on the Open Build
Service worker that runs the KIWI NG build process.
Setup the image type:
Edit the XML description file:
kiwi/build-tests/x86/tumbleweed/test-image-wsl/appliance.kiwi
and add the following type and containerconfig:
<type image="appx" metadata_path="/meta/data">
    <containerconfig name="Tumbleweed">
        <history
            created_by="SUSE"
            author="KIWI-Team"
            application_id="tumbleweed"
            package_version="2003.12.0.0"
            launcher="openSUSE-Tumbleweed.exe"
        >Tumbleweed Appliance text based</history>
    </containerconfig>
</type>
Warning
If the configured metadata path does not exist the build
will fail. Furthermore there is no validation by KIWI NG
that the contents of the metadata path are valid or
complete with respect to the requirements of the
WSL-DistroLauncher
Build the image with KIWI NG:
$ sudo kiwi-ng system build \
    --description kiwi/build-tests/x86/tumbleweed/test-image-wsl \
    --set-repo http://download.opensuse.org/tumbleweed/repo/oss \
    --target-dir /tmp/myimage
10.5.2 Testing the WSL image #
For testing the image a Windows 10 system is required. As a first step
the optional feature named Microsoft-Windows-Subsystem-Linux
must be enabled. For further details on how to setup the Windows machine
see the following documentation:
Windows Subsystem for Linux
10.6 Build KIS Image (Kernel, Initrd, System) #
A KIS image is a collection of image components that are not
associated with a dedicated use case. This means from a KIWI NG
perspective we don’t know in which environment these components
are later used. The predecessor of this image type was called
pxe under the assumption that the components will be used
in a pxe boot environment. However this assumption is not
neccessarily true and the image components are used in a different
way. Because there are so many possible deployment strategies
for a kernel plus initrd and optional system root filesystem,
KIWI NG provides this as generic KIS type that is generically
usable.
The former pxe image type will continue to exist but is expected
to be used only in combination with the legacy netboot infrastructure
as described in Section 11.14, “Build PXE Root File System Image for the legacy netboot infrastructure”.
To add a KIS build to your appliance, create a type element with
image set to kis in your config.xml as shown below:
<preferences>
    <type image="kis"/>
</preferences>
With this image type setup KIWI NG will just build a kernel and initrd
not associated to any system root file system. Usually such
an image is only useful with some custom dracut extensions
as part of the image description.
The following attributes of the type element are often used when
building KIS images:
filesystem: Specifies the root filesystem and triggers the build
of an additional filesystem image of that filesystem. The generated
kernel command line options file (append file) will then also
include a root= parameter that references this filesystem image UUID.
If the information from the append file should be used or not is
optional.
kernelcmdline: Specifies kernel command line options that will be
part of the generated kernel command line options file (append file).
By default the append file contains no information or the reference
to the root UUID if the filesystem attribute is used.
All other attributes of the type element that applies to an optional
root filesystem image will be effective in the system image of a KIS
image as well.
With the appropriate settings present in config.xml KIWI NG can now
build the image:
$ sudo kiwi-ng --type kis system build \
    --description kiwi/build-tests/x86/tumbleweed/test-image-pxe \
    --set-repo http://download.opensuse.org/tumbleweed/repo/oss \
    --target-dir /tmp/myimage
The resulting image components are saved in the folder /tmp/myimage.
Outside of a deployment infrastructure the example KIS image can be
tested with QEMU as follows:
$ sudo qemu
    -kernel /tmp/myimage/*.kernel \
    -initrd /tmp/myimage/*.initrd \
    -append $(cat /tmp/myimage/*.append) \
    -hda /tmp/myimage/kiwi-test-image-pxe.*-1.15.3 \
    -serial stdio
Note
This document provides a collection of worksheets which
describes the creation and setup of appliances to work
within a number of different target environments.
11.1 Deploy ISO Image on an USB Stick #
In KIWI NG all generated ISO images are created to be hybrid. This means,
the image can be used as a CD/DVD or as a disk. This works because
the ISO image also has a partition table embedded. With more and more
computers delivered without a CD/DVD drive this becomes important.
The very same ISO image can be copied onto a USB stick and used as a
bootable disk. The following procedure shows how to do this:
Plug in a USB stick
Once plugged in, check which Unix device name the stick was assigned
to. The following command provides an overview about all linux
storage devices:
Dump the ISO image on the USB stick:
Warning
Make sure the selected device really points to your stick because
the following operation can not be revoked and will destroy all
data on the selected device
$ dd if={exc_image_base_name}.x86_64-1.15.3.iso of=/dev/<stickdevice>Boot from your USB Stick
Activate booting from USB in your BIOS/UEFI. As many firmware has different
procedures on how to do it, look into your user manual.
Many firmware offers a boot menu which can be activated at boot time.
11.2 Deploy ISO Image as File on a FAT32 Formated USB Stick #
In KIWI NG, all generated ISO images are created to be hybrid. This means,
the image can be used as a CD/DVD or as a disk. The deployment of such
an image onto a disk like an USB stick normally destroys all existing
data on this device. Most USB sticks are pre-formatted with a FAT32
Windows File System and to keep the existing data on the stick untouched
a different deployment needs to be used.
The following deployment process copies the ISO image as an
additional file to the USB stick and makes the USB stick bootable.
The ability to boot from the stick is configured through a SYSLINUX
feature which allows to loopback mount an ISO file and boot the
kernel and initrd directly from the ISO file.
The initrd loaded in this process must also be able to loopback
mount the ISO file to access the root filesystem and boot the
live system. The dracut initrd system used by KIWI NG provides this
feature upstream called as “iso-scan”. Therefore all KIWI NG generated
live ISO images supports this deployment mode.
For copying the ISO file on the USB stick and the setup of the
SYSLINUX bootloader to make use of the “iso-scan” feature an extra tool
named live-grub-stick exists. The following procedure shows how
to setup the USB stick with live-grub-stick:
Install the live-grub-stick package from software.opensuse.org:
Plug in a USB stick
Once plugged in, check which Unix device name the FAT32 partition
was assigned to. The following command provides an overview about all
storage devices and their filesystems:
Call the live-grub-stick command as follows:
Assuming “/dev/sdz1” was the FAT32 partition selected from the
output of the lsblk command:
$ sudo live-grub-stick {exc_image_base_name}.x86_64-1.15.3.iso /dev/sdz1Boot from your USB Stick
Activate booting from USB in your BIOS/UEFI. As many firmware has different
procedures on how to do it, look into your user manual.
EFI booting from iso image is not supported at the moment, for EFI booting
use –isohybrid option with live-grub-stick, however note that all the data
on the stick will be lost.
Many firmware offers a boot menu which can be activated at boot time.
Usually this can be reached by pressing the Esc or F12 keys.
11.3 Booting a Live ISO Images from Grub2 #
In KIWI NG, all generated ISO images are created to be hybrid. This means,
the image can be used as a CD/DVD or as a disk. This works because
the ISO image also has a partition table embedded. With more and more
computers delivered without a CD/DVD drive this becomes important.
The deployment of such an image onto a disk like an USB stick normally
destroys all existing data on this device. It is also not possible to use
USB stick as a data storage device. Most USB sticks are pre-formatted
with a FAT32 or exFAT Windows File System and to keep the existing data
on the stick untouched a different deployment needs to be used.
Fortunately Grub2 supports booting directly from ISO files. It does not matter
whether it is installed on your computer’s hard drive or on a USB stick.
The following deployment process copies the ISO image as an additional file
to the USB stick or hard drive. The ability to boot from the disk is configured
through a Grub2 feature which allows to loopback mount an ISO file and boot the
kernel and initrd directly from the ISO file.
The initrd loaded in this process must also be able to loopback
mount the ISO file to access the root filesystem and boot the
live system. Almost every Linux distribution supports fat32,
and more and more of them also support exFAT. For hard drives,
Linux filesystems are also supported.
The dracut initrd system used by KIWI NG provides this
feature upstream called as “iso-scan/filename”. Therefore all KIWI NG generated
live ISO images supports this deployment mode.
The following procedure shows how to setup Grub2 on your hard drive:
Copy the ISO image to a folder of your choice on your hard drive.
Add the following code to the “grub.cfg” file:
Be sure to set the path to the ISO image, you can set your own menu name.
The drive identification for Grub2 can be checked at boot time
by pressing the ‘c’ key and typing ‘ls’.
submenu "Boot from openSUSE ISO" {
     iso_path="(hd0,gpt2)/path/to/openSUSE.iso"
     export iso_path
     loopback loop "$iso_path"
     root=(loop)
     source /boot/grub2/loopback.cfg
     loopback --delete loop
}
Restart your computer and select the added menu.
For USB sticks, the procedure is identical. You would then install
Grub2 on the USB drive and follow the steps above.
The use of scripts such as “MultiOS-USB” is strongly recommended.
11.4 Image Description for Amazon EC2 #
A virtual disk image which is able to boot in the Amazon EC2
cloud framework has to comply the following constraints:
Xen tools and libraries must be installed
cloud-init package must be installed
cloud-init configuration for Amazon must be provided
Grub bootloader modules for Xen must be installed
AWS tools must be installed
Disk size must be set to 10G
Kernel parameters must allow for xen console
To meet this requirements add or update the KIWI NG image
description as follows:
Software packages
Make sure to add the following packages to the package list
Note
Package names used in the following list matches the
package names of the SUSE distribution and might be different
on other distributions.
<package name="aws-cli"/>
<package name="grub2-x86_64-xen"/>
<package name="xen-libs"/>
<package name="xen-tools-domU"/>
<package name="cloud-init"/>
Image Type definition
Update the oem image type setup as follows
<type image="oem"
      filesystem="ext4"
      kernelcmdline="console=xvc0 multipath=off net.ifnames=0"
      devicepersistency="by-label"
      firmware="ec2">
  <bootloader name="grub2" timeout="1"/>
  <size unit="M">10240</size>
  <machine xen_loader="hvmloader"/>
  <oemconfig>
      <oem-resize>false</oem-resize>
  </oemconfig>
</type>
Cloud Init setup
Cloud init is a service which runs at boot time and allows
to customize the system by activating one ore more cloud init
modules. For Amazon EC2 the following configuration file
/etc/cloud/cloud.cfg needs to be provided as part of the
overlay files in your KIWI NG image description
users:
  - default

disable_root: true
preserve_hostname: false
syslog_fix_perms: root:root

datasource_list: [ NoCloud, Ec2, None ]

cloud_init_modules:
  - migrator
  - bootcmd
  - write-files
  - growpart
  - resizefs
  - set_hostname
  - update_hostname
  - update_etc_hosts
  - ca-certs
  - rsyslog
  - users-groups
  - ssh

cloud_config_modules:
  - mounts
  - ssh-import-id
  - locale
  - set-passwords
  - package-update-upgrade-install
  - timezone

cloud_final_modules:
  - scripts-per-once
  - scripts-per-boot
  - scripts-per-instance
  - scripts-user
  - ssh-authkey-fingerprints
  - keys-to-console
  - phone-home
  - final-message
  - power-state-change

system_info:
  default_user:
    name: ec2-user
    gecos: "cloud-init created default user"
    lock_passwd: True
    sudo: ["ALL=(ALL) NOPASSWD:ALL"]
    shell: /bin/bash
  paths:
    cloud_dir: /var/lib/cloud/
    templates_dir: /etc/cloud/templates/
  ssh_svcname: sshd
An image built with the above setup can be uploaded into the
Amazon EC2 cloud and registered as image. For further information
on how to upload to EC2 see: ec2uploadimg
11.5 Image Description for Microsoft Azure #
A virtual disk image which is able to boot in the Microsoft Azure
cloud framework has to comply the following constraints:
Hyper-V tools must be installed
Microsoft Azure Agent must be installed
Disk size must be set to 30G
Kernel parameters must allow for serial console
To meet this requirements update the KIWI NG image
description as follows:
Software packages
Make sure to add the following packages to the package list
Note
Package names used in the following list matches the
package names of the SUSE distribution and might be different
on other distributions.
<package name="hyper-v"/>
<package name="python-azure-agent"/>
Image Type definition
Update the oem image type setup as follows
<type image="oem"
      filesystem="ext4"
      kernelcmdline="console=ttyS0 rootdelay=300 net.ifnames=0"
      devicepersistency="by-uuid"
      format="vhd-fixed"
      formatoptions="force_size"
      bootpartition="true"
      bootpartsize="1024">
  <bootloader name="grub2" timeout="1"/>
  <size unit="M">30720</size>
  <oemconfig>
      <oem-resize>false</oem-resize>
  </oemconfig>
</type>
An image built with the above setup can be uploaded into the
Microsoft Azure cloud and registered as image. For further
information on how to upload to Azure see:
azurectl
11.6 Image Description for Google Compute Engine #
A virtual disk image which is able to boot in the Google Compute Engine
cloud framework has to comply the following constraints:
KIWI NG type must be an expandable disk
Google Compute Engine init must be installed
Disk size must be set to 10G
Kernel parameters must allow for serial console
To meet this requirements update the KIWI NG image
description as follows:
Software packages
Make sure to add the following packages to the package list
Note
Package names used in the following list matches the
package names of the SUSE distribution and might be different
on other distributions.
<package name="google-compute-engine-init"/>
Image Type definition
To allow the image to be expanded to the configured disk
geometry of the instance started by Google Compute Engine it is
suggested to let KIWI NG’s OEM boot code take over that task. It would
also be possible to try cloud-init’s resize module but we found
conflicts when two cloud init systems, google-compute-engine-init and
cloud-init were used together. Thus for now we stick with KIWI NG’s
boot code which can resize the disk from within the initrd before
the system gets activated through systemd.
Update the oem image type setup to be changed into an expandable
type as follows:
<type image="oem"
      initrd_system="dracut"
      filesystem="ext4"
      kernelcmdline="console=ttyS0,38400n8 net.ifnames=0"
      format="gce">
  <bootloader name="grub2" timeout="1"/>
  <size unit="M">10240</size>
  <oemconfig>
      <oem-resize>true</oem-resize>
      <oem-swap>false</oem-swap>
  </oemconfig>
</type>
An image built with the above setup can be uploaded into the
Google Compute Engine cloud and registered as image. For further information
on how to upload to Google see: google-cloud-sdk on software.opensuse.org
11.7 Image Description for Vagrant #
Vagrant is a framework to
implement consistent processing/testing work environments based on
Virtualization technologies. To run a system, Vagrant needs so-called
boxes. A box is a TAR archive containing a virtual disk image and
some metadata.
To build Vagrant boxes, you can use Packer which
is provided by Hashicorp itself. Packer is based on the official
installation media (DVDs) as shipped by the distribution vendor.
The KIWI NG way of building images might be helpful, if such a media does not
exist or does not suit your needs. For example, if the distribution is
still under development or you want to use a collection of your own
repositories. Note, that in contrast to Packer KIWI NG only supports the
libvirt and VirtualBox providers. Other providers require a different box
layout that is currently not supported by KIWI NG.
In addition, you can use the KIWI NG image description as source for the
Open Build Service which allows
building and maintaining boxes.
Vagrant expects boxes to be setup in a specific way (for details refer to
the Vagrant box documentation.), applied to the
referenced KIWI NG image description from Section 10.2, “Build a Virtual Disk Image”, the following
steps are required:
Update the image type setup
<type image="oem" filesystem="ext4" format="vagrant">
    <bootloader name="grub2" timeout="0"/>
    <vagrantconfig provider="libvirt" virtualsize="42"/>
    <size unit="G">42</size>
    <oemconfig>
        <oem-resize>false</oem-resize>
    </oemconfig>
</type>
This modifies the type to build a Vagrant box for the libvirt
provider including a pre-defined disk size. The disk size is
optional, but recommended to provide some free space on disk.
For the VirtualBox provider, the additional attribute
virtualbox_guest_additions_present can be set to true when the
VirtualBox guest additions are installed in the KIWI NG image:
<type image="oem" filesystem="ext4" format="vagrant">
    <bootloader name="grub2" timeout="0"/>
    <vagrantconfig
      provider="virtualbox"
      virtualbox_guest_additions_present="true"
      virtualsize="42"
    />
    <size unit="G">42</size>
    <oemconfig>
        <oem-resize>false</oem-resize>
    </oemconfig>
</type>
The resulting Vagrant box then uses the vboxfs module for the
synchronized folder instead of rsync, that is used by default.
Add mandatory packages
<package name="sudo"/>
<package name="openssh"/>
Add additional packages
If you have set the attribute virtualbox_guest_additions_present to
true, add the VirtualBox guest additions. For openSUSE the following
packages are required:
<package name="virtualbox-guest-tools"/>
<package name="virtualbox-guest-x11"/>
<package name="virtualbox-guest-kmp-default"/>
Otherwise, you must add rsync:
Note that KIWI NG cannot verify whether these packages are installed. If
they are missing, the resulting Vagrant box will be broken.
Add Vagrant user
<users group='vagrant'>
    <user name='vagrant' password='vh4vw1N4alxKQ' home='/home/vagrant'/>
</users>
This adds the vagrant user to the system and applies the
name of the user as the password for login.
Configure SSH, the default shared folder and sudo permissions
Vagrant expects that it can login as the user vagrant using an
insecure public key . Furthermore, vagrant also usually uses
/vagrant as the default shared folder and assumes that the
vagrant user can invoke commands via sudo without having
to enter a password.
This can be achieved using the function baseVagrantSetup in
config.sh:
Additional customizations:
Additionally to baseVagrantSetup, you might want to also ensure the
following:
If you have installed the Virtualbox guest additions into your box,
then also load the vboxsf kernel module.
When building boxes for libvirt, then ensure that the default wired
networking interface is called eth0 and uses DHCP. This is
necessary since libvirt uses dnsmasq to issue IPs to the VMs. This
step can be omitted for Virtualbox boxes.
An image built with the above setup creates a Vagrant box file with the
extension .vagrant.libvirt.box or
.vagrant.virtualbox.box. Add the box file to Vagrant with the
command:
vagrant box add my-box image-file.vagrant.libvirt.box
Note
Using the box with the libvirt provider requires alongside a correct
Vagrant installation:
Once added to Vagrant, boot the box and log in
with the following sequence of vagrant commands:
vagrant init my-box
vagrant up --provider libvirt
vagrant ssh
11.7.1 Customizing the embedded Vagrantfile #
Warning
This is an advanced topic and not required for most users
Vagrant ship with an embedded Vagrantfile that carries settings
specific to this box, for instance the synchronization mechanism for the
shared folder. KIWI NG generates such a file automatically for you and it
should be sufficient for most use cases.
If a box requires different settings in the embedded Vagrantfile,
then the user can provide KIWI NG with a path to an alternative via the
attribute embebbed_vagrantfile of the vagrantconfig element: it
specifies a relative path to the Vagrantfile that will be included
in the finished box.
In the following example snippet from config.xml we add a custom
MyVagrantfile into the box (the file should be in the image
description directory next to config.sh):
<type image="oem" filesystem="ext4" format="vagrant">
    <bootloader name="grub2" timeout="0"/>
    <vagrantconfig
      provider="libvirt"
      virtualsize="42"
      embedded_vagrantfile="MyVagrantfile"
    />
    <size unit="G">42</size>
    <oemconfig>
        <oem-resize>false</oem-resize>
    </oemconfig>
</type>
The option to provide a custom Vagrantfile can be combined with the
usage of profiles (see Section 7.4, “Image Profiles”), so that
certain builds can use the automatically generated Vagrantfile (in
the following example that is the Virtualbox build) and others get a
customized one (the libvirt profile in the following example):
<?xml version="1.0" encoding="utf-8"?>

<image schemaversion="7.4" name="{exc_image_base_name}">
  <!-- description goes here -->
  <profiles>
    <profile name="libvirt" description="Vagrant Box for Libvirt"/>
    <profile name="virtualbox" description="Vagrant Box for VirtualBox"/>
  </profiles>

  <!-- general preferences go here -->

  <preferences profiles="libvirt">
    <type
      image="oem"
      filesystem="ext4"
      format="vagrant">
        <bootloader name="grub2" timeout="0"/>
        <vagrantconfig
          provider="libvirt"
          virtualsize="42"
          embedded_vagrantfile="LibvirtVagrantfile"
        />
        <size unit="G">42</size>
        <oemconfig>
            <oem-resize>false</oem-resize>
        </oemconfig>
   </type>
   </preferences>
   <preferences profiles="virtualbox">
     <type
       image="oem"
       filesystem="ext4"
       format="vagrant">
         <bootloader name="grub2" timeout="0"/>
         <vagrantconfig
           provider="virtualbox"
           virtualbox_guest_additions_present="true"
           virtualsize="42"
         />
         <size unit="G">42</size>
         <oemconfig>
             <oem-resize>false</oem-resize>
         </oemconfig>
     </type>
   </preferences>

   <!-- remaining box description -->
 </image>
11.8 Image Description Encrypted Disk #
A virtual disk image can be partially or fully encrypted
using the LUKS extension supported by KIWI NG. A fully encrypted
image also includes the data in /boot to be encrypted.
Such an image requests the passphrase for the master key
to be entered at the bootloader stage. A partialy encrypted
image keeps /boot unencrypted and on an extra boot partition.
Such an image requests the passphrase for the master key later
in the boot process when the root partition gets accessed by
the systemd mount service. In any case the master passphrase
is requested only once.
Update the KIWI NG image description as follows:
Software packages
Make sure to add the following package to the package list
Note
Package names used in the following list match the
package names of the SUSE distribution and might be different
on other distributions.
<package name="cryptsetup"/>
Image Type definition
Update the oem image type setup as follows
- Full disk encryption including
/boot: <type image="oem" filesystem="ext4" luks="linux" bootpartition="false">
<oemconfig>
<oem-resize>false</oem-resize>
</oemconfig>
</type>- Encrypted root partition with an unencrypted extra
/boot partition: <type image="oem" filesystem="ext4" luks="linux" bootpartition="true">
<oemconfig>
<oem-resize>false</oem-resize>
</oemconfig>
</type>
Note
The value for the luks attribute sets the master passphrase
for the LUKS keyring. Therefore the XML description becomes
security critical and should only be readable by trustworthy
people. Alternatively the credentials information can be
stored in a key file and referenced as:
<type luks="file:///path/to/keyfile"/>
11.9 Deploy and Run System in a RamDisk #
If a machine should run the OS completely in memory without
the need for any persistent storage, the approach to deploy
the image into a ramdisk serves this purpose. KIWI NG allows
to create a bootable ISO image which deploys the image
into a ramdisk and activates that image with the following
oem type definition:
<type image="oem" filesystem="ext4" installiso="true" initrd_system="dracut" installboot="install" kernelcmdline="rd.kiwi.ramdisk ramdisk_size=2048000">
    <bootloader name="grub2" timeout="1"/>
    <oemconfig>
        <oem-skip-verify>true</oem-skip-verify>
        <oem-unattended>true</oem-unattended>
        <oem-unattended-id>/dev/ram1</oem-unattended-id>
        <oem-swap>false</oem-swap>
        <oem-multipath-scan>false</oem-multipath-scan>
     </oemconfig>
 </type>
The type specification above builds an installation ISO image
which deploys the System Image into the specified ramdisk
device (/dev/ram1). The setup of the ISO image boots with a
short boot timeout of 1sec and just runs through the process
without asking any questions. In a ramdisk deployment the
optional target verification, swap space and multipath targets
are out of scope and therefore disabled.
The configured size of the ramdisk specifies the size of the
OS disk and must be at least of the size of the System Image.
The disk size can be configured with the following value in
the kernelcmdline attribute:
An image built with the above setup can be tested in QEMU as
follows:
$ sudo qemu -cdrom \
      {exc_image_base_name}.x86_64-1.15.3.install.iso \
      -serial stdio
Note
Enough Main Memory
The machine, no matter if it’s a virtual machine like QEMU
or a real machine, must provide enough RAM to hold the image
in the ramdisk as well as have enough RAM available to operate
the OS and its applications. The KIWI NG build image with the
extension .raw provides the System Image which gets deployed
into the RAM space. Substract the size of the System Image
from the RAM space the machine offers and make sure the result
is still big enough for the use case of the appliance. In
case of a virtual machine, attach enough main memory to fit
this calculation. In case of QEMU this can be done with
the -m option
Like all other oem KIWI NG images, also the ramdisk setup supports
all the deployments methods as explained in Section 10.3.1, “Deployment Methods”
This means it’s also possible to dump the ISO image on a USB
stick let the system boot from it and unplug the stick from
the machine because the system was deployed into RAM
Note
Limitations Of RamDisk Deployments
Only standard images which can be booted by a simple root mount
and root switch can be used. Usually KIWI NG calls kexec after deployment
such that the correct, for the image created dracut initrd, will boot
the image. In case of a RAM only system kexec does not work because
it would loose the ramdisk contents. Thus the dracut initrd driving
the deployment is also the environment to boot the system.
There are cases where this environment is not suitable to boot
the system.
11.10 Custom Disk Partitions #
KIWI NG has its own partitioning schema which is defined according to several
different user configurations: boot firmware, boot partition,
expandable layouts, etc. Those supported features have an impact on the
partitioning schema.
MBR or GUID partition tables are not flexible, carry limitations and are
tied to some specific disk geometry. Because of that the preferred alternative
to disk layouts based on traditional partition tables is using flexible
approaches like logic volumes.
However, on certain conditions additional entries to the low level
partition table are needed. For this purpose the <partitions> section
exists and allows to add custom entries like shown in the following
example:
<partitions>
    <partition name="var" size="100" mountpoint="/var" filesystem="ext3"/>
</partitions>
Each <partition> entry puts a partition of the configured size in the
low level partition table, creates a filesystem on it and includes
it to the system’s fstab file. If parts of the root filesystem are
moved into its own partition like it’s the case in the above example,
this partition will also contain the data that gets installed during
the image creation process to that area.
The following attributes must/can be set to configured a partition entry:
- name=”identifier”
Mandatory name of the partition as handled by KIWI NG.
Note
There are the following reserved names which cannot be used
because they are already represented by existing attributes:
root, readonly, boot, prep, spare, swap, efi_csm
and efi.
- partition_name=”name”
Optional name of the partition as it appears when listing the
table contents with tools like gdisk. If no name is set
KIWI NG constructs a name of the form p.lx(identifier_from_name_attr)
- partition_type=”type_identifier”
Optional partition type identifier as handled by KIWI NG.
Allowed values are t.linux and t.raid. If not specified
t.linux is the default.
- size=”size_string”
Mandatory size of the partition. A size string can end with M or
G to indicate a mega-Byte or giga-Byte value. Without a unit
specification mega-Byte is used.
- mountpoint=”path”
Mandatory mountpoint to mount the partition in the system.
- filesystem=”btrfs|ext2|ext3|ext4|squashfs|xfs
Mandatory filesystem configuration to create one of the supported
filesystems on the partition.
- clone=”number”
Optional setting to indicate that this partition should be
cloned number of times. A clone partition is content wise an
exact byte for byte copy of the origin. However, to avoid conflicts at boot
time the UUID of any cloned partition will be made unique. In the
sequence of partitions, the clone(s) will always be created first
followed by the partition considered the origin. The origin
partition is the one that will be referenced and used by the
system
Despite the customization options of the partition table shown above
there are the following limitations:
By default the root partition is always the last one
Disk imags build with KIWI NG are designed to be expandable.
For this feature to work the partition containing the system
rootfs must always be the last one. If this is unwanted for
some reason KIWI NG offers an opportunity for one extra/spare
partition with the option to be also placed at the end of the
table. For details lookup spare_part in Section 8.1, “Image Description Elements”
By default there are no gaps in the partition table
The way partitions are configured is done such that there are no
gaps in the table of the image. However, leaving some space
free at the end of the partition geometry is possible in the
following ways:
Deploy with unpartitioned free space.
To leave space unpartitioned on first boot of a disk image
it is possible to configure an <oem-systemsize> which is
smaller than the disk the image gets deployed to. Details
about this setting can be found in Section 8.1, “Image Description Elements”
Build with unpartitioned free space.
To leave space unpartitioned at build time of the image it
is possible to disable <oem-resize> and configure an
<oem-systemsize> which is smaller than the kiwi calculated
disk size or the fixed setting for the disk size via the
size> element.
Build with unpartitioned free space.
Setting some unpartitioned free space on the disk can be done using
the unpartitioned attribute of size element in type’s section.
For details see Section 10.2.2, “Modifying the Size of the Image”
Resize built image adding unpartitioned free space.
A built image can be resized by using the kiwi-ng image resize command
and set a new extended size for the disk. See KIWI NG commands docs
Section 4.8, “kiwi-ng image resize”.
11.11 Custom Disk Volumes #
KIWI NG supports defining custom volumes by using the logical volume manager
(LVM) for the Linux kernel or by setting volumes at filesystem level when
filesystem supports it (e.g. btrfs).
Volumes are defined in the KIWI NG description file config.xml,
using systemdisk. This element is a child of the type.
Volumes themselves are added via (multiple) volume child
elements of the systemdisk element:
<image schemaversion="7.4" name="openSUSE-Leap-15.1">
  <type image="oem" filesystem="btrfs" preferlvm="true">
    <systemdisk name="vgroup">
      <volume name="usr/lib" size="1G" label="library"/>
      <volume name="@root" freespace="500M"/>
      <volume name="etc_volume" mountpoint="etc" copy_on_write="false"/>
      <volume name="bin_volume" size="all" mountpoint="/usr/bin"/>
    </systemdisk>
  </type>
</image>
Additional non-root volumes are created for each volume
element. Volume details can be defined by setting the following volume
attributes:
name: Required attribute representing the volume’s name. Additionally, this
attribute is interpreted as the mountpoint if the mountpoint attribute
is not used.
mountpoint: Optional attribute that specifies the mountpoint of this
volume.
size: Optional attribute to set the size of the volume. If no suffix
(M or G) is used, then the value is considered to be in megabytes.
Note
Special name for the root volume
One can use the @root name to refer to the volume mounted at /, in
case some specific size attributes for the root volume have to be
defined. For instance:
<volume name="@root" size="4G"/>
In addition to the custom size of the root volume it’s also possible
to setup the name of the root volume as follows:
<volume name="@root=rootlv" size="4G"/>
If no name for the root volume is specified the
default name: LVRoot applies.
freespace: Optional attribute defining the additional free space added
to the volume. If no suffix (M or G) is used, the value is considered
to be in megabytes.
label: Optional attribute to set filesystem label of the volume.
copy_on_write: Optional attribute to set the filesystem copy-on-write
attribute for this volume.
filesystem_check: Optional attribute to indicate that this
filesystem should perform the validation to become filesystem checked.
The actual constraints if the check is performed or not depends on
systemd and filesystem specific components. If not set or set to
false no system component will be triggered to run an eventual
filesystem check, which results in this filesystem to be never checked.
The latter is the default.
Warning
The size attributes for filesystem volumes, as for btrfs, are
ignored and have no effect.
The systemdisk element additionally supports the following optional
attributes:
name: The volume group name, by default kiwiVG is used. This setting
is only relevant for LVM volumes.
preferlvm: Boolean value instructing KIWI NG to prefer LVM even if the
used filesystem has its own volume management system.
KIWI NG allows to create block level clones of certain partitions
used in the image. Clones can be created from the root, boot
and any other partition listed in the <partitions> element.
A partition clone is a simple byte dump from one
block storage device to another. However, this would cause conflicts
during boot of the system because all unique identifiers like
the UUID of a filesystem will no longer be unique. The clone
feature of KIWI NG takes care of this part and re-creates the
relevant unique identifiers per cloned partition. KIWI NG allows
this also for complex partitions like LVM, LUKS or RAID.
The partition clone(s) will always appear first in the partition table,
followed by the origin partition. The origin partition is the one
whose identifier will be referenced and used by the system. By default
no cloned partition will be mounted or used by the system at boot time.
Let’s take a look at the following example:
<type image="oem" root_clone="1" boot_clone="1" firmware="uefi" filesystem="xfs" bootpartition="true" bootfilesystem="ext4">
    <partitions>
        <partition name="home" size="10" mountpoint="/home" filesystem="ext3" clone="2"/>
    </partitions>
</type>
With the above setup KIWI NG will create a disk image that
contains the following partition table:
Number  Start (sector)    End (sector)  Size       Code  Name
   1            2048            6143   2.0 MiB     EF02  p.legacy
   2            6144           47103   20.0 MiB    EF00  p.UEFI
   3           47104          661503   300.0 MiB   8300  p.lxbootclone1
   4          661504         1275903   300.0 MiB   8300  p.lxboot
   5         1275904         1296383   10.0 MiB    8300  p.lxhomeclone1
   6         1296384         1316863   10.0 MiB    8300  p.lxhomeclone2
   7         1316864         1337343   10.0 MiB    8300  p.lxhome
   8         1337344         3864575   1.2 GiB     8300  p.lxrootclone1
   9         3864576         6287326   1.2 GiB     8300  p.lxroot
When booting the system only the origin partitions p.lxboot, p.lxroot
and p.lxhome will be mounted and visible in e.g. /etc/fstab,
the bootloader or the initrd. Thus partition clones are present as a data
source but are not relevant for the operating system from a functional
perspective.
As shown in the above example there is one clone request for root and boot
and a two clone requests for the home partition. KIWI NG does not sanity-
check the provided number of clones (e.g. whether your partition table
can hold that many partitions).
Warning
There is a limit how many partitions a partition table can hold.
This also limits how many clones can be created.
Potential use cases for which a clone of one or more partitions
is useful include among others:
- Factory Resets:
Creating an image with the option to rollback to the
state of the system at deployment time can be very helpful
for disaster recovery
- System Updates with Rollbacks e.g A/B:
Creating an image which holds extra space allowing to rollback
modified data can make a system more robust. For example
in a simple A/B update concept, partition A would get updated
but would flip to B if A is considered broken after applying the
update.
Note
Most probably any use case based on partition clones requires
additional software to manage them. KIWI NG provides the
option to create the clone layout but it does not provide
the software to implement the actual use case for which the
partition clones are needed.
Developers writing applications based on a clone layout created
with KIWI NG can leverage the metadata file /config.partids.
This file is created at build time and contains the mapping between
the partition name and the actual partition number in the partition
table. For partition clones, the following naming convention applies:
kiwi_(name)PartClone(id)="(partition_number)"
The (name) is either taken from the name attribute
of the <partition> element or it is a fixed name assigned by KIWI NG.
There are the following reserved partition names for which cloning
is supported:
For the mentioned example this will result in the
following /config.partids:
kiwi_BiosGrub="1"
kiwi_EfiPart="2"
kiwi_bootPartClone1="3"
kiwi_BootPart="4"
kiwi_homePartClone1="5"
kiwi_homePartClone2="6"
kiwi_HomePart="7"
kiwi_rootPartClone1="8"
kiwi_RootPart="9"
11.13 Setting Up a Network Boot Server #
To be able to deploy a system through the PXE boot protocol, you need
to set up a network boot server providing the services DHCP and tftp.
With dnsmasq an utility exists which allows to setup all needed
services at once:
11.13.1 Installing and Configuring DHCP and TFTP with dnsmasq #
The following instructions can only serve as an example. Depending on your
network structure, the IP addresses, ranges and domain settings needs to
be adapted to allow the DHCP server to work within your network. If you
already have a DHCP server running in your network, make sure that the
filename and next-server directives are correctly set on this server.
The following steps describe how to set up dnsmasq to work as
DHCP and TFTP server.
Install the dnsmasq package.
Create the file /etc/dnsmasq.conf and insert the following content
# Don't function as a DNS server.
port=0

# Log information about DHCP transactions.
log-dhcp

# Set the root directory for files available via FTP,
# usually "/srv/tftpboot":
tftp-root=TFTP_ROOT_DIR

enable-tftp

dhcp-range=BOOT_SERVER_IP,proxy
In the next step it’s required to decide for the boot method. There
is the PXE loader provided via pxelinux.0 from the syslinux package
and there is the GRUB loader provided via the grub package.
Note
Placeholders
Replace all placeholders (written in uppercase) with data fitting
your network setup.
2.1. insert the following content to use pxelinux.0:
# The boot filename, Server name, Server Ip Address
dhcp-boot=pxelinux.0,,BOOT_SERVER_IP

# Disable re-use of the DHCP servername and filename fields as extra
# option space. That's to avoid confusing some old or broken
# DHCP clients.
dhcp-no-override

# PXE menu.  The first part is the text displayed to the user.
# The second is the timeout, in seconds.
pxe-prompt="Booting FOG Client", 1

# The known types are x86PC, PC98, IA64_EFI, Alpha, Arc_x86,
# Intel_Lean_Client, IA32_EFI, BC_EFI, Xscale_EFI and X86-64_EFI
# This option is first and will be the default if there is no input
# from the user.
pxe-service=X86PC, "Boot to FOG", pxelinux.0
pxe-service=X86-64_EFI, "Boot to FOG UEFI", ipxe
pxe-service=BC_EFI, "Boot to FOG UEFI PXE-BC", ipxe
Note
On boot of a network client with that configuration the default
pxelinux.0 config file is expected at
TFTP_ROOT_DIR/pxelinux.cfg/default
2.2. insert the following content to use grub:
# The boot filename, Server name, Server Ip Address
dhcp-boot=boot/grub2/i386-pc/core.0,,BOOT_SERVER_IP
When using grub the referenced dhcp-boot grub module must be genereated.
To do this change the directory to TFTP_ROOT_DIR and create
the setvars.conf with the following content:
set root=(tftp)
set net_default_server=BOOT_SERVER_IP
set prefix=boot/grub2
Now call the following commands to create the grub module
$ grub2-mknetdir --net-directory=TFTP_ROOT_DIR --subdir=boot/grub2
$ grub2-mkimage -O i386-pc-pxe \
    --output boot/grub2/i386-pc/core.0 \
    --prefix=/boot/grub2 \
    -c setvars.conf \
  pxe tftp
Note
On boot of a network client with that configuration the grub
config file is expected at TFTP_ROOT_DIR/boot/grub2/grub.cfg
11.14 Build PXE Root File System Image for the legacy netboot infrastructure #
PXE is a network boot protocol that is shipped with most BIOS
implementations. The protocol sends a DHCP request to get an IP
address. When an IP address is assigned, it uses the TFTP protocol
to download a Kernel and boot instructions. Contrary to other images
built with KIWI NG, a PXE image consists of separate boot, kernel and root
filesystem images, since those images need to be made available in
different locations on the PXE boot server.
A root filesystem image which can be deployed via KIWI NG’s PXE
netboot infrastructure represents the system rootfs in a linux
filesystem. A user could loop mount the image and access the
contents of the root filesystem. The image does not contain
any information about the system disk its partitions or the
bootloader setup. All of these information is provided by a
client configuration file on the PXE server which controlls
how the root filesystem image should be deployed.
Many different deployment strategies are possible, e.g root over
NBD (network block device), AoE (ATA over Ethernet), or
NFS for diskless and diskfull clients. This particular
example shows how to build an overlayfs-based union system based
on openSUSE Leap for a diskless client which receives the squashfs
compressed root file system image in a ramdisk overlayed via
overlayfs and writes new data into another ramdisk on the same
system. As diskless client, a QEMU virtual machine is used.
Make sure you have checked out the example image descriptions,
see Section 2.4, “Example Appliance Descriptions”.
Build the image with KIWI NG:
$ sudo kiwi-ng --profile Flat system build \
    --description kiwi/build-tests/x86/tumbleweed/test-image-pxe \
    --set-repo http://download.opensuse.org/tumbleweed/repo/oss \
    --target-dir /tmp/mypxe-result
Change into the build directory:
Copy the initrd and the kernel to /srv/tftpboot/boot:
$ cp *.initrd /srv/tftpboot/boot/initrd
$ cp *.kernel /srv/tftpboot/boot/linux
Copy the system image and its MD5 sum to /srv/tftpboot/image:
$ cp kiwi-test-image-pxe.x86_64-1.15.3 /srv/tftpboot/image
$ cp kiwi-test-image-pxe.x86_64-1.15.3.md5 /srv/tftpboot/image
Adjust the PXE configuration file.
The configuration file controls which kernel and initrd is
loaded and which kernel parameters are set. A template has been installed
at /srv/tftpboot/pxelinux.cfg/default from the kiwi-pxeboot
package. The minimal configuration required to boot the example image
looks like to following:
DEFAULT KIWI-Boot

LABEL KIWI-Boot
    kernel boot/linux
    append initrd=boot/initrd
    IPAPPEND 2
Create the image client configuration file:
$ vi /srv/tftpboot/KIWI/config.default

IMAGE=/dev/ram1;kiwi-test-image-pxe.x86_64;1.15.3;192.168.100.2;4096
UNIONFS_CONFIG=/dev/ram2,/dev/ram1,overlay
All PXE boot based deployment methods are controlled by a client
configuration file. The above configuration tells the client where
to find the image and how to activate it. In this case the image
will be deployed into a ramdisk (ram1) and overlay mounted such
that all write operations will land in another ramdisk (ram2).
KIWI NG supports a variety of different deployment strategies based
on the rootfs image created beforehand. For details, refer
to PXE Client Setup Configuration
Connect the client to the network and boot. This can also be done
in a virtualized environment using QEMU as follows:
$ sudo qemu -boot n -m 4096
11.14.1 PXE Client Setup Configuration #
All PXE boot based deployment methods are controlled by configuration files
located in /srv/tftpboot/KIWI on the PXE server. Such a configuration
file can either be client-specific (config.MAC_ADDRESS, for example
config.00.AB.F3.11.73.C8), or generic (config.default).
In an environment
with heterogeneous clients, this allows to have a default configuration
suitable for the majority of clients, to have configurations suitable
for a group of clients (for example machines with similar or identical
hardware), and individual configurations for selected machines.
The configuration file contains data about the image and about
configuration, synchronization, and partition parameters.
The configuration file has got the following general format:
IMAGE="device;name;version;srvip;bsize;compressed,...,"

DISK="device"
PART="size;id;Mount,...,size;id;Mount"
RAID="raid-level;device1;device2;..."

AOEROOT=ro-device[,rw-device]
NBDROOT="ip-address;export-name;device;swap-export-name;swap-device;write-export-name;write-device"
NFSROOT="ip-address;path"

UNIONFS_CONFIGURATION="rw-partition,compressed-partition,overlayfs"

CONF="src;dest;srvip;bsize;[hash],...,src;dest;srvip;bsize;[hash]"

KIWI_BOOT_TIMEOUT="seconds"
KIWI_KERNEL_OPTIONS="opt1 opt2 ..."

REBOOT_IMAGE=1
RELOAD_CONFIG=1
RELOAD_IMAGE=1
Note
Quoting the Values
The configuration file is sourced by Bash, so the same quoting
rules as for Bash apply.
Not all configuration options needs to be specified. It depends on the
setup of the client which configuration values are required. The
following is a collection of client setup examples which covers all
supported PXE client configurations.
11.14.1.1 Setup Client with Remote Root #
To serve the image from a remote location and redirect all
write operations on a tmpfs, the following setup is required:
# When using AoE, see vblade toolchain for image export

AOEROOT=/dev/etherd/e0.1
UNIONFS_CONFIG=tmpfs,aoe,overlay

# When using NFS, see exports manual page for image export

NFSROOT="192.168.100.2;/srv/tftpboot/image/root"
UNIONFS_CONFIG=tmpfs,nfs,overlay

# When using NBD, see nbd-server manual page for image export

NBDROOT=192.168.100.2;root_export;/dev/nbd0
UNIONFS_CONFIG=tmpfs,nbd,overlay
The above setup shows the most common use case where the image built
with KIWI NG is populated over the network using either AoE, NBD or NFS
in combination with overlayfs which redirects all write operations
to be local to the client. In any case a setup of either AoE, NBD or
NFS on the image server is required beforehand.
11.14.1.2 Setup Client with System on Local Disk #
To deploy the image on a local disk the following setup
is required:
Note
In the referenced x86/tumbleweed/test-image-pxe XML description the pxe
type must be changed as follows and the image needs to be
rebuild:
<type image="pxe" filesystem="ext3" boot="netboot/suse-tumbleweed"/>
IMAGE="/dev/sda2;kiwi-test-image-pxe.x86_64;1.15.3;192.168.100.2;4096"
DISK="/dev/sda"
PART="5;S;X,X;L;/"
The setup above will create a partition table on sda with a 5MB swap
partition (no mountpoint) and the rest of the disk will be a Linux(L)
partition with / as mountpoint. The (X) in the PART setup specifies
a place holder to indicate the default behaviour.
11.14.1.3 Setup Client with System on Local MD RAID Disk #
To deploy the image on a local disk with prior software RAID
configuration, the following setup is required:
Note
In the referenced x86/tumbleweed/test-image-pxe XML description the pxe
type must be changed as follows and the image needs to be
rebuild:
<type image="pxe" filesystem="ext3" boot="netboot/suse-tumbleweed"/>
RAID="1;/dev/sda;/dev/sdb"
IMAGE="/dev/md1;kiwi-test-image-pxe.x86_64;1.15.3;192.168.100.2;4096"
PART="5;S;x,x;L;/"
The first parameter of the RAID line is the RAID level. So far only raid1
(mirroring) is supported. The second and third parameter specifies the
raid disk devices which make up the array. If a RAID line is present
all partitions in PART will be created as RAID partitions. The first
RAID is named md0, the second one md1 and so on. It is required to
specify the correct RAID partition in the IMAGE line according to the
PART setup. In this case md0 is reserved for the SWAP space and md1
is reserved for the system.
11.14.1.4 Setup Loading of Custom Configuration File(s) #
In order to load for example a custom /etc/hosts file on the client,
the following setup is required:
CONF="hosts;/etc/hosts;192.168.1.2;4096;ffffffff"
On boot of the client KIWI NG’s boot code will fetch the hosts file
from the root of the server (192.168.1.2) with 4k blocksize and deploy
it as /etc/hosts on the client. The protocol is by default tftp
but can be changed via the kiwiservertype kernel commandline option.
For details, see Setup a Different Download Protocol and Server
11.14.1.5 Setup Client to Force Reload Image #
To force the reload of the system image even if the image on
the disk is up-to-date, the following setup is required:
The option only applies to configurations with a DISK/PART setup
11.14.1.6 Setup Client to Force Reload Configuration Files #
To force the reload of all configuration files specified in
CONF, the following setup is required:
By default only configuration files which has changed according to
their md5sum value will be reloaded. With the above setup all files
will be reloaded from the PXE server. The option only applies to
configurations with a DISK/PART setup
11.14.1.7 Setup Client for Reboot After Deployment #
To reboot the system after the initial deployment process is
done the following setup is required:
11.14.1.8 Setup custom kernel boot options #
To deactivate the kernel mode setting on local
boot of the client the following setup is required:
KIWI_KERNEL_OPTIONS="nomodeset"
Note
This does not influence the kernel options passed to the client
if it boots from the network. In order to setup those the PXE
configuration on the PXE server needs to be changed
11.14.1.9 Setup a Custom Boot Timeout #
To setup a 10sec custom timeout for the local boot of the client
the following setup is required.
Note
This does not influence the boot timeout if the client boots off
from the network.
11.14.1.10 Setup a Different Download Protocol and Server #
By default all downloads controlled by the KIWI NG linuxrc code are
performed by an atftp call using the TFTP protocol. With PXE the download
protocol is fixed and thus you cannot change the way how the kernel and
the boot image (initrd) is downloaded. As soon as Linux takes over, the
download protocols http, https and ftp are supported too. KIWI NG uses
the curl program to support the additional protocols.
To select one of the additional download protocols the following
kernel parameters need to be specified
kiwiserver=192.168.1.1 kiwiservertype=ftp
To set up this parameters edit the file
/srv/tftpboot/pxelinux.cfg/default on your PXE boot server and change
the append line accordingly.
Note
Once configured all downloads except for kernel and initrd are
now controlled by the given server and protocol. You need to make
sure that this server provides the same directory and file structure
as initially provided by the kiwi-pxeboot package
11.15 Booting a Root Filesystem from Network #
In KIWI NG, the kiwi-overlay dracut module can be used to boot
from a remote exported root filesystem. The exported device
is visible as block device on the network client. KIWI NG
supports the two export backends NBD (Network Block Device)
and AoE (ATA over Ethernet) for this purpose. A system that is
booted in this mode will read the contents of the root filesystem
from a remote location and targets any write action into RAM by
default. The kernel cmdline option rd.root.overlay.write can
be used to specify an alternative device to use for writing.
The two layers (read and write) are combined using the overlayfs
filesystem.
For remote boot of a network client, the PXE boot protocol
is used. This functionality requires a network boot server
setup on the system. Details how to setup such a server
can be found in Section 11.13, “Setting Up a Network Boot Server”.
Before the KIS image can be build, the following configuration step
is required:
Now the KIS image can be build as shown in Section 10.6, “Build KIS Image (Kernel, Initrd, System)”. After the
build, the following configuration steps are required to boot
from the network:
Copy initrd/kernel from the KIS build to the PXE server
The PXE boot process loads the configured kernel and initrd from
the PXE server. For this reason, the following files must be
copied to the PXE server as follows:
$ cp *.initrd /srv/tftpboot/boot/initrd
$ cp *.kernel /srv/tftpboot/boot/linux
Export Root FileSystem to the Network
Access to the root filesystem is implemented using either the
AoE or the NBD protocol. This requires the export of the
root filesystem image as remote block device:
- Export via AoE:
Install the vblade package on the system which is expected
to export the root filesystem
Note
Not all versions of AoE are compatible with any kernel. This
means the kernel on the system exporting the root filesystem image
must provide a compatible aoe kernel module compared to the
kernel used inside of the root filesystem image.
Once done, export the filesystem from the KIS build above as follows:
$ vbladed 0 1 IFACE {exc_image_base_name}.x86_64-1.15.3The above command exports the given filesystem image file as a block
storage device to the network of the given IFACE. On any machine except
the one exporting the file, it will appear as /dev/etherd/e0.1
once the aoe kernel module was loaded. The two numbers,
0 and 1 in the above example, classifies a major and minor number which
is used in the device node name on the reading side, in this
case e0.1.
Note
Only machines in the same network of the given INTERFACE
can see the exported block device.
- Export via NBD:
Install the nbd package on the system which is expected
to export the root filesystem
Once done, export the filesystem from the KIS build above as follows:
$ losetup /dev/loop0 {exc_image_base_name}.x86_64-1.15.3

$ vi /etc/nbd-server/config

  [generic]
      user = root
      group = root
  [export]
      exportname = /dev/loop0

$ nbd-server
Setup boot entry in the PXE configuration
Note
The following step assumes that the pxelinux.0 loader
has been configured on the boot server to boot up network
clients
Edit the file /srv/tftpboot/pxelinux.cfg/default and create
a boot entry of the form:
- Using NBD:
LABEL Overlay-Boot
    kernel boot/linux
    append initrd=boot/initrd root=overlay:nbd=server-ip:export
The boot parameter root=overlay:nbd=server-ip:export specifies
the NBD server IP address and the name of the export as used in
/etc/nbd-server/config
- Using AoE:
LABEL Overlay-Boot
    kernel boot/linux
    append initrd=boot/initrd root=overlay:aoe=AOEINTERFACE
The boot parameter root=overlay:aoe=AOEINTERFACE specifies the
interface name as it was exported by the vbladed command
Boot from the Network
Within the network which has access to the PXE server and the
exported root filesystem image, any network client can now boot the
system. A test based on QEMU can be done as follows:
11.16 Booting a Live ISO Image from Network #
In KIWI NG, live ISO images can be configured to boot via the
PXE boot protocol. This functionality requires a network boot
server setup on the system. Details how to setup such a server
can be found in Section 11.13, “Setting Up a Network Boot Server”.
After the live ISO was built as shown in Section 10.1, “Build an ISO Hybrid Live Image”,
the following configuration steps are required to boot from
the network:
Extract initrd/kernel From Live ISO
The PXE boot process loads the configured kernel and initrd from
the PXE server. For this reason, those two files must be extracted
from the live ISO image and copied to the PXE server as follows:
$ mount {exc_image_base_name}.x86_64-1.15.3.iso /mnt
$ cp /mnt/boot/x86_64/loader/initrd /srv/tftpboot/boot/initrd
$ cp /mnt/boot/x86_64/loader/linux /srv/tftpboot/boot/linux
$ umount /mnt
Note
This step must be repeated with any new build of the live ISO image
Export Live ISO To The Network
Access to the live ISO file is implemented using the AoE protocol
in KIWI NG. This requires the export of the live ISO file as remote
block device which is typically done with the vblade
toolkit. Install the following package on the system which is
expected to export the live ISO image:
Note
Not all versions of AoE are compatible with any kernel. This
means the kernel on the system exporting the live ISO image
must provide a compatible aoe kernel module compared to the
kernel used in the live ISO image.
Once done, export the live ISO image as follows:
$ vbladed 0 1 INTERFACE {exc_image_base_name}.x86_64-1.15.3.isoThe above command exports the given ISO file as a block storage
device to the network of the given INTERFACE. On any machine
except the one exporting the file, it will appear as
/dev/etherd/e0.1 once the aoe kernel module
was loaded. The two numbers, 0 and 1 in the above example, classifies
a major and minor number which is used in the device node name
on the reading side, in this case e0.1. The numbers given
at export time must match the AOEINTERFACE name as described in
the next step.
Note
Only machines in the same network of the given INTERFACE
can see the exported live ISO image. If virtual machines
are the target to boot the live ISO image they could all
be connected through a bridge. In this case INTERFACE
is the bridge device. The availability scope of the live
ISO image on the network is in general not influenced
by KIWI NG and is a task for the network administrators.
Setup live ISO boot entry in PXE configuration
Note
The following step assumes that the pxelinux.0 loader
has been configured on the boot server to boot up network
clients
Edit the file /srv/tftpboot/pxelinux.cfg/default and create
a boot entry of the form:
LABEL Live-Boot
    kernel boot/linux
    append initrd=boot/initrd rd.kiwi.live.pxe root=live:AOEINTERFACE=e0.1
The boot parameter rd.kiwi.live.pxe tells the KIWI NG boot process to
setup the network and to load the required aoe kernel module.
The boot parameter root=live:AOEINTERFACE=e0.1 specifies the
interface name as it was exported by the vbladed command
from the last step. Currently only AoE (Ata Over Ethernet)
is supported.
Boot from the Network
Within the network which has access to the PXE server and the
exported live ISO image, any network client can now boot the
live system. A test based on QEMU is done as follows:
11.17 Setting Up YaST at First Boot #
To be able to use YaST in a non interactive way, create a
YaST profile which tells the autoyast module what to do.
To create the profile, run:
Once the YaST profile exists, update the KIWI NG XML description
as follows:
Edit the KIWI NG XML file and add the following package to
the <packages type="image"> section:
<package name="yast2-firstboot"/>
Copy the YaST profile file as overlay file to your KIWI NG image
description overlay directory:
cd IMAGE_DESCRIPTION_DIRECTORY
mkdir -p root/etc/YaST2
cp PROFILE_FILE root/etc/YaST2/firstboot.xml
Copy and activate the YaST firstboot template.
This is done by the following instructions which needs to be written
into the KIWI NG config.sh which is stored in the image
description directory:
sysconfig_firsboot=/etc/sysconfig/firstboot
sysconfig_template=/var/adm/fillup-templates/sysconfig.firstboot
if [ ! -e "${sysconfig_firsboot}" ]; then
    cp "${sysconfig_template}" "${sysconfig_firsboot}"
fi

touch /var/lib/YaST2/reconfig_system
11.18 Add or Update the Fstab File #
In KIWI NG, all major filesystems that were created at image
build time are handled by KIWI NG itself and setup in /etc/fstab.
Thus there is usually no need to add entries or change the
ones added by KIWI NG. However depending on where the image is
deployed later it might be required to pre-populate fstab
entries that are unknown at the time the image is build.
Possible use cases are for example:
Adding NFS locations that should be mounted at boot time.
Using autofs would be an alternative to avoid additional
entries to fstab. The information about the NFS location
will make this image specific to the target network. This
will be independent of the mount method, either fstab or
the automount map has to provide it.
Adding or changing entries in a read-only root system
which becomes effective on first boot but can’t be added
at that time because of the read-only characteristics.
Note
Modifications to the fstab file are a critical change. If
done wrongly the risk exists that the system will not boot.
In addition this type of modification makes the image
specific to its target and creates a dependency to the
target hardware, network, etc… Thus this feature should
be used with care.
The optimal way to provide custom fstab information is through a
package. If this can’t be done the files can also be provided via
the overlay file tree of the image description.
KIWI NG supports three ways to modify the contents of the /etc/fstab
file:
- Providing an
/etc/fstab.append file If that file exists in the image root tree, KIWI NG will take its
contents and append it to the existing /etc/fstab file. The
provided /etc/fstab.append file will be deleted after successful
modification.
- Providing an
/etc/fstab.patch file The /etc/fstab.patch represents a patch file that will be
applied to /etc/fstab using the patch program. This method
also allows to change the existing contents of /etc/fstab.
On success /etc/fstab.patch will be deleted.
- Providing an
/etc/fstab.script file The /etc/fstab.script represents an executable which is called
as chrooted process. This method is the most flexible one and
allows to apply any change. On success /etc/fstab.script will be
deleted.
Note
All three variants to handle the fstab file can be used together.
Appending happens first, patching afterwards and the script call
is last. When using the script call, there is no validation that
checks if the script actually handles fstab or any other
file in the image rootfs.
11.19 Building Images with Profiles #
KIWI NG supports so-called profiles inside the XML image description. Profiles
act as namespaces for additional settings to be applied on top of the
defaults. For further details, see Section 7.4, “Image Profiles”.
To execute local KIWI NG builds with a specific, selected profile, add the
command line flag --profile=$PROFILE_NAME:
$ sudo kiwi-ng --type oem --profile libvirt system build \
      --description kiwi/build-tests/x86/leap/test-image-vagrant \
      --set-repo obs://openSUSE:Leap:15.3/standard \
      --target-dir /tmp/myimage
Consult the manual page of kiwi for further details:
Section 4.1.1, “SYNOPSIS”.
11.19.2 Building with the Open Build Service #
The Open Build Service (OBS) support profiles via the multibuild
feature.
To enable and use the profiles, follow these steps:
Add the following XML comment to your config.xml:
<!-- OBS-Profiles: @BUILD_FLAVOR@ -->
It must be added before the opening <image> element and after the
<?xml?> element, e.g.:
<?xml version="1.0" encoding="utf-8"?>
<!-- OBS-Profiles: @BUILD_FLAVOR@ -->
<image schemaversion="7.4" name="kiwi-test-image-vagrant">
  <!-- snip -->
</image>
Add a file _multibuild into your package’s repository with the
following contents:
<multibuild>
  <flavor>profile_1</flavor>
  <flavor>profile_2</flavor>
</multibuild>
Add a line <flavor>$PROFILE</flavor> for each profile that
you want OBS to build.
Note, by default, OBS excludes the build without any profile
enabled.
Running a build of a multibuild enabled repository via osc can be
achieved via the -M $PROFILE flag:
11.20 Building in the Open Build Service #
The next generation KIWI NG is fully integrated with the Open Build Service.
In order to start it’s best to checkout one of the integration test
image build projects from the base Testing project
Virtualization:Appliances:Images:Testing_$ARCH:$DISTRO at:
https://build.opensuse.org
For example the test images for SUSE on x86 can be found here.
11.20.1 Advantages of using the Open Build Service (OBS) #
The Open Build Service offers multiple advantages over running KIWI NG
locally:
OBS will host the latest successful build for you without having to setup
a server yourself.
As KIWI NG is fully integrated into OBS, OBS will automatically rebuild your
images if one of the included packages or one of its dependencies or KIWI NG
itself get updated.
The builds will no longer have to be executed on your own machine, but
will run on OBS, thereby saving you resources. Nevertheless, if a build
fails, you get a notification via email (if enabled in your user’s
preferences).
11.20.2 Differences Between Building Locally and on OBS #
Note, there is a number of differences when building images with KIWI NG using
the Open Build Service. Your image that build locally just fine, might not
build without modifications.
The notable differences to running KIWI NG locally include:
OBS will pick the KIWI NG package from the repositories configured in your
project, which will most likely not be the same version that you are
running locally.
This is especially relevant when building images for older versions like
SUSE Linux Enterprise. Therefore, include the custom appliances
repository as described in the following section:
Recommendations.
When KIWI NG runs on OBS, OBS will extract the list of packages from
config.xml and use it to create a build root. In contrast to a
local build (where your distributions package manager will resolve the
dependencies and install the packages), OBS will not build your image
if there are multiple packages that could be chosen to satisfy the
dependencies of your packages . This shows errors like this:
unresolvable: have choice for SOMEPACKAGE: SOMEPAKAGE_1 SOMEPACKAGE_2
This can be solved by explicitly specifying one of the two packages in
the project configuration via the following setting:
Place the above line into the project configuration, which can be
accessed either via the web interface (click on the tab Project
Config on your project’s main page) or via osc meta -e prjconf.
Warning
We strongly encourage you to remove your repositories from
config.xml and move them to the repository configuration in
your project’s settings. This usually prevents the issue of having the
choice for multiple package version and results in a much smoother
experience when using OBS.
By default, OBS builds only a single build type and the default
profile. If your appliance uses multiple build types, put
each build type into a profile, as OBS cannot handle multiple build
types.
There are two options to build multiple profiles on OBS:
Use the <image> element and add it bellow the XML
declaration (<?xml ..?>):
<?xml version="1.0" encoding="utf-8"?>

<!-- OBS-Profiles: foo_profile bar_profile -->

<image schemaversion="7.4" name="openSUSE-Leap-15.1">
  <!-- image description with the profiles foo_profile and bar_profile
</image>
Use the multibuild feature.
The first option is simpler to use, but has the disadvantage that your
appliances are built sequentially. The multibuild feature allows to
build each profile as a single package, thereby enabling parallel execution,
but requires an additional _multibuild file. For the above example
config.xml would have to be adapted as follows:
<?xml version="1.0" encoding="utf-8"?>

<!-- OBS-Profiles: @BUILD_FLAVOR@ -->

<image schemaversion="7.4" name="openSUSE-Leap-15.1">
  <!-- image description with the profiles foo_profile and bar_profile
</image>
The file _multibuild would have the following contents:
<multibuild>
  <flavor>foo_profile</flavor>
  <flavor>bar_profile</flavor>
</multibuild>
Subfolders in OBS projects are ignored by default by osc and
must be explicitly added via osc add $FOLDER. Bear that
in mind when adding the overlay files inside the root/ directory
to your project.
OBS ignores file permissions. Therefore config.sh and
images.sh will always be executed through BASH (see also:
Section 7.6, “User Defined Scripts”).
11.20.3 Recommendations #
11.20.3.1 Working with OBS #
Although OBS is an online service, it is not necessary to test every change
by uploading it. OBS will use the same process as osc build does, so if
your image builds locally via osc build it should also build online on
OBS.
11.20.3.2 Repository Configuration #
When setting up the project, enable the images repository: the images
repository’s checkbox can be found at the bottom of the selection screen
that appears when clicking Add from a Distribution in the Repositories
tab. Or specify it manually in the project configuration (it can be
accessed via osc meta -e prj):
<repository name="images">
  <arch>x86_64</arch>
</repository>
Furthermore, OBS requires additional repositories from which it obtains
your dependent packages. These repositories can be provided in two ways:
Add the repositories to the project configuration on OBS and omit them
from config.xml. Provide only the following repository inside
the image description:
<repository type="rpm-md">
  <source path="obsrepositories:/"/>
</repository>
This instructs OBS to inject the repositories from your project into
your appliance.
Additional repositories can be added by invoking osc meta -e prj and
adding a line of the following form as a child of <repository
name="images">:
<path project="$OBS_PROJECT" repository="$REPOSITORY_NAME"/>
The order in which you add repositories matters: if a package is present
in multiple repositories, then it is taken from the first
repository. The last repository is subject to path expansion: its
repository paths are included as well.
Don’t forget to add the repository from the
Virtualization:Appliances:Builder project, providing the latest stable
version of KIWI NG (which you are very likely using for your local builds).
The following example repository configuration adds the
repositories from the Virtualization:Appliances:Builder project and
those from the latest snapshot of openSUSE Tumbleweed:
<project name="Virtualization:Appliances:Images:openSUSE-Tumbleweed">
<title>Tumbleweed JeOS images</title>
<description>Host JeOS images for Tumbleweed</description>
<repository
name="images">
<path project="Virtualization:Appliances:Builder" repository="Factory"/>
<path project="openSUSE:Factory" repository="snapshot"/>
<arch>x86_64</arch>
</repository>
</project>The above can be simplified further using the path expansion of the last
repository to:
<project name="Virtualization:Appliances:Images:openSUSE-Tumbleweed">
  <title>Tumbleweed JeOS images</title>
  <description>Host JeOS images for Tumbleweed</description>
  <repository name="images">
    <path project="Virtualization:Appliances:Builder" repository="Factory"/>
    <arch>x86_64</arch>
  </repository>
</project>
Now Virtualization:Appliances:Builder is the last repository, which’
repositories are included into the search path. As
openSUSE:Factory/snapshot is among these, it can be omitted from the
repository list.
Keep the repositories in your config.xml configuration file. If
you have installed the latest stable KIWI NG as described in
Chapter 2, Installation then you should add the following repository to
your projects configuration (accessible via osc meta -e
prjconf), so that OBS will pick the latest stable KIWI NG version too:
<repository name="images">
  <path project="Virtualization:Appliances:Builder" repository="$DISTRO"/>
  <arch>x86_64</arch>
</repository>
Replace $DISTRO with the appropriate name for the distribution that
you are currently building and optionally adjust the architecture.
We recommend to use the first method, as it integrates better into
OBS. Note that your image description will then no longer build outside of
OBS though. If building locally is required, use the second method.
Warning
Adding the repositories to project’s configuration makes it impossible
to build images for different distributions from the same project.
Since the repositories are added for every package in your project, all
your image builds will share the same repositories, thereby resulting in
conflicts for different distributions.
We recommend to create a separate project for each distribution. If that
is impossible, you can keep all your repositories (including
Virtualization:Appliances:Builder) in config.xml. That however
usually requires a large number of workarounds via Prefer: settings in
the project configuration and is thus not recommended.
11.20.3.3 Project Configuration #
The Open Build Service will by default create the same output file as KIWI NG
when run locally, but with a custom filename ending (that is unfortunately
unpredictable). This has the consequence that the download URL of your
image will change with every rebuild (and thus break automated
scripts). OBS can create symbolic links with static names to the latest
build by adding the following line to the project configuration:
If build Vagrant images (see Section 11.7, “Image Description for Vagrant”) add the repository-type
vagrant. OBS creates a boxes/ subdirectory in your download
repositories, which contains JSON files for Vagrant .
If you have added your repositories to config.xml, you probably see
errors of the following type:
unresolvable: have choice for SOMEPACKAGE: SOMEPAKAGE_1 SOMEPACKAGE_2
Instead of starting from scratch and manually adding Prefer: statements
to the project configuration, we recommend to copy the current project
configuration of the testing project
Virtualization:Appliances:Images:Testing_$ARCH:$DISTRO into your own project.
It provides a good starting point and can be adapted to your OBS project.
11.22 Circumvent debootstrap #
When building Debian based images KIWI NG uses two tools to
create the image root tree. First it calls debootstrap to
initialize a minimal root tree and next it chroot’s into that
tree to complete the installation via apt. The reason why it
is done that way is because apt does not(yet) support to
install packages into an empty root directory like it is done
with all other packagemanager interfaces implemented in KIWI NG.
The use of debootstrap comes along with some prerequisites
and limitations:
It can only use one repository to bootstrap from
It can only use an official archive repo
It has its own dependency resolver different from apt
If one ore more of this properties turns into an issue, KIWI NG
allows for an alternative process which is based on a prebuilt
bootstrap-root archive provided as a package.
To make use of a bootstrap_package, the name of that package
needs to be referenced in the KIWI NG description as follows:
<packages type="bootstrap" bootstrap_package="bootstrap-root">
    <package name="a"/>
    <package name="b"/>
</packages>
The boostrap process now changes in a way that the provided
bootstrap_package bootstrap-root will be installed on the build
host machine. Next KIWI NG searches for a tar archive file
/var/lib/bootstrap/bootstrap-root.ARCH.tar.xz,
where ARCH is the name of the host architecture e.g x86_64.
If found the archive gets unpacked and serves as the bootstrap
root tree to begin with. The optionally provided additional
bootstrap packages, a and b in this example will be installed
like system packages via chroot and apt. Usually no additional
bootstrap packages are needed as they could all be handled as
system packages.
11.22.1 How to Create a bootstrap_package #
Changing the setup in KIWI NG to use a bootstrap_package rather
then letting debootstrap do the job comes with the task to create
that package providing the bootstrap root tree. There are more than
one way to do this. The following procedure is just one example and
requires some background knowledge about the Open Build Service
OBS and its KIWI NG integration.
Create an OBS project and repository setup that matches your image target
Create an image build package
Create the following appliance.kiwi file
<image schemaversion="7.4" name="bootstrap-root">
    <description type="system">
        <author>The Author</author>
        <contact>author@example.com</contact>
        <specification>prebuilt bootstrap rootfs for ...</specification>
    </description>

    <preferences>
        <version>1.0.1</version>
        <packagemanager>apt</packagemanager>
        <type image="tbz"/>
    </preferences>

    <repository type="rpm-md">
        <source path="obsrepositories:/"/>
    </repository>

    <packages type="image">
        <!-- packages included so OBS adds it as a build dependency, however this is installed by debootstrap -->
        <package name="mawk"/>
    </packages>

    <packages type="bootstrap">
        <!-- bootstrap done via debootstrap -->
    </packages>
</image>
osc add appliance.kiwi
osc ci
Package the image build results into a debian package
In step 3. the bootstrap root tarball was created but not yet
packaged. A debian package is needed such that it can be
referenced with the bootstrap_package attribute and the repository
providing it. The simplest way to package the bootstrap-root tarball
is to create another package in OBS and use the tarball file as
its source.
Note
Abstract
This document describes the development process of KIWI NG
and how you can be part of it. This description applies
to version 9.25.12.
12.1 Using KIWI NG in a Python Project #
Note
Abstract
KIWI NG is provided as python module under the kiwi namespace.
It is available for the python 3 version. The following
description applies for KIWI NG version 9.25.12.
KIWI NG can also function as a module for other Python projects.
The following example demonstrates how to read an existing image
description, add a new repository definition and export the
modified description on stdout.
import sys
import logging

from kiwi.xml_description import XMLDescription
from kiwi.xml_state import XMLState

description = XMLDescription('path/to/kiwi/XML/config.xml')

xml_data = description.load()

xml_state = XMLState(
    xml_data=xml_data, profiles=[], build_type='iso'
)

xml_state.add_repository(
    repo_source='http://repo',
    repo_type='rpm-md',
    repo_alias='myrepo',
    repo_prio=99
)

xml_data.export(
    outfile=sys.stdout, level=0
)
All classes are written in a way to care for a single responsibility
in order to allow for re-use on other use cases. Therefore it is possible
to use KIWI NG outside of the main image building scope to manage e.g
the setup of loop devices, filesystems, partitions, etc…
This means KIWI NG provides you a way to describe a system but you are
free to make use of the kiwi description format or not. The following
example shows how to use kiwi to create a simple filesystem image
which contains your host tmp directory.
import logging

from kiwi.storage.loop_device import LoopDevice
from kiwi.filesystem import FileSystem

loop_provider = LoopDevice(
    filename='my_tmp.ext4', filesize_mbytes=100
)
loop_provider.create()

filesystem = FileSystem.new(
    'ext4', loop_provider, '/tmp/'
)
filesystem.create_on_device(
    label='TMP'
)
filesystem.sync_data()
12.2 Plugin Architecture #
Each command provided by KIWI NG is written as a task plugin under
the kiwi.tasks namespace. As a developer you can extend KIWI NG
with custom task plugins if the following conventions are taken
into account:
12.2.1 Naming Conventions #
- Task Plugin File Name
The file name of a task plugin must follow the pattern
<service>_<command>.py. This allows to invoke the task
with kiwi-ng service command ...
- Task Plugin Option Handling
KIWI NG uses the docopt module to handle options. Each task plugin
must use docopt to allow option handling.
- Task Plugin Class
The implementation of the plugin must be a class that matches
the naming convention: <Service><Command>Task. The class
must inherit from the CliTask base class. On startup of
the plugin, KIWI NG expects an implementation of the
process method.
- Task Plugin Entry Point
Registration of the plugin must be done in setup.py
using the entry_points concept from Python’s setuptools.
'packages': ['kiwi_plugin'],
'entry_points': {
    'kiwi.tasks': [
        'service_command=kiwi_plugin.tasks.service_command'
    ]
}
Note
The following example assumes an existing Python project
which was set up according to the Python project rules
and standards.
Assuming the project namespace is kiwi_relax_plugin.
Create the task plugin directory kiwi_relax_plugin/tasks
Create the entry point in setup.py.
Assuming we want to create the service named relax providing
the command justdoit this would be the following entry point
definition in setup.py:
'packages': ['kiwi_relax_plugin'],
'entry_points': {
    'kiwi.tasks': [
        'relax_justdoit=kiwi_relax_plugin.tasks.relax_justdoit'
    ]
}
Create the plugin code in the file
kiwi_relax_plugin/tasks/relax_justdoit.py with the following
content:
"""
usage: kiwi-ng relax justdoit -h | --help
       kiwi-ng relax justdoit --now

commands:
    justdoit
        time to relax

options:
    --now
        right now. For more details about docopt
        see: http://docopt.org
"""
# These imports requires kiwi to be part of your environment
# It can be either installed from pip into a virtual development
# environment or from the distribution package manager
from kiwi.tasks.base import CliTask
from kiwi.help import Help

class RelaxJustdoitTask(CliTask):
    def process(self):
        self.manual = Help()
        if self.command_args.get('help') is True:
            # The following will invoke man to show the man page
            # for the requested command. Thus for the call to
            # succeed a manual page needs to be written and
            # installed by the plugin
            return self.manual.show('kiwi::relax::justdoit')

        print(
            'https://genius.com/Frankie-goes-to-hollywood-relax-lyrics'
        )
Test the plugin
$ ./setup.py develop
$ kiwi-ng relax justdoit --now
12.3 Write Integration Tests for the Scripts #
Kiwi ships a set of helper functions that can be used in config.sh (see
also: Section 7.6, “User Defined Scripts”). These utilize containers
to run the individual functions and verify that they resulted in the desired
state.
Ensure that you have either podman or docker installed and
configured on your system. The integration tests will use podman in
rootless mode by default, if it is installed on your system. You can select
docker instead by setting the environment variable
CONTAINER_RUNTIME to docker. Then you can run the integration tests via
tox:
$ tox -e scripts -- -n NUMBER_OF_THREADS
The tests are written using the pytest-container plugin. If applicable please
leverage the utility functions and fixtures of that plugin, e.g. the
auto_container and auto_container_per_test fixtures in conjunction with
testinfra.
The script tests can be run inside different containers, which are setup in
test/scripts/conftest.py. This file contains the CONTAINERS list
with all currently present images. These images get pulled and build when needed
and the functions.sh is copied into /bin/, so that it is
available in PATH.
To use any of these containers, you can either define the global variable
CONTAINER_IMAGES in a test module and use the auto_container fixture or
parametrize the
container fixture indirectly:
@pytest.mark.parametrize("container_per_test", (TUMBLEWEED, LEAP_15_3), indirect=True)
def test_RmWorks(container_per_test):
    # create the file /root/foobar
    container_per_test.connection.run_expect([0], "touch /root/foobar")
    assert container_per_test.connection.file("/root/foobar").exists

    # source the functions and execute our function under test
    container_per_test.connection.run_expect([0], ". /bin/functions.sh && Rm /root/foobar")

    # verify the result
    assert not container_per_test.connection.file("/root/foobar").exists
We used the _per_test variant of the container fixture in the above
example. This fixture ensures that this container is only used in a single test
function. You should use this variant for tests that mutate the system under
test, as otherwise hard to debug race conditions could occur. For tests that
only perform reads, you can omit the _per_test suffix and the container
environment will be shared with other tests. This improves execution speed, but
comes at the expense of safety in case mutation does occur.
For further information please refer to the documentation of pytest-container.
12.4 Extending KIWI NG with Custom Operations #
Note
Abstract
Users building images with KIWI NG need to implement their
own infrastructure if the image description does not
provide a way to embed custom information which is
outside of the scope of the general schema as it is
provided by KIWI NG today.
This document describes how to create an extension plugin
for the KIWI NG schema to add and validate additional information
in the KIWI NG image description.
Such a schema extension can be used in an additional KIWI NG
task plugin to provide a new subcommand for KIWI NG.
As of today there is no other plugin interface except for
providing additional KIWI NG commands implemented.
Depending on the demand for custom plugins, the interface
to hook in code into other parts of the KIWI NG processing
needs to be extended.
This description applies for version 9.25.12.
12.4.1 The <extension> Section #
The main KIWI NG schema supports an extension section which allows
to specify any XML structure and attributes as long as they are
connected to a namespace. According to this any custom XML
structure can be implemented like the following example shows:
<image>
    ...
    <extension xmlns:my_plugin="http://www.my_plugin.com">
        <my_plugin:my_feature>
            <my_plugin:title name="cool stuff"/>
        </my_plugin:my_feature>
    </extension>
</image>
Any toplevel namespace must exist only once
Multiple different toplevel namespaces are allowed,
e.g my_plugin_a, my_plugin_b
12.4.2 RELAX NG Schema for the Extension #
If an extension section is found, KIWI NG looks up its namespace and asks
the main XML catalog for the schema file to validate the extension data.
The schema file must be a RELAX NG schema in the .rng format. We recommend
to place the schema as /usr/share/xml/kiwi/my_plugin.rng
For the above example the RELAX NG Schema in the compressed format
my_plugin.rnc would look like this:
namespace my_plugin = "http://www.my_plugin.com"

start =
    k.my_feature

div {
    k.my_feature.attlist = empty
    k.my_feature =
        element my_plugin:my_feature {
            k.my_feature.attlist &
            k.title
        }
}

div {
    k.title.name.attribute =
        attribute name { text }
    k.title.attlist = k.title.name.attribute
    k.title =
        element my_plugin:title {
            k.title.attlist
        }
}
In order to convert this schema to the .rng format just call:
$ trang -I rnc -O rng my_plugin.rnc /usr/share/xml/kiwi/my_plugin.rng
12.4.3 Extension Schema in XML catalog #
As mentioned above the mapping from the extension namespace to the
correct RELAX NG schema file is handled by a XML catalog file. The
XML catalog for the example use here looks like this:
<?xml version="1.0"?>
<catalog xmlns="urn:oasis:names:tc:entity:xmlns:xml:catalog">
    <system
        systemId="http://www.my_plugin.com"
        uri="file:////usr/share/xml/kiwi/my_plugin.rng"/>
</catalog>
For resolving the catalog KIWI NG uses the xmlcatalog command
and the main XML catalog from the system which is /etc/xml/catalog.
Note
It depends on the distribution and its version how the main catalog
gets informed about the existence of the KIWI NG extension catalog file.
Please consult the distribution manual about adding XML catalogs.
If the following command provides the information to the correct
RELAX NG schema file you are ready for a first test:
$ xmlcatalog /etc/xml/catalog http://www.my_plugin.com
12.4.4 Using the Extension #
In order to test your extension place the example extension section
from the beginning of this document into one of your image description’s
config.xml file
The following example will read the name attribute from the title
section of the my_feature root element and prints it:
import logging

from kiwi.xml_description import XMLDescription

description = XMLDescription('path/to/kiwi/XML/config.xml')
description.load()

my_plugin = description.get_extension_xml_data('my_plugin')

print(my_plugin.getroot()[0].get('name'))The core appliance builder is developed in Python and follows the test
driven development rules.
If you want to implement a bigger feature, consider opening an issue on
GitHub first to discuss the changes. Or join the discussion in the
#kiwi channel on Riot.im.
12.6 Fork the upstream repository #
12.7 Create a local clone of the forked repository #
$ git clone https://github.com/YOUR-USERNAME/kiwi

$ git remote add upstream https://github.com/OSInside/kiwi.git
12.8 Install Required Operating System Packages #
KIWI NG requires the following additional packages which are not provided by
pip. Those will be installed by calling the
install_devel_packages.sh helper script from the checked out Git
repository as follows:
$ sudo helper/install_devel_packages.sh
Note
The helper script checks for the package managers zypper and
dnf and associates a distribution with it. If you use a
distribution that does not use one of those package managers
the script will not install any packages and exit with an
error message. In this case we recommend to take a look at
the package list encoded in the script and adapt to your
distribution and package manager as needed. Because distributions
also changes on a regular basis it might happen that the
install_devel_packages helper is not 100% accurate or outdated
depending on your host system. In this case the following
list describes the needed components and we are happy to
received feedback or patches to make install_devel_packages
a better experience.
- XML processing libraries
libxml2 and libxslt (for lxml)
- Python header files, GCC compiler and glibc-devel header files
Required for python modules that hooks into shared library context
and often named similar to: python3-devel
- Spell Checking library
Provided by the enchant library
- ShellCheck
ShellCheck script linter.
ISO creation program xorriso.
- LaTeX documentation build environment
A full LaTeX installation is required to build the PDF documentation
.
- Host Requirements To Build Images
A set of tools needed to build images and provided by
the kiwi-systemdeps package
12.9 Create a Python Virtual Development Environment #
The following commands initializes and activates a development
environment for Python 3:
Note
KIWI NG uses tox to create a devel environment and to run
tests, linters and other tasks in the tox generated environment.
A tox version >= 3.3 is required for this setup process. On your
host a python version >= 3.7 is required for tox to work.
$ tox -e devel
$ source .tox/devel/bin/activate
The commands above automatically creates the application script
called kiwi-ng, which allows you to run KIWI NG from the
Python sources inside the virtual environment:
Warning
The virtualenv’s $PATH will not be taken into account when calling
KIWI NG via sudo! Use the absolute path to the KIWI NG executable
to run an actual build using your local changes:
$ sudo $PWD/.tox/devel/bin/kiwi-ng system build ...
To leave the development mode, run:
To resume your work, cd into your local Git repository and call:
$ source .tox/devel/bin/activate
Alternatively, you can launch single commands inside the virtualenv without
sourcing it directly:
$ tox -e devel -- kiwi-ng --version
12.10 Running the Unit Tests #
We use tox to run the unit tests. Tox sets up its own
virtualenvs inside the .tox directory for multiple Python versions
and should thus not be invoked from inside your development virtualenv.
Before submitting your changes via a pull request, ensure that all tests
pass and that the code has the required test coverage via the command:
We also include pytest-xdist in the development virtualenv which allows
to run the unit tests in parallel. It is turned off by default but can be
enabled via:
$ tox -- "-n NUMBER_OF_PROCESSES"
where you can insert an arbitrary number as NUMBER_OF_PROCESSES (or a
shell command like $(nproc)). Note that the double quotes around -n
NUMBER_OF_PROCESSES are required (otherwise tox will consume
this command line flag instead of forwarding it to pytest).
The previous call would run the unit tests for different Python versions,
check the source code for errors and build the documentation.
If you want to see the available targets, use the option -l to let
tox print a list of them:
To only run a special target, use the -e option. The following
example runs the test cases for the Python 3.11 interpreter only:
12.11 Create a Branch for each Feature or Bugfix #
Code changes should be done in an extra Git branch. This allows for
creating GitHub pull requests in a clean way. See also: Collaborating with
issues and pull requests
$ git checkout -b my-topic-branch
Make and commit your changes.
Note
You can make multiple commits which is generally useful to
give your changes a clear structure and to allow us to better
review your work.
Note
Your work is important and must be signed to ensure the integrity of
the repository and the code. Thus we recommend to setup a signing key
as documented in Signing Git Patches.
Run the tests and code style checks. All of these are also performed by
GitLab CI when a pull request is created.
Once everything is done, push your local branch to your forked repository and
create a pull request into the upstream repository.
$ git push origin my-topic-branch
Thank you much for contributing to KIWI NG. Your time and work effort is very
much appreciated!
KIWI NG follows the general PEP8 guidelines with the following exceptions:
We do not use free functions at all. Even utility functions must be part
of a class, but should be either prefixed with the @classmethod or
@staticmethod decorators (whichever is more appropriate).
Do not set module and class level variables, put these into the classes’
__init__ method.
The names of constants are not written in all capital letters.
KIWI NG uses Sphinx for the API and
user documentation.
In order to build the HTML documentation call:
or to build the full documentation (including a PDF generated by LaTeX
):
Document all your classes, methods, their parameters and their types using
the standard reStructuredText
syntax as supported by Sphinx, an example class is documented as follows:
class Example:
    """
    **Example class**

    :param str param: A parameter
    :param bool : Source file name to compress
    :param list supported_zipper: List of supported compression tools
    :attr Optional[str] attr: A class attribute
    """
    def __init__(self, param, param_w_default=False):
        self.attr = param if param_w_default else None

    def method(self, param):
        """
        A method that takes a parameter.

        :param list param: a parameter
        :return: whether param is very long
        :rtype: bool
        """
        return len(param) > 50
Try to stick to the following guidelines when documenting source code:
Classes should be documented directly in their main docstring and not in
__init__.
Document every function parameter and every public attribute
including their types.
Only public methods should be documented, private methods don’t have to,
unless they are complex and it is not easy to grasp what they do (which
should be avoided anyway).
Please also document any user-facing changes that you implementing
(e.g. adding a new build type) in the user documentation, which can be
found in doc/source. General documentation should be put into the
working_with_kiwi/ subfolder, whereas documentation about more
specialized topics would belong into the building/ subfolder.
Adhere to a line limit of 75 characters when writing the user facing
documentation .