25 NFS Ganesha #
NFS Ganesha is an NFS server that runs in a user address space instead of as part of the operating system kernel. With NFS Ganesha, you can plug in your own storage mechanism—such as Ceph—and access it from any NFS client. For installation instructions, see Section 8.3.6, “Deploying NFS Ganesha”.
Because of increased protocol overhead and additional latency caused by extra network hops between the client and the storage, accessing Ceph via an NFS Gateway may significantly reduce application performance when compared to native CephFS.
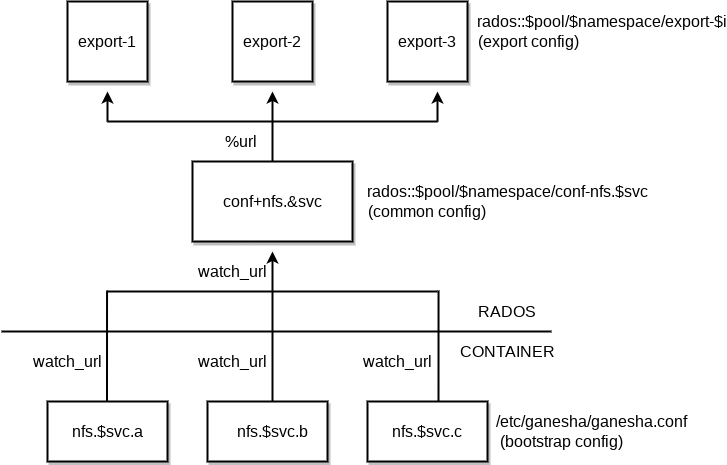
Each NFS Ganesha service consists of a configuration hierarchy that contains:
A bootstrap
ganesha.confA per-service RADOS common configuration object
A per export RADOS configuration object
The bootstrap configuration is the minimal configuration to start the
nfs-ganesha daemon within a
container. Each bootstrap configuration will contain a
%url directive that includes any additional configuration
from the RADOS common configuration object. The common configuration object
can include additional %url directives for each of the NFS
exports defined in the export RADOS configuration objects.
25.1 Creating an NFS service #
The recommended way to specify the deployment of Ceph services is to create a YAML-formatted file with the specification of the services that you intend to deploy. You can create a separate specification file for each type of service, or you specify multiple (or all) services types in one file.
Depending on what you have chosen to do, you will need to update or create a relevant YAML-formatted file to create a NFS Ganesha service. For more information on creating the file, see Section 8.2, “Service and placement specification”.
One you have updated or created the file, execute the following to create a
nfs-ganesha service:
cephuser@adm > ceph orch apply -i FILE_NAME25.2 Starting or Restarting NFS Ganesha #
Starting the NFS Ganesha service does not automatically export a CephFS file system. To export a CephFS file system, create an export configuration file. Refer to Section 25.4, “Creating an NFS export” for more details.
To start the NFS Ganesha service, run:
cephuser@adm > ceph orch start nfs.SERVICE_IDTo restart the NFS Ganesha service, run:
cephuser@adm > ceph orch restart nfs.SERVICE_IDIf you only want to restart a single NFS Ganesha daemon, run:
cephuser@adm > ceph orch daemon restart nfs.SERVICE_IDWhen NFS Ganesha is started or restarted, it has a grace timeout of 90 seconds for NFS v4. During the grace period, new requests from clients are actively rejected. Hence, clients may face a slowdown of requests when NFS is in the grace period.
25.3 Listing objects in the NFS recovery pool #
Execute the following to list the objects in the NFS recovery pool:
cephuser@adm > rados --pool POOL_NAME --namespace NAMESPACE_NAME ls25.4 Creating an NFS export #
You can create an NFS export either in the Ceph Dashboard, or manually on the command line. To create the export by using the Ceph Dashboard, refer to Chapter 7, Manage NFS Ganesha, more specifically to Section 7.1, “Creating NFS exports”.
To create an NFS export manually, create a configuration file for the
export. For example, a file /tmp/export-1 with the
following content:
EXPORT {
    export_id = 1;
    path = "/";
    pseudo = "/";
    access_type = "RW";
    squash = "no_root_squash";
    protocols = 3, 4;
    transports = "TCP", "UDP";
    FSAL {
        name = "CEPH";
        user_id = "admin";
        filesystem = "a";
        secret_access_key = "SECRET_ACCESS_KEY";
    }
}
After you have created and saved the configuration file for the new export, run the following command to create the export:
rados --pool POOL_NAME --namespace NAMESPACE_NAME put EXPORT_NAME EXPORT_CONFIG_FILE
For example:
cephuser@adm > rados --pool example_pool --namespace example_namespace put export-1 /tmp/export-1
The FSAL block should be modified to include the desired cephx user ID
and secret access key.
25.5 Verifying the NFS export #
NFS v4 will build a list of exports at the root of a pseudo file system. You
can verify that the NFS shares are exported by mounting
/ of the NFS Ganesha server node:
#mount-t nfs nfs_ganesha_server_hostname:/ /path/to/local/mountpoint#ls/path/to/local/mountpoint cephfs
By default, cephadm will configure an NFS v4 server. NFS v4 does not
interact with rpcbind nor the mountd
daemon. NFS client tools such as showmount will not show
any configured exports.
25.6 Mounting the NFS export #
To mount the exported NFS share on a client host, run:
#mount-t nfs nfs_ganesha_server_hostname:/ /path/to/local/mountpoint
25.7 Multiple NFS Ganesha clusters #
Multiple NFS Ganesha clusters can be defined. This allows for:
Separated NFS Ganesha clusters for accessing CephFS.
