- Release notes
- Copyright
- 1 Introduction
- 2 Requirements
- 3 Installation using the Rancher UI
- 4 Installation using the command line
- 5 Installing in air-gapped environment
- 6 High Availability setup
- 6.1 Understanding the HA setup
- 6.2 Choosing a resilience model
- 6.3 Distributing Private Registry components
- 6.4 Providing a highly available endpoint
- 6.5 Prerequisites
- 6.6 Choosing resilient dependencies and storage
- 6.7 Using CloudNativePG with Private Registry
- 6.8 Deploying Private Registry with HA
- 6.9 Performing maintenance and upgrades
- 6.10 Configuring retention and garbage collection
- 6.11 Monitoring the deployment
- 6.12 Managing network traffic
- 6.13 Planning backup and recovery
- 6.14 Reviewing the deployment before production
- 7 Configure Rancher as an OIDC Identity Provider
- 8 How do I automate access to a proxy-cache project?
- 8.1 What do I need before configuring the proxy?
- 8.2 How do I find available components?
- 8.3 How do I create upstream credentials?
- 8.4 How do I configure the registry endpoint and proxy project?
- 8.5 How do I create a pull-only robot account?
- 8.6 How do I replace the dollar sign in robot user names?
- 8.7 How do I pull images and charts through the proxy?
- 8.8 How do I manage registry resources with infrastructure as code?
- 8.9 How do I deploy workloads through the proxy with infrastructure as code?
- 8.10 How do I rotate credentials and troubleshoot access?
- 9 Migrating data from upstream Harbor to SUSE Private Registry
- 10 Backing up and restoring with Velero
- 11 Frequently asked questions
- 12 Troubleshooting
- A Overriding the SUSE Private Registry Helm chart
- B Example of a Private Registry HA setup Helm chart
- C GNU Free Documentation License
- C1 0. PREAMBLE
- C2 1. APPLICABILITY AND DEFINITIONS
- C3 2. VERBATIM COPYING
- C4 3. COPYING IN QUANTITY
- C5 4. MODIFICATIONS
- C6 5. COMBINING DOCUMENTS
- C7 6. COLLECTIONS OF DOCUMENTS
- C8 7. AGGREGATION WITH INDEPENDENT WORKS
- C9 8. TRANSLATION
- C10 9. TERMINATION
- C11 1. FUTURE REVISIONS OF THIS LICENSE
- C12 ADDENDUM: How to use this License for your documents
- 3.1 Adding a SUSE Private Registry repository
- 3.2 Adding SUSE Private Registry secrets
- 3.3 Installing SUSE Private Registry
- 6.1 Private Registry HA setup
- 8.1 Application Collection artifact details and available versions
- 8.2 Application Collection registry endpoint form in Harbor
- 8.3 Robot Name Prefix setting in SUSE Private Registry
Release notes #
SUSE Private Registry is an on-premises container registry. It is designed for SUSE customers who need a container registry that works well with other SUSE services and products.
This document provides a high-level overview of the features, capabilities and limitations of SUSE Private Registry, and highlights important product updates.
1 Release 1.2.1 #
Security updates:
Updates Harbor 2.15.1 to 2.15.2 (Release Notes v2.15.2).
Validates blob-mount source projects and rejects tokens missing the
iatclaim.Hardens cryptography usage and removes the unused SMTP package.
Disables and ignores
tlogduring Cosign signing checks and verification.
Component updates:
Updates Harbor 2.15.1 to 2.15.2 (Release Notes v2.15.2).
Updates Trivy to version 0.72.0 (Release Notes v0.72.0) and the Trivy adapter to version 0.38.0.
Upgrades Go to version 1.26.4.
Upgrades Harbor UI to Angular 21, Clarity v18, and Node.js v22.
Updates the registry source tag to
v2.8.3-harbor.1of the distribution project (Release Notes v2.8.3-harbor.1).Replaces the
gopkg.in/yaml.v2package withgithub.com/goccy/go-yaml.
Key fixes:
Bumps the repository
update_timeon tag and artifact changes.Fixes multiple UI and UX issues, including checkboxes, form alignment, dark theme rendering, and i18n localization across portal components.
Aligns pending job queue counts and improves form styling.
Uses the selected tag for the pull command copy function.
Makes the OpenAPI generator download URL and
PIP_INDEX_URLconfigurable.
Container image updates:
private-registry/1.2/harbor-core:1.2.0 ➡ private-registry/1.2/harbor-core:1.2.1
private-registry/1.2/harbor-exporter:1.2.0 ➡ private-registry/1.2/harbor-exporter:1.2.1
private-registry/1.2/harbor-jobservice:1.2.0 ➡ private-registry/1.2/harbor-jobservice:1.2.1
private-registry/1.2/harbor-portal:1.2.0 ➡ private-registry/1.2/harbor-portal:1.2.1
private-registry/1.2/harbor-registry:1.2.0 ➡ private-registry/1.2/harbor-registry:1.2.1
private-registry/1.2/harbor-registryctl:1.2.0 ➡ private-registry/1.2/harbor-registryctl:1.2.1
private-registry/1.2/harbor-trivy-adapter:1.2.0 ➡ private-registry/1.2/harbor-trivy-adapter:1.2.1
Upgrade notes:
No breaking changes in this release.
2 Release 1.2.0 #
Security updates:
Updates Harbor 2.14.3 to 2.15.1 (Release Notes v2.15.1).
Updates Trivy version 0.68.2 to 0.70.0 with adapter v0.36.0 general availability (GA) (Release Notes v0.70.0).
Component updates:
Updates
k8s.io/client-goto 0.34.1.Updates
aws-sdk-goto 1.55.8.Updates
go-ldapto 3.4.11.Updates Go to 1.25.9.
New features and performance:
Adds support for the Cosign v3 Bundle signature format.
Introduces an option to disable audit log recording to the database during initialization.
Enables pprof support and the ability to export the Harbor version via the Prometheus exporter binary.
Replaces the existing pull-through cache with a new proxy cache implementation.
Improves general performance through code refactoring (for example, by using
strings.Builderandstrings.CutPrefix).
Key fixes:
Implements a security fix to reject bearer tokens issued before project creation.
Fixes issues related to OpenID Connect (OIDC) integration for users with a single group.
Corrects errors in user and group search functionality.
Resolves various user interface (UI) issues, including an unwanted scrollbar in tag retention and issues with the "Copy Pull Button" when tags are undefined.
Adds support for both
docker-composev1 anddocker-composev2.Calls the
/v2/auth/tokenapplication programming interface (API) to get a bearer token for the Docker Hub adapter.
Container image updates:
private-registry/harbor-core:1.1.2 ➡ private-registry/1.2/harbor-core:1.2.0
private-registry/harbor-exporter:1.1.2 ➡ private-registry/1.2/harbor-exporter:1.2.0
private-registry/harbor-jobservice:1.1.2 ➡ private-registry/1.2/harbor-jobservice:1.2.0
private-registry/harbor-portal:1.1.2 ➡ private-registry/1.2/harbor-portal:1.2.0
private-registry/harbor-registry:1.1.2 ➡ private-registry/1.2/harbor-registry:1.2.0
private-registry/harbor-registryctl:1.1.2 ➡ private-registry/1.2/harbor-registryctl:1.2.0
private-registry/harbor-trivy-adapter:1.1.2 ➡ private-registry/1.2/harbor-trivy-adapter:1.2.0
Helm chart updates:
The chart is the version 1.2.x will be in oci://registry.suse.com/private-registry/1.2/private-registry-helm
Makes health probe
timeoutSecondsandfailureThresholdconfigurable via values.Fixes extra environment variables for the exporter.
Installs
PodDisruptionBudgetresources when the replica count is greater than one.
Upgrade notes:
No breaking changes in this release.
3 Release 1.1.3 #
Security updates:
Updates Harbor 2.14.2 to 2.14.4 (Release Notes v2.14.4).
Updates Trivy version 0.68.2 to 0.70.0 with adapter v0.36.0 (Release Notes v0.70.0).
Key fixes:
Fixed SessionRegenerate arguments/lifetime and prevented background polling from artificially renewing session TTLs.
Fixes scanner application programming interface (API) issues and resolves an issue that occurs when editing distribution instances without credentials.
Calls the
/v2/auth/tokenAPI to get a bearer token for the Docker Hub adapter.Bumped Go to version 1.25.9 and upgraded the OpenTelemetry SDK and go-jose packages.
Container image updates:
private-registry/harbor-core:1.1.2 ➡ private-registry/harbor-core:1.1.3
private-registry/harbor-exporter:1.1.2 ➡ private-registry/harbor-exporter:1.1.3
private-registry/harbor-jobservice:1.1.2 ➡ private-registry/harbor-jobservice:1.1.3
private-registry/harbor-portal:1.1.2 ➡ private-registry/harbor-portal:1.1.3
private-registry/harbor-registry:1.1.2 ➡ private-registry/harbor-registry:1.1.3
private-registry/harbor-registryctl:1.1.2 ➡ private-registry/harbor-registryctl:1.1.3
private-registry/harbor-trivy-adapter:1.1.2 ➡ private-registry/harbor-trivy-adapter:1.1.3
suse/postgres:17.9 ➡ suse/postgres:17.10
suse/nginx:1.21 ➡ suse/nginx:1.27
Upgrade notes:
No breaking changes in this release.
4 Release 1.1.2 #
Security Updates:
CVE-2026-4404: Use of hard coded credentials allows attackers to use the default password and gain access to the Web UI, if not set during installation or upgrade.
Now if the HARBOR_ADMIN_PASSWORD is not set during the installation or upgrade, it will be generated randomly and stored in a Kubernetes secret.
This change mitigates the risk of using a default password and enhances the security of the installation.
Upgrade Notes:
No breaking changes in this release.
5 Release 1.1.1 #
Security Updates:
Update Harbor 2.14.1 to 2.14.2 (Release Notes v2.14.2)
Trivy version update 0.67.2 to 0.68.2 (Release Notes v0.68.2)
Container Image Updates:
private-registry/harbor-core:1.1.0 ➡ private-registry/harbor-core:1.1.1
private-registry/harbor-exporter:1.1.0 ➡ private-registry/harbor-exporter:1.1.1
private-registry/harbor-jobservice:1.1.0 ➡ private-registry/harbor-jobservice:1.1.1
private-registry/harbor-portal:1.1.0 ➡ private-registry/harbor-portal:1.1.1
private-registry/harbor-registry:1.1.0 ➡ private-registry/harbor-registry:1.1.1
private-registry/harbor-registryctl:1.1.0 ➡ private-registry/harbor-registryctl:1.1.1
private-registry/harbor-trivy-adapter:1.1.0 ➡ private-registry/harbor-trivy-adapter:1.1.1
Upgrade Notes:
No breaking changes in this release.
6 Release 1.1.0 #
Security Updates:
Updated Harbor 2.13.2 to 2.14.1 (Release Notes v2.14.1)
Container Image Updates:
Update the base image bci/bci-micro:15.6 to bci/bci-micro:15.7
Updated images:
private-registry/harbor-valkey:8.0.6 ➡ suse/valkey:8.0.6
private-registry/harbor-db:2.13.2 (postgres 17) ➡ suse/postgres:17.6
private-registry/harbor-nginx:1.21 ➡ suse/nginx:1.21
Upgrade Notes:
Images are now tagged with the SUSE Private Registry version instead of the corresponding Harbor version. The change in image versioning scheme is handled by Helm when upgrading the installation using the chart:
private-registry/harbor-core:1.1.0
private-registry/harbor-exporter:1.1.0
private-registry/harbor-jobservice:1.1.0
private-registry/harbor-portal:1.1.0
private-registry/harbor-registry:1.1.0
private-registry/harbor-registryctl:1.1.0
private-registry/harbor-registryctl:1.1.0
No breaking changes in this release.
7 Release 1.0.2 #
Security updates:
Updates Harbor 2.13.2 to 2.13.5 (Release Notes v2.13.5).
Component updates:
(cherry-pick) Remove payload from config audit log
bump go and base images
[CP] Bump trivy to 0.69.3 & adapter to v0.35.1-rc.1 on release-2.13.0
fix(security): reject bearer tokens issued before project creation
update the GitHub Actions workflows to use the ubuntu-latest runner
Bump trivy-adapter v0.35.1 GA on release-2.13.0
Container image updates:
private-registry/harbor-core:2.13.2 ➡ private-registry/harbor-core:2.13.5
private-registry/harbor-exporter:2.13.2 ➡ private-registry/harbor-exporter:2.13.5
private-registry/harbor-jobservice:2.13.2 ➡ private-registry/harbor-jobservice:2.13.5
private-registry/harbor-portal:2.13.2 ➡ private-registry/harbor-portal:2.13.5
private-registry/harbor-registryctl:2.13.2 ➡ private-registry/harbor-registryctl:2.13.5
private-registry/harbor-trivy-adapter:0.33.2 ➡ private-registry/harbor-trivy-adapter:0.35.1
private-registry/harbor-db:2.13.2 (postgres 17) ➡ suse/postgres:17.10
private-registry/harbor-nginx:1.21 ➡ suse/nginx:1.27
private-registry/harbor-valkey:8.0.6 ➡ suse/valkey:8.0.9
Upgrade notes:
No breaking changes in this release.
8 Release 1.0.1 #
Security updates:
CVE-2025-55198: Helm may panic due to incorrect YAML content.
CVE-2025-55199: Helm charts with specific JSON schema values can cause memory exhaustion.
CVE-2025-54410: Moby versions before 25.0.13, when firewall reloads, Docker fails to re-create iptables rules isolating bridge networks. This allows any container to access all ports on any other container across different bridge networks on the same host and breaks network segmentation in multi-tenant environments (only
--internalnetworks remain protected).CVE-2025-29923: go-redis allows potential out of order responses when
CLIENT SETINFOtimes out during connection establishment.CVE-2025-54388: Moby versions 28.2.0–28.3.2 fails to re-create iptables rules after a firewall reloads. This exposes containers with localhost-published ports (e.g., 127.0.0.1:8080) to remote access via the Docker bridge, while unpublished ports remain protected; fixed in version 28.3.3.
GHSA-2464-8j7c-4cjm: go-viper’s map structure may leak sensitive information in logs when processing malformed data.
CVE-2025-8959: HashiCorp go-getter vulnerable to arbitrary read through a symlink attack.
CVE-2025-58058: github.com/ulikunitz/xz leaks memory when decoding a corrupted multiple LZMA archives.
CVE-2025-53547: Helm chart dependency updating with malicious Chart.yaml content and symlink can lead to code execution.
Bugs fixed:
Trivy: the correct version is shown when calling
trivy version.
Container image updates:
Valkey updated from 8.0.2 ➡ 8.0.6.
Upgrade notes:
No breaking changes in this release.
9 Release 1.0 #
Key features:
SUSE Private Registry is based on Harbor 2.13.2
Integration with Model Spec for first-class handling of AI models
Enhanced audit logging
Predictable release cycle aligned with SUSE Rancher Prime. SUSE Private Registry will be updated every 4 months
Each release is supported by SUSE for 18 months from the date of release
6 months of security and bug fix maintenance, followed by
12 months of security-only maintenance
Can be used to mirror SUSE Application Collection
Supports SUSE Security as an external scanner
SUSE Private Registry includes all the features of Harbor:
On-premises private container image and OCI artifact registry
Web interface for administration
Role-based Access Control
Fine-grained project configuration for image and artifact storage
Mirroring and pull-through caching of upstream registries' artifacts
Image retention and garbage collection controls
Scanning images for security vulnerabilities with the Trivy scanner
Generate SBOMs for stored images
Content trust with Cosign (Notary is not included)
Copyright #
Copyright © 20XX–2026-10-22 SUSE LLC and contributors. All rights reserved.
Permission is granted to copy, distribute and/or modify this document under the terms of the GNU Free Documentation License, Version 1.2 or (at your option) version 1.3; with the Invariant section being this copyright notice and license. A copy of the license version 1.2 is included in the section entitled 'GNU Free Documentation License'.
For SUSE trademarks, see https://www.suse.com/company/legal/. All third-party trademarks are the property of their respective owners. Trademark symbols (®, ™ etc.) denote trademarks of SUSE and its affiliates. Asterisks (*) denote third-party trademarks.
All information found in this book has been compiled with utmost attention to detail. However, this does not guarantee complete accuracy. Neither SUSE LLC, its affiliates, the authors nor the translators shall be held liable for possible errors or the consequences thereof.
1 Introduction #
1.1 What is SUSE Private Registry? #
SUSE Private Registry (Private Registry) is an on-premises container registry. Private Registry is designed for SUSE customers who need a container registry that works well with other SUSE services and products.
1.2 What are SUSE Private Registry benefits? #
Private Registry is based on the Harbor project and includes all its core features as well as added benefits. For example:
On-premises container registry. Private Registry is a locally hosted container registry with access to online SUSE registry services.
Security. Private Registry offers security considerations for containerized environments. It includes authentication, authorization and vulnerability scanning.
Deployment flexibility. You can install Private Registry on a Kubernetes environment such as SUSE Rancher Prime: RKE2. You can also deploy Private Registry with High Availability setup.
User management. Private Registry provides authentication and authorization mechanism with role-based access control (RBAC).
User interface. Besides a command-line interface, you can administer Private Registry via Web user interface.
1.3 How does SUSE Private Registry work? #
Private Registry is delivered as Open Container Initiative (OCI) containers and is expected to be deployed on a Kubernetes cluster. Private Registry consists of the following containers:
harbor-core: the main component of the Harbor registry, responsible for handling core functionalities such as managing projects, repositories and user interactions.
harbor-db: the database container that stores all metadata related to images, users and configurations for the Harbor registry.
harbor-jobservice: a service that manages background jobs, such as image replication and scheduled tasks, ensuring efficient processing of operations within the registry.
harbor-nginx: the reverse proxy and load balancer that routes incoming requests to the appropriate Harbor services, providing a single entry point for users.
harbor-portal: the Web-based user interface that allows users to interact with the Harbor registry, manage images, and configure settings through a graphical interface.
harbor-registry: the container that serves as the actual image storage back-end, handling the storage and retrieval of container images.
harbor-registryctl: a command-line tool for managing the Harbor registry, allowing users to perform administrative tasks and configurations directly from the terminal.
harbor-trivy-adapter: a container that integrates the Trivy vulnerability scanner with Harbor, enabling automated security scanning of container images for vulnerabilities.
harbor-exporter: the container that exports Harbor metrics in a format that can be collected by Prometheus for monitoring and observability.
harbor-valkey: an in-memory key-value store.
After deployment, you can log in via Web user interface. After successful authentication and authorization, you can configure multiple aspects of the product, for example:
Configure global settings, such as setting the registry to read-only mode or restricting who can create projects.
Select an authentication method.
Add users when in database authentication mode and assign the system administrator role to other users.
Apply resource quotas to projects.
Set up the replication of images between Private Registry instances.
1.4 For more information #
Refer to the following sources to obtain more details:
The Harbor project homepage is at https://goharbor.io/.
Harbor usage is detailed in https://goharbor.io/docs.
2 Requirements #
This section describes the minimum platform prerequisites and recommended production sizing for SUSE Private Registry.
2.1 Prerequisites #
A Kubernetes cluster in version 1.33, 1.34 or 1.35
Helm version 3.2.0 or higher
Persistent Volume (PV) provisioner support in your infrastructure
An active subscription for SUSE Private Registry
2.1.1 Which Kubernetes versions are supported? #
Private Registry versions 1.0, 1.1 and 1.2 are currently validated on Kubernetes versions 1.33, 1.34 and 1.35.
| Private Registry version | Kubernetes versions |
|---|---|
1.0 | 1.33, 1.34, 1.35 |
1.1 | 1.33, 1.34, 1.35 |
1.2 | 1.33, 1.34, 1.35 |
Versions outside 1.33 through 1.35 are not currently validated for this release.
2.2 Hardware and sizing recommendations #
Use these values as a production starting point. Tune based on retention policy, image churn, scan concurrency and replication traffic.
2.2.1 Cluster Baseline #
| Scope | Recommended starting point |
|---|---|
Worker nodes | 3 worker nodes minimum |
Node shape | 4 vCPU and 16 GiB RAM per node minimum |
Preferred node shape | 8 vCPU and 32 GiB RAM per node for higher scan and push concurrency |
These recommendations align with Rancher guidance for RKE2 Kubernetes. For details, see RKE2 Kubernetes installation requirements. For guidance about distributing replicas, selecting reliable worker nodes, and planning external dependencies, see Chapter 6, High Availability setup.
2.2.2 Persistent Storage Baseline #
| Component | Default chart size | Recommended starting size |
|---|---|---|
Registry data | 5 Gi | 500 Gi to 1 Ti |
Trivy cache and DB | 5 Gi | 20 Gi to 50 Gi |
Jobservice logs | 1 Gi | 10 Gi |
Internal PostgreSQL (if used) | 1 Gi | 20 Gi minimum |
Internal Valkey (if used) | 1 Gi | 20 Gi minimum |
The chart defaults are installation-oriented and should not be used as long-term production capacity values.
3 Installation using the Rancher UI #
To install SUSE Private Registry using the Rancher UI, you must meet the following requirements and follow the steps below.
3.1 What requirements do I need to meet? #
An environment with a running supported Kubernetes cluster(s) and Rancher deployed. Refer to Rancher installation requirements for more details.
SUSE Registry credentials for an account with a SUSE Private Registry subscription (a username and a password/token). Refer to Obtaining Kubernetes secrets from SCC for more details.
3.2 What are the steps to install SUSE Private Registry using the Rancher UI? #
Log in to Rancher.
Click the three-line menu (☰) in the top-left corner, select , and click your cluster’s name, usually
local.From the left-hand menu, select › .
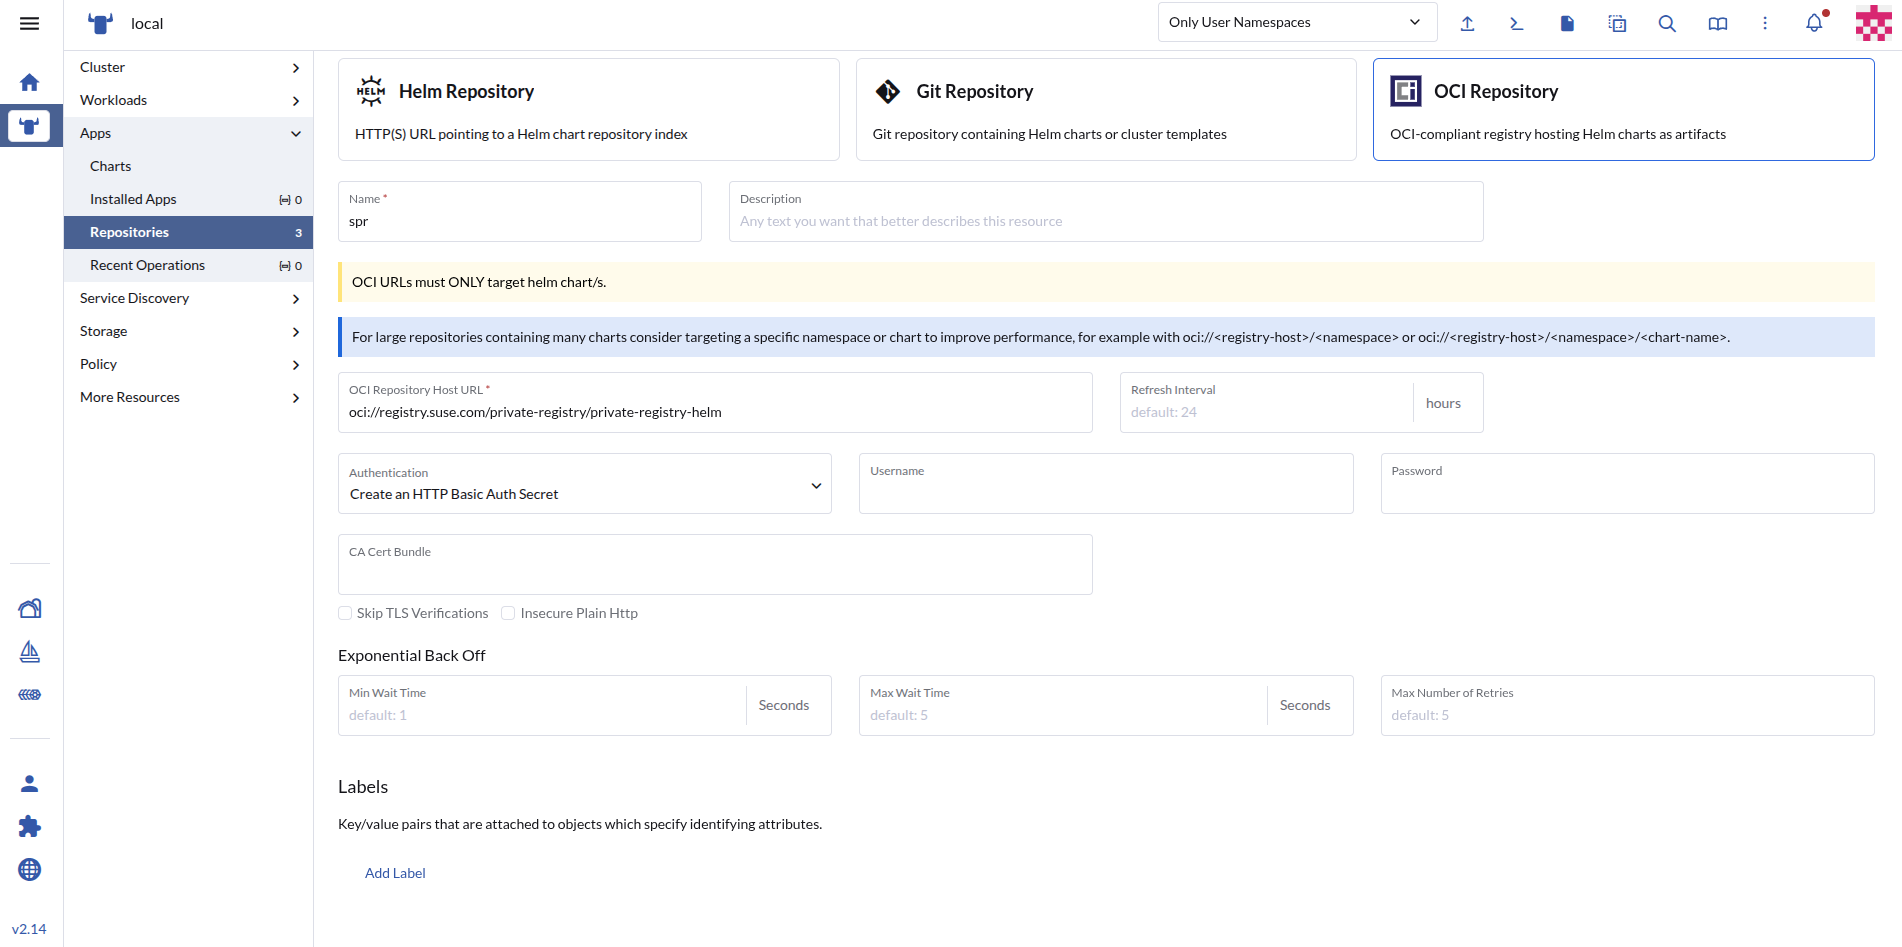
Click the button in the top right and complete the form that opens:
Target: Select .
Name: Enter a name for the repository, such as
SUSE Private Registry.Description: Optionally, add a description of the repository.
OCI Repository Host URL: Enter `oci://registry.suse.com/private-registry/private-registry-helm`.
Authentication: Change to
Create an HTTP Basic Auth Secretand enter the user name and password of the registry’s credentials.
Confirm with .
Click the three-line menu (☰) in the top-left corner and select .
Switch to the cluster to which you want to add the secret and click .
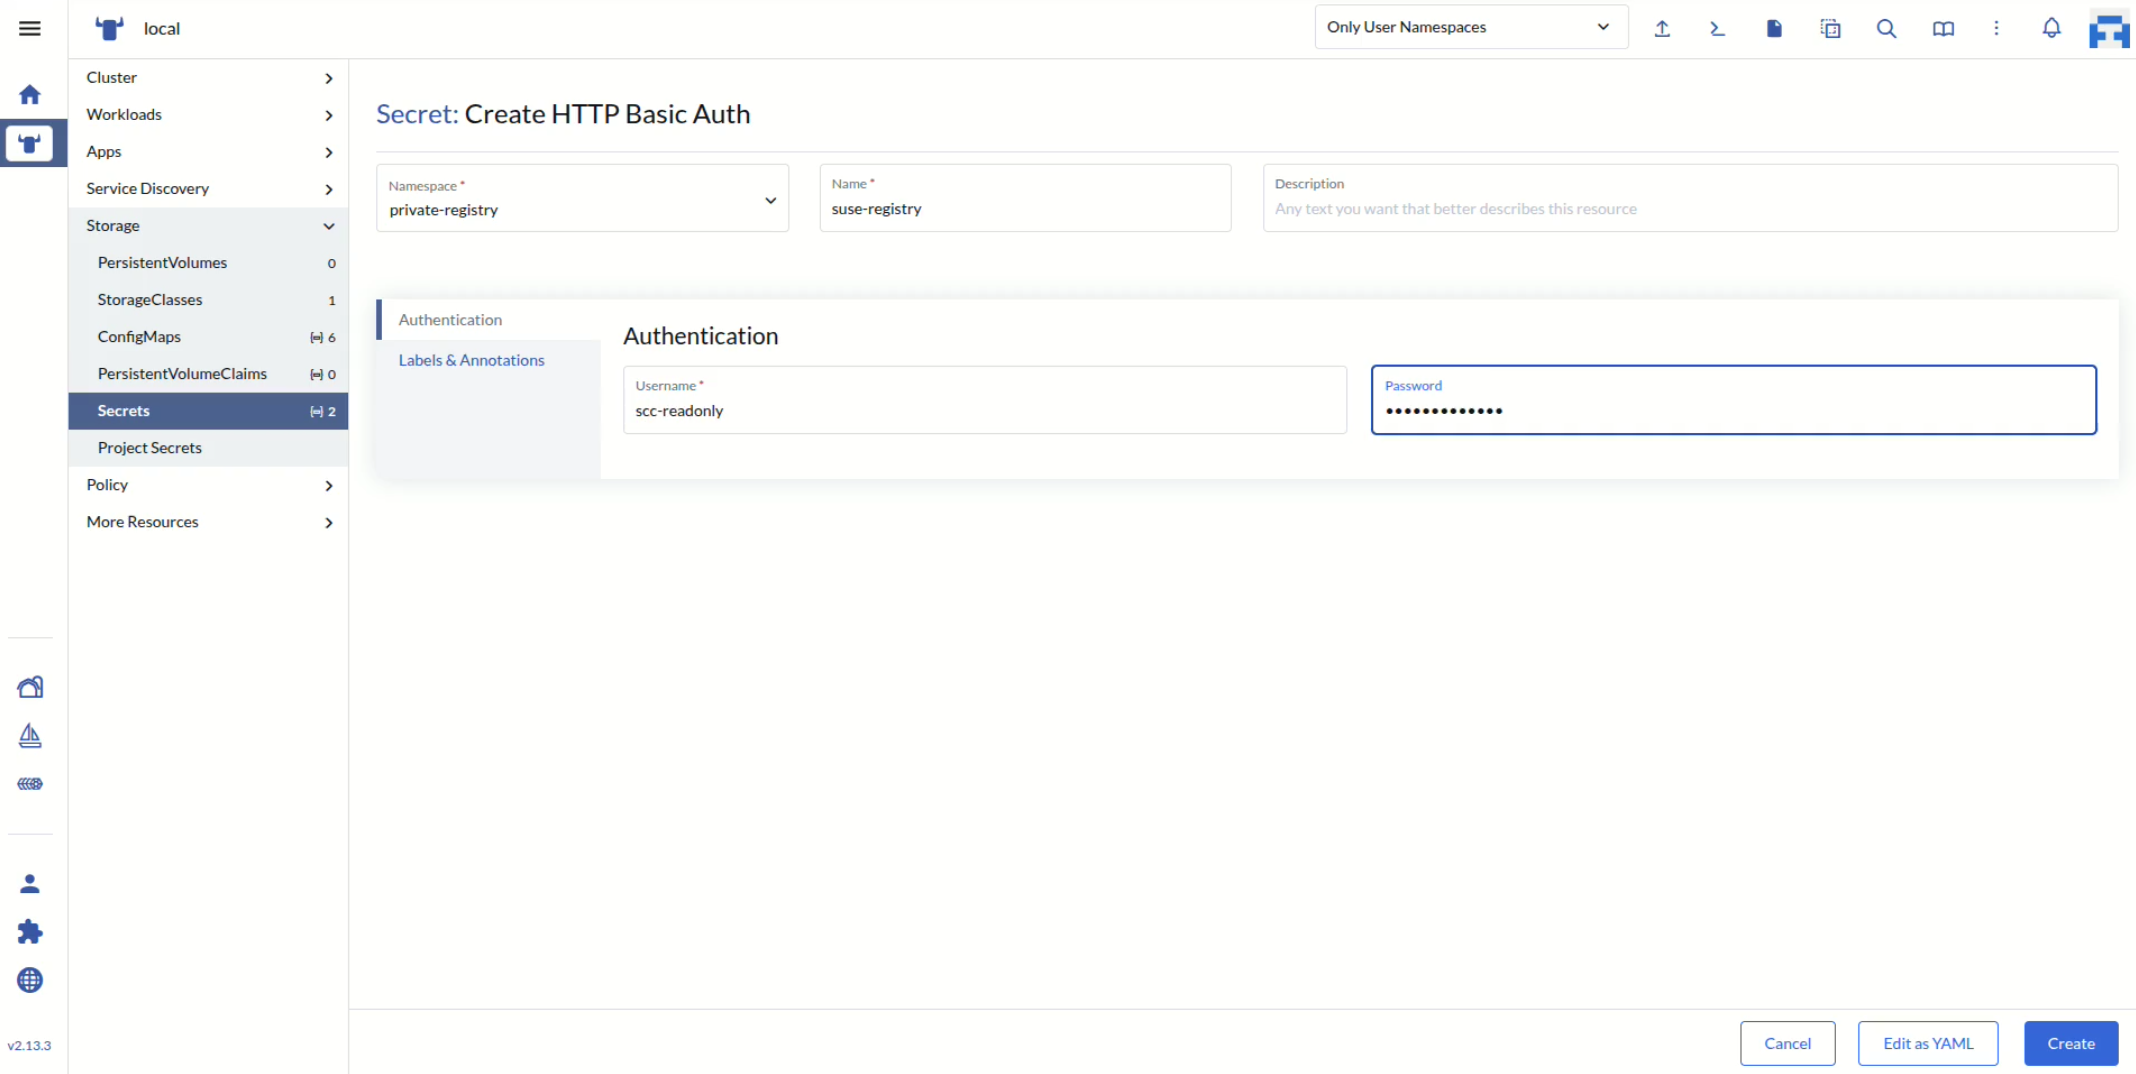
To navigate to secrets management, select › and click in the top right.
Select the secret and then the
private-registrynamespace.Enter
suse-registryas the name for the secret.Fill the
usernameand thepasswordfields with the SUSE credentials obtained in Section 3.1, “What requirements do I need to meet?”.
From the main left menu, select › .
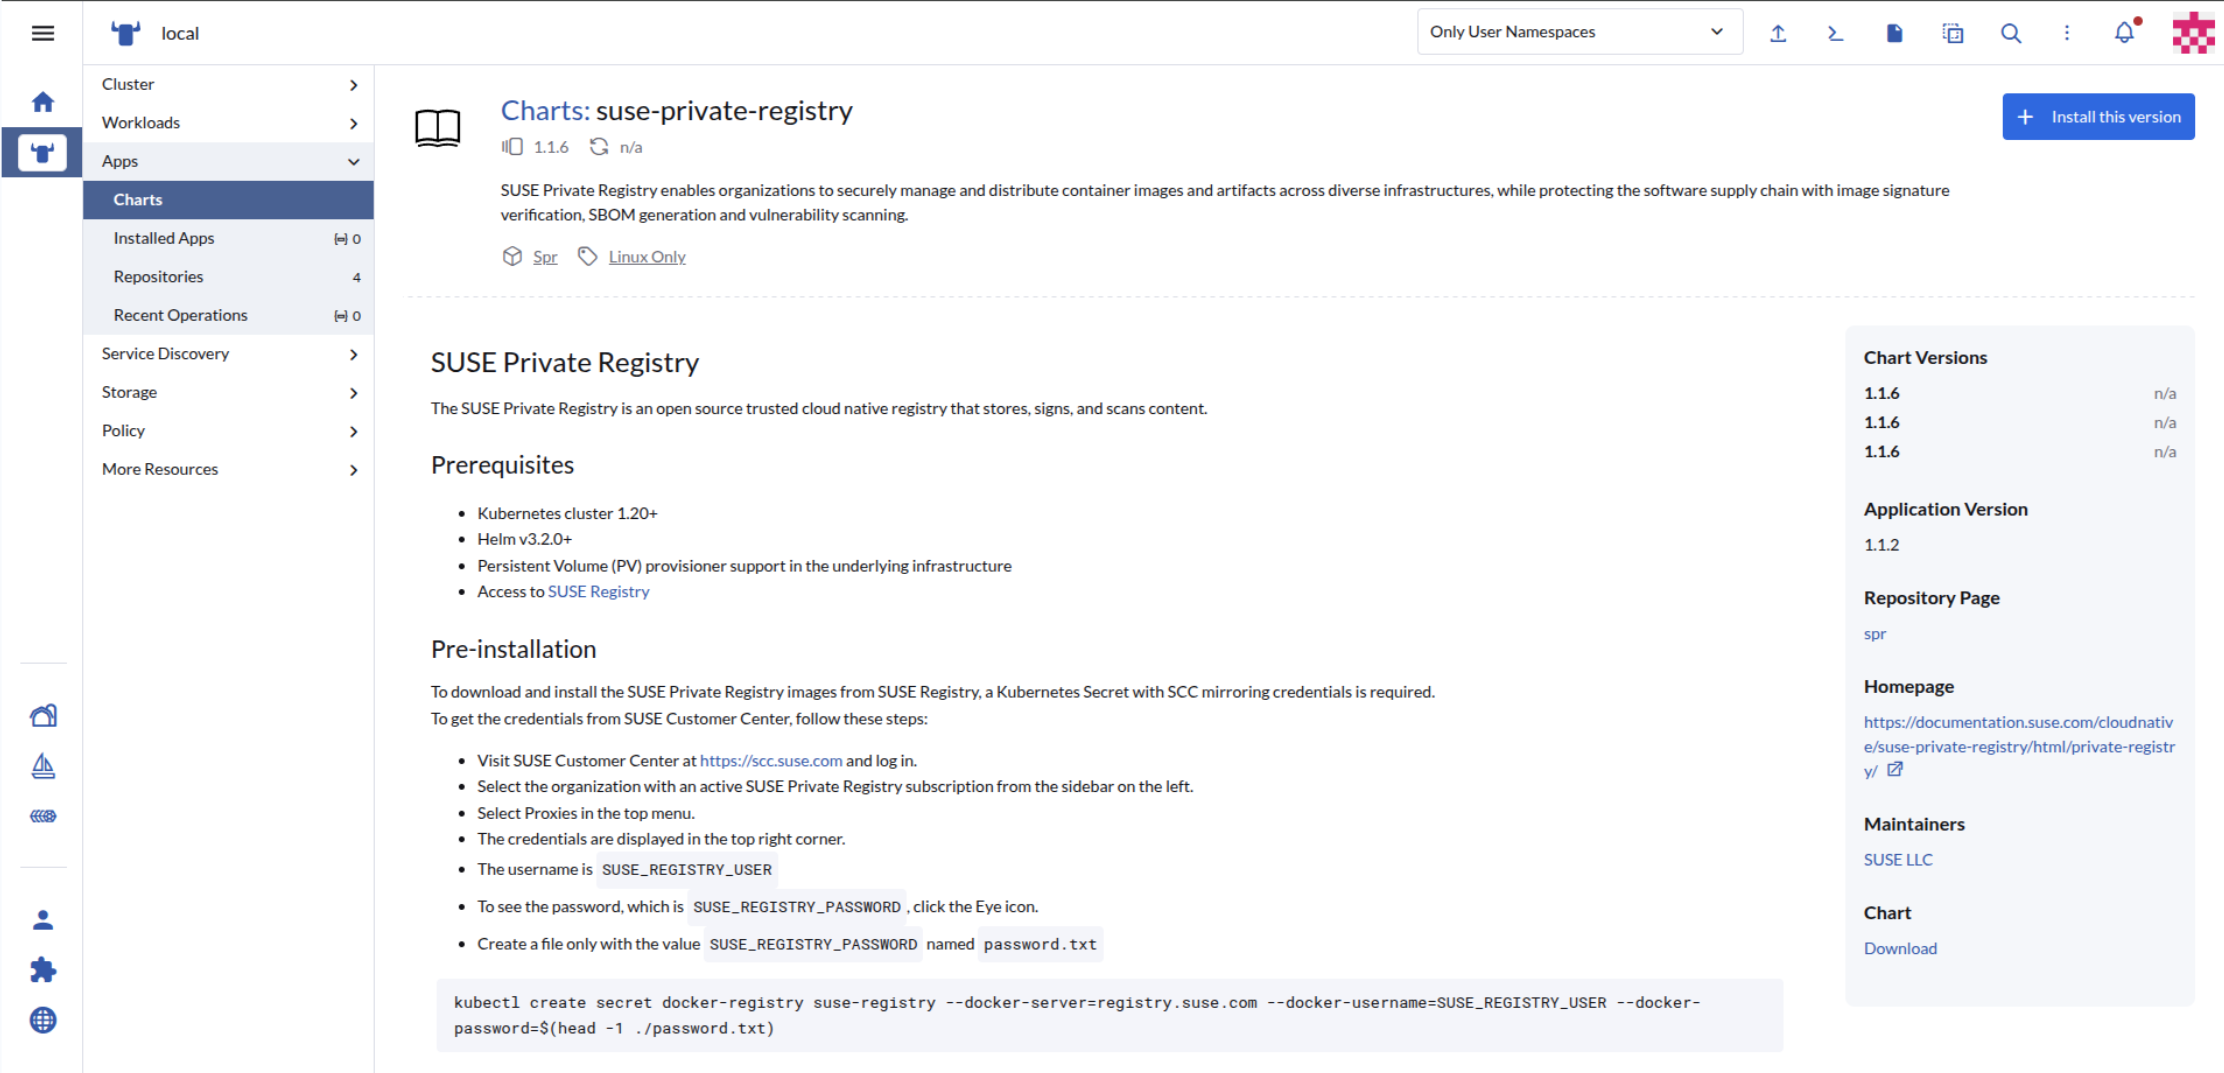
Enter the name of the assigned SUSE Private Registry repository in the search box. For example,
SUSE Private Registry. If it does not appear in the list, click .Click the chart and view the
README.md.Optionally, you can customize the installation values. Either click through the sections on the left side of the
Edit Optionspanel to view all the values you can configure, or edit the values directly in the chart’s YAML file.In the top right corner, click .
4 Installation using the command line #
The following procedures describe how to deploy SUSE Private Registry (Private Registry) on a Kubernetes cluster.
4.1 Obtaining Kubernetes secrets from the SUSE Customer Center #
To download and install the Private Registry images from SUSE Registry, you need a Kubernetes secret with SUSE Customer Center (SCC) mirroring credentials. To obtain the credentials from SCC, follow these steps:
Visit SUSE Customer Center at https://scc.suse.com and log in.
Select the organization with an active Private Registry subscription from the left sidebar.
Select
Proxiesin the top menu. The credentials are displayed in the top right corner.To see the password, click the 'eye' icon.
Create a
password.txtfile containing the obtained password.> head -1 ./password.txt | helm registry login registry.suse.com \ --username <PRIVATE_REGISTRY_USERNAME> --password-stdinCreate a namespace for SUSE Registry.
> kubectl create namespace <PRIVATE_REGISTRY_NAMESPACE>Store the mirroring credentials retrieved from SCC as Kubernetes secrets by running the following command:
> kubectl create secret docker-registry suse-registry \
  --namespace <PRIVATE_REGISTRY_NAMESPACE> \
  --docker-server=registry.suse.com \
  --docker-username=<PRIVATE_REGISTRY_USERNAME> \
  --docker-password=$(head -1 ./password.txt)
Optionally, to use TLS encrypted communication, create a TLS secret from your private key and certificate files.
> kubectl create secret tls suse-registry-tls \
  --namespace <PRIVATE_REGISTRY_NAMESPACE> \
  --cert=<CERTIFICATE>.pem \
  --key=<PRIVATE_KEY>.pem
4.2 Installing and running Private Registry using Helm #
The following procedure describes how to install Private Registry using Helm. Before you begin, replace the following placeholders:
<RELEASE_NAME>with your custom release name for the Helm chart deployment.<APP_VERSION>with the desired application version (for example,1.2).Log in to SUSE Registry using the obtained SCC mirroring credentials.
> head -1 ./password.txt | helm registry login registry.suse.com \
  --username <SUSE_REGISTRY_USERNAME> --password-stdin
Install the latest version of the Private Registry Helm chart.
> helm install <RELEASE_NAME> \
  oci://registry.suse.com/private-registry/<APP_VERSION>/private-registry-helm \
  --namespace <PRIVATE_REGISTRY_NAMESPACE>
When you install the Private Registry Helm chart, it displays the following output:
NOTES:
CHART VERSION: 1.1.6
It may take several minutes for the SUSE Private Registry  1.1.2 deployment to complete.

Once the deployment has finished, you will be able to open the SUSE Private Registry portal at https://core.harbor.domain

To get the admin credentials, copy and run the following commands:

echo Username: "admin"
echo Password: $(kubectl get secret --namespace <PRIVATE_REGISTRY_NAMESPACE>-harbor-core <RELEASE_NAME> -o jsonpath="{.data.HARBOR_ADMIN_PASSWORD}" | base64 -d)
With Helm version 4, you can use a digest to specify the chart to install:
> helm install <RELEASE_NAME> \
  oci://registry.suse.com/private-registry/<APP_VERSION>/private-registry-helm@sha256:<DIAGEST_OF_CHART_TO_INSTALL> \
  --namespace <PRIVATE_REGISTRY_NAMESPACE>

To get the password for the administrator user, you can also run the following command:
> kubectl get secret \
  --namespace <PRIVATE_REGISTRY_NAMESPACE> \
  --harbor-core <RELEASE_NAME> \
  -o jsonpath="{.data.HARBOR_ADMIN_PASSWORD}" | base64 -d; echo
It is possible to use kstatus watcher with the flag '--wait=watcher' to make sure that all the objects are ready to finish the installation. Using the watcher may cause the command to take longer.
To override the default installation with custom values from the suse_registry_override.yaml file, refer to Appendix A, Overriding the SUSE Private Registry Helm chart.
The command starts deploying several related containers and may take several minutes to complete. It also prints a message with the URL to the Private Registry Web portal and commands to obtain the administrator credentials.
4.3 Upgrading Private Registry #
To upgrade the release of the Helm chart to a specific newer version, run the following command:
> helm upgrade <RELEASE_NAME> \
  oci://registry.suse.com/private-registry/<APP_VERSION>/private-registry-helm \
  --version <NEW_VERSION_OF_HELM_CHART> \
  --namespace <PRIVATE_REGISTRY_NAMESPACE> \
The digest is only possible with Helm 4.
> helm upgrade <RELEASE_NAME> \
  oci://registry.suse.com/private-registry/<APP_VERSION>/private-registry-helm@sha256:<DIAGEST_OF_CHART_TO_INSTALL> \
  --namespace <PRIVATE_REGISTRY_NAMESPACE> \
5 Installing in air-gapped environment #
SUSE Private Registry and Hauler provide a robust solution for managing content in disconnected environments while significantly simplifying the air-gapping workflow for Kubernetes distributions like RKE2 and K3s.
5.1 SUSE Private Registry and Hauler #
5.1.1 About Hauler #
Hauler: Purpose-built and lightweight, Hauler is a CLI tool that streamlines the management of content in air-gapped environments. It is engineered as a versatile utility for workflows and pipelines, allowing users to transport charts, container images, and other OCI artifacts into isolated networks without imposing a rigid workflow. For more information, refer to the Hauler documentation.
5.1.2 Prerequisites #
Before beginning the air-gapped installation process, ensure you have the following in place:
Hauler CLI: Install Hauler on your source machine (connected to the Internet) and air-gapped system. Visit the Hauler Installation Guide for installation instructions.
Helm 3.x or later: Required for managing Helm charts and authentication with registries.
kubectl: Needed for deploying to your Kubernetes cluster.
Docker or container runtime: Required to handle OCI image operations (optional if using Hauler in stand-alone mode).
Registry Credentials:
Credentials for registries you want to pull from (e.g.,
registry.suse.comfor SUSE images). For instructions on how to obtain these credentials, see Section 4.1, “Obtaining Kubernetes secrets from the SUSE Customer Center”.For the target Private Registry instance, set the administrator password during installation using the
harborAdminPasswordHelm value. You will use this password to authenticate after deployment.
5.1.3 Configuration #
An easy way to move artifacts into an air-gapped environment is to use a manifest, which is a YAML file with all the artifacts you want to transfer.
Reproducibility: The same manifest can be used consistently across multiple environments
Version control: Manifest files can be tracked in version control systems (e.g., Git) to ensure artifact versions are documented and auditable
Flexibility: Support for multiple artifact types including Helm charts, OCI images, and arbitrary files
Scalability: Easily manage large numbers of artifacts without manual configuration
5.1.3.1 Understanding Hauler Manifest Structure #
The Hauler manifest supports three main kinds of artifacts:
Charts: Helm charts that will be deployed in your air-gapped environment. You specify the registry URL (OCI registry), chart name, and version.
Files: Arbitrary files or binaries from HTTP(S) sources, such as installation scripts or Kubernetes binaries.
Images: Container images (OCI images) that your applications and SUSE Private Registry depend on.
Each section in the manifest is independent and can be organized logically based on your deployment needs.
5.1.3.2 Example of hauler-manifest.yaml #
Before using the following example, replace the placeholders:
<APP_VERSION>with the desired application version (for example,1.2), as in Section 4.2, “Installing and running Private Registry using Helm”.<CHART_VERSION>with the exact chart version you want to pull (for example,1.2.19).<RKE2_VERSION_URLENCODED>with the RKE2 release you want to install, found on the RKE2 releases page (for example,v1.34.5+rke2r1written asv1.34.5%2Brke2r1, the percent-encoded form used in the download URL).<HELM_VERSION>with the Helm release you want to install, found on the Helm releases page (for example,v3.18.0).

The Images list must use the exact image tags the chart’s own values.yaml defaults expect, not a hand-copied or simplified list. Get the authoritative list, already formatted as ready-to-use image references, by running:
> helm show values oci://registry.suse.com/private-registry/<APP_VERSION>/private-registry-helm \
  --version <CHART_VERSION> \
  | grep -E "repository:|tag:" | paste - - | awk '{print "registry.suse.com/"$2":"$4}'
For example, against chart version 1.2.19, this prints:
registry.suse.com/suse/nginx:1.27-21.8
registry.suse.com/private-registry/1.2/harbor-portal:1.2.1-1.118
registry.suse.com/private-registry/1.2/harbor-core:1.2.1-1.109
registry.suse.com/private-registry/1.2/harbor-jobservice:1.2.1-1.107
registry.suse.com/private-registry/1.2/harbor-registry:1.2.1-1.109
registry.suse.com/private-registry/1.2/harbor-registryctl:1.2.1-1.109
registry.suse.com/private-registry/1.2/harbor-trivy-adapter:1.2.1-1.118
registry.suse.com/suse/postgres:17.10-83.19
registry.suse.com/suse/valkey:8.0.10-17.8
registry.suse.com/private-registry/1.2/harbor-exporter:1.2.1-1.109
Copy each line as-is into the manifest’s Images.spec.images[].name field.
A manifest built from the wrong tags still lets hauler store sync and helm install succeed, but every pod fails ImagePullBackOff once you are air-gapped, with no route back to the internet to self-correct.
apiVersion: content.hauler.cattle.io/v1
kind: Charts
metadata:
  name: suse-private-registry-chart
spec:
  charts:
    - name: private-registry-helm
      repoURL: oci://registry.suse.com/private-registry/<APP_VERSION>
      version: <CHART_VERSION>
---
apiVersion: content.hauler.cattle.io/v1
kind: Files
metadata:
  name: rke2-install-files
spec:
  files:
    - path: https://get.rke2.io
      name: install-rke2.sh
    - path: https://get.helm.sh/helm-<HELM_VERSION>-linux-amd64.tar.gz
      name: helm-<HELM_VERSION>-linux-amd64.tar.gz
    - path: https://github.com/rancher/rke2/releases/download/<RKE2_VERSION_URLENCODED>/rke2.linux-amd64.tar.gz
      name: rke2.linux-amd64.tar.gz
    - path: https://github.com/rancher/rke2/releases/download/<RKE2_VERSION_URLENCODED>/rke2-images.linux-amd64.tar.zst
      name: rke2-images.linux-amd64.tar.zst
    - path: https://github.com/rancher/rke2/releases/download/<RKE2_VERSION_URLENCODED>/sha256sum-amd64.txt
      name: sha256sum-amd64.txt
---
apiVersion: content.hauler.cattle.io/v1
kind: Images
metadata:
  name: spr-images
spec:
  images:
    # SUSE Private Registry (Harbor) images -- get the full, exact list with
    # the `helm show values` command above; do not hand-copy the example below
    - name: registry.suse.com/private-registry/<APP_VERSION>/harbor-core:<IMAGE_TAG>
    - name: registry.suse.com/private-registry/<APP_VERSION>/harbor-portal:<IMAGE_TAG>
    - name: registry.suse.com/private-registry/<APP_VERSION>/harbor-registry:<IMAGE_TAG>
    - name: registry.suse.com/private-registry/<APP_VERSION>/harbor-registryctl:<IMAGE_TAG>
    - name: registry.suse.com/private-registry/<APP_VERSION>/harbor-jobservice:<IMAGE_TAG>
    - name: registry.suse.com/private-registry/<APP_VERSION>/harbor-exporter:<IMAGE_TAG>
    - name: registry.suse.com/private-registry/<APP_VERSION>/harbor-trivy-adapter:<IMAGE_TAG>
    - name: registry.suse.com/suse/valkey:<IMAGE_TAG>
    - name: registry.suse.com/suse/postgres:<IMAGE_TAG>
    - name: registry.suse.com/suse/nginx:<IMAGE_TAG>
The manifest’s Images kind only needs to list SUSE Private Registry’s own images. RKE2’s own required images are already covered by the rke2-images.linux-amd64.tar.zst file downloaded above and are loaded separately (see the RKE2 air-gap installation documentation for the load methods and for the correct tarball to use with a non-default CNI plugin).
5.1.4 Synergy: Orchestrating Hauler with SUSE Private Registry #
To maximize the utility of both products, adopt the following integration pattern:
Centralized Source Control: Store all hauler-manifest.yaml files in a version-controlled repository (e.g., Git). This ensures that the exact versions of images and charts used in your air-gapped environment are tracked and reproducible.
Hauler-to-Registry Sync: Instead of manually handling tarballs, utilize Hauler’s ability to copy directly from the Hauler store to your SUSE Private Registry instance. This maintains the OCI structure and simplifies provenance tracking.
Pipeline Automation: Treat the Hauler sync process as a CI job. Automate the retrieval of upstream artifacts and push them into a designated "incoming" project within your SUSE Private Registry.
Security Scanning: Since SUSE Private Registry is based on Harbor, configure automatic vulnerability scanning on the projects where Hauler pushes content. This ensures that even in disconnected environments, your images remain secure.
5.1.5 Workflow #
5.1.5.1 About Hauler Store #
The Hauler store is a local directory that acts as an intermediate storage for all artifacts collected from registries and remote sources. Think of it as a staging area where Hauler downloads and organizes all content before you transport it to the air-gapped environment. The store maintains the OCI structure, making it easy to load artifacts into your SUSE Private Registry or local registries later.
5.1.5.2 Step-by-Step Instructions #
Prerequisites:
Establish secure authentication with the Helm and Hauler registries to enable artifact access:
# Log in to SUSE registry to pull SUSE Private Registry images and charts
> helm registry login registry.suse.com -u <YOUR_USERNAME> -p <YOUR_PASSWORD> 1

# Configure Hauler with the same credentials
> head -1 ./password.txt | hauler login registry.suse.com -u <YOUR_USERNAME> --password-stdin

# or
# hauler login registry.suse.com -u <YOUR_USERNAME> -p <YOUR_PASSWORD>


# If using additional registries, log in to them as well
# hauler login <OTHER_REGISTRY> -u <YOUR_USERNAME> -p <YOUR_PASSWORD>Replace |
Create and prepare your hauler-manifest.yaml file on your internet-connected machine. Update the manifest to match your specific environment:
Update the chart version to the exact version you need for SUSE Private Registry
Adjust RKE2 versions if you’re using a different Kubernetes version (current example uses v1.34.5)
Add or remove images based on your specific requirements
If deploying additional applications, add their charts and images to the manifest
Synchronize and package the artifacts:
# Sync artifacts from remote registries into the Hauler store
# This downloads all charts, images, and files specified in your manifest
> hauler store sync -f hauler-manifest.yaml

# Generate a portable tarball for your target architecture
# Available architectures: amd64, arm64
# This creates a compressed file that can be easily transported
> hauler store save --filename hauler-store.tar.zst
The
hauler store savecommand creates a compressed tarball containing all collected artifacts. The resulting file size depends on the artifacts in your manifest (typically 20-50GB for a full RKE2 + SUSE Private Registry deployment).Transport the Hauler store tarball to your isolated air-gapped infrastructure using your preferred method:
External storage (USB drives, external hard drives)
Sneakernet (physical transport)
Direct file transfer if there’s a one-way network connection to the air-gapped environment
In the air-gapped environment, load the artifacts into your SUSE Private Registry. Loading the store and pushing it to a registry are two separate steps:
# Load the Hauler store archive (no manual extraction needed; `store load`
# reads the .tar.zst directly)
> hauler store load -f hauler-store.tar.zst

# Create a file containing the password configured with `harborAdminPassword`
# during the SUSE Private Registry installation
> read -r -s -p "Enter the registry administrator password: " REGISTRY_PASSWORD; printf '\n'; printf '%s\n' "$REGISTRY_PASSWORD" > ./registry-password.txt

# Log in to your target SUSE Private Registry
> head -1 ./registry-password.txt | hauler login <SUSE_PRIVATE_REGISTRY_HOST> \\ 1
  -u <REGISTRY_USERNAME> --password-stdin 2

# Push the loaded store's content into your SUSE Private Registry project
> hauler store copy registry://<SUSE_PRIVATE_REGISTRY_HOST>/<PROJECT_NAME>

# If your SUSE Private Registry is served over unencrypted HTTP, add --plain-http:
# hauler store copy registry://<SUSE_PRIVATE_REGISTRY_HOST>/<PROJECT_NAME> --plain-http
Replace
<SUSE_PRIVATE_REGISTRY_HOST>with the host name of your SUSE Private Registry instance, withouthttps://orhttp://(for example,registry.example.com).Replace
<REGISTRY_USERNAME>with your SUSE Private Registry administrator user name. The password inregistry-password.txtmust match the password configured withharborAdminPassword.Alternatively, use Hauler’s ephemeral local registry for immediate deployment:
To deploy directly without waiting for a full SUSE Private Registry setup, you can use Hauler’s local registry. Hauler’s registry serves plain, unencrypted HTTP, so Kubernetes needs to be told to trust it before you deploy, and the chart itself is served under a path based on its own
Chart.yamlname (suse-private-registry), not the manifest’s chart alias or its original registry path:# On the air-gapped host, add a plain-HTTP mirror for the Hauler registry so # containerd does not attempt an HTTPS handshake against it, then restart # RKE2 (or K3s) to pick up the change: > cat <<EOF | sudo tee /etc/rancher/rke2/registries.yaml mirrors: "localhost:5000": endpoint: - "http://localhost:5000" EOF > sudo systemctl restart rke2-server # Start Hauler's ephemeral registry (runs on localhost:5000) > hauler store serve registry --port 5000 & # Deploy SUSE Private Registry using the local Hauler registry # Note: This registry is temporary and will be removed after the process ends > helm install <RELEASE_NAME> \ oci://localhost:5000/hauler/suse-private-registry \ --namespace <PRIVATE_REGISTRY_NAMESPACE> --create-namespace \ --version <CHART_VERSION> \ --plain-http \ --set global.imageRegistry=localhost:5000 \ --set-file harborAdminPassword=./registry-password.txt \ --set-json 'imagePullSecrets=[]'After a successful deployment, you can configure and use SUSE Private Registry as your persistent artifact registry.
5.1.5.3 Verification and Troubleshooting #
After completing the deployment:
Verify that all artifacts have been successfully loaded:
# Check if images are available in your SUSE Private Registry
# Log into the registry web interface or use the Registry API to verify image presence
Verify the SUSE Private Registry deployment:
# Check the status of SUSE Private Registry pods
> kubectl get pods -n <PRIVATE_REGISTRY_NAMESPACE>
Test connectivity and functionality:
# Verify that you can log in and pull images from the registry.
# Note: Hauler uses Docker credentials. If you completed the previous steps
# and pushed images, you are already authenticated.
> docker login <SUSE_PRIVATE_REGISTRY_HOST> -u <REGISTRY_USERNAME>
> docker pull <REGISTRY_URL>/library/image:tag
6 High Availability setup #
You can use Helm to deploy the highly available (HA) Private Registry on a Kubernetes cluster. An HA deployment reduces interruptions when a pod or worker node becomes unavailable. It does not protect the registry from every failure. The database, cache, image storage, Ingress endpoint, and Kubernetes cluster must also remain available.
This topic describes the Private Registry-specific choices and trade-offs. For Kubernetes control-plane and worker-node design, see the Kubernetes production environment documentation. For Rancher-managed clusters, see the Rancher production installation checklist.
6.1 Understanding the HA setup #
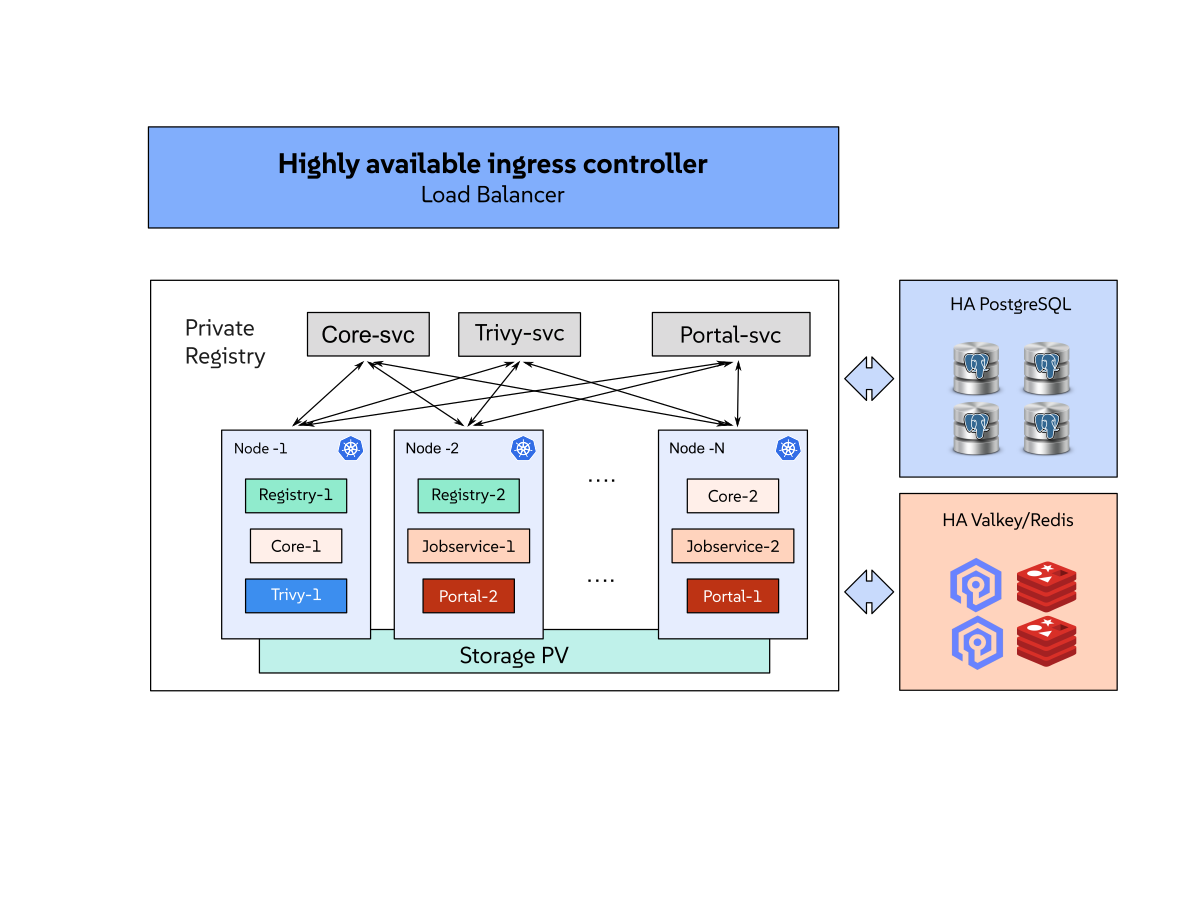
Most Private Registry application components are stateless. You can run multiple replicas and distribute them across worker nodes or failure domains. This protects the application from a pod or node failure, but only when the replicas do not share the same failure domain.
The stateful parts of the deployment require separate resilience decisions:
PostgreSQL stores registry metadata, projects, users, and configuration.
Valkey or Redis stores sessions, queues, and cache data.
Image and chart storage holds the registry content.
Persistent volumes hold database data, job logs, and scanner data when the corresponding chart settings use PVCs.
The Ingress controller, load balancer, DNS, and TLS endpoint provide access to the registry.
Private Registry does not deploy or manage HA for these external endpoints and services.
6.2 Choosing a resilience model #
Choose a model based on the kinds of failure that the deployment must tolerate:
| Model | Configuration | Trade-off |
|---|---|---|
Pod availability | Run two or more replicas of the stateless Private Registry components on separate worker nodes. | Protects against failures affecting pods or worker nodes, but does not protect the database, cache, storage, or Ingress endpoint. |
Production availability | Combine distributed application replicas with HA PostgreSQL, HA Valkey or Redis, durable image storage, and a highly available Ingress endpoint. | Reduces more failure modes, but requires you to operate or purchase these services separately. |
Disaster recovery | Keep backups in a separate environment and prepare a recovery Kubernetes cluster with compatible storage and networking. | Protects against cluster loss, but recovery is not automatic and has a defined recovery point and recovery time. |
Increasing the replica count alone does not create a resilient deployment. For example, two replicas on the same worker node are both affected when that node fails.
6.3 Distributing Private Registry components #
The example in Appendix B, Example of a Private Registry HA setup Helm chart sets three replicas for the portal, core, job service, and registry components, together with the corresponding nodeSelector and topologySpreadConstraints values.
These settings are available for the Private Registry components in Appendix A, Overriding the SUSE Private Registry Helm chart.
Use the following scheduling principles:
Label a dedicated or reliable worker-node pool and select it with
nodeSelectoror node affinity.Use pod anti-affinity or topology spread constraints to place replicas on different nodes or failure domains.
Reserve enough CPU and memory for another replica when one node is unavailable.
Use taints and tolerations when only selected workloads should run on the registry nodes.
Test node drains and upgrades with the planned replica count and storage configuration.
Kubernetes does not automatically spread replicas across failure domains unless the workload includes suitable scheduling rules. For more information, see the Kubernetes pod assignment and topology spread constraints documentation.
The chart can create a pod disruption budget for each component with <COMPONENT>.podDisruptionBudget.enabled, which is disabled by default.
Node-drain policy remains a cluster-level control.
Define it with the platform tools used by your organization and verify that the disruption budgets do not prevent planned maintenance.
Size the worker-node pool with at least one node more than the replica count.
With whenUnsatisfiable: DoNotSchedule and a pool the same size as the replica count, draining a node leaves one replica of every component unschedulable until the node returns.
The registry stays available on the remaining replicas, but the deployment runs without spare capacity for the duration of the maintenance.
6.4 Providing a highly available endpoint #
Use a highly available Ingress controller or load balancer in front of the Private Registry services.
The endpoint provides the redundancy; DNS only needs a stable record that resolves reliably to it, and the TLS certificate only needs to remain valid when pods or worker nodes change.
The externalURL value and expose.ingress.hosts.core value must identify the same registry address.
Private Registry does not manage the external endpoint. Configure health checks, endpoint failover, certificate renewal, and DNS availability with the Ingress or load-balancer provider.
When expose.type is ingress, the chart does not deploy its own nginx proxy, and increasing nginx.replicas has no effect.
Endpoint redundancy then comes entirely from the Ingress controller.
Increase nginx.replicas only when expose.type is clusterIP, nodePort, or loadBalancer.
6.5 Prerequisites #
An HA deployment has the same base prerequisites as a standard deployment. For the supported Kubernetes versions, the required Helm version, and the subscription requirement, see Section 2.1, “Prerequisites”.
An HA deployment additionally requires the following:
Enough worker nodes and spare capacity to distribute the replicas and to keep the registry running while one node is unavailable
A highly available Ingress controller or load balancer with stable DNS and TLS
HA PostgreSQL 9.6+; Private Registry does not deploy or manage the HA database
HA Valkey or Redis; Private Registry does not deploy or manage HA Valkey or Redis
Persistent storage that remains available after a worker-node failure, or supported external object storage
SUSE Customer Center (SCC) mirroring credentials stored as a Kubernetes pull secret, as described in Section 4.1, “Obtaining Kubernetes secrets from the SUSE Customer Center”
6.6 Choosing resilient dependencies and storage #
The following table summarizes the main dependency choices:
| Dependency | What it stores or provides | Recommended production choice | Failure consideration |
|---|---|---|---|
PostgreSQL | Registry metadata, users, projects, and configuration. | Use an HA external service or a database platform with tested failover and backups. | A database outage affects registry operations even when all registry pods are healthy. After a failover, verify that the components reconnect to the new primary; restart the affected deployments if they do not. |
Valkey or Redis | Sessions, queues, and cache data. | Use an HA external service. Configure a supported direct or Sentinel connection in the chart. Cluster mode is not supported. | Users may lose sessions during recovery. Queued or in-progress tasks may need review. |
Image and chart storage | Container images and Helm charts. | Use supported durable object storage or storage that survives node failure. | If image storage is unavailable, users cannot reliably push or pull artifacts. |
Ingress and DNS | The external connection to the registry. | Use a redundant controller or load balancer with stable DNS and TLS. | An unavailable endpoint prevents access even when the application is running. |
External managed services reduce the operational work inside the Kubernetes cluster, but introduce network, credential, and provider dependencies. In-cluster stateful services keep the deployment self-contained, but you must design their replication, storage, upgrades, monitoring, and backups. Private Registry does not provide those HA implementations.
For the supported connection and storage values, see Appendix B, Example of a Private Registry HA setup Helm chart and Appendix A, Overriding the SUSE Private Registry Helm chart.
When you use file system storage, confirm that the storage class can make the volume available after a node failure.
Shared ReadWriteMany access is not automatically required for every deployment, but the access mode must match the selected chart configuration and storage implementation.
When you use object storage, protect the object store with its own availability, access-control, retention, and backup policies.
To configure file system storage, set the storage class and access mode in the values file. For example:
persistence:
  enabled: true
  persistentVolumeClaim:
    registry:
      storageClass: <STORAGE_CLASS_NAME>
      accessMode: ReadWriteMany
      size: 500Gi
Use ReadWriteMany only when the storage implementation supports simultaneous access from the nodes that run the registry pods.
Verify that the StorageClass supports the requested access mode and provides the required durability and failure behavior before using it in production.
When the storage implementation does not support ReadWriteMany, you must set updateStrategy.type to Recreate.
That strategy stops the running pods before it starts the new ones, which causes downtime during an upgrade and prevents the registry components from running more than one replica per volume.
This applies even to a component that runs a single replica.
With the default RollingUpdate strategy, the replacement pod is created before the running pod stops, and it stays Pending indefinitely: the ReadWriteOnce volume ties it to one node, and the topologySpreadConstraints of the component keep it off that node while the running pod is still there.
Use object storage or a ReadWriteMany volume when the deployment must stay available during upgrades.
Select the storage class and the access mode before the first installation.
The specification of a PersistentVolumeClaim cannot be changed afterwards, so an upgrade that modifies storageClass or accessMode for an existing release fails with spec is immutable after creation and leaves the release in a failed state.
Recover from it with helm rollback.
Only the size can be increased, and only when the storage class allows volume expansion.
To move the registry to a different storage class or access mode, copy the data to the new volume, delete the claim, and let the chart create it again.
Note that a claim created with persistence.resourcePolicy set to keep also survives helm uninstall and must be deleted explicitly.
Installing the chart again with the same release name in the same namespace reuses the surviving claims and preserves their data.
Use the sizing recommendations in Chapter 2, Requirements as a starting point. Increase capacity based on artifact growth, scan activity, job logs, retention, and replication traffic.
6.7 Using CloudNativePG with Private Registry #
Private Registry supports connecting to an external PostgreSQL database.
You can deploy CloudNativePG (CNPG) to provide a Kubernetes-native, highly available PostgreSQL cluster.
CloudNativePG runs one primary instance and one or more streaming standbys.
It manages failover, rolling updates and backups declaratively through a Cluster custom resource.
Using CloudNativePG for the external database provides several advantages:
Dedicated primary and standby topology independent of the Private Registry release lifecycle.
Kubernetes-native failover using Lease-based leader election and PostgreSQL WAL streaming without external HA proxies.
Dedicated Kubernetes services for read-write, read-only and any-instance traffic.
Declarative backup, restore and upgrade operations managed through custom resources.
6.7.1 Prerequisites and version selection #
Before deploying CloudNativePG, verify the following prerequisites:
A Kubernetes cluster with a storage class that supports dynamic volume provisioning.
kubectland Helm installed and configured for the cluster.The
kubectl cnpgplugin for status inspection and maintenance tasks.Access to the CloudNativePG Helm chart, such as the Rancher Prime Application Collection (
oci://dp.apps.rancher.io/charts/cloudnative-pg) or upstream.Sufficient node capacity for at least three PostgreSQL instances (one primary and two standbys), each with dedicated storage.
Verify supported versions before deploying:
Operator chart version: Check available chart versions from your repository. Cross-reference the version against the CloudNativePG release compatibility table for your Kubernetes version.
PostgreSQL container image: Review available container images in the CloudNativePG container repository. Choose a version supported by the PostgreSQL versioning policy.
Set environment variables for the selected versions:
> export CNPG_VERSION=<chart-version>
> export CNPG_IMAGE=ghcr.io/cloudnative-pg/postgresql:<tag>
6.7.2 Installing the CloudNativePG operator #
Deploy the operator using Helm:
> helm upgrade --install cnpg oci://dp.apps.rancher.io/charts/cloudnative-pg \
  --version "$CNPG_VERSION" \
  --namespace cnpg-system --create-namespace \
  --set config.clusterWide=true \
  --set crds.create=true \
  --wait
When your registry requires authentication, configure image pull secrets and specify global.imagePullSecrets in your Helm values.
For example, create an image pull secret if you use the Rancher Prime Application Collection.
To generate credentials and create the secret, see the Application Collection authentication documentation.
Verify that the operator deployment and custom resource definitions (CRDs) are ready:
> kubectl -n cnpg-system rollout status deployment -l app.kubernetes.io/name=cloudnative-pg
> kubectl wait --for=condition=Established crd/clusters.postgresql.cnpg.io --timeout=5m
6.7.3 Creating a PostgreSQL cluster #
Deploy a Cluster custom resource in the Private Registry namespace or in a reachable namespace.
The following example configures a three-instance cluster with anti-affinity across nodes:
> kubectl apply -f - <<EOF
apiVersion: postgresql.cnpg.io/v1
kind: Cluster
metadata:
  name: spr-postgres
  namespace: <PRIVATE_REGISTRY_NAMESPACE>
spec:
  instances: 3
  imageName: ${CNPG_IMAGE}
  postgresUID: 26
  postgresGID: 26
  enableSuperuserAccess: false
  affinity:
    enablePodAntiAffinity: true
    podAntiAffinityType: required
    topologyKey: kubernetes.io/hostname
  bootstrap:
    initdb:
      database: registry
      owner: harbor
  postgresql:
    parameters:
      max_connections: "300"
  storage:
    size: 8Gi
    storageClass: <STORAGE_CLASS_NAME>
EOF
Wait for the cluster to become ready:
> kubectl -n <PRIVATE_REGISTRY_NAMESPACE> wait --for=condition=Ready cluster.postgresql.cnpg.io/spr-postgres --timeout=15m
> kubectl cnpg status spr-postgres -n <PRIVATE_REGISTRY_NAMESPACE>
The operator automatically creates the following resources:
A Secret named
spr-postgres-appcontaining the database credentials and connection parameters.Three Services:
spr-postgres-rw(read-write for the primary),spr-postgres-ro(read-only for standbys) andspr-postgres-r(read-only across any instance).
6.7.4 Configuring Private Registry to use CloudNativePG #
Configure Private Registry to connect to the spr-postgres-rw Service and reuse the generated application Secret in suse_registry_override.yaml:
database:
  type: external
  maxIdleConns: 5
  maxOpenConns: 20
  external:
    host: spr-postgres-rw.<PRIVATE_REGISTRY_NAMESPACE>.svc.cluster.local
    port: 5432
    username: harbor
    coreDatabase: registry
    existingSecret: spr-postgres-app
    sslmode: verify-full
Always point database.external.host to the -rw Service.
The -rw Service automatically directs traffic to the active primary pod during switchover and failover.
6.7.5 Best practices and recommendations #
Follow these recommendations when running CloudNativePG with Private Registry:
Always route writes through the
-rwService. Do not configure thecorecomponent to use-roServices, because it requires immediate read-after-write consistency.Distribute instances across failure domains. Enable
affinity.enablePodAntiAffinitywithpodAntiAffinityType: requiredso that a node failure does not affect multiple PostgreSQL pods.Run at least three instances. Deploying three instances ensures that a standby remains available even if one node fails.
Size connection pools appropriately. Sum
maxOpenConnsacross all component replicas and ensure the total remains well belowmax_connectionsin the database configuration.Restrict database privileges. Keep
enableSuperuserAccess: falseto reduce the blast radius if application credentials leak.Preserve user IDs and image repositories. Keep
postgresUIDandpostgresGIDset to26for upstream images and avoid major-version image changes without proper migration.Enforce TLS encryption. Use
sslmode: verify-fullwith trusted certificates. If you configurerequire, understand that it encrypts traffic without validating the server certificate.Configure disruption budgets. Ensure pod disruption budgets prevent multiple instances from being evicted simultaneously during maintenance.
Test switchover and failover. Run
kubectl cnpg promote spr-postgres <CLUSTER_INSTANCE> -n <PRIVATE_REGISTRY_NAMESPACE>during testing to verify that Private Registry recovers cleanly from a primary change.Monitor database metrics. Export Prometheus metrics and create alerts for replication lag, degraded instance counts and backup failures.
6.7.6 Backing up and restoring with Velero #
When backing up Private Registry with Velero, manage the CloudNativePG database as an external database:
Exclude database volumes from Velero backups. Generic file-system or CSI snapshots do not coordinate with PostgreSQL replication states. Label the PostgreSQL pods and claims to exclude them:
> kubectl -n <PRIVATE_REGISTRY_NAMESPACE> label pod -l cnpg.io/cluster=spr-postgres velero.io/exclude-from-backup=true
> kubectl -n <PRIVATE_REGISTRY_NAMESPACE> label pvc -l cnpg.io/cluster=spr-postgres velero.io/exclude-from-backup=true
Use native CloudNativePG backups. Configure WAL archiving and scheduled base backups to object storage using CloudNativePG
Backupresources. For more information, see the CloudNativePG backup documentation.Follow the correct recovery sequence. During disaster recovery:
Reinstall the CloudNativePG operator on the destination cluster.
Restore the
Clusterresource using CloudNativePG recovery mechanisms.Restore the Private Registry Velero backup into the namespace.
Verify that the generated database Secret matches the restored deployment settings before starting Private Registry.
For more information on Velero procedures, see Chapter 10, Backing up and restoring with Velero.
6.7.7 Limitations #
Keep the following limitations in mind:
Replication protects against node or pod failure, but does not protect against accidental data deletion or table corruption.
Standard asynchronous replication can lose unreplicated in-flight transactions during an unplanned primary failure.
Node-local storage classes bind each PostgreSQL instance to a single node. Standbys on other nodes are necessary to survive node loss.
Reducing the instance count does not reduce
max_connectionsor resource requests automatically.
6.8 Deploying Private Registry with HA #
Complete the SCC mirroring credential and Kubernetes secret steps described in Section 4.1, “Obtaining Kubernetes secrets from the SUSE Customer Center”.
Log in to SUSE Registry using the SCC mirroring credentials.
> head -1 ./password.txt | helm registry login registry.suse.com \
  --username <SUSE_REGISTRY_USERNAME> --password-stdin
Create a
suse_registry_override.yamlvalues file that matches your requirements. Refer to Appendix B, Example of a Private Registry HA setup Helm chart for an example values file for a Private Registry HA setup. Refer to Appendix A, Overriding the SUSE Private Registry Helm chart for a complete list of values to specify or override.Install the Private Registry Helm chart with your values file. Replace
<APP_VERSION>with the application version to install, for example,1.2. Replace<RELEASE_NAME>with your custom release name for the Helm chart deployment.> helm install <RELEASE_NAME> \ oci://registry.suse.com/private-registry/<APP_VERSION>/private-registry-helm \ --namespace <PRIVATE_REGISTRY_NAMESPACE> \ -f suse_registry_override.yaml
6.9 Performing maintenance and upgrades #
Follow this procedure for planned maintenance, such as a node drain or a rolling upgrade:
Verify that the registry has enough available capacity to run during a node drain.
Upgrade one failure domain at a time.
After each change, verify pod readiness, registry API health, and image pulls and pushes. For example, log in and push and pull a test image to confirm that the registry serves traffic correctly:
> docker login <SUSE_PRIVATE_REGISTRY_URL> -u <REGISTRY_USERNAME>
> docker pull <SUSE_PRIVATE_REGISTRY_URL>/library/<TEST_IMAGE>:<TAG>
> docker push <SUSE_PRIVATE_REGISTRY_URL>/library/<TEST_IMAGE>:<TAG>
Set persistence.resourcePolicy to keep when PVCs must remain after a Helm release is deleted, for example when a release is reinstalled as part of maintenance.
This setting does not replace backups and does not protect PVCs from deletion outside Helm.
Before placing the deployment into production, test the failure of one pod and one worker node, and test the documented recovery procedure with a non-production backup.
6.10 Configuring retention and garbage collection #
Retention and garbage-collection settings are standing configuration, not steps in the maintenance procedure in Section 6.9, “Performing maintenance and upgrades”. Set them up once, independently of any planned maintenance, and let them run on their own schedule.
Configure image retention policies and schedule garbage collection in the Private Registry administrator interface.
Garbage collection removes unreferenced image data after retention policies or artifact deletions run.
Review the reclaimable storage before a production garbage-collection run and monitor storage growth afterward.
The registry upload-purging settings also remove leftover data from incomplete or interrupted image uploads (as opposed to garbage collection, which removes unreferenced but otherwise complete image data); see Appendix A, Overriding the SUSE Private Registry Helm chart for the available registry.upload_purging values.
6.11 Monitoring the deployment #
Monitor the following conditions:
Available replicas for each Private Registry deployment.
Pending or restarting pods and PVCs that are not bound.
Database, cache, object-storage, and Ingress health.
Artifact storage growth, job queues, scan failures, and replication failures.
Enable the chart’s Prometheus metrics and configure a ServiceMonitor when your cluster runs the Prometheus Operator:
metrics:
  enabled: true
  serviceMonitor:
    enabled: true
Create alerts for unavailable replicas, repeated pod restarts, storage capacity, failed scans, failed jobs, and dependency health.
Use metrics.serviceMonitor.additionalLabels when your monitoring stack requires a label to discover the ServiceMonitor.
6.12 Managing network traffic #
Ensure that the worker-node and load-balancer networks provide enough bandwidth for peak image pushes, pulls, replication, and vulnerability database updates. Monitor network throughput and connection errors during normal and peak workloads.
If the registry requires a corporate proxy, configure the proxy URL, excluded addresses, and affected components in the Helm values:
proxy:
  httpProxy: <HTTP_PROXY_URL>
  httpsProxy: <HTTPS_PROXY_URL>
  noProxy: 127.0.0.1,localhost,.local,.internal
  components:
    - core
    - jobservice
    - trivy
Include the registry services, database, cache, object storage, Kubernetes API, and monitoring endpoints in noProxy when they must not use the proxy.
Verify proxy access for each component that downloads external content or connects to an external service.
6.13 Planning backup and recovery #
HA reduces downtime during selected failures. It does not replace backups or protect against accidental deletion, data corruption, or loss of the entire cluster. Define the required recovery point objective (RPO) and recovery time objective (RTO) before selecting backup schedules and storage.
For a complete recovery plan:
Back up PostgreSQL with an application-consistent database method.
Protect external image and chart storage with the provider’s backup and retention features.
Store Kubernetes resource and volume backups outside the primary cluster.
Preserve the chart version, application version, Helm values, connection information, and required secret references.
Prepare a recovery cluster with compatible Kubernetes versions,
StorageClassnames, networking, and Ingress configuration.
For the detailed Velero procedure, see Chapter 10, Backing up and restoring with Velero. The procedure also describes expected recovery behavior, including lost Valkey or Redis sessions, interrupted tasks, internal PostgreSQL consistency requirements, and the need to preserve chart-generated secrets.
6.14 Reviewing the deployment before production #
Confirm the following items before you rely on the deployment for production workloads:
Replicas are distributed across worker nodes or failure domains.
Worker nodes have enough reserved capacity for a node failure.
The Ingress endpoint is redundant, and DNS reliably resolves to it.
The TLS certificate is valid on every endpoint instance and renews automatically before it expires.
PostgreSQL and Valkey or Redis have tested failover and backup procedures.
Image and chart storage remains available during a worker-node failure.
Monitoring detects unavailable replicas, dependency failures, storage exhaustion, and failed jobs.
A Velero backup, together with the external database and object-storage backups, has been restored successfully in a test environment. See Chapter 10, Backing up and restoring with Velero.
7 Configure Rancher as an OIDC Identity Provider #
This guide explains how to configure Rancher to act as an OIDC Identity Provider, allowing users to authenticate into external applications such as SUSE Private Registry using their Rancher credentials.
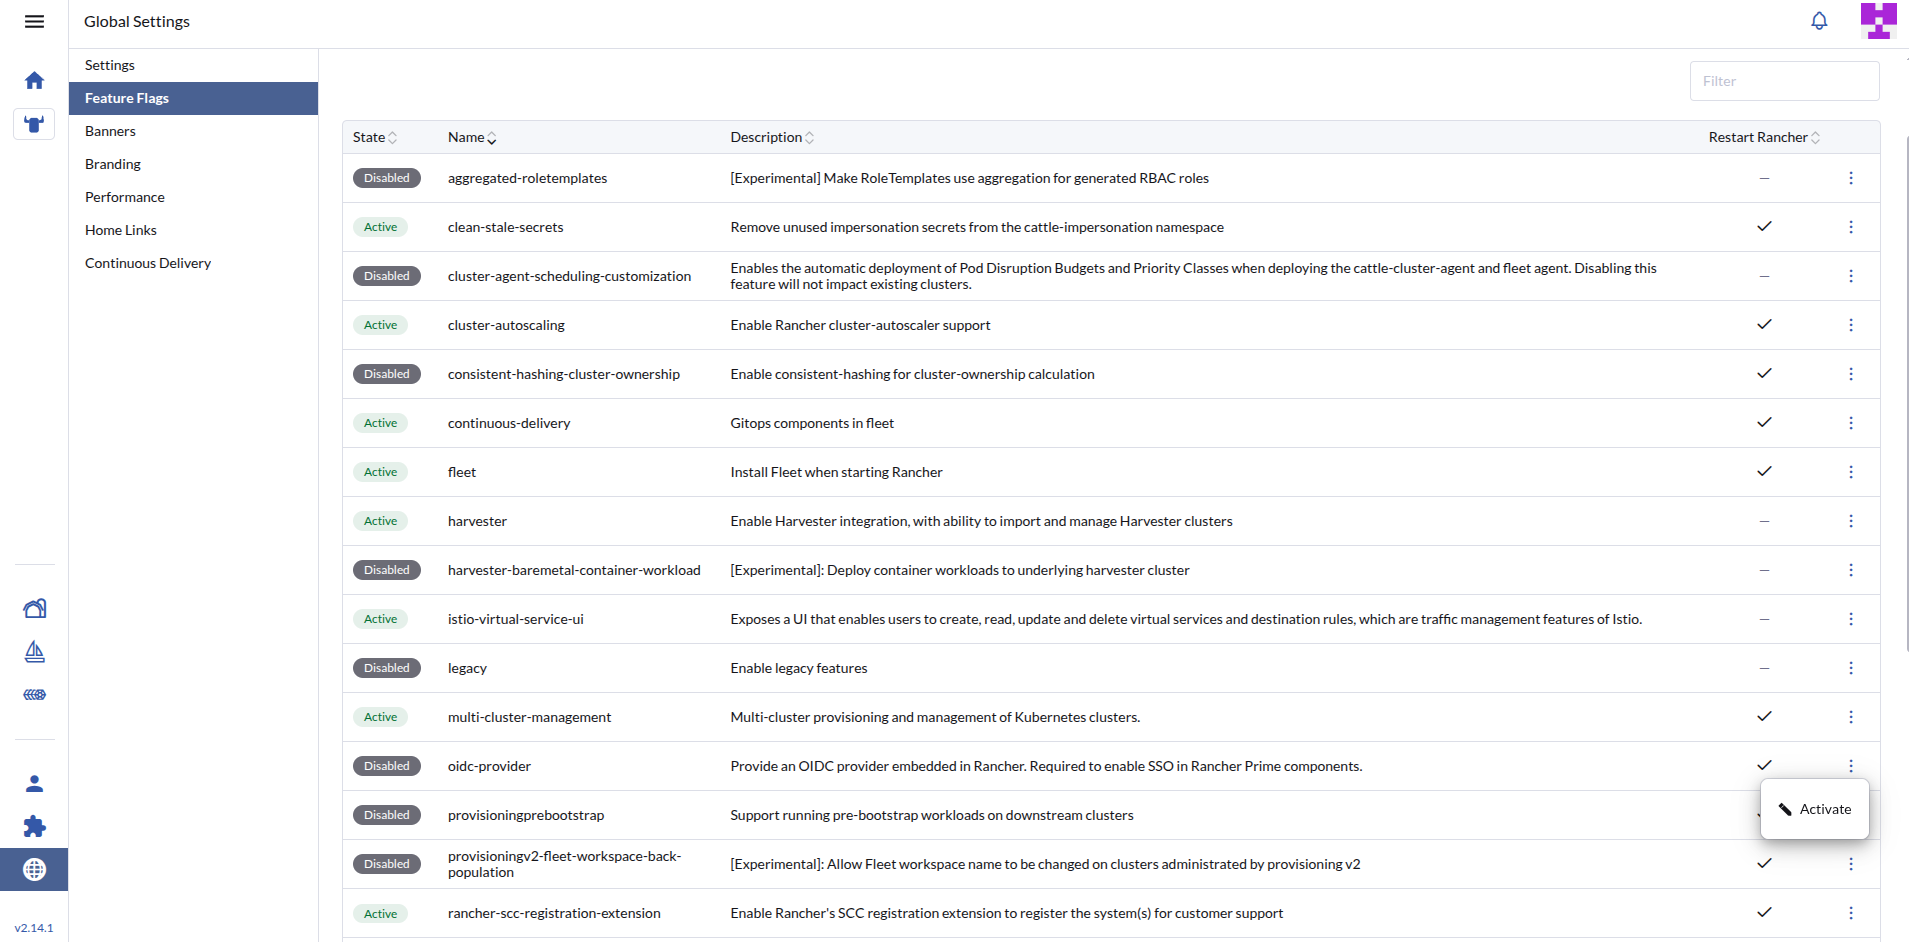
7.1 Step 1: Enable the oidc-provider feature flag #
Log in to the Rancher UI as an administrator.
Click the three-line menu (☰) in the upper left and go to › .
Find the
oidc-providerflag, click the More Actions icon (⋮), and click Activate.
7.2 Step 2: Create an OIDCClient resource #
Rancher uses an OIDCClient Custom Resource to register downstream applications.
Create a file named
rancher-oidc-client.yamlwith the following content:apiVersion: management.cattle.io/v3 kind: OIDCClient metadata: name: spr-client spec: tokenExpirationSeconds: 600 refreshTokenExpirationSeconds: 3600 redirectURIs: # Replace this with the actual callback URL of your SUSE private registry instance - "https://<SUSE_PRIVATE_REGISTR_URL>/c/oidc/callback"Apply the file to the cluster where Rancher is running:
> kubectl apply -f rancher-oidc-client.yaml
7.3 Step 3: Retrieve the Client ID and Secret #
Once the resource is created, Rancher automatically populates the clientID and provisions a Kubernetes Secret containing the clientSecret.
Get the generated Client ID:
> kubectl get oidcclient spr-client -o jsonpath="{.status.clientID}"Fetch the Client Secret. Remember to replace
<YOUR_CLIENT_ID>with the ID retrieved in the previous step:> kubectl get secret <YOUR_CLIENT_ID> -n cattle-oidc-client-secrets -o jsonpath="{.data.client-secret-1}" | base64 -d
7.4 Step 4: Configure SUSE Private Registry #
You can configure SUSE Private Registry to use Rancher as its OIDC provider by passing the values via Helm.
Use the core.configureUserSettings block in your values-oidc.yaml configuration.
The following is an example block using your Rancher endpoint and the credentials retrieved above.
Replace the values of <YOUR_CLIENT_ID> and <YOUR_CLIENT_SECRET>.
core:
  configureUserSettings: |
    {
      "auth_mode": "oidc_auth",
      "oidc_name": "Rancher",
      "oidc_endpoint": "<RANCHER_URL>/oidc",
      "oidc_client_id": "<YOUR_CLIENT_ID>",
      "oidc_client_secret": "<YOUR_CLIENT_SECRET>",
      "oidc_scope": "openid,profile,offline_access",
      "oidc_verify_cert": false,
      "oidc_auto_onboard": true,
      "oidc_user_claim": "preferred_username",
      "oidc_groups_claim": "groups",
      "oidc_admin_group": "spr-admins"
}Ensure oidc_verify_cert is set to false if your Rancher instance is using self-signed certificates.
By specifying oidc_admin_group, any Rancher user belonging to the spr-admins group will automatically be granted System Administrator privileges in SUSE Private Registry.
8 How do I automate access to a proxy-cache project? #
A proxy-cache project in SUSE Private Registry retrieves container images and Open Container Initiative (OCI) Helm charts from SUSE Application Collection on demand. A SUSE Application Collection service account authenticates upstream requests, while a SUSE Private Registry robot account authenticates downstream clients. This separation lets administrators retain upstream credentials in the registry and give automation project-scoped access through command-line tools or Terraform.
8.1 What do I need before configuring the proxy? #
A running SUSE Private Registry instance and system administrator access to configure registry endpoints and projects.
Project administrator access to create a project robot account.
A SUSE Application Collection organization administrator who can create a service account, with subscriptions covering the artifacts you need.
Network access from SUSE Private Registry to SUSE Application Collection, including its authentication and artifact download services.
Trusted Transport Layer Security (TLS) certificates and working Domain Name System (DNS) resolution for both registries.
Docker and Helm clients for testing pulls.
Terraform and cluster credentials if you follow the infrastructure-as-code examples.
Project robot accounts act within one project. System robot accounts can have system permissions and permissions across selected projects. Robot accounts authenticate OCI clients and application programming interface (API) requests, not interactive web sessions. A SUSE Application Collection service account belongs to one organization and inherits that organization’s subscriptions.
8.2 How do I find available components? #
Use the upstream catalog to discover applications, container images and Helm charts. A proxy-cache project does not automatically list or download the upstream catalog. Its repository list contains artifacts cached after clients request them.
Filter by container images or Helm charts, or search for an application.
Open the application and select an artifact version.
 Figure 8.1: Application Collection artifact details and available versions #
Record its repository path and tag from the artifact details or pull command. For example, container paths start with
containers/and chart paths start withcharts/.Check that your service account’s organization has the subscription required to pull the selected artifact.
Catalog visibility does not grant download access. For an example of viewing an application and its available artifact versions, see the SUSE Application Collection documentation on reviewing application details. For programmatic discovery, see the Metadata Service API. Follow each endpoint’s pagination and filtering rules rather than treating one response as the complete catalog.
8.3 How do I create upstream credentials? #
Create a SUSE Application Collection service account for registry-to-registry access. Keep its credentials separate from the SUSE Private Registry robot credentials distributed to clients.
Sign in to SUSE Application Collection with an organization administrator account.
Open your profile menu and select Settings.
Select Service accounts.
Enter a description and select the organization that provides the required subscriptions.
Click Create.
Save the generated username and secret in your approved secret store.
For account requirements, see the SUSE Application Collection authentication documentation.
8.4 How do I configure the registry endpoint and proxy project? #
Register SUSE Application Collection as an upstream Docker Registry endpoint, then select that endpoint in a new proxy-cache project.
Sign in to SUSE Private Registry as a system administrator.
Go to Registries and click New endpoint.
Configure the endpoint with the following values:
Field Value Provider
Docker Registry
Name
application-collectionEndpoint URL
Access ID
The SUSE Application Collection service account username
Access Secret
The SUSE Application Collection service account secret
Verify Remote Cert
Enabled
 Figure 8.2: Application Collection registry endpoint form in Harbor #
Click Test Connection and resolve authentication or connectivity errors before continuing.
Click OK to save the endpoint.
Go to Projects and click New Project.
Set Project Name to
application-collectionand keep the project private.Enable Proxy Cache and select the
application-collectionregistry endpoint.Click OK.

Clients with pull access to this project can request upstream artifacts accessible to the configured SUSE Application Collection service account. Restrict project membership and robot permissions to authorized consumers.
Proxy-cache projects do not accept pushes. The first pull of an uncached artifact requires upstream connectivity. Review the project’s retention policy because cached artifacts can expire. Proxy caching does not replace a complete mirror for an air-gapped environment.
For upstream configuration details, see Mirror with Harbor.
8.5 How do I create a pull-only robot account? #
Use a project robot account for clients that only consume artifacts from the proxy. Do not grant registry administration permissions to this account.
Open Projects, select
application-collectionand select Robot Accounts.Click New Robot Account.
Enter a name, such as
proxy-reader, and a description.Set an expiration time that matches your credential rotation policy.
Continue to the permissions step and select only Pull Repository.
Click FINISH.
Use Export to File or the copy control to save the generated credentials securely.
Use the full generated username, including the configured prefix and project name.
With the configured robot@ prefix, an example is robot@application-collection+proxy-reader.
The secret is not retrievable after creation; refresh it if you lose it.
8.6 How do I replace the dollar sign in robot user names? #
If a client or automation system has trouble with the default robot$ prefix, a system administrator can change the robot name prefix to robot@.
The configured prefix applies to existing and new system and project robot accounts.
Robot accounts created with Harbor 2.1 or earlier keep the robot$ prefix.
Sign in to SUSE Private Registry as a system administrator.
Go to Configuration and select System Settings.
Find Robot Name Prefix and replace
robot$withrobot@.Save the change.
Update stored robot user names in Docker and Helm clients, Terraform variables, automation systems and Kubernetes image-pull secrets.
Test authentication with the updated username before removing the old client configuration.
The account name and secret do not change when you update the prefix.
For example, robot$application-collection+proxy-reader becomes robot@application-collection+proxy-reader.
The change is global, so coordinate it with every team and automation system that uses robot accounts.

For more information, see Configure Robot Account Prefix.
8.7 How do I pull images and charts through the proxy? #
Replace the upstream host with your registry host and proxy project, while preserving the artifact repository path.
For example, dp.apps.rancher.io/containers/IMAGE:TAG becomes REGISTRY_HOST/application-collection/containers/IMAGE:TAG.
In Bash, enter the registry host and the pull-only robot credentials:
printf '%s' "$ROBOT_SECRET" | docker login "$REGISTRY_HOST" \
  --username "$ROBOT_USERNAME" --password-stdin
printf '%s' "$ROBOT_SECRET" | helm registry login "$REGISTRY_HOST" \
  --username "$ROBOT_USERNAME" --password-stdin
unset ROBOT_SECRET
Use a trusted certificate rather than disabling TLS verification. Client login stores credentials locally; protect the client credential files or use a credential helper. For more SUSE Application Collection Docker, Helm and Kubernetes authentication examples, see the authentication documentation.
Enter the image name and tag selected from the catalog, then pull through the proxy:
read -r -p 'Container name, without containers/: ' IMAGE_NAME
read -r -p 'Container tag: ' IMAGE_TAG
docker pull "$REGISTRY_HOST/application-collection/containers/$IMAGE_NAME:$IMAGE_TAG"
Enter the chart name and version selected from the catalog, then pull the chart:
read -r -p 'Chart name, without charts/: ' CHART_NAME
read -r -p 'Chart version: ' CHART_VERSION
helm pull "oci://$REGISTRY_HOST/application-collection/charts/$CHART_NAME" \
  --version "$CHART_VERSION"
Open the project’s Repositories view and confirm that the requested artifacts appear.
Downloading a chart through the proxy does not rewrite the container image references inside that chart. Configure chart-specific registry values and namespace-local image-pull secrets before deploying its workloads.
8.8 How do I manage registry resources with infrastructure as code? #
The goharbor/harbor Terraform provider authenticates to the SUSE Private Registry API with a robot username and secret.
Use a separate management robot, not the pull-only account distributed to workloads.
The following example manages the upstream registry endpoint and proxy-cache project configured in Section 8.4, “How do I configure the registry endpoint and proxy project?”.
The endpoint must point directly to SUSE Application Collection so SUSE Private Registry can retrieve artifacts to cache.
Clients still pull artifacts through the proxy-cache project, not directly from SUSE Application Collection.
The example pins provider version 3.12.5 and requires Terraform 1.14.0 or later.
For Terraform language and command-line guidance, see the Terraform documentation.
The upstream provider lists Harbor 2.15 in its compatibility tests; this does not establish SUSE certification of the provider.
In Terraform, setting sensitive = true hides values in normal output but does not encrypt them or exclude resource secrets from state.
The endpoint’s access_secret and ordinary Kubernetes Secret data remain in Terraform state.
Use encrypted, access-restricted state storage and protect saved plans, backups and automation logs.
Do not commit credentials, state files or secret-bearing variable files.
As a system administrator, go to › and click New Robot Account.
Enter an account name, such as
terraform-registry, a description and an expiration time.Grant the system permissions required by the following table.
Associate the account with the existing
application-collectionproject and grant the listed project permissions. Do not enable Cover all projects for this example.Click FINISH and save the full username and secret securely.
| Scope | Permission | Purpose in this example |
|---|---|---|
System | List Project | Look up the project by name with |
System | Read Registry | Read the imported registry endpoint. |
System | Update Registry | Update endpoint settings or upstream credentials. |
Project | Read Scanner | Read the project’s scanner during the data-source lookup. |
Project | Read Project | Read the imported project’s settings. |
Project | Update Project | Apply changes to project settings. |
These permissions follow the provider’s API calls for this example. Additional resources can require different permissions; Pull Repository alone does not grant registry management access. Configuration-related APIs are not generally available to robot accounts. This example leaves scanner assignment and storage quota management to the administrator.
In a dedicated Terraform working directory, create
main.tfwith the following configuration:terraform { required_version = ">= 1.14.0" required_providers { harbor = { source = "goharbor/harbor" version = "3.12.5" } } } provider "harbor" { insecure = false } data "harbor_project" "application_collection" { name = "application-collection" } output "proxy_project_id" { value = data.harbor_project.application_collection.project_id }Set the registry URL and management credentials in Bash:
read -r -p 'Private Registry URL, including https://: ' HARBOR_URL read -r -p 'Full management robot username: ' HARBOR_USERNAME read -r -s -p 'Management robot secret: ' HARBOR_PASSWORD printf '\n' export HARBOR_URL HARBOR_USERNAME HARBOR_PASSWORD unset HARBOR_SESSION_ID HARBOR_BEARER_TOKEN terraform init terraform validate terraform planHARBOR_URLis the registry’s base URL, without/api/v2.0. Explicitinsecure = falseenables certificate verification despite the provider’s default. Supply a trusted certificate authority for privately signed certificates. In automation, inject credentials from your protected secret store instead of using interactive input.Confirm that the plan reads the intended project before adding managed resources.
Add the following configuration to
main.tf:variable "collection_username" { type = string } variable "collection_secret" { type = string sensitive = true } resource "harbor_registry" "application_collection" { name = "application-collection" provider_name = "docker-registry" endpoint_url = "https://dp.apps.rancher.io" access_id = var.collection_username access_secret = var.collection_secret insecure = false lifecycle { prevent_destroy = true } } resource "harbor_project" "application_collection" { name = "application-collection" public = false registry_id = harbor_registry.application_collection.registry_id lifecycle { prevent_destroy = true } }The numeric
registry_idenables proxy caching. Theaccess_idandaccess_secretare upstream SUSE Application Collection credentials, not the management robot credentials.Enter the upstream credentials and the existing resource IDs:
read -r -p 'Application Collection service account username: ' TF_VAR_collection_username
read -r -s -p 'Application Collection service account secret: ' TF_VAR_collection_secret
printf '\n'
export TF_VAR_collection_username TF_VAR_collection_secret
read -r -p 'Existing registry endpoint ID: ' ENDPOINT_ID
read -r -p 'Existing proxy project ID: ' PROJECT_ID
terraform import harbor_registry.application_collection "/registries/$ENDPOINT_ID"
terraform import harbor_project.application_collection "/projects/$PROJECT_ID"
terraform plan
Use the numeric IDs from the SUSE Private Registry API. Import existing resources before applying; otherwise Terraform attempts to create resources with names that already exist.
Review differences against the existing project settings. Match settings you need to preserve, including scanning and content-trust policies, before applying.
Run
terraform applyonly after reviewing the plan in an isolated test environment.Remove credentials from the shell environment when finished:
unset HARBOR_PASSWORD TF_VAR_collection_secret
Creating a new endpoint requires Create Registry; creating a new project requires Create Project.
A system administrator must arrange the management robot’s project permissions for subsequent reads and updates of a new project.
Do not assume that project creation grants those permissions automatically.
Use an administrator-assisted setup when the new project cannot yet be associated with the robot.
Deletion requires additional permissions; the example blocks destruction with prevent_destroy and does not enable force_destroy.
For resource schemas, see the Harbor provider documentation.
8.9 How do I deploy workloads through the proxy with infrastructure as code? #
Use the pull-only robot account for both chart downloads and container image pulls. The registry credentials in the Helm provider authenticate chart downloads; a namespace-local image-pull secret authenticates the workload images. Your kubeconfig authenticates Terraform to the cluster separately and needs permission to manage the deployment resources.
This example uses the SUSE Application Collection etcd chart and its global.imageRegistry and global.imagePullSecrets values.
Confirm these values in the selected chart version before applying.
Other charts can use different value names.
The providers are pinned to hashicorp/helm 3.3.0 and hashicorp/kubernetes 3.3.0.
Create a separate Terraform working directory and a
main.tffile with the following configuration:terraform { required_version = ">= 1.14.0" required_providers { helm = { source = "hashicorp/helm" version = "3.3.0" } kubernetes = { source = "hashicorp/kubernetes" version = "3.3.0" } } } variable "registry_host" { type = string } variable "robot_username" { type = string } variable "robot_secret" { type = string sensitive = true } variable "chart_version" { type = string } variable "kubeconfig_path" { type = string default = "~/.kube/config" } provider "kubernetes" { config_path = pathexpand(var.kubeconfig_path) } provider "helm" { kubernetes = { config_path = pathexpand(var.kubeconfig_path) } registries = [ { url = "oci://${var.registry_host}" username = var.robot_username password = var.robot_secret } ] } resource "kubernetes_namespace_v1" "application_collection" { metadata { name = "application-collection" } } resource "kubernetes_secret_v1" "proxy_pull" { metadata { name = "proxy-pull" namespace = kubernetes_namespace_v1.application_collection.metadata[0].name } type = "kubernetes.io/dockerconfigjson" data = { ".dockerconfigjson" = jsonencode({ auths = { (var.registry_host) = { username = var.robot_username password = var.robot_secret auth = base64encode("${var.robot_username}:${var.robot_secret}") } } }) } } resource "helm_release" "etcd" { name = "collection-etcd" namespace = kubernetes_namespace_v1.application_collection.metadata[0].name repository = "oci://${var.registry_host}/application-collection/charts" chart = "etcd" version = var.chart_version values = [yamlencode({ global = { imageRegistry = "${var.registry_host}/application-collection" imagePullSecrets = [kubernetes_secret_v1.proxy_pull.metadata[0].name] } })] }Set
registry_hostto the host name and optional port, without a scheme or project path. The Secret uses that host as its authentication key. The provider encodes thedatavalues for Kubernetes; do not base64-encode the complete JSON value again. The release references the Secret, ensuring that Terraform creates the Secret before installing the chart.In Bash, enter your pull-only robot credentials and the chart version selected from the catalog:
read -r -p 'Private Registry host, without https://: ' TF_VAR_registry_host
read -r -p 'Full pull-only robot username: ' TF_VAR_robot_username
read -r -s -p 'Pull-only robot secret: ' TF_VAR_robot_secret
printf '\n'
read -r -p 'Application Collection etcd chart version: ' TF_VAR_chart_version
export TF_VAR_registry_host TF_VAR_robot_username TF_VAR_robot_secret TF_VAR_chart_version
terraform init
terraform validate
terraform plan
Confirm the kubeconfig context targets your test cluster and review the planned resources.
If the
application-collectionnamespace already exists, import it into Terraform state before applying:terraform import kubernetes_namespace_v1.application_collection application-collectionRun
terraform applyin the test environment.Check the workload with your configured kubeconfig:
kubectl --kubeconfig "$HOME/.kube/config" -n application-collection get pods
kubectl --kubeconfig "$HOME/.kube/config" -n application-collection get pods \
  -o jsonpath='{range .items[*]}{.metadata.name}{"\n"}{.spec.containers[*].image}{"\n"}{.spec.imagePullSecrets[*].name}{"\n"}{end}'
unset TF_VAR_robot_secret
If you set
kubeconfig_path, use that same path forkubectl. Confirm that container image paths include your registry and proxy project and that Pods referenceproxy-pull. InvestigateImagePullBackOffevents before treating the deployment as verified.Run
terraform planagain and check for unexpected changes.
The Secret’s ordinary data attribute stores credentials in state even though robot_secret is sensitive.
The providers offer additional secret-handling options; evaluate their version requirements before changing this example.
For schemas, see the Helm provider and
Kubernetes Secret resource documentation.
8.10 How do I rotate credentials and troubleshoot access? #
To refresh a robot secret, select the account under Robot Accounts and choose › .
Store the new secret and update client credentials, automation secrets and Kubernetes image-pull secrets.
For Terraform, update protected HARBOR_PASSWORD or TF_VAR_robot_secret values for the corresponding account.
Apply the workload configuration to update the image-pull secret after rotation.
Do not rotate the management credential during an active Terraform run.
Test a new pull before retiring the previous configuration.
Deactivate or delete accounts that no longer need access.
Rotate upstream service-account credentials separately and update the registry endpoint when they change.
For a downstream
401or403response, check the full robot username, secret, expiration, enabled status and project permissions.For upstream authentication failures, check the endpoint credentials and the service account’s organization subscriptions.
For missing repositories in a new project, pull an artifact first; the project is not an upstream catalog browser.
For a missing tag, confirm the selected version in the upstream catalog.
For TLS or connection failures, check certificate trust, DNS resolution and network access from the registry.
For upstream
429responses, review SUSE Application Collection rate limits and reduce concurrent requests.For Terraform API
403responses, check the management robot’s permissions for each provider API call.For Kubernetes authorization failures, check kubeconfig credentials and role-based access control (RBAC), not the registry robot credentials.
For account permissions and cache behavior, see the upstream documentation:
9 Migrating data from upstream Harbor to SUSE Private Registry #
9.1 Overview #
SUSE Private Registry (Private Registry) is derived from Harbor and shares the same PostgreSQL database schema and registry blob storage layout. This means that data from an existing Harbor installation, including projects, users, repositories, artifacts, policies, and image or chart blobs, can be migrated to Private Registry using a database dump and restore along with a copy of the registry blob storage. This avoids the need to re-push every artifact manually.
This guide covers migrating:
The PostgreSQL database of Harbor (all metadata, including projects, users, repositories, artifacts, tags, and policies)
The registry blob storage (the actual image layers and Helm chart content)
It does not cover the migration of the configuration of Harbor itself, such as authentication backends, replication endpoints, and quotas. Review your existing Harbor Helm values and reapply the relevant settings to your Private Registry installation separately.
9.2 Prerequisites #
kubectlaccess to a separate namespace for each installation. Each namespace must contain only one Harbor or Private Registry release. The commands use component labels and are not safe when multiple releases share a namespace.Enough local or otherwise accessible disk space to hold the database dump and the registry blob archive. Size the blob archive against the actual storage usage of your Harbor registry.
The bundled PostgreSQL database for both installations. This procedure does not support external databases.
File-system registry storage for both installations. This procedure does not export or restore object-storage content. For object storage, use a provider-specific transfer procedure.
A supported source Harbor version. The source Harbor version must match the Harbor version that your Private Registry release is based on. Upgrade an older source to this version before exporting. Do not migrate from a newer source into an older destination.
A cluster that supports ephemeral debug containers (
kubectl debug, GA since Kubernetes 1.25). This is required to work around a specific Private Registry limitation described in Section 9.7, “Step 4: Restore the data into Private Registry”.If your cluster enforces the
restrictedPod Security Standard, plan for a temporary exception: the debug container used in Section 9.7, “Step 4: Restore the data into Private Registry” needsrunAsUser: 0and theSYS_PTRACEcapability. Loosening the Pod Security label of the namespace during the migration (or using an equivalent exemption) is the simplest approach.A maintenance window. Both the source Harbor and the destination Private Registry are put into a read-only or quiesced state (and briefly scaled down) while data is copied, so clients cannot push during the migration.
The supported version combination for this procedure is:
| Private Registry version | Supported source Harbor version | Required action for other source versions |
|---|---|---|
1.2.1 | 2.15.2 | Upgrade the source to 2.15.2 before exporting. Do not restore a newer source into an older destination. |
Take a full backup or storage snapshot of both the source Harbor and destination Private Registry independently of the export this procedure produces. The steps below are destructive to the Private Registry database and registry storage — they overwrite both.
9.3 Migration overview #
9.4 Step 1: Export data from Harbor #
Set variables for your environment:
SRC_NAMESPACE=<harbor-namespace>
SRC_HOST=<harbor-external-hostname>
SRC_ADMIN_PASSWORD=<harbor-admin-password>
SRC_CA_CERT=<path-to-harbor-ca-certificate>
SRC_HARBOR_VERSION=<harbor-version>
EXPORT_PATH=./harbor-export-$(date +%Y%m%d-%H%M%S)
> install -d -m 0700 "$EXPORT_PATH"

SRC_DB_POD=$(kubectl -n "$SRC_NAMESPACE" get pod -l component=database -o jsonpath='{.items[0].metadata.name}')
SRC_REGISTRY_POD=$(kubectl -n "$SRC_NAMESPACE" get pod -l component=registry -o jsonpath='{.items[0].metadata.name}')
SRC_JOBSERVICE_REPLICAS=$(kubectl -n "$SRC_NAMESPACE" get deploy -l component=jobservice -o jsonpath='{.items[0].spec.replicas}')
SRC_TRIVY_REPLICAS=$(kubectl -n "$SRC_NAMESPACE" get statefulset -l component=trivy -o jsonpath='{.items[0].spec.replicas}')
> [ "$SRC_HARBOR_VERSION" = "2.15.2" ] || { echo "ERROR: upgrade the source Harbor to 2.15.2 before exporting"; exit 1; }
Before starting the export, stop or postpone garbage collection, replication, and vulnerability scans. Read-only mode does not stop these operations, and scaling down their workers can interrupt jobs that are in progress.
Put Harbor into read-only mode so no new writes land during the export:
> curl -s -u "admin:${SRC_ADMIN_PASSWORD}" \
  --cacert "${SRC_CA_CERT}" \
  -H 'Content-Type: application/json' \
  -X PUT "https://${SRC_HOST}/api/v2.0/configurations" \
  -d '{"read_only":true}'
You can also enable this from the Harbor UI, under Administration > Configuration > Repository, instead of using the API call above.
Keep the source in read-only mode until the migration is verified in Section 9.8, “Step 5: Verify the migration”. Only disable it if you need to fall back to the source, as described in Section 9.9, “Rollback”.
Scale down the components that could still write to the database or registry storage in the background (job execution, vulnerability scanning). Leave core, registry, and database running — they’re needed to serve the export itself:
> kubectl -n "$SRC_NAMESPACE" scale deploy -l component=jobservice --replicas=0
> kubectl -n "$SRC_NAMESPACE" scale statefulset -l component=trivy --replicas=0
> kubectl -n "$SRC_NAMESPACE" wait --for=delete pod -l component=jobservice --timeout=120s
> kubectl -n "$SRC_NAMESPACE" wait --for=delete pod -l component=trivy --timeout=120s
Dump the database:
> kubectl -n "$SRC_NAMESPACE" exec "$SRC_DB_POD" -- pg_dump -U postgres -d registry \
  > "${EXPORT_PATH}/harbor-db.sql"
Archive the registry blob storage:
> kubectl -n "$SRC_NAMESPACE" exec "$SRC_REGISTRY_POD" -c registry -- \
  tar czf - -C /storage . > "${EXPORT_PATH}/harbor-registry-blobs.tgz"
Confirm both exports are non-empty before continuing:
> [ -s "${EXPORT_PATH}/harbor-db.sql" ] && [ -s "${EXPORT_PATH}/harbor-registry-blobs.tgz" ] \
  && echo "Export looks good" || echo "ERROR: export incomplete"
Keep $EXPORT_PATH until the migration is verified in Section 9.8, “Step 5: Verify the migration”. Do not delete it after retaining Harbor for rollback.
9.5 Step 2: Retain the source Harbor for rollback #
Once you have confirmed that the above export files are present and not empty, keep the source Harbor deployment available until the migrated SUSE Private Registry instance is running correctly with the restored data. If something goes wrong during verification, you can restore the old registry from the export instead of losing access to the source data. You can keep the source deployment scaled down or read-only as long as you are not ready to remove it completely. Just make sure that it is not accepting any writes that the migrated instance will not see.
9.6 Step 3: Install or prepare SUSE Private Registry #
Install Private Registry following the standard installation procedure described in Chapter 4, Installation using the command line. Two choices matter specifically for a smooth migration:
- External hostname
Configure Private Registry with the same external URL or hostname the source Harbor used. This keeps client endpoints and pull-secret references consistent after the cutover. The fresh installation’s generated secrets are not restored by this procedure, so regenerate robot account credentials after the migration and update clients that use them.
- Persistent storage
Provision enough storage for the restored registry blobs plus headroom for future growth, sized against the blob archive produced in Section 9.4, “Step 1: Export data from Harbor”.
Do not seed Private Registry with production traffic yet, because the restore in the next step overwrites its database and registry storage. The fresh installation’s core secret and token certificate authority are also not restored. Regenerate robot account credentials after the restore.
9.7 Step 4: Restore the data into Private Registry #
Set variables for the destination:
DST_NAMESPACE=<spr-namespace>
DST_HOST=<spr-external-hostname>
DST_CA_CERT=<path-to-spr-ca-certificate>
DST_DB_POD=$(kubectl -n "$DST_NAMESPACE" get pod -l component=database -o jsonpath='{.items[0].metadata.name}')
DST_REGISTRY_POD=$(kubectl -n "$DST_NAMESPACE" get pod -l component=registry -o jsonpath='{.items[0].metadata.name}')
DST_CORE_REPLICAS=$(kubectl -n "$DST_NAMESPACE" get deploy -l component=core -o jsonpath='{.items[0].spec.replicas}')
DST_JOBSERVICE_REPLICAS=$(kubectl -n "$DST_NAMESPACE" get deploy -l component=jobservice -o jsonpath='{.items[0].spec.replicas}')
DST_TRIVY_REPLICAS=$(kubectl -n "$DST_NAMESPACE" get statefulset -l component=trivy -o jsonpath='{.items[0].spec.replicas}')
Scale down the components that write to or read from the database, but leave registry running. The blob-restore step below needs the registry pod alive to copy files into it:
> kubectl -n "$DST_NAMESPACE" scale deploy -l component=core --replicas=0
> kubectl -n "$DST_NAMESPACE" scale deploy -l component=jobservice --replicas=0
> kubectl -n "$DST_NAMESPACE" scale statefulset -l component=trivy --replicas=0
> kubectl -n "$DST_NAMESPACE" wait --for=delete pod -l component=core --timeout=120s
> kubectl -n "$DST_NAMESPACE" wait --for=delete pod -l component=jobservice --timeout=120s
> kubectl -n "$DST_NAMESPACE" wait --for=delete pod -l component=trivy --timeout=120s
9.7.1 Restore the database #
> kubectl -n "$DST_NAMESPACE" cp "${EXPORT_PATH}/harbor-db.sql" "${DST_DB_POD}:/tmp/harbor-db.sql"
> kubectl -n "$DST_NAMESPACE" exec "$DST_DB_POD" -- \
  psql -U postgres -d registry -c 'DROP SCHEMA public CASCADE; CREATE SCHEMA public;'
> kubectl -n "$DST_NAMESPACE" exec "$DST_DB_POD" -- \
  psql -v ON_ERROR_STOP=1 -U postgres -d registry -f /tmp/harbor-db.sql
> kubectl -n "$DST_NAMESPACE" exec "$DST_DB_POD" -- rm -f /tmp/harbor-db.sql
9.7.2 Restore the registry blobs #
The registry container image of Private Registry does not include a tar binary. A plain kubectl cp or kubectl exec … tar against it fails, because kubectl cp itself relies on tar being present in the target container for both directions of the copy. (The registry image of upstream Harbor does contain tar, which is why it works fine for the export in Section 9.4, “Step 1: Export data from Harbor”. This limitation is specific to restoring into Private Registry.)
Work around this by attaching an ephemeral debug container — one that does have tar — to the registry pod, sharing its process namespace. From there, the registry container’s filesystem is reachable through /proc/<pid>/root:
> cat > /tmp/debug-profile.json <<'EOF'
{
  "securityContext": {
    "runAsUser": 0,
    "runAsNonRoot": false,
    "capabilities": { "add": ["SYS_PTRACE"] }
  }
}
EOF

> kubectl -n "$DST_NAMESPACE" debug "$DST_REGISTRY_POD" -c restore-helper \
  --image=registry.suse.com/bci/bci-busybox:16.0 \
  --target=registry --custom=/tmp/debug-profile.json -- sleep infinity
Wait for the debug container to be running, then locate the PID of the registry process from inside it:
> kubectl -n "$DST_NAMESPACE" wait --for=jsonpath='{.status.ephemeralContainerStatuses[?(@.name=="restore-helper")].state.running}' \
  pod/"$DST_REGISTRY_POD" --timeout=60s

REGISTRY_PID=$(kubectl -n "$DST_NAMESPACE" exec "$DST_REGISTRY_POD" -c restore-helper -- sh -c '
  for p in /proc/[0-9]*; do
    if tr "\0" " " < "$p/cmdline" 2>/dev/null | grep -q "^registry serve"; then
      basename "$p"; break
    fi
  done
')
Copy the blob archive in and extract it into the registry’s storage path through the debug container:
> kubectl -n "$DST_NAMESPACE" exec "$DST_REGISTRY_POD" -c restore-helper -- \
  sh -c "rm -rf /proc/${REGISTRY_PID}/root/storage/*"
> cat "${EXPORT_PATH}/harbor-registry-blobs.tgz" | \
  kubectl -n "$DST_NAMESPACE" exec -i "$DST_REGISTRY_POD" -c restore-helper -- \
  tar xzf - -C "/proc/${REGISTRY_PID}/root/storage"
Restart the registry deployment so it picks up the restored files with a clean process (this also clears the temporary debug container):
> kubectl -n "$DST_NAMESPACE" rollout restart deploy -l component=registry
> kubectl -n "$DST_NAMESPACE" rollout status deploy -l component=registry --timeout=180s
9.7.3 Bring the rest of Private Registry back up #
> kubectl -n "$DST_NAMESPACE" scale deploy -l component=core --replicas="$DST_CORE_REPLICAS"
> kubectl -n "$DST_NAMESPACE" scale deploy -l component=jobservice --replicas="$DST_JOBSERVICE_REPLICAS"
> kubectl -n "$DST_NAMESPACE" scale statefulset -l component=trivy --replicas="$DST_TRIVY_REPLICAS"
> kubectl -n "$DST_NAMESPACE" rollout status deploy -l component=core --timeout=180s
> curl -s --cacert "${DST_CA_CERT}" -u "admin:${SRC_ADMIN_PASSWORD}" \
  -H 'Content-Type: application/json' \
  -X PUT "https://${DST_HOST}/api/v2.0/configurations" \
  -d '{"read_only":false}'
9.8 Step 5: Verify the migration #
Check Private Registry’s health endpoint:
> curl -s --cacert "${DST_CA_CERT}" -u "admin:${SRC_ADMIN_PASSWORD}" \
  "https://${DST_HOST}/api/v2.0/health"
Confirm known data survived by querying the API for a project, its repositories/artifacts, and a known user, substituting values you expect to exist:
> curl -s --cacert "${DST_CA_CERT}" -u "admin:${SRC_ADMIN_PASSWORD}" \
  "https://${DST_HOST}/api/v2.0/projects/<project-name>"
> curl -s --cacert "${DST_CA_CERT}" -u "admin:${SRC_ADMIN_PASSWORD}" \
  "https://${DST_HOST}/api/v2.0/projects/<project-name>/repositories/<repo-name>/artifacts/<tag>"
> curl -s --cacert "${DST_CA_CERT}" -u "admin:${SRC_ADMIN_PASSWORD}" \
  "https://${DST_HOST}/api/v2.0/users?username=<username>"
API checks only confirm the database rows migrated. To confirm the blob data itself is intact, do a real pull-back of a known image or Helm chart:
> docker pull <spr-host>/<project-name>/<repo-name>:<tag>
> helm pull oci://<spr-host>/<project-name>/<chart-name> --version <chart-version>
> docker tag <known-local-image> "${DST_HOST}/<project-name>/<repo-name>:migration-test"
> docker push "${DST_HOST}/<project-name>/<repo-name>:migration-test"
A successful pull with the expected digest is the strongest confirmation that the migration succeeded end-to-end.
9.9 Rollback #
If verification fails, do not discard the Harbor export. Before directing clients back to the source, disable read-only mode and restore the source worker counts saved in Step 1:
> curl -s -u "admin:${SRC_ADMIN_PASSWORD}" --cacert "${SRC_CA_CERT}" \
  -H 'Content-Type: application/json' \
  -X PUT "https://${SRC_HOST}/api/v2.0/configurations" \
  -d '{"read_only":false}'
> kubectl -n "$SRC_NAMESPACE" scale deploy -l component=jobservice --replicas="$SRC_JOBSERVICE_REPLICAS"
> kubectl -n "$SRC_NAMESPACE" scale statefulset -l component=trivy --replicas="$SRC_TRIVY_REPLICAS"
Resume serving traffic from the source while you investigate. Then retry the Private Registry restore from the same export once the issue is resolved.
10 Backing up and restoring with Velero #
Velero provides a framework for backing up and restoring SUSE Private Registry deployments on supported Kubernetes clusters. It captures the Kubernetes API objects of the registry and the data in the persistent volumes that the registry uses. This approach protects the registry configuration and the container images stored in the cluster against accidental deletion or cluster failure.
10.1 Before you start #
Velero protects Private Registry by backing up Kubernetes resources and persistent data. In most cases, it is the recommended backup method for registry deployments on Kubernetes.
The scope of the backup depends on whether the registry database and image storage run inside or outside the cluster:
Internal PostgreSQL: Velero backs up the registry resources and the data volume for the internal PostgreSQL database, but you must also create a separate database-level backup for application consistency. This is the registry database, not the Kubernetes etcd data store.
External PostgreSQL: Velero backs up the registry deployment and its Kubernetes resources. Protect the external PostgreSQL database and the external object storage with the native backup tools of the database or the cloud provider.
Velero does not back up Redis data. Redis mainly holds sessions and caches, so users must log in again after a restore.
For a full disaster-recovery workflow, the Velero backup repository must be separate from the cluster where Private Registry runs.
A cluster-local backend such as local-path, a PVC-backed store, or an NFS-backed store is not a portable production backup target.
Velero stores backups in an object store, and it does not provide a PVC-backed or NFS-backed BackupStorageLocation that supports a full-cluster recovery workflow.
10.2 Prerequisites #
Before starting the backup process, make sure you have the following:
A supported Kubernetes cluster and a Private Registry release that is compatible with both the cluster and the Velero version you use.
Helm,
kubectland the Velero CLI installed.A Velero server with the storage-provider plugin that your object store requires. See the supported providers.
An off-cluster
BackupStorageLocationfor production use.For File System Backup, the Velero node agent running in the cluster. Install it with
velero install --use-node-agent, or enable it in the Velero Helm chart.For CSI volume snapshots, a CSI driver that supports snapshots and a
VolumeSnapshotClassthat is labeledvelero.io/csi-volumesnapshot-class: "true".A recovery cluster that provides the same
StorageClassnames as the source cluster, so that the restored PVCs can bind.
10.3 Recommended storage configuration #
For production environments and full disaster recovery, use a storage backend that is independent from the primary cluster. This keeps backups available even if the cluster is lost or the registry namespace is deleted.
Supported backup backends include:
Amazon S3
Azure Blob Storage
Google Cloud Storage
Any other approved Velero provider plugin
For the complete supported-provider list, see the Velero supported providers page.
10.4 What to expect after a restore #
A successful backup does not preserve every runtime state. After a restore, expect the following:
Lost memory data: The registry keeps repository and artifact pull times in memory and writes them to the database periodically. Any data that was not yet written to the database is lost. This typically has a low impact on operations.
Lost user sessions: The Redis volume is excluded from the backup, so all active sessions are lost and users must log in again.
Hanging tasks: Replication, garbage collection and security scans can remain in a pending or interrupted state and must be restarted or stopped manually from the administrator interface.
Crash consistency: Velero volume snapshots are crash-consistent. This protects the storage state after a crash, but it does not guarantee that the database transactions are complete. For a production deployment with an internal PostgreSQL database, also create an application-consistent database dump.
10.5 Backing up Private Registry #
10.5.1 Step 1: Preparing the registry #
Before you create a backup, record the information that you need for a later restore.
Then stop the tasks that could change registry data while the backup runs.
Replace <PRIVATE_REGISTRY_NAMESPACE> with the namespace of your deployment and <RELEASE_NAME> with the name of your Helm release.
Save your Private Registry chart version, application version and Helm values in a secure recovery record:
> helm list -n <PRIVATE_REGISTRY_NAMESPACE> > helm get values <RELEASE_NAME> -n <PRIVATE_REGISTRY_NAMESPACE> \ -o yaml > <VALUES_FILE>.yamlNoteThe
-o yamloption is required. Without it,helm get valuesprints aUSER-SUPPLIED VALUES:header, and the resulting file is not a valid values file.Record your namespace, release name, persistent volume claim (PVC) names, and storage classes. The following command only lists the PVCs in the namespace; it does not back up the PVC data or the storage configuration:
> kubectl get pvc -n <PRIVATE_REGISTRY_NAMESPACE>Record your TLS, OIDC, image-pull, and database secret references. The following command only lists the existing secrets in the namespace; it does not back up the secrets or their values:
> kubectl get secrets -n <PRIVATE_REGISTRY_NAMESPACE>Enable Repository Read Only in the Private Registry administrator interface.
Stop or postpone image pushes, chart pushes, garbage collection, replication, and security scans.
10.5.2 Step 2: Excluding Redis #
Redis is not part of the backup target because it mainly contains user session and cache data. Exclude it from the backup so that the restored environment does not contain stale session state.
Identify the Redis resources of your release:
> kubectl get sts,pod -n <PRIVATE_REGISTRY_NAMESPACE> -l component=redisThe Redis PVC is created from a volume claim template and does not carry the
componentlabel, so it cannot be selected by label. Its name is alwaysdata-<RELEASE_NAME>-harbor-redis-0.Exclude the Redis pod, PVC, and persistent volume (PV) from the backup:
> kubectl label pod -n <PRIVATE_REGISTRY_NAMESPACE> -l component=redis \
  velero.io/exclude-from-backup=true --overwrite
> kubectl label pvc -n <PRIVATE_REGISTRY_NAMESPACE> \
  data-<RELEASE_NAME>-harbor-redis-0 velero.io/exclude-from-backup=true --overwrite
> kubectl label pv $(kubectl get pvc -n <PRIVATE_REGISTRY_NAMESPACE> \
  data-<RELEASE_NAME>-harbor-redis-0 -o jsonpath='{.spec.volumeName}') \
  velero.io/exclude-from-backup=true --overwrite
Do not add the velero.io/exclude-from-backup label to the Redis StatefulSet.
Excluding the StatefulSet removes the Redis workload from the backup entirely.
After a restore, the cluster then has no Redis deployment, and the core and job service pods fail repeatedly.
When only the pod, the PVC, and the PV are excluded, the StatefulSet is restored and creates an empty Redis volume.
10.5.3 Step 3: Creating the backup #
Use the backup method that matches your storage platform.
Replace <BACKUP_NAME> with a name for the backup and <RETENTION_DURATION> with the retention period, for example, 720h.
File System Backup
File System Backup copies the volume content through the Velero node agent.
It does not depend on volume snapshot support in the storage provider, so it also works with storage backends such as local-path.
> velero backup create <BACKUP_NAME> \
  --include-namespaces <PRIVATE_REGISTRY_NAMESPACE> \
  --default-volumes-to-fs-backup \
  --ttl <RETENTION_DURATION> \
  --wait
CSI volume snapshots
If your storage platform supports CSI snapshots, use the snapshot-based approach instead.
It requires a CSI driver with snapshot support and a VolumeSnapshotClass that is labeled velero.io/csi-volumesnapshot-class: "true".
> velero backup create <BACKUP_NAME> \
  --include-namespaces <PRIVATE_REGISTRY_NAMESPACE> \
  --snapshot-volumes \
  --ttl <RETENTION_DURATION> \
  --wait
10.5.4 Step 4: Verifying the backup #
A backup is not complete until you verify that the expected resources and volumes are included.
Review the result and the volume coverage:
> velero backup describe <BACKUP_NAME> --detailsConfirm that the phase is
Completed, and that the registry PVC, the PostgreSQL PVC, and the job service PVC are included in the backup.Confirm that no Redis volume is listed in the backup:
> kubectl -n velero get podvolumebackups \
  -l velero.io/backup-name=<BACKUP_NAME> \
  -o custom-columns='POD:.spec.pod.name,VOLUME:.spec.volume,PHASE:.status.phase'
Disable Repository Read Only after the backup completes successfully.
10.6 Automating backups #
You can automate Private Registry backups with Velero schedules. A schedule creates periodic backups based on a standard cron expression, which provides consistent recovery points without manual intervention.
Verify that the Redis pod, PVC, and PV are still labeled with
velero.io/exclude-from-backup=true:> kubectl get pod,pvc -n <PRIVATE_REGISTRY_NAMESPACE> \ -l velero.io/exclude-from-backup=trueNoteThe label on a pod is lost when the pod is recreated, for example, after an upgrade or a node restart. Check the Redis pod label again after any operation that recreates the pod. The labels on the PVC and the PV persist.
Create a schedule that uses the same backup method as your manual backup. For example, to run a File System Backup every day at 2:00 AM:
> velero schedule create <SCHEDULE_NAME> \
  --schedule="0 2 * * *" \
  --include-namespaces <PRIVATE_REGISTRY_NAMESPACE> \
  --default-volumes-to-fs-backup \
  --ttl <RETENTION_DURATION>
If you back up with CSI snapshots, replace
--default-volumes-to-fs-backupwith--snapshot-volumes.Verify that the schedule is active and configured correctly:
> velero schedule get <SCHEDULE_NAME>
10.7 Restoring Private Registry #
10.7.1 Restoring a deployment with an internal PostgreSQL database #
Use this procedure when PostgreSQL runs inside the Kubernetes cluster. Velero recreates the namespace, the workloads, the PVCs, the secrets, and the Helm release secret. Therefore, do not install the chart before you restore.
Do not run helm install before the restore.
Velero skips every resource that already exists.
A pre-created release therefore keeps the empty PVCs and the new secrets of the fresh installation, and the backed-up data is not restored.
A new installation also regenerates the <RELEASE_NAME>-core secret and the token CA, which invalidates all existing robot accounts.
Provision the target Kubernetes cluster with the same
StorageClassnames as the source cluster, and install the required Ingress and Velero components. Configure Velero with the sameBackupStorageLocationthat holds the backup.Wait until the backup is visible in the target cluster before you restore it. If the backup is still synchronizing from the object store,
velero backup getcan report that it is unavailable or returnnot founduntil the object-store upload completes:> velero backup get <BACKUP_NAME>Restore the backup:
> velero restore create <RESTORE_NAME> \
  --from-backup <BACKUP_NAME> \
  --wait
Review the result and confirm that all items were restored:
> velero restore describe <RESTORE_NAME> --detailsA warning about the
kube-root-ca.crtConfigMap that already exists is expected and can be ignored. Warnings about PVCs, secrets, or workloads that already exist indicate that the namespace was not empty, and that the restore is incomplete.Confirm that the Helm release is known again in the restored cluster:
> helm list -n <PRIVATE_REGISTRY_NAMESPACE>Verify that the TLS, OIDC, image-pull, and database secrets were restored. Recreate only the secrets that are managed outside the namespace, such as certificates issued by an external certificate manager. Do not recreate the secrets that the chart generates, because this invalidates the robot accounts of the registry.
If the recovery cluster is reached at a different address than the source cluster, update
externalURLand the Ingress host in the saved values file. Then upgrade the release with that file:> helm upgrade <RELEASE_NAME> \ oci://registry.suse.com/private-registry/<APP_VERSION>/private-registry-helm \ --namespace <PRIVATE_REGISTRY_NAMESPACE> \ --version <CHART_VERSION> \ -f <VALUES_FILE>.yamlDisable Repository Read Only.
The chart version, the application version, and the values file that you saved in Section 10.5.1, “Step 1: Preparing the registry” are a fallback for rebuilding the release manually. They are not required for the restore itself.
10.7.2 Restoring a deployment with an external PostgreSQL database #
Use this procedure when your database and object storage are managed outside of the Kubernetes cluster.
Provision the target Kubernetes cluster and the required Velero components, and configure Velero with the same
BackupStorageLocationthat holds the backup.Confirm that the backup is available in the target cluster before you start the restore:
> velero backup get <BACKUP_NAME>Restore the external PostgreSQL database with the native recovery procedure of your database provider.
Restore the external registry object-storage data with its native recovery procedure.
Restore the Private Registry Kubernetes resources and the in-cluster PVCs into an empty namespace:
> velero restore create <RESTORE_NAME> \
  --from-backup <BACKUP_NAME> \
  --wait
Verify that the connection secret of the external database and the TLS CA or OIDC credentials were restored, and recreate only the ones that are managed outside the namespace.
Start the registry and verify that it connects to the restored database.
Disable Repository Read Only.
10.8 Verification and troubleshooting #
After the restore, validate that the registry is fully operational.
Check the PVCs and the pods, and confirm that the PVCs are bound and the pods are running:
> kubectl get pvc -n <PRIVATE_REGISTRY_NAMESPACE>
> kubectl get pods -n <PRIVATE_REGISTRY_NAMESPACE>
Validate the API health, the administrator login, and the image pull and image push operations.
Confirm that the projects, users, and artifacts that existed at backup time are present again, and that a robot account can still authenticate.
If the restore does not complete as expected, check the following:
velero restore describe <RESTORE_NAME> --detailsreports resources that already exist. The target namespace was not empty. Restore into a clean cluster or a clean namespace.PVCs remain
Pending. TheStorageClassof the source cluster does not exist in the recovery cluster, or it cannot provision the requested volume.No volume data is restored. The Velero node agent was not running when the backup was created, so no
PodVolumeBackupwas produced. Verify the backup withvelero backup describe <BACKUP_NAME> --details.Velero cannot find the backup in the recovery cluster. The
BackupStorageLocationis not the one that holds the backup, or it is not in theAvailablephase. Check it withkubectl -n velero get backupstoragelocation.Users cannot log in, and robot accounts fail to authenticate. The chart-generated secrets were recreated instead of restored.
11 Frequently asked questions #
11.1 Product overview and differentiators #
- What kind of subscription do customers need for SUSE Private Registry?
It is included in Rancher Suite and offered as an add-on for Rancher Prime.
The pricing of the add-on is the same as other add-ons.
- What are the differentiators with Harbor (from Application Collection or upstream)?
Use SUSE Private Registry if you need:
Level 3 (L3) support for product issues.
A predictable release cycle.
Patched images for known vulnerabilities. Upstream Harbor images from Docker Hub often contain numerous unpatched vulnerabilities.
Over time, SUSE will also add out-of-the-box integrations with Rancher and prioritize feature requests from customers.
- Do customers have to buy the same number of add-on SUSE Private Registry subscriptions as Rancher Prime subscriptions?
Yes, just like other add-ons such as SUSE Security. An additional advantage of the SUSE Private Registry subscription model is that it allows customers to run as many deployments as they need.
11.2 Relationship with upstream Harbor #
- How does the release cycle align with upstream Harbor?
The release cycle of SUSE Private Registry is independent of the release cycle of upstream Harbor.
When releasing new versions of SUSE Private Registry, SUSE aims to include the latest version of the upstream Harbor project that meets SUSE quality assurance and maintenance requirements.
- Will you publish migration considerations for customers running Harbor from other sources?
Yes. Migration instructions are available in Chapter 9, Migrating data from upstream Harbor to SUSE Private Registry.
11.3 Deployment and installation #
- Do you support installing SUSE Private Registry via docker-compose?
No. You must install and configure SUSE Private Registry using its Helm chart. This chart is also used for ongoing management (Day 2 operations) and can be integrated with GitOps workflows.
- Do you recommend deployments on the local (Rancher Manager) cluster?
No. SUSE recommends deploying SUSE Private Registry on a downstream cluster. This makes the registry accessible to other downstream clusters that need to consume images.
- What are the deployment best practices for a high-availability (HA) environment?
For HA, do not deploy SUSE Private Registry on the Rancher Management cluster to avoid resource contention.
You can deploy SUSE Private Registry on a dedicated cluster, or on one or more of your application clusters.
For instructions, see Chapter 6, High Availability setup. Note that you must provide your own HA components for the Postgres database, Valkey or Redis server, and Ingress controller. These components are not deployed by the SUSE Private Registry Helm chart and are not supported by SUSE.
- Is the SUSE Private Registry Helm chart going to be added to the Application Collection eventually?
Yes, SUSE plans to publish the chart there in the future.
- Do you ship a Kubernetes operator?
SUSE Private Registry does not ship with a dedicated operator. It is installed and managed using its Helm chart, which can be integrated with GitOps. SUSE continues to evaluate operator-based management for future releases.
11.4 Security, scanning and signing #
- Do you integrate any signing tool within SUSE Private Registry?
SUSE Private Registry does not sign images itself, but it can store, distribute and verify Open Container Initiative (OCI)-compatible signatures.
A widely used tool is
cosign, which can sign images and store the signatures in SUSE Private Registry.cosignsignatures attached to images are viewable and downloadable from the SUSE Private Registry portal.- Is it possible to sign images with Notary or Cosign for approval during the deployment process?
SUSE Private Registry can store, distribute and verify
cosignsignatures.SUSE Private Registry itself does not sign images. You must sign images during their build process, and then upload the signature to the registry along with the image.
Notary is not included or supported with SUSE Private Registry.
- Are images scanned for Common Vulnerabilities and Exposures (CVEs) only with Trivy, or can it use SUSE Security (Neuvector) as well?
Images are scanned with Trivy, which comes out of the box. SUSE Security can be added in addition to or as a replacement for Trivy.
- Is it possible to run ClamAV or similar malware scans?
By default, SUSE Private Registry scans images using Trivy. You can also configure SUSE Security (Neuvector) as a scanner.
- In the pull-through cache scenario, will the vulnerability criteria be enforced?
Yes, but with a known limitation. Due to upstream Harbor issues, vulnerability criteria are not enforced on the first pull of an image because the scan has not yet completed.
For complete coverage, pair SUSE Private Registry with SUSE Security admission controls.
- Are the images of SUSE Private Registry hardened?
Yes. The container images for SUSE Private Registry are hardened. They are based on SUSE Linux Enterprise Base Container Images (SLE BCI) and built in the same enterprise-grade SUSE Build Service used for SUSE Linux Enterprise Server. This ensures a secure supply chain. The images are also signed, and SUSE publishes their Supply-chain Levels for Software Artifacts (SLSA) attestations.
- Are the images of SUSE Private Registry signed? How?
The images are signed with
cosign. You can verify them by saving the PEM-formatted signing key published at KB 000021411.Then run, for example:
cosign verify --key container-key.pem registry.suse.com/private-registry/harbor-portal:latest
11.5 Replication and sync #
- Can I use a robot account to synchronize users between SUSE Private Registry instances?
Yes. The
goharbor/harborprovider includes theharbor_userandharbor_project_member_userresources. Configure a provider instance for each SUSE Private Registry deployment and apply the same user and project-membership definitions to both. This manages desired state in Terraform; it does not automatically copy changes made directly in one registry.
Authenticate each provider instance with a system robot account that has the required user-management and project-member API permissions. SUSE Private Registry 1.0 and later supports these permissions for system robot accounts, subject to the permissions of the account creator. These Terraform resources manage database-authenticated users. For OpenID Connect (OIDC) or Lightweight Directory Access Protocol (LDAP) authentication, manage identities in a shared identity provider. Each SUSE Private Registry instance still maintains its own project memberships and roles.
Protect Terraform state and password inputs. Where supported by your provider version, use its write-only password argument. See the provider documentation for user resources and project-member resources.
- Can I use SUSE Application Collection through a proxy-cache project now?
Yes. Configure an upstream service account and a private proxy-cache project, then use a robot account for client access. See Chapter 8, How do I automate access to a proxy-cache project?.
Proxy caching retrieves requested artifacts on demand; it does not synchronize the full catalog or require the planned synchronization plug-in.
- Does SUSE Private Registry offer multi-site replication?
Yes. SUSE Private Registry supports multi-site, policy-based image replication (pull and push). You can synchronize images across multiple SUSE Private Registry deployments while keeping each registry independent.
11.6 Features and integration with Rancher #
- Is there a plan to integrate the Registry within Rancher using an Extension?
Yes. SUSE plans deeper integration with Rancher Prime and other offerings. Future enhancements being considered include single sign-on (SSO) integration, simplified setup for SUSE Security scanners and Application Collection mirroring, monitoring with SUSE Observability, and a Rancher UI extension.
- Will SUSE add the Registry to the Training Catalog?
This is not yet planned. If you are interested in training material, contact SUSE to discuss possibilities with the Training team.
11.7 Support and documentation #
- Is there a support policy for SUSE Private Registry?
Yes. The support policy of SUSE Private Registry is the same as any other Rancher Prime add-on.
- If the SUSE Private Registry documentation lacks information, can I refer to the official Harbor documentation?
Yes. Since SUSE Private Registry is based on Harbor, the official Harbor documentation is a useful resource. For features specific to the SUSE version, refer to the SUSE Private Registry documentation.
The Release notes specify which upstream Harbor version corresponds to your SUSE Private Registry version.
12 Troubleshooting #
This section provides solutions to problems that you may encounter when deploying or using SUSE Private Registry.
- I am encountering the
401 unauthorizederror when trying to install SUSE Private Registry The full version of the error message looks as follows:
Error: INSTALLATION FAILED:
GET "https://registry.suse.com/v2/private-registry/private-registry-helm/tags/list":
response status code 401: unauthorized:
authentication required:
[map[Action:pull Class: Name:private-registry/private-registry-helm Type:repository]]
To install and use SUSE Private Registry, you need the following:
A qualifying subscription that includes this product, such as a Rancher Suite subscription or a SUSE Private Registry Add-on subscription. If you do not have a qualifying subscription, contact your SUSE representative.
Log in to SUSE Registry with Helm using the SCC mirroring credentials of the SCC organization which holds the subscription. Refer to Section 4.1, “Obtaining Kubernetes secrets from the SUSE Customer Center” for more details.
A Overriding the SUSE Private Registry Helm chart #
The SUSE Private Registry (Private Registry) Helm chart is delivered with default values. For guidance about using replicas, scheduling, exposure, and persistence values in a resilient deployment, see Chapter 6, High Availability setup. You can adjust the Helm chart installation in one of the following ways:
Ensure you replace <APP_VERSION> with your specific application version (for example, 1.2).
Append specific parameters to the
--setflags on thehelm installcommand line, for example:$ helm install <RELEASE_NAME> \ oci://registry.suse.com/private-registry/<APP_VERSION>/private-registry-helm \ --namespace <PRIVATE_REGISTRY_NAMESPACE> \ --set harborAdminPassword=<MY_PASSWORD> \ --set externalURL=https://<PRIVATE_REGISTRY_FQDN> \ --set expose.ingress.hosts.core=<PRIVATE_REGISTRY_FQDN>
Create a SUSE custom
suse_registry_override.yamlfile and pass it to the-fflag, for example:$ helm install <RELEASE_NAME> \ oci://registry.suse.com/private-registry/<APP_VERSION>/private-registry-helm \ --namespace <PRIVATE_REGISTRY_NAMESPACE> -f suse_registry_override.yaml
A1 Examples of SUSE Registry Helm override files #
expose:
  type: ingress 1
  ingress:
    hosts:
      core: <PRIVATE_REGISTRY_FQDN> 2

externalURL: https://<PRIVATE_REGISTRY_FQDN> 3

harborAdminPassword: "<MY_PASSWORD>" 4

database:
  internal:
    password: "<MY_PASSWORD_POSTGRESQL>"

redis:
  internal:
   password: "<MY_PASSWORD_REDIS>"
How SUSE Registry is exposed. Can be | |
Host name for the Kubernetes internal networking configuration. | |
URL where the SUSE Registry application runs. It is used to generate links in the user interface, redirects and also for API responses. | |
The administrator password to the application. |
loadBalancer #expose: type: loadBalancer 1 tls: enabled: true certSource: secret 2 secret: secretName: <SECRET_NAME> auto: commonName: <PRIVATE_REGISTRY_FQDN> 3 externalURL: https://<PRIVATE_REGISTRY_FQDN> 4 harborAdminPassword: "<MY_PASSWORD>" 5 database: internal: password: "<MY_PASSWORD_POSTGRESQL>" redis: internal: password: "<MY_PASSWORD_REDIS>"
How SUSE Registry is exposed. Can be | |
Can be | |
When using TLS encryption, this field must match the | |
URL where the SUSE Registry application runs. It is used to generate links in the user interface, redirects and also for API responses. | |
The administrator password to the application. |
A2 Overriding Helm chart parameters and values #
The following tables list all parameters with descriptions that you can use to override the default installation values.
global.imageRegistrySets a global override for the container image registry used for all images.
global.imagePullSecretsSets global pull secrets for accessing the container image registry.
harborAdminPasswordSets the initial password for Harbor administrator. Change it from portal after deployment. Default is
Harbor12345.externalURLSpecifies the external URL for
harbor-coreservice. Default ishttps://core.harbor.domain.existingSecretAdminPasswordKeySets the key name in the secret containing Harbor administrator password. Default is
HARBOR_ADMIN_PASSWORD.imagePullSecretsSets the
imagePullSecretsnames for all deployments.updateStrategy.typeSets the update strategy for deployments with persistent volumes. Accepts
RollingUpdateorRecreate. UseRecreatewhen RWM for volumes is not supported. Default isRollingUpdate.logLevelSets the log level for Harbor services. Accepts
fatal,error,warn,info,debugortrace. Default isdebug.enableMigratehelmHookRuns database migration job via Helm hook. When
true, separates migration job fromharbor-core. Default isfalse.caSecretNameSpecifies the secret name containing the
ca.crtkey.
proxy.httpProxySpecifies the HTTP proxy server URL. Default is
"".proxy.httpsProxySpecifies the HTTPS proxy server URL. Default is
"".proxy.noProxySets URLs that bypass the proxy configuration. Default is
127.0.0.1,localhost,.local,.internal.proxy.componentsSets components that use the proxy configuration. Default is
["core","jobservice","trivy"].
expose.typeSpecifies service exposure type:
ingress,clusterIP,nodePortorloadBalancer. Default isingress.expose.tls.enabledEnables TLS. Default is
true.expose.tls.certSourceSets TLS certificate source as
auto,secretornone. Default isauto.expose.tls.auto.commonNameSets certificate common name when type is not
ingress.expose.tls.secret.secretNameSpecifies name of secret containing
tls.crt(certificate) andtls.key(private key).expose.ingress.hosts.coreSets Harbor core service host in Ingress rule. Default is
core.harbor.domain.expose.ingress.controllerSets Ingress controller type. Supports
default,gce,alb,f5-bigipandncp. Default isdefault.expose.ingress.kubeVersionOverrideOverrides Kubernetes version for Ingress templating.
expose.ingress.annotationsSets Ingress annotations.
expose.ingress.labelsSets Ingress-specific labels. Default is
{}.expose.clusterIP.nameSets ClusterIP service name. Default is
harbor.expose.clusterIP.annotationsSets ClusterIP service annotations. Default is
{}.expose.clusterIP.ports.httpPortSets HTTP service port. Default is
80.expose.clusterIP.ports.httpsPortSets HTTPS service port. Default is
443.expose.clusterIP.labelsSets ClusterIP-specific labels. Default is
{}.expose.nodePort.nameSets NodePort service name. Default is
harbor.expose.nodePort.ports.http.portSets HTTP service port. Default is
80.expose.nodePort.ports.http.nodePortSets HTTP node port. Default is
30002.expose.nodePort.ports.https.portSets HTTPS service port. Default is
443.expose.nodePort.ports.https.nodePortSets HTTPS node port. Default is
30003.expose.nodePort.annotationsSets NodePort annotations.
expose.nodePort.labelsSets NodePort-specific labels. Default is
{}.expose.loadBalancer.nameSets service name. Default is
harbor.expose.loadBalancer.IPSets loadBalancer IP when IP assignment is supported. Default is
"".expose.loadBalancer.ports.httpPortSets HTTP service port. Default is
80.expose.loadBalancer.ports.httpsPortSets HTTPS service port. Default is
30002.expose.loadBalancer.annotationsSets loadBalancer service annotations. Default is
{}.expose.loadBalancer.labelsSets loadBalancer-specific labels. Default is
{}.expose.loadBalancer.sourceRangesSpecifies IP address ranges for loadBalancerSourceRanges. Default is
[].
persistence.enabledEnables or disables data persistence. Default is
true.persistence.resourcePolicykeepprevents removal of PVCs during a Helm delete operation. Empty value deletes PVCs after chart deletion. Default iskeep.persistence.persistentVolumeClaim.registry.existingClaimThe existing PVC that must be created manually before binding. Requires a subPath specification if the PVC is shared with other components.
persistence.persistentVolumeClaim.registry.storageClassThe
storageClassthat provisions the volume.persistence.persistentVolumeClaim.registry.subPathThe subpath in the volume.
persistence.persistentVolumeClaim.registry.accessModeThe access mode of the volume. Default is
ReadWriteOnce.persistence.persistentVolumeClaim.registry.sizeThe size of the volume. Default is
5Gi.persistence.persistentVolumeClaim.registry.annotationsThe annotations of the volume.
persistence.persistentVolumeClaim.jobservice.jobLog.existingClaimThe existing PVC that must be created manually before binding. Requires a subPath specification if the PVC is shared with other components.
persistence.persistentVolumeClaim.jobservice.jobLog.storageClassThe
storageClassthat provisions the volume.persistence.persistentVolumeClaim.jobservice.jobLog.subPathThe subpath in the volume.
persistence.persistentVolumeClaim.jobservice.jobLog.accessModeThe access mode of the volume. Default is
ReadWriteOnce.persistence.persistentVolumeClaim.jobservice.jobLog.sizeThe size of the volume. Default is
1Gi.persistence.persistentVolumeClaim.jobservice.jobLog.annotationsThe annotations of the volume.
persistence.persistentVolumeClaim.database.existingClaimThe existing PVC that must be created manually before binding. Requires a subPath specification if the PVC is shared with other components.
persistence.persistentVolumeClaim.database.storageClassThe
storageClassthat provisions the volume.persistence.persistentVolumeClaim.database.subPathThe subpath in the volume. Ignored when an external database is used.
persistence.persistentVolumeClaim.database.accessModeThe access mode of the volume. Ignored when an external database is used. Default is
ReadWriteOnce.persistence.persistentVolumeClaim.database.sizeThe size of the volume. Ignored when an external database is used. Default is
1Gi.persistence.persistentVolumeClaim.database.annotationsThe annotations of the volume.
persistence.persistentVolumeClaim.redis.existingClaimThe existing PVC that must be created manually before binding. Requires a subPath specification if the PVC is shared with other components.
persistence.persistentVolumeClaim.redis.storageClassThe
storageClassthat provisions the volume. Uses default StorageClass if not specified.persistence.persistentVolumeClaim.redis.subPathThe subpath in the volume. Ignored when an external Valkey is used.
persistence.persistentVolumeClaim.redis.accessModeThe access mode of the volume. Ignored when an external Valkey is used. Default is
ReadWriteOnce.persistence.persistentVolumeClaim.redis.sizeThe size of the volume. Ignored when an external Valkey is used. Default is
1Gi.persistence.persistentVolumeClaim.redis.annotationsThe annotations of the volume.
persistence.persistentVolumeClaim.trivy.existingClaimThe existing PVC that must be created manually before binding. Requires a subPath specification if the PVC is shared with other components.
persistence.persistentVolumeClaim.trivy.storageClassThe
storageClassthat provisions the volume. Uses default StorageClass if not specified.persistence.persistentVolumeClaim.trivy.subPathThe subpath in the volume.
persistence.persistentVolumeClaim.trivy.accessModeThe access mode of the volume. Default is
ReadWriteOnce.persistence.persistentVolumeClaim.trivy.sizeThe size of the volume. Default is
1Gi.persistence.persistentVolumeClaim.trivy.annotationsThe annotations of the volume.
persistence.imageChartStorage.disableredirectControls redirect management from content back-ends. Set to true to disable redirects for unsupported back-ends. Default is
false.persistence.imageChartStorage.caBundleSecretNameThe name of secret containing CA bundle for self-signed storage service certificates.
persistence.imageChartStorage.typeThe storage type for images and charts:
filesystem,azure,gcs,s3,swift, oross. Default isfilesystem.persistence.imageChartStorage.gcs.existingSecretThe name of existing secret containing the GCS service account JSON key. The key must be
gcs-key.json. Default is"".persistence.imageChartStorage.gcs.useWorkloadIdentityEnables workload identity usage in a GKE cluster. Default is
false.
nginx.image.repositoryThe image repository for nginx. Default is
private-registry/harbor-nginx.nginx.image.tagThe image tag for nginx.
nginx.replicasThe number of replicas to run. Default is
1.nginx.revisionHistoryLimitThe maximum number of old
ReplicaSetrevisions to retain. Default is10.nginx.resourcesThe compute resources allocated for the container. Default is
undefined.nginx.automountServiceAccountTokenControls automatic mounting of the service account token. Default is
false.nginx.nodeSelectorThe node labels used for pod assignment. Default is
{}.nginx.tolerationsThe pod assignment tolerations. Default is
[].nginx.affinityThe node or pod affinity rules. Default is
{}.nginx.topologySpreadConstraintsThe rules for spreading pods across failure-domains such as regions or availability zones. Default is
[].nginx.podAnnotationsThe annotations added to the nginx pod. Default is
{}.
portal.image.repositoryRepository location for the portal image. Default is
private-registry/harbor-portal.portal.image.tagTag for the portal image. Default is
3.11.portal.replicasNumber of replicas to create. Default is
1.portal.revisionHistoryLimitMaximum number of old
ReplicaSetrevisions to retain. Default is10.portal.resourcesResources allocated to the container. Default is
undefined.portal.automountServiceAccountTokenControls automatic mounting of the service account token. Default is
false.portal.nodeSelectorNode labels used for pod assignment. Default is
{}.portal.tolerationsTolerations used for pod assignment. Default is
[].portal.affinityNode and pod affinity settings. Default is
{}.portal.topologySpreadConstraintsDefines pod distribution across failure-domains such as regions or availability zones. Default is
[].portal.podAnnotationsAnnotations added to the portal pod. Default is
{}.portal.serviceAnnotationsAnnotations added to the portal service. Default is
{}.portal.priorityClassNamePriority class name for pod execution.
portal.initContainersInit containers to be run before the controller container starts. Default is
[].
core.image.repositoryThe repository for the Harbor core image. Default is
private-registry/harbor-core.core.image.tagThe tag for the Harbor core image. Default is
2.11.core.replicasThe number of replicas. Default is
1.core.revisionHistoryLimitThe revision history limit. Default is
10.core.startupProbe.initialDelaySecondsThe initial delay in seconds for the startup probe. Default is
10.core.resourcesThe resources to allocate for the container. Default is
undefined.core.automountServiceAccountTokenMounts the service account token. Default is
false.core.nodeSelectorThe node labels for pod assignment. Default is
{}.core.tolerationsThe tolerations for pod assignment. Default is
[].core.affinityThe node or pod affinities. Default is
{}.core.topologySpreadConstraintsThe constraints that define how pods are spread across failure-domains like regions or availability zones. Default is
[].core.podAnnotationsThe annotations to add to the core pod. Default is
{}.core.serviceAnnotationsThe annotations to add to the core service. Default is
{}.core.configureUserSettingsA JSON string in the environment variable CONFIG_OVERWRITE_JSON to configure user settings.
core.quotaUpdateProviderThe provider for updating project quota usage, options are
redisordb. Default isdb.core.secretUsed when core server communicates with other components.
core.secretNameThe name of a Kubernetes secret to use your own TLS certificate and private key for token encryption or decryption.
core.tokenKeyThe PEM-formatted RSA private key used to sign service tokens.
core.tokenCertThe PEM-formatted certificate signed by
core.tokenKeyused to validate service tokens.core.xsrfKeyThe XSRF key, automatically generated if not specified.
core.priorityClassNameThe priority class to run the pod as.
core.artifactPullAsyncFlushDurationThe time duration for asynchronously updating artifact pull time and repository pull count.
core.gdpr.deleteUserEnables GDPR compliant user deletion. Default is
false.core.gdpr.auditLogsCompliantEnables GDPR compliance for audit logs by changing username to its CRC32 value if that user was deleted from the system. Default is
false.core.initContainersThe init containers to run before the controller’s container starts. Default is
[].
jobservice.image.repositoryThe repository for the jobservice image. Default is
private-registry/harbor-jobservice.jobservice.image.tagThe tag for the jobservice image. Default is
2.11.jobservice.replicasThe number of replicas. Default is
1.jobservice.revisionHistoryLimitThe revision history limit. Default is
10.jobservice.maxJobWorkersThe maximum number of job workers. Default is
10.jobservice.jobLoggersThe loggers for jobs:
file,databaseorstdout. Default is[file].jobservice.loggerSweeperDurationThe duration in days to keep job logs (ignored if
jobLoggersis set tostdout). Default is14.jobservice.notification.webhook_job_max_retryThe maximum number of retries for webhook notification sending. Default is
3.jobservice.notification.webhook_job_http_client_timeoutThe HTTP client timeout in seconds for webhook notification sending. Default is
3.jobservice.reaper.max_update_hoursThe maximum time in hours to wait for a task to finish. If the task is not finished after the specified hours, it is marked as an error but continues to run. Default is
24.jobservice.reaper.max_dangling_hoursThe maximum time in hours for execution in running state without a new task created. Default is
168.jobservice.resourcesThe [resources] to allocate for container. Default is
undefined.jobservice.automountServiceAccountTokenMounts the service account token. Default is
false.jobservice.nodeSelectorThe node labels for pod assignment. Default is
{}.jobservice.tolerationsThe tolerations for pod assignment. Default is
[].jobservice.affinityThe node or pod affinities. Default is
{}.jobservice.topologySpreadConstraintsThe constraints that define how pods are spread across failure-domains like regions or availability zones. Default is
[].jobservice.podAnnotationsThe annotations to add to the jobservice pod. Default is
{}.jobservice.priorityClassNameThe priority class to run the pod as.
jobservice.secretThe secret used when job service communicates with other components. If a secret key is not specified, Helm generates it. Must be a string of 16 characters.
jobservice.initContainersThe init containers to run before the controller’s container starts. Default is
[].
registry.registry.image.repositoryThe repository location for the registry image. Default is
private-registry/harbor-registry.registry.registry.image.tagThe tag for the registry image. Default is
2.11.registry.registry.resourcesThe [resources] to allocate for container. Default is
undefined.registry.controller.image.repositoryThe repository location for the registry controller image. Default is
private-registry/harbor-registryctl.registry.controller.image.tagThe tag for the registry controller image. Default is
2.11.registry.controller.resourcesThe [resources] to allocate for container. Default is
undefined.registry.replicasThe number of replica instances. Default is
1.registry.revisionHistoryLimitThe maximum number of revisions to maintain in history. Default is
10.registry.nodeSelectorThe node labels for pod assignment. Default is
{}.registry.automountServiceAccountTokenControls whether to mount the service account token. Default is
false.registry.tolerationsThe tolerations for pod assignment. Default is
[].registry.affinityThe node or pod affinities. Default is
{}.registry.topologySpreadConstraintsThe constraints that define pod distribution across failure-domains such as regions or availability zones. Default is
[].registry.middlewareMiddleware support for a CDN between back-end storage and Docker pull recipient.
registry.podAnnotationsThe annotations to add to the registry pod. Default is
{}.registry.priorityClassNameThe priority class for pod execution.
registry.secretThe secret that secures the upload state between client and registry storage back-end.
registry.credentials.usernameThe username for Harbor core’s internal registry access. Default is
harbor_registry_user.registry.credentials.passwordThe password for Harbor core’s internal registry access. Default is
harbor_registry_password.registry.credentials.existingSecretAn existing secret containing the password for registry instance access in htpasswd auth mode. Default is
"".registry.credentials.htpasswdStringThe login and password in htpasswd string format. Excludes
registry.credentials.usernameandregistry.credentials.password. Default isundefined.registry.relativeurlsReturns relative URLs in Location headers when true. Required if Harbor is behind a reverse proxy. Default is
false.registry.upload_purging.enabledEnables purging of upload directories. Default is
true.registry.upload_purging.ageThe time period after which files in upload directories are removed, default is one week. Default is
168h.registry.upload_purging.intervalThe time interval between purge operations. Default is
24h.registry.upload_purging.dryrunEnables dryrun mode for upload purging. Default is
false.registry.initContainersThe init containers that run before the controller’s container starts. Default is
[].
trivy.enabledEnables or disables the Trivy scanner. Default is
true.trivy.image.repositoryThe repository for the Trivy adapter image. Default is
private-registry/harbor-trivy-adapter.trivy.image.tagThe tag for the Trivy adapter image. Default is
2.11.trivy.resourcesThe resources to allocate for the Trivy adapter container. Default is
undefined.trivy.automountServiceAccountTokenWhether to mount the service account token. Default is
false.trivy.replicasThe number of Pod replicas. Default is
1.trivy.debugModeEnables Trivy debug mode for troubleshooting. Default is
false.trivy.vulnTypeComma-separated list of vulnerability types (
osandlibrary). Default isos,library.trivy.severityComma-separated list of vulnerability severities to check. Default is
UNKNOWN,LOW,MEDIUM,HIGH,CRITICAL.trivy.ignoreUnfixedDisplays only fixed vulnerabilities. Default is
false.trivy.insecureSkips registry certificate verification. Default is
false.trivy.skipUpdateDisables Trivy database downloads from GitHub. Default is
false.trivy.skipJavaDBUpdateRequires manual download of the
trivy-java.dbfile when enabled. Default isfalse.trivy.offlineScanPrevents Trivy from sending API requests to identify dependencies. Default is
false.trivy.securityCheckComma-separated list of security issues to detect. Default is
vuln.trivy.timeoutThe duration to wait for scan completion. Default is
5m0s.trivy.gitHubTokenThe GitHub access token required for database downloads. Default is
undefined.trivy.priorityClassNameThe priority class for running the pod. Default is
undefined.trivy.topologySpreadConstraintsDefines pod distribution constraints across failure domains. Default is
undefined.trivy.initContainersList of init containers to run before the main container starts. Default is
[].
database.typeThe database type. Set to
externalwhen using an external database. Default isinternal.database.internal.image.repositoryThe repository for the database image. Default is
private-registry/harbor-db.database.internal.image.tagThe tag for the database image. Default is
2.11.database.internal.passwordThe password for the internal database. Default is
changeit.database.internal.shmSizeLimitThe shared memory size limit for PostgreSQL (typically 50% of the container memory limit). Default is
512Mi.database.internal.resourcesThe resources allocated for the database container. Default is
undefined.database.internal.automountServiceAccountTokenControls whether the service account token is mounted. Default is
false.database.internal.initContainer.migrator.resourcesThe resources allocated for the database migrator init container. Default is
undefined.database.internal.initContainer.permissions.resourcesThe resources allocated for the database permissions init container. Default is
undefined.database.internal.nodeSelectorThe node labels for pod assignment. Default is
{}.database.internal.tolerationsThe tolerations for pod assignment. Default is
[].database.internal.affinityThe node or pod affinity settings. Default is
{}.database.internal.priorityClassNameThe priority class for running the pod. Default is
undefined.database.internal.livenessProbe.timeoutSecondsThe timeout in seconds for the liveness probe (range: 1-5s). Default is
1.database.internal.readinessProbe.timeoutSecondsThe timeout in seconds for the readiness probe (range: 1-5s). Default is
1.database.internal.extrInitContainersAdditional init containers that run before the database container starts. Default is
[].database.external.hostThe host name of the external database. Default is
192.168.0.1.database.external.portThe port number of the external database. Default is
5432.database.external.usernameThe username for the external database. Default is
user.database.external.passwordThe password for the external database. Default is
password.database.external.coreDatabaseThe database name used by the core service. Default is
registry.database.external.existingSecretThe existing secret containing the database password. The key must be
password. Default is"".database.external.sslmodeThe connection method for the external database. Options:
require,verify-full,verify-ca,disable. Default isdisable.database.maxIdleConnsThe maximum number of idle connections in the pool (0 or less means no idle connections are retained). Default is
50.database.maxOpenConnsThe maximum number of open connections to the database (0 or less means unlimited). Default is
100.database.podAnnotationsThe annotations to add to the database pod. Default is
{}.
redis.typeThe Redis deployment type. Set to
externalfor external Redis. Default isinternal.redis.internal.image.repositoryThe repository for the Redis image. Default is
private-registry/harbor-redis.redis.internal.image.tagThe tag for the Redis image. Default is
7.2.redis.internal.resourcesThe resources allocated for the Redis container. Default is
undefined.redis.internal.automountServiceAccountTokenControls whether the service account token is mounted. Default is
false.redis.internal.nodeSelectorThe node labels for pod assignment. Default is
{}.redis.internal.tolerationsThe tolerations for pod assignment. Default is
[].redis.internal.affinityThe node or pod affinity settings. Default is
{}.redis.internal.priorityClassNameThe priority class for running the Redis pod. Default is
undefined.redis.internal.jobserviceDatabaseIndexThe database index for jobservice. Default is
1.redis.internal.registryDatabaseIndexThe database index for registry. Default is
2.redis.internal.trivyAdapterIndexThe database index for Trivy adapter. Default is
5.redis.internal.harborDatabaseIndexThe database index for miscellaneous Harbor business logic. Default is
0.redis.internal.cacheLayerDatabaseIndexThe database index for Harbor’s cache layer. Default is
0.redis.internal.initContainersThe init containers that run before the Redis container starts. Default is
[].redis.external.addrThe address of the external Redis instance. Default is
192.168.0.2:6379.redis.external.sentinelMasterSetThe name of the Redis Sentinel master set (if applicable). Default is
undefined.redis.external.coreDatabaseIndexThe database index for core. Default is
0.redis.external.jobserviceDatabaseIndexThe database index for jobservice. Default is
1.redis.external.registryDatabaseIndexThe database index for registry. Default is
2.redis.external.trivyAdapterIndexThe database index for Trivy adapter. Default is
5.redis.external.harborDatabaseIndexThe database index for miscellaneous Harbor business logic. Default is
0.redis.external.cacheLayerDatabaseIndexThe database index for Harbor’s cache layer. Default is
0.redis.external.usernameThe username for external Redis authentication. Default is
undefined.redis.external.passwordThe password for external Redis authentication. Default is
undefined.redis.external.existingSecretThe existing secret containing the Redis password. The key must be
REDIS_PASSWORD. Default is"".redis.podAnnotationsThe annotations to add to the Redis pod. Default is
{}.
exporter.replicasThe number of replicas to run. Default is
1.exporter.revisionHistoryLimitThe revision history limit. Default is
10.exporter.podAnnotationsAnnotations to add to the exporter pod. Default is
{}.exporter.image.repositoryThe repository for the exporter image. Default is
private-registry/harbor-exporter.exporter.image.tagThe tag for the exporter image. Default is
2.11.exporter.nodeSelectorNode labels for pod assignment. Default is
{}.exporter.tolerationsTolerations for pod assignment. Default is
[].exporter.affinityNode or Pod affinities. Default is
{}.exporter.topologySpreadConstraintsConstraints that define how Pods spread across failure-domains like regions or availability zones. Default is
[].exporter.automountServiceAccountTokenControls whether to mount the serviceAccountToken. Default is
false.exporter.cacheDurationThe cache duration for information collected by the exporter. Default is
30.exporter.cacheCleanIntervalThe cache clean interval for information collected by the exporter. Default is
14400.exporter.priorityClassNameThe priority class to run the pod as. Default is
undefined.
metrics.enabledEnables Harbor metrics. Default is
false.metrics.core.pathThe URL path for core metrics. Default is
/metrics.metrics.core.portThe port for core metrics. Default is
8001.metrics.registry.pathThe URL path for registry metrics. Default is
/metrics.metrics.registry.portThe port for registry metrics. Default is
8001.metrics.exporter.pathThe URL path for exporter metrics. Default is
/metrics.metrics.exporter.portThe port for exporter metrics. Default is
8001.metrics.serviceMonitor.enabledEnables creation of a Prometheus ServiceMonitor (requirePrometheusus CRDs). Default is
false.metrics.serviceMonitor.additionalLabelsAdditional labels to apply to the ServiceMonitor manifest. Default is
"".metrics.serviceMonitor.intervalThe scrape interval for Harbor metrics. Default is
"".metrics.serviceMonitor.metricRelabelingsThe relabeling rules for metrics before ingestion. Default is
[].metrics.serviceMonitor.relabelingsThe relabeling rules for metrics before scraping. Default is
[].
trace.enabledEnables tracing functionality. Default is
false.trace.providerThe tracing provider (
jaegerorotel). Jaeger version should be 1.26+. Default isjaeger.trace.sample_rateThe sampling rate for trace data.
1samples 100%,0.5samples 50%. Default is1.trace.namespaceThe namespace to differentiate different Harbor services.
trace.attributesA key-value dictionary for user-defined attributes in trace provider initialization.
trace.jaeger.endpointThe endpoint for Jaeger tracing. Default is
http://hostname:14268/api/traces.trace.jaeger.usernameThe username for Jaeger authentication.
trace.jaeger.passwordThe password for Jaeger authentication.
trace.jaeger.agent_hostThe agent host for Jaeger.
trace.jaeger.agent_portThe agent port for Jaeger. Default is
6831.trace.otel.endpointThe endpoint for OpenTelemetry tracing. Default is
hostname:4318.trace.otel.url_pathThe URL path for OpenTelemetry. Default is
/v1/traces.trace.otel.compressionEnables compression for OpenTelemetry. Default is
false.trace.otel.insecureEstablishes an insecure connection for OpenTelemetry. Default is
true.trace.otel.timeoutThe timeout in seconds for OpenTelemetry. Default is
10.
cache.enabledEnables the cache layer. Default is
false.cache.expireHoursThe expiration time in hours for the cache layer. Default is
24.
B Example of a Private Registry HA setup Helm chart #
The following example values file illustrates a starting point for a Private Registry HA setup. It uses external PostgreSQL and external Valkey or Redis services. This example uses three replicas for the main services. Two replicas provide basic redundancy, but three replicas leave two instances available after one pod or node becomes unavailable. Three replicas also provide more capacity during planned maintenance or a rolling update.
Replicas alone do not make the deployment tolerate a node failure.
The example therefore also sets topologySpreadConstraints, so that the replicas of a component are placed on different nodes, and nodeSelector, so that the registry components run on a dedicated worker-node pool with sufficient capacity.
The selected nodes must have the label specified in the nodeSelector configuration.
For the design decisions behind these values, see Chapter 6, High Availability setup. For the complete list of values, see Appendix A, Overriding the SUSE Private Registry Helm chart.
expose:
  type: ingress
  tls:
    enabled: true
    certSource: secret 1
    secret:
      secretName: <TLS_SECRET_NAME>
  ingress:
    hosts:
      core: <PRIVATE_REGISTRY_FQDN> 2

externalURL: https://<PRIVATE_REGISTRY_FQDN> 3

harborAdminPassword: "<MY_PASSWORD>" 4

core:
  replicas: 3 5
  nodeSelector:
    <NODE_LABEL_KEY>: <NODE_LABEL_VALUE> 6
  topologySpreadConstraints: 7
    - maxSkew: 1
      topologyKey: kubernetes.io/hostname
      whenUnsatisfiable: DoNotSchedule
      matchLabelKeys:
        - pod-template-hash 8
      labelSelector:
        matchLabels:
          component: core
          release: <RELEASE_NAME>

portal:
  replicas: 3
  # Repeat the nodeSelector and topologySpreadConstraints of the core
  # component, with "component: portal" in the label selector. 9

registry:
  replicas: 3
  # Repeat with "component: registry" in the label selector.

jobservice:
  replicas: 3
  jobLoggers:
    - database 10
  # Repeat with "component: jobservice" in the label selector.

# Increase Trivy replicas when vulnerability scanning is a critical workload
trivy:
  replicas: 3
  # Repeat the nodeSelector and topologySpreadConstraints of the core
  # component, with "component: trivy" in the label selector, but without
  # matchLabelKeys.

# With "expose.type: ingress" the chart does not deploy its own nginx proxy,
# so "nginx.replicas" has no effect. Endpoint redundancy comes from the
# Ingress controller. 11

metrics:
  enabled: true 12
  serviceMonitor:
    enabled: true 13

# While not strictly for the HA of the registry itself, consider increasing exporter replicas for robust monitoring availability
exporter:
  replicas: 3
  # Repeat with "component: exporter" in the label selector.

# The CA certificate that signed the certificate of the external PostgreSQL
# server. The secret must contain the key "ca.crt".
caBundleSecretName: <CA_SECRET_NAME> 14

database:
  type: external
  external: 15
    host: <POSTGRESQL_HOST>
    port: "5432"
    username: <POSTGRESQL_USER>
    coreDatabase: "registry"
    existingSecret: <POSTGRESQL_SECRET_NAME> 16
    sslmode: "verify-full" 17

redis:
  type: external
  external: 18
    addr: <VALKEY_HOST>:6379 19
    sentinelMasterSet: "" 20
    coreDatabaseIndex: "0" 21
    jobserviceDatabaseIndex: "1"
    registryDatabaseIndex: "2"
    trivyAdapterIndex: "5"
    harborDatabaseIndex: "6" 22
    cacheLayerDatabaseIndex: "7" 23
    username: "" 24
    existingSecret: <VALKEY_SECRET_NAME> 25

persistence:
  enabled: true 26
  resourcePolicy: keep 27
  persistentVolumeClaim:
    registry:
      storageClass: <STORAGE_CLASS_NAME>
      accessMode: ReadWriteMany 28
      size: 500Gi 29
    trivy:
      storageClass: <STORAGE_CLASS_NAME>
size: 20Gi 30Can be | |
Core service host name in Ingress rule. | |
The external URL for the | |
The initial administrator password. In production, store the password in a Kubernetes secret and reference it with | |
Number of replicas to create. Two replicas provide basic redundancy. Three replicas are a recommended production starting point because two instances remain available after one pod or node becomes unavailable. Replicas do not guarantee node failure tolerance unless you distribute them across different nodes or failure domains. | |
Schedules the component on a dedicated worker-node pool. The selected nodes must carry this label. | |
Places the replicas of the component on different nodes. Set | |
Counts only the pods of the revision being rolled out. Without it, a rolling update also counts the pods it is about to replace, so the replacements can be placed on fewer nodes than | |
Apply the same | |
Writes job logs to the database instead of a volume. The default | |
The chart deploys its own nginx proxy only when | |
Required for the exporter to be deployed. Defaults to | |
Creates a Prometheus | |
The name of an existing secret containing the CA certificate that signed the certificate of the external PostgreSQL server. The key in the secret must be | |
Provide the database connection details in the | |
The name of an existing secret containing the database password. The key in the secret must be | |
Accepts one of the following values:
| |
Provide the connection information in the | |
Supports direct and Sentinel connections. Cluster mode is not supported. | |
The name of the set of Valkey or Redis instances to monitor. It must be set for a Sentinel connection. | |
Must be | |
Optional. The database index for miscellaneous business logic. Defaults to | |
Optional. The database index for the cache layer. Defaults to | |
If empty, it is authenticated against the default user. | |
The name of an existing secret containing the Valkey or Redis password. The key in the secret must be | |
To store all the images, metadata and scans, ensure that the persistence-related settings (Persistence parameters) are properly configured. | |
Keeps the PVCs when the Helm release is deleted. This setting does not replace backups and does not protect the PVCs from deletion outside Helm. | |
Replace | |
The chart default of | |
The chart default of |
For a production deployment, store the registry content in external object storage instead of a file system volume.
Object storage removes the shared-volume requirement and keeps the registry content available when a worker node fails.
Replace the persistence.persistentVolumeClaim.registry values with an imageChartStorage configuration. For example:
persistence:
  enabled: true
  resourcePolicy: keep
  imageChartStorage:
    type: s3 1
    s3:
      region: <S3_REGION>
      bucket: <S3_BUCKET>
      accesskey: <S3_ACCESS_KEY>
      secretkey: <S3_SECRET_KEY>
    disableredirect: true 2
  persistentVolumeClaim:
    trivy:
      storageClass: <STORAGE_CLASS_NAME>
size: 20GiAccepts | |
By default, the registry responds to pull requests by redirecting clients directly to object storage. Set |
C GNU Free Documentation License #
Copyright © 2000, 2001, 2002 Free Software Foundation, Inc. 51 Franklin St, Fifth Floor, Boston, MA 02110-1301 USA. Everyone is permitted to copy and distribute verbatim copies of this license document, but changing it is not allowed.
C1 0. PREAMBLE #
The purpose of this License is to make a manual, textbook, or other functional and useful document "free" in the sense of freedom: to assure everyone the effective freedom to copy and redistribute it, with or without modifying it, either commercially or non-commercially. Secondarily, this License preserves for the author and publisher a way to get credit for their work, while not being considered responsible for modifications made by others.
This License is a kind of "copyleft", which means that derivative works of the document must themselves be free in the same sense. It complements the GNU General Public License, which is a copyleft license designed for free software.
We have designed this License to use it for manuals for free software, because free software needs free documentation: a free program should come with manuals providing the same freedoms that the software does. But this License is not limited to software manuals; it can be used for any textual work, regardless of subject matter or whether it is published as a printed book. We recommend this License principally for works whose purpose is instruction or reference.
C2 1. APPLICABILITY AND DEFINITIONS #
This License applies to any manual or other work, in any medium, that contains a notice placed by the copyright holder saying it can be distributed under the terms of this License. Such a notice grants a world-wide, royalty-free license, unlimited in duration, to use that work under the conditions stated herein. The "Document", below, refers to any such manual or work. Any member of the public is a licensee, and is addressed as "you". You accept the license if you copy, modify or distribute the work in a way requiring permission under copyright law.
A "Modified Version" of the Document means any work containing the Document or a portion of it, either copied verbatim, or with modifications and/or translated into another language.
A "Secondary Section" is a named appendix or a front-matter section of the Document that deals exclusively with the relationship of the publishers or authors of the Document to the Document’s overall subject (or to related matters) and contains nothing that could fall directly within that overall subject. (Thus, if the Document is in part a textbook of mathematics, a Secondary Section may not explain any mathematics.) The relationship could be a matter of historical connection with the subject or with related matters, or of legal, commercial, philosophical, ethical or political position regarding them.
The "Invariant Sections" are certain Secondary Sections whose titles are designated, as being those of Invariant Sections, in the notice that says that the Document is released under this License. If a section does not fit the above definition of Secondary then it is not allowed to be designated as Invariant. The Document may contain zero Invariant Sections. If the Document does not identify any Invariant Sections then there are none.
The "Cover Texts" are certain short passages of text that are listed, as Front-Cover Texts or Back-Cover Texts, in the notice that says that the Document is released under this License. A Front-Cover Text may be at most 5 words, and a Back-Cover Text may be at most 25 words.
A "Transparent" copy of the Document means a machine-readable copy, represented in a format whose specification is available to the general public, that is suitable for revising the document straightforwardly with generic text editors or (for images composed of pixels) generic paint programs or (for drawings) some widely available drawing editor, and that is suitable for input to text formatters or for automatic translation to a variety of formats suitable for input to text formatters. A copy made in an otherwise Transparent file format whose markup, or absence of markup, has been arranged to thwart or discourage subsequent modification by readers is not Transparent. An image format is not Transparent if used for any substantial amount of text. A copy that is not "Transparent" is called "Opaque".
Examples of suitable formats for Transparent copies include plain ASCII without markup, Texinfo input format, LaTeX input format, SGML or XML using a publicly available DTD, and standard-conforming simple HTML, PostScript or PDF designed for human modification. Examples of transparent image formats include PNG, XCF and JPG. Opaque formats include proprietary formats that can be read and edited only by proprietary word processors, SGML or XML for which the DTD and/or processing tools are not generally available, and the machine-generated HTML, PostScript or PDF produced by some word processors for output purposes only.
The "Title Page" means, for a printed book, the title page itself, plus such following pages as are needed to hold, legibly, the material this License requires to appear in the title page. For works in formats which do not have any title page as such, "Title Page" means the text near the most prominent appearance of the work’s title, preceding the beginning of the body of the text.
A section "Entitled XYZ" means a named subunit of the Document whose title either is precisely XYZ or contains XYZ in parentheses following text that translates XYZ in another language. (Here XYZ stands for a specific section name mentioned below, such as "Acknowledgements", "Dedications", "Endorsements", or "History".) To "Preserve the Title" of such a section when you modify the Document means that it remains a section "Entitled XYZ" according to this definition.
The Document may include Warranty Disclaimers next to the notice which states that this License applies to the Document. These Warranty Disclaimers are considered to be included by reference in this License, but only as regards disclaiming warranties: any other implication that these Warranty Disclaimers may have is void and has no effect on the meaning of this License.
C3 2. VERBATIM COPYING #
You may copy and distribute the Document in any medium, either commercially or non-commercially, provided that this License, the copyright notices, and the license notice saying this License applies to the Document are reproduced in all copies, and that you add no other conditions whatsoever to those of this License. You may not use technical measures to obstruct or control the reading or further copying of the copies you make or distribute. However, you may accept compensation in exchange for copies. If you distribute a large enough number of copies you must also follow the conditions in section 3.
You may also lend copies, under the same conditions stated above, and you may publicly display copies.
C4 3. COPYING IN QUANTITY #
If you publish printed copies (or copies in media that commonly have printed covers) of the Document, numbering more than 100, and the Document’s license notice requires Cover Texts, you must enclose the copies in covers that carry, clearly and legibly, all these Cover Texts: Front-Cover Texts on the front cover, and Back-Cover Texts on the back cover. Both covers must also clearly and legibly identify you as the publisher of these copies. The front cover must present the full title with all words of the title equally prominent and visible. You may add other material on the covers in addition. Copying with changes limited to the covers, as long as they preserve the title of the Document and satisfy these conditions, can be treated as verbatim copying in other respects.
If the required texts for either cover are too voluminous to fit legibly, you should put the first ones listed (as many as fit reasonably) on the actual cover, and continue the rest onto adjacent pages.
If you publish or distribute Opaque copies of the Document numbering more than 100, you must either include a machine-readable Transparent copy along with each Opaque copy, or state in or with each Opaque copy a computer-network location from which the general network-using public has access to download using public-standard network protocols a complete Transparent copy of the Document, free of added material. If you use the latter option, you must take reasonably prudent steps, when you begin distribution of Opaque copies in quantity, to ensure that this Transparent copy will remain thus accessible at the stated location until at least one year after the last time you distribute an Opaque copy (directly or through your agents or retailers) of that edition to the public.
It is requested, but not required, that you contact the authors of the Document well before redistributing any large number of copies, to give them a chance to provide you with an updated version of the Document.
C5 4. MODIFICATIONS #
You may copy and distribute a Modified Version of the Document under the conditions of sections 2 and 3 above, provided that you release the Modified Version under precisely this License, with the Modified Version filling the role of the Document, thus licensing distribution and modification of the Modified Version to whoever possesses a copy of it. In addition, you must do these things in the Modified Version:
Use in the Title Page (and on the covers, if any) a title distinct from that of the Document, and from those of previous versions (which should, if there were any, be listed in the History section of the Document). You may use the same title as a previous version if the original publisher of that version gives permission.
List on the Title Page, as authors, one or more persons or entities responsible for authorship of the modifications in the Modified Version, together with at least five of the principal authors of the Document (all of its principal authors, if it has fewer than five), unless they release you from this requirement.
State on the Title page the name of the publisher of the Modified Version, as the publisher.
Preserve all the copyright notices of the Document.
Add an appropriate copyright notice for your modifications adjacent to the other copyright notices.
Include, immediately after the copyright notices, a license notice giving the public permission to use the Modified Version under the terms of this License, in the form shown in the Addendum below.
Preserve in that license notice the full lists of Invariant Sections and required Cover Texts given in the Document’s license notice.
Include an unaltered copy of this License.
Preserve the section Entitled "History", Preserve its Title, and add to it an item stating at least the title, year, new authors, and publisher of the Modified Version as given on the Title Page. If there is no section Entitled "History" in the Document, create one stating the title, year, authors, and publisher of the Document as given on its Title Page, then add an item describing the Modified Version as stated in the previous sentence.
Preserve the network location, if any, given in the Document for public access to a Transparent copy of the Document, and likewise the network locations given in the Document for previous versions it was based on. These may be placed in the "History" section. You may omit a network location for a work that was published at least four years before the Document itself, or if the original publisher of the version it refers to gives permission.
For any section Entitled "Acknowledgements" or "Dedications", Preserve the Title of the section, and preserve in the section all the substance and tone of each of the contributor acknowledgements and/or dedications given therein.
Preserve all the Invariant Sections of the Document, unaltered in their text and in their titles. Section numbers or the equivalent are not considered part of the section titles.
Delete any section Entitled "Endorsements". Such a section may not be included in the Modified Version.
Do not retitle any existing section to be Entitled "Endorsements" or to conflict in title with any Invariant Section.
Preserve any Warranty Disclaimers.
If the Modified Version includes new front-matter sections or appendices that qualify as Secondary Sections and contain no material copied from the Document, you may at your option designate some or all of these sections as invariant. To do this, add their titles to the list of Invariant Sections in the Modified Version’s license notice. These titles must be distinct from any other section titles.
You may add a section Entitled "Endorsements", provided it contains nothing but endorsements of your Modified Version by various parties—for example, statements of peer review or that the text has been approved by an organization as the authoritative definition of a standard.
You may add a passage of up to five words as a Front-Cover Text, and a passage of up to 25 words as a Back-Cover Text, to the end of the list of Cover Texts in the Modified Version. Only one passage of Front-Cover Text and one of Back-Cover Text may be added by (or through arrangements made by) any one entity. If the Document already includes a cover text for the same cover, previously added by you or by arrangement made by the same entity you are acting on behalf of, you may not add another; but you may replace the old one, on explicit permission from the previous publisher that added the old one.
The author(s) and publisher(s) of the Document do not by this License give permission to use their names for publicity for or to assert or imply endorsement of any Modified Version.
C6 5. COMBINING DOCUMENTS #
You may combine the Document with other documents released under this License, under the terms defined in section 4 above for modified versions, provided that you include in the combination all of the Invariant Sections of all of the original documents, unmodified, and list them all as Invariant Sections of your combined work in its license notice, and that you preserve all their Warranty Disclaimers.
The combined work need only contain one copy of this License, and multiple identical Invariant Sections may be replaced with a single copy. If there are multiple Invariant Sections with the same name but different contents, make the title of each such section unique by adding at the end of it, in parentheses, the name of the original author or publisher of that section if known, or else a unique number. Make the same adjustment to the section titles in the list of Invariant Sections in the license notice of the combined work.
In the combination, you must combine any sections Entitled "History" in the various original documents, forming one section Entitled "History"; likewise combine any sections Entitled "Acknowledgements", and any sections Entitled "Dedications". You must delete all sections Entitled "Endorsements".
C7 6. COLLECTIONS OF DOCUMENTS #
You may make a collection consisting of the Document and other documents released under this License, and replace the individual copies of this License in the various documents with a single copy that is included in the collection, provided that you follow the rules of this License for verbatim copying of each of the documents in all other respects.
You may extract a single document from such a collection, and distribute it individually under this License, provided you insert a copy of this License into the extracted document, and follow this License in all other respects regarding verbatim copying of that document.
C8 7. AGGREGATION WITH INDEPENDENT WORKS #
A compilation of the Document or its derivatives with other separate and independent documents or works, in or on a volume of a storage or distribution medium, is called an "aggregate" if the copyright resulting from the compilation is not used to limit the legal rights of the compilation’s users beyond what the individual works permit. When the Document is included in an aggregate, this License does not apply to the other works in the aggregate which are not themselves derivative works of the Document.
If the Cover Text requirement of section 3 is applicable to these copies of the Document, then if the Document is less than one half of the entire aggregate, the Document’s Cover Texts may be placed on covers that bracket the Document within the aggregate, or the electronic equivalent of covers if the Document is in electronic form. Otherwise they must appear on printed covers that bracket the whole aggregate.
C9 8. TRANSLATION #
Translation is considered a kind of modification, so you may distribute translations of the Document under the terms of section 4. Replacing Invariant Sections with translations requires special permission from their copyright holders, but you may include translations of some or all Invariant Sections in addition to the original versions of these Invariant Sections. You may include a translation of this License, and all the license notices in the Document, and any Warranty Disclaimers, provided that you also include the original English version of this License and the original versions of those notices and disclaimers. In case of a disagreement between the translation and the original version of this License or a notice or disclaimer, the original version will prevail.
If a section in the Document is Entitled "Acknowledgements", "Dedications", or "History", the requirement (section 4) to Preserve its Title (section 1) will typically require changing the actual title.
C10 9. TERMINATION #
You may not copy, modify, sublicense, or distribute the Document except as expressly provided for under this License. Any other attempt to copy, modify, sublicense or distribute the Document is void, and will automatically terminate your rights under this License. However, parties who have received copies, or rights, from you under this License will not have their licenses terminated so long as such parties remain in full compliance.
C11 1. FUTURE REVISIONS OF THIS LICENSE #
The Free Software Foundation may publish new, revised versions of the GNU Free Documentation License from time to time. Such new versions will be similar in spirit to the present version, but may differ in detail to address new problems or concerns. See https://www.gnu.org/copyleft/.
Each version of the License is given a distinguishing version number. If the Document specifies that a particular numbered version of this License "or any later version" applies to it, you have the option of following the terms and conditions either of that specified version or of any later version that has been published (not as a draft) by the Free Software Foundation. If the Document does not specify a version number of this License, you may choose any version ever published (not as a draft) by the Free Software Foundation.
C12 ADDENDUM: How to use this License for your documents #
  Copyright (c) YEAR YOUR NAME.
  Permission is granted to copy, distribute and/or modify this document
  under the terms of the GNU Free Documentation License, Version 1.2
  or any later version published by the Free Software Foundation;
  with no Invariant Sections, no Front-Cover Texts, and no Back-Cover Texts.
  A copy of the license is included in the section entitled "GNU
  Free Documentation License".
If you have Invariant Sections, Front-Cover Texts and Back-Cover Texts, replace the "with…Texts."" line with this:
  with the Invariant Sections being LIST THEIR TITLES, with the
  Front-Cover Texts being LIST, and with the Back-Cover Texts being LIST.
If you have Invariant Sections without Cover Texts, or some other combination of the three, merge those two alternatives to suit the situation.
If your document contains nontrivial examples of program code, we recommend releasing these examples in parallel under your choice of free software license, such as the GNU General Public License, to permit their use in free software.