Démarrage rapide de l'installation #
Ce guide de démarrage rapide vous assiste étape par étape lors de l'installation de SUSE® Linux Enterprise Desktop 15 SP6.
1 Bienvenue dans SUSE Linux Enterprise Desktop #
Utilisez les procédures suivantes pour installer le produit sur toutes les plates-formes matérielles prises en charge. Elles supposent que vous avez réussi à démarrer sur le système d'installation. Pour des instructions d'installation plus détaillées et les stratégies de déploiement, reportez-vous au Book “Deployment Guide”. Pour connaître les étapes de préparation requises pour le démarrage sur le système d'installation, reportez-vous au Book “Deployment Guide”, Chapter 2 “Installation on AMD64 and Intel 64”.
1.1 Programme d'installation unifié #
Depuis la version 15 de SUSE Linux Enterprise Desktop (SLED), le support d'installation se compose uniquement du programme d'installation unifié, un système minimal permettant l'installation, la mise à jour et l'enregistrement de tous les produits de base de SUSE Linux Enterprise. Lors de l'installation, vous pouvez ajouter des fonctionnalités en sélectionnant les modules et extensions à installer dans le programme d'installation unifié.
1.2 Installation hors ligne ou sans enregistrement #
Le support d'installation par défaut SLE-15-SP6-Online-ARCH-GM-media1.iso est optimisé au niveau de la taille et ne contient aucun module ni extension. Dès lors, le programme d'installation doit disposer d'un accès réseau pour enregistrer votre produit et récupérer les données de dépôt pour les modules et extensions.
Pour une installation sans enregistrement du système, utilisez l'image SLE-15-SP6-Full-ARCH-GM-media1.iso disponible à l'adresse https://www.suse.com/download/sled/ et reportez-vous au Book “Deployment Guide”, Chapter 5 “Installation steps”, Section 5.6.3 “Installing without registration” pour obtenir des instructions.
Utilisez la commande suivante pour copier le contenu de l'image d'installation sur un disque flash amovible.
>sudodd if=IMAGE of=FLASH_DISK bs=4M && sync
IMAGE doit être remplacé par le chemin d'accès au fichier image SLE-15-SP6-Online-ARCH-GM-media1.iso ou SLE-15-SP6-Full-ARCH-GM-media1.iso. FLASH_DISK doit être remplacé par le périphérique flash. Pour identifier le périphérique, insérez-le et exécutez la commande suivante :
# grep -Ff <(hwinfo --disk --short) <(hwinfo --usb --short)
disk:
  /dev/sdc             General USB Flash Disk
Assurez-vous que la taille du périphérique est suffisante pour l'image souhaitée. Vous pouvez vérifier la taille du périphérique à l'aide de la commande suivante :
# fdisk -l /dev/sdc | grep -e "^/dev"
     /dev/sdc1  *     2048 31490047 31488000  15G 83 Linux
Dans cet exemple, la capacité du périphérique est de 15 Go. La commande à utiliser pour le fichier SLE-15-SP6-Full-ARCH-GM-media1.iso serait la suivante :
dd if=SLE-15-SP6-Full-ARCH-GM-media1.iso of=/dev/sdc bs=4M && sync
Le périphérique ne doit pas être monté lors de l'exécution de la commande dd. Notez que toutes les données de la partition seront effacées !
2 Procédure d'installation #
Pour installer SUSE Linux Enterprise Desktop, démarrez le programme d'installation à partir du support du programme d'installation unifié, puis lancez l'installation.
2.1 Sélection de la langue, du clavier et des produits #
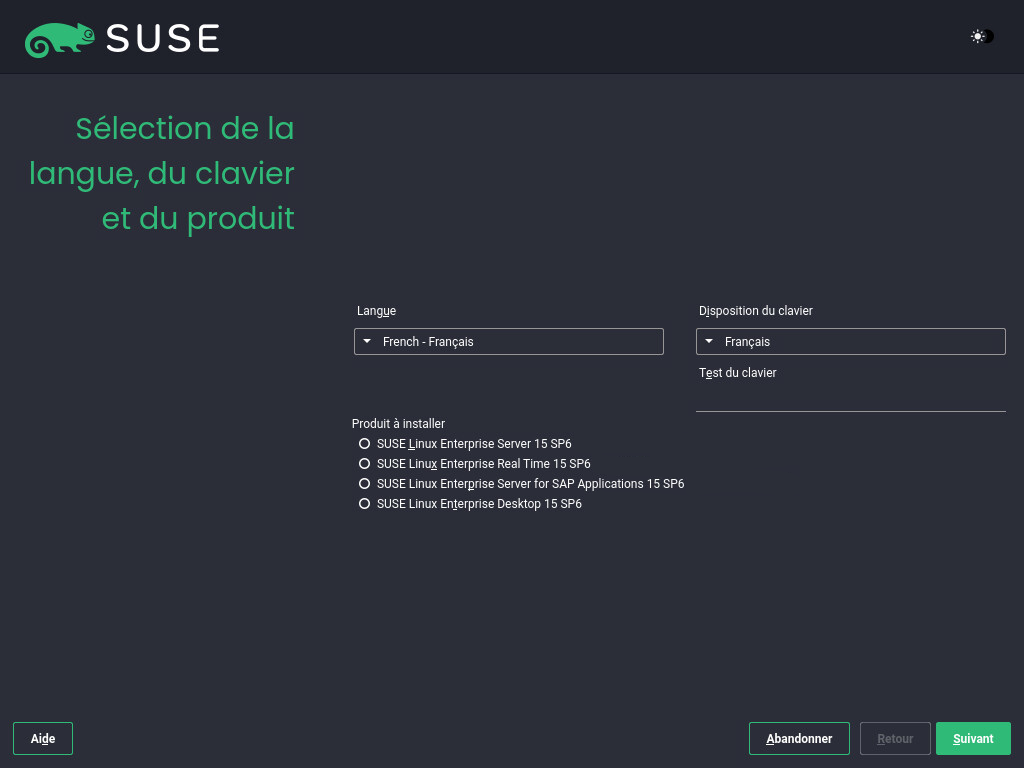
Les paramètres et sont initialisés en fonction de la langue choisie sur l'écran de démarrage. Si vous n'avez pas modifié la valeur par défaut, la langue sera l'anglais (États-Unis). Modifiez les paramètres ici, si nécessaire. Testez la disposition du clavier dans la zone de texte (Test du clavier).
Avec le programme d'installation unifié, vous pouvez installer tous les produits de base de SUSE Linux Enterprise :
SUSE Linux Enterprise Server 15 SP6 (pour des instructions d'installation, voir https://documentation.suse.com/sles/)
SUSE Linux Enterprise Desktop 15 SP6 (abordé dans ce guide)
SUSE Linux Enterprise Real Time 15 SP6 (pour des instructions d'installation, voir la page https://documentation.suse.com/sle-rt/)
SUSE Linux Enterprise Server for SAP Applications 15 SP6 (pour des instructions d'installation, voir la page https://documentation.suse.com/sles-sap)
SUSE Manager Server 5.0 (pour des instructions d'installation, voir la page https://documentation.suse.com/suma/)
SUSE Manager Proxy 5.0 (pour des instructions d'installation, voir la page https://documentation.suse.com/suma/)
SUSE Manager Retail Branch Server 5.0 (pour des instructions d'installation, voir la page https://documentation.suse.com/suma-retail)
Sélectionnez un produit à installer. Vous devez disposer du code d'enregistrement du produit correspondant. Ce document suppose que vous avez choisi SUSE Linux Enterprise Desktop (SLED). Cliquez ensuite sur .
Si vous rencontrez des difficultés lors de la lecture des étiquettes dans le programme d'installation, vous pouvez modifier les couleurs de widget et le thème.
Cliquez sur le bouton ou appuyez sur Maj–F3 pour ouvrir une boîte de dialogue de sélection de thème.Sélectionnez un thème dans la liste, puis quittez la boîte de dialogue en cliquant sur .
Maj–F4 permet de basculer vers le modèle de couleurs pour les utilisateurs malvoyants. Appuyez de nouveau sur les boutons pour revenir au modèle par défaut.
2.2 Accord de licence #
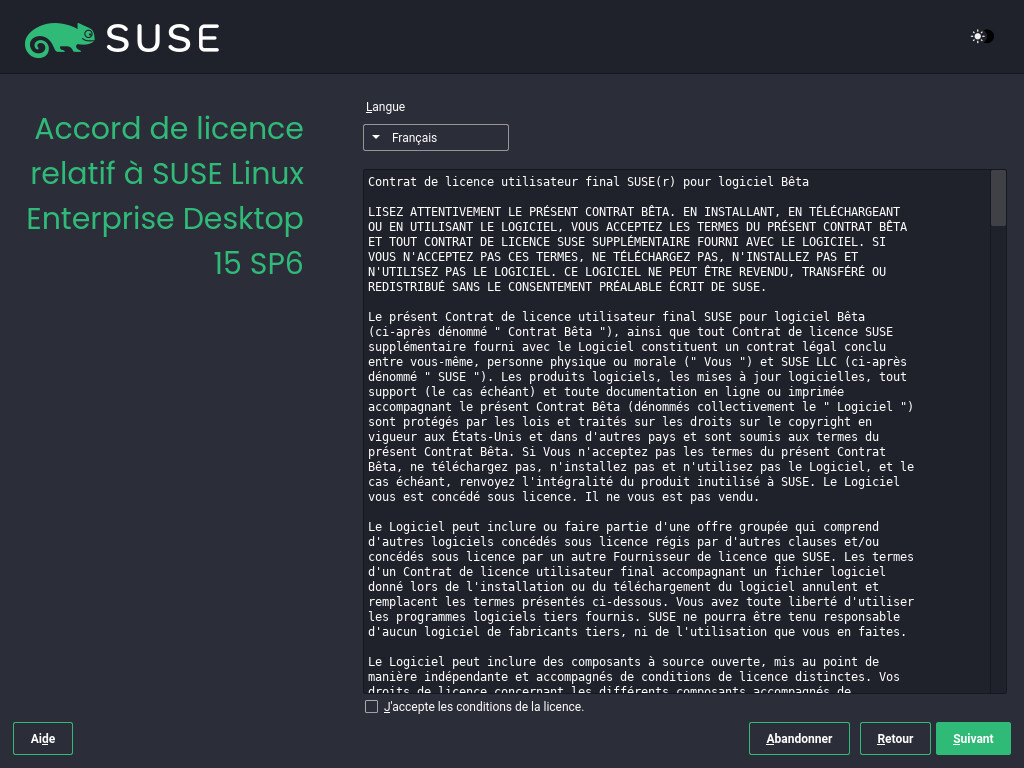
Lisez le contrat de licence. Celui-ci s'affiche dans la langue sélectionnée sur l'écran de démarrage. Des traductions sont disponibles via la zone déroulante . Vous devez accepter l'accord de licence en cochant la case afin d'installer SUSE Linux Enterprise Desktop. Cliquez ensuite sur .
2.3 Paramètres réseau #
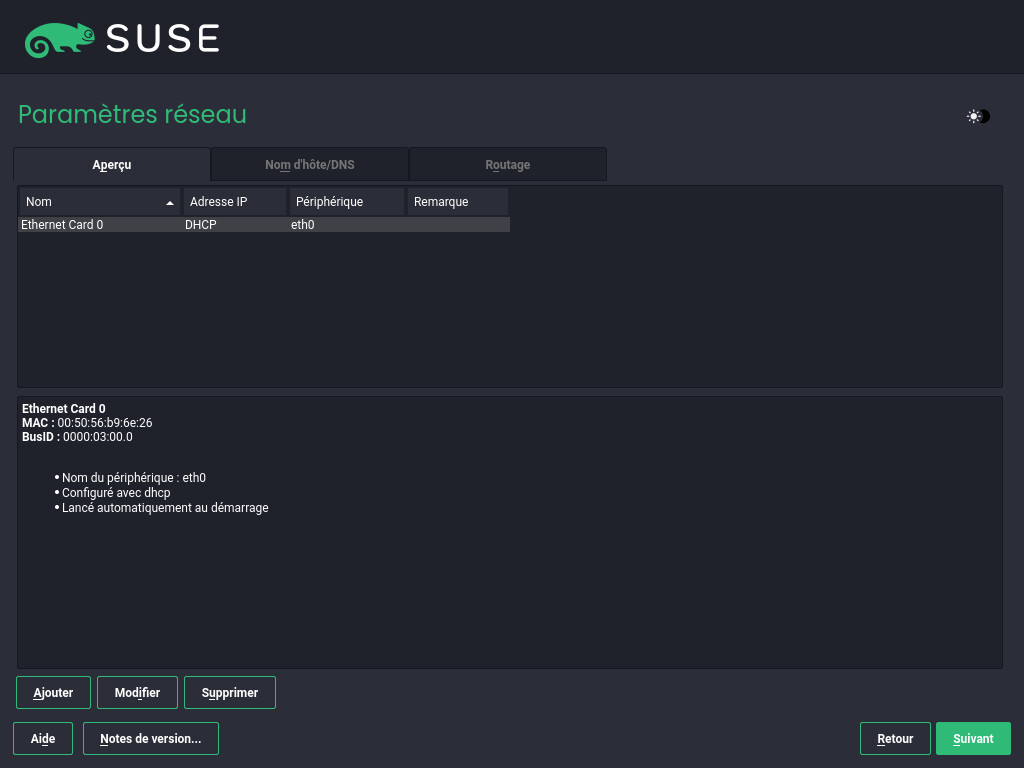
Une analyse système est effectuée, opération au cours de laquelle le programme d'installation recherche des périphériques de stockage et d'autres systèmes installés. Si le réseau a été configuré automatiquement au cours du démarrage de l'installation via DHCP, vous serez dirigé vers l'étape d'enregistrement.
Si le réseau n'est pas encore configuré, la boîte de dialogue s'ouvre. Choisissez une interface réseau dans la liste et configurez-la avec l'option . Vous pouvez également une interface manuellement. Reportez-vous au Book “Deployment Guide”, Chapter 5 “Installation steps”, Section 5.5 “Network settings” et au Book “Administration Guide”, Chapter 23 “Basic networking”, Section 23.4 “Configuring a network connection with YaST” pour plus d'informations. Si vous préférez effectuer une installation sans accès réseau, ignorez cette étape sans apporter de modification et cliquez sur .
2.4 Enregistrement #
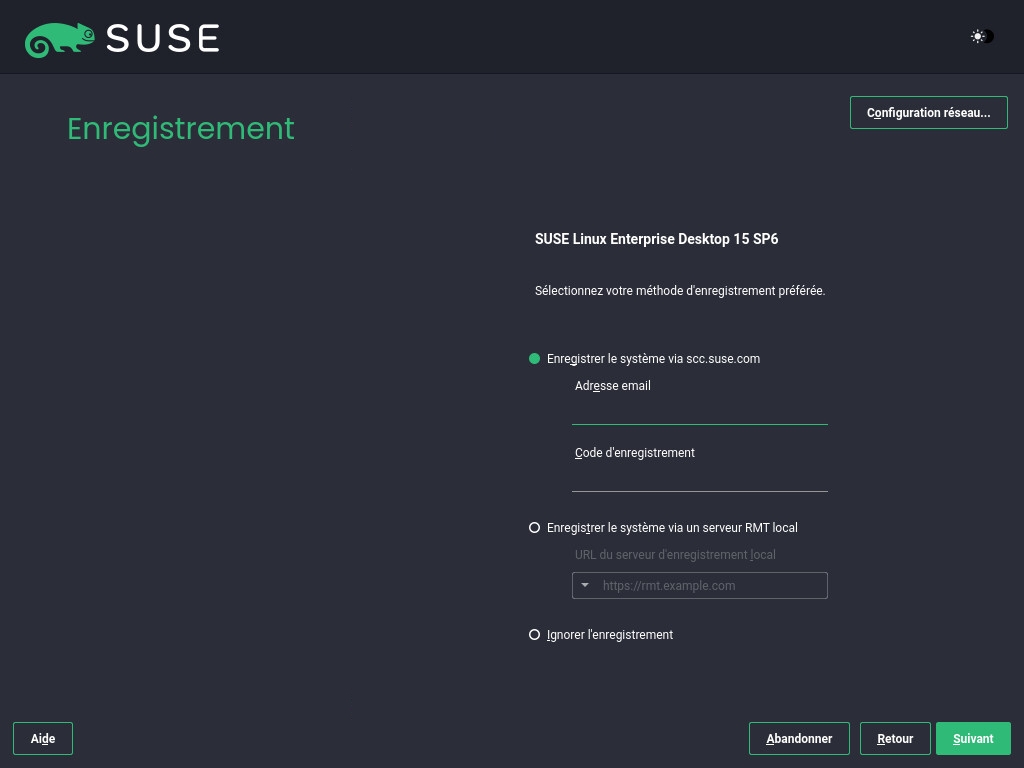
Pour obtenir un support technique et les mises à jour des produits, vous devez enregistrer et activer SUSE Linux Enterprise Desktop auprès du SUSE Customer Center ou d'un serveur d'enregistrement local. En enregistrant votre produit au cours de cette étape, vous disposez d'un accès immédiat au dépôt des mises à jour. Cela vous permet d'installer le système avec les mises à jour et les correctifs les plus récents.
Lors de l'enregistrement, les dépôts et dépendances des modules et extensions sont chargés à partir du serveur d'enregistrement.
Pour effectuer un enregistrement auprès du SUSE Customer Center, entrez l' associée à votre compte SUSE Customer Center et le pour SUSE Linux Enterprise Desktop. Cliquez ensuite sur .
Si votre organisation fournit un serveur d'enregistrement local, vous pouvez aussi effectuer l'enregistrement auprès de celui-ci. Activez l'option et choisissez une URL dans la zone de liste déroulante ou entrez une adresse. Cliquez ensuite sur .
Si vous êtes hors ligne ou si vous souhaitez ignorer l'enregistrement, sélectionnez . Acceptez l'avertissement en cliquant sur , puis appuyez sur .
Important : enregistrement ignoréVotre système et les extensions doivent être enregistrés afin de récupérer les mises à jour et de bénéficier d'une prise en charge. L'enregistrement ne peut être ignoré que lors d'une installation à partir de l'image
SLE-15-SP6-Full-ARCH-GM-media1.iso.Si vous n'effectuez pas d'enregistrement lors de l'installation, vous pouvez le faire à tout moment ultérieurement à partir du système en cours d'exécution. Pour ce faire, exécutez › ou l'outil de ligne de commande
SUSEConnect.
Selon votre matériel, il se peut que des dépôts supplémentaires contenant des pilotes matériels soient ajoutés au cours de l'enregistrement. Dans ce cas, vous serez invité à à chacun de ces dépôts.
Lorsque SUSE Linux Enterprise Desktop a bien été enregistré, vous devez indiquer si vous souhaitez installer les dernières mises à jour disponibles en ligne au cours de l'installation. Si vous sélectionnez , le système sera installé avec les paquetages les plus récents sans avoir à appliquer les mises à jour une fois l'opération effectuée. L'activation de cette option est recommandée.
Par défaut, le pare-feu de SUSE Linux Enterprise Desktop bloque uniquement les connexions entrantes. Si votre système se trouve derrière un autre pare-feu qui bloque le trafic sortant, veillez à autoriser les connexions vers https://scc.suse.com/ et https://updates.suse.com sur les ports 80 et 443 afin de recevoir les mises à jour.
2.5 Sélection d'extensions et de modules #
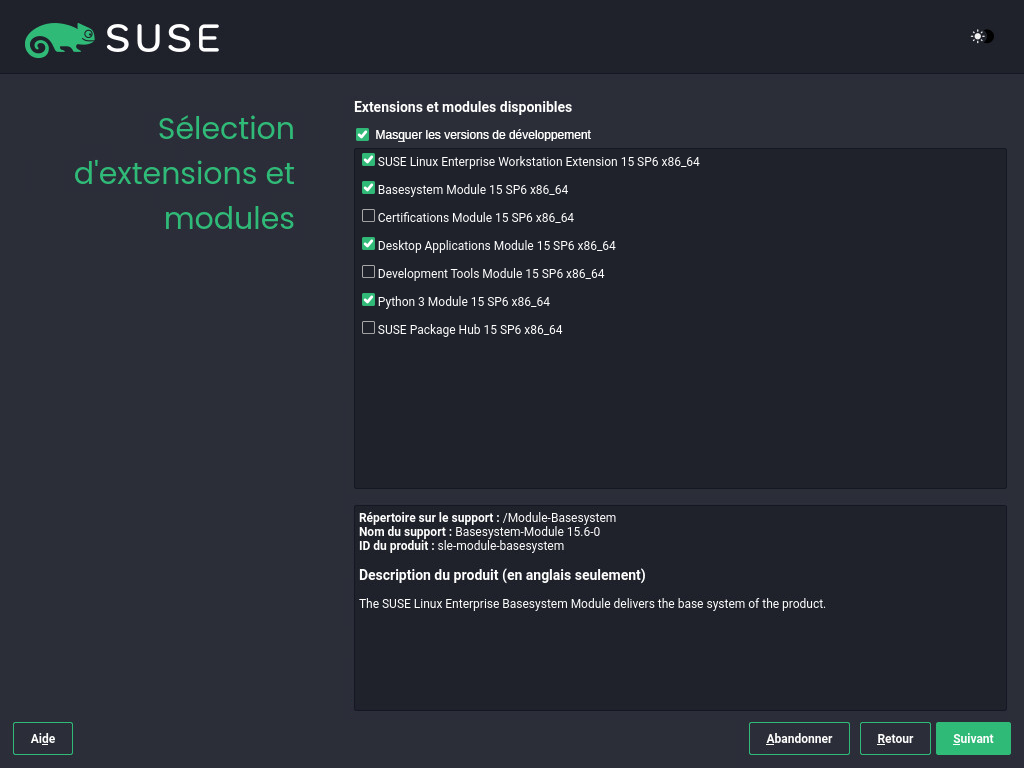
Une fois que le système a bien été enregistré, le programme d'installation répertorie les modules et extensions qui sont disponibles pour SUSE Linux Enterprise Desktop. Les modules sont des composants qui vous permettent de personnaliser le produit selon vos besoins. Ils sont inclus dans votre abonnement SUSE Linux Enterprise Desktop. Les extensions ajoutent des fonctionnalités à votre produit. Elles doivent être achetées séparément.
La disponibilité de certains modules ou extensions dépend du produit que vous avez sélectionné lors de la première étape de cette installation. Pour une description des modules et de leur cycle de vie, sélectionnez un module afin d'afficher le texte d'accompagnement. Des informations plus détaillées sont disponibles dans le document Modules and Extensions Quick Start.
La sélection des modules a une incidence indirecte sur l'étendue de l'installation, car elle définit les sources de logiciels (dépôts) qui sont disponibles pour l'installation et sur le système en cours d'exécution.
Les modules et extensions suivants sont disponibles pour SUSE Linux Enterprise Desktop :
- Module Basesystem (Système de base)
Ce module ajoute un système de base dans le programme d'installation unifié. Il est nécessaire à l'ensemble des autres modules et extensions. L'étendue d'une installation qui contient uniquement le système de base est comparable au modèle d'installation minimal system des versions antérieures de SUSE Linux Enterprise Desktop. Ce module est sélectionné pour l'installation par défaut et ne doit pas être désélectionné.
Dépendances : aucune
- Module Certifications
Contient les paquetages de certification FIPS.
Dépendances : Basesystem
- Module Desktop Applications (Applications de bureau)
Ajoute une interface graphique et des applications de bureau essentielles au système. Ce module est sélectionné pour l'installation par défaut. Il est déconseillé de le désélectionner.
Dépendances : Basesystem
- Module Development Tools (Outils de développement)
Contient les compilateurs (y compris gcc) et les bibliothèques nécessaires à la compilation et au débogage des applications. Remplace l'ancien SDK (Software Development Kit).
Dépendances : Basesystem, Desktop Applications
- Module Python 3
Ce module contient la version la plus récente des paquetages Python 3 sélectionnés.
Dépendances : Basesystem
- Extension SUSE Linux Enterprise Workstation
Contient des outils de bureau supplémentaires comme une suite bureautique ou des logiciels multimédias, notamment des lecteurs de musique et vidéo. Cette extension est incluse dans l'abonnement SUSE Linux Enterprise Desktop (SLED) et est sélectionnée pour l'installation par défaut ; il est déconseillé de la désélectionner.
Dépendances : Basesystem, Desktop Applications
- SUSE Package Hub
Donne accès aux paquetages pour SUSE Linux Enterprise Desktop gérés par la communauté openSUSE. Ces paquetages sont distribués sans support L3 et n'interfèrent pas avec la prise en charge de SUSE Linux Enterprise Desktop. Pour plus d'informations, reportez-vous au site https://packagehub.suse.com/.
Dépendances : Basesystem
Certains modules dépendent de l'installation d'autres modules. Par conséquent, lorsque vous sélectionnez un module, d'autres modules peuvent être sélectionnés automatiquement pour satisfaire les dépendances.
Selon le produit, le serveur d'enregistrement peut marquer des modules et extensions comme étant recommandés. Les extensions et modules recommandés sont présélectionnés pour installation et enregistrement. Pour éviter l'installation de ces recommandations, désélectionnez-les manuellement.
Sélectionnez les modules et l'extension que vous souhaitez installer et cliquez ensuite sur . Si vous avez choisi une ou plusieurs extensions, vous devrez saisir leur code d'enregistrement respectif. En fonction de votre choix, il peut également être nécessaire d'accepter des contrats de licence supplémentaires.
Lorsque vous effectuez une installation hors ligne à partir de SLE-15-SP6-Full-ARCH-GM-media1.iso, seul le est sélectionné par défaut. Pour installer l'ensemble complet de paquetages par défaut de SUSE Linux Enterprise Desktop, sélectionnez en outre le (Applications de bureau), l' et le .
2.6 Produit complémentaire #
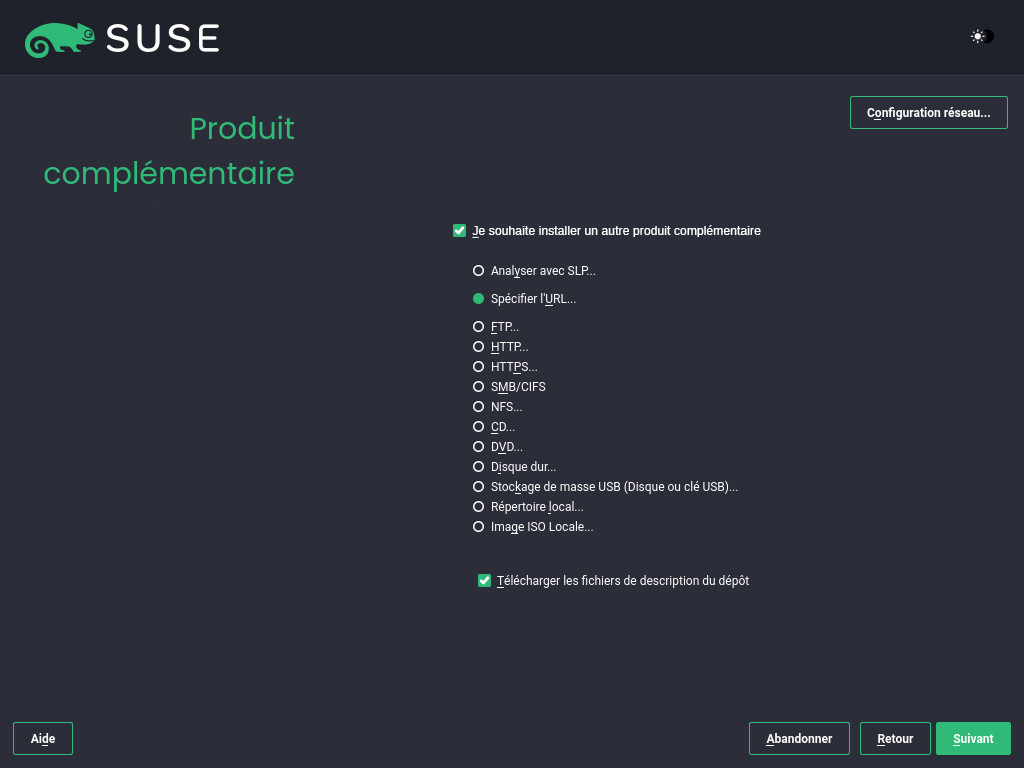
La boîte de dialogue vous permet d'ajouter des sources de logiciels supplémentaires (appelées « dépôts ») à SUSE Linux Enterprise Desktop, qui ne sont pas fournies par le SUSE Customer Center. Ces produits complémentaires peuvent être des produits tiers, des pilotes ou des logiciels supplémentaires pour votre système.
Vous pouvez également ajouter des dépôts de mises à jour de pilote au moyen de la boîte de dialogue . Les mises à jour des pilotes pour SUSE Linux Enterprise sont disponibles à l'adresse suivante : https://drivers.suse.com/. Ces pilotes ont été créés via le programme SolidDriver SUSE.
Si vous voulez ignorer cette étape, cliquez sur . Dans le cas contraire, cochez la case . Indiquez un type de support, un chemin local ou une ressource réseau hébergeant le dépôt et suivez les instructions affichées à l'écran.
Cochez pour télécharger directement les fichiers décrivant le dépôt. Si cette case n'est pas cochée, ils seront téléchargés une fois que l'installation aura commencé. Continuez en cliquant sur et insérez un support si nécessaire. Selon le contenu du produit, vous devrez peut-être accepter des contrats de licence supplémentaires. Cliquez ensuite sur . Si vous avez choisi un produit complémentaire nécessitant une clé d'enregistrement, le système vous demandera de l'indiquer avant de passer à l'étape suivante.
2.7 Rôle système #
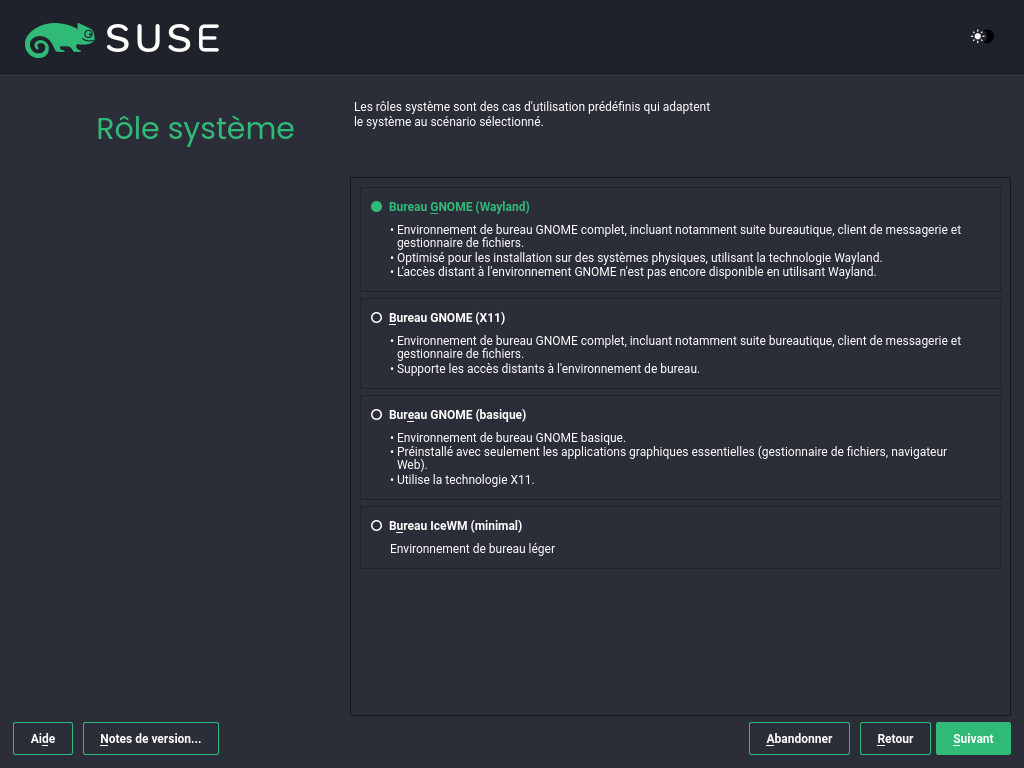
La disponibilité des rôles système dépend de votre sélection de modules et d'extensions. Les rôles système définissent, par exemple, l'ensemble de modèles de logiciels qui va être présélectionné pour installation. Reportez-vous à la description à l'écran pour effectuer votre choix. Sélectionnez un rôle et cliquez ensuite sur . Si dans les modules activés, un seul rôle est approprié ou aucun rôle n'est approprié pour les produits de base respectifs, la boîte de dialogue est ignorée.
À partir de maintenant, les notes de version peuvent être consultées sur n'importe quel écran au cours du processus d'installation en sélectionnant .
2.8 Partitionnement proposé #
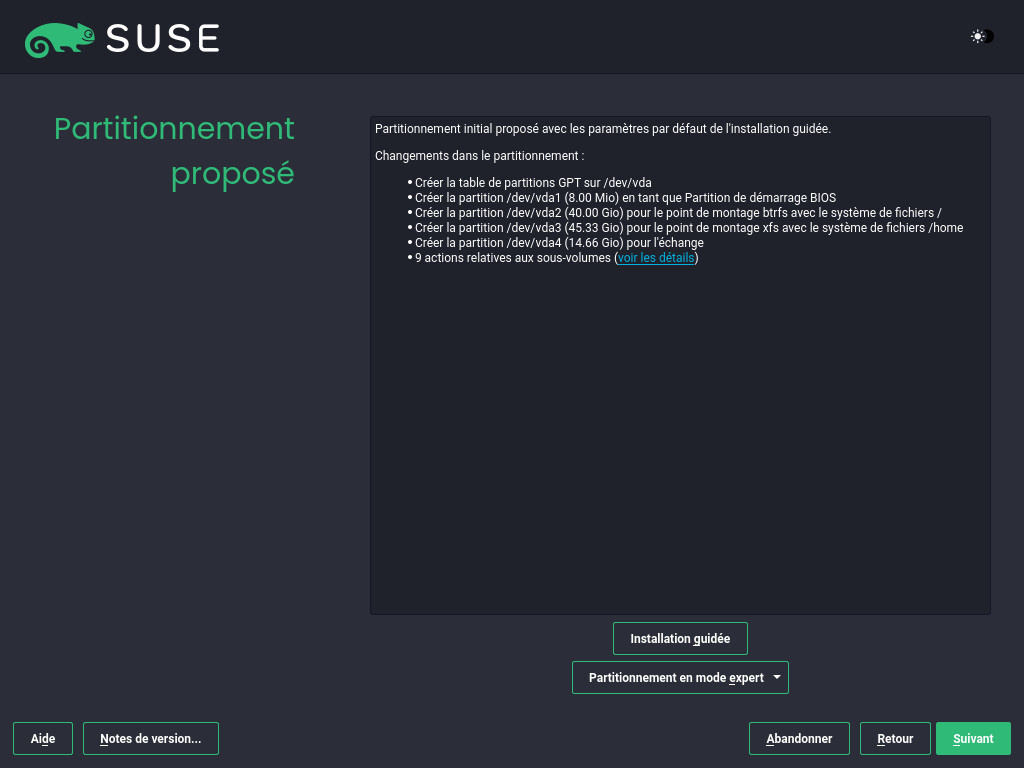
Passez en revue la configuration de la partition proposée par le système. Si besoin, modifiez-la. Vous avez les options suivantes :
Démarre un assistant qui vous permet d'affiner la proposition de partitionnement. Les options disponibles ici dépendent de votre configuration système. Si celle-ci contient plusieurs disques durs, vous pouvez choisir quel(s) disque(s) utiliser et l'emplacement de la partition racine. Si un ou plusieurs disques contiennent déjà des partitions, décidez si vous souhaitez les supprimer ou les redimensionner.
Dans les étapes suivantes, vous pouvez également ajouter le chiffrement de disque et la prise en charge de LVM. Vous pouvez modifier le système de fichiers de la partition racine et décider s'il faut disposer d'une partition privée distincte ou pas.
Ouvre la fenêtre de décrite dans le Book “Deployment Guide”, Chapter 7 “”, Section 7.1 “Using the ”. Cela vous donne un contrôle total sur la configuration du partitionnement et vous permet de créer une configuration personnalisée. Cette option est destinée aux experts.
Notez qu'à des fins de partitionnement, l'espace disque est mesuré en unités binaires plutôt qu'en unités décimales. Par exemple, si vous spécifiez la taille de 1GB, 1GiB ou 1G, cela correspond à 1 Gio (gibioctet), et non à 1 Go (gigaoctet).
- Binaire
1 Gio = 1 073 741 824 octets.
- Décimal
1 Go = 1 000 000 000 octets.
- Différence
1 Gio ≈ 1,07 Go.
Pour accepter la configuration proposée sans apporter de modifications, cliquez sur pour continuer.
2.9 Horloge et fuseau horaire #
Sélectionnez l'horloge et le fuseau horaire à utiliser sur votre système. Pour ajuster manuellement l'heure ou configurer un serveur NTP à des fins de synchronisation horaire, choisissez . Pour de plus amples informations, reportez-vous au Book “Deployment Guide”, Chapter 5 “Installation steps”, Section 5.11 “Clock and time zone”. Cliquez ensuite sur .
2.10 Utilisateur local #
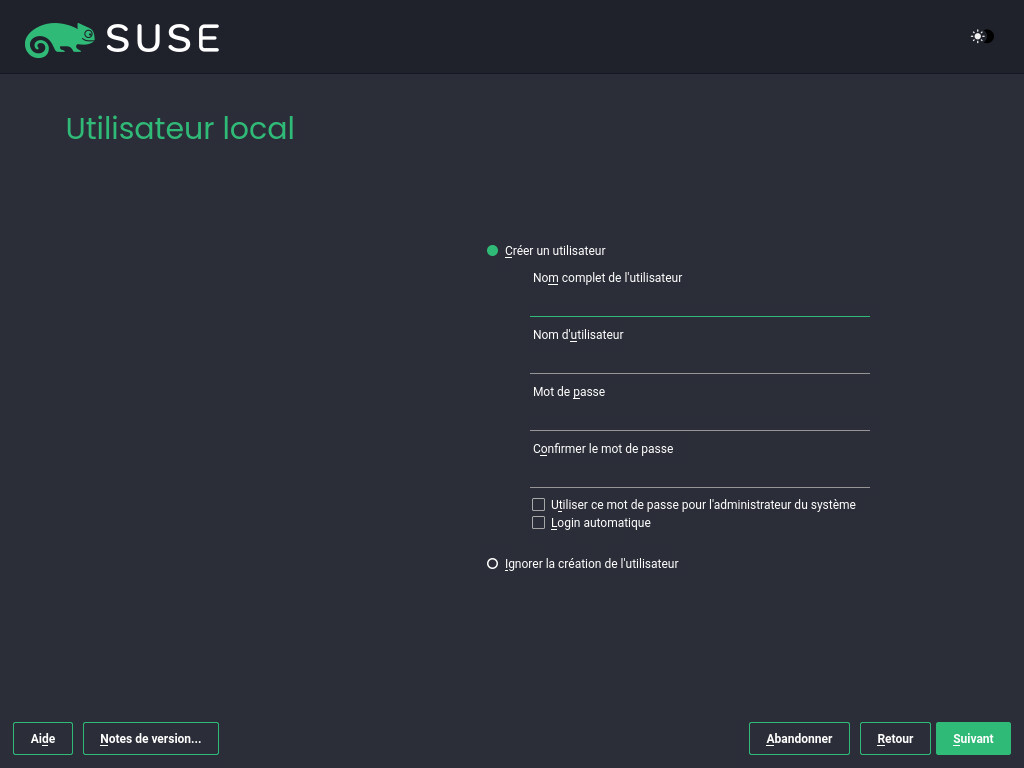
Pour créer un utilisateur local, saisissez votre prénom et votre nom dans le champ , votre nom de connexion dans le champ et votre mot de passe dans le champ .
Votre mot de passe doit contenir huit caractères au minimum sous la forme d'une combinaison de lettres majuscules et minuscules et de chiffres. Les mots de passe ne peuvent pas comporter plus de 72 caractères ; de plus, ils sont sensibles à la casse.
Pour des raisons de sécurité, il est également fortement recommandé de ne pas activer la fonction de . Vous ne devez pas , mais plutôt fournir un mot de passe root distinct lors de l'étape d'installation suivante.
Si vous effectuez l'installation sur un système où une précédente installation de Linux a été détectée, vous pouvez . Cliquez sur (Sélectionner un utilisateur) pour obtenir la liste des comptes utilisateur disponibles. Sélectionnez un ou plusieurs utilisateurs.
Dans un environnement où les utilisateurs sont gérés de manière centralisée (par exemple, par NIS ou LDAP), vous pouvez ignorer la création d'utilisateurs locaux. Sélectionnez dans ce cas.
Cliquez ensuite sur .
2.11 Authentification de l'administrateur système « root » #
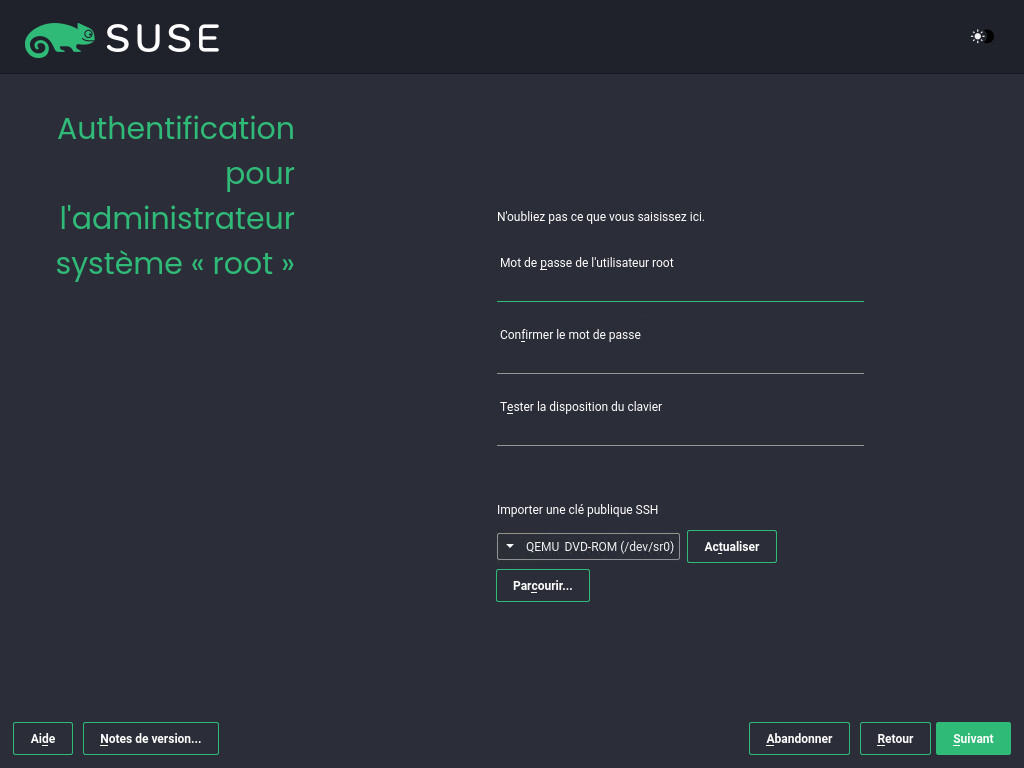
Saisissez un mot de passe pour l'administrateur système (appelé utilisateur root) ou fournissez une clé publique SSH. Si vous le souhaitez, vous pouvez utiliser les deux.
Comme l'utilisateur root est doté d'autorisations étendues, le mot de passe doit être choisi avec soin. N'oubliez pas votre mot de passe root ! Une fois que vous l'avez saisi, il vous est impossible de le récupérer.
Il est recommandé d'utiliser uniquement des caractères ASCII américains. En cas d'erreur système ou s'il s'avère nécessaire de démarrer le système en mode de secours, il se peut que le clavier ne soit pas localisé.
Si vous souhaitez accéder au système à distance via SSH à l'aide d'une clé publique, importez une clé à partir d'un support amovible ou d'une partition existante. Pour plus d'informations, reportez-vous au Book “Deployment Guide”, Chapter 5 “Installation steps”, Section 5.13 “Authentication for the system administrator root”.
Cliquez sur pour continuer.
2.12 Paramètres d'installation #
Utilisez l'écran pour passer en revue et, si besoin, modifier certains des paramètres d'installation proposés. La configuration actuelle est répertoriée pour chaque paramètre. Pour la modifier, cliquez sur son intitulé. Certains paramètres, tels que le pare-feu ou le SSH, peuvent être modifiés directement en cliquant sur les liens respectifs.
Les modifications que vous apportez ici peuvent également être effectuées ultérieurement à partir du système installé. Toutefois, si vous avez besoin d'un accès à distance juste après l'installation, vous devrez peut-être ouvrir le port SSH dans les paramètres .
L'étendue de l'installation est définie par les modules et extensions que vous avez choisis pour cette installation. Toutefois, en fonction de votre choix, seule une partie des paquetages disponibles dans un module sont sélectionnés pour installation.
Le fait de cliquer sur ouvre l'écran , où vous pouvez modifier la sélection des logiciels en sélectionnant ou en désélectionnant des modèles. Chaque modèle contient plusieurs paquetages logiciels nécessaires pour des fonctions spécifiques (par exemple, ). Pour une sélection plus détaillée des paquetages logiciels à installer, sélectionnez afin de basculer vers le de YaST. Pour plus d'informations, reportez-vous au Book “Administration Guide”, Chapter 8 “Installing or removing software”.
Cette section montre la configuration du chargeur de démarrage. La modification des valeurs par défaut est uniquement recommandée si elle est réellement nécessaire. Reportez-vous au Book “Administration Guide”, Chapter 18 “The boot loader GRUB 2” pour obtenir des informations détaillées.
Les font référence aux paramètres de la ligne de commande de démarrage du kernel pour les atténuations logicielles déployées afin d'empêcher les attaques d'UC par canal auxiliaire. Cliquez sur l'entrée sélectionnée pour choisir une autre option. Pour plus de détails, reportez-vous au Book “Administration Guide”, Chapter 18 “The boot loader GRUB 2” CPU Mitigations.
Par défaut, le est activé sur toutes les interfaces réseau configurées. Pour désactiver complètement
firewalld, cliquez sur (non recommandé). Pour connaître les détails de la configuration, reportez-vous au Book “Security and Hardening Guide”, Chapter 23 “Masquerading and firewalls”.Note : paramètres du pare-feu pour la réception des mises à jourPar défaut, le pare-feu de SUSE Linux Enterprise Desktop bloque uniquement les connexions entrantes. Si votre système se trouve derrière un autre pare-feu qui bloque le trafic sortant, veillez à autoriser les connexions vers
https://scc.suse.com/ethttps://updates.suse.comsur les ports 80 et 443 afin de recevoir les mises à jour.Le est activé par défaut, mais son port (22) est fermé dans le pare-feu. Cliquez sur pour l'ouvrir ou sur pour désactiver le service. Notez que si SSH est désactivé, les connexions à distance ne seront pas possibles. Reportez-vous au Book “Security and Hardening Guide”, Chapter 22 “Securing network operations with OpenSSH” pour plus d'informations.
Le par défaut est . Pour le désactiver, sélectionnez comme module dans les paramètres
Cliquez pour la stratégie de sécurité
Defense Information Systems Agency STIG. Si des paramètres d'installation sont incompatibles avec la stratégie, vous êtes invité à les modifier en conséquence. Certains paramètres peuvent être ajustés automatiquement, d'autres nécessitent une intervention de l'utilisateur.L'activation d'un profil de sécurité permet un traitement SCAP complet au premier démarrage. Vous pouvez également ou et traiter manuellement le système par la suite avec OpenSCAP. Pour plus d'informations, reportez-vous au Book “Deployment Guide”, Chapter 5 “Installation steps”, Section 5.14.4 “”.
Affiche la configuration réseau actuelle. Par défaut,
wickedest utilisé pour les installations de serveur et NetworkManager pour les charges de travail de bureau. Cliquez sur pour modifier ces paramètres. Pour plus de détails, reportez-vous au Book “Administration Guide”, Chapter 23 “Basic networking”, Section 23.4 “Configuring a network connection with YaST”.La fonctionnalité Kdump enregistre l'image de la mémoire (« vidage de la mémoire ») sur le système de fichiers en cas de plantage du kernel. Cela vous permet de trouver l'origine du plantage en déboguant le fichier de vidage. Cette fonctionnalité est préconfigurée et activée par défaut. Pour plus d'informations, reportez-vous au Book “System Analysis and Tuning Guide”, Chapter 18 “Kexec and Kdump”, Section 18.7 “Basic Kdump configuration”.
Par défaut, SUSE Linux Enterprise Desktop démarre dans un environnement de bureau graphique. Étant donné qu'il n'est pas très judicieux d'exécuter un système de bureau à partir de la ligne de commande, il est recommandé de ne pas modifier ce paramètre.
Consultez des informations détaillées sur le matériel en cliquant sur . Dans l'écran qui s'affiche, vous pouvez également modifier les . Pour plus d'informations, reportez-vous au Book “Deployment Guide”, Chapter 5 “Installation steps”, Section 5.14.8 “”.
2.13 Démarrage de l'installation #
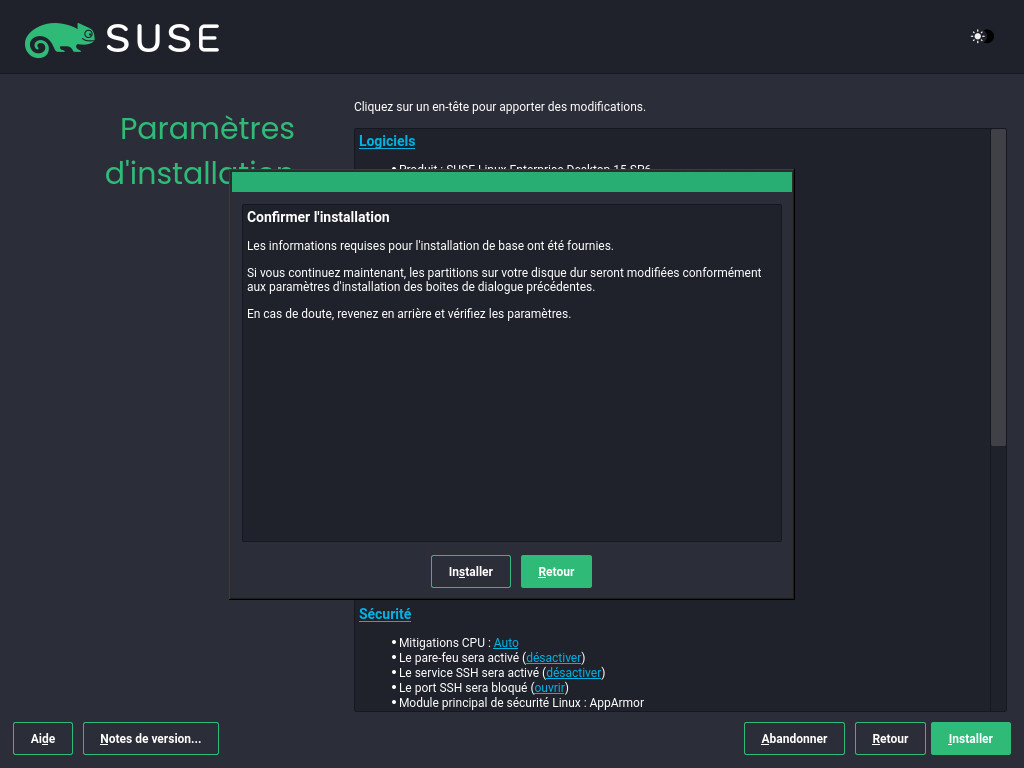
Une fois la configuration du système finalisée sur l'écran , cliquez sur . En fonction du logiciel que vous avez sélectionné, il se peut que vous deviez accepter un contrat de licence avant que l'écran de confirmation de l'installation ne s'affiche. Jusqu'ici, aucune modification n'a été apportée à votre système. Lorsque vous cliquez sur pour la deuxième fois, le processus d'installation démarre.
2.14 Processus d'installation #
Au cours de l'installation, la progression est affichée. Une fois la routine d'installation terminée, l'ordinateur est redémarré avec le système installé.
3 Mentions légales #
Copyright © 2006– 2024 SUSE LLC et contributeurs. Tous droits réservés.
Il est autorisé de copier, distribuer et/ou modifier ce document conformément aux conditions de la licence de documentation libre GNU version 1.2 ou (à votre discrétion) 1.3, avec la section permanente qu'est cette mention de copyright et la licence. Une copie de la version de licence 1.2 est incluse dans la section intitulée « Licence de documentation libre GNU ».
Pour les marques commerciales SUSE, consultez le site Web https://www.suse.com/company/legal/. Toutes les autres marques de fabricants tiers sont la propriété de leur détenteur respectif. Les symboles de marque (®, ™, etc.) désignent des marques de SUSE et de ses sociétés affiliées. Des astérisques (*) désignent des marques commerciales de fabricants tiers.
Toutes les informations de cet ouvrage ont été regroupées avec le plus grand soin. Cela ne garantit cependant pas sa complète exactitude. Ni SUSE LLC, ni les sociétés affiliées, ni les auteurs, ni les traducteurs ne peuvent être tenus responsables des erreurs possibles ou des conséquences qu'elles peuvent entraîner.
4 GNU Free Documentation License #
Copyright (C) 2000, 2001, 2002 Free Software Foundation, Inc. 51 Franklin St, Fifth Floor, Boston, MA 02110-1301 USA. Everyone is permitted to copy and distribute verbatim copies of this license document, but changing it is not allowed.
0. PREAMBLE #
The purpose of this License is to make a manual, textbook, or other functional and useful document "free" in the sense of freedom: to assure everyone the effective freedom to copy and redistribute it, with or without modifying it, either commercially or non-commercially. Secondarily, this License preserves for the author and publisher a way to get credit for their work, while not being considered responsible for modifications made by others.
This License is a kind of "copyleft", which means that derivative works of the document must themselves be free in the same sense. It complements the GNU General Public License, which is a copyleft license designed for free software.
We have designed this License to use it for manuals for free software, because free software needs free documentation: a free program should come with manuals providing the same freedoms that the software does. But this License is not limited to software manuals; it can be used for any textual work, regardless of subject matter or whether it is published as a printed book. We recommend this License principally for works whose purpose is instruction or reference.
1. APPLICABILITY AND DEFINITIONS #
This License applies to any manual or other work, in any medium, that contains a notice placed by the copyright holder saying it can be distributed under the terms of this License. Such a notice grants a world-wide, royalty-free license, unlimited in duration, to use that work under the conditions stated herein. The "Document", below, refers to any such manual or work. Any member of the public is a licensee, and is addressed as "you". You accept the license if you copy, modify or distribute the work in a way requiring permission under copyright law.
A "Modified Version" of the Document means any work containing the Document or a portion of it, either copied verbatim, or with modifications and/or translated into another language.
A "Secondary Section" is a named appendix or a front-matter section of the Document that deals exclusively with the relationship of the publishers or authors of the Document to the Document's overall subject (or to related matters) and contains nothing that could fall directly within that overall subject. (Thus, if the Document is in part a textbook of mathematics, a Secondary Section may not explain any mathematics.) The relationship could be a matter of historical connection with the subject or with related matters, or of legal, commercial, philosophical, ethical or political position regarding them.
The "Invariant Sections" are certain Secondary Sections whose titles are designated, as being those of Invariant Sections, in the notice that says that the Document is released under this License. If a section does not fit the above definition of Secondary then it is not allowed to be designated as Invariant. The Document may contain zero Invariant Sections. If the Document does not identify any Invariant Sections then there are none.
The "Cover Texts" are certain short passages of text that are listed, as Front-Cover Texts or Back-Cover Texts, in the notice that says that the Document is released under this License. A Front-Cover Text may be at most 5 words, and a Back-Cover Text may be at most 25 words.
A "Transparent" copy of the Document means a machine-readable copy, represented in a format whose specification is available to the general public, that is suitable for revising the document straightforwardly with generic text editors or (for images composed of pixels) generic paint programs or (for drawings) some widely available drawing editor, and that is suitable for input to text formatters or for automatic translation to a variety of formats suitable for input to text formatters. A copy made in an otherwise Transparent file format whose markup, or absence of markup, has been arranged to thwart or discourage subsequent modification by readers is not Transparent. An image format is not Transparent if used for any substantial amount of text. A copy that is not "Transparent" is called "Opaque".
Examples of suitable formats for Transparent copies include plain ASCII without markup, Texinfo input format, LaTeX input format, SGML or XML using a publicly available DTD, and standard-conforming simple HTML, PostScript or PDF designed for human modification. Examples of transparent image formats include PNG, XCF and JPG. Opaque formats include proprietary formats that can be read and edited only by proprietary word processors, SGML or XML for which the DTD and/or processing tools are not generally available, and the machine-generated HTML, PostScript or PDF produced by some word processors for output purposes only.
The "Title Page" means, for a printed book, the title page itself, plus such following pages as are needed to hold, legibly, the material this License requires to appear in the title page. For works in formats which do not have any title page as such, "Title Page" means the text near the most prominent appearance of the work's title, preceding the beginning of the body of the text.
A section "Entitled XYZ" means a named subunit of the Document whose title either is precisely XYZ or contains XYZ in parentheses following text that translates XYZ in another language. (Here XYZ stands for a specific section name mentioned below, such as "Acknowledgements", "Dedications", "Endorsements", or "History".) To "Preserve the Title" of such a section when you modify the Document means that it remains a section "Entitled XYZ" according to this definition.
The Document may include Warranty Disclaimers next to the notice which states that this License applies to the Document. These Warranty Disclaimers are considered to be included by reference in this License, but only as regards disclaiming warranties: any other implication that these Warranty Disclaimers may have is void and has no effect on the meaning of this License.
2. VERBATIM COPYING #
You may copy and distribute the Document in any medium, either commercially or non-commercially, provided that this License, the copyright notices, and the license notice saying this License applies to the Document are reproduced in all copies, and that you add no other conditions whatsoever to those of this License. You may not use technical measures to obstruct or control the reading or further copying of the copies you make or distribute. However, you may accept compensation in exchange for copies. If you distribute a large enough number of copies you must also follow the conditions in section 3.
You may also lend copies, under the same conditions stated above, and you may publicly display copies.
3. COPYING IN QUANTITY #
If you publish printed copies (or copies in media that commonly have printed covers) of the Document, numbering more than 100, and the Document's license notice requires Cover Texts, you must enclose the copies in covers that carry, clearly and legibly, all these Cover Texts: Front-Cover Texts on the front cover, and Back-Cover Texts on the back cover. Both covers must also clearly and legibly identify you as the publisher of these copies. The front cover must present the full title with all words of the title equally prominent and visible. You may add other material on the covers in addition. Copying with changes limited to the covers, as long as they preserve the title of the Document and satisfy these conditions, can be treated as verbatim copying in other respects.
If the required texts for either cover are too voluminous to fit legibly, you should put the first ones listed (as many as fit reasonably) on the actual cover, and continue the rest onto adjacent pages.
If you publish or distribute Opaque copies of the Document numbering more than 100, you must either include a machine-readable Transparent copy along with each Opaque copy, or state in or with each Opaque copy a computer-network location from which the general network-using public has access to download using public-standard network protocols a complete Transparent copy of the Document, free of added material. If you use the latter option, you must take reasonably prudent steps, when you begin distribution of Opaque copies in quantity, to ensure that this Transparent copy will remain thus accessible at the stated location until at least one year after the last time you distribute an Opaque copy (directly or through your agents or retailers) of that edition to the public.
It is requested, but not required, that you contact the authors of the Document well before redistributing any large number of copies, to give them a chance to provide you with an updated version of the Document.
4. MODIFICATIONS #
You may copy and distribute a Modified Version of the Document under the conditions of sections 2 and 3 above, provided that you release the Modified Version under precisely this License, with the Modified Version filling the role of the Document, thus licensing distribution and modification of the Modified Version to whoever possesses a copy of it. In addition, you must do these things in the Modified Version:
Use in the Title Page (and on the covers, if any) a title distinct from that of the Document, and from those of previous versions (which should, if there were any, be listed in the History section of the Document). You may use the same title as a previous version if the original publisher of that version gives permission.
List on the Title Page, as authors, one or more persons or entities responsible for authorship of the modifications in the Modified Version, together with at least five of the principal authors of the Document (all of its principal authors, if it has fewer than five), unless they release you from this requirement.
State on the Title page the name of the publisher of the Modified Version, as the publisher.
Preserve all the copyright notices of the Document.
Add an appropriate copyright notice for your modifications adjacent to the other copyright notices.
Include, immediately after the copyright notices, a license notice giving the public permission to use the Modified Version under the terms of this License, in the form shown in the Addendum below.
Preserve in that license notice the full lists of Invariant Sections and required Cover Texts given in the Document's license notice.
Include an unaltered copy of this License.
Preserve the section Entitled "History", Preserve its Title, and add to it an item stating at least the title, year, new authors, and publisher of the Modified Version as given on the Title Page. If there is no section Entitled "History" in the Document, create one stating the title, year, authors, and publisher of the Document as given on its Title Page, then add an item describing the Modified Version as stated in the previous sentence.
Preserve the network location, if any, given in the Document for public access to a Transparent copy of the Document, and likewise the network locations given in the Document for previous versions it was based on. These may be placed in the "History" section. You may omit a network location for a work that was published at least four years before the Document itself, or if the original publisher of the version it refers to gives permission.
For any section Entitled "Acknowledgements" or "Dedications", Preserve the Title of the section, and preserve in the section all the substance and tone of each of the contributor acknowledgements and/or dedications given therein.
Preserve all the Invariant Sections of the Document, unaltered in their text and in their titles. Section numbers or the equivalent are not considered part of the section titles.
Delete any section Entitled "Endorsements". Such a section may not be included in the Modified Version.
Do not retitle any existing section to be Entitled "Endorsements" or to conflict in title with any Invariant Section.
Preserve any Warranty Disclaimers.
If the Modified Version includes new front-matter sections or appendices that qualify as Secondary Sections and contain no material copied from the Document, you may at your option designate some or all of these sections as invariant. To do this, add their titles to the list of Invariant Sections in the Modified Version's license notice. These titles must be distinct from any other section titles.
You may add a section Entitled "Endorsements", provided it contains nothing but endorsements of your Modified Version by various parties--for example, statements of peer review or that the text has been approved by an organization as the authoritative definition of a standard.
You may add a passage of up to five words as a Front-Cover Text, and a passage of up to 25 words as a Back-Cover Text, to the end of the list of Cover Texts in the Modified Version. Only one passage of Front-Cover Text and one of Back-Cover Text may be added by (or through arrangements made by) any one entity. If the Document already includes a cover text for the same cover, previously added by you or by arrangement made by the same entity you are acting on behalf of, you may not add another; but you may replace the old one, on explicit permission from the previous publisher that added the old one.
The author(s) and publisher(s) of the Document do not by this License give permission to use their names for publicity for or to assert or imply endorsement of any Modified Version.
5. COMBINING DOCUMENTS #
You may combine the Document with other documents released under this License, under the terms defined in section 4 above for modified versions, provided that you include in the combination all of the Invariant Sections of all of the original documents, unmodified, and list them all as Invariant Sections of your combined work in its license notice, and that you preserve all their Warranty Disclaimers.
The combined work need only contain one copy of this License, and multiple identical Invariant Sections may be replaced with a single copy. If there are multiple Invariant Sections with the same name but different contents, make the title of each such section unique by adding at the end of it, in parentheses, the name of the original author or publisher of that section if known, or else a unique number. Make the same adjustment to the section titles in the list of Invariant Sections in the license notice of the combined work.
In the combination, you must combine any sections Entitled "History" in the various original documents, forming one section Entitled "History"; likewise combine any sections Entitled "Acknowledgements", and any sections Entitled "Dedications". You must delete all sections Entitled "Endorsements".
6. COLLECTIONS OF DOCUMENTS #
You may make a collection consisting of the Document and other documents released under this License, and replace the individual copies of this License in the various documents with a single copy that is included in the collection, provided that you follow the rules of this License for verbatim copying of each of the documents in all other respects.
You may extract a single document from such a collection, and distribute it individually under this License, provided you insert a copy of this License into the extracted document, and follow this License in all other respects regarding verbatim copying of that document.
7. AGGREGATION WITH INDEPENDENT WORKS #
A compilation of the Document or its derivatives with other separate and independent documents or works, in or on a volume of a storage or distribution medium, is called an "aggregate" if the copyright resulting from the compilation is not used to limit the legal rights of the compilation's users beyond what the individual works permit. When the Document is included in an aggregate, this License does not apply to the other works in the aggregate which are not themselves derivative works of the Document.
If the Cover Text requirement of section 3 is applicable to these copies of the Document, then if the Document is less than one half of the entire aggregate, the Document's Cover Texts may be placed on covers that bracket the Document within the aggregate, or the electronic equivalent of covers if the Document is in electronic form. Otherwise they must appear on printed covers that bracket the whole aggregate.
8. TRANSLATION #
Translation is considered a kind of modification, so you may distribute translations of the Document under the terms of section 4. Replacing Invariant Sections with translations requires special permission from their copyright holders, but you may include translations of some or all Invariant Sections in addition to the original versions of these Invariant Sections. You may include a translation of this License, and all the license notices in the Document, and any Warranty Disclaimers, provided that you also include the original English version of this License and the original versions of those notices and disclaimers. In case of a disagreement between the translation and the original version of this License or a notice or disclaimer, the original version will prevail.
If a section in the Document is Entitled "Acknowledgements", "Dedications", or "History", the requirement (section 4) to Preserve its Title (section 1) will typically require changing the actual title.
9. TERMINATION #
You may not copy, modify, sublicense, or distribute the Document except as expressly provided for under this License. Any other attempt to copy, modify, sublicense or distribute the Document is void, and will automatically terminate your rights under this License. However, parties who have received copies, or rights, from you under this License will not have their licenses terminated so long as such parties remain in full compliance.
10. FUTURE REVISIONS OF THIS LICENSE #
The Free Software Foundation may publish new, revised versions of the GNU Free Documentation License from time to time. Such new versions will be similar in spirit to the present version, but may differ in detail to address new problems or concerns. See https://www.gnu.org/copyleft/.
Each version of the License is given a distinguishing version number. If the Document specifies that a particular numbered version of this License "or any later version" applies to it, you have the option of following the terms and conditions either of that specified version or of any later version that has been published (not as a draft) by the Free Software Foundation. If the Document does not specify a version number of this License, you may choose any version ever published (not as a draft) by the Free Software Foundation.
ADDENDUM: How to use this License for your documents #
Copyright (c) YEAR YOUR NAME.
Permission is granted to copy, distribute and/or modify this document
under the terms of the GNU Free Documentation License, Version 1.2
or any later version published by the Free Software Foundation;
with no Invariant Sections, no Front-Cover Texts, and no Back-Cover Texts.
A copy of the license is included in the section entitled “GNU
Free Documentation License”.
If you have Invariant Sections, Front-Cover Texts and Back-Cover Texts, replace the “with...Texts.” line with this:
with the Invariant Sections being LIST THEIR TITLES, with the
Front-Cover Texts being LIST, and with the Back-Cover Texts being LIST.
If you have Invariant Sections without Cover Texts, or some other combination of the three, merge those two alternatives to suit the situation.
If your document contains nontrivial examples of program code, we recommend releasing these examples in parallel under your choice of free software license, such as the GNU General Public License, to permit their use in free software.

