Custom Salt Formulas
This section contains information about writing custom formulas, including formulas with forms. You can write your own custom formulas, and make them available to client systems in the SUSE Manager Web UI.
For information about the formulas provided by SUSE Manager, see Formulas Provided by SUSE Manager.
1. File Structure Overview
RPM-based formulas must be placed in a specific directory structure to ensure that they work correctly. A formula contains two separate directories: states, and metadata. Folders in these directories need to have exactly matching names.
The formula states directory contains anything necessary for a Salt state to work independently. This includes .sls files, a map.jinja file and any other required files. This directory should only be modified by RPMs and should not be edited manually. For example, the locale-formula states directory is located in:
/usr/share/susemanager/formulas/states/locale/
To create formulas with forms, the metadata directory contains a form.yml file. The form.yml file defines the forms for SUSE Manager. The metadata directory also contains an optional metadata.yml file with additional information about the formula. For example, the locale-formula metadata directory is located in:
/usr/share/susemanager/formulas/metadata/locale/
If you have a custom formula that is not in an RPM, it must be in a state directory configured as a Salt file root. Custom state formula data must be in:
/srv/salt/<custom-formula-name>/
Custom metadata information must be in:
/srv/formula_metadata/<custom-formula-name>/
All custom folders must contain a form.yml file. These files are detected as form recipes and are applied to groups and systems from the Web UI:
/srv/formula_metadata/<custom-formula-name>/form.yml
|
The Salt formula directory changed in SUSE Manager 4.0. The old directory location, |
2. Define Formula with Forms Data
SUSE Manager requires a file called form.yml, to describe how formula data should look within the Web UI. The form.yml file is used by SUSE Manager to generate the desired formula with forms, with values editable by a user.
The file contains a list of editable attributes that start with a $ sign. These attributes are used to determine how to display the formula in the SUSE Manager Web UI.
For example, the form.yml that is included with the locale-formula is in:
/usr/share/susemanager/formulas/metadata/locale/form.yml
Part of that file looks like this:
timezone:
  $type: group

  name:
    $type: select
    $values: ["CET",
              "Etc/Zulu"
              ]
    $default: CET

  hardware_clock_set_to_utc:
    $type: boolean
    $default: True
...
All values that start with a $ sign are annotations used to display the UI that users interact with. These annotations are not part of pillar data itself and are handled as metadata.
This section lists the available attributes:
- $type
-
The most important attribute is the
$typeattribute. It defines the type of the pillar value and the form-field that is generated. The supported types are:-
text -
password -
number -
url -
email -
date -
time -
datetime -
boolean -
color -
select -
group -
edit-group -
namespace -
hidden-group(obsolete, renamed tonamespace)
-
|
The text attribute is the default and does not need to be specified explicitly. |
Many of these values are self-explanatory:
-
The
texttype generates a simple text field -
The
passwordtype generates a password field -
The
colortype generates a color picker
The group, edit-group, and namespace (formerly hidden-group) types do not generate an editable field and are used to structure form and pillar data. All these types support nesting.
The group and namespace types differ slightly. The group type generates a visible border with a heading. The namespace type shows nothing visually, and is only used to structure pillar data.
The edit-group type allows you to structure and restrict editable fields in a more flexible way. The edit-group type is a collection of items of the same kind. Collections can have these four shapes:
-
List of primitive items
-
List of dictionaries
-
Dictionary of primitive items
-
Dictionary of dictionaries
The size of each collection is variable. Users can add or remove elements.
For example, edit-group supports the $minItems and $maxItems attributes, which simplifies complex and repeatable input structures. These, and also itemName, are optional.
- $default
-
Allows you to specify a default value to be displayed. This default value will be used if no other value is entered. In an
edit-groupit allows you to create initial members of the group and populate them with specified data. - $optional
-
This type is a Boolean attribute. If it is
trueand the field is empty in the form, then this field will not be generated in the formula data and the generated dictionary will not contain the field name key. If it isfalseand the field is empty, the formula data will contain a<field name>: nullentry. - $ifEmpty
-
This type is used if the field is empty. This usually occurs because the user did not provide a value. The
ifEmptytype can only be used when$optionalisfalseor not defined. If$optionalistrue, then$ifEmptyis ignored. In this example, theDP2string would be used if the user leaves the field empty:displayName: $type: string $ifEmpty: DP2
- $name
-
Allows you to specify the name of a value that is shown in the form. If this value is not set, the pillar name is used and capitalized without underscores and dashes. Reference it in the same section with
${name}. - $help and $placeholder
-
These attributes are used to give a user a better understanding of what the value should be. The
$helptype defines the message a user sees when hovering over a field The$placeholdertype displays a gray placeholder text in the field
Use $placeholder only with text fields like text, password, email or date fields. Do not add a placeholder if you also use $default, as it will hide the placeholder.
- $key
-
Applicable only if the
edit-grouphas the shape of a dictionary. When the pillar data is a dictionary, the$keyattribute determines the key of an entry in the dictionary.For example:
user_passwords:
  $type: edit-group
  $minItems: 1
  $prototype:
    $key:
        $type: text
    $type: text
  $default:
    alice: secret-password
    bob: you-shall-not-pass
Pillar:
user_passwords: alice: secret-password bob: you-shall-not-pass - $minItems and $maxItems
-
In an
edit-group,$minItemsand$maxItemsspecifies the lowest and highest numbers for the group. - $itemName
-
In an
edit-group,$itemNamedefines a template for the name to be used for the members of the group. - $prototype
-
In an
edit-group,$prototypeis mandatory and defines the default pre-filled values for newly added members in the group. - $scope
-
Specifies a hierarchy level at which a value may be edited. Possible values are
system,group, andreadonly.The default value is
$scope: system, allows values to be edited at group and system levels. A value can be entered for each system but if no value is entered the system will fall back to the group default.The
$scope: groupoption makes a value editable only for a group. On the system level you will be able to see the value, but not edit it.The
$scope: readonlyoption makes a field read-only. It can be used to show data to the user, but will not allow them to edit it. This option should be used in combination with the$defaultattribute. - $visibleIf
-
Deprecated in favor of
$visible.Allows you to show a field or group if a simple condition is met. An example condition is:
some_group#another_group#my_checkbox == true
The left part of the condition is the path to another value, and groups are separated by
#signs. The middle section of the condition should be either==for a value to be equal or!=for values that should be not equal. The last field in the statement can be any value which a field should have or not have.The field with this attribute associated with it will be shown only when the condition is met. In this example the field will be shown only if
my_checkboxis checked. The ability to use conditional statements is not limited to check boxes. It may also be used to check values of select-fields, text-fields, and similar.A check box should be structured like this:
some_group:
  $type: group

  another_group:
    $type: group

      my_checkbox:
        $type: boolean
Relative paths can be specified using prefix dots. One dot indicates a sibling, two dots indicate a parent, and so on. This is mostly useful for
edit-group.some_group: $type: group another_group: $type: group my_checkbox: $type: boolean my_text: $visibleIf: .my_checkbox == true yet_another_group: $type: group my_text2: $visibleIf: ..another_group#my_checkbox == trueIf you use multiple groups with the attribute, you can allow a users to select an option and show a completely different form, dependent upon the selected value.
Values from hidden fields can be merged into the pillar data and sent to the client. A formula must check the condition again and use the appropriate data. For example:
show_option:
  $type: checkbox
some_text:
  $visibleIf: .show_option == true
{% if pillar.show_option %} do_something: with: {{ pillar.some_text }} {% endif %} - $values
-
Can only be used together with
$typeUse to specify the different options in the select-field.$valuesmust be a list of possible values to select. For example:select_something: $type: select $values: ["option1", "option2"]
Or:
select_something: $type: select $values: - option1 - option2 - $visible
-
Allows you to show a field or group if a condition is met. You must use the jexl expression language to write the condition.
Example structure:
some_group:
  $type: group

  another_group:
    $type: group

      my_checkbox:
        $type: boolean
An example condition is:
formValues.some_group.another_group.my_checkbox == true
The field with this attribute will only show if the condition is met. In this example, the field will show only if
my_checkboxis checked. You can also choose other elements for the conditional statement, such as select fields or text fields.If you use multiple groups with the attribute, users can select an option that will show a completely different form, depending on the selected value.
Values from hidden fields can be merged into the pillar data and sent to the client. A formula must check the condition again and use the appropriate data. For example:
show_option:
  $type: checkbox
some_text:
  $visible: this.parent.value.show_option == true
{% if pillar.show_option %} do_something: with: {{ pillar.some_text }} {% endif %} - $disabled
-
Allows you to disable a field or group if a condition is met. You must use the jexl expression language to write the condition.
If specified at group level it will disable all fields in that group.
- $required
-
Fields with this attribute are mandatory. Supports using the jexl expresion language.
- $match
-
Allows using a regular expression to validate the content of a text field.
It supports the regular expression features existing in JavaScript.
Example:
      hardware:
        $type: text
        $name: Hardware Type and Address
        $placeholder: Enter hardware-type hardware-address (for example, "ethernet AA:BB:CC:DD:EE:FF")
        $help: Hardware Identifier - prefix is mandatory
        $match: "\\w+ [A-Z]{2}:[A-Z]{2}:[A-Z]{2}:[A-Z]{2}:[A-Z]{2}:[A-Z]{2}"
2.1. Expression language
You must use the jexl expression language to write conditions.
Given a structure like this:
some_group:
  $type: group

  another_group:
    $type: group

      my_checkbox:
        $type: boolean
An example condition is:
formValues.some_group.another_group.my_checkbox == true
Absolute paths must begin with formValues.
Specify relative paths using this.parent.value to define the value of the parent.
You can also refer to the parent of the parent, with this.parent.parent.value. This is mostly useful for edit-group elements.
Example for relative paths:
some_group:
  $type: group

  another_group:
    $type: group

    my_checkbox:
      $type: boolean

    my_text:
      $visible: this.parent.value.my_checkbox

  yet_another_group:
    $type: group

    my_text2:
      $visible: this.parent.parent.value.another_group.my_checkbox
partitions:
  $name: "Hard Disk Partitions"
  $type: "edit-group"
  $minItems: 1
  $maxItems: 4
  $itemName: "Partition ${name}"
  $prototype:
    name:
      $default: "New partition"
    mountpoint:
      $default: "/var"
    size:
      $type: "number"
      $name: "Size in GB"
  $default:
    - name: "Boot"
      mountpoint: "/boot"
    - name: "Root"
      mountpoint: "/"
      size: 5000
Click Add to fill the form with the default values.
The formula is called hd-partitions and will appear as Hd Partitions in the Web UI.
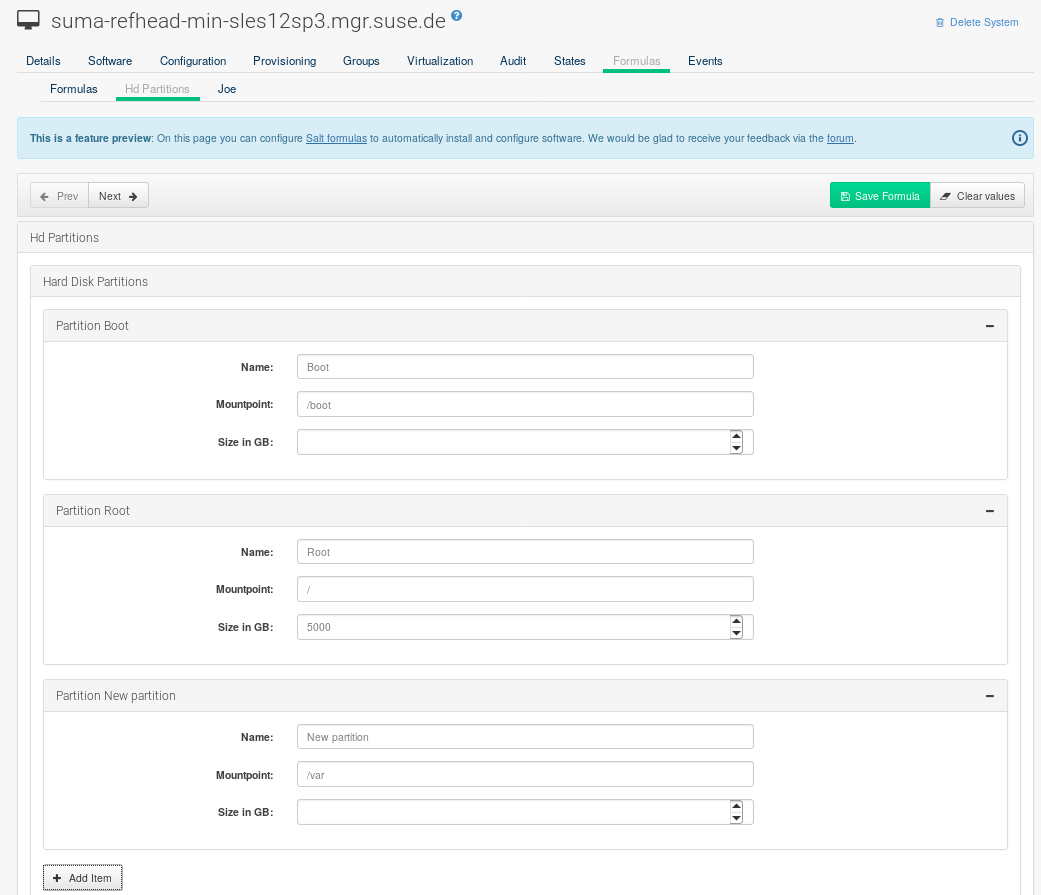
To remove the definition of a partition click the minus symbol in the title line of an inner group.
When you are finished, click Save Formula.
users:
  $name: "Users"
  $type: edit-group
  $minItems: 2
  $maxItems: 5
  $prototype:
    name:
      $default: "username"
    password:
      $type: password
    groups:
      $type: edit-group
      $minItems: 1
      $prototype:
        group_name:
          $type: text
  $default:
    - name: "root"
      groups:
        - group_name: "users"
        - group_name: "admins"
    - name: "admin"
      groups:
        - group_name: "users"
3. Writing Salt Formulas
Salt formulas are pre-written Salt states. You can use Jinja to configure formulas with pillar data.
Basic Jinja syntax is:
pillar.some.value
When you are sure a pillar exists, use this syntax:
salt['pillar.get']('some:value', 'default value')
You can also replace the pillar value with grains. For example, grains.some.value.
Using data this way makes the formula configurable. In this example, a specified package is installed in the package_name pillar:
install_a_package:
  pkg.installed:
    - name: {{ pillar.package_name }}
You can also use more complex constructs such as if/else and for-loops to provide greater functionality:
{% if pillar.installSomething %}
something:
  pkg.installed
{% else %}
anotherPackage:
  pkg.installed
{% endif %}
Another example:
{% for service in pillar.services %}
start_{{ service }}:
  service.running:
    - name: {{ service }}
{% endfor %}
Jinja also provides other helpful functions. For example, you can iterate over a dictionary:
{% for key, value in some_dictionary.items() %}
do_something_with_{{ key }}: {{ value }}
{% endfor %}
You can have Salt manage your files (for example, configuration files for a program), and change them with pillar data.
In this example, Salt copies the file salt-file_roots/my_state/files/my_program.conf on the server to /etc/my_program/my_program.conf on the client and template it with Jinja:
/etc/my_program/my_program.conf:
  file.managed:
    - source: salt://my_state/files/my_program.conf
    - template: jinja
This example allows you to use Jinja in the file, like the previous example for states:
some_config_option = {{ pillar.config_option_a }}
4. Separate Data
Separating data from a state can increase flexibility and make it easier to re-use. You can do this by writing values into a separate file named map.jinja. This file must be within the same directory as the state files.
This example sets data to a dictionary with different values, depending on which system the state runs on. It will also merge data with the pillar using the some.pillar.data value so you can access some.pillar.data.value by using data.value.
You can choose to override defined values from pillars. For example, by overriding some.pillar.data.package in this example:
{% set data = salt['grains.filter_by']({
    'Suse': {
        'package': 'packageA',
        'service': 'serviceA'
    },
    'RedHat': {
        'package': 'package_a',
        'service': 'service_a'
    }
}, merge=salt['pillar.get']('some:pillar:data')) %}
When you have created a map file, you can maintain compatibility with multiple system types while accessing deep pillar data in a simpler way.
Now you can import and use data in any file. For example:
{% from "some_folder/map.jinja" import data with context %}

install_package_a:
  pkg.installed:
    - name: {{ data.package }}
You can define multiple variables by copying the {% set …%} statement with different values and then merge it with other pillars. For example:
{% set server = salt['grains.filter_by']({
    'Suse': {
        'package': 'my-server-pkg'
    }
}, merge=salt['pillar.get']('myFormula:server')) %}
{% set client = salt['grains.filter_by']({
    'Suse': {
        'package': 'my-client-pkg'
    }
}, merge=salt['pillar.get']('myFormula:client')) %}
To import multiple variables, separate them with a comma. For example:
{% from "map.jinja" import server, client with context %}
For more information about conventions to use when writing formulas, see https://docs.saltproject.io/en/latest/topics/development/conventions/formulas.html.
5. Generated Pillar Data
Pillar data is generated by SUSE Manager when events occur like generating the highstate. You can use an external pillar script to generate pillar data for packages and group IDs, and include all pillar data for a system:
/usr/share/susemanager/modules/pillar/suma_minion.py
The process is executed like this:
-
The
suma_minion.pyscript starts and finds all formulas for a system by checking thegroup_formulas.jsonandserver_formulas.jsonfiles. -
The script loads the values for each formula (groups and from the system) and merges them with the highstate. By default, if no values are found, a group overrides a system if
$scope: group. -
The script also includes a list of formulas applied to the system in a pillar named
formulas.
This structure makes it possible to include states. In this example, the top file is specifically generated by the mgr_master_tops.py script. The top file includes a state called formulas for each system. This includes the formulas.sls file located in /usr/share/susemanager/formulas/states or /usr/share/salt-formulas/states/. The content looks similar to this:
include: {{ pillar["formulas"] }}
This pillar includes all formulas that are specified in the pillar data generated from the external pillar script.
Formulas should be created directly after SUSE Manager is installed. If you encounter any problems with formulas check these things first:
-
The external pillar script (
suma_minion.py) must include formula data. -
Data is saved to
/srv/susemanager/formula_dataand thepillarandgroup_pillarsub-directories. These directories should be automatically generated by the server. -
Formulas must be included for every client listed in the top file. Currently this process is initiated by the
mgr_master_tops.pyscript which includes theformulas.slsfile located in/usr/share/susemanager/formulas/states/or/usr/share/salt-formulas/states/. This directory must be a salt file root. File roots are configured on the salt-master (SUSE Manager) located at/etc/salt/master.d/susemanager.conf.