Efficient Multi-Tenancy with CLASTIX Kamaji and Rancher Prime by SUSE #
Streamline Deployment and Management of Multi-Tenant Kubernetes Landscapes
Streamline deployment and management of multi-tenant Kubernetes landscapes with CLASTIX Kamaji and Rancher Prime by SUSE.
Documents published as part of the series SUSE Technical Reference Documentation have been contributed voluntarily by SUSE employees and third parties. They are meant to serve as examples of how particular actions can be performed. They have been compiled with utmost attention to detail. However, this does not guarantee complete accuracy. SUSE cannot verify that actions described in these documents do what is claimed or whether actions described have unintended consequences. SUSE LLC, its affiliates, the authors, and the translators may not be held liable for possible errors or the consequences thereof.
1 Introduction #
Efficiency, security, and cost savings are top concerns for most businesses. This becomes particularly important for large enterprises, who need to share Kubernetes infrastructure and resources between multiple teams, departments, or business units. These are also concerns for managed services providers, who offer Kubernetes-as-a-Service or leverage Kubernetes to deliver other services.
Multi-tenancy enables different users or tenants to securely share Kubernetes resources, simplifying administration and reducing costs. Multi-tenancy is recognized as key to achieving these goals. Yet Kubernetes does not have first-class concepts of end users or tenants.
By integrating CLASTIX Kamaji into your Rancher Prime by SUSE environment, you gain:
A highly scalable and high-density Kubernetes control plane infrastructure.
Reduced operational overhead, yielding faster deployment, configuration, upgrades, and maintenance.
Consistent configurations across multiple tenants.
Distributed architectures across clouds, edge, and data center.
Hard multi-tenancy with strong security and isolation.
1.1 Scope #
Learn how to deploy CLASTIX Kamaji into an existing Kubernetes cluster managed by Rancher Prime by SUSE.
1.2 Audience #
Systems architects, platform engineers, administrators, and others seeking efficient operation of Kubernetes infrastructure through multi-tenancy and secure workload isolation will find this guide relevant.
A basic understanding of Kubernetes and cluster management with Rancher Prime by SUSE is needed.
2 Prerequisites #
For this guide, you need the following:
You can follow this guide with Rancher by SUSE 2.7.3 or later, which enables support for Rancher Extensions. See Rancher Deployment Quick Start Guides for setting up your Rancher environment.
A Kubernetes cluster to be the Kamaji Admin Cluster and managed by Rancher.
Any CNCF-certified Kubernetes cluster can be used, including RKE2 and K3s. Follow the instructions of your chosen Kubernetes distribution for proper setup of the Kamaji Admin Cluster.
For this guide, in addition to the cluster’s control plane nodes, you need at least 3 worker nodes. Each worker node should have the following minimum specifications:
2 vCPUs
2 GB of RAM
16 GB storage
Swap disabled
Full network connectivity between all machines
Your Kamaji Admin Cluster also must provide the following services:
A Container Storage Interface (CSI) module installed with a defined Storage Class for the tenant datastores. For example, you can use Rancher Longhorn or any other persistent storage system. The Rancher Local Path Provisioner is also an option.
Support for Load Balancer service types, such as MetalLB or one provided by your cloud provider. The addresses provided by the load balancer must be accessible by the worker nodes of the tenant clusters as well as by tenant users.
Ingress Controller. The Kamaji Console is exposed through Ingress, so the cluster needs an Ingress controller. For RKE2 and K3s installations, you an ingress controller is installed by default. For other Kubernetes distributions, such as AKS, EKS, or GKE, you may need to deploy the ingress controller before continuing.
Cert-Manager. Kamaji takes advantage of dynamic admission control, such as validating and mutating webhook configurations. These webhooks are secured by Transport Layer Security (TLS), and the certificates are managed by Cert-Manager.
An arbitrary number of Linux machines to host multiple tenant worker nodes. These can be bare metal systems or virtual machines, on-premises or in any cloud. For this guide, each tenant worker node should have at least:
2 vCPUs
2 GB of RAM
16 GB of storage
Swap disabled
Full network connectivity between all machines
A Linux workstation with the following tools installed:
3 Technical overview #
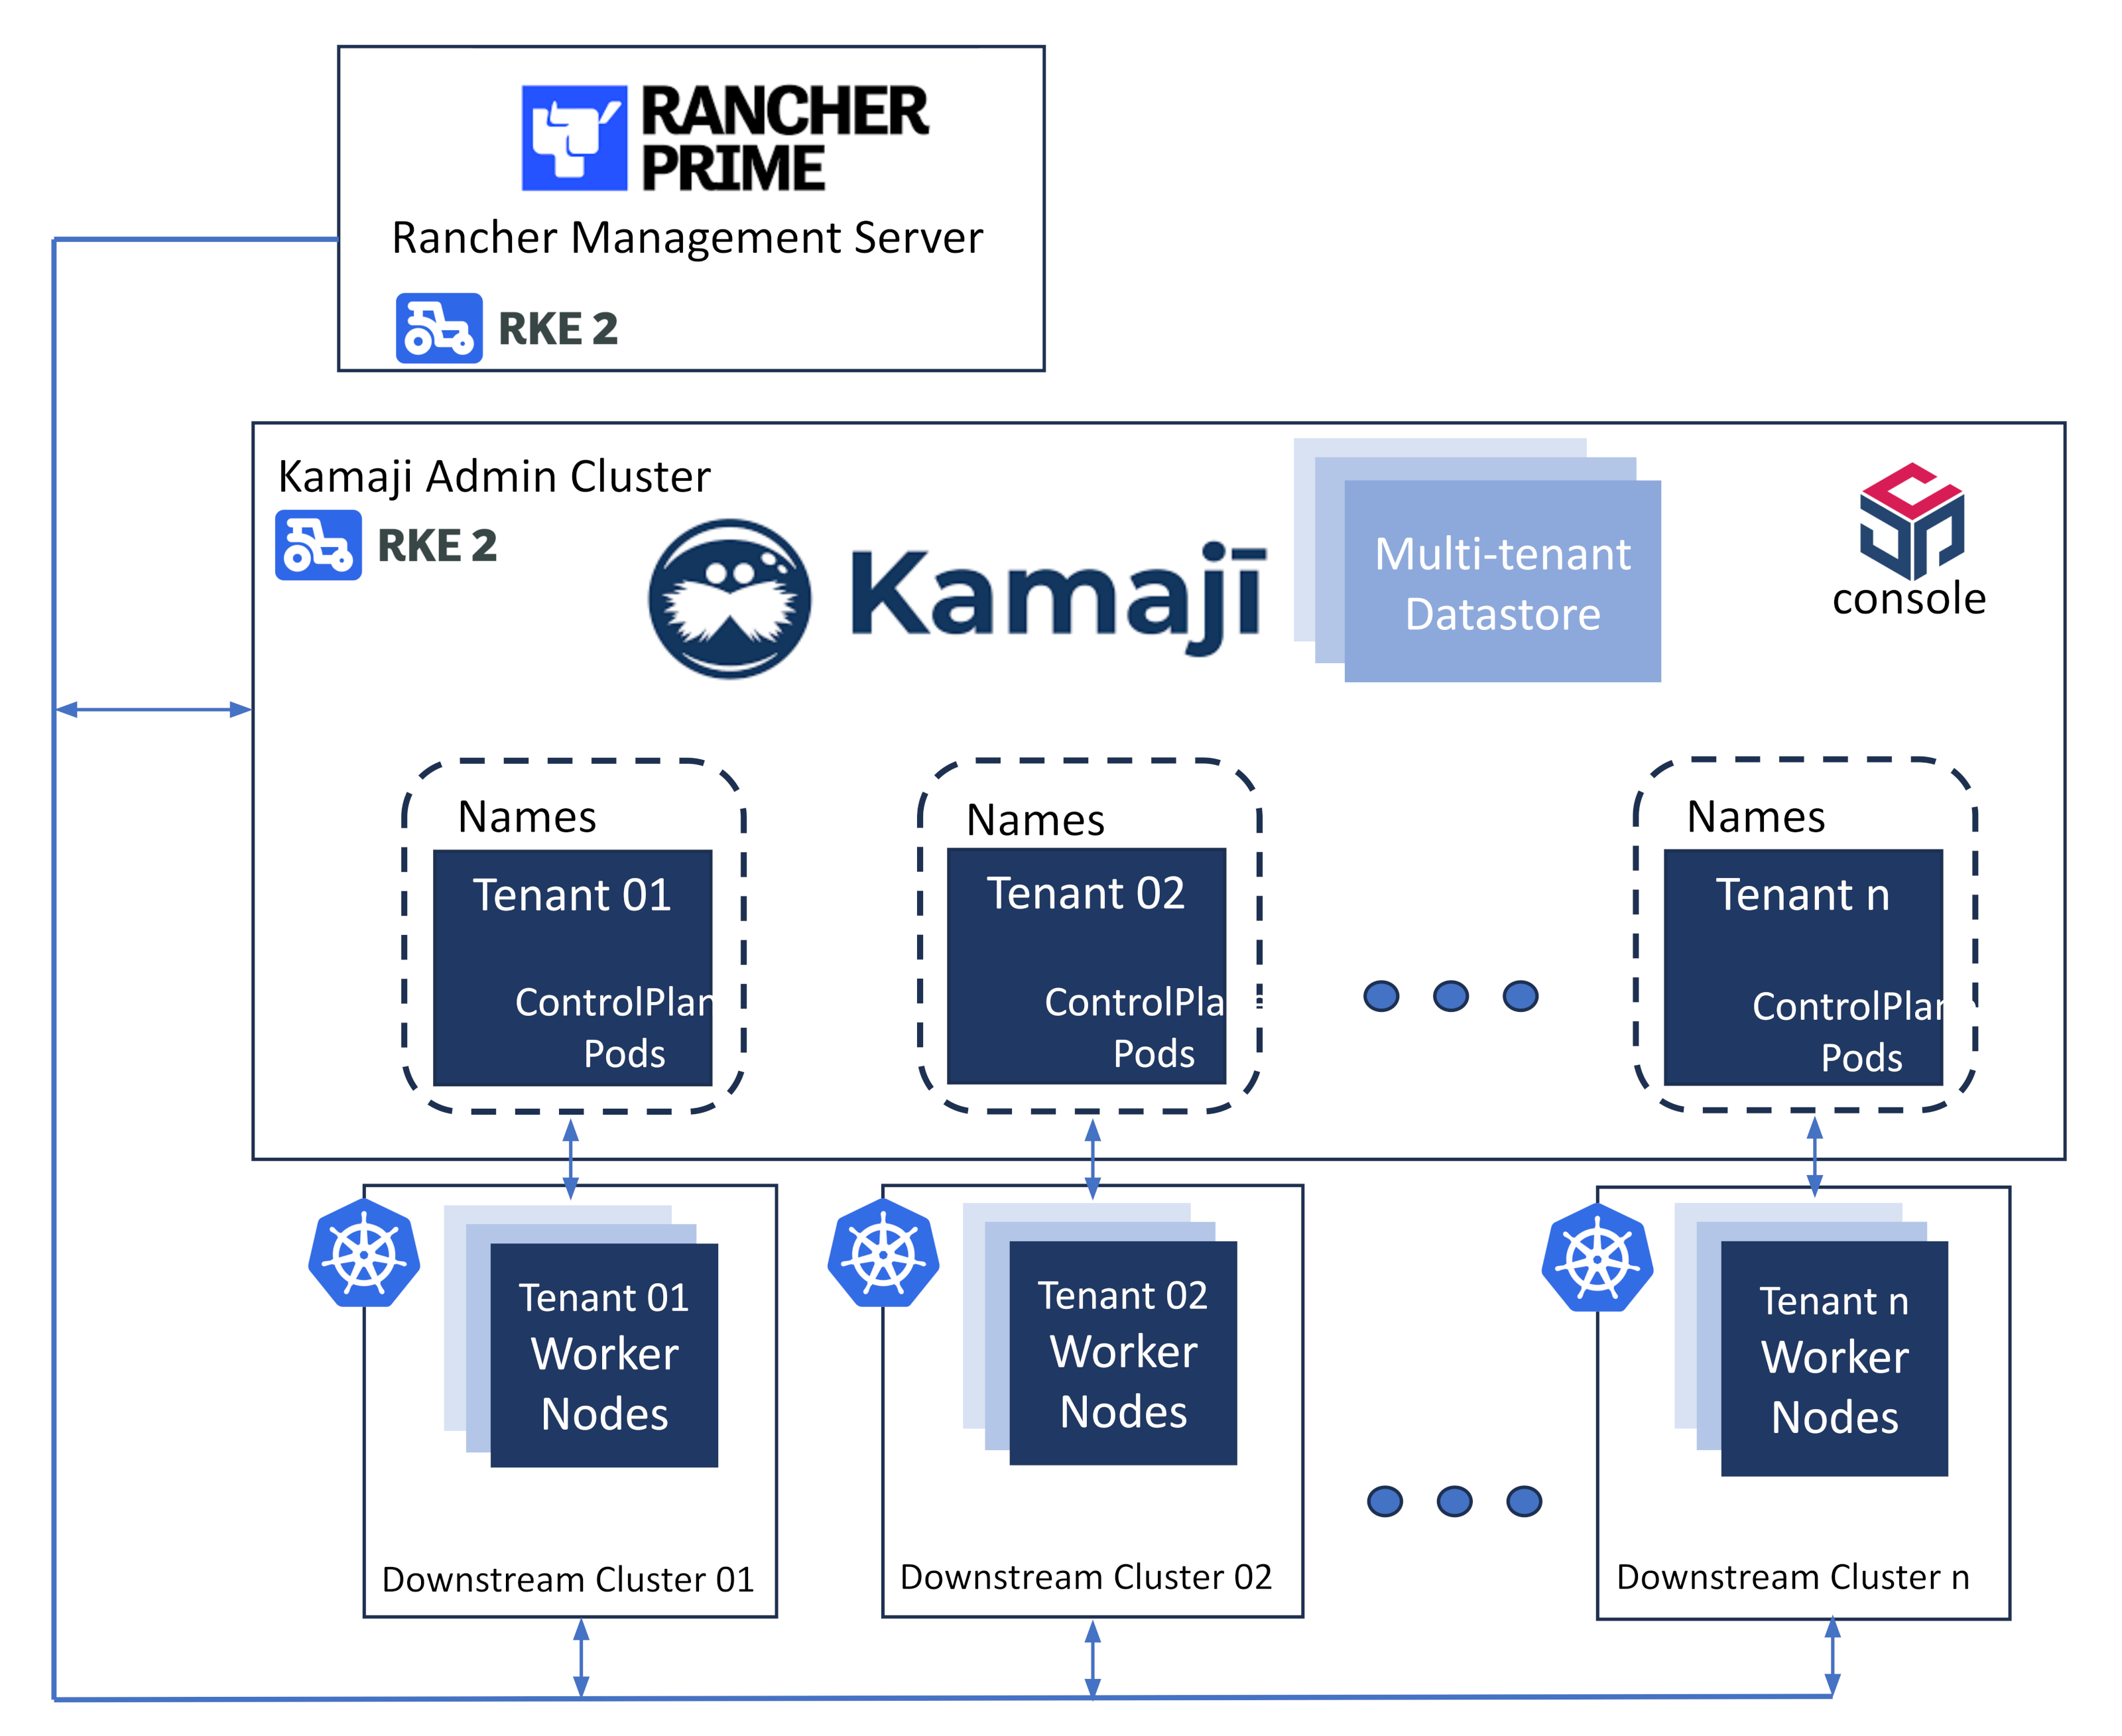
CLASTIX Kamaji turns any CNCF-compliant Kubernetes cluster into an “Admin Cluster” to orchestrate other Kubernetes clusters called “tenant clusters.” With Kamaji, the tenant control planes run in pods on the Admin Cluster instead of on dedicated machines. This makes running Kubernetes at scale less costly, easier to deploy, and simpler to operate while providing users with a fully managed, native Kubernetes experience.
After a tenant cluster is created, you can import it into Rancher Prime by SUSE for centralized management of your Kubernetes landscape. Rancher Prime enables global administrators to streamline operations, improve consistency and security through an intuitive interface or through GitOps-driven workflows.
3.1 Components and tools #
Key Kamaji components discussed in this guide are:
- Kamaji Operator
The Kamaji Operator is installed on the Admin Cluster. It is responsible for creating and monitoring multiple custom resources called tenant control planes (TCPs).
The Kamaji Operator continuously checks for any deviations or changes in the TCPs. If it detects any drift, such as misconfigurations or inconsistencies, it initiates immediate reconciliation to bring the TCPs back to their desired states.
The Kamaji Operator rolls out new versions of TCPs and seamlessly migrates between different datastores. It ensures smooth transitions and minimizes disruptions during updates or changes to the control plane infrastructure.
- Kamaji Console
The Kamaji Console is a Web-based, graphical interface for global administrators.
- Tenant Control Plane (TCP)
Running in the Admin Cluster as pods, tenant control planes provide dedicated control plane capabilities for each tenant cluster. They expose the control plane endpoint (the address and port) to the tenant’s worker nodes through a balanced and secure network service.
- Datastore
Installed on the Admin Cluster, the datastore is responsible for storing the state of the tenant clusters into a multi-tenant capable datastore as etcd running on the Admin Cluster. The relationship between the datastore and TCPs can be one-to-one or one-to-many. Thanks to kine integration, an open source component from SUSE acting as a shim for
etcd, Kamaji supports other datastore types, including PostgreSQL and MySQL.TipIt is highly recommended that you use a managed datastore in production, such as CloudNativePG, an open source, PostgreSQL distribution for Kubernetes. You can also use the kamaji-etcd Helm chart to set up a multi-tenant etcd datastore, running as a StatefulSet of three replicas.
- Tenant Worker Nodes
Tenant worker nodes run workloads of the respective tenants. They consist of virtual or bare metal machines that are connected to the TCP through a secure network connection. Tenant worker nodes can be isolated by infrastructure for hard multi-tenancy and can run on different infrastructures in data centers, clouds, and edge locations.
- Konnectivity
Konnectivity is a cloud-native network technology that facilitates traffic between the TCP and the worker nodes. It establishes a secure tunnel between the TCP and the tenant worker nodes, which is especially useful when the worker nodes are not directly reachable from the TCP.
You can find additional details in the Kamaji documentation.
3.2 Workflow #
The workflow for this guide and in general for working with Kamaji in a Rancher Prime landscape is as follows:
Installing Kamaji
Installing Kamaji Operator
Installing Kamaji Console
Verifying Kamaji Operator and Kamaji Console
Installing Kamaji Rancher Extension
Provisioning a tenant cluster
Deploying a tenant control plane
Joining worker nodes
Installing the Cluster Network Interface
Importing the tenant cluster into Rancher Prime
4 Installing Kamaji #
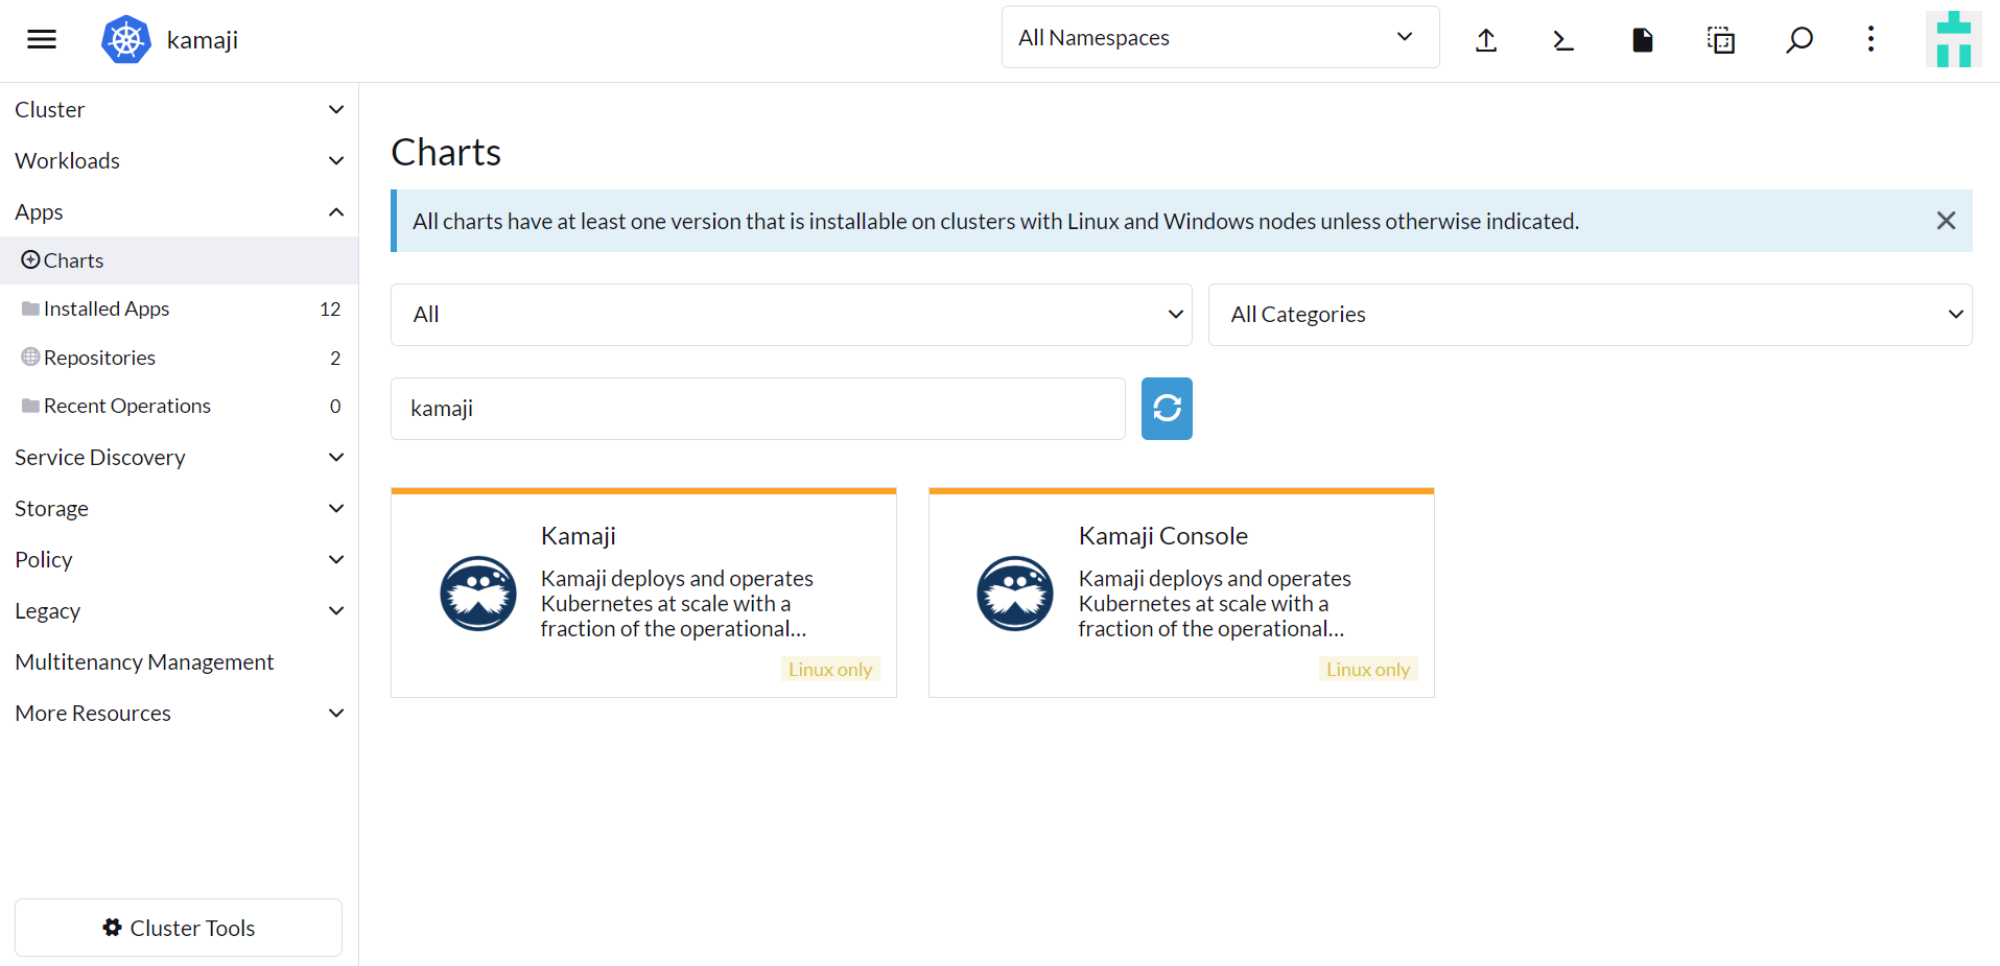
CLASTIX Kamaji is available through the Rancher App catalog. This curated collection of software, packaged and maintained as Helm charts, makes it easy to install software directly from the Rancher user interface (UI). Kamaji consists of the Kamaji Operator and the Kamaji Console, both of which are available in the Rancher App catalog.
In addition, CLASTIX has created a Rancher extension. Rancher extensions allow users, developers, partners, and customers to extend and enhance the Rancher UI.
4.1 Installing Kamaji Operator #
Install the Kamaji Operator and default datastore through the Rancher Apps catalog.
Log in to the Rancher UI.
Select the Kamaji Admin Cluster you provisioned as part of the prerequisites for this guide.
Navigate to Apps > Charts and search for 'kamaji'.
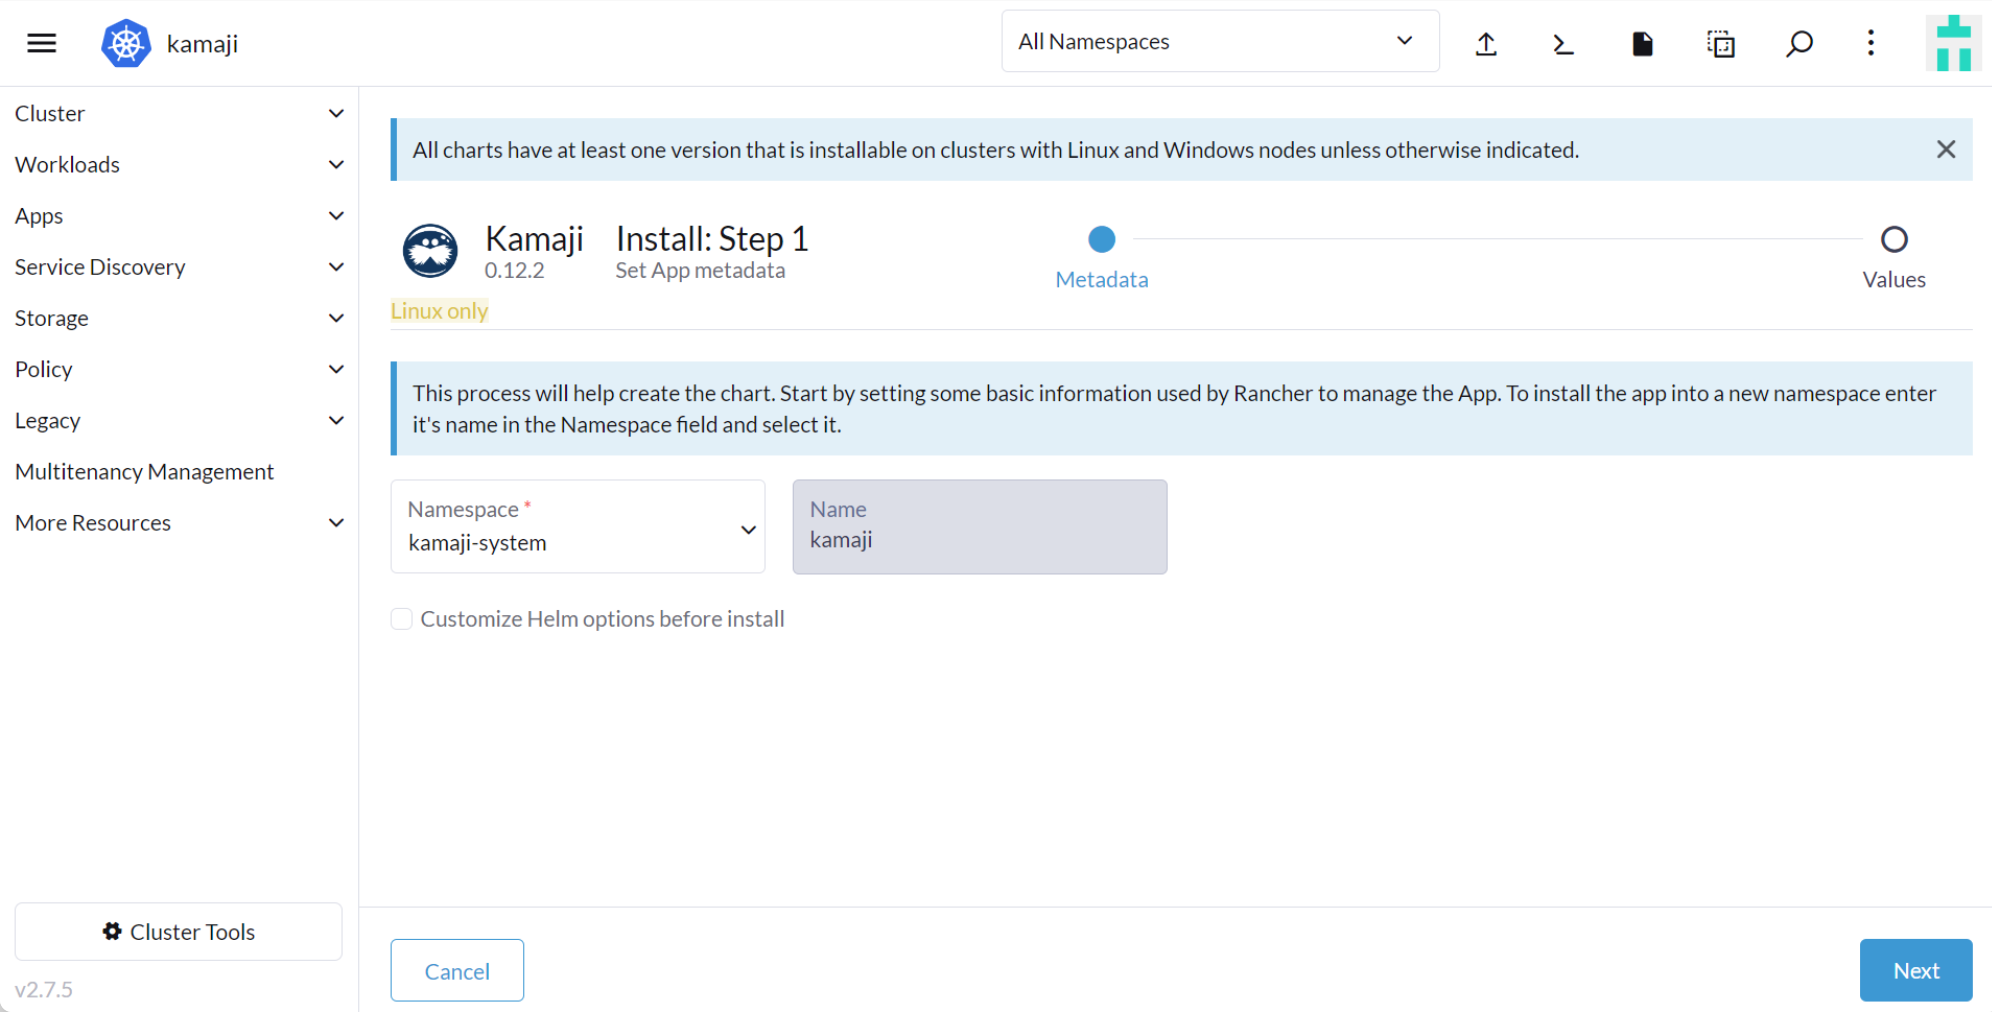
Click the Kamaji chart to begin installation of the Kamaji Operator.
In Namespace, select 'Create new namespace' and enter a name, such as 'kamaji-system'.
Optionally select Customize Helm options before install to customize the deployment.
Click Next, then click Install.
4.2 Installing Kamaji Console #
Install the Kamaji Console through the Rancher App catalog.
In the Rancher UI, select Apps > Charts and search for 'Kamaji Console'.
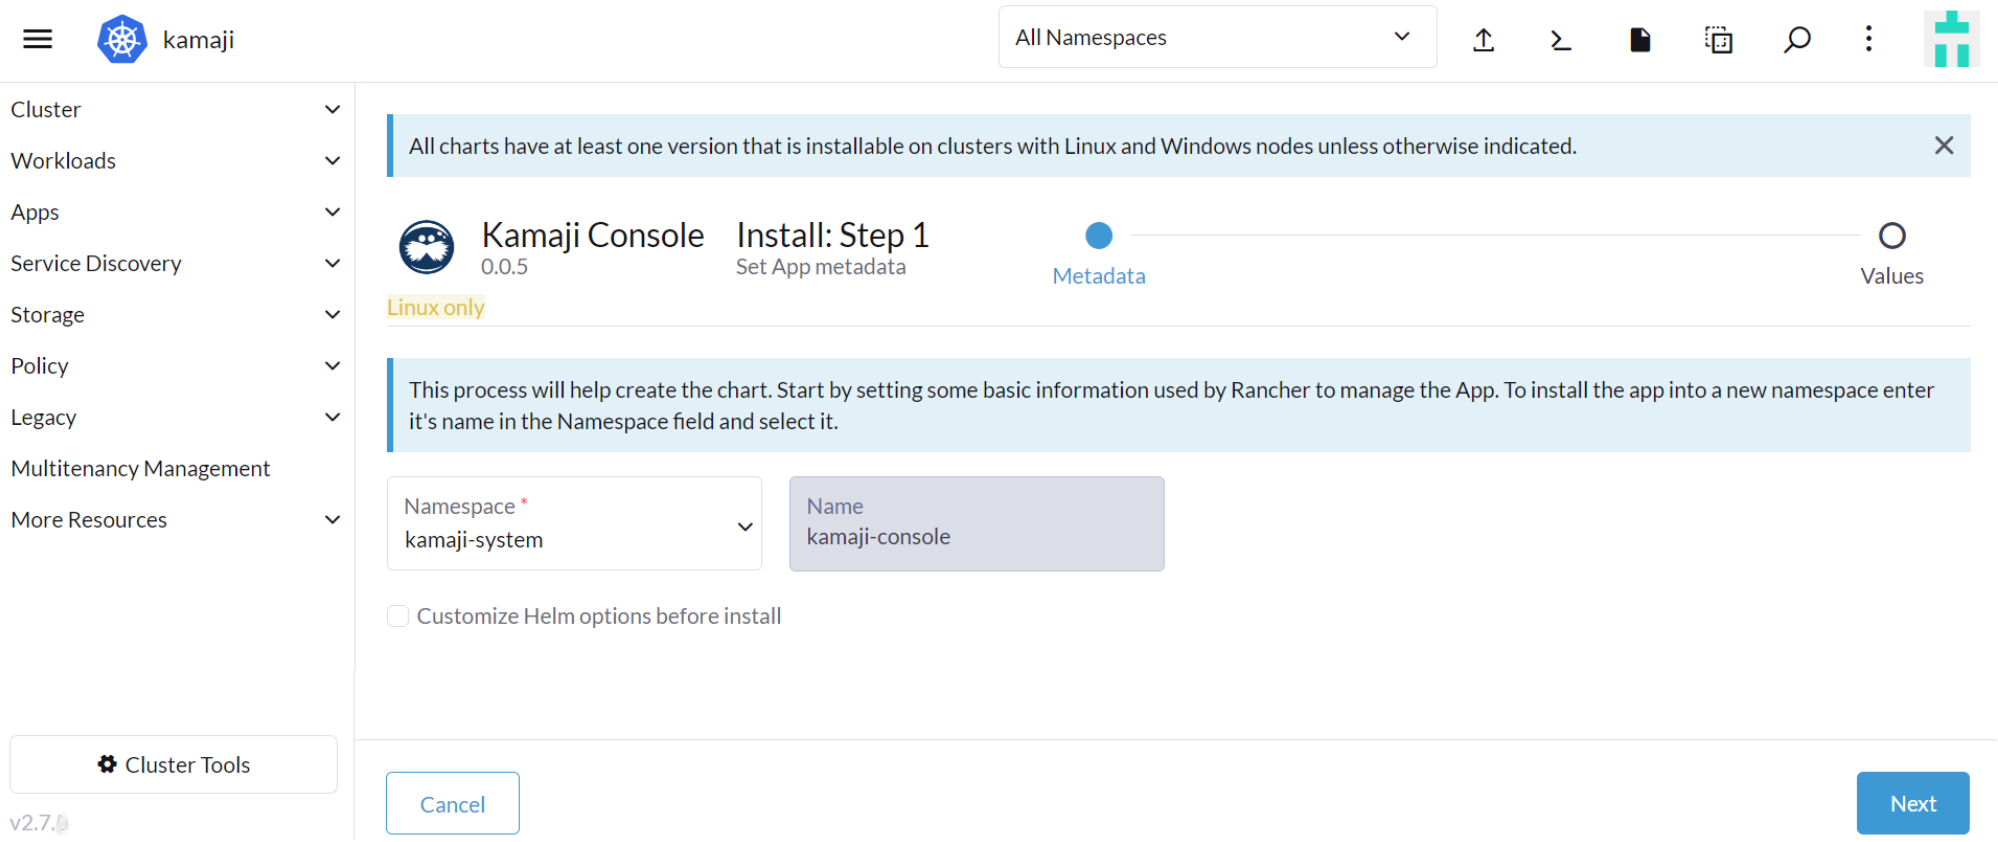
Click the Kamaji Console chart to begin installation.
Select 'kamaji-system' in Namespace, then click Next.
Optionally, select Customize Helm options before install to customize the deployment.
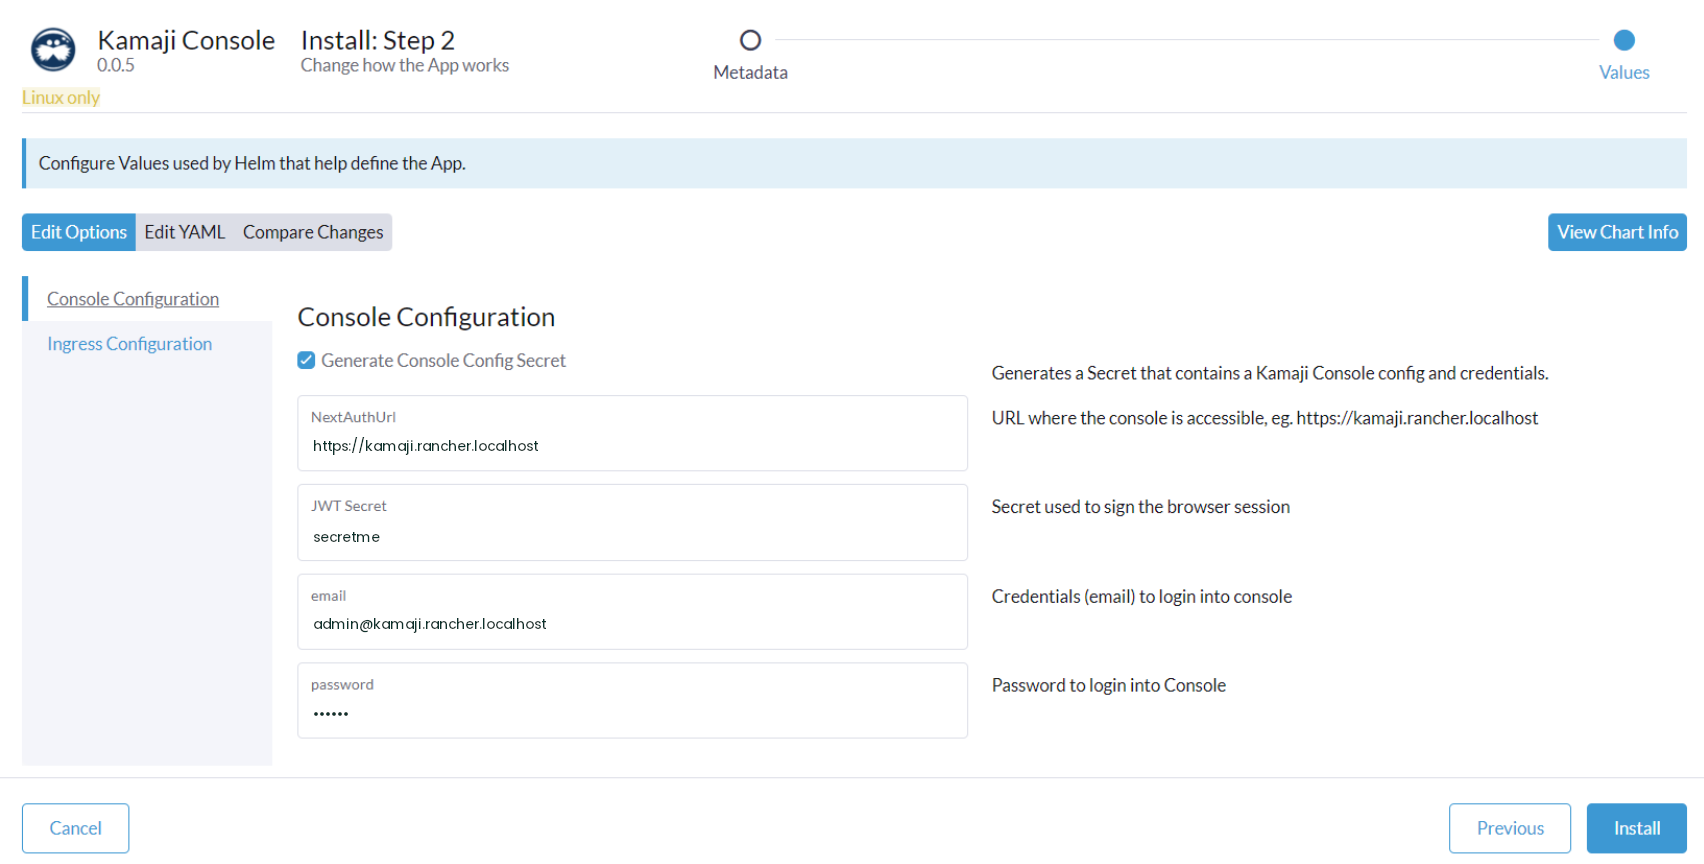
Select Console Configuration and make the following adjustments:
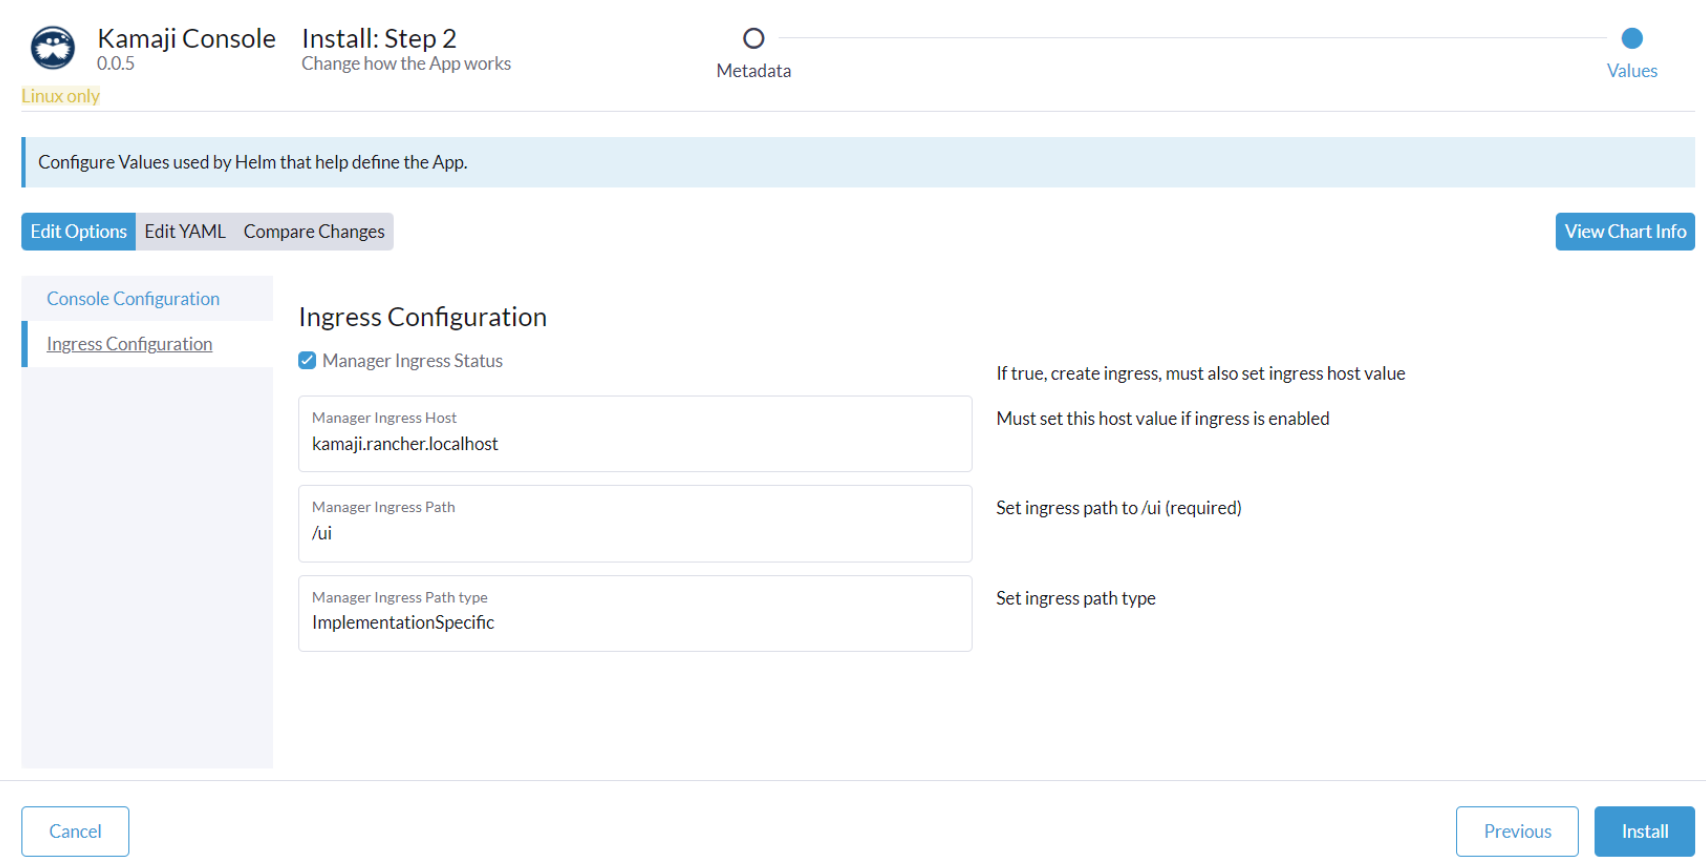
Select Ingress Configuration and make the following adjustments:
4.3 Verifying Kamaji Operator and Kamaji Console #
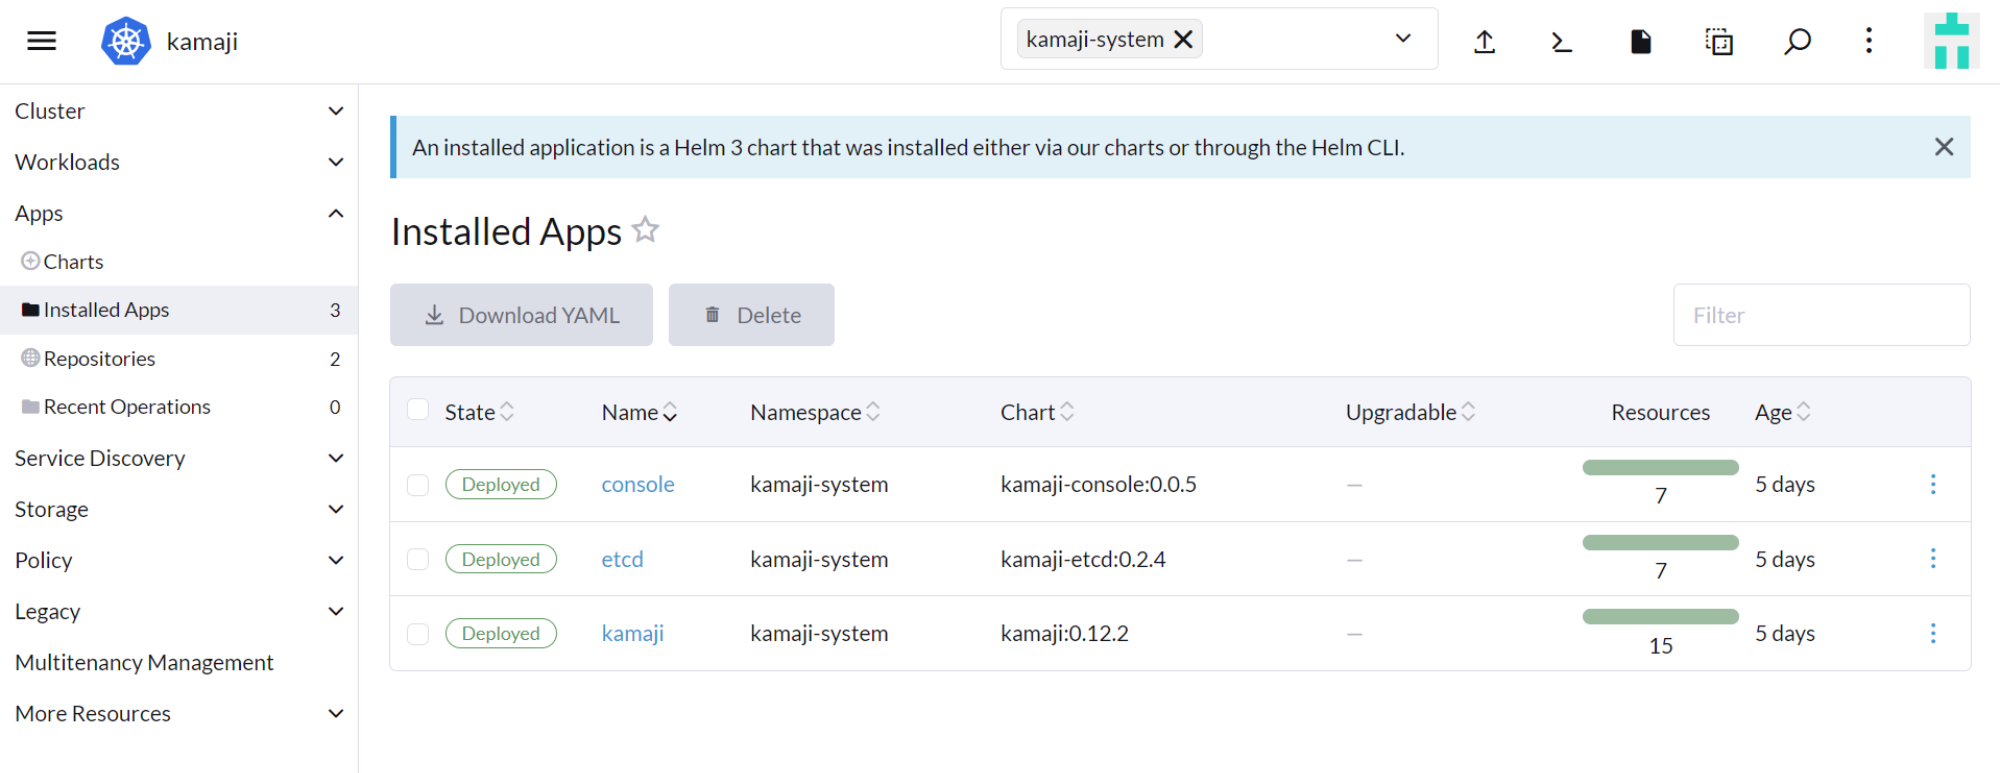
Verify that the Kamaji Operator and Kamaji Console are installed.
4.4 Installing Kamaji Rancher Extension #
Rancher extensions allow users, developers, partners, and customers to extend and enhance the Rancher UI. Examples of built-in Rancher extensions are Fleet, Explorer, and Harvester. Other extensions that use the Extensions API can be manually added.
In the Rancher UI, select Extensions.
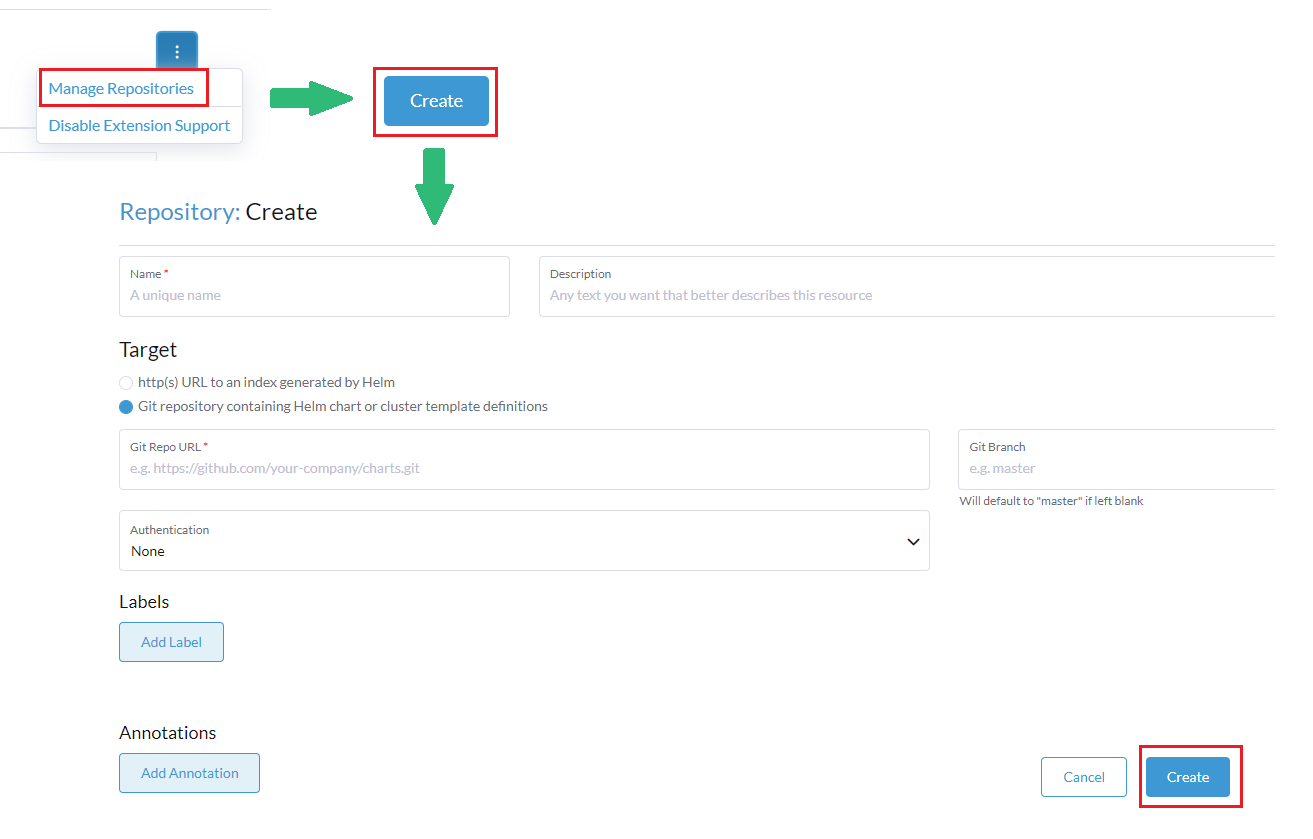
Add the Partner Extensions repository.
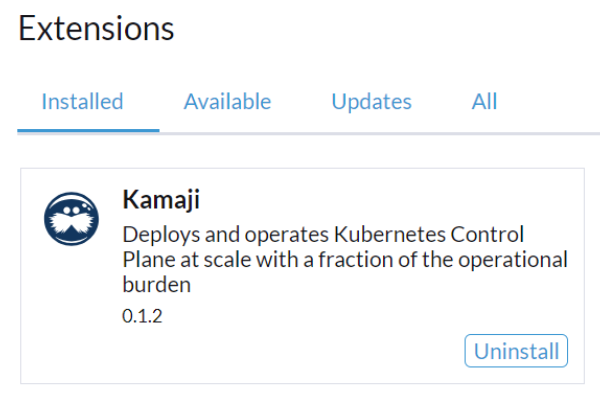
Install the Kamaji extension.
Verify that the Kamaji extension is installed.
5 Provisioning a tenant cluster #
With the Kamaji Operator, the Kamaji Console, and the Kamaji Rancher Extension deployed to your Kamaji Admin Cluster, you are ready to provision tenant (downstream) clusters.
5.1 Deploying a tenant control plane #
The first step to provision a tenant cluster is to create a tenant control plane (TCP) in the Kamaji Admin Cluster.
Tenant control plane pods are exposed by a load balancer service that is the 'ControlPlaneEndpoint' for the worker nodes. Make sure your Kamaji Admin Cluster supports the creation of the 'LoadBalancer' service type and that IP addresses can be provisioned and assigned. Otherwise, the Kamaji Operator will wait indefinitely to deploy your tenant control plane.
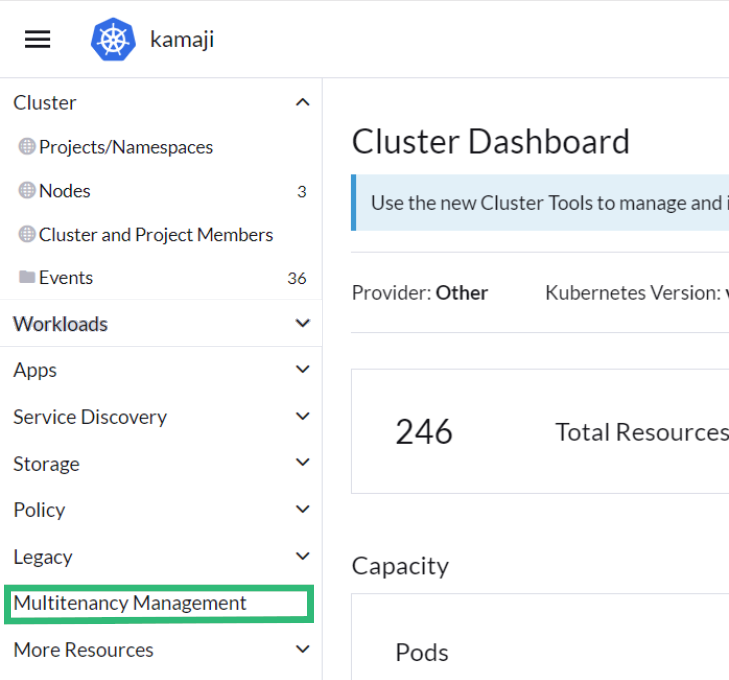
In the Rancher UI, select your Kamaji Admin Cluster.
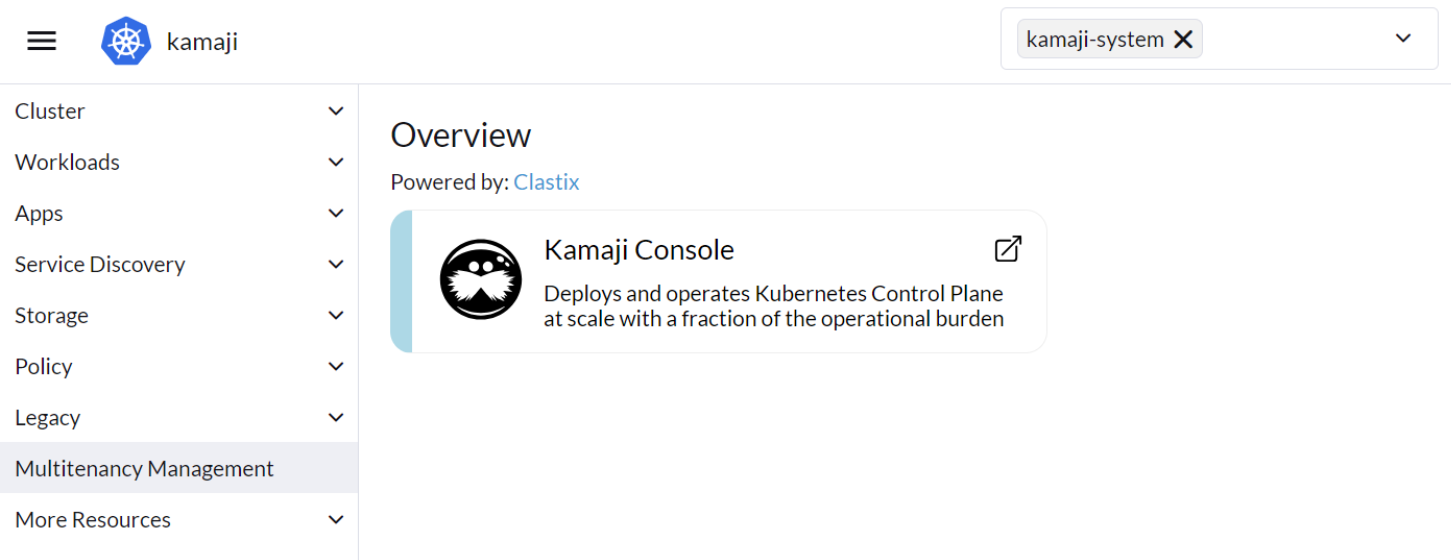
Select Multitenancy Management and click Kamaji Console.
The Kamaji Console opens in another tab or window of your browser.
Log in to the Kamaji Console UI with the e-mail address and password you set during deployment.
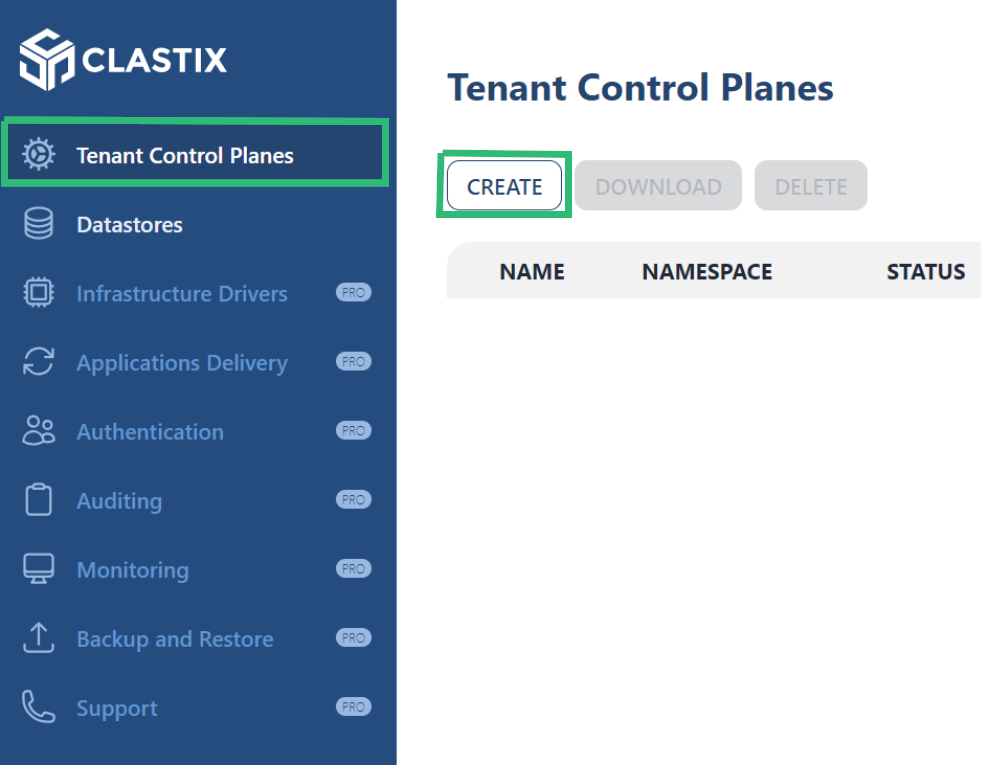
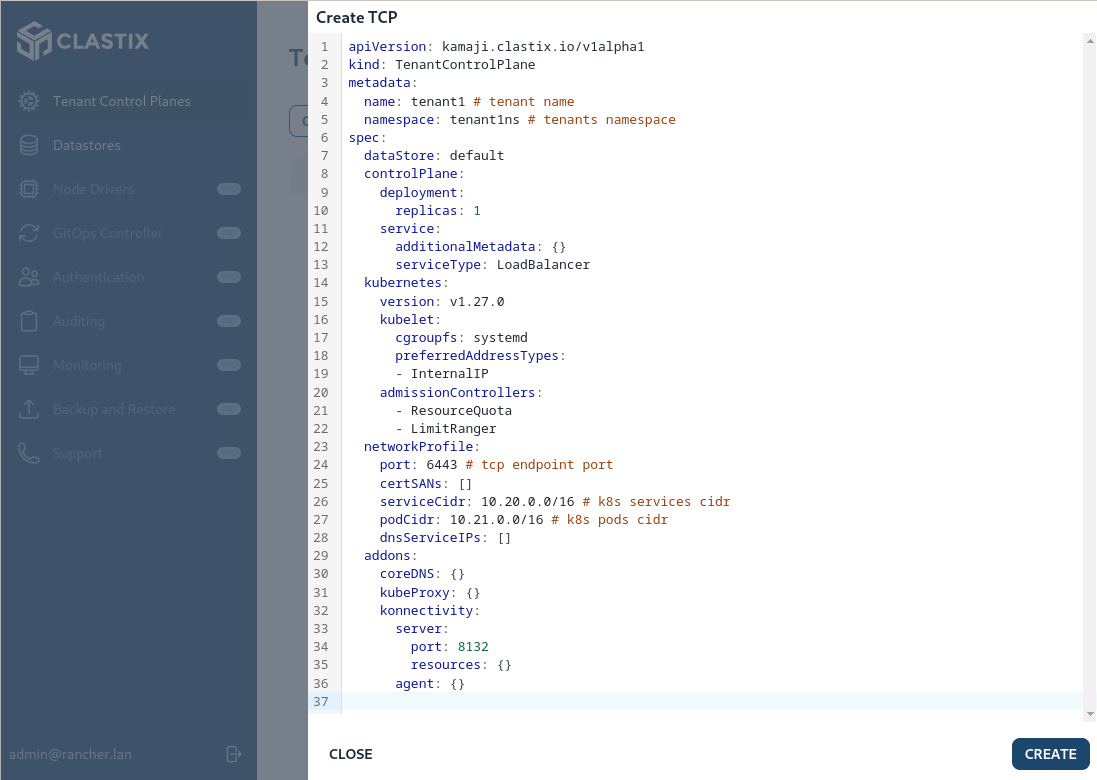
In the Kamaji Console, select Tenant Control Planes in the left panel, then click Create.
You are presented a sample TCP YAML file for configuring the tenant control plane. Adjust Kubernetes version, ServiceType, and other values for your infrastructure.
For convenience, a sample TCP YAML file is provided below.
apiVersion: kamaji.clastix.io/v1alpha1 kind: TenantControlPlane metadata: name: sample namespace: default spec: dataStore: default controlPlane: deployment: replicas: 2 service: serviceType: LoadBalancer kubernetes: version: v1.25.4 kubelet: cgroupfs: systemd networkProfile: port: 6443 addons: coreDNS: {} kubeProxy: {} konnectivity: server: port: 8132 version: v0.0.32 agent: version: v0.0.32NoteIf you are not using the default namespace, make sure the namespace exists before applying the configuration.
Click Create to deploy the tenant control plane.
The Kamaji Operator creates the tenant control plane as declared in the TCP YAML file, including Secrets to store the certificates used to access the tenant cluster.
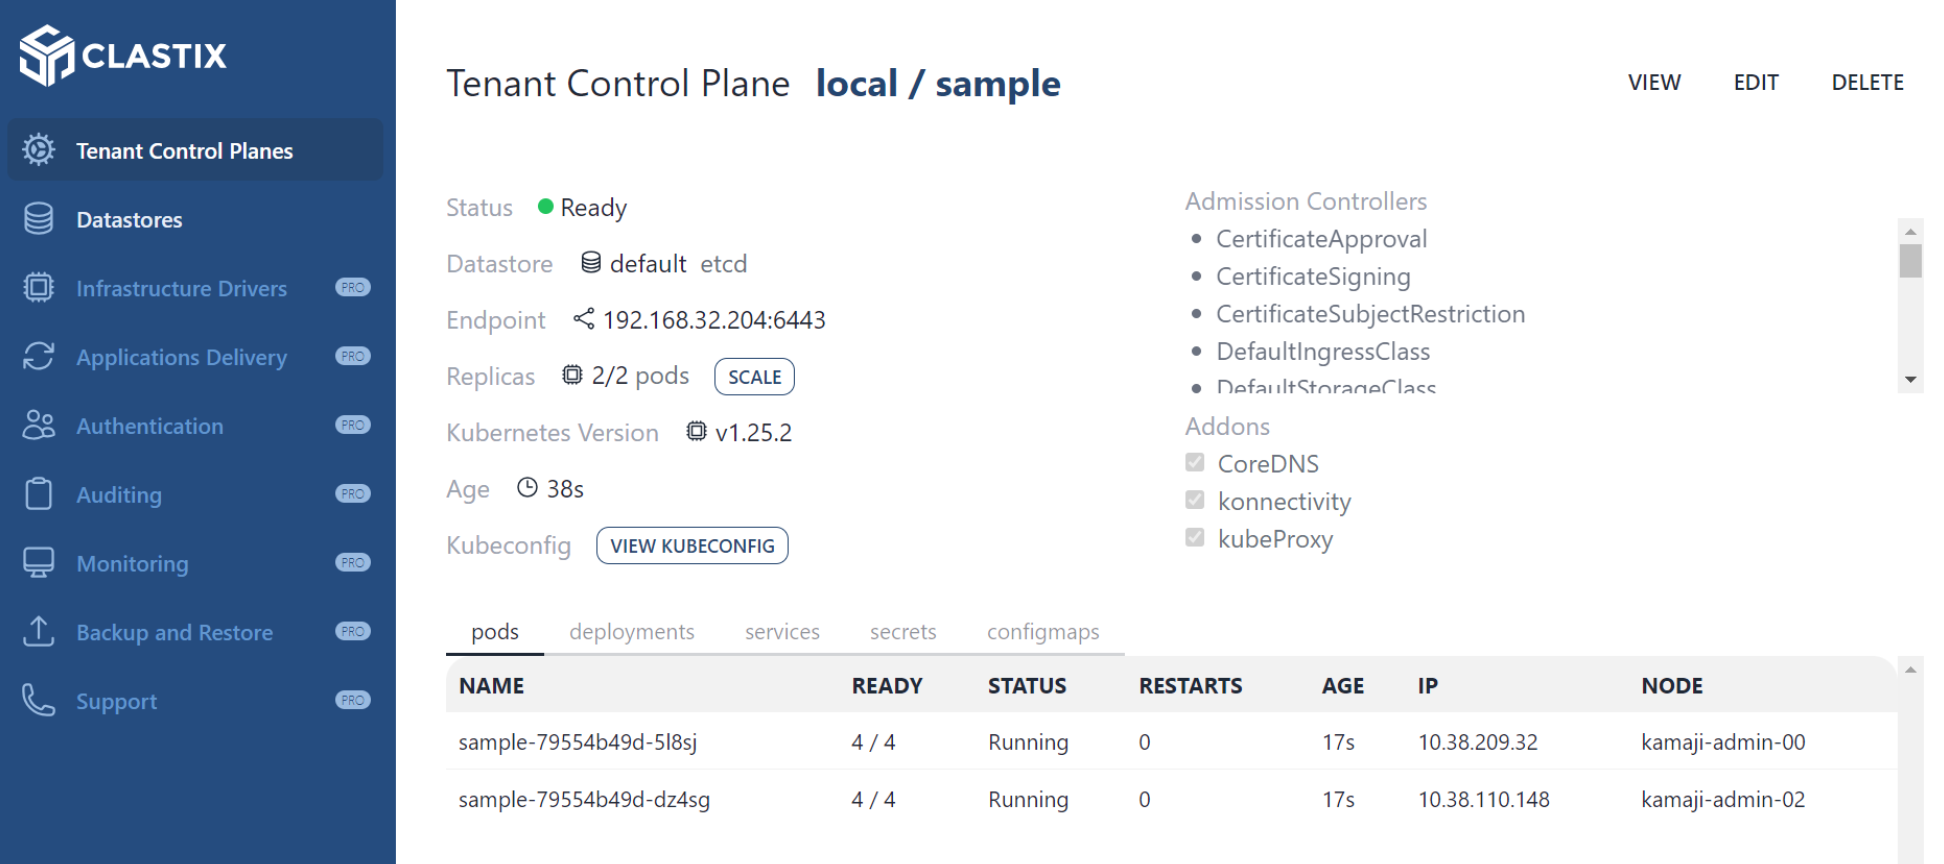
You can see an overview of the 'sample' tenant control plane that was created in the Kamaji Console.
Click VIEW KUBECONFIG to retrieve the Kubeconfig for your tenant control plane and save it as the file,
default-sample.kubeconfig.
5.2 Preparing worker nodes #
Be sure the bare metal or virtual machines you will use as your worker nodes have the following components installed:
containerd
crictl
kubectl
kubelet
kubeadm
The nodesetup.sh script can automate installation of these prerequisites for Ubuntu 22.04 and can be modified for your preferred operating system.
5.3 Joining worker nodes #
The tenant control plane is made of pods running in the Kamaji Admin Cluster. At this point, the tenant cluster has no worker nodes. So, the next step is to join some worker nodes to the tenant control plane.
Kamaji leverages the Cluster Management API (CAPI) project. This allows you to create the tenant clusters, including worker nodes, in a completely declarative way. Refer to the Kamaji CAPI providers repository to learn more about supported providers.
The current approach for joining nodes is to run a kubeadm command on each node.
Open the command line on your Linux workstation.
Store the IP address (or host name) of each node in a variable.
WORKER0=<address of first node>
WORKER1=<address of second node>
WORKER2=<address of third node>
Store the join command in a variable.
JOIN_CMD=$(echo "sudo ")$(kubeadm --kubeconfig=default-sample.kubeconfig token create --print-join-command)
Use a loop to log in to and run the join command on each node.
HOSTS=(${WORKER0} ${WORKER1} ${WORKER2})
for i in "${!HOSTS[@]}"; do
  HOST=${HOSTS[$i]}
  ssh ${USER}@${HOST} -t ${JOIN_CMD};
done
You can check the status of the worker nodes from the command line with:
kubectl --kubeconfig=default-sample.kubeconfig get nodes
This process can be further automated to handle the node prerequisites and joining. See yaki nodesetup.sh script, which you could modify for your preferred operating system.
5.4 Installing the Cluster Network Interface #
Your tenant cluster also needs a Container Network Interface (CNI) plugin. The CNI plugin enables seamless communication and connectivity between containers and external networks. For this guide, you use the Calico CNI.
Download the latest, stable Calico manifest to your Linux workstation.
For example:
curl https://raw.githubusercontent.com/projectcalico/calico/v3.24.1/manifests/calico.yaml -O
Apply the manifest to your tenant cluster.
kubectl --kubeconfig=default-sample.kubeconfig apply -f calico.yaml
TipYou can check the status from the command line:
kubectl --kubeconfig=default-sample.kubeconfig get nodes
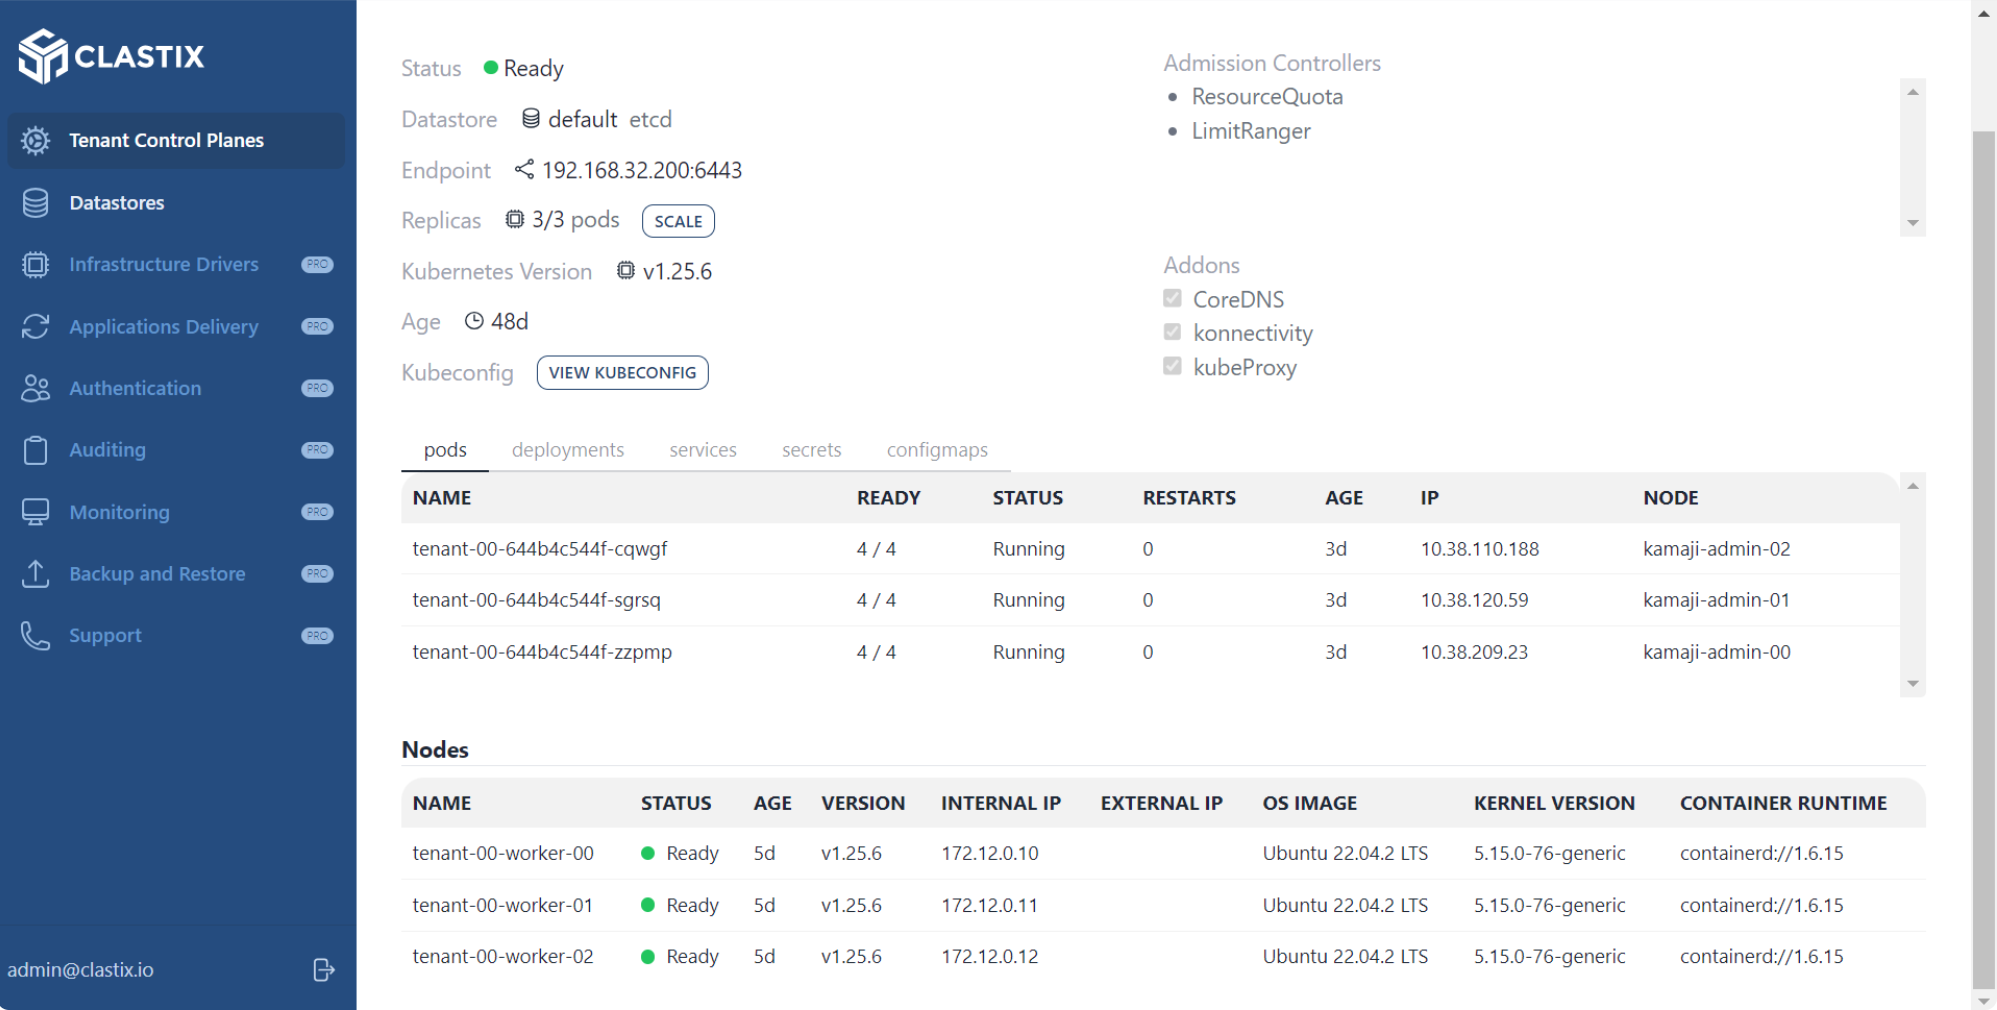
When the nodes are ready, they are visible to you in the Kamaji Console.
6 Importing the tenant cluster into Rancher Prime #
Bring your tenant clusters into Rancher Prime by SUSE for unified management and oversight of your Kubernetes landscape.
Log in to the Rancher UI.
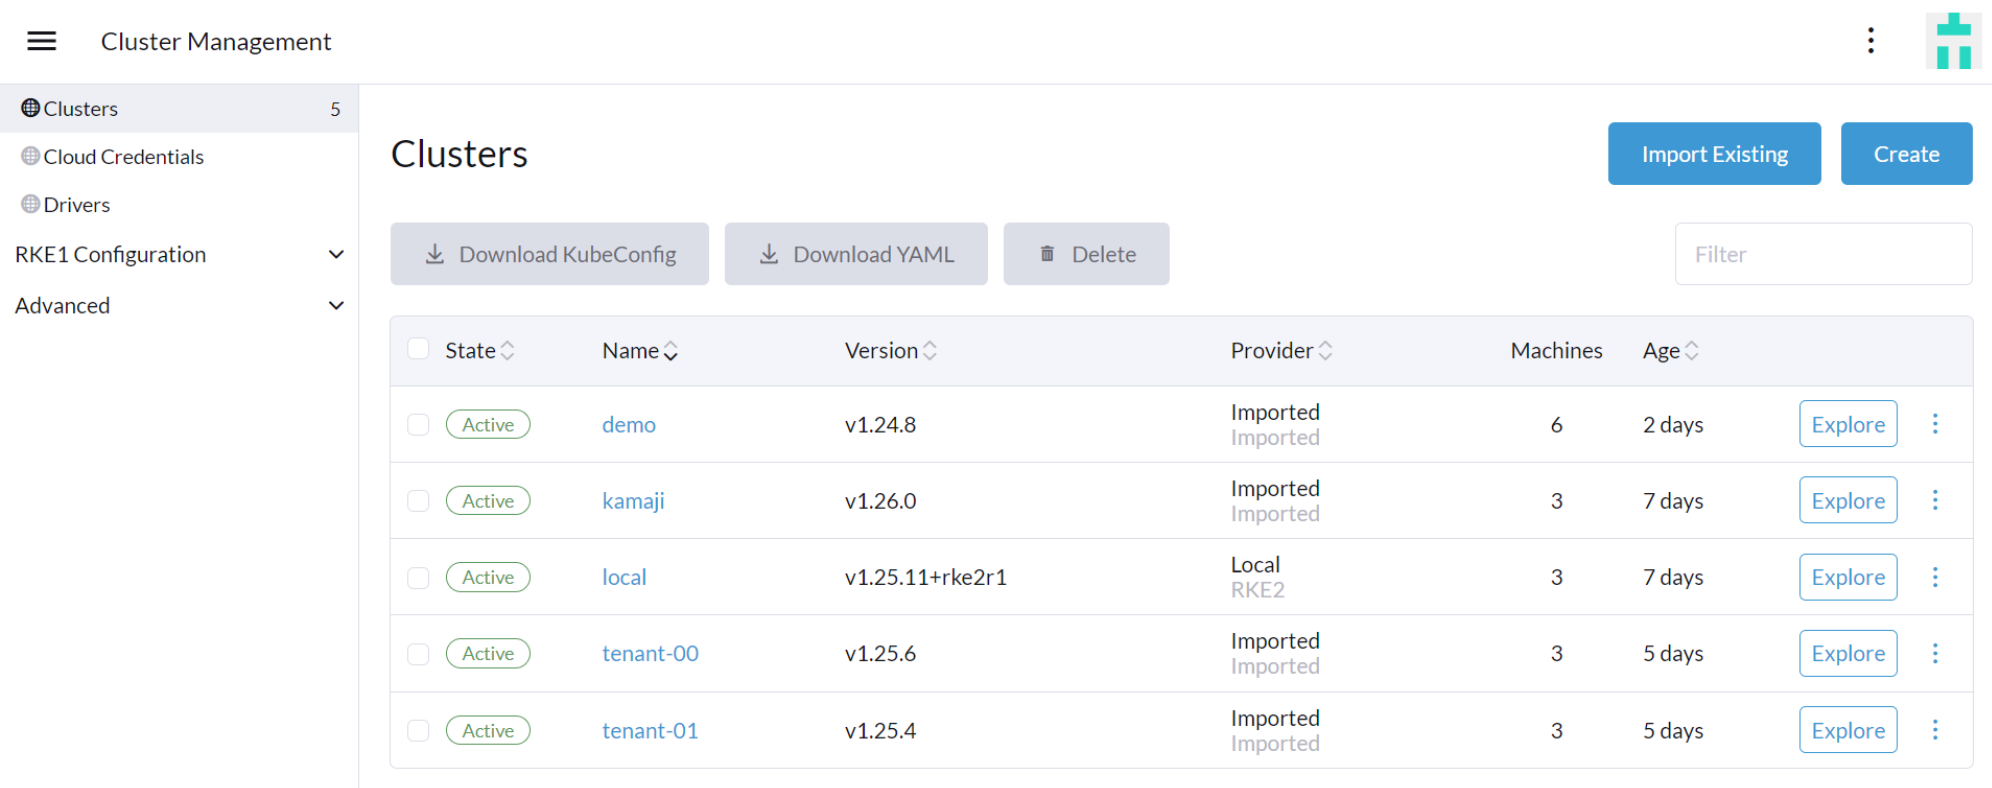
In Cluster Management, select Clusters.
Click Import Existing.
Enter a 'Cluster Name'.
Click Create.
Copy the
kubectlcommand displayed in the Rancher UI to your clipboard and run it against the tenant cluster on the command line of your Linux workstation.WarningMake sure you use the Kubeconfig related to the tenant cluster you wish to import.
Your tenant cluster is in a 'Pending' state while Rancher deploys resources to manage it. This may take a few minutes.
When the state changes to 'Active', your tenant cluster has been imported.
You now have a unified view and central management of your Kubernetes landscape with Rancher.
7 Summary #
Rancher Prime by SUSE empowers enterprises to streamline multi-cluster Kubernetes operations everywhere with unified security, policy, and user management. CLASTIX Kamaji delivers a highly scalable and high-density Kubernetes control plane infrastructure with reduced operational overhead, yielding faster deployment, configuration, upgrades, and maintenance. Together, SUSE and CLASTIX enable enterprises, managed services providers, and others to leverage Kubernetes resources more efficiently and enable secure Kubernetes-as-a-Service to multiple departments and clients.
In this guide, you learned how to seamlessly deploy CLASTIX Kamaji into your Rancher Prime by SUSE Kubernetes landscape, create tenant clusters, and import them into Rancher for unified and streamlined management.
Continue your journey by watching Rancher and Kamaji: solving multi-tenancy challenges in the Kubernetes world.
8 Legal notice #
Copyright © 2006–2024 SUSE LLC and contributors. All rights reserved.
Permission is granted to copy, distribute and/or modify this document under the terms of the GNU Free Documentation License, Version 1.2 or (at your option) version 1.3; with the Invariant Section being this copyright notice and license. A copy of the license version 1.2 is included in the section entitled "GNU Free Documentation License".
SUSE, the SUSE logo and YaST are registered trademarks of SUSE LLC in the United States and other countries. For SUSE trademarks, see https://www.suse.com/company/legal/.
Linux is a registered trademark of Linus Torvalds. All other names or trademarks mentioned in this document may be trademarks or registered trademarks of their respective owners.
Documents published as part of the series SUSE Technical Reference Documentation have been contributed voluntarily by SUSE employees and third parties. They are meant to serve as examples of how particular actions can be performed. They have been compiled with utmost attention to detail. However, this does not guarantee complete accuracy. SUSE cannot verify that actions described in these documents do what is claimed or whether actions described have unintended consequences. SUSE LLC, its affiliates, the authors, and the translators may not be held liable for possible errors or the consequences thereof.
9 GNU Free Documentation License #
Copyright © 2000, 2001, 2002 Free Software Foundation, Inc. 51 Franklin St, Fifth Floor, Boston, MA 02110-1301 USA. Everyone is permitted to copy and distribute verbatim copies of this license document, but changing it is not allowed.
0. PREAMBLE#
The purpose of this License is to make a manual, textbook, or other functional and useful document "free" in the sense of freedom: to assure everyone the effective freedom to copy and redistribute it, with or without modifying it, either commercially or noncommercially. Secondarily, this License preserves for the author and publisher a way to get credit for their work, while not being considered responsible for modifications made by others.
This License is a kind of "copyleft", which means that derivative works of the document must themselves be free in the same sense. It complements the GNU General Public License, which is a copyleft license designed for free software.
We have designed this License in order to use it for manuals for free software, because free software needs free documentation: a free program should come with manuals providing the same freedoms that the software does. But this License is not limited to software manuals; it can be used for any textual work, regardless of subject matter or whether it is published as a printed book. We recommend this License principally for works whose purpose is instruction or reference.
1. APPLICABILITY AND DEFINITIONS#
This License applies to any manual or other work, in any medium, that contains a notice placed by the copyright holder saying it can be distributed under the terms of this License. Such a notice grants a world-wide, royalty-free license, unlimited in duration, to use that work under the conditions stated herein. The "Document", below, refers to any such manual or work. Any member of the public is a licensee, and is addressed as "you". You accept the license if you copy, modify or distribute the work in a way requiring permission under copyright law.
A "Modified Version" of the Document means any work containing the Document or a portion of it, either copied verbatim, or with modifications and/or translated into another language.
A "Secondary Section" is a named appendix or a front-matter section of the Document that deals exclusively with the relationship of the publishers or authors of the Document to the Document’s overall subject (or to related matters) and contains nothing that could fall directly within that overall subject. (Thus, if the Document is in part a textbook of mathematics, a Secondary Section may not explain any mathematics.) The relationship could be a matter of historical connection with the subject or with related matters, or of legal, commercial, philosophical, ethical or political position regarding them.
The "Invariant Sections" are certain Secondary Sections whose titles are designated, as being those of Invariant Sections, in the notice that says that the Document is released under this License. If a section does not fit the above definition of Secondary then it is not allowed to be designated as Invariant. The Document may contain zero Invariant Sections. If the Document does not identify any Invariant Sections then there are none.
The "Cover Texts" are certain short passages of text that are listed, as Front-Cover Texts or Back-Cover Texts, in the notice that says that the Document is released under this License. A Front-Cover Text may be at most 5 words, and a Back-Cover Text may be at most 25 words.
A "Transparent" copy of the Document means a machine-readable copy, represented in a format whose specification is available to the general public, that is suitable for revising the document straightforwardly with generic text editors or (for images composed of pixels) generic paint programs or (for drawings) some widely available drawing editor, and that is suitable for input to text formatters or for automatic translation to a variety of formats suitable for input to text formatters. A copy made in an otherwise Transparent file format whose markup, or absence of markup, has been arranged to thwart or discourage subsequent modification by readers is not Transparent. An image format is not Transparent if used for any substantial amount of text. A copy that is not "Transparent" is called "Opaque".
Examples of suitable formats for Transparent copies include plain ASCII without markup, Texinfo input format, LaTeX input format, SGML or XML using a publicly available DTD, and standard-conforming simple HTML, PostScript or PDF designed for human modification. Examples of transparent image formats include PNG, XCF and JPG. Opaque formats include proprietary formats that can be read and edited only by proprietary word processors, SGML or XML for which the DTD and/or processing tools are not generally available, and the machine-generated HTML, PostScript or PDF produced by some word processors for output purposes only.
The "Title Page" means, for a printed book, the title page itself, plus such following pages as are needed to hold, legibly, the material this License requires to appear in the title page. For works in formats which do not have any title page as such, "Title Page" means the text near the most prominent appearance of the work’s title, preceding the beginning of the body of the text.
A section "Entitled XYZ" means a named subunit of the Document whose title either is precisely XYZ or contains XYZ in parentheses following text that translates XYZ in another language. (Here XYZ stands for a specific section name mentioned below, such as "Acknowledgements", "Dedications", "Endorsements", or "History".) To "Preserve the Title" of such a section when you modify the Document means that it remains a section "Entitled XYZ" according to this definition.
The Document may include Warranty Disclaimers next to the notice which states that this License applies to the Document. These Warranty Disclaimers are considered to be included by reference in this License, but only as regards disclaiming warranties: any other implication that these Warranty Disclaimers may have is void and has no effect on the meaning of this License.
2. VERBATIM COPYING#
You may copy and distribute the Document in any medium, either commercially or noncommercially, provided that this License, the copyright notices, and the license notice saying this License applies to the Document are reproduced in all copies, and that you add no other conditions whatsoever to those of this License. You may not use technical measures to obstruct or control the reading or further copying of the copies you make or distribute. However, you may accept compensation in exchange for copies. If you distribute a large enough number of copies you must also follow the conditions in section 3.
You may also lend copies, under the same conditions stated above, and you may publicly display copies.
3. COPYING IN QUANTITY#
If you publish printed copies (or copies in media that commonly have printed covers) of the Document, numbering more than 100, and the Document’s license notice requires Cover Texts, you must enclose the copies in covers that carry, clearly and legibly, all these Cover Texts: Front-Cover Texts on the front cover, and Back-Cover Texts on the back cover. Both covers must also clearly and legibly identify you as the publisher of these copies. The front cover must present the full title with all words of the title equally prominent and visible. You may add other material on the covers in addition. Copying with changes limited to the covers, as long as they preserve the title of the Document and satisfy these conditions, can be treated as verbatim copying in other respects.
If the required texts for either cover are too voluminous to fit legibly, you should put the first ones listed (as many as fit reasonably) on the actual cover, and continue the rest onto adjacent pages.
If you publish or distribute Opaque copies of the Document numbering more than 100, you must either include a machine-readable Transparent copy along with each Opaque copy, or state in or with each Opaque copy a computer-network location from which the general network-using public has access to download using public-standard network protocols a complete Transparent copy of the Document, free of added material. If you use the latter option, you must take reasonably prudent steps, when you begin distribution of Opaque copies in quantity, to ensure that this Transparent copy will remain thus accessible at the stated location until at least one year after the last time you distribute an Opaque copy (directly or through your agents or retailers) of that edition to the public.
It is requested, but not required, that you contact the authors of the Document well before redistributing any large number of copies, to give them a chance to provide you with an updated version of the Document.
4. MODIFICATIONS#
You may copy and distribute a Modified Version of the Document under the conditions of sections 2 and 3 above, provided that you release the Modified Version under precisely this License, with the Modified Version filling the role of the Document, thus licensing distribution and modification of the Modified Version to whoever possesses a copy of it. In addition, you must do these things in the Modified Version:
Use in the Title Page (and on the covers, if any) a title distinct from that of the Document, and from those of previous versions (which should, if there were any, be listed in the History section of the Document). You may use the same title as a previous version if the original publisher of that version gives permission.
List on the Title Page, as authors, one or more persons or entities responsible for authorship of the modifications in the Modified Version, together with at least five of the principal authors of the Document (all of its principal authors, if it has fewer than five), unless they release you from this requirement.
State on the Title page the name of the publisher of the Modified Version, as the publisher.
Preserve all the copyright notices of the Document.
Add an appropriate copyright notice for your modifications adjacent to the other copyright notices.
Include, immediately after the copyright notices, a license notice giving the public permission to use the Modified Version under the terms of this License, in the form shown in the Addendum below.
Preserve in that license notice the full lists of Invariant Sections and required Cover Texts given in the Document’s license notice.
Include an unaltered copy of this License.
Preserve the section Entitled "History", Preserve its Title, and add to it an item stating at least the title, year, new authors, and publisher of the Modified Version as given on the Title Page. If there is no section Entitled "History" in the Document, create one stating the title, year, authors, and publisher of the Document as given on its Title Page, then add an item describing the Modified Version as stated in the previous sentence.
Preserve the network location, if any, given in the Document for public access to a Transparent copy of the Document, and likewise the network locations given in the Document for previous versions it was based on. These may be placed in the "History" section. You may omit a network location for a work that was published at least four years before the Document itself, or if the original publisher of the version it refers to gives permission.
For any section Entitled "Acknowledgements" or "Dedications", Preserve the Title of the section, and preserve in the section all the substance and tone of each of the contributor acknowledgements and/or dedications given therein.
Preserve all the Invariant Sections of the Document, unaltered in their text and in their titles. Section numbers or the equivalent are not considered part of the section titles.
Delete any section Entitled "Endorsements". Such a section may not be included in the Modified Version.
Do not retitle any existing section to be Entitled "Endorsements" or to conflict in title with any Invariant Section.
Preserve any Warranty Disclaimers.
If the Modified Version includes new front-matter sections or appendices that qualify as Secondary Sections and contain no material copied from the Document, you may at your option designate some or all of these sections as invariant. To do this, add their titles to the list of Invariant Sections in the Modified Version’s license notice. These titles must be distinct from any other section titles.
You may add a section Entitled "Endorsements", provided it contains nothing but endorsements of your Modified Version by various parties—for example, statements of peer review or that the text has been approved by an organization as the authoritative definition of a standard.
You may add a passage of up to five words as a Front-Cover Text, and a passage of up to 25 words as a Back-Cover Text, to the end of the list of Cover Texts in the Modified Version. Only one passage of Front-Cover Text and one of Back-Cover Text may be added by (or through arrangements made by) any one entity. If the Document already includes a cover text for the same cover, previously added by you or by arrangement made by the same entity you are acting on behalf of, you may not add another; but you may replace the old one, on explicit permission from the previous publisher that added the old one.
The author(s) and publisher(s) of the Document do not by this License give permission to use their names for publicity for or to assert or imply endorsement of any Modified Version.
5. COMBINING DOCUMENTS#
You may combine the Document with other documents released under this License, under the terms defined in section 4 above for modified versions, provided that you include in the combination all of the Invariant Sections of all of the original documents, unmodified, and list them all as Invariant Sections of your combined work in its license notice, and that you preserve all their Warranty Disclaimers.
The combined work need only contain one copy of this License, and multiple identical Invariant Sections may be replaced with a single copy. If there are multiple Invariant Sections with the same name but different contents, make the title of each such section unique by adding at the end of it, in parentheses, the name of the original author or publisher of that section if known, or else a unique number. Make the same adjustment to the section titles in the list of Invariant Sections in the license notice of the combined work.
In the combination, you must combine any sections Entitled "History" in the various original documents, forming one section Entitled "History"; likewise combine any sections Entitled "Acknowledgements", and any sections Entitled "Dedications". You must delete all sections Entitled "Endorsements".
6. COLLECTIONS OF DOCUMENTS#
You may make a collection consisting of the Document and other documents released under this License, and replace the individual copies of this License in the various documents with a single copy that is included in the collection, provided that you follow the rules of this License for verbatim copying of each of the documents in all other respects.
You may extract a single document from such a collection, and distribute it individually under this License, provided you insert a copy of this License into the extracted document, and follow this License in all other respects regarding verbatim copying of that document.
7. AGGREGATION WITH INDEPENDENT WORKS#
A compilation of the Document or its derivatives with other separate and independent documents or works, in or on a volume of a storage or distribution medium, is called an "aggregate" if the copyright resulting from the compilation is not used to limit the legal rights of the compilation’s users beyond what the individual works permit. When the Document is included in an aggregate, this License does not apply to the other works in the aggregate which are not themselves derivative works of the Document.
If the Cover Text requirement of section 3 is applicable to these copies of the Document, then if the Document is less than one half of the entire aggregate, the Document’s Cover Texts may be placed on covers that bracket the Document within the aggregate, or the electronic equivalent of covers if the Document is in electronic form. Otherwise they must appear on printed covers that bracket the whole aggregate.
8. TRANSLATION#
Translation is considered a kind of modification, so you may distribute translations of the Document under the terms of section 4. Replacing Invariant Sections with translations requires special permission from their copyright holders, but you may include translations of some or all Invariant Sections in addition to the original versions of these Invariant Sections. You may include a translation of this License, and all the license notices in the Document, and any Warranty Disclaimers, provided that you also include the original English version of this License and the original versions of those notices and disclaimers. In case of a disagreement between the translation and the original version of this License or a notice or disclaimer, the original version will prevail.
If a section in the Document is Entitled "Acknowledgements", "Dedications", or "History", the requirement (section 4) to Preserve its Title (section 1) will typically require changing the actual title.
9. TERMINATION#
You may not copy, modify, sublicense, or distribute the Document except as expressly provided for under this License. Any other attempt to copy, modify, sublicense or distribute the Document is void, and will automatically terminate your rights under this License. However, parties who have received copies, or rights, from you under this License will not have their licenses terminated so long as such parties remain in full compliance.
10. FUTURE REVISIONS OF THIS LICENSE#
The Free Software Foundation may publish new, revised versions of the GNU Free Documentation License from time to time. Such new versions will be similar in spirit to the present version, but may differ in detail to address new problems or concerns. See http://www.gnu.org/copyleft/.
Each version of the License is given a distinguishing version number. If the Document specifies that a particular numbered version of this License "or any later version" applies to it, you have the option of following the terms and conditions either of that specified version or of any later version that has been published (not as a draft) by the Free Software Foundation. If the Document does not specify a version number of this License, you may choose any version ever published (not as a draft) by the Free Software Foundation.
ADDENDUM: How to use this License for your documents#
Copyright (c) YEAR YOUR NAME.
   Permission is granted to copy, distribute and/or modify this document
   under the terms of the GNU Free Documentation License, Version 1.2
   or any later version published by the Free Software Foundation;
   with no Invariant Sections, no Front-Cover Texts, and no Back-Cover Texts.
   A copy of the license is included in the section entitled “GNU
   Free Documentation License”.
If you have Invariant Sections, Front-Cover Texts and Back-Cover Texts, replace the “ with…Texts.” line with this:
with the Invariant Sections being LIST THEIR TITLES, with the
   Front-Cover Texts being LIST, and with the Back-Cover Texts being LIST.
If you have Invariant Sections without Cover Texts, or some other combination of the three, merge those two alternatives to suit the situation.
If your document contains nontrivial examples of program code, we recommend releasing these examples in parallel under your choice of free software license, such as the GNU General Public License, to permit their use in free software.

