3 SMT Server Configuration #
This chapter introduces the YaST configuration module for the SMT server. This module can be used to set and configure mirroring credentials, SMT database passwords, and e-mail addresses for receiving SMT reports. The module also lets you set the SMT job schedule, and activate or deactivate the SMT service.
To configure SMT with SMT Server Configuration, follow the steps below.
Start the YaST module from the YaST control center or by running
yast
    smt-server
from the command line.To activate SMT, toggle the option in the section. For more information about activating SMT with YaST, see Section 3.1, “Activating and Deactivating SMT with YaST”.
If the firewall is enabled, activate .
In the section of , you can set the custom server URLs. Set and test credentials for the SUSE Update service. Correct credentials are necessary to enable mirroring from the download server and determine the products that should be mirrored. Also set the e-mail address used for the registration and the URL of your SMT server. For more information, see Section 3.2, “Setting the Update Server Credentials with YaST”.
In the section, set the password for the SMT user in the MariaDB database and specify e-mail addresses for receiving reports. For more information, see Section 3.3, “Setting SMT Database Password with YaST” and Section 3.4, “Setting E-mail Addresses to Receive Reports with YaST”.
In the section, set a schedule for SMT jobs, such as synchronization of updates, SUSE Customer Center registration, and SMT report generation. For more information, see Section 3.5, “Setting the SMT Job Schedule with YaST”.
When you are satisfied with the configuration, click . YaST updates the SMT configuration and starts or restarts necessary services.
If you want to abort the configuration and cancel any changes, click .
Note: Check for CertificateWhen the SMT Configuration applies changes, it checks whether the common server certificate exists. If the certificate does not exist, you will be asked whether the certificate should be created.
3.1 Activating and Deactivating SMT with YaST #
YaST provides an easy way to activate or deactivate the SMT service. To activate SMT using YaST, follow the steps below.
Switch to the section in the SMT Configuration.
Activate the option.
Note: Organization CredentialsSpecify organization credentials before activating SMT. For more information on how to set organization credentials with YaST, see Section 3.2, “Setting the Update Server Credentials with YaST”.
Click to apply the changes and leave the SMT Configuration.
To deactivate SMT with YaST, proceed as follows.
Switch to the section in the SMT Configuration.
Disable the option.
Click to apply the changes and leave the SMT Configuration.
When activating SMT, YaST performs the following actions.
The Apache configuration is changed by creating symbolic links in the
/etc/apache2/conf.d/directory. Links to the/etc/smt.d/nu_server.confand/etc/smt.d/smt_mod_perl.conffiles are created there.The Apache Web server is started (or reloaded if already running).
The MariaDB server is started or restarted. The smt user and all necessary tables in the database are created, if needed.
The schema of the SMT database is checked. If the database schema is outdated, the SMT database is upgraded to the current schema.
Cron is updated by creating a symbolic link in the
/etc/cron.d/directory. A link to the/etc/smt.d/novell.com-smtfile is created there.
When deactivating SMT, YaST performs the following actions.
Symbolic links that were created upon SMT activation in the /etc/apache2/conf.d/ and /etc/cron.d/ directories are deleted.
The Cron daemon, the Apache server, and the MariaDB database daemon are restarted. Neither Apache nor MariaDB are stopped, as they may be used for other purposes than the SMT service.
3.2 Setting the Update Server Credentials with YaST #
The following procedure describes how to set and test the download server credentials and the URL of the download server service using YaST.
Switch to the section in the SMT Configuration. If the credentials have been already set with YaST or via the
/etc/smt.confconfiguration file, they will be displayed in the and fields.If you do not have credentials, visit SUSE Customer Center to obtain them. For more details, see Section 4.1, “Mirroring Credentials”.
Enter your user name and password in the appropriate fields.
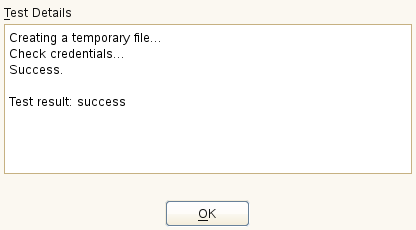
Click to check the credentials. YaST will try to download a list of available repositories with the provided credentials. If the test succeeds, the last line of the test results will read
Test result: success. If the test fails, check the provided credentials and try again.Figure 3.2: Successful Test of the Update Server Credentials #Enter the . This should be the address you used to register to SUSE Customer Center.
Enter if it has not been detected automatically.
Click .
3.3 Setting SMT Database Password with YaST #
For security reasons, SMT uses its own user in the database. YaST provides an interface for setting up or changing the SMT database password. To set or change the SMT database password with YaST, follow the steps below.
Switch to the section in the SMT Configuration module.
Enter the . Confirm the password by re-entering it, then click .
3.4 Setting E-mail Addresses to Receive Reports with YaST #
YaST SMT provides an interface for setting up a list of e-mail addresses for receiving reports from SMT. To edit this list of addresses, proceed as follows.
Switch to the section in the SMT Configuration.
The list of e-mail addresses is shown in the table. Use the appropriate buttons to add, edit, and delete existing address entries.
Click .
The comma-separated list of addresses for SMT reports is written to the
reportEmail section of the
/etc/smt.conf configuration file.
3.5 Setting the SMT Job Schedule with YaST #
The SMT Configuration module provides an interface to
schedule recurring SMT jobs. YaST uses cron
to schedule configured jobs. If needed, cron
can be used directly. There are five types of recurring jobs that can be set:
- Synchronization of Updates
Synchronizes with SUSE Customer Center, updates repositories, and downloads new updates.
- Generation of Reports
Generates and sends SMT Subscription Reports to addresses defined in Section 3.4, “Setting E-mail Addresses to Receive Reports with YaST”.
- SCC Registration
Registers with SUSE Customer Center all clients that are not already registered or that changed their data since the last registration.
- Job Queue Cleanup
Cleans up queued jobs. It removes finished or failed jobs from the job queue that are older than eight days. It also removes job artifacts that are left in the database as result of an error.
Use the following procedure to configure the schedule of SMT jobs with YaST.
Switch to the section in the SMT Configuration. The table contains a list of all scheduled jobs, their type, frequency, date, and time to run. You can add, delete, and edit the existing scheduled tasks.
To add a scheduled SMT job, click . This opens the dialog.
Choose the synchronization job to schedule. You can choose between , , , and .
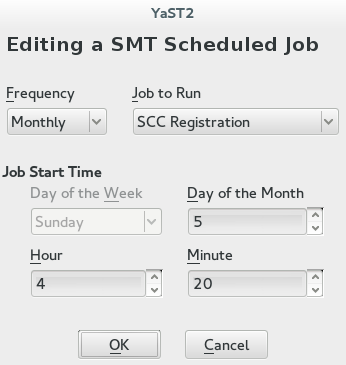
Choose the of the new scheduled SMT job. Jobs can be performed , , , or (every n-th hour or every m-th minute).
Set the by entering and . In case of a recurring job, enter the relevant intervals. For weekly and monthly schedules, select or .
Click .
To edit a scheduled SMT job (for example, change its frequency, time, or date), select the job in the table and click . Then change the desired parameters and click .
Figure 3.4: Setting Scheduled Job with YaST #To cancel a scheduled job and delete it from the table, select the job in the table and click .
Click to apply the settings and quit the SMT Configuration.


