Skrócona instrukcja instalacji #
Niniejsza skrócona instrukcja prowadzi użytkownika krok po kroku przez proces instalacji systemu SUSE® Linux Enterprise Server 15 SP5.
1 SUSE Linux Enterprise Server — zapraszamy! #
Aby zainstalować produkt na wszystkich obsługiwanych platformach sprzętowych, należy użyć poniższych procedur. Zakładają one, że wykonano pomyślnie start systemu/procedurę IPL do systemu instalacyjnego. Bardziej szczegółowe instrukcje instalacji oraz strategie wdrożeniowe zawiera Deployment Guide. Szczegóły dotyczące przygotowań platform do startu systemu lub procedury IPL do systemu instalacyjnego opisano w następujących częściach wspomnianej instrukcji:
1.1 Ujednolicony instalator #
Począwszy od wersji SUSE Linux Enterprise 15, nośnik instalacyjny zawiera tylko ujednolicony instalator, czyli minimalny system służący do instalowania, aktualizowania i rejestrowania produktów podstawowych systemu SUSE Linux Enterprise Server. Podczas instalacji można dodać funkcje, wybierając moduły i rozszerzenia, które ma uwzględnić ujednolicony instalator.
1.2 Instalacja w trybie offline lub bez rejestracji #
Domyślny nośnik instalacyjny SLE-15-SP5-Online-ARCH-GM-media1.iso jest zoptymalizowany pod kątem rozmiaru i nie zawiera żadnych modułów ani rozszerzeń. Dlatego instalacja wymaga dostępu do sieci, aby umożliwić rejestrację produktu i pobranie danych repozytorium dotyczących modułów i rozszerzeń.
W przypadku instalacji bez rejestrowania systemu należy użyć obrazu SLE-15-SP5-Full-ARCH-GM-media1.iso z https://www.suse.com/download/sles/. Instrukcje można znaleźć w dokumencie Section 8.7.3, “Installing without registration”.
Aby skopiować zawartość obrazu instalacyjnego na dysk wymienny flash, użyj poniższego polecenia.
>sudodd if=IMAGE of=FLASH_DISK bs=4M && sync
IMAGE należy zastąpić ścieżką do pliku obrazu SLE-15-SP5-Online-ARCH-GM-media1.iso lub SLE-15-SP5-Full-ARCH-GM-media1.iso. FLASH_DISK należy zastąpić ścieżką do dysku wymiennego flash. Aby zidentyfikować urządzenie, podłącz je, a następnie uruchom polecenie:
# grep -Ff <(hwinfo --disk --short) <(hwinfo --usb --short)
disk:
  /dev/sdc             General USB Flash Disk
Upewnij się, że rozmiar urządzenia jest wystarczający do nagrania obrazu. Rozmiar urządzenia można sprawdzić, wpisując polecenie:
# fdisk -l /dev/sdc | grep -e "^/dev"
     /dev/sdc1  *     2048 31490047 31488000  15G 83 Linux
W tym przykładzie urządzenie ma 15 GB pojemności. Z obrazem SLE-15-SP5-Full-ARCH-GM-media1.iso należy użyć następującego polecenia:
dd if=SLE-15-SP5-Full-ARCH-GM-media1.iso of=/dev/sdc bs=4M && sync
Podczas uruchamiania polecenia dd urządzenie nie może być zamontowane. Należy pamiętać, że wszelkie dane zawarte na partycji zostaną wymazane!
2 Procedura instalacji #
Aby zainstalować system SUSE Linux Enterprise Server, wykonaj start systemu lub procedurę IPL do instalatora z nośnika ujednoliconego instalatora i uruchom instalację.
2.1 Wybór języka, klawiatury i produktu #
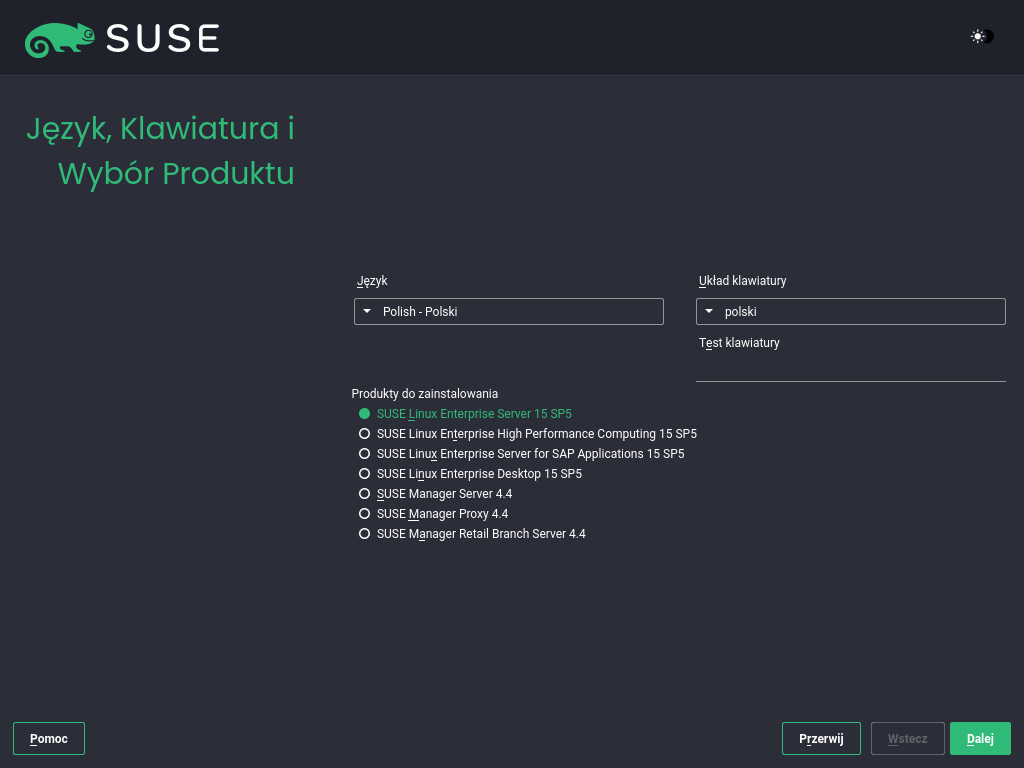
Ustawienia i są inicjowane przy użyciu języka wybranego na ekranie startu systemu. Jeśli ustawienia domyślne nie zostaną zmienione, będzie to język angielski (USA). Jeśli to konieczne, ustawienia te można zmienić w tym miejscu. Do przetestowania układu należy użyć pola tekstowego .
Za pomocą ujednoliconego instalatora można zainstalować wszystkie produkty z rodziny SUSE Linux Enterprise:
SUSE Linux Enterprise Server 15 SP5 (opisany w tym dokumencie)
SUSE Linux Enterprise Desktop 15 SP5 (instrukcja instalacji znajduje się na stronie https://documentation.suse.com/sled/)
SUSE Linux Enterprise High Performance Computing 15 SP5
SUSE Linux Enterprise Real Time 15 SP5 (instrukcja instalacji znajduje się na stronie https://documentation.suse.com/sle-rt/)
SUSE Linux Enterprise Server for SAP Applications 15 SP5 (instrukcja instalacji znajduje się na stronie https://documentation.suse.com/sles-sap)
SUSE Manager Server 4.4 (instrukcja instalacji znajduje się na stronie https://documentation.suse.com/suma/)
SUSE Manager Proxy 4.4 (instrukcja instalacji znajduje się na stronie https://documentation.suse.com/suma/)
SUSE Manager Retail Branch Server 4.4 (instrukcja instalacji znajduje się na stronie https://documentation.suse.com/suma-retail)
Wybierz produkt do zainstalowania. Należy podać kod rejestracyjny odpowiedniego produktu. W treści tego dokumentu założono, że wybrano system SUSE Linux Enterprise Server. Kliknij przycisk , aby kontynuować.
Jeśli masz trudności z odczytaniem etykiet w instalatorze, możesz zmienić kolory i motyw widżetu.
Kliknij przycisk
lub naciśnij kombinację klawiszy Shift–F3, aby otworzyć okno dialogowe wyboru motywu. Wybierz motyw z listy i okno dialogowe.
Naciśnięcie klawiszy Shift–F4 powoduje przełączenie na schemat kolorów dla osób niedowidzących. Naciśnij te klawisze ponownie, aby powrócić do domyślnego schematu.
2.2 Umowa licencyjna #
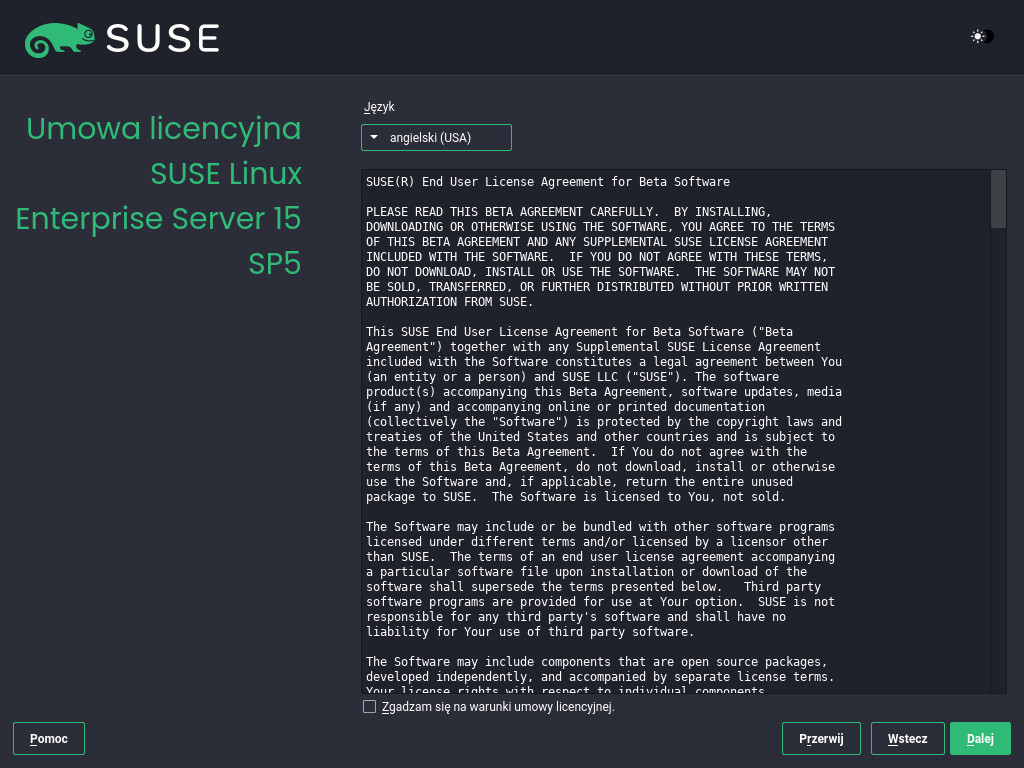
Przeczytaj Umowę licencyjną. Jest ona wyświetlana w języku wybranym na ekranie startu systemu. Tłumaczenia są dostępne za pośrednictwem listy rozwijanej . Aby móc zainstalować system SUSE Linux Enterprise Server, należy zaakceptować umowę, zaznaczając pole wyboru . Kliknij przycisk , aby kontynuować.
2.3 Ustawienia sieci #
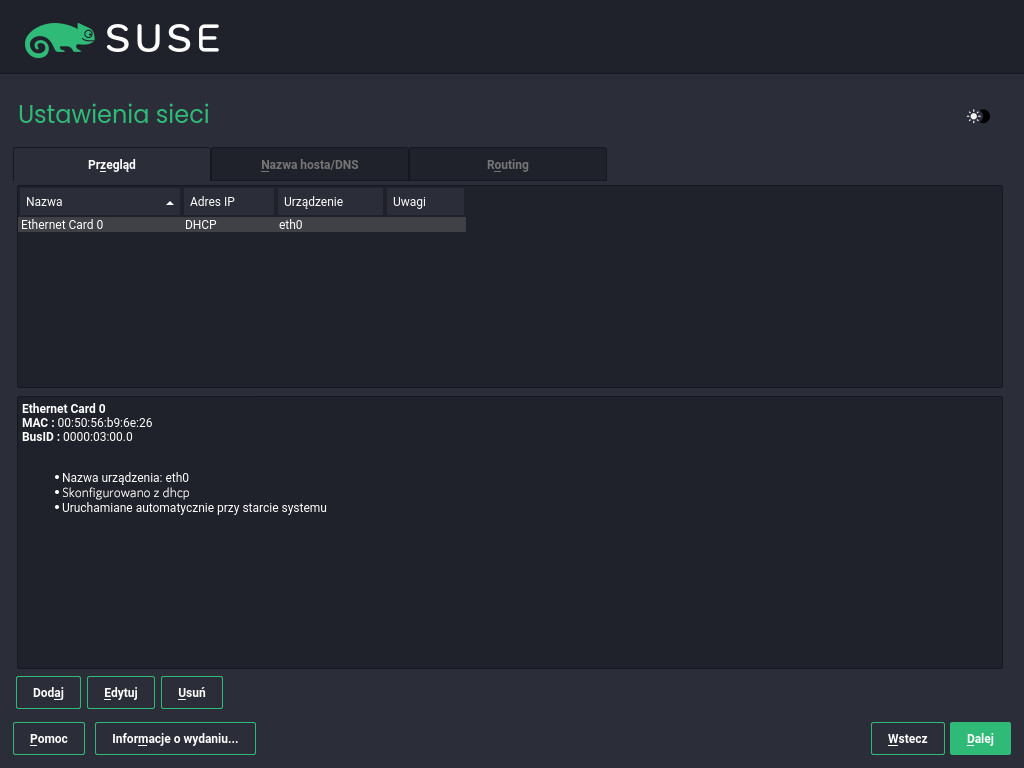
Zostanie przeprowadzona analiza systemu, podczas której program instalacyjny sprawdzi urządzenia pamięci masowej i podejmie próbę wykrycia innych zainstalowanych systemów. Jeśli sieć nie została automatycznie skonfigurowana przez DHCP podczas uruchamiania instalacji, nastąpi przejście do kroku rejestracji.
Jeśli sieć nie jest jeszcze skonfigurowana, zostanie otwarte okno dialogowe . Wybierz z listy interfejs sieciowy i skonfiguruj go za pomocą opcji . Interfejs można również dodać ręcznie (opcja ). Więcej informacji na ten temat zawierają Section 8.6, “Network settings” i Section 23.4, “Configuring a network connection with YaST”. Jeśli preferujesz instalację bez dostępu do sieci, pomiń ten krok bez wprowadzania zmian i kontynuuj, klikając przycisk .
2.4 IBM Z: aktywacja dysku #
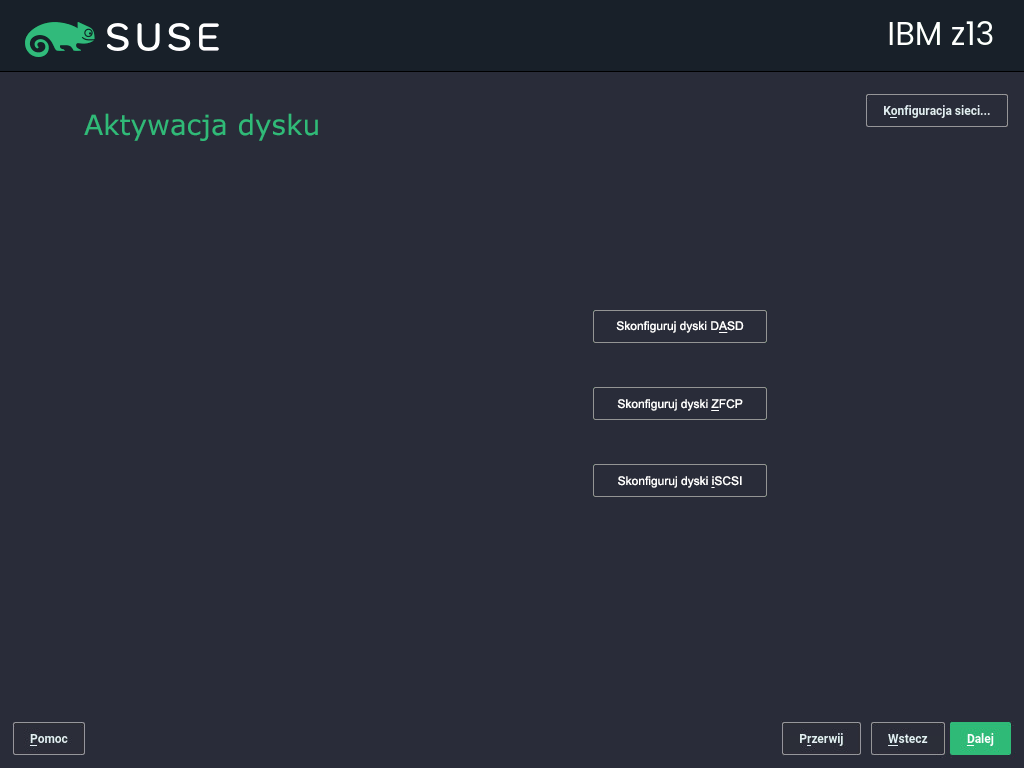
Ten krok należy pominąć, jeśli instalacja nie jest przeprowadzana na sprzęcie IBM Z.
Skonfiguruj podłączone dyski twarde. W przypadku instalacji systemu SUSE Linux Enterprise Server wybierz dysk DASD, dysk SCSI Fibre Channel (zFCP) lub dysk iSCSI. Przyciski konfiguracji DASD i zFCP są dostępne tylko wtedy, gdy są podłączone odpowiednie urządzenia. Kontynuuj, klikając przycisk , aby skonfigurować dysk wybranego typu. Więcej informacji na ten temat zawiera Section 8.5, “IBM Z: disk activation”.
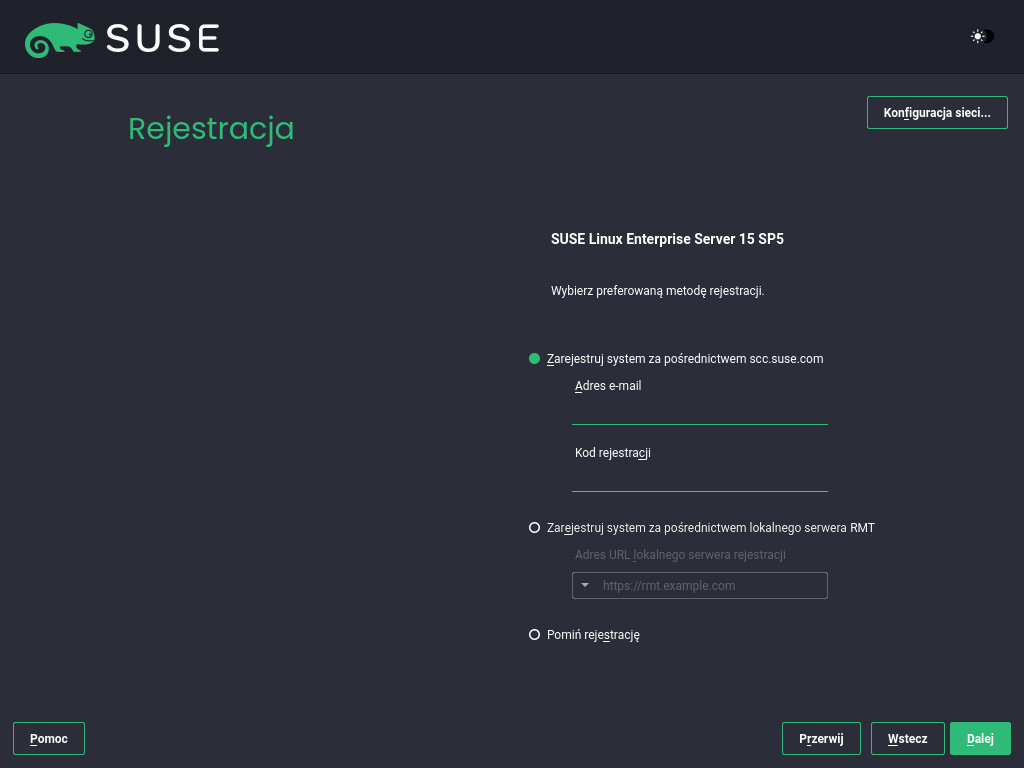
2.5 Rejestracja #
Aby uzyskać wsparcie techniczne i aktualizacje produktu SUSE Linux Enterprise Server, należy go zarejestrować i aktywować w Centrum obsługi klienta SUSE lub na lokalnym serwerze rejestracji. Zarejestrowanie produktu na tym etapie pozwala również uzyskać natychmiastowy dostęp do repozytorium aktualizacji. Umożliwia to instalowanie w systemie najnowszych dostępnych aktualizacji i poprawek.
Podczas rejestracji następuje załadowanie repozytoriów i zależności modułów z serwera rejestracji.
Aby zarejestrować się w Centrum obsługi klienta SUSE, wprowadź skojarzony z Twoim kontem w Centrum obsługi klienta SUSE i podaj systemu SUSE Linux Enterprise Server. Kliknij przycisk , aby kontynuować.
Jeśli organizacja zapewnia lokalny serwer rejestracji, można również przeprowadzić rejestrację na tym serwerze. Aktywuj opcję i wybierz adres URL z listy rozwijanej lub wpisz go ręcznie. Kliknij przycisk , aby kontynuować.
Jeśli pracujesz w trybie offline lub chcesz pominąć rejestrację, aktywuj opcję . Potwierdź ostrzeżenie, klikając przycisk i kontynuuj, klikając przycisk .
Ważne: Pomijanie rejestracjiAby było możliwe pobieranie aktualizacji i uzyskanie wsparcia, należy zarejestrować system i rozszerzenia. Pominięcie rejestracji jest możliwe tylko w przypadku instalowania z obrazu
SLE-15-SP5-Full-ARCH-GM-media1.iso.Jeśli rejestracja nie zostanie przeprowadzona podczas instalacji, można to zrobić później z poziomu uruchomionego systemu. W tym celu wybierz kolejno polecenia › lub narzędzie wiersza poleceń
SUSEConnect.
Po pomyślnym zarejestrowaniu systemu SUSE Linux Enterprise Server zostanie wyświetlone zapytanie o zainstalowanie najnowszych aktualizacji dostępnych online w trakcie instalacji. Wybranie opcji spowoduje zainstalowanie w systemie najnowszych pakietów, co zwalnia z konieczności zainstalowania tych aktualizacji po instalacji. Zaleca się włączenie tej opcji.
Domyślnie zapora sieciowa w systemie SUSE Linux Enterprise Server blokuje tylko połączenia przychodzące. Jeśli Twój system znajduje się za inną zaporą sieciową, która blokuje ruch wychodzący, upewnij się, że zezwalasz na połączenia z adresami https://scc.suse.com/ i https://updates.suse.com na portach 80 i 443, aby można było odbierać aktualizacje.
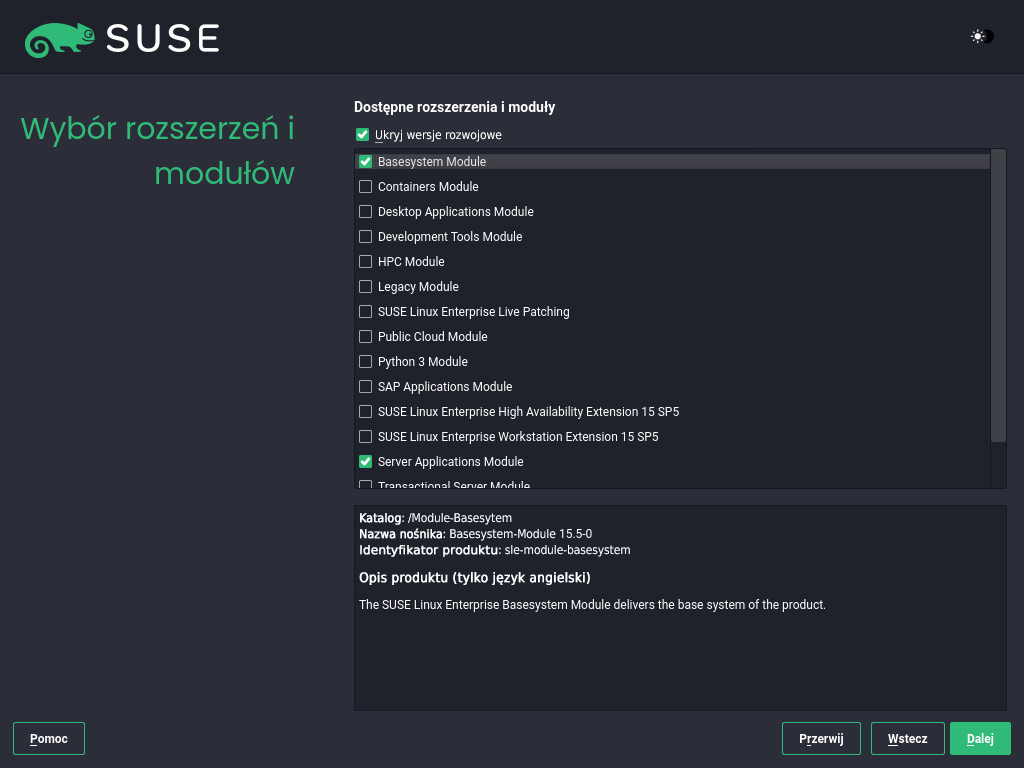
2.6 Wybór rozszerzeń i modułów #
Po pomyślnym zarejestrowaniu systemu instalator wyświetla listę modułów oraz rozszerzeń systemu SUSE Linux Enterprise Server. Moduły są komponentami umożliwiającymi dostosowanie produktu do własnych potrzeb. Są one częścią subskrypcji systemu SUSE Linux Enterprise Server. Rozszerzenia dodają funkcje do produktu. Należy je zakupić oddzielnie.
Dostępność niektórych modułów lub rozszerzeń zależy od produktu wybranego w pierwszym kroku instalacji. W celu uzyskania opisów modułów wraz z ich okresami użytkowania należy wybrać moduł, aby wyświetlić odpowiedni tekst. Więcej informacji zawiera dokument Modules and Extensions Quick Start.
Wybór modułów wpływa pośrednio na zakres instalacji, ponieważ definiuje, które źródła instalacji (repozytoria) są dostępne do zainstalowania oraz w uruchomionym systemie.
Dla systemu SUSE Linux Enterprise Server dostępne są następujące moduły i rozszerzenia:
- Moduł Basesystem
Ten moduł dodaje system podstawowy do ujednoliconego instalatora. Jest on wymagany przez pozostałe moduły i rozszerzenia. Zakres instalacji zawierającej jedynie system podstawowy jest porównywalny z wzorcem instalacji minimal system poprzednich wersji systemu SUSE Linux Enterprise Server. Ten moduł jest wybrany domyślnie do zainstalowania i nie należy usuwać jego zaznaczenia.
Zależności: brak
- Moduł Certifications
Zawiera pakiety certyfikacji FIPS 140-2.
Zależności: Basesystem
- Moduł Containers
Zawiera składniki obsługi i narzędzia dla kontenerów.
Zależności: Basesystem
- Moduł Desktop Applications
Dodaje do systemu graficzny interfejs użytkownika oraz istotne aplikacje komputerowe.
Zależności: Basesystem
- Moduł Development Tools
Zawiera kompilatory (w tym gcc) i biblioteki potrzebne do kompilowania i debugowania aplikacji. Zastępuje poprzedni pakiet rozwoju oprogramowania SDK (Software Development Kit).
Zależności: Basesystem, Desktop Applications
- Moduł Legacy
Ułatwia migrację aplikacji ze starszych wersji systemu SUSE Linux Enterprise Server oraz innych systemów do SLES 15 SP5, zapewniając pakiety, które zostały wycofane z wersji SUSE Linux Enterprise. Pakiety w tym module zostały wybrane na podstawie wymagań migracji oraz poziomu złożoności konfiguracji.
Ten moduł jest zalecany w przypadku migracji z poprzedniej wersji produktu.
Zależności: Basesystem, Server Applications
- Moduł NVIDIA Compute
Zawiera sterowniki NVIDIA CUDA (Compute Unified Device Architecture).
Oprogramowanie zawarte w tym module jest dostarczane przez firmę NVIDIA w ramach dokumentu CUDA End User License Agreement i nie jest wspierane przez SUSE.
Zależności: Basesystem
- Moduł Public Cloud
Zawiera wszystkie narzędzia wymagane do tworzenia obrazów na potrzeby wdrażania systemu SUSE Linux Enterprise Server w środowiskach chmury, takich jak Amazon Web Services (AWS), Microsoft Azure, Google Compute Platform czy OpenStack.
Zależności: Basesystem, Server Applications
- Moduł Python 3
Ten moduł zawiera najnowsze wersje wybranych pakietów Python 3.
Zależności: Basesystem
- Moduł Server Applications
Dodaje funkcje serwera, udostępniając usługi sieciowe, takie jak serwer DHCP, serwer nazw czy serwer sieci Web. Ten moduł jest domyślnie wybrany do zainstalowania. Nie zaleca się usuwania jego zaznaczenia.
Zależności: Basesystem
- Rozszerzenie SUSE Linux Enterprise High Availability
Dodaje obsługę klastrowania dla kluczowych konfiguracji systemu SUSE Linux Enterprise Server. To rozszerzenie wymaga osobnego klucza licencji.
Zależności: Basesystem, Server Applications
- SUSE Linux Enterprise Live Patching
Dodaje obsługę stosowania kluczowych poprawek bez konieczności zamykania systemu. To rozszerzenie wymaga osobnego klucza licencji.
Zależności: Basesystem, Server Applications
- Rozszerzenie SUSE Linux Enterprise Workstation
Rozszerza funkcjonalność systemu SUSE Linux Enterprise Server o pakiety z systemu SUSE Linux Enterprise Desktop, takie jak dodatkowe aplikacje komputerowe (pakiet biurowy, klient poczty e-mail, edytor graficzny itp.) czy biblioteki. Umożliwia zespolenie obydwu produktów w celu uzyskania w pełni funkcjonalnej stacji roboczej. To rozszerzenie wymaga osobnego klucza licencji.
Zależności: Basesystem, Desktop Applications
- SUSE Package Hub
Zapewnia dostęp do pakietów systemu SUSE Linux Enterprise Server zarządzanych przez społeczność openSUSE. Pakiety te są dostarczane bez wsparcia 3. stopnia i nie zakłócają możliwości wsparcia systemu SUSE Linux Enterprise Server. Więcej informacji na ten temat: https://packagehub.suse.com/.
Zależności: Basesystem
- Moduł Transactional Server
Dodaje obsługę aktualizacji transakcyjnych. Aktualizacje są instalowane w systemie razem w pojedynczej transakcji lub wcale. Odbywa się to bez wpływu na działający system. Jeśli aktualizacja nie powiedzie się lub pomyślna aktualizacja zostanie uznana za niezgodną lub w inny sposób nieprawidłową, można ją odrzucić w celu natychmiastowego przywrócenia systemu do poprzedniego stanu działania.
Zależności: Basesystem
- Moduł Web and Scripting
Zawiera pakiety przeznaczone dla uruchomionego serwera sieci Web.
Zależności: Basesystem, Server Applications
Niektóre moduły są zależne od instalacji pozostałych modułów. Dlatego podczas wybierania określonych modułów pozostałe mogą zostać wybrane automatycznie ze względu na zależności.
W zależności od produktu serwer rejestracji może oznaczać niektóre moduły i rozszerzenia jako zalecane. Zalecane moduły i rozszerzenia są wstępnie zaznaczone do rejestracji i instalacji. Aby uniknąć instalacji tych zalecanych składników, należy usunąć ręcznie ich zaznaczenie.
Wybierz moduły i rozszerzenia do zainstalowania i kontynuuj, klikając przycisk . W przypadku zaznaczenia co najmniej jednego rozszerzenia zostanie wyświetlony monit o podanie odpowiednich kodów rejestracyjnych. W zależności od wyboru może okazać się konieczne zaakceptowanie dodatkowych umów licencyjnych.
Podczas instalacji w trybie offline przy użyciu pliku SLE-15-SP5-Full-ARCH-GM-media1.iso domyślnie wybrany jest tylko . Aby zainstalować pełny zestaw pakietów domyślnych systemu SUSE Linux Enterprise Server, wybierz dodatkowo .
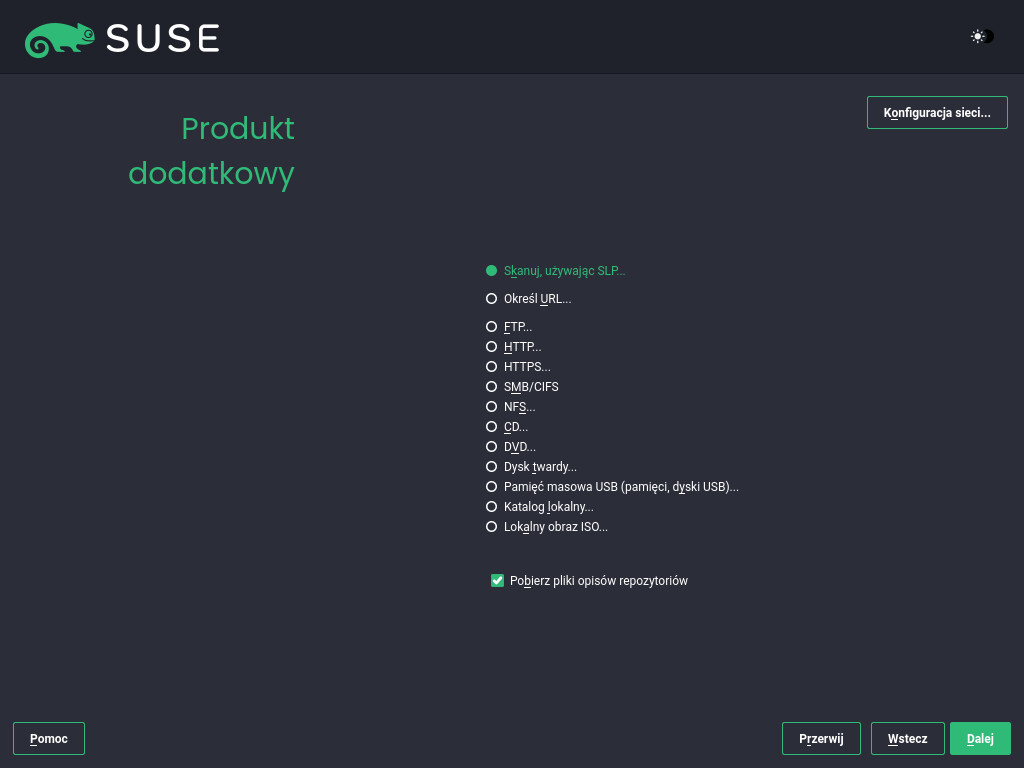
2.7 Produkt dodatkowy #
Okno dialogowe umożliwia dodawanie innych źródeł oprogramowania (tak zwanych „repozytoriów”) do systemu SUSE Linux Enterprise Server. Nie są one dostępne w Centrum obsługi klienta SUSE. Wśród nich można znaleźć produkty i sterowniki lub dodatkowe oprogramowanie innych firm przeznaczone dla danego systemu.
W oknie dialogowym można również dodać repozytoria aktualizacji sterowników. Aktualizacje sterowników dla systemu SUSE Linux Enterprise są dostępne pod adresem http://drivers.suse.com/. Te sterowniki zostały utworzone w ramach programu SUSE SolidDriver.
Jeśli chcesz pominąć ten krok, wybierz opcję . W przeciwnym razie wybierz opcję . Określ typ nośnika, ścieżkę lokalną lub zasób sieciowy zawierający repozytorium i postępuj zgodnie z instrukcjami wyświetlanymi na ekranie.
Zaznacz pole wyboru , aby od razu pobrać pliki opisujące repozytorium. Jeśli ta opcja nie zostanie wybrana, pliki zostaną pobrane po rozpoczęciu instalacji. Wybierz opcję i włóż nośnik, jeśli jest to wymagane. W zależności od zawartości produktu może okazać się konieczne zaakceptowanie dodatkowych umów licencyjnych. Kliknij przycisk , aby kontynuować. W przypadku wybrania produktu dodatkowego wymagającego klucza rejestracyjnego przed przejściem do następnego kroku zostanie wyświetlone żądanie jego wprowadzenia.
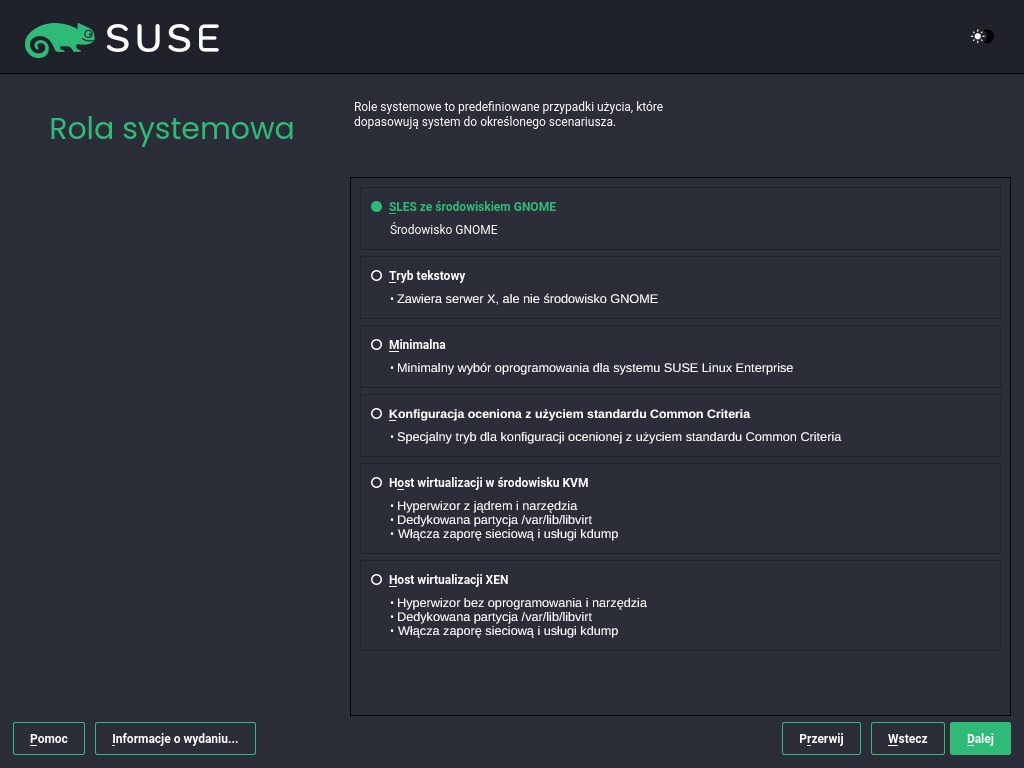
2.8 Rola systemowa #
Dostępność ról systemowych zależy od wyboru modułów i rozszerzeń. Przykładowo role systemowe ustawiają wzorce oprogramowania, które zostaną wstępnie wybrane do instalacji. Aby dokonać odpowiedniego wyboru, zapoznaj się z opisem na ekranie. Wybierz rolę i kontynuuj, klikając przycisk . Jeśli do określonego produktu podstawowego pasuje tylko jedna rola z włączonych modułów lub nie pasuje żadna z ról, okno dialogowe zostaje pominięte.
Począwszy od tego momentu, można wyświetlić informacje o wydaniu na dowolnym ekranie w trakcie procesu instalacyjnego, wybierając opcję .
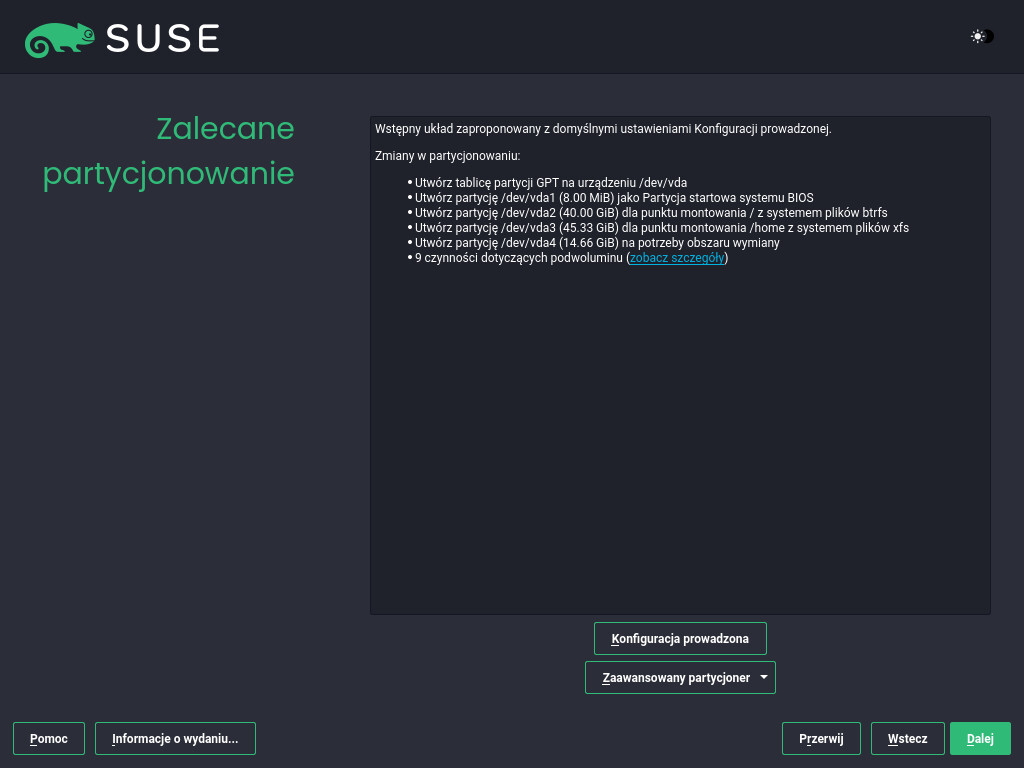
2.9 Zalecane partycjonowanie #
Zapoznaj się z układem partycji proponowanym przez system. W razie konieczności możesz go zmienić. Dostępne są następujące opcje:
Uruchamia kreatora umożliwiającego uszczegółowienie propozycji partycjonowania. Opcje dostępne na tym ekranie zależą od konfiguracji systemu. Jeśli zawiera on więcej niż jeden dysk twardy, można wybrać, które dyski mają być używane oraz na którym dysku ma znajdować się partycja główna. Jeśli dyski zawierają już partycje, można zdecydować o ich usunięciu lub zmianie rozmiaru.
W kolejnych krokach można także dodać obsługę LVM oraz szyfrowania dysku. Można zmienić system plików partycji głównej oraz zdecydować o ewentualnym oddzieleniu partycji home.
Otwiera okno dialogowe — opis zobacz Section 10.1, “Using the ”. Zapewnia to pełną kontrolę nad konfiguracją partycji i umożliwia utworzenie własnej konfiguracji. Opcja ta jest przeznaczona dla ekspertów.
Należy pamiętać, że na potrzeby partycjonowania miejsce na dysku jest mierzone w jednostkach binarnych, a nie dziesiętnych. Na przykład zarówno 1GB, 1GiB, jak i 1G oznaczają 1 GiB (gibibajt), nie 1 GB (gigabajt).
- Binarny
1 GiB = 1 073 741 824 bajtów.
- Zapis dziesiętny
1 GB = 1 000 000 000 bajtów.
- Różnica
1 GiB ≈ 1,07 GB.
Aby zaakceptować proponowaną konfigurację bez żadnych zmian, wybierz opcję .
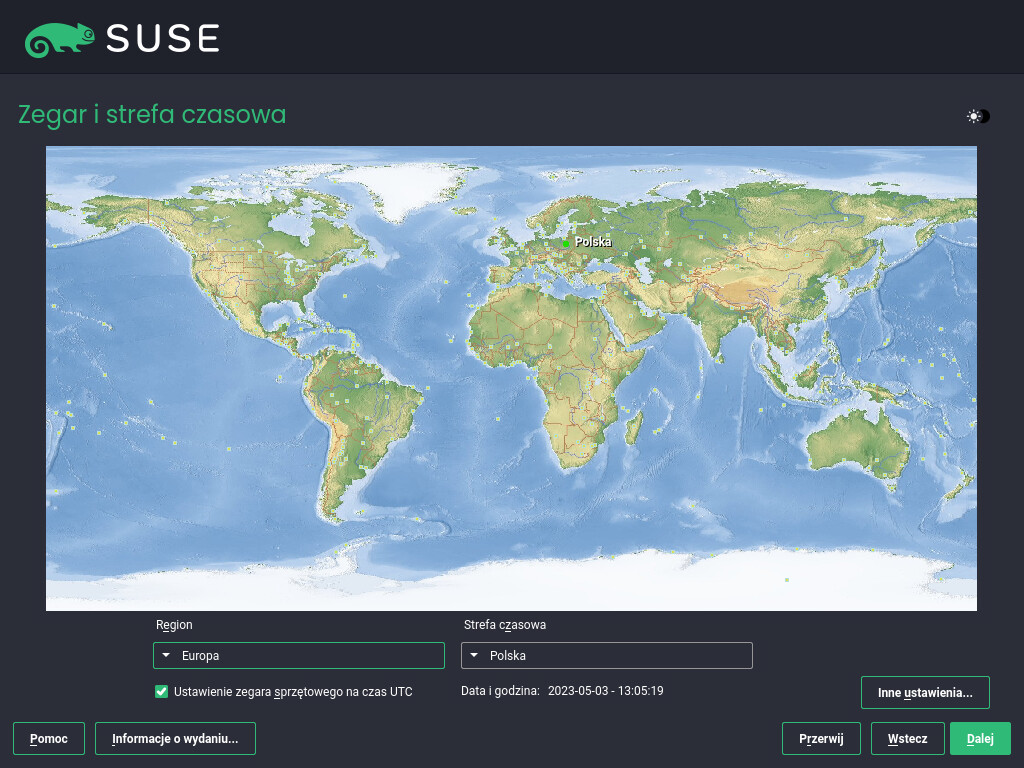
2.10 Zegar i strefa czasowa #
Wybierz strefę czasową używaną dla danego komputera. Aby ręcznie ustawić godzinę lub skonfigurować serwer NTP w celu zsynchronizowania czasu, wybierz opcję . Szczegółowe informacje zawiera Section 8.12, “Clock and time zone”. Kliknij przycisk , aby kontynuować.
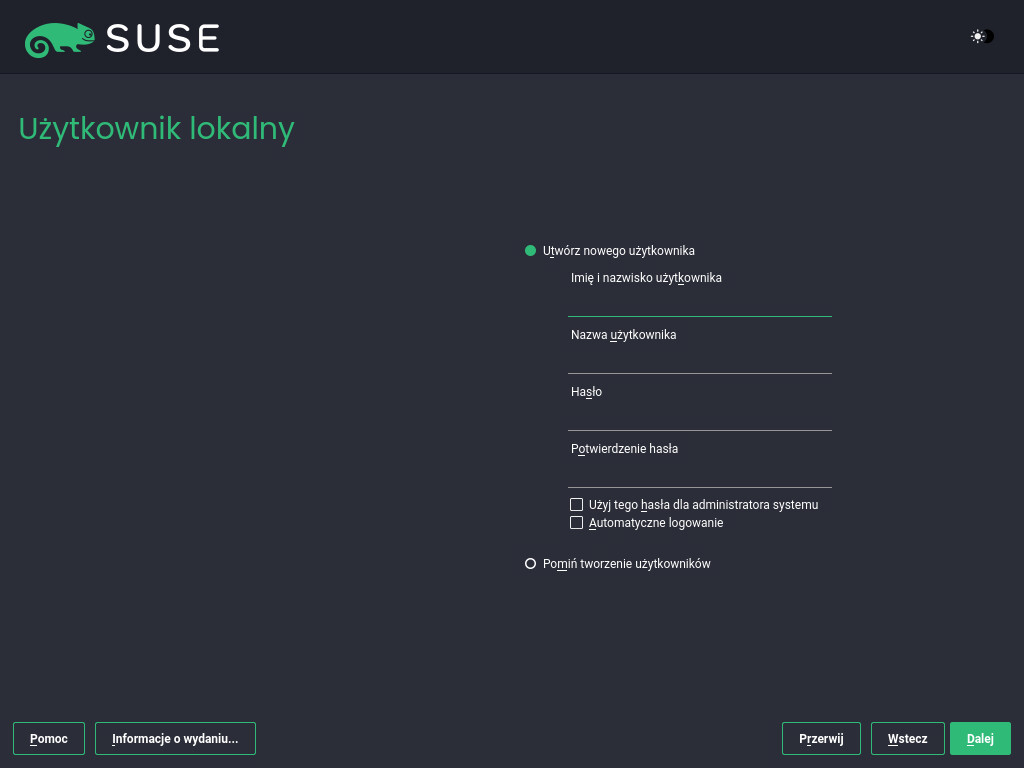
2.11 Użytkownik lokalny #
Aby utworzyć użytkownika lokalnego, wpisz jego imię i nazwisko w polu , login w polu oraz hasło w polu .
Hasło powinno mieć co najmniej osiem znaków i powinno zawierać małe i duże litery oraz cyfry. Maksymalna długość hasła to 72 znaki. Hasła zapisywane są z rozróżnieniem małych i wielkich liter.
Ze względów bezpieczeństwa zdecydowanie zaleca się nie włączać opcji . Również nie , ale wybrać inne hasło dla użytkownika root w następnym kroku instalacji.
Jeśli instalacja jest przeprowadzana w systemie, w którym znaleziono poprzednią instalację systemu Linux, można użyć opcji . Kliknij opcję , aby sprawdzić listę dostępnych kont użytkowników. Wybierz co najmniej jednego użytkownika.
W środowiskach z centralnym zarządzaniem użytkownikami (na przykład NIS lub LDAP) można pominąć proces tworzenia użytkowników lokalnych. W takim przypadku wybierz opcję .
Kliknij przycisk , aby kontynuować.
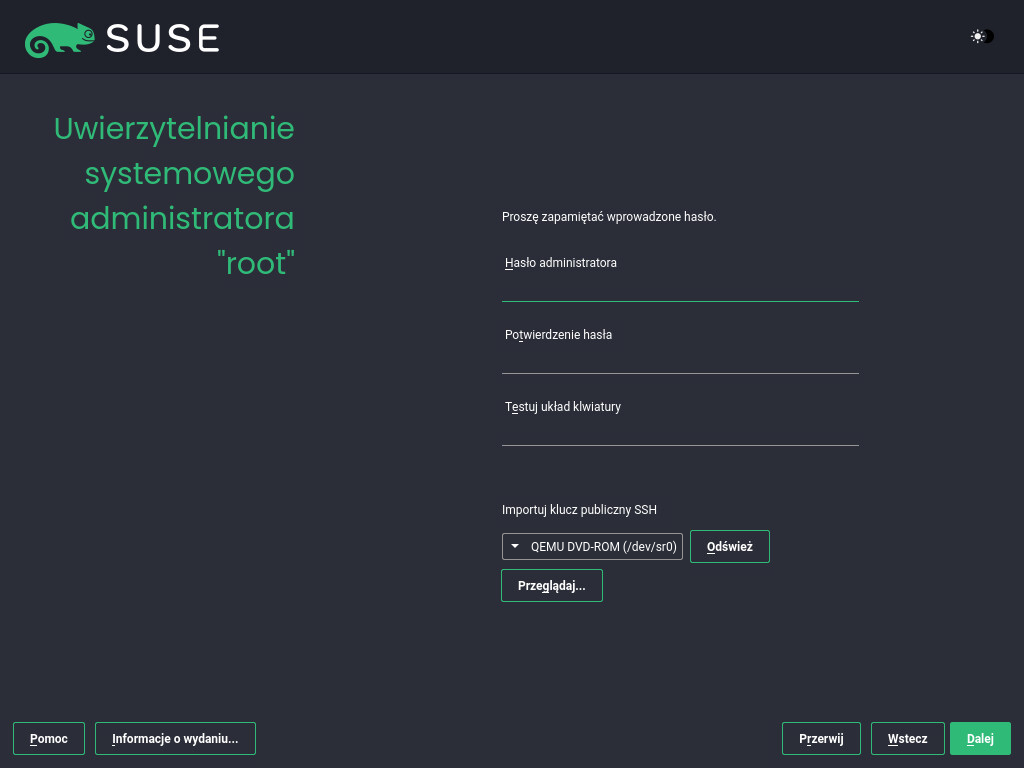
2.12 Uwierzytelnianie administratora systemu — użytkownik „root” #
Wpisz hasło administratora systemu (nazywanego użytkownikiem root) lub podaj klucz publiczny SSH. W razie potrzeby można użyć obu poświadczeń.
Ponieważ użytkownik root ma szerokie uprawnienia, hasło powinno być przemyślane. Hasła użytkownika root nie wolno zapomnieć! Po jego wprowadzeniu tutaj nie może być odzyskane.
Zaleca się używanie wyłącznie znaków US ASCII. W przypadku błędu systemowego lub konieczności uruchomienia systemu w trybie awaryjnym klawiatura może nie być zlokalizowana.
Aby umożliwić dostęp zdalny do systemu za pomocą szyfrowania SSH i klucza publicznego, zaimportuj klucz z nośnika wymiennego lub istniejącej partycji. Więcej informacji na ten temat zawiera Section 8.14, “Authentication for the system administrator root”.
Kliknij przycisk .
2.13 Ustawienia instalacji #
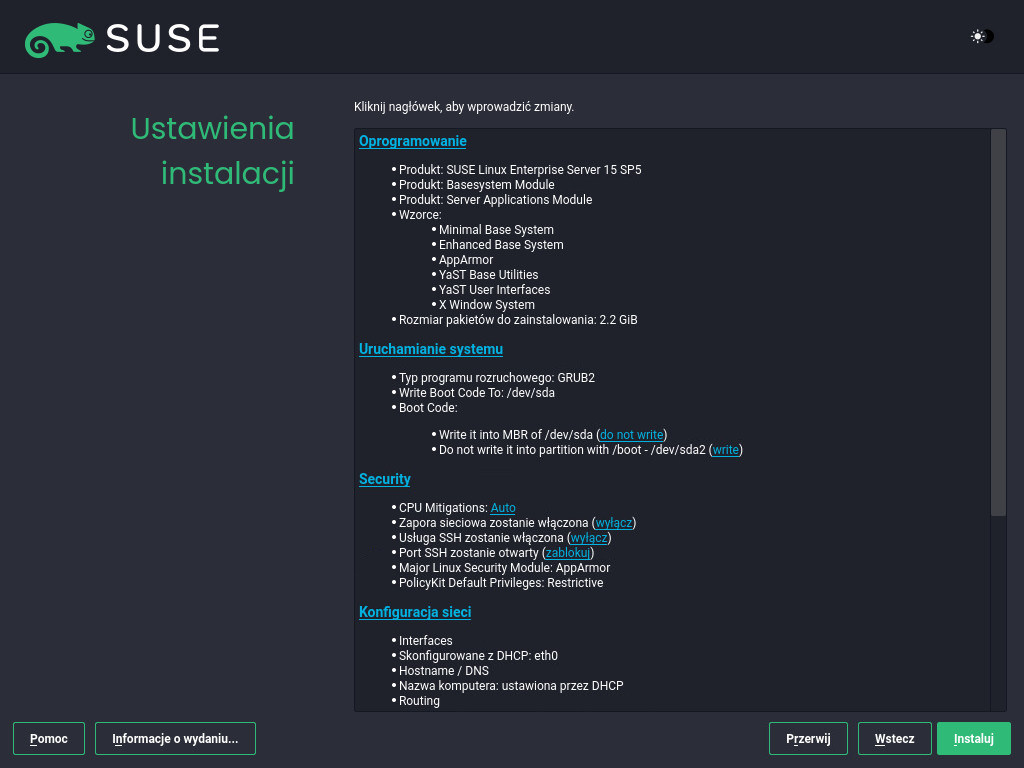
Użyj ekranu , aby przejrzeć i w razie konieczności zmienić proponowane ustawienia instalacji. Dla każdego ustawienia przedstawiona jest aktualna konfiguracja. Aby zmienić ustawienie, kliknij jego nagłówek. Niektóre ustawienia, takie jak zapora sieciowa czy protokół SSH, mogą zostać bezpośrednio zmienione przez kliknięcie odpowiednich łączy.
Dokonane tutaj zmiany mogą być również wprowadzone później w dowolnie wybranym momencie, z już zainstalowanego systemu. Jeśli jednak potrzebujesz dostępu zdalnego zaraz po instalacji, może być konieczne otwarcie portu SSH w ustawieniach w obszarze .
Zakres instalacji jest definiowany przez moduły i rozszerzenia wybrane na potrzeby tej instalacji. W zależności od dokonanego wyboru, do instalacji mogą nie być jednak wybrane wszystkie pakiety dostępne w module.
Kliknięcie opcji powoduje otwarcie ekranu , na którym można zmienić wybrane oprogramowanie, zaznaczając poszczególne wzorce lub usuwając ich zaznaczenie. Każdy wzorzec zawiera pewną liczbę pakietów niezbędnych do wykonania żądanych funkcji (na przykład ). Bardziej szczegółowy wybór oparty na instalowanych pakietach oprogramowania można przeprowadzić po wybraniu opcji powodującej przejście do programu YaST. Więcej informacji na ten temat zawiera Chapter 8, Installing or removing software.
Niniejsza sekcja zawiera opis konfiguracji programu rozruchowego. Zmiana domyślnych ustawień jest zalecana wyłącznie w przypadku uzasadnionej potrzeby. Szczegółowe informacje zawiera Chapter 18, The boot loader GRUB 2.
oznaczają parametry wiersza poleceń używane podczas uruchamiania jądra w odniesieniu do ograniczeń programowych, które zostały zastosowane w celu uniknięcia ataków typu side-channel na procesor. Kliknij zaznaczony wpis, aby wybrać inną opcję. Aby uzyskać więcej informacji, zobacz .
jest domyślnie włączona we wszystkich skonfigurowanych interfejsach sieciowych. Aby całkowicie wyłączyć funkcję
firewalld, kliknij opcję (niezalecane). Szczegółowe informacje o konfiguracji można znaleźć w dokumencie Chapter 23, Masquerading and firewalls.Uwaga: Ustawienia zapory sieciowej dotyczące odbierania aktualizacjiDomyślnie zapora sieciowa w systemie SUSE Linux Enterprise Server blokuje tylko połączenia przychodzące. Jeśli Twój system znajduje się za inną zaporą sieciową, która blokuje ruch wychodzący, upewnij się, że zezwalasz na połączenia z adresami
https://scc.suse.com/ihttps://updates.suse.comna portach 80 i 443, aby można było odbierać aktualizacje.jest domyślnie włączona, ale jej port (22) jest zamknięty w zaporze sieciowej. Kliknij opcję , aby otworzyć port, lub , aby wyłączyć usługę. Pamiętaj, że po wyłączeniu usługi SSH logowanie zdalne nie będzie możliwe. Więcej informacji podano w Chapter 22, Securing network operations with OpenSSH.
Domyślnym modułem jest . Aby go wyłączyć, wybierz jako nazwę modułu w ustawieniach .
Kliknij, aby zasadę zabezpieczeń
Defense Information Systems Agency STIG. Jeśli którekolwiek z ustawień instalacji są niezgodne z zasadą, zostanie wyświetlony monit o ich odpowiednie zmodyfikowanie. Niektóre ustawienia mogą zostać zmienione automatycznie, inne wymagają interwencji użytkownika.Włączenie profilu zabezpieczeń pociąga za sobą pełną korekcję za pomocą protokołu SCAP po pierwszym uruchomieniu. Można również przeprowadzić lub i później ręcznie skorygować system za pomocą narzędzia OpenSCAP. Więcej informacji na ten temat zawiera Section 8.15.4, “”.
Wyświetla bieżącą konfigurację sieci. Kliknij opcję , aby zmienić ustawienia. Aby uzyskać więcej informacji, zobacz Section 23.4, “Configuring a network connection with YaST”.
Program Kdump zapisuje obraz pamięci („zrzut pamięci”) w systemie plików w przypadku awarii jądra. Umożliwia to późniejsze zbadanie przyczyny awarii poprzez debugowanie pliku ze zrzutem. Program Kdump jest wstępnie skonfigurowany i domyślnie włączony. Więcej informacji na ten temat zawiera Section 19.7, “Basic Kdump configuration”.
Jeśli zainstalowano moduł Desktop Applications, system jest uruchamiany jako , sieciowy, wielodostępny i z obsługą menedżera wyświetlania. Przełącz do konfiguracji (dla wielu użytkowników), jeśli nie chcesz się logować przy użyciu menedżera wyświetlania.
Aby wyświetlić szczegółowe informacje o sprzęcie, kliknij opcję . Na wyświetlonym ekranie można również zmienić opcję — więcej informacji zawiera Section 8.15.10, “”.
2.14 Rozpoczęcie instalacji #
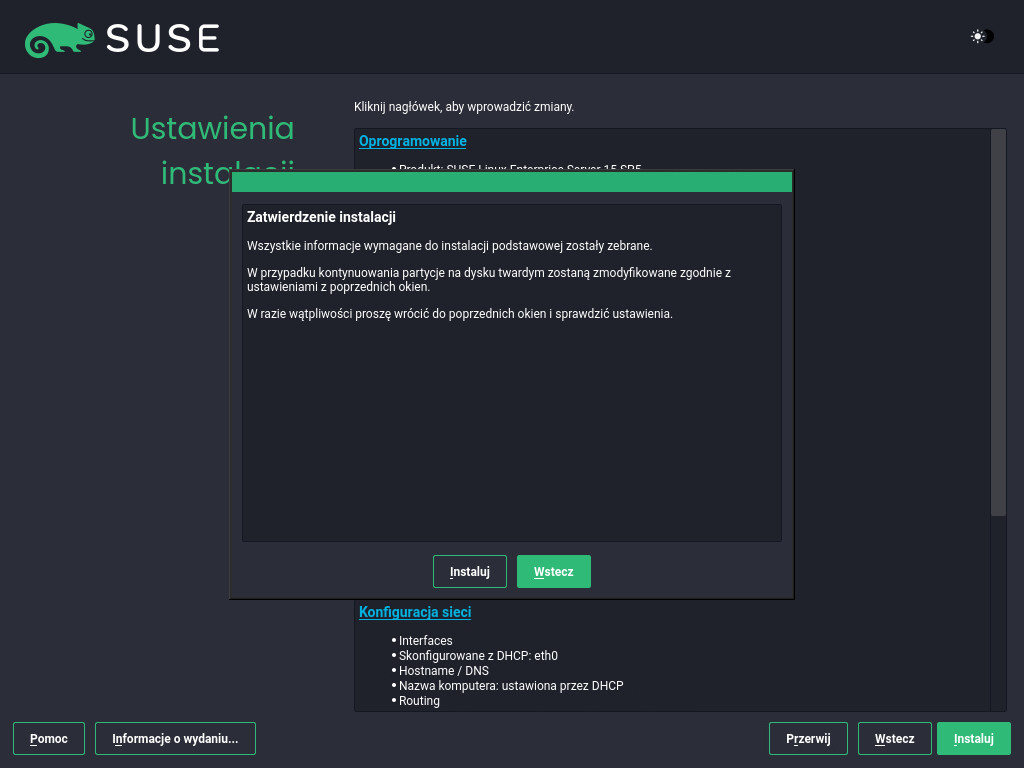
Po zakończeniu konfiguracji systemu na ekranie kliknij opcję . W zależności od wybranego oprogramowania może okazać się konieczne wyrażenie zgody na umowy licencyjne przed pojawieniem się ekranu z potwierdzeniem instalacji. Aż do tego momentu w systemie nie wprowadzono żadnych zmian. Proces instalacji rozpoczyna się po kliknięciu po raz drugi opcji .
2.15 Proces instalacji #
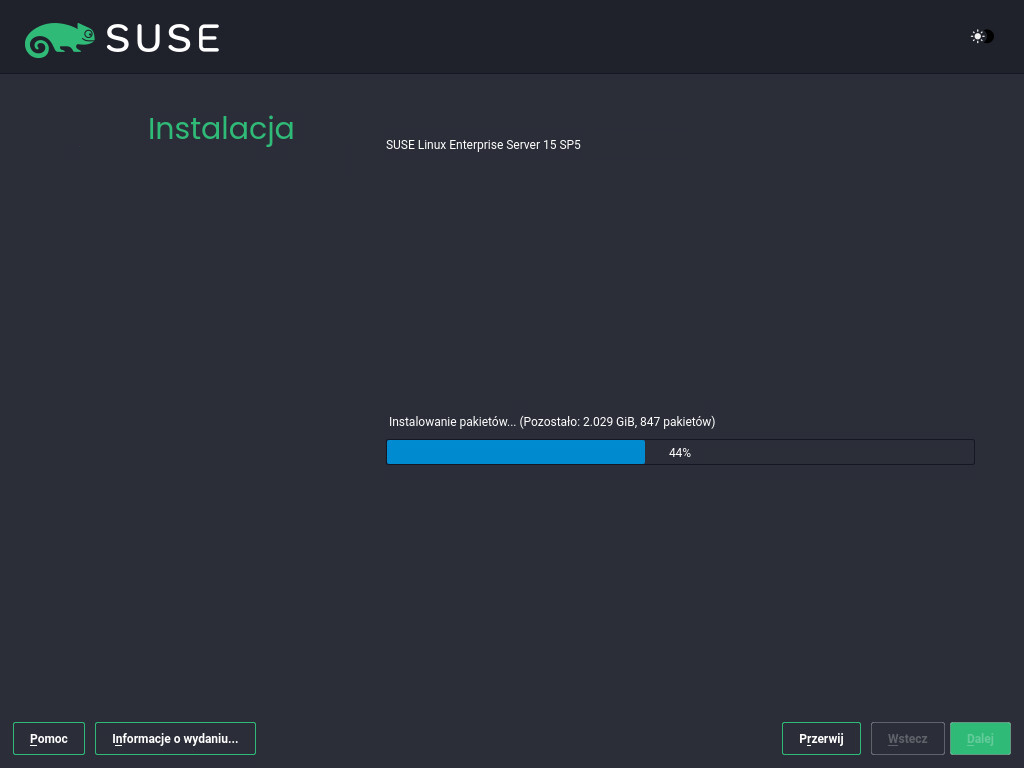
Podczas instalacji wyświetlany jest jej postęp. Po zakończeniu procedury instalacji komputer uruchamia się już w nowym, zainstalowanym systemie.
3 Informacje prawne #
Copyright© 2006–2023 SUSE LLC i współautorzy. Wszelkie prawa zastrzeżone.
Kopiowanie, rozpowszechnianie i/lub modyfikowanie tego dokumentu jest dozwolone zgodnie z warunkami licencji GNU Free Documentation License w wersji 1.2 lub (zgodnie z wyborem użytkownika) w wersji 1.3, przy czym niniejsze informacje o prawach autorskich i licencji są sekcją niezmienną. Kopia licencji w wersji 1.2 znajduje się w sekcji zatytułowanej „GNU Free Documentation License”.
Znaki towarowe firmy SUSE, patrz https://www.suse.com/company/legal/. Wszystkie inne znaki towarowe są własnością odpowiednich firm. Symbole znaków towarowych (®, ™ itp.) oznaczają znaki towarowe firmy SUSE i jej podmiotów stowarzyszonych. Gwiazdki (*) oznaczają znaki towarowe osób trzecich.
Wszelkie informacje w niniejszym dokumencie zostały zebrane z najwyższą dbałością o szczegóły. Jednakże nie gwarantuje to pełnej dokładności. Firma SUSE LLC, jej podmioty stowarzyszone, autorzy ani tłumacze nie ponoszą odpowiedzialności za ewentualne błędy i ich konsekwencje.
4 GNU Free Documentation License #
Copyright (C) 2000, 2001, 2002 Free Software Foundation, Inc. 51 Franklin St, Fifth Floor, Boston, MA 02110-1301 USA. Everyone is permitted to copy and distribute verbatim copies of this license document, but changing it is not allowed.
0. PREAMBLE #
The purpose of this License is to make a manual, textbook, or other functional and useful document "free" in the sense of freedom: to assure everyone the effective freedom to copy and redistribute it, with or without modifying it, either commercially or non-commercially. Secondarily, this License preserves for the author and publisher a way to get credit for their work, while not being considered responsible for modifications made by others.
This License is a kind of "copyleft", which means that derivative works of the document must themselves be free in the same sense. It complements the GNU General Public License, which is a copyleft license designed for free software.
We have designed this License to use it for manuals for free software, because free software needs free documentation: a free program should come with manuals providing the same freedoms that the software does. But this License is not limited to software manuals; it can be used for any textual work, regardless of subject matter or whether it is published as a printed book. We recommend this License principally for works whose purpose is instruction or reference.
1. APPLICABILITY AND DEFINITIONS #
This License applies to any manual or other work, in any medium, that contains a notice placed by the copyright holder saying it can be distributed under the terms of this License. Such a notice grants a world-wide, royalty-free license, unlimited in duration, to use that work under the conditions stated herein. The "Document", below, refers to any such manual or work. Any member of the public is a licensee, and is addressed as "you". You accept the license if you copy, modify or distribute the work in a way requiring permission under copyright law.
A "Modified Version" of the Document means any work containing the Document or a portion of it, either copied verbatim, or with modifications and/or translated into another language.
A "Secondary Section" is a named appendix or a front-matter section of the Document that deals exclusively with the relationship of the publishers or authors of the Document to the Document's overall subject (or to related matters) and contains nothing that could fall directly within that overall subject. (Thus, if the Document is in part a textbook of mathematics, a Secondary Section may not explain any mathematics.) The relationship could be a matter of historical connection with the subject or with related matters, or of legal, commercial, philosophical, ethical or political position regarding them.
The "Invariant Sections" are certain Secondary Sections whose titles are designated, as being those of Invariant Sections, in the notice that says that the Document is released under this License. If a section does not fit the above definition of Secondary then it is not allowed to be designated as Invariant. The Document may contain zero Invariant Sections. If the Document does not identify any Invariant Sections then there are none.
The "Cover Texts" are certain short passages of text that are listed, as Front-Cover Texts or Back-Cover Texts, in the notice that says that the Document is released under this License. A Front-Cover Text may be at most 5 words, and a Back-Cover Text may be at most 25 words.
A "Transparent" copy of the Document means a machine-readable copy, represented in a format whose specification is available to the general public, that is suitable for revising the document straightforwardly with generic text editors or (for images composed of pixels) generic paint programs or (for drawings) some widely available drawing editor, and that is suitable for input to text formatters or for automatic translation to a variety of formats suitable for input to text formatters. A copy made in an otherwise Transparent file format whose markup, or absence of markup, has been arranged to thwart or discourage subsequent modification by readers is not Transparent. An image format is not Transparent if used for any substantial amount of text. A copy that is not "Transparent" is called "Opaque".
Examples of suitable formats for Transparent copies include plain ASCII without markup, Texinfo input format, LaTeX input format, SGML or XML using a publicly available DTD, and standard-conforming simple HTML, PostScript or PDF designed for human modification. Examples of transparent image formats include PNG, XCF and JPG. Opaque formats include proprietary formats that can be read and edited only by proprietary word processors, SGML or XML for which the DTD and/or processing tools are not generally available, and the machine-generated HTML, PostScript or PDF produced by some word processors for output purposes only.
The "Title Page" means, for a printed book, the title page itself, plus such following pages as are needed to hold, legibly, the material this License requires to appear in the title page. For works in formats which do not have any title page as such, "Title Page" means the text near the most prominent appearance of the work's title, preceding the beginning of the body of the text.
A section "Entitled XYZ" means a named subunit of the Document whose title either is precisely XYZ or contains XYZ in parentheses following text that translates XYZ in another language. (Here XYZ stands for a specific section name mentioned below, such as "Acknowledgements", "Dedications", "Endorsements", or "History".) To "Preserve the Title" of such a section when you modify the Document means that it remains a section "Entitled XYZ" according to this definition.
The Document may include Warranty Disclaimers next to the notice which states that this License applies to the Document. These Warranty Disclaimers are considered to be included by reference in this License, but only as regards disclaiming warranties: any other implication that these Warranty Disclaimers may have is void and has no effect on the meaning of this License.
2. VERBATIM COPYING #
You may copy and distribute the Document in any medium, either commercially or non-commercially, provided that this License, the copyright notices, and the license notice saying this License applies to the Document are reproduced in all copies, and that you add no other conditions whatsoever to those of this License. You may not use technical measures to obstruct or control the reading or further copying of the copies you make or distribute. However, you may accept compensation in exchange for copies. If you distribute a large enough number of copies you must also follow the conditions in section 3.
You may also lend copies, under the same conditions stated above, and you may publicly display copies.
3. COPYING IN QUANTITY #
If you publish printed copies (or copies in media that commonly have printed covers) of the Document, numbering more than 100, and the Document's license notice requires Cover Texts, you must enclose the copies in covers that carry, clearly and legibly, all these Cover Texts: Front-Cover Texts on the front cover, and Back-Cover Texts on the back cover. Both covers must also clearly and legibly identify you as the publisher of these copies. The front cover must present the full title with all words of the title equally prominent and visible. You may add other material on the covers in addition. Copying with changes limited to the covers, as long as they preserve the title of the Document and satisfy these conditions, can be treated as verbatim copying in other respects.
If the required texts for either cover are too voluminous to fit legibly, you should put the first ones listed (as many as fit reasonably) on the actual cover, and continue the rest onto adjacent pages.
If you publish or distribute Opaque copies of the Document numbering more than 100, you must either include a machine-readable Transparent copy along with each Opaque copy, or state in or with each Opaque copy a computer-network location from which the general network-using public has access to download using public-standard network protocols a complete Transparent copy of the Document, free of added material. If you use the latter option, you must take reasonably prudent steps, when you begin distribution of Opaque copies in quantity, to ensure that this Transparent copy will remain thus accessible at the stated location until at least one year after the last time you distribute an Opaque copy (directly or through your agents or retailers) of that edition to the public.
It is requested, but not required, that you contact the authors of the Document well before redistributing any large number of copies, to give them a chance to provide you with an updated version of the Document.
4. MODIFICATIONS #
You may copy and distribute a Modified Version of the Document under the conditions of sections 2 and 3 above, provided that you release the Modified Version under precisely this License, with the Modified Version filling the role of the Document, thus licensing distribution and modification of the Modified Version to whoever possesses a copy of it. In addition, you must do these things in the Modified Version:
Use in the Title Page (and on the covers, if any) a title distinct from that of the Document, and from those of previous versions (which should, if there were any, be listed in the History section of the Document). You may use the same title as a previous version if the original publisher of that version gives permission.
List on the Title Page, as authors, one or more persons or entities responsible for authorship of the modifications in the Modified Version, together with at least five of the principal authors of the Document (all of its principal authors, if it has fewer than five), unless they release you from this requirement.
State on the Title page the name of the publisher of the Modified Version, as the publisher.
Preserve all the copyright notices of the Document.
Add an appropriate copyright notice for your modifications adjacent to the other copyright notices.
Include, immediately after the copyright notices, a license notice giving the public permission to use the Modified Version under the terms of this License, in the form shown in the Addendum below.
Preserve in that license notice the full lists of Invariant Sections and required Cover Texts given in the Document's license notice.
Include an unaltered copy of this License.
Preserve the section Entitled "History", Preserve its Title, and add to it an item stating at least the title, year, new authors, and publisher of the Modified Version as given on the Title Page. If there is no section Entitled "History" in the Document, create one stating the title, year, authors, and publisher of the Document as given on its Title Page, then add an item describing the Modified Version as stated in the previous sentence.
Preserve the network location, if any, given in the Document for public access to a Transparent copy of the Document, and likewise the network locations given in the Document for previous versions it was based on. These may be placed in the "History" section. You may omit a network location for a work that was published at least four years before the Document itself, or if the original publisher of the version it refers to gives permission.
For any section Entitled "Acknowledgements" or "Dedications", Preserve the Title of the section, and preserve in the section all the substance and tone of each of the contributor acknowledgements and/or dedications given therein.
Preserve all the Invariant Sections of the Document, unaltered in their text and in their titles. Section numbers or the equivalent are not considered part of the section titles.
Delete any section Entitled "Endorsements". Such a section may not be included in the Modified Version.
Do not retitle any existing section to be Entitled "Endorsements" or to conflict in title with any Invariant Section.
Preserve any Warranty Disclaimers.
If the Modified Version includes new front-matter sections or appendices that qualify as Secondary Sections and contain no material copied from the Document, you may at your option designate some or all of these sections as invariant. To do this, add their titles to the list of Invariant Sections in the Modified Version's license notice. These titles must be distinct from any other section titles.
You may add a section Entitled "Endorsements", provided it contains nothing but endorsements of your Modified Version by various parties--for example, statements of peer review or that the text has been approved by an organization as the authoritative definition of a standard.
You may add a passage of up to five words as a Front-Cover Text, and a passage of up to 25 words as a Back-Cover Text, to the end of the list of Cover Texts in the Modified Version. Only one passage of Front-Cover Text and one of Back-Cover Text may be added by (or through arrangements made by) any one entity. If the Document already includes a cover text for the same cover, previously added by you or by arrangement made by the same entity you are acting on behalf of, you may not add another; but you may replace the old one, on explicit permission from the previous publisher that added the old one.
The author(s) and publisher(s) of the Document do not by this License give permission to use their names for publicity for or to assert or imply endorsement of any Modified Version.
5. COMBINING DOCUMENTS #
You may combine the Document with other documents released under this License, under the terms defined in section 4 above for modified versions, provided that you include in the combination all of the Invariant Sections of all of the original documents, unmodified, and list them all as Invariant Sections of your combined work in its license notice, and that you preserve all their Warranty Disclaimers.
The combined work need only contain one copy of this License, and multiple identical Invariant Sections may be replaced with a single copy. If there are multiple Invariant Sections with the same name but different contents, make the title of each such section unique by adding at the end of it, in parentheses, the name of the original author or publisher of that section if known, or else a unique number. Make the same adjustment to the section titles in the list of Invariant Sections in the license notice of the combined work.
In the combination, you must combine any sections Entitled "History" in the various original documents, forming one section Entitled "History"; likewise combine any sections Entitled "Acknowledgements", and any sections Entitled "Dedications". You must delete all sections Entitled "Endorsements".
6. COLLECTIONS OF DOCUMENTS #
You may make a collection consisting of the Document and other documents released under this License, and replace the individual copies of this License in the various documents with a single copy that is included in the collection, provided that you follow the rules of this License for verbatim copying of each of the documents in all other respects.
You may extract a single document from such a collection, and distribute it individually under this License, provided you insert a copy of this License into the extracted document, and follow this License in all other respects regarding verbatim copying of that document.
7. AGGREGATION WITH INDEPENDENT WORKS #
A compilation of the Document or its derivatives with other separate and independent documents or works, in or on a volume of a storage or distribution medium, is called an "aggregate" if the copyright resulting from the compilation is not used to limit the legal rights of the compilation's users beyond what the individual works permit. When the Document is included in an aggregate, this License does not apply to the other works in the aggregate which are not themselves derivative works of the Document.
If the Cover Text requirement of section 3 is applicable to these copies of the Document, then if the Document is less than one half of the entire aggregate, the Document's Cover Texts may be placed on covers that bracket the Document within the aggregate, or the electronic equivalent of covers if the Document is in electronic form. Otherwise they must appear on printed covers that bracket the whole aggregate.
8. TRANSLATION #
Translation is considered a kind of modification, so you may distribute translations of the Document under the terms of section 4. Replacing Invariant Sections with translations requires special permission from their copyright holders, but you may include translations of some or all Invariant Sections in addition to the original versions of these Invariant Sections. You may include a translation of this License, and all the license notices in the Document, and any Warranty Disclaimers, provided that you also include the original English version of this License and the original versions of those notices and disclaimers. In case of a disagreement between the translation and the original version of this License or a notice or disclaimer, the original version will prevail.
If a section in the Document is Entitled "Acknowledgements", "Dedications", or "History", the requirement (section 4) to Preserve its Title (section 1) will typically require changing the actual title.
9. TERMINATION #
You may not copy, modify, sublicense, or distribute the Document except as expressly provided for under this License. Any other attempt to copy, modify, sublicense or distribute the Document is void, and will automatically terminate your rights under this License. However, parties who have received copies, or rights, from you under this License will not have their licenses terminated so long as such parties remain in full compliance.
10. FUTURE REVISIONS OF THIS LICENSE #
The Free Software Foundation may publish new, revised versions of the GNU Free Documentation License from time to time. Such new versions will be similar in spirit to the present version, but may differ in detail to address new problems or concerns. See http://www.gnu.org/copyleft/.
Each version of the License is given a distinguishing version number. If the Document specifies that a particular numbered version of this License "or any later version" applies to it, you have the option of following the terms and conditions either of that specified version or of any later version that has been published (not as a draft) by the Free Software Foundation. If the Document does not specify a version number of this License, you may choose any version ever published (not as a draft) by the Free Software Foundation.
ADDENDUM: How to use this License for your documents #
Copyright (c) YEAR YOUR NAME.
Permission is granted to copy, distribute and/or modify this document
under the terms of the GNU Free Documentation License, Version 1.2
or any later version published by the Free Software Foundation;
with no Invariant Sections, no Front-Cover Texts, and no Back-Cover Texts.
A copy of the license is included in the section entitled “GNU
Free Documentation License”.
If you have Invariant Sections, Front-Cover Texts and Back-Cover Texts, replace the “with...Texts.” line with this:
with the Invariant Sections being LIST THEIR TITLES, with the
Front-Cover Texts being LIST, and with the Back-Cover Texts being LIST.
If you have Invariant Sections without Cover Texts, or some other combination of the three, merge those two alternatives to suit the situation.
If your document contains nontrivial examples of program code, we recommend releasing these examples in parallel under your choice of free software license, such as the GNU General Public License, to permit their use in free software.

