SAP Data Intelligence 3 on SUSE CaaS Platform 4 #
Installation Guide
SAP
SAP* Data Hub 2 is the toolset to govern big amounts of data. SUSE CaaS Platform 4 is the Kubernetes base that makes deploying SAP Data Hub 2 easy. This document describes the installation and configuration of SUSE CaaS Platform 4 and SAP Data Hub 2.
Disclaimer: Documents published as part of the SUSE Best Practices series have been contributed voluntarily by SUSE employees and third parties. They are meant to serve as examples of how particular actions can be performed. They have been compiled with utmost attention to detail. However, this does not guarantee complete accuracy. SUSE cannot verify that actions described in these documents do what is claimed or whether actions described have unintended consequences. SUSE LLC, its affiliates, the authors, and the translators may not be held liable for possible errors or the consequences thereof.
1 Introduction #
Today, business and industries create more and more data. As the amount of data grows, so does the need to manage and get the best out of the data. SAP Data Intelligence 3 is a tool to make it easier to deal with such amounts of data, and with SUSE CaaS Platform 4, SUSE delivers the foundation on top of which to run SAP Data Intelligence 3.
2 Requirements #
To install SAP Data Intelligence 3 on SUSE CaaS Platform 4, we need to meet certain requirements. Consult the relevant documentation:
2.1 Hardware and software requirements #
2.1.1 SUSE CaaS Platform 4 cluster #
Hardware requirements:
See SAP’s sizing recommendations:
The minimum hardware requirements for installing SAP Data Intelligence 3 for on-premises production use are:
7 Kubernetes cluster nodes (three master nodes and four worker nodes)
All machines should have at least four CPU cores
The master nodes should have > 32 GiB RAM
The worker nodes should have > 64 GiB RAM
Load-balancer
Management host
Environments for non-production use may run with one master, three workers, and a management node.
Having only one master node is not recommended for production environments. For production use, three master nodes are recommended.
Access to a SUSE Enterprise Storage 5 or SUSE Enterprise Storage 6 system (see SAP Note Pre-requisites for installing SAP Data Hub)
2.1.2 Management host #
Two cores
16 GiB RAM
Disk space:
80 GiB for
/, including the space for the SAP Data Intelligence 3 softwareAt least 100 GiB for
/var/lib/docker(needed for the SAP Data Intelligence 3 installation)
Network connectivity to the SUSE CaaS Platform cluster (1 GBit/s)
2.2 Software requirements #
The following software is needed:
SUSE CaaS Platform 4.0.3
NoteFor SAP Data Hub, it is required to stay on SUSE CaaS Platform 4.0.0—4.0.3, because of the Kubernetes version delivered with our CaaSP product. SAP Data Intelligence 3 needs a Kubernetes version not higher than 1.15.
SAP Data Hub 2.7.1 or higher
SAP Hostagent
Access to SAP Maintenance Planner
Connection to a secure private Docker registry
Optional Hadoop/Spark, see Vora’s Spark extensions
3 Installing SUSE CaaS Platform 4 #
3.1 Getting the installation media #
All installation media can be found at: SUSE CaaS Platform ISO images
3.2 Getting a subscription for SUSE CaaS Platform 4 #
To be able to get all maintenance updates for your SUSE products, you need a valid subscription for the particular product: * Order subscription for SUSE CaaS Platform
3.3 Reading the Deployment Guide for SUSE CaaS Platform 4 #
SUSE CaaS Platform is designed to make the installation of Kubernetes easy. To get a deeper understanding you should read the Deployment Guide for SUSE CaaS Platform 4, available at https://www.suse.com/documentation/ For further reference, there are also a Quick Start Guide and an Administrator’s Guide.
3.4 Installing SUSE CaaS Platform 4 on SUSE Linux Enterprise #
In this guide, we describe the installation of SUSE CaaS Platform 4 on top of SUSE Linux Enterprise 15 SP1 on your premises. We will use the SUSE Linux Enterprise 15 SP1 installer ISO image for starting the installation.
Make sure that the host names you will use for the installation can be resolved via DNS. It is preferred to have a static network setup.
You will need to have the FQDN or IP address of your time server. A reliable system time is required.
Connect the media to your hardware and boot from the media.
Select Installation from the GRUB menu.
3.4.1 Preparation #
Install SUSE Linux Enterprise 15 SP1 or higher (as released for CaaS Platform 4.x) on all nodes.
The following Modules/Products are required on the respective hosts:
Management host:
SUSE Linux Enterprise 15 SP1
SUSE Linux Enterprise 15 SP1 Containers Modules
SUSE Linux Enterprise 15 SP1 Public Cloud
SUSE CaaSP 4
Kubernetes master nodes:
SUSE Linux Enterprise 15 SP1
SUSE Linux Enterprise 15 SP1 Public Cloud
SUSE CaaSP 4
Kubernetes worker nodes:
SUSE Linux Enterprise 15 SP1
SUSE Linux Enterprise 15 SP1 Public Cloud
SUSE CaaSP 4
Load balancer host:
SUSE Linux Enterprise Server for SAP applications 15 SP1
or
SUSE Linux Enterprise 15 SP1 plus High Availability Extension
3.4.2 Installing the management node #
Install SUSE Linux Enterprise 15 SP1
Add the following software:
Install software pattern "CaaSP management"
Install Python2 and PyYaml-python2 (needed for installing DH2.7)
Install Docker (needed for installing DH2.7)
3.4.3 Installing the load balancer #
This is only necessary if no other load-balancing device is available.
In our setup, we describe the installation of a haproxy instance.
haproxy is available in the SUSE Linux Enterprise High Availability Extension or SUSE Linux Enterprise Server for SAP applications.
Install SUSE Linux Enterprise 15 SP1
Add the "SLE 15 SP1 HA" repository
(in case of SUSE Linux Enterprise Server for SAP applications, this is added automatically)
Create the
haproxyconfigurationEnable and start
haproxy
3.4.4 Installing the master nodes #
Install SUSE Linux Enterprise 15 SP1
Set up static IP addresses
Use the "Expert Partitioner" to disable any swap partition
Disable
firewalldEnable
ssh
Add the necessary software repositories:
SUSEConnect -p caasp/4.0/x86_64
SUSEConnect -p …
Create the directory
/var/lib/docker/containers
3.4.5 Installing the worker nodes #
Install SUSE Linux Enterprise 15 SP1
Set up static IP addresses
Use the "Expert Partitioner" to disable any swap partition
Disable
firewalldEnable
ssh
Add the necessary software repositories:
SUSEConnect -p caasp/4.0/x86_64
SUSEConnect -p …
3.4.6 Creating the Kubernetes cluster on SUSE CaaS Platform 4 #
Log in to the management host
Ensure that
ssh-agentis working as expected(for example
ssh -A root@managementhost.example.com)Initialize the Kubernetes cluster
skuba cluster init --control-plane <LB_IP/FQDN> my-cluster
Create the first master node of the Kubernetes Cluster
cd my-cluster
skuba node bootstrap --user sles --sudo --target <IP/FQDN> <NODE_NAME>
Add additional master nodes
skuba node join --role master --user sles --sudo --target <IP/FQDN> <NODE_NAME>
Add worker nodes to the Kubernetes cluster
skuba node join --role worker --user sles --sudo --target <IP/FQDN> <NODE_NAME>
verify your Kubernetes cluster
skuba cluster status
Modifications needed to install SAP Data Haub 2 on a CaaSP 4 cluster
Change the
pidparameter in/etc/crio/crio.conffrom 1024 to 8192Edit
/etc/containers/registry.confto reflect your private registry
4 Installing SAP Data Intelligence 3 #
The following sections describe the preparation and installation of SAP Data Intelligence 3 on a SUSE CaaS Platform 4 cluster.
4.1 Preparing the SAP Data Intelligence 3 installation #
The steps that are needed to successfully install SAP Data Hub on SUSE CaaS Platform are as follows:
4.1.1 Downloading the SAP Data Intelligence 3 software archive #
To download and install SAP Data Intelligence 3:
Go to the SAP Software Download Center, log in with your SAP account, and search for "SAP DATA Intelligence 3".
Download the SAP Data Hub Foundation file, for example:
DHFOUNDATION07_3-80004015.ZIP(SAP DATA HUB - FOUNDATION 2.7)
Unzip the software archive on to your management host.
There are three ways to install SAP Data Intelligence 3:
Use the SL Plugin. There are two variants of it:
SL Plugin with Maintenance Planner (
mpsl)SL Plugin only (
mpfree)
Use the command line
install.shscript.
This document will focus on the Maintenance Planner and SL Plugin installation methods.
4.1.2 Prerequisites on the SUSE CaaS Platform 4 cluster #
The following steps are done on the jump host if not stated otherwise:
Create a new namespace in the Kubernetes cluster, into which to install SAP Data Intelligence 3:
$ kubectl create namespace datahub
Create the storage class to provide volumes for SAP Data Intelligence 3 on SUSE Enterprise Storage:
Make sure you have the connection data for your SUSE Enterprise Storage at hand:
IP addresses and port number (default: 6789) of the monitor nodes of your SUSE Storage cluster
Create a data pool (
datahubin this example) on your SUSE Enterprise Storage for use with SAP Data Intelligence 3
Edit the example below to fit your environment.
$ cat > storageClass.yaml <<EOF
apiVersion: storage.kubernetes.io/v1
kind: StorageClass
metadata:
  annotations:
    storageclass.kubernetes.io/is-default-class: "true"
  name: datahub
  namespace: default
parameters:
  adminId: admin
  adminSecretName: ceph-admin-secret
  adminSecretNamespace:  default
  imageFeatures: layering
  imageFormat: "2"
  monitors: <IP ADDRESS OF MONITOR 1>:6789, <IP ADDRESS OF MONITOR 2>:6789, <IP ADDRESS OF MONITOR 3 >:6789
  pool: datahub
  userId: admin
  userSecretName: ceph-user-secret
provisioner: kubernetes.io/rbd
reclaimPolicy: Delete
volumeBindingMode: Immediate
EOF

$ kubectl create -f storageClass.yaml
Create the secrets needed to access the storage:
Obtain the keys from your SUSE Enterprise Storage cluster. They are located in
ceph.admin.keyringandceph.user.keyring.You must encode the keys using
base64:echo <YOUR KEY HERE> | base64
$ cat > ceph-admin-secret.yaml <<EOF
apiVersion: v1
kind: Secret
metadata:
    name: ceph-admin-secret
type: "kubernetes.io/rbd"
data:
   key: <YOUR BASE64 ENCODED KEY HERE>
EOF
image::002-SCT-CaaSP.png
$ cat > ceph-user-secret.yaml <<EOF
apiVersion: v1
kind: Secret
metadata:
    name: ceph-user-secret
type: "kubernetes.io/rbd"
data:
   key: <YOUR BASE64 ENCODED KEY HERE>
EOF

$ kubectl create -f ceph-admin-secret.yaml
$ kubectl create -f ceph-user-secret.yaml
4.2 Installing SAP Data Intelligence 3 using the SAP Maintenance Planner with SL Plugin #
SAP recommends the "SAP Maintenance Planner with SL Plugin" (mpsl) installation method as the best approach to install
SAP Data Intelligence 3.
SAP recommends this Web-based installation method because it offers an option to send analytic data and feedback to SAP. All the necessary prerequisites have been satisfied by applying all the steps described above.
You need to install the latest SAP Host Agent on the management host. You
can use the rpm package downloadable from the SAP Software Download center.
Install the SAP Host Agent on the management host
Download the
rpmpackage from the SAP Software Download CenterInstall SAP Host Agent:
zypper in path to rpm
Start SAP Host agent
/etc/init.d/sapinit start
Configure SAP Host Agent to be used with SAP Maintenance Planner
Create certificates according to the documentation provided by SAP
Enable CORS Web service in SAP Host Agent
Navigate to
apps.sap.com/mpwith your browserCreate a new plan
Select "container based system"
Connect to your SAP Host Agent running on the management host
Follow the steps given by the wizard
Fill in values for the installer as needed.
Wait for successful deployment
4.3 Installing SAP Data Intelligence 3 using the SL Plugin (mpfree method) #
This is an alternative command-line-based installation method. Refer to the SAP Data Hub documentation (2.7) for more information and the exact procedure.
4.4 Installing SAP Data Intelligence 3 using the command line (manual installation) #
Unpack the SAP Data Hub software archive on the jump host — for example:
$ unzip DHFOUNDATION07_3-80004015.ZIP
Run the installation command as described in the SAP Data Intelligence 3 install guide:
$ cd SAP-Datahub-2.7.155-Foundation
$ export DOCKER_REGISTRY=<URI of your registry>
$ export NAMESPACE=<YOUR NAME SPACE HERE>
// $ ./install.sh --enable-kaniko=yes  --docker-log-path='/var/log/containers'  -e vora-vsystem.vRep.nfsv4MinorVersion=1 -e vora-diagnostic.fluentd.logDriverFormat=regexp
$ ./install.sh --enable-kaniko=yes  --docker-log-path='/var/log/containers' -e vora-diagnostic.fluentd.logDriverFormat=regexp
This interactive script configures the installation of SAP Data Intelligence 3. You should have the following information at hand:
Name and credentials of your SAP
S-UserYour namespace
Login credentials to your secure registry
4.5 Post-installation tasks #
After successful installation, you can connect to the SAP Data Hub Web UI. You need to identify the service IP and port of the SAP Data Hub UI.
kubectl -n $NAMESPACE get services
kubectl -n $NAMESPACE describe service vsystem
Point your browser to the IP and port you obtained from the steps above.
Use the login data you defined during the installation.
4.5.1 Post-installation steps #
Follow the documentation provided by SAP to the post-installation steps.
Create the
vflow-secretfor the modeller app, as pointed out in the SAP documentation.Import any necessary certificate authority, for example the CA that signed the certificate of the secure registry.
5 Upgrading SAP Data Intelligence 3 #
This section describes the update of an existing SAP Data Hub 2 installation to a higher version (e.g. 2.3 to 2.4)
Execute the SAP Data Hub upgrade as described in the official instructions. One can choose between different upgrade methods:
Maintenance Planner:
Upgrade SAP Data Hub 2 using the Maintenance Planner / SL Plugin and SAP Host Agent
SL Plugin method:
Upgrade SAP Data Hub 2 using the SL Plugin and SAP Host Agent
Command line method:
6 Appendix #
6.1 Secure Private Registry #
To satisfy the requirements of SAP Data Hub, you also need a Docker Registry. The easiest way to build and manage one is with the Portus project.
First, you need to create a dedicated server for your Docker registry and Portus stack.
# sudo virt-install --name portus-dr --ram 8192 --disk path=/var/lib/libvirt/VMS/portus-dr.qcow2,size=40 --vcpus 4 --os-type linux --os-variant generic --network bridge=common --graphics none --console pty,target_type=serial --location '/var/lib/libvirt/isos/SLE-12-SP4-Server-DVD-x86_64-GM-DVD1.iso' --extra-args 'console=ttyS0,115200n8 serial ifcfg=eth0=10.10.10.11/24,10.10.10.1,10.10.10.11,suse-sap.net hostname=portus-dr domain=suse-sap.net Textmode=1'
In our example, this server will be connected to another local bridge which provides common services (DNS, SMT, Docker-registry) for the Data Hub stack.
Our Portus deployment will be based on a container, and orchestrated locally with
docker-compose.
Portus deployments using docker-compose require an up-to-date release of
the docker-compose tool.
sudo curl -L "https://github.com/docker/compose/releases/download/1.24.1/docker-compose-$(uname -s)-$(uname -m)" -o /usr/local/bin/docker-compose
sudo chmod +x /usr/local/bin/docker-compose
sudo ln -s /usr/local/bin/docker-compose /usr/bin/docker-compose
Now you can simply clone the Portus repository. Adapt the .env and the
nginx configurations to your naming convention.
# git clone https://github.com/SUSE/Portus.git /tmp/Portus-DR
# mv /tmp/Portus-DR/examples/compose ./portus
# cd portus
You can edit both .env and nginx/nginx.conf.
This is how our configuration looks:
# cat .env
MACHINE_FQDN=portus-dr.suse-sap.net
SECRET_KEY_BASE=b494a25faa8d22e430e843e220e424e10ac84d2ce0e64231f5b636d21251eb6d267adb042ad5884cbff0f3891bcf911bdf8abb3ce719849ccda9a4889249e5c2
PORTUS_PASSWORD=XXXXXXXX
DATABASE_PASSWORD=YYYYYYYY
In the nginx/nginx.conf file, you should adapt the following section:
server {
    listen 443 ssl http2;
    server_name portus-dr.suse-sap.net;
    root /srv/Portus/public;
Pull the latest docker-compose.yml:
# rm docker-compose.*
# wget https://gist.githubusercontent.com/Patazerty/d05652294d5874eddf192c9b633751ee/raw/6bf4ac6ba14192a1fe5c337494ab213200dd076e/docker-compose.yml
To avoid dealing with Docker’s insecure registry configuration, add SSL to your setup.
echo "subjectAltName = DNS:portus-dr.suse-sap.net" > extfile.cnf
openssl genrsa -out secrets/rootca.key 2048
openssl req -x509 -new -nodes -key secrets/rootca.key -subj "/C=FR/ST=FR/O=SUSE"  -sha256 -days 1024 -out secrets/rootca.crt
openssl genrsa -out secrets/portus.key 2048
openssl req -new -key secrets/portus.key -out secrets/portus.csr -subj "/C=FR/ST=FR/O=SUSE/CN
openssl req -new -key secrets/portus.key -out secrets/portus.csr -subj "/C=FR/ST=FR/O=SUSE/CN=portus-dr.suse-sap.net"
openssl x509 -req -in secrets/portus.csr -CA secrets/rootca.crt -extfile extfile.cnf -CAkey secrets/rootca.key -CAcreateserial  -out secrets/portus.crt -days 500 -sha256
Next, all you need to do is to make the servers aware of this certificate:
cp -p secrets/rootca.crt /etc/pki/trust/anchors/.net-ca.crt
scp secrets/rootca.crt root@jumpbox.suse-sap.net:/etc/pki/trust/anchors/portus-dr.suse-sap.net-ca.crt
Then, on all servers that need to interact with the Docker registry, do the following:
sudo update-ca-certificates
sudo systemctl restart docker
Start your Portus setup:
docker-compose up -d
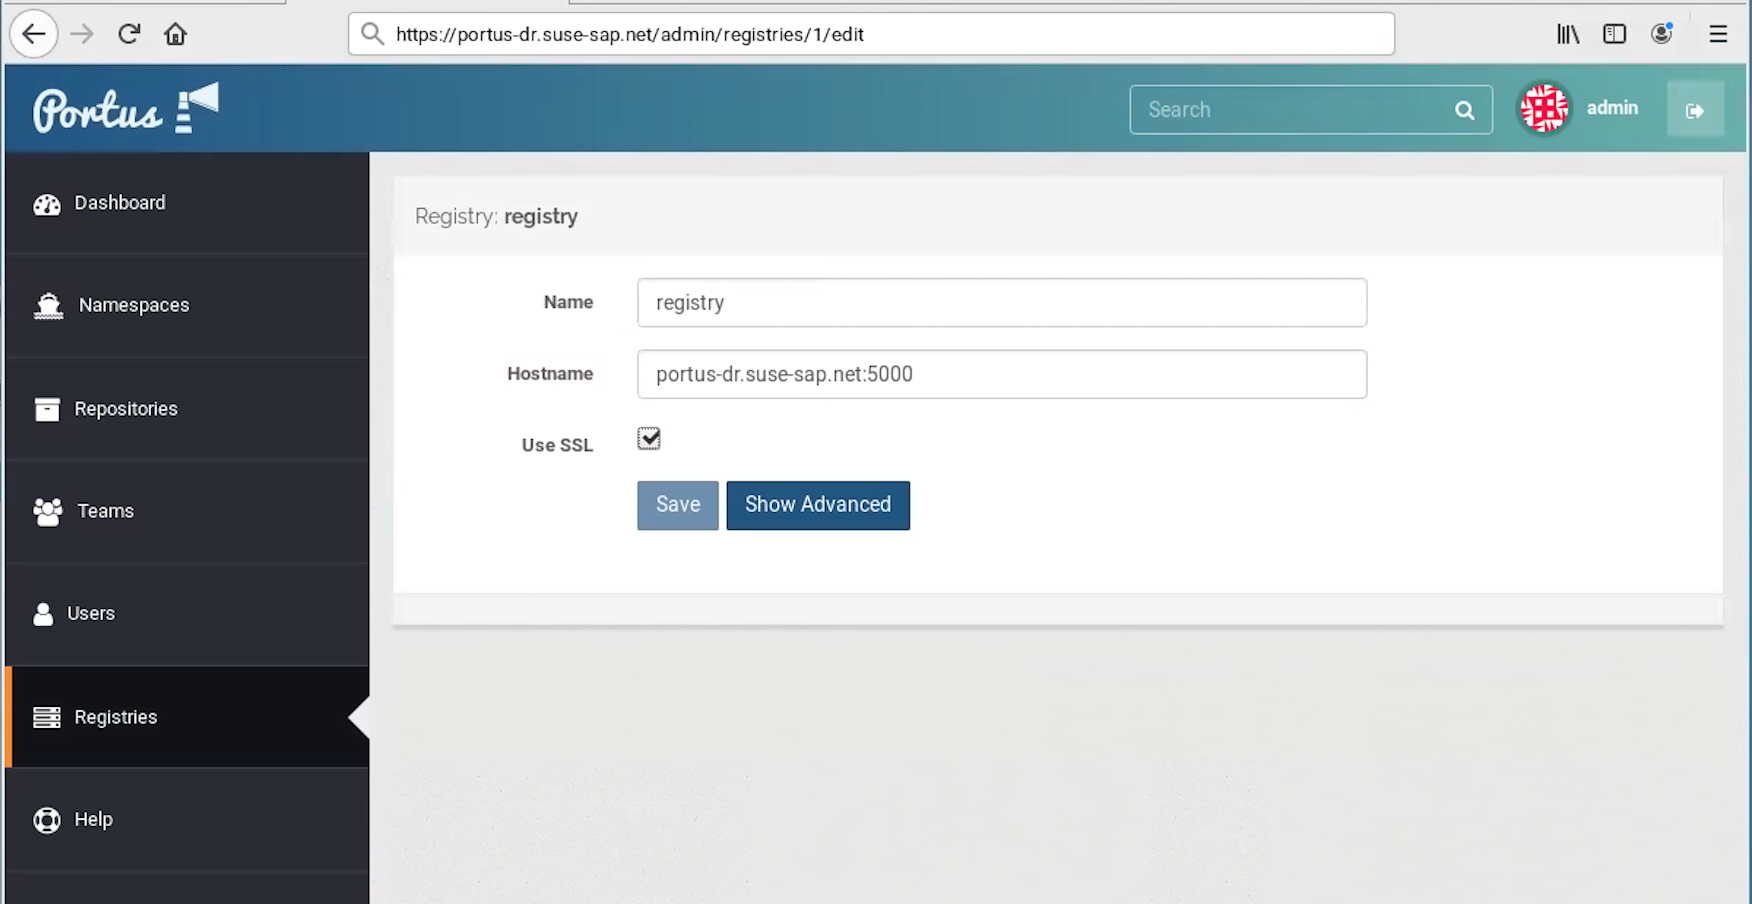
Finally, you can log in to Portus and configure the registry.
6.1.1 Installing and configuring a secure private registry using SUSE Linux Enterprise Server and the SLE-Container-Module #
The needed components are Docker, a registry, and Portus. Create SSL certificates as needed. Distribute the CA certificates to all your Kubernetes nodes.
Run:
# update-ca-certificates
# systemctl restart docker
Create the namespaces on your registry that are needed for SAP Data Intelligence 3:
com.sap.hana.containercom.sap.datahub.linuxx86_64com.sap.datahub.linuxx86_64.gcc6consulelasticsearchfabric8google_containersgrafanakibanapromvorakaniko-projectcom.sap.bds.docker
6.2 SUSE Enterprise Storage #
An on-premises installation of SAP Data Intelligence requires SUSE Enterprise Storage 5 or higher.
If you plan to use SUSE Enterprise Storage not only for your Kubernetes dynamic
storage class, but also for your Kubernetes Control plan (virtualized or not),
you should reserve enough resources to address the
etcd hardware requirements
The following steps will deploy a minimalist, virtualized, test-oriented instance of SUSE Enterprise Storage 5.5. In the our example, we will build a four-node (1 admin + 3 OSD) Ceph cluster.
Before you start:
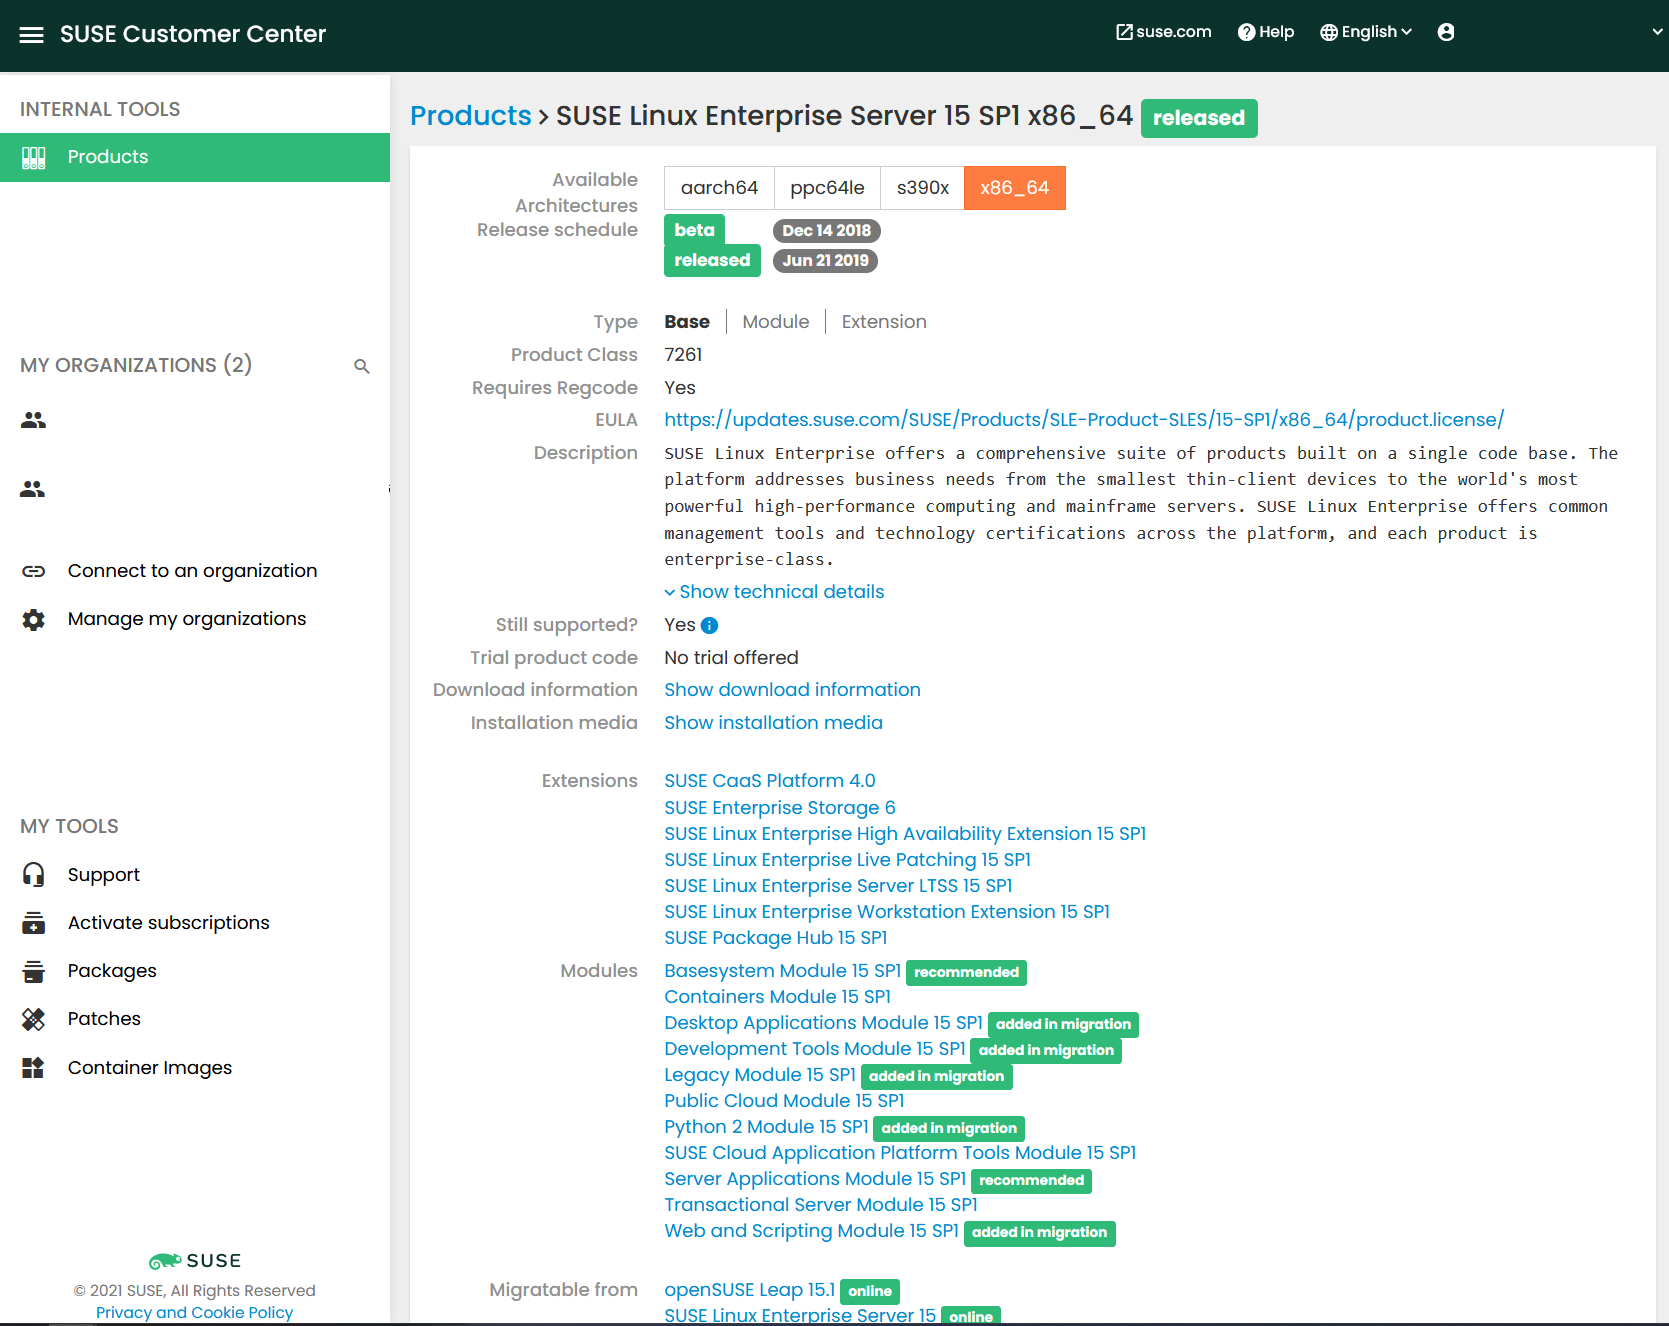
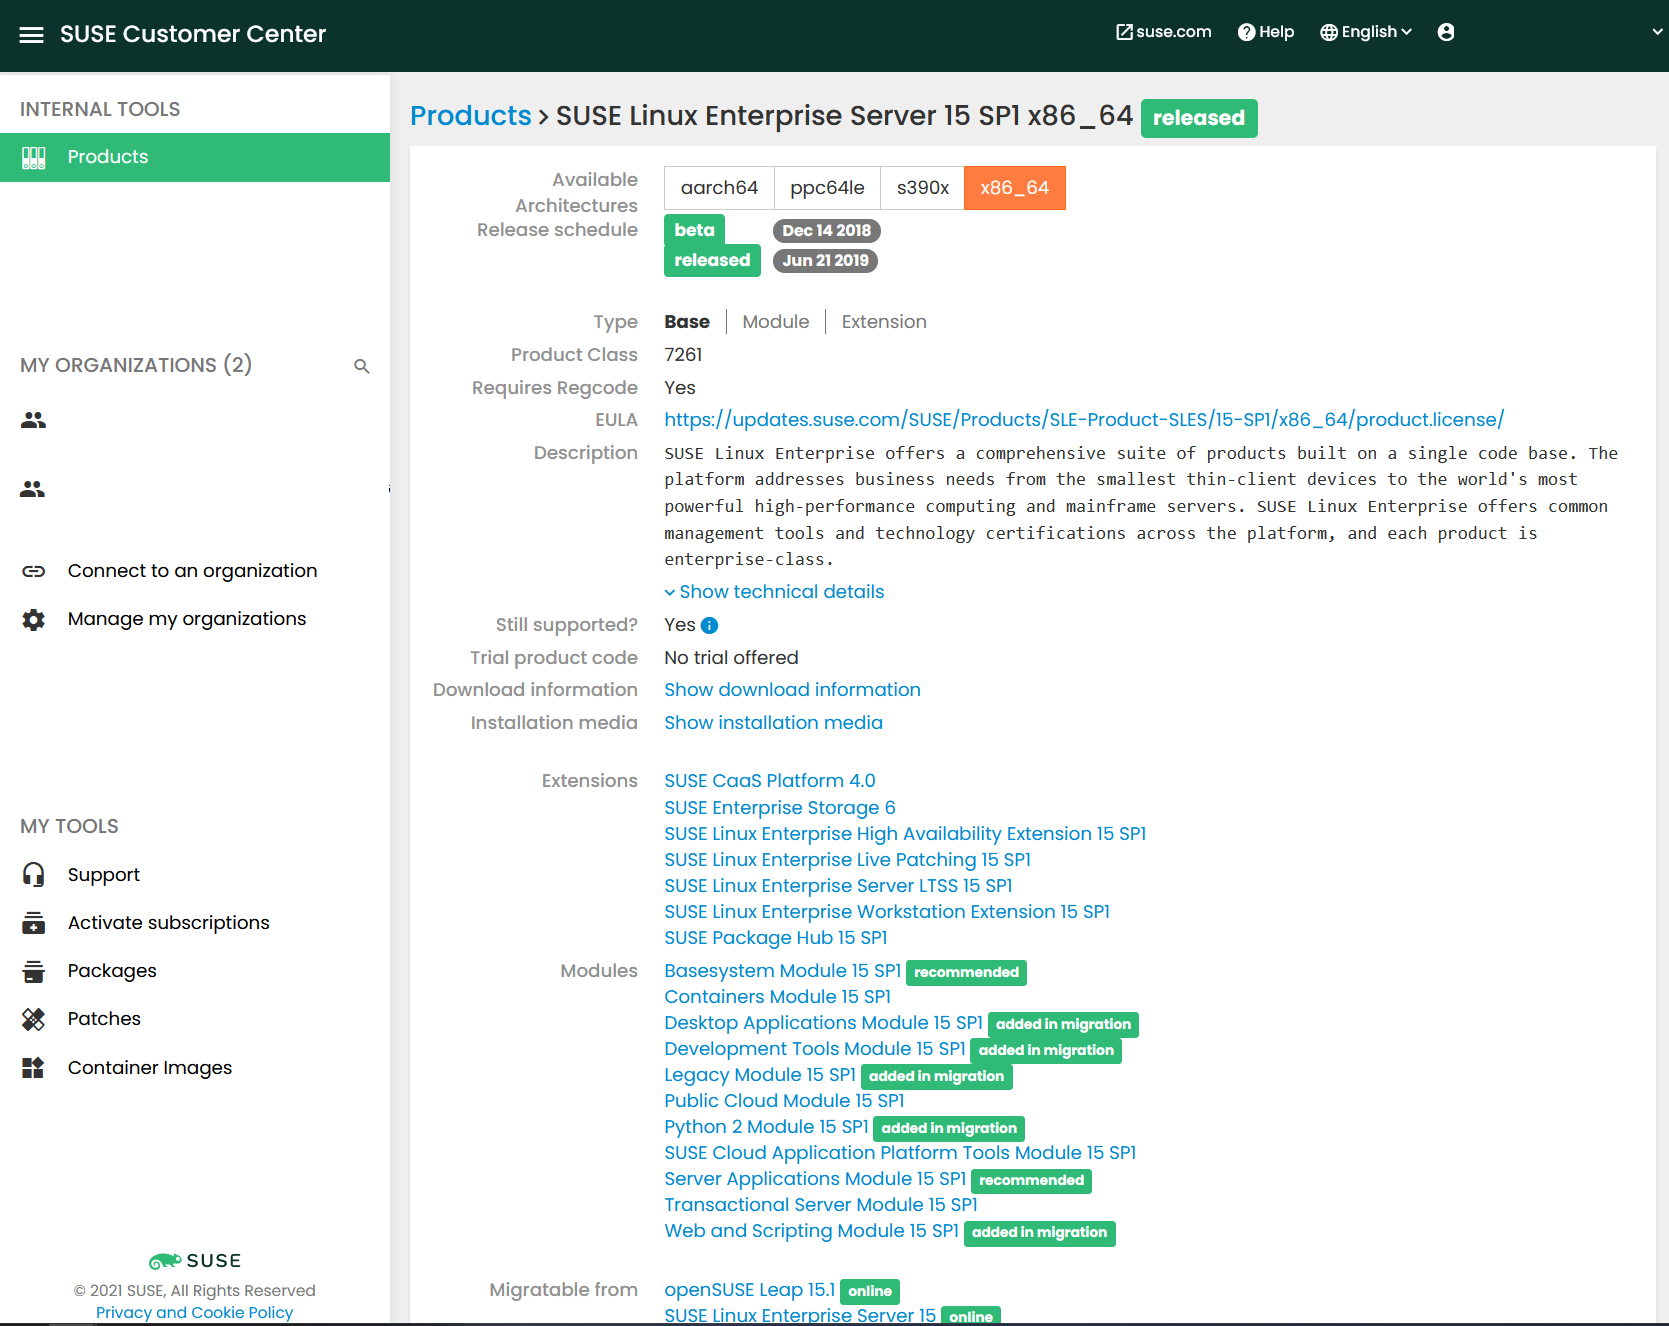
Obtain registration codes for SUSE Linux Enterprise Server 12 SP3 and SUSE Enterprise Storage from https://scc.suse.com, or have an SMT/RMT properly set up and already mirroring these products:
SMT
Figure 3: SUSE Customer Center: SUSE Enterprise Storage Overview #You should already have set up a DNS zone. In our example, where all Data Hub components are in the same DNS zone and the same subnet, it should look like:
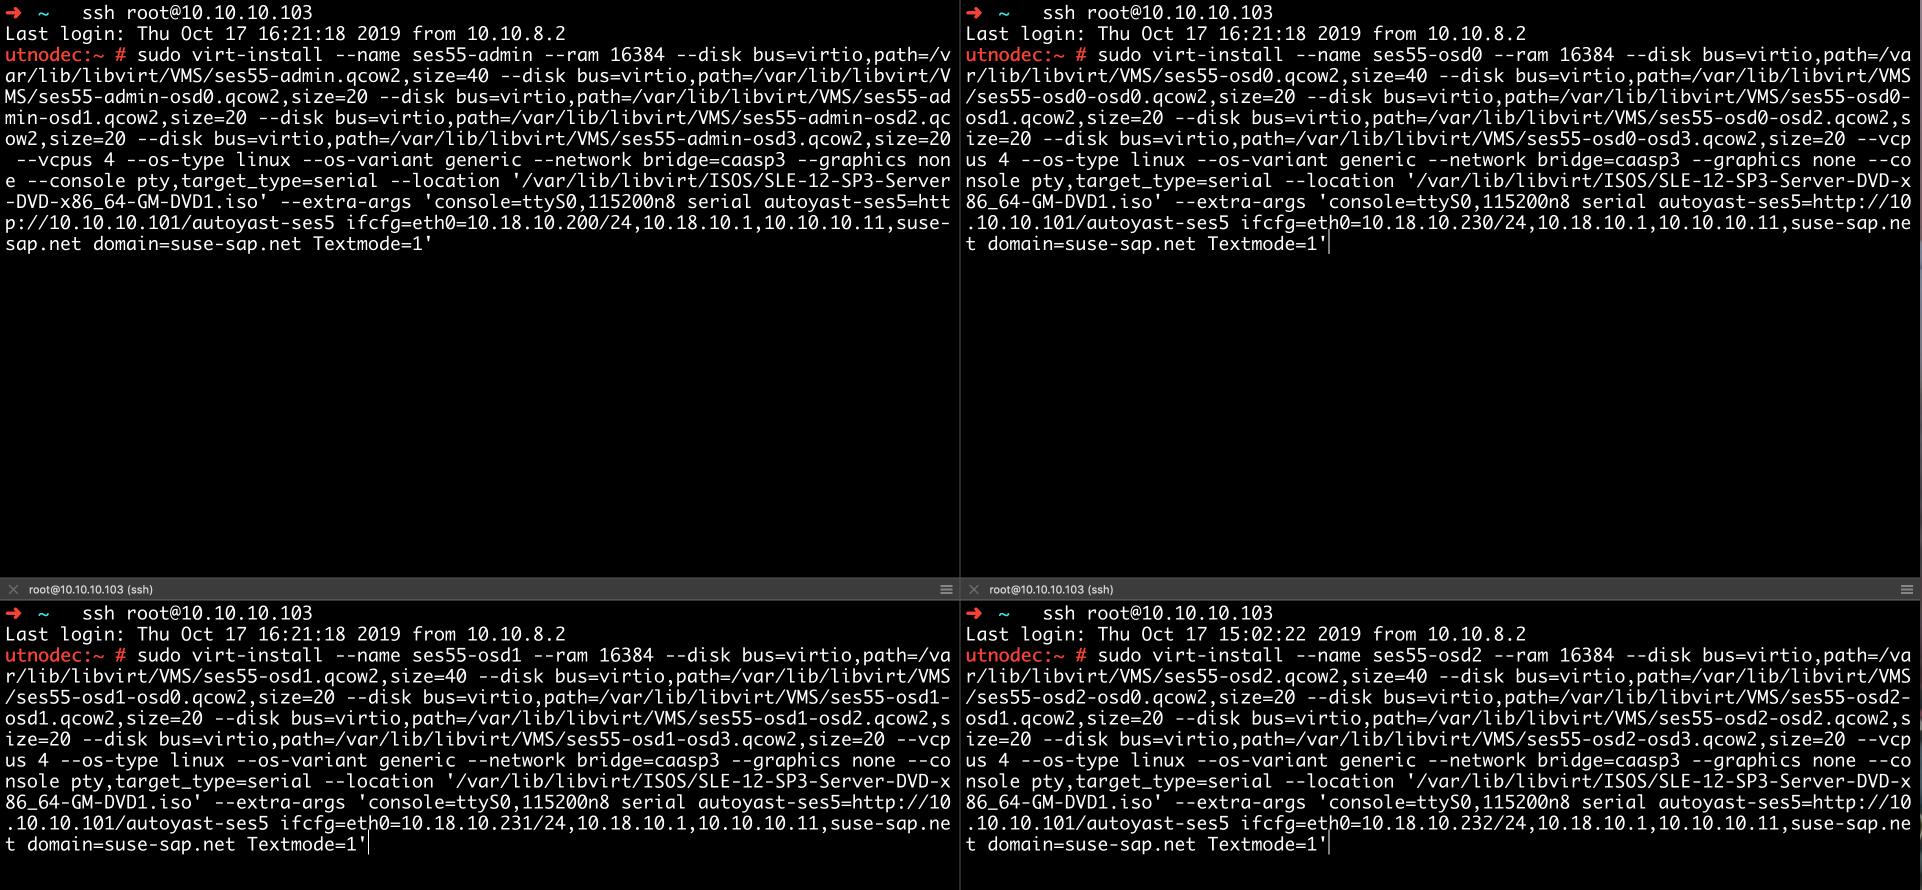
Figure 4: DNS Zone #To be as efficient as possible when using interactive shell-scripted infrastructure deployment, we advise to use an advanced terminal client or multiplexer which will allow you to address multiple shells at once:
Figure 5: Multiple Shells View #
Now you can create the virtual machines.
Create
First the Admin Node:
# sudo virt-install --name ses55-admin --ram 16384 --disk bus=virtio,path=/var/lib/libvirt/VMS/ses55-admin.qcow2,size=40 --disk bus=virtio,path=/var/lib/libvirt/VMS/ses55-admin-osd0.qcow2,size=20 --disk bus=virtio,path=/var/lib/libvirt/VMS/ses55-admin-osd1.qcow2,size=20 --disk bus=virtio,path=/var/lib/libvirt/VMS/ses55-admin-osd2.qcow2,size=20 --disk bus=virtio,path=/var/lib/libvirt/VMS/ses55-admin-osd3.qcow2,size=20 --vcpus 4 --os-type linux --os-variant generic --network bridge=caasp3 --graphics none --console pty,target_type=serial --location '/var/lib/libvirt/ISOS/SLE-12-SP3-Server-DVD-x86_64-GM-DVD1.iso' --extra-args 'console=ttyS0,115200n8 serial autoyast-ses5=http://10.10.10.101/autoyast-ses5 ifcfg=eth0=10.18.10.200/24,10.18.10.1,10.10.10.11,suse-sap.net domain=suse-sap.net Textmode=1'
Then the OSD Nodes:
# sudo virt-install --name ses55-osd0 --ram 16384 --disk bus=virtio,path=/var/lib/libvirt/VMS/ses55-osd0.qcow2,size=40 --disk bus=virtio,path=/var/lib/libvirt/VMS/ses55-osd0-osd0.qcow2,size=20 --disk bus=virtio,path=/var/lib/libvirt/VMS/ses55-osd0-osd1.qcow2,size=20 --disk bus=virtio,path=/var/lib/libvirt/VMS/ses55-osd0-osd2.qcow2,size=20 --disk bus=virtio,path=/var/lib/libvirt/VMS/ses55-osd0-osd3.qcow2,size=20 --vcpus 4 --os-type linux --os-variant generic --network bridge=caasp3 --graphics none --console pty,target_type=serial --location '/var/lib/libvirt/ISOS/SLE-12-SP3-Server-DVD-x86_64-GM-DVD1.iso' --extra-args 'console=ttyS0,115200n8 serial autoyast-ses5=http://10.10.10.101/autoyast-ses5 ifcfg=eth0=10.18.10.230/24,10.18.10.1,10.10.10.11,suse-sap.net domain=suse-sap.net Textmode=1'

# sudo virt-install --name ses55-osd1 --ram 16384 --disk bus=virtio,path=/var/lib/libvirt/VMS/ses55-osd1.qcow2,size=40 --disk bus=virtio,path=/var/lib/libvirt/VMS/ses55-osd1-osd0.qcow2,size=20 --disk bus=virtio,path=/var/lib/libvirt/VMS/ses55-osd1-osd1.qcow2,size=20 --disk bus=virtio,path=/var/lib/libvirt/VMS/ses55-osd1-osd2.qcow2,size=20 --disk bus=virtio,path=/var/lib/libvirt/VMS/ses55-osd1-osd3.qcow2,size=20 --vcpus 4 --os-type linux --os-variant generic --network bridge=caasp3 --graphics none --console pty,target_type=serial --location '/var/lib/libvirt/ISOS/SLE-12-SP3-Server-DVD-x86_64-GM-DVD1.iso' --extra-args 'console=ttyS0,115200n8 serial autoyast-ses5=http://10.10.10.101/autoyast-ses5 ifcfg=eth0=10.18.10.231/24,10.18.10.1,10.10.10.11,suse-sap.net domain=suse-sap.net Textmode=1'

# sudo virt-install --name ses55-osd2 --ram 16384 --disk bus=virtio,path=/var/lib/libvirt/VMS/ses55-osd2.qcow2,size=40 --disk bus=virtio,path=/var/lib/libvirt/VMS/ses55-osd2-osd0.qcow2,size=20 --disk bus=virtio,path=/var/lib/libvirt/VMS/ses55-osd2-osd1.qcow2,size=20 --disk bus=virtio,path=/var/lib/libvirt/VMS/ses55-osd2-osd2.qcow2,size=20 --disk bus=virtio,path=/var/lib/libvirt/VMS/ses55-osd2-osd3.qcow2,size=20 --vcpus 4 --os-type linux --os-variant generic --network bridge=caasp3 --graphics none --console pty,target_type=serial --location '/var/lib/libvirt/ISOS/SLE-12-SP3-Server-DVD-x86_64-GM-DVD1.iso' --extra-args 'console=ttyS0,115200n8 serial autoyast-ses5=http://10.10.10.101/autoyast-ses5 ifcfg=eth0=10.18.10.232/24,10.18.10.1,10.10.10.11,suse-sap.net domain=suse-sap.net Textmode=1'
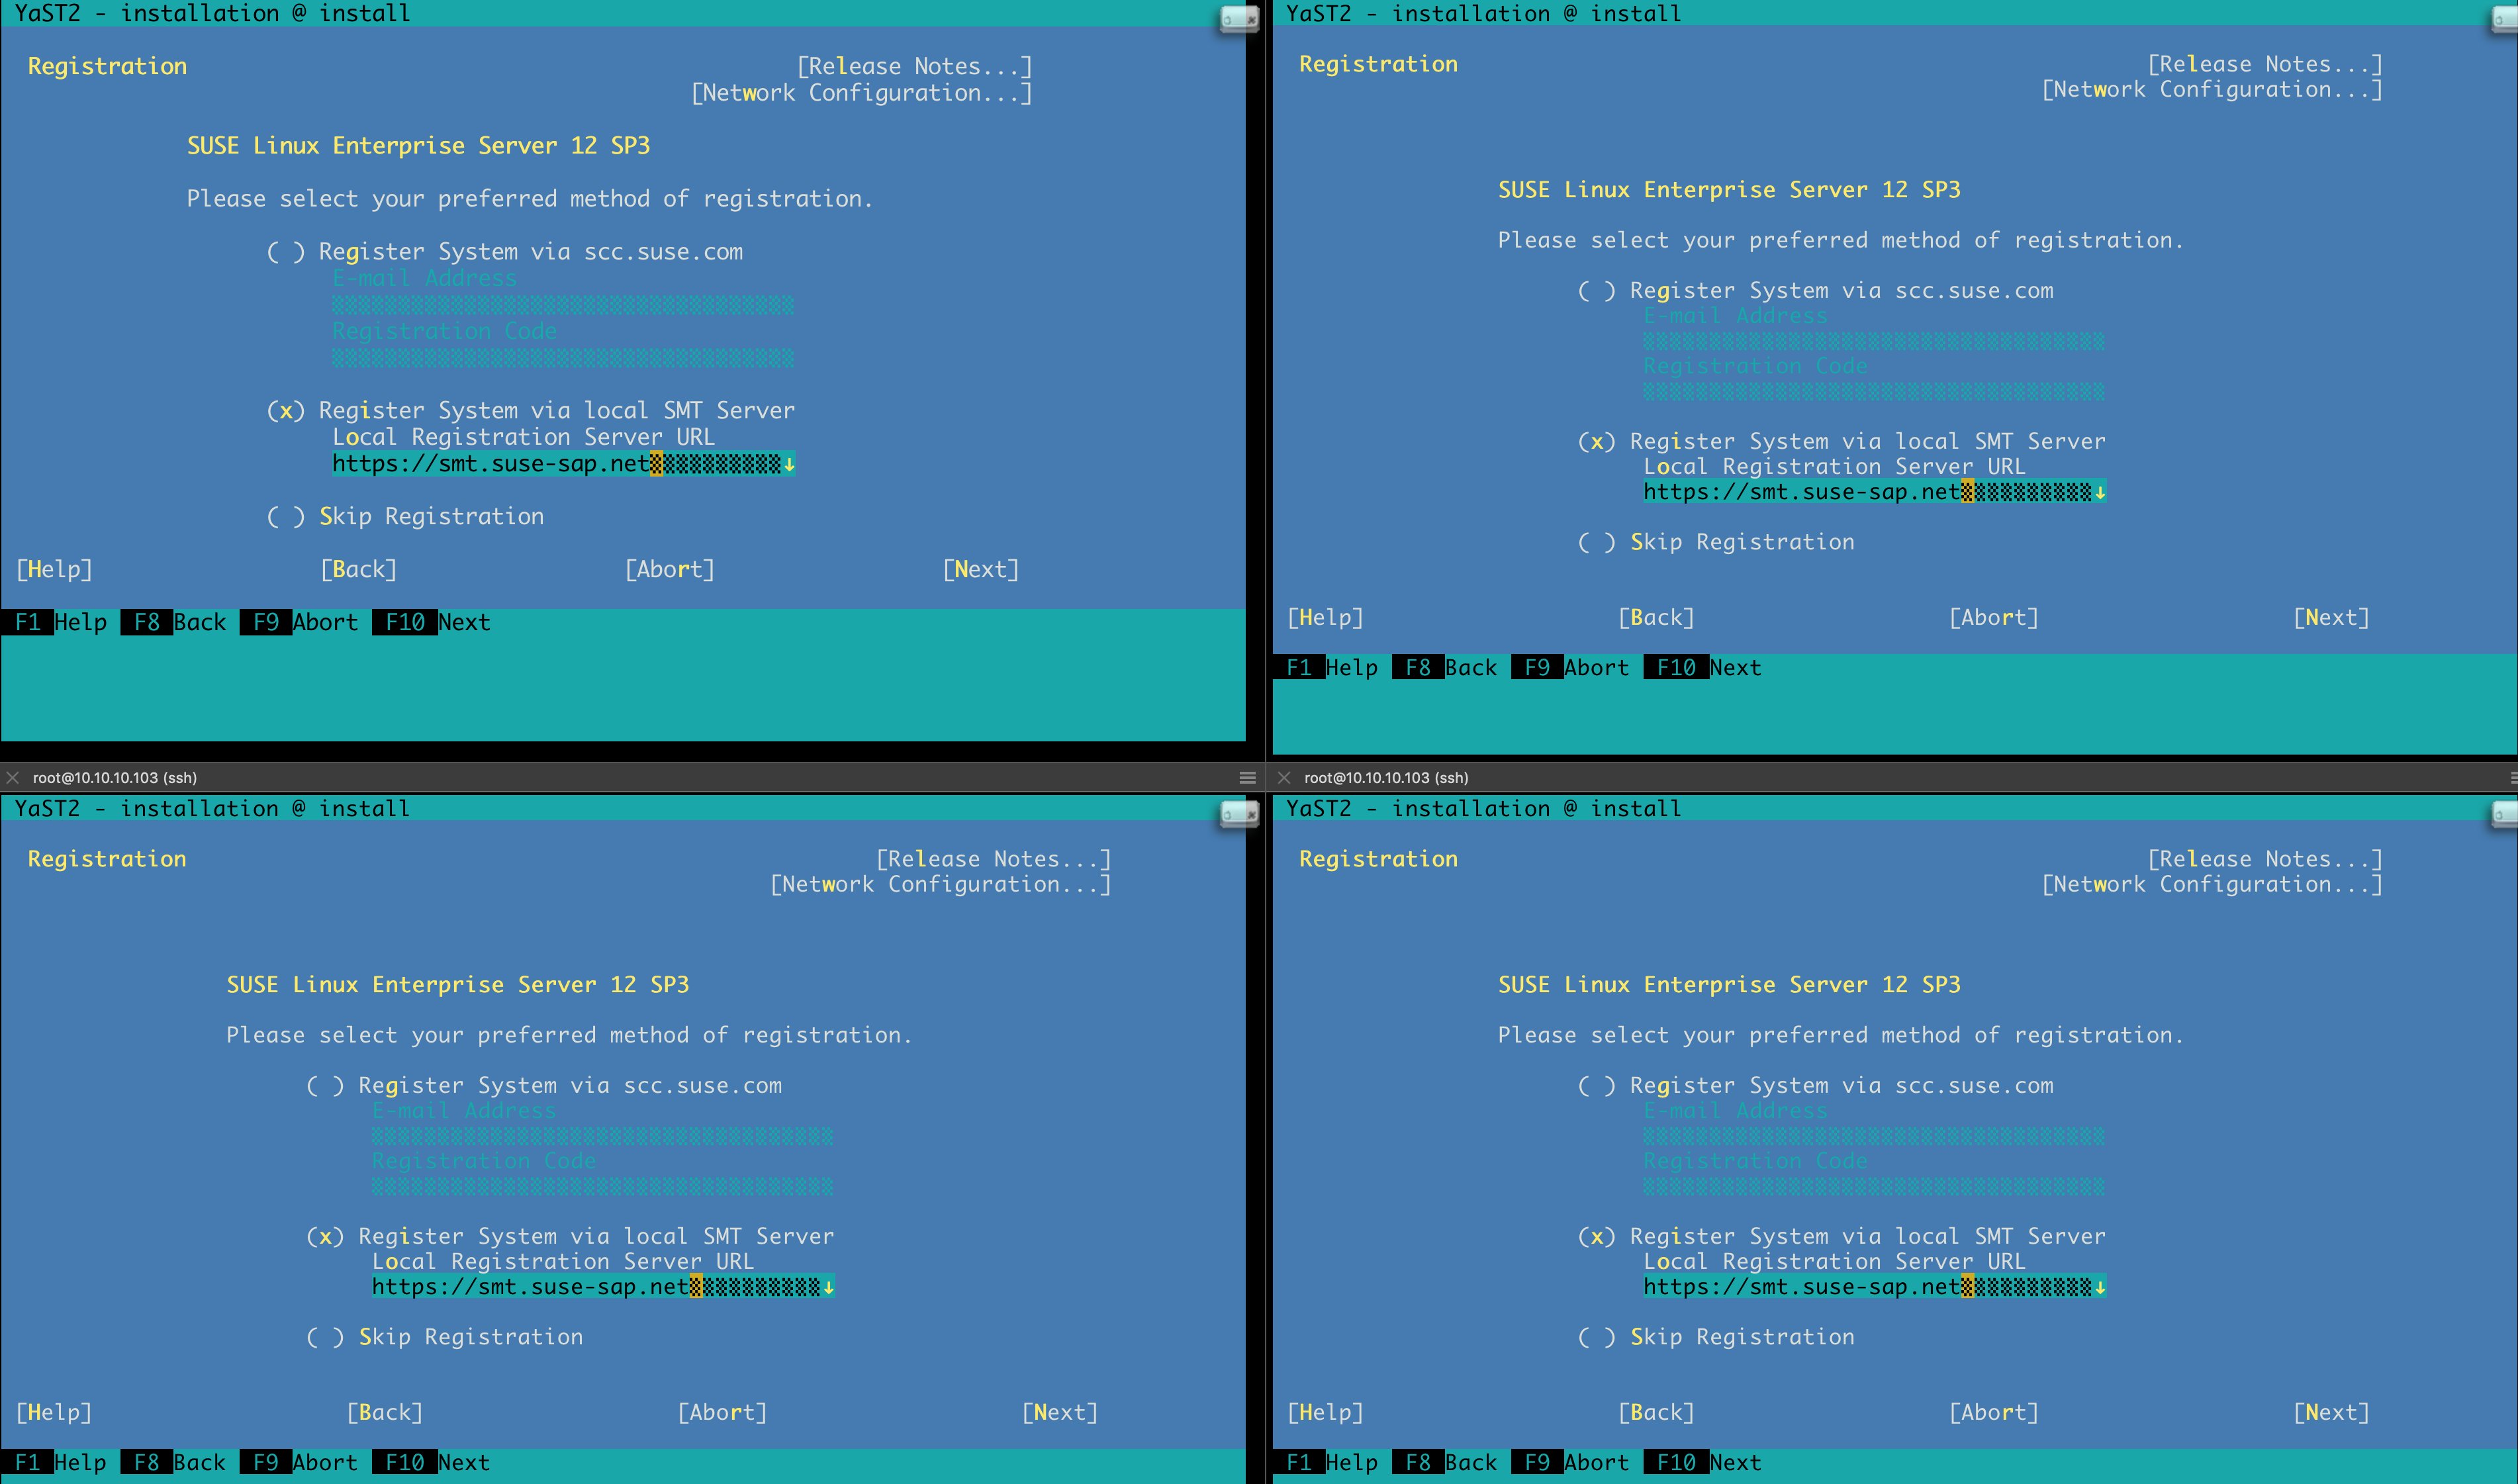
Figure 6: Multiple SMT View #Select the SUSE Enterprise Storage 5 extension:
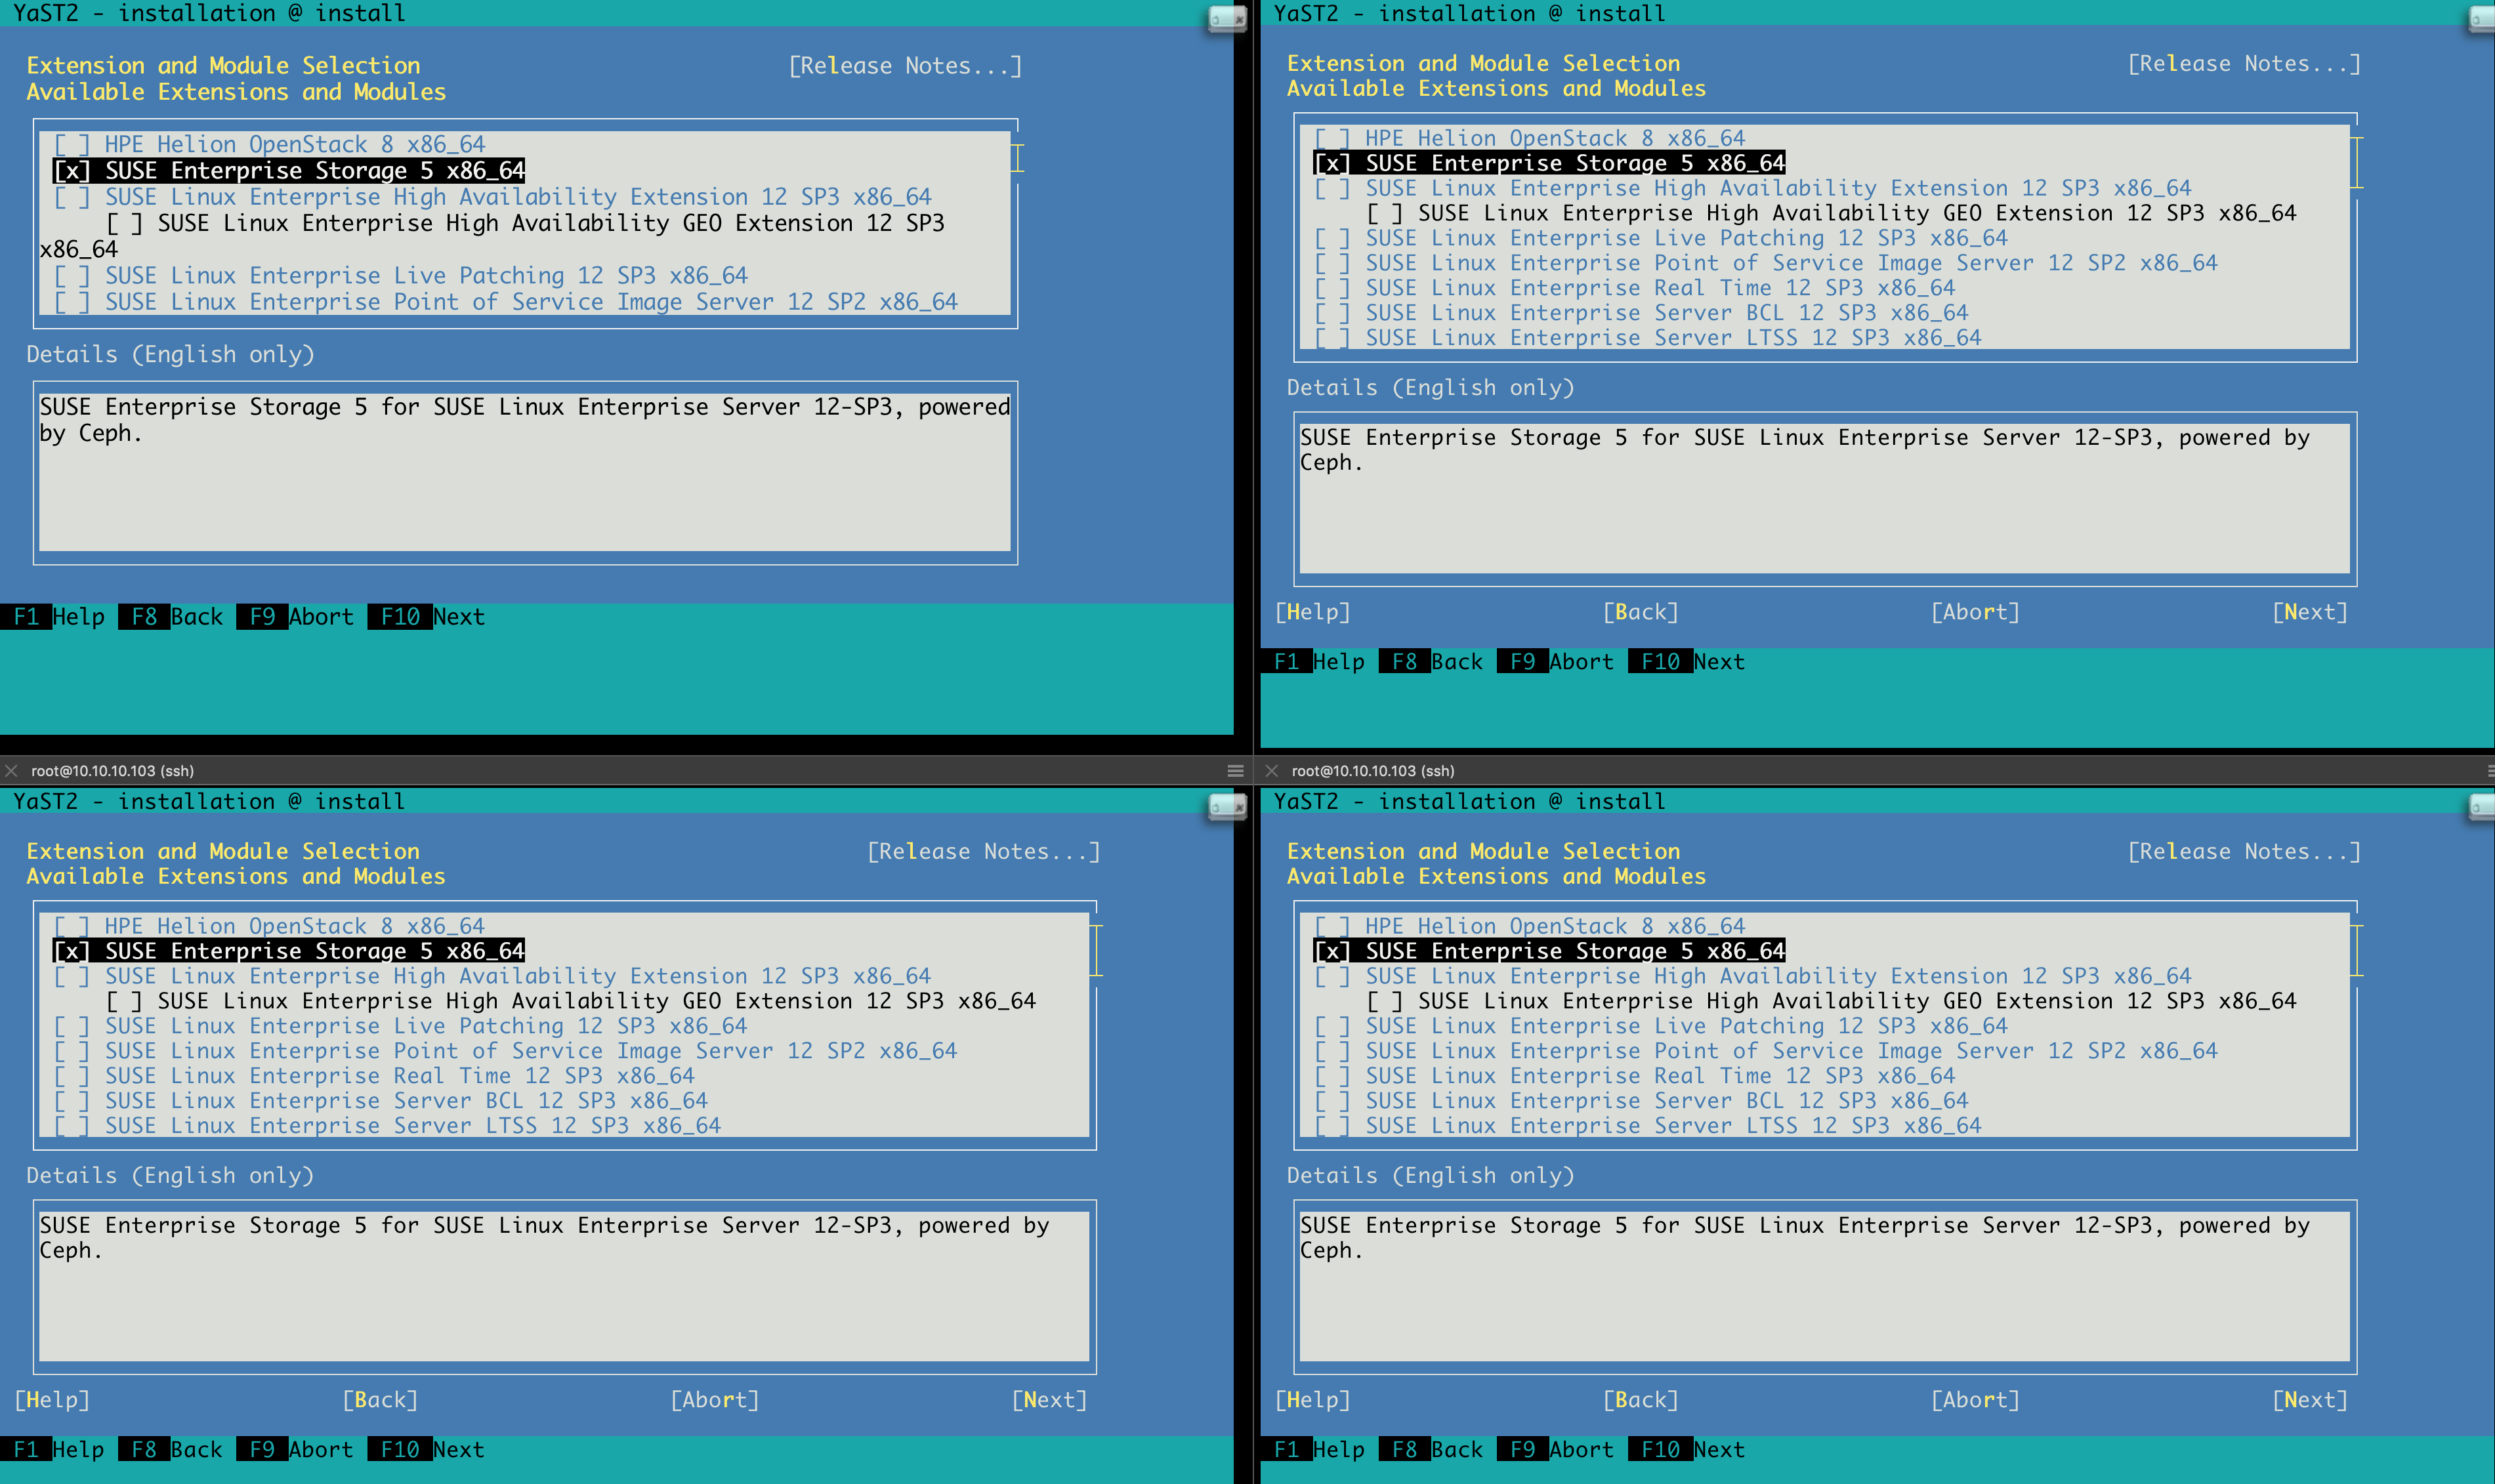
Figure 7: Selecting SES Extensions on all Nodes #On the hypervisor, you should also be able to route or bridge your upcoming SUSE Enterprise Storage 5.5 network segment. In our example, for simplicity, we are using the same bridge and network address as our CaaSP cluster:
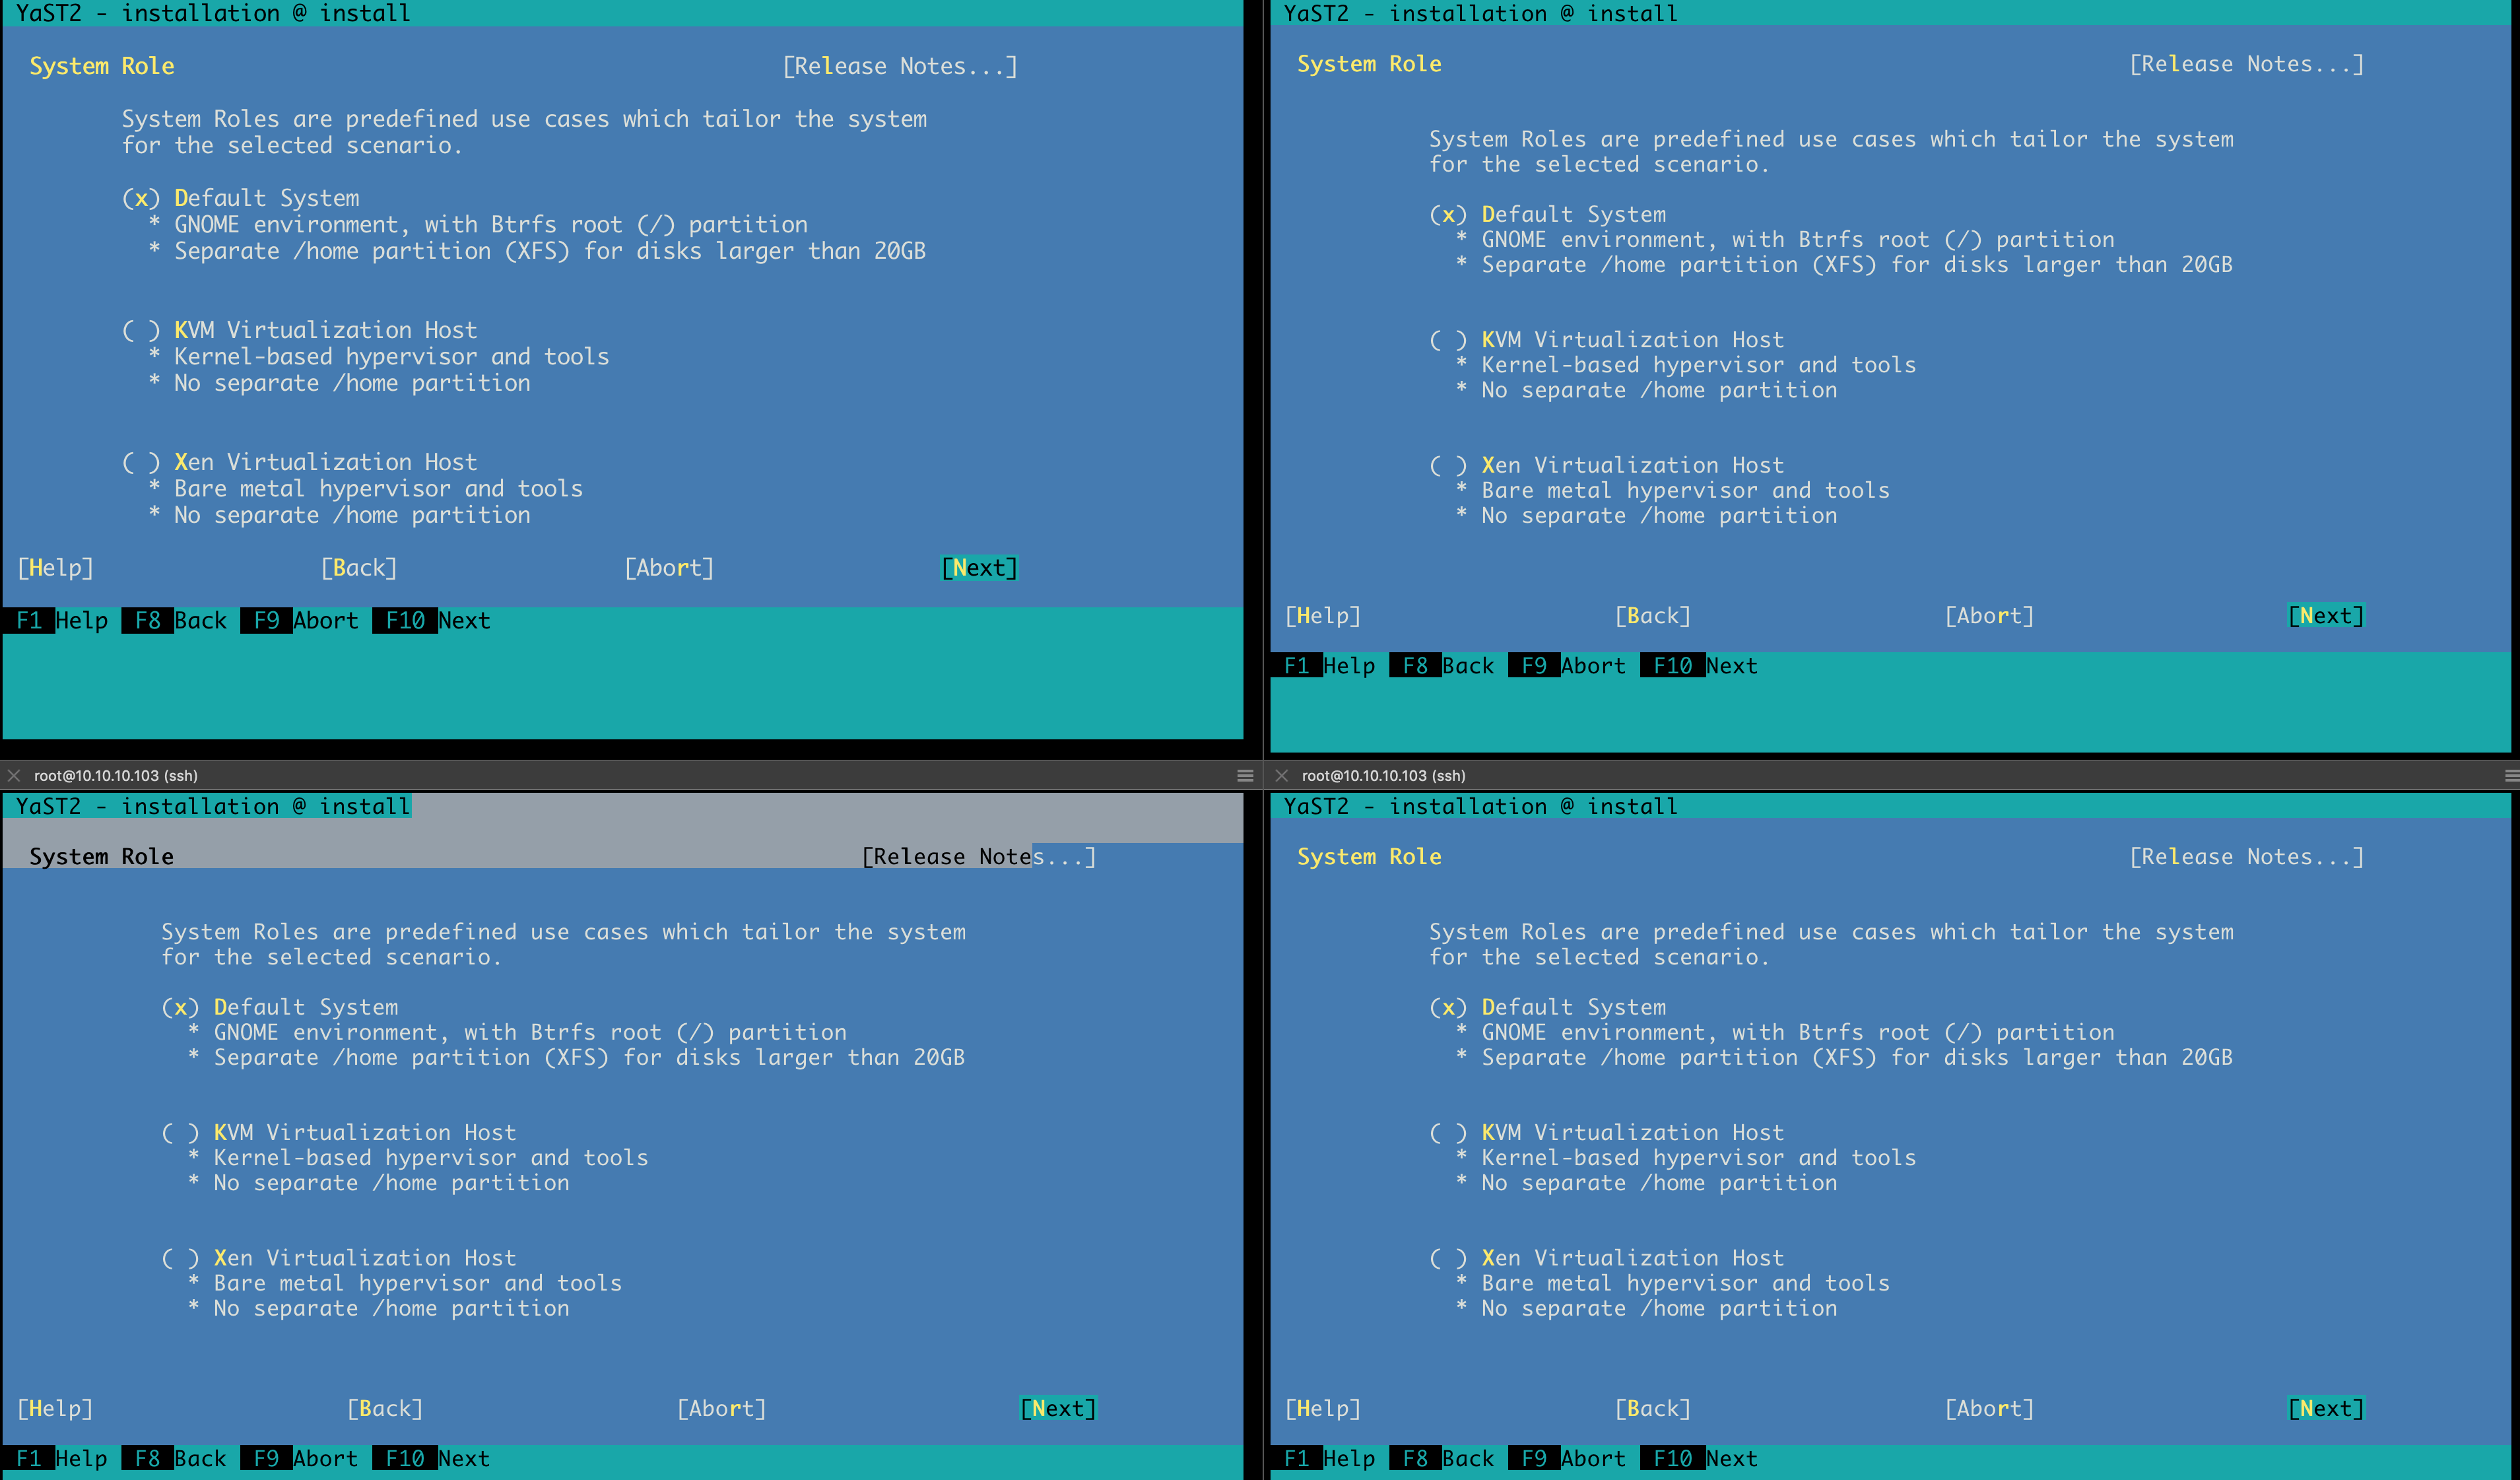
--network bridge=caasp3In our example below, each node is powered by 16 GiB of RAM, 4 vCPUs, 40 GiB for the root disk, and 4 × 20 GiB OSDB disks:
Figure 8: Selecting System Role on all Nodes #NTP must be configured on each node:
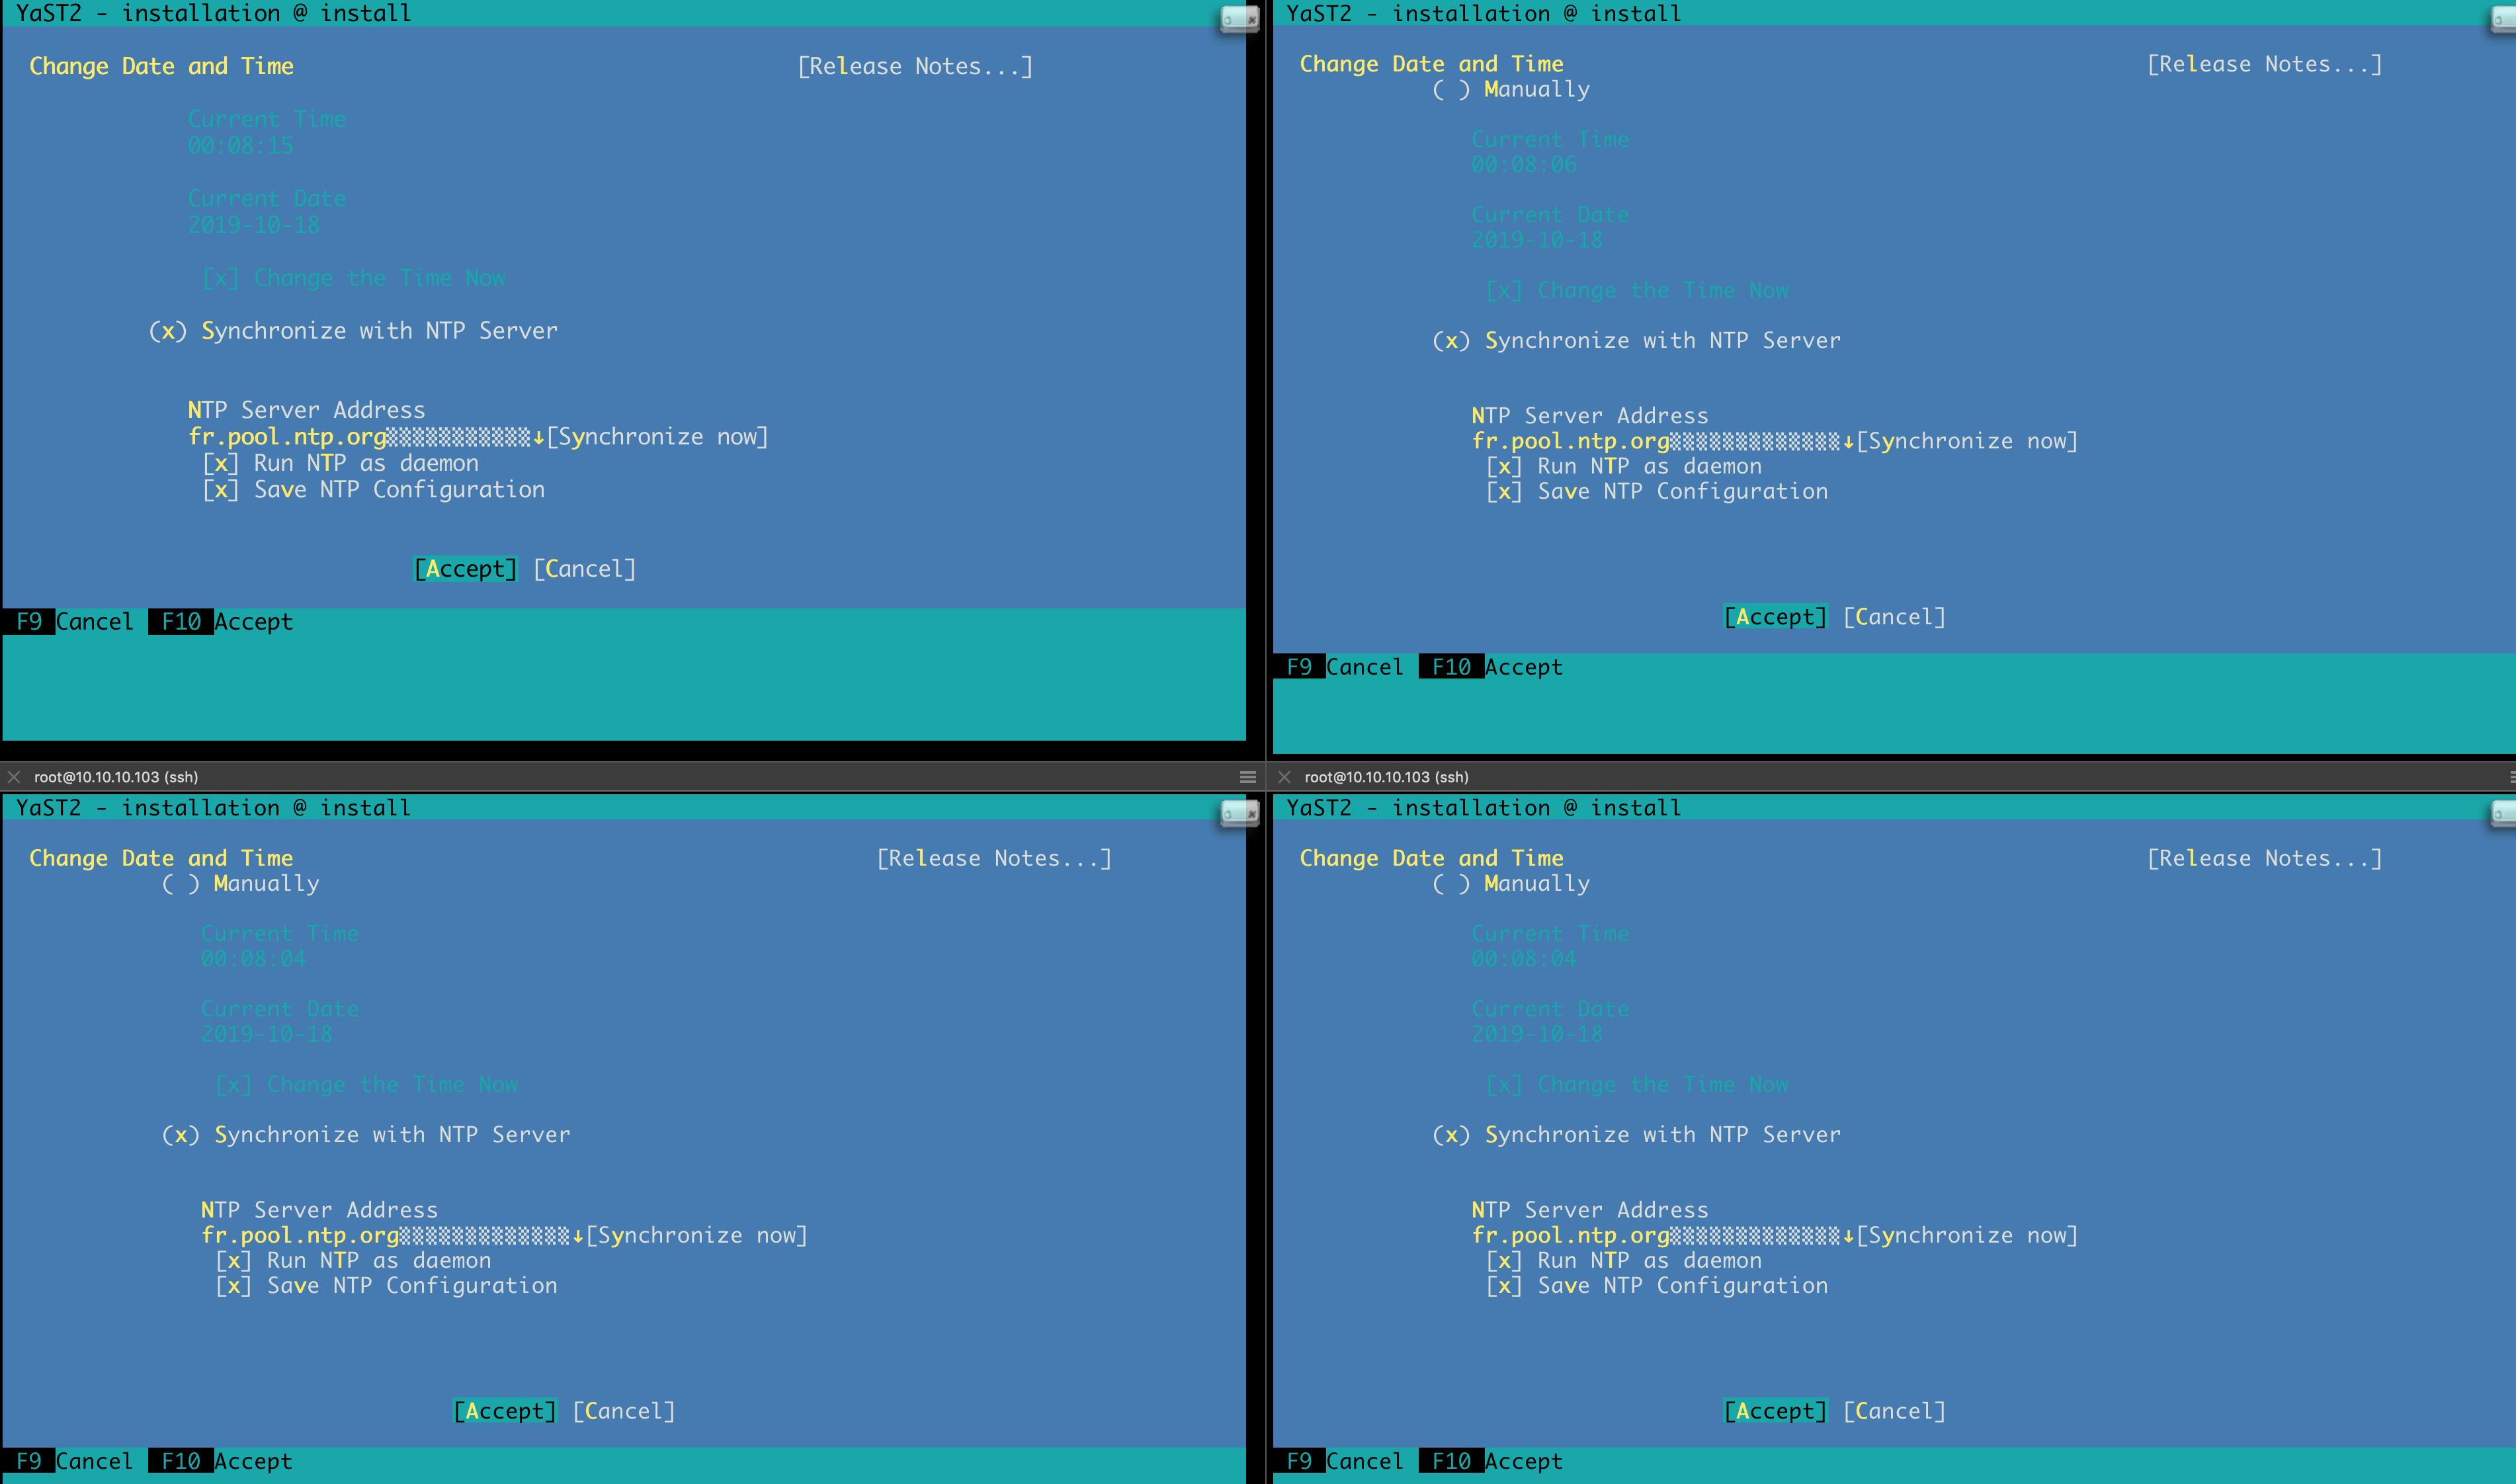
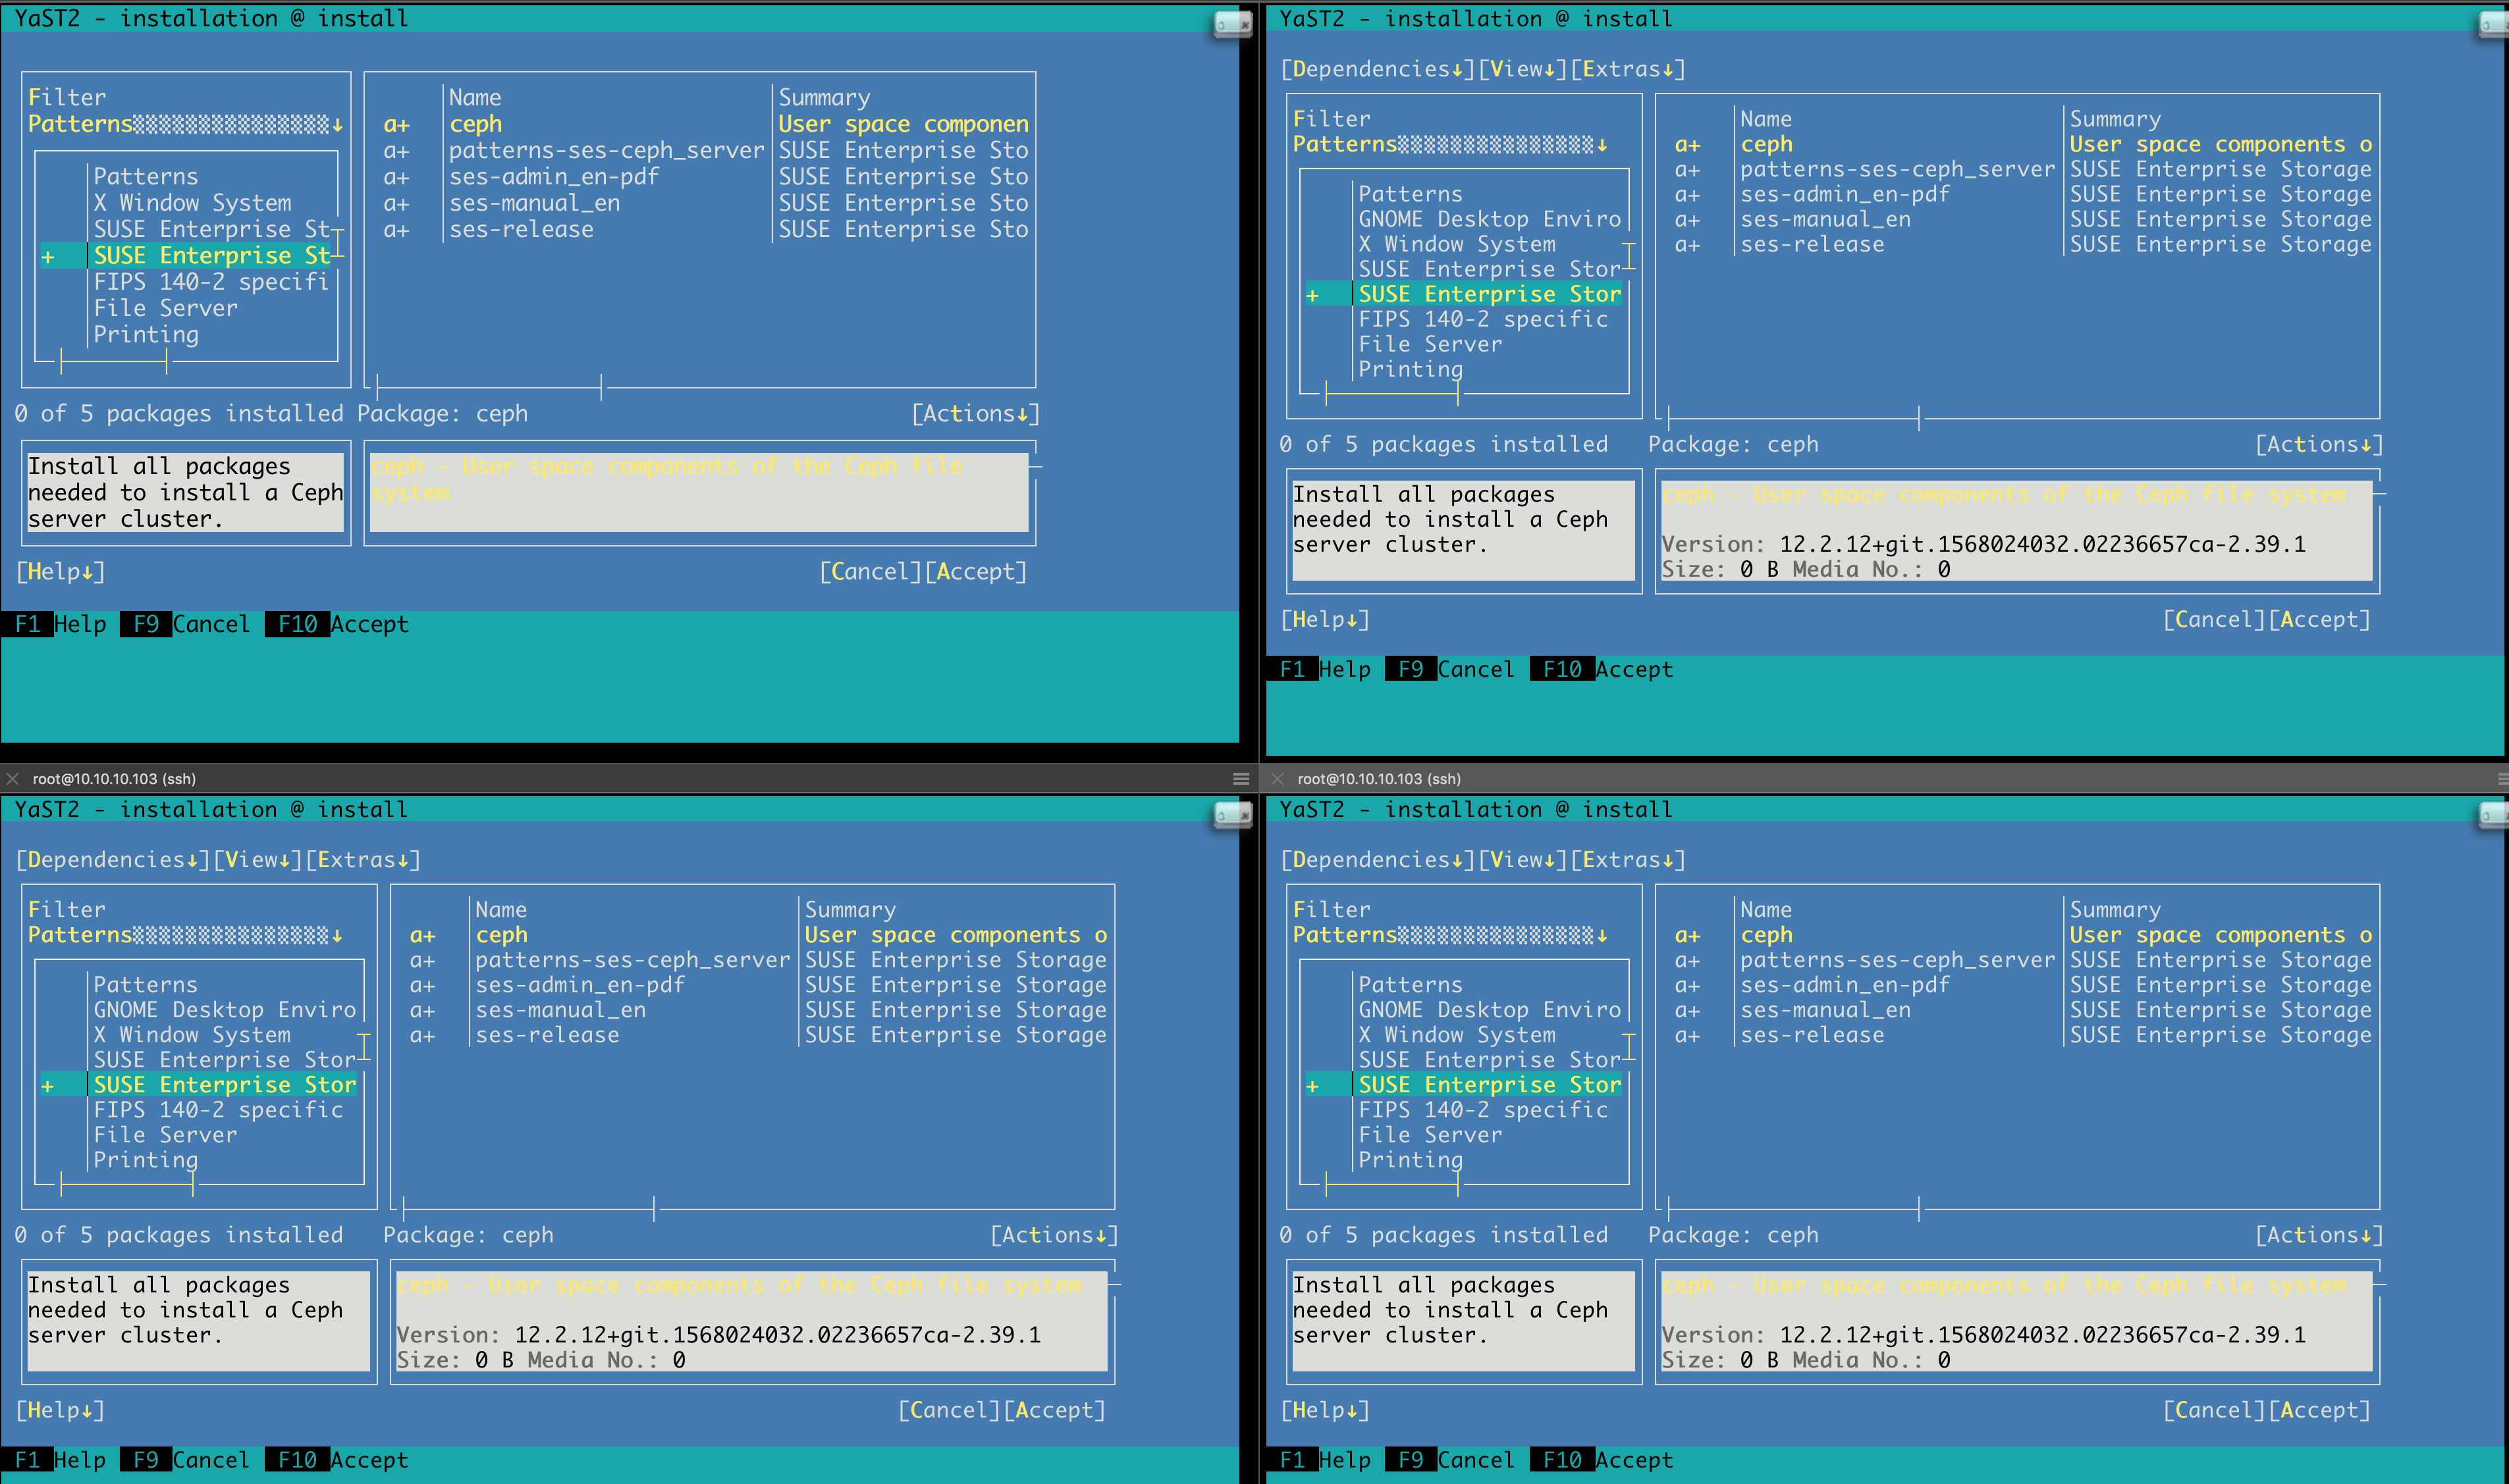
Figure 9: Configuring NTP on all Nodes #Deselect "AppArmor" and the unnecessary "X" and "GNOME" patterns, but select the "SUSE Enterprise Storage" pattern:
Figure 10: Selecting Patterns on all Nodes #De-activate the firewall on the nodes.
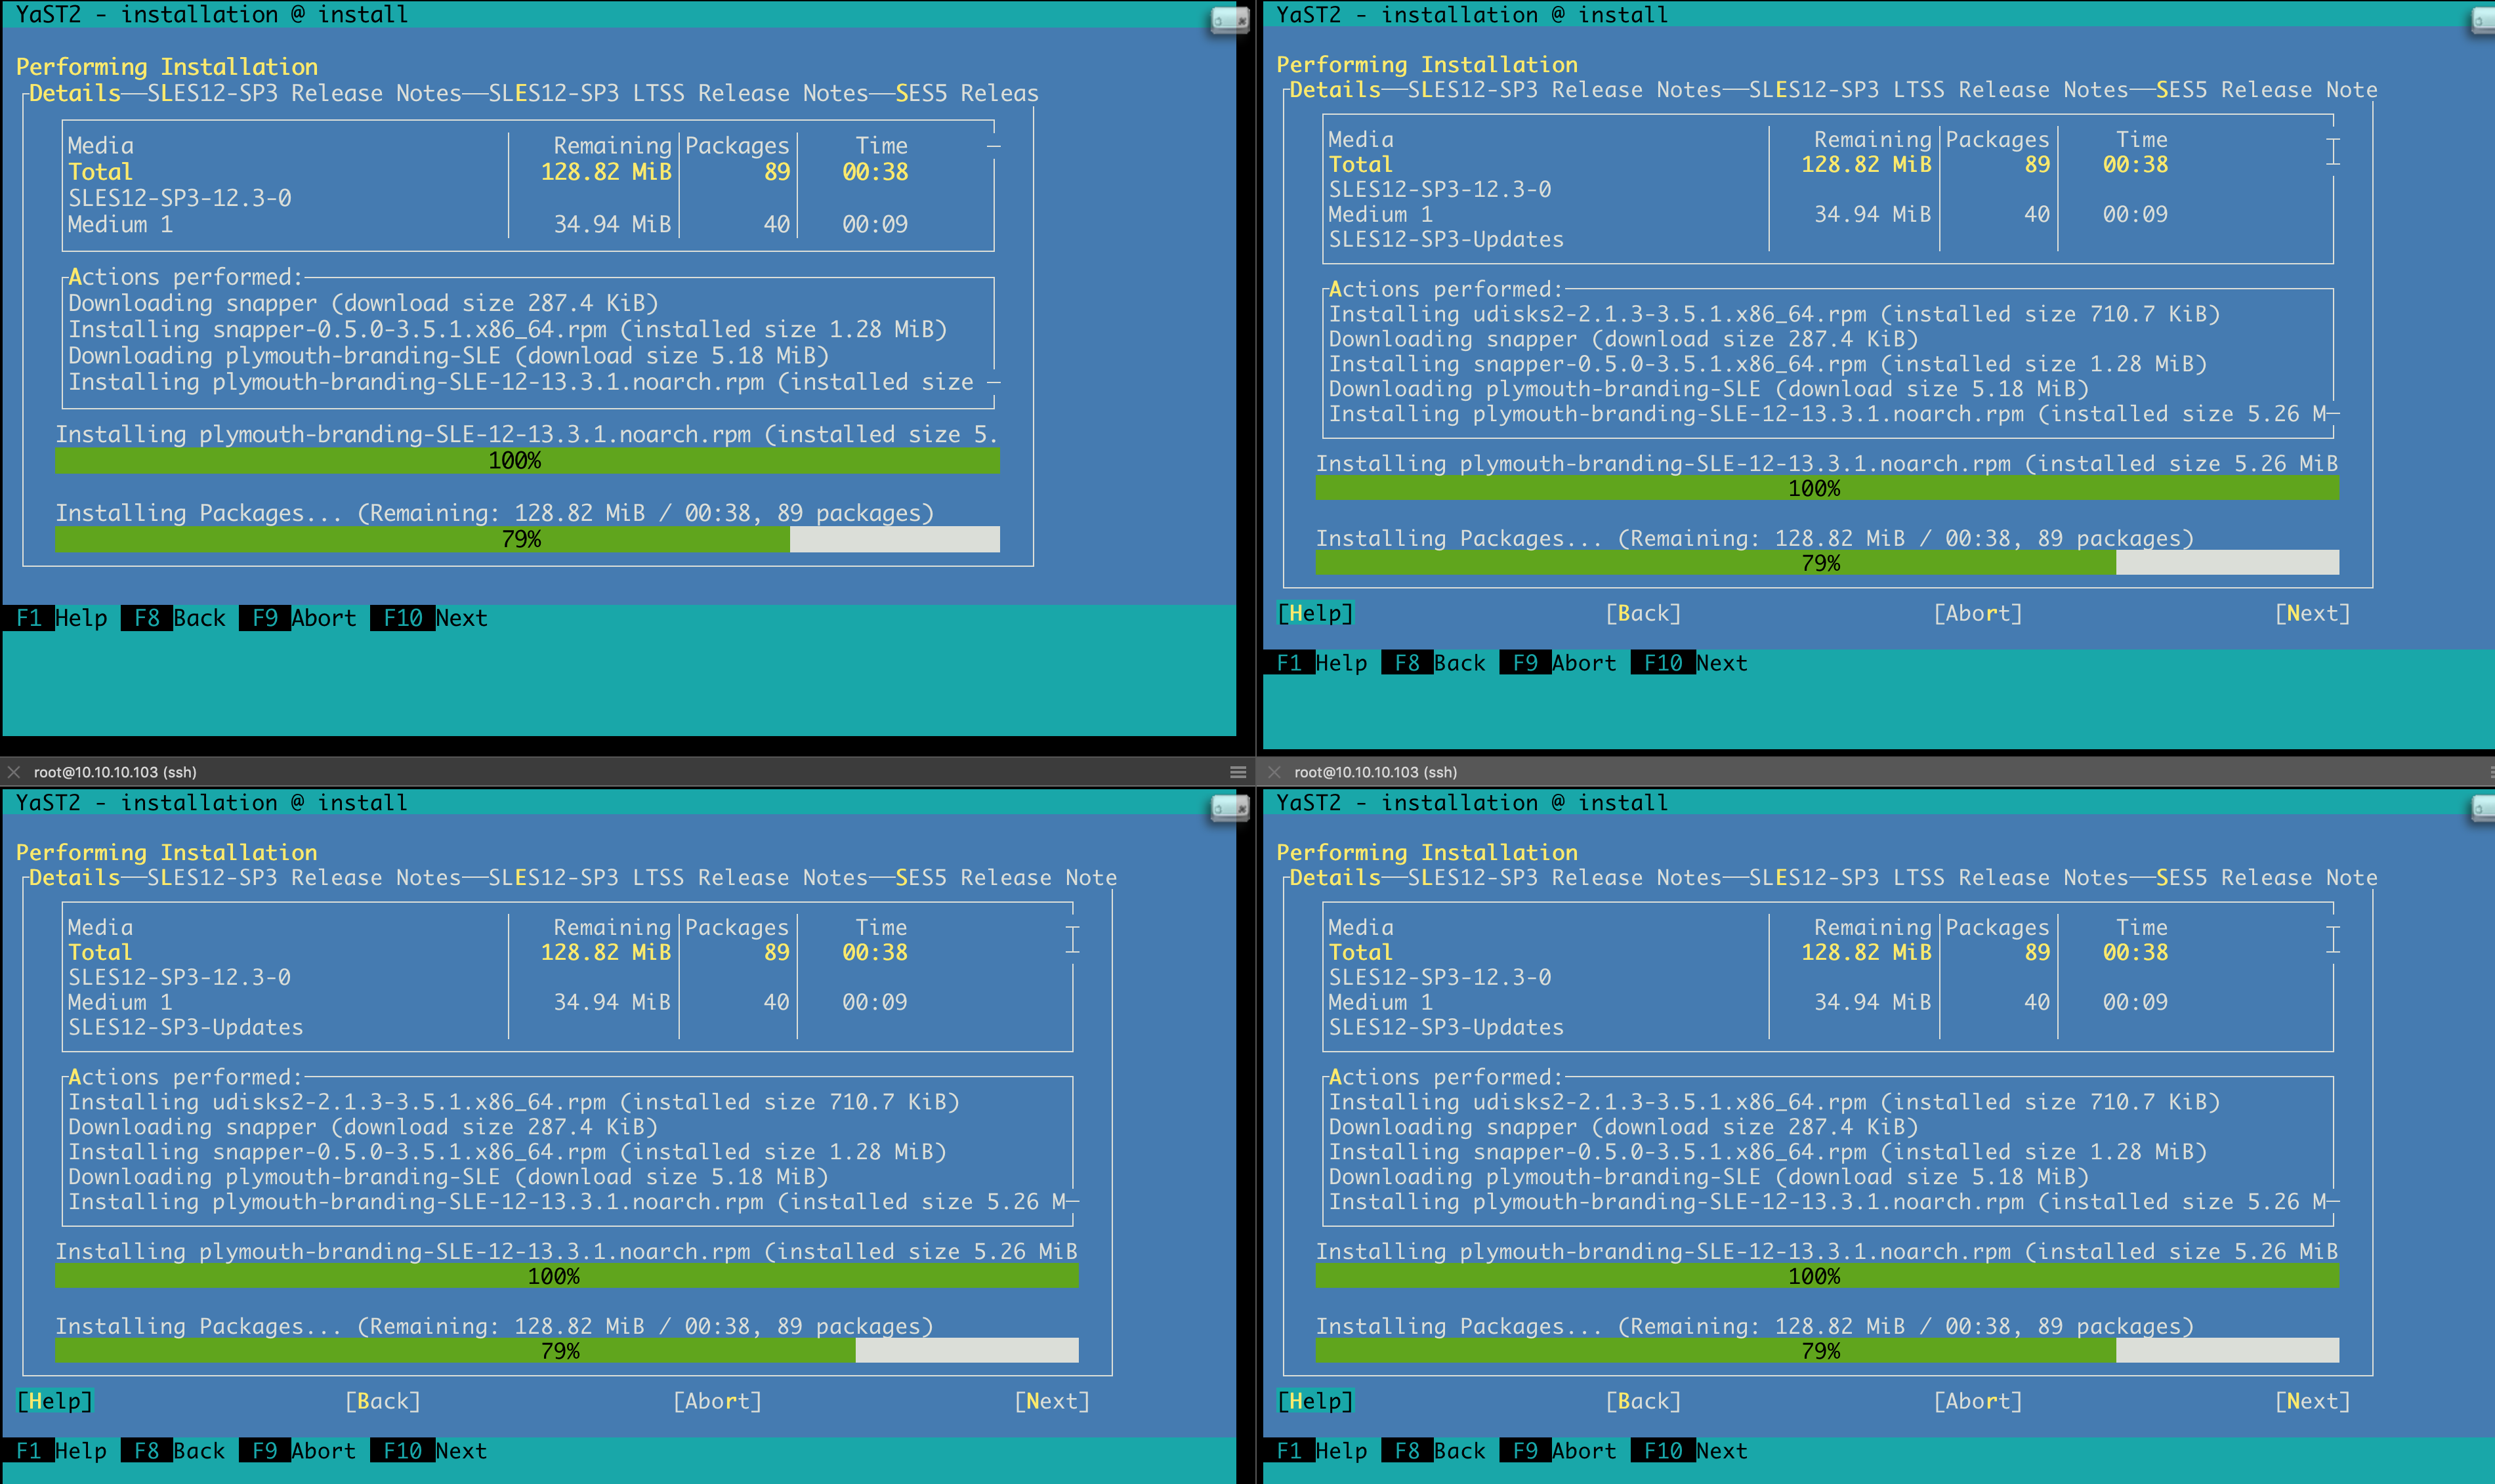
Start the installation on all nodes:
Figure 11: Starting Installation on all Nodes #When the nodes have rebooted, log in and finish the network/host name and NTP configurations, so that
hostname -freturns the FQDN of the nodes, andntpq -preturns a stratum less than 16:Figure 12: Finishing NTP configuration #Using
ssh-keygenthenssh-copy-id, spread your SUSE Enterprise Storage Admin nodesshpublic key to all other nodes.Verify that the drives you will allocate for SUSE Enterprise Storage OSDs are clean by wiping them.
On all nodes, including the Admin Node, install
salt-minion.On the Admin Node only (in our example,
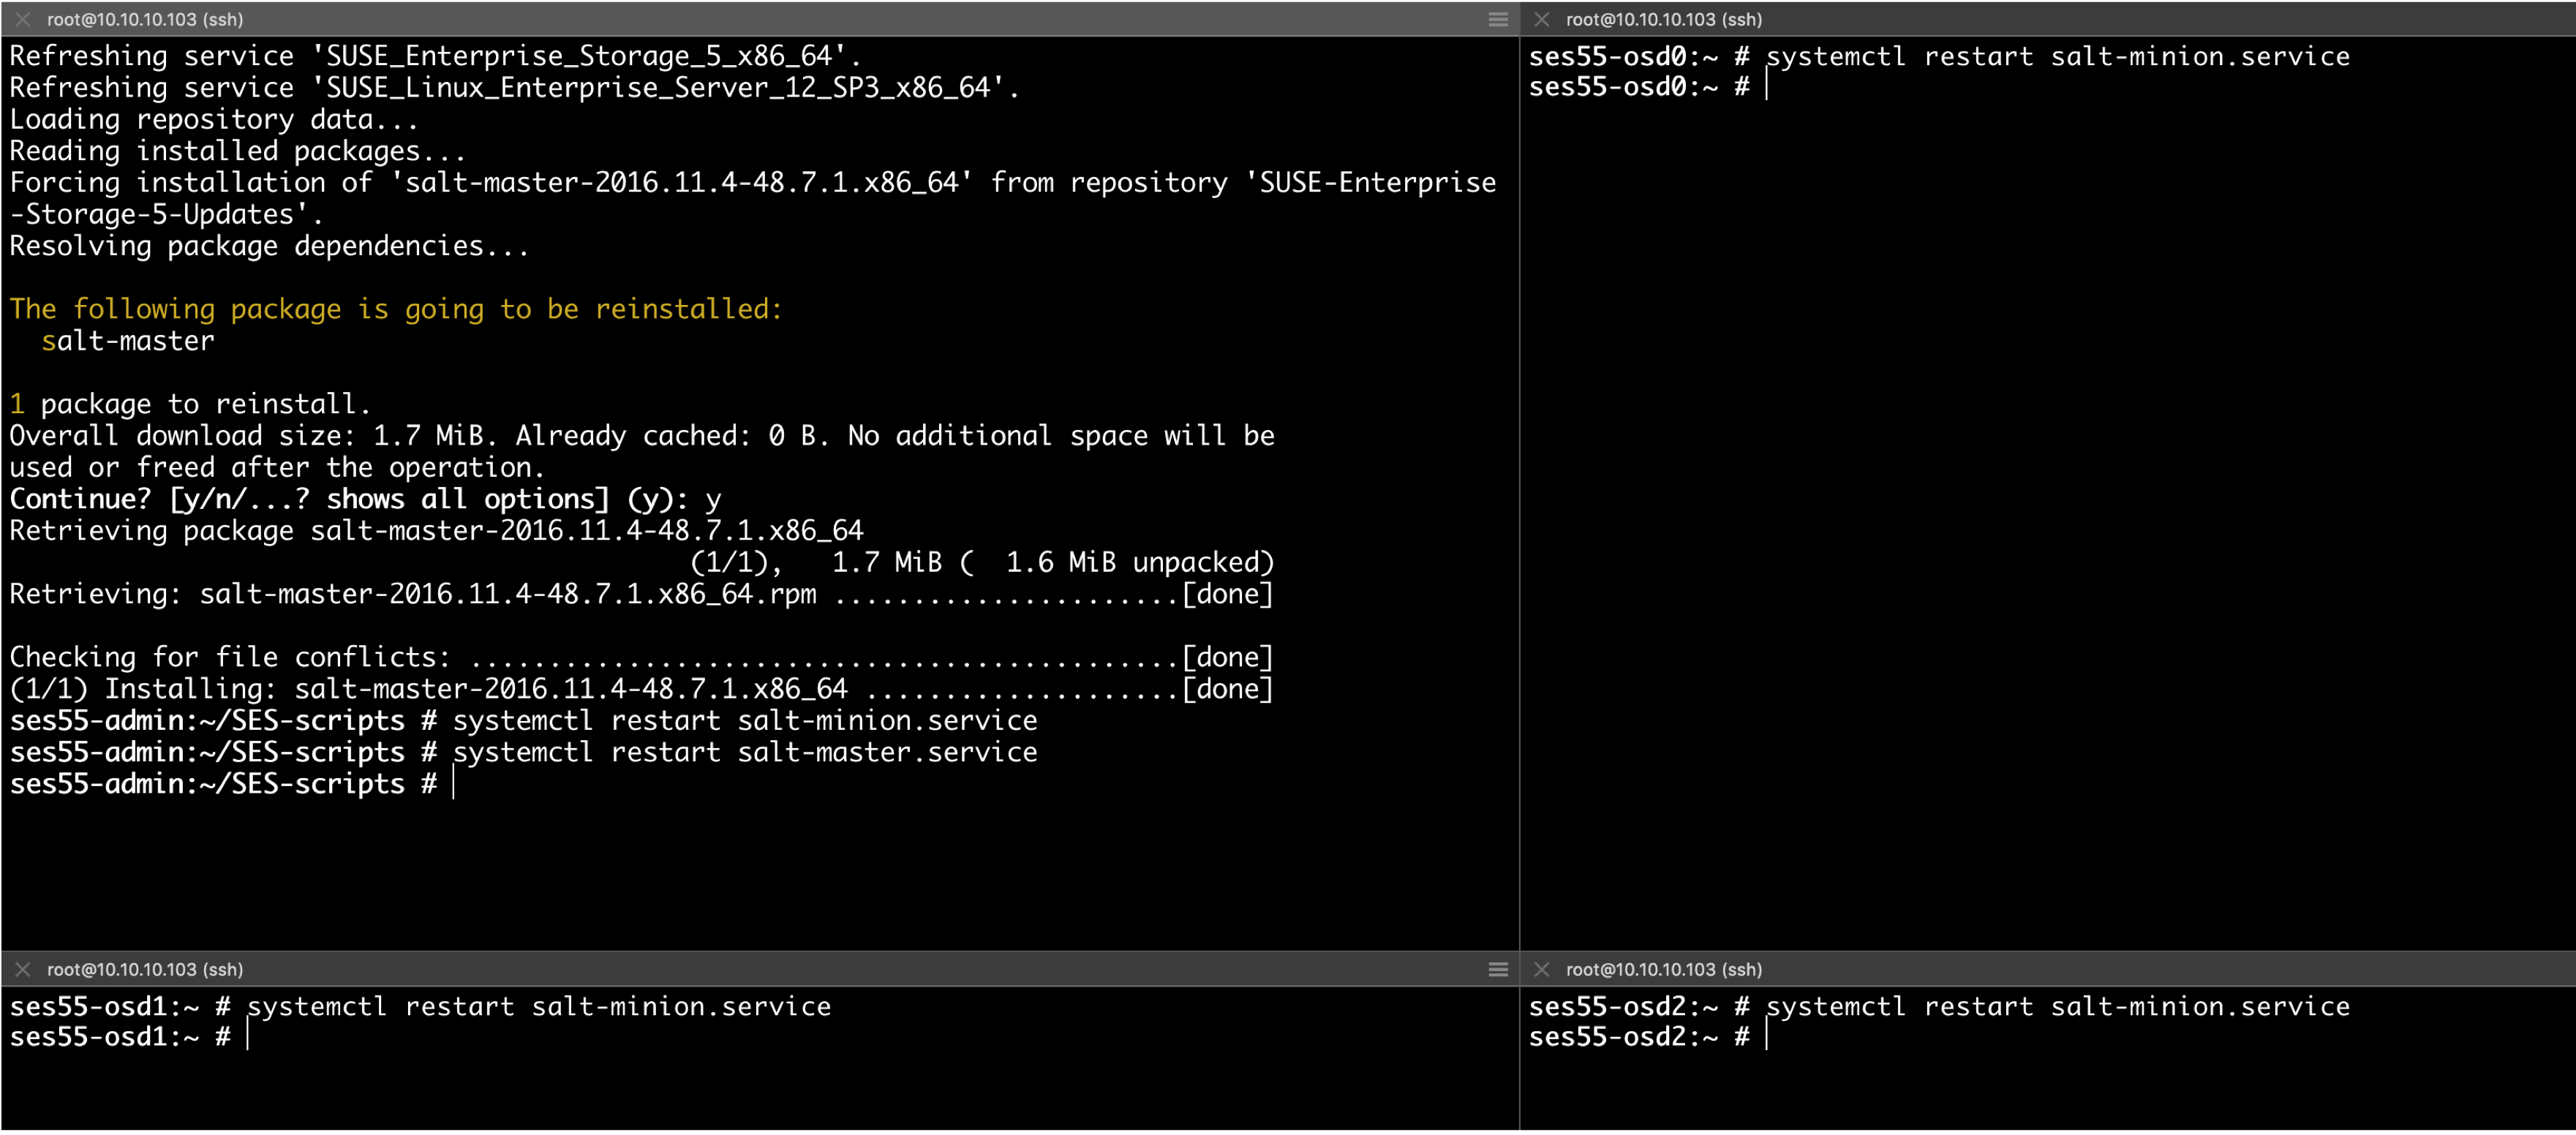
ses55-admin.suse-sap.net), also installsalt-masteranddeepsea.Then, restart
salt-minionon all nodes, and restartsalt-masteron the Admin Node:Figure 13: Installing Salt on all Nodes #Accept the related pending Salt keys:
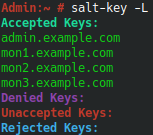
Figure 14: Accepting Salt Keys #Verify that
/srv/pillar/ceph/master_minion.slspoints to your Admin Node. In our example, it contains the FQDN of oursalt-master:master_minion: ses55-admin.suse-sap.netPrepare the cluster:
# salt-run state.orch ceph.stage.0
Figure 15: Preparing the Cluster #Collect information about the nodes:
# salt-run state.orch ceph.stage.1
Adapt the file
/srv/pillar/ceph/proposals/policy.cfgto your needs. In our example, where the only deployed service is OpenAttic, it contains the following:cluster-ceph/cluster/ses55-osd2.suse-sap.net.sls config/stack/default/ceph/cluster.yml config/stack/default/global.yml profile-default/cluster/ses55-admin.suse-sap.net.sls profile-default/cluster/ses55-osd0.suse-sap.net.sls profile-default/cluster/ses55-osd1.suse-sap.net.sls profile-default/cluster/ses55-osd2.suse-sap.net.sls profile-default/stack/default/ceph/minions/ses55-admin.suse-sap.net.yml profile-default/stack/default/ceph/minions/ses55-osd0.suse-sap.net.yml profile-default/stack/default/ceph/minions/ses55-osd1.suse-sap.net.yml profile-default/stack/default/ceph/minions/ses55-osd2.suse-sap.net.yml role-admin/cluster/ses55-admin.suse-sap.net.sls role-admin/cluster/ses55-osd0.suse-sap.net.sls role-admin/cluster/ses55-osd1.suse-sap.net.sls role-admin/cluster/ses55-osd2.suse-sap.net.sls role-master/cluster/ses55-admin.suse-sap.net.sls role-mgr/cluster/ses55-osd0.suse-sap.net.sls role-mgr/cluster/ses55-osd1.suse-sap.net.sls role-mgr/cluster/ses55-osd2.suse-sap.net.sls role-mon/cluster/ses55-osd0.suse-sap.net.sls role-mon/cluster/ses55-osd1.suse-sap.net.sls role-mon/cluster/ses55-osd2.suse-sap.net.sls role-openattic/cluster/ses55-admin.suse-sap.net.sls
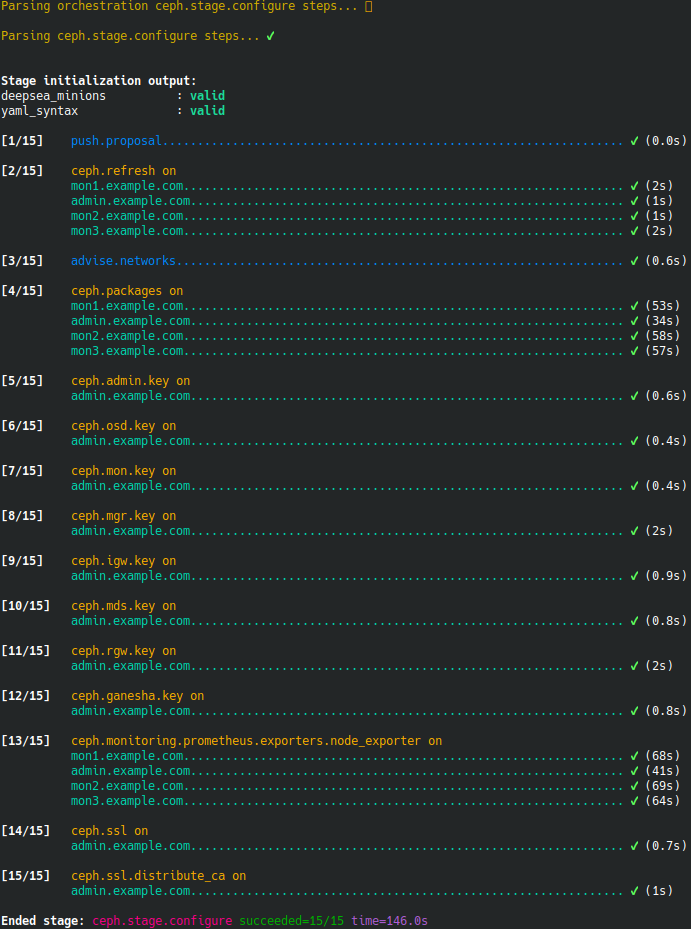
Prepare the final state of configuration files set:
# salt-run state.orch ceph.stage.2
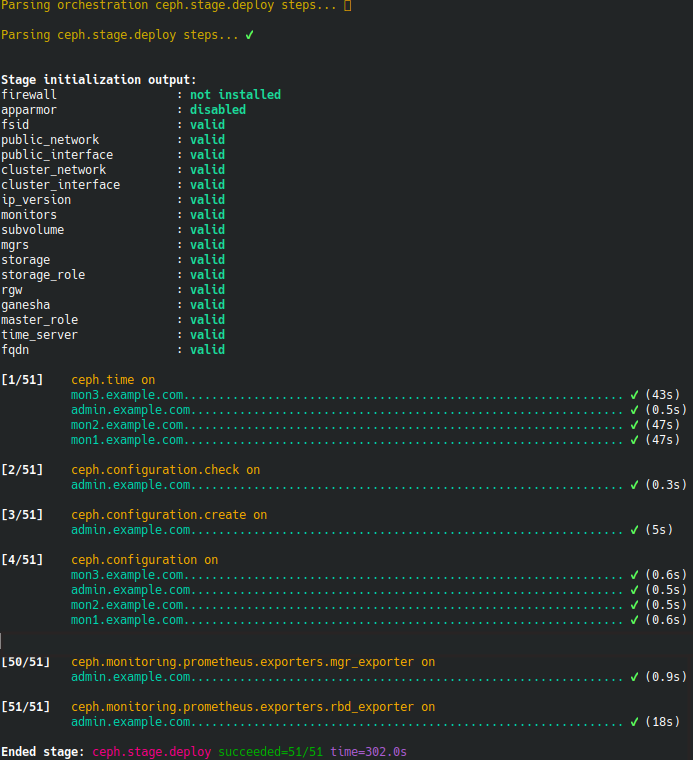
Figure 16: Preparing Configuration Files #You can now safely deploy your configuration:
# salt-run state.orch ceph.stage.3
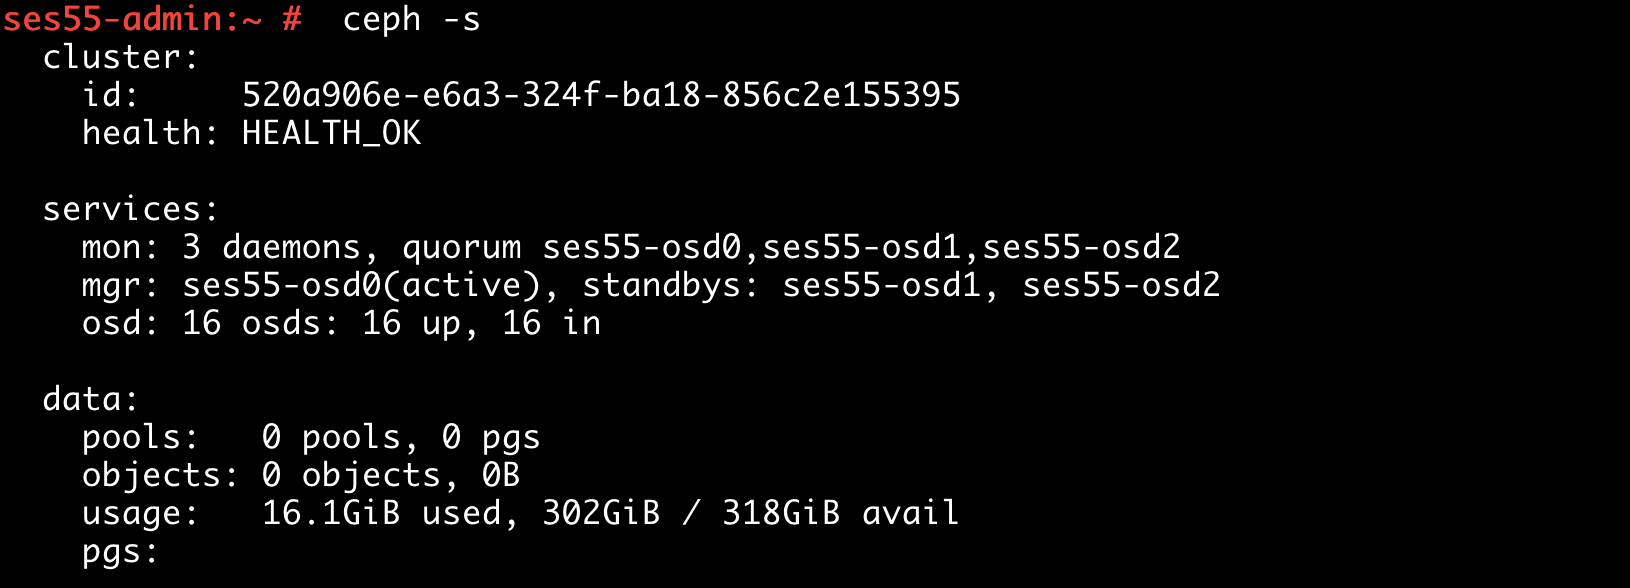
Figure 17: Deploying Configuration Files #When Stage 3 has completed successfully, check the cluster’s health to ensure that everything is running properly:
# ceph -s
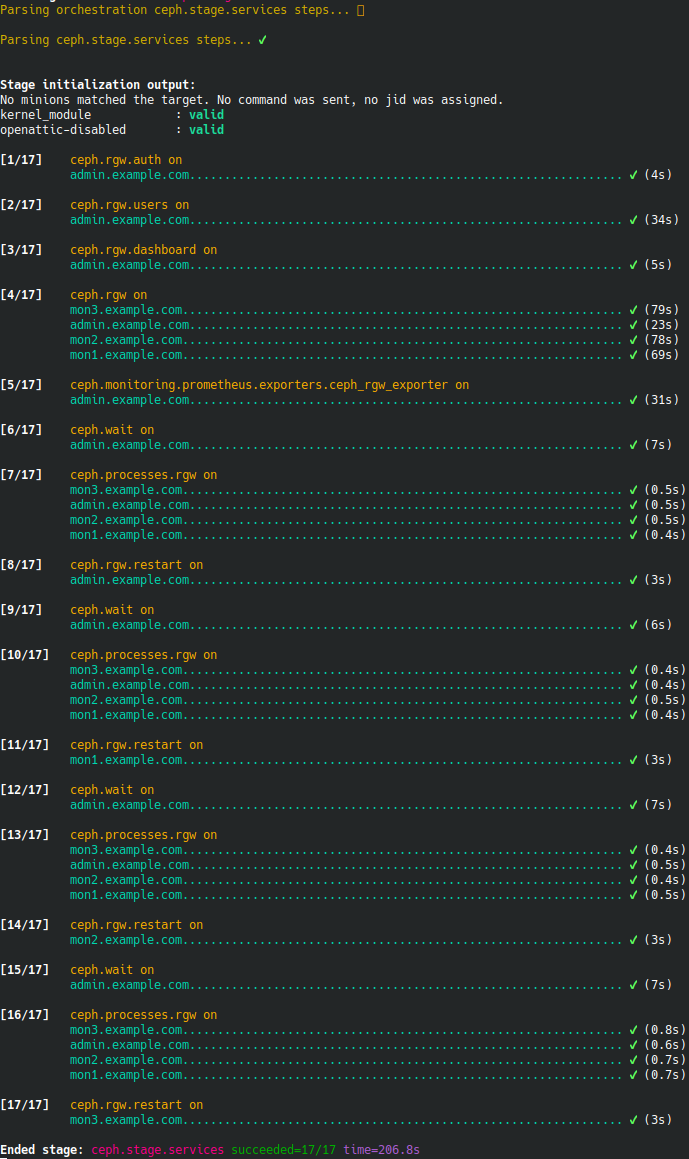
Figure 18: Checking Cluster Health #To get the benefits of the OpenAttic WebUI, you must now initiate
ceph.stage.4, which will install the OpenAttic service:# salt-run state.orch ceph.stage.4
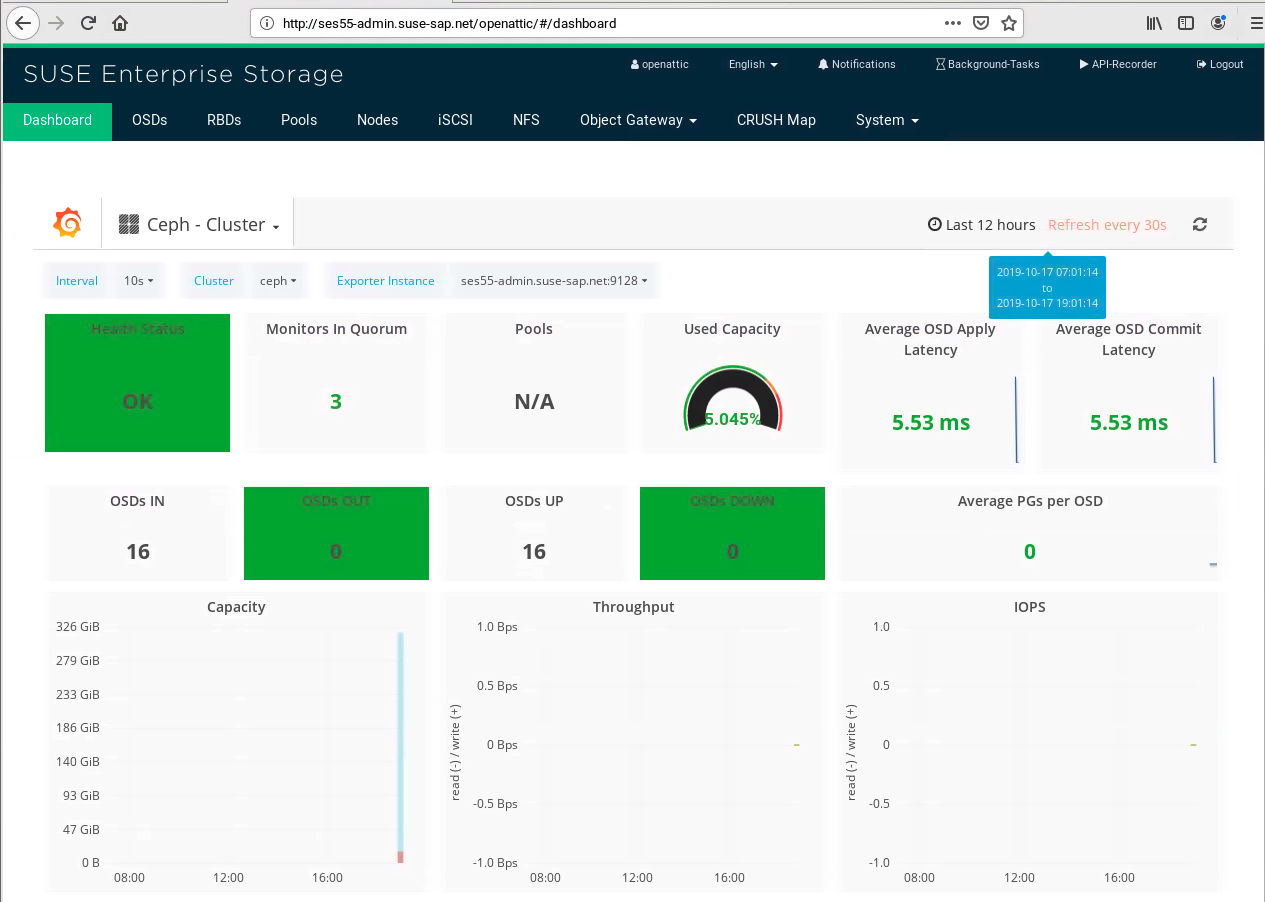
Figure 19: Installing OpenAttic service #You can now manage your cluster through the WebUI:
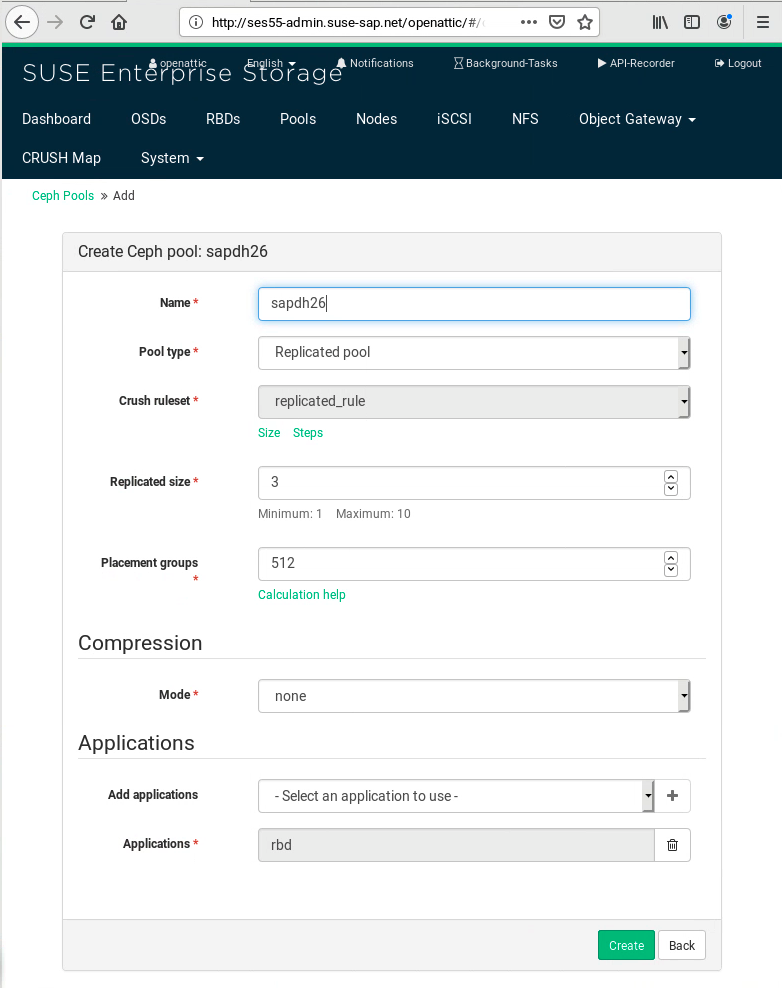
Figure 20: SUSE Enterprise Storage WebUI #To provide a Data Hub RBD device, you first need to create a related pool:
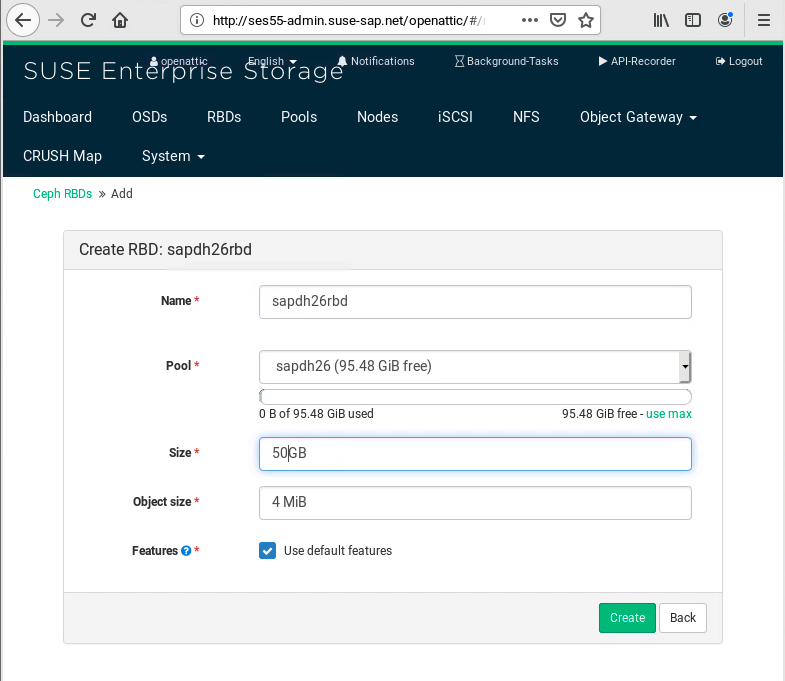
Then provide access to this pool through an RBD device:
Figure 22: Accessing Ceph Pool #
You can now go to Section 4.1.2, “Prerequisites on the SUSE CaaS Platform 4 cluster” and follow the prerequisites for a SUSE CaaS Platform Cluster.
7 Legal notice #
Copyright © 2006–2025 SUSE LLC and contributors. All rights reserved.
Permission is granted to copy, distribute and/or modify this document under the terms of the GNU Free Documentation License, Version 1.2 or (at your option) version 1.3; with the Invariant Section being this copyright notice and license. A copy of the license version 1.2 is included in the section entitled "GNU Free Documentation License".
SUSE, the SUSE logo and YaST are registered trademarks of SUSE LLC in the United States and other countries. For SUSE trademarks, see https://www.suse.com/company/legal/.
Linux is a registered trademark of Linus Torvalds. All other names or trademarks mentioned in this document may be trademarks or registered trademarks of their respective owners.
Documents published as part of the SUSE Best Practices series have been contributed voluntarily by SUSE employees and third parties. They are meant to serve as examples of how particular actions can be performed. They have been compiled with utmost attention to detail. However, this does not guarantee complete accuracy. SUSE cannot verify that actions described in these documents do what is claimed or whether actions described have unintended consequences. SUSE LLC, its affiliates, the authors, and the translators may not be held liable for possible errors or the consequences thereof.
Below we draw your attention to the license under which the articles are published.
8 GNU Free Documentation License #
Copyright © 2000, 2001, 2002 Free Software Foundation, Inc. 51 Franklin St, Fifth Floor, Boston, MA 02110-1301 USA. Everyone is permitted to copy and distribute verbatim copies of this license document, but changing it is not allowed.
0. PREAMBLE#
The purpose of this License is to make a manual, textbook, or other functional and useful document "free" in the sense of freedom: to assure everyone the effective freedom to copy and redistribute it, with or without modifying it, either commercially or noncommercially. Secondarily, this License preserves for the author and publisher a way to get credit for their work, while not being considered responsible for modifications made by others.
This License is a kind of "copyleft", which means that derivative works of the document must themselves be free in the same sense. It complements the GNU General Public License, which is a copyleft license designed for free software.
We have designed this License in order to use it for manuals for free software, because free software needs free documentation: a free program should come with manuals providing the same freedoms that the software does. But this License is not limited to software manuals; it can be used for any textual work, regardless of subject matter or whether it is published as a printed book. We recommend this License principally for works whose purpose is instruction or reference.
1. APPLICABILITY AND DEFINITIONS#
This License applies to any manual or other work, in any medium, that contains a notice placed by the copyright holder saying it can be distributed under the terms of this License. Such a notice grants a world-wide, royalty-free license, unlimited in duration, to use that work under the conditions stated herein. The "Document", below, refers to any such manual or work. Any member of the public is a licensee, and is addressed as "you". You accept the license if you copy, modify or distribute the work in a way requiring permission under copyright law.
A "Modified Version" of the Document means any work containing the Document or a portion of it, either copied verbatim, or with modifications and/or translated into another language.
A "Secondary Section" is a named appendix or a front-matter section of the Document that deals exclusively with the relationship of the publishers or authors of the Document to the Document’s overall subject (or to related matters) and contains nothing that could fall directly within that overall subject. (Thus, if the Document is in part a textbook of mathematics, a Secondary Section may not explain any mathematics.) The relationship could be a matter of historical connection with the subject or with related matters, or of legal, commercial, philosophical, ethical or political position regarding them.
The "Invariant Sections" are certain Secondary Sections whose titles are designated, as being those of Invariant Sections, in the notice that says that the Document is released under this License. If a section does not fit the above definition of Secondary then it is not allowed to be designated as Invariant. The Document may contain zero Invariant Sections. If the Document does not identify any Invariant Sections then there are none.
The "Cover Texts" are certain short passages of text that are listed, as Front-Cover Texts or Back-Cover Texts, in the notice that says that the Document is released under this License. A Front-Cover Text may be at most 5 words, and a Back-Cover Text may be at most 25 words.
A "Transparent" copy of the Document means a machine-readable copy, represented in a format whose specification is available to the general public, that is suitable for revising the document straightforwardly with generic text editors or (for images composed of pixels) generic paint programs or (for drawings) some widely available drawing editor, and that is suitable for input to text formatters or for automatic translation to a variety of formats suitable for input to text formatters. A copy made in an otherwise Transparent file format whose markup, or absence of markup, has been arranged to thwart or discourage subsequent modification by readers is not Transparent. An image format is not Transparent if used for any substantial amount of text. A copy that is not "Transparent" is called "Opaque".
Examples of suitable formats for Transparent copies include plain ASCII without markup, Texinfo input format, LaTeX input format, SGML or XML using a publicly available DTD, and standard-conforming simple HTML, PostScript or PDF designed for human modification. Examples of transparent image formats include PNG, XCF and JPG. Opaque formats include proprietary formats that can be read and edited only by proprietary word processors, SGML or XML for which the DTD and/or processing tools are not generally available, and the machine-generated HTML, PostScript or PDF produced by some word processors for output purposes only.
The "Title Page" means, for a printed book, the title page itself, plus such following pages as are needed to hold, legibly, the material this License requires to appear in the title page. For works in formats which do not have any title page as such, "Title Page" means the text near the most prominent appearance of the work’s title, preceding the beginning of the body of the text.
A section "Entitled XYZ" means a named subunit of the Document whose title either is precisely XYZ or contains XYZ in parentheses following text that translates XYZ in another language. (Here XYZ stands for a specific section name mentioned below, such as "Acknowledgements", "Dedications", "Endorsements", or "History".) To "Preserve the Title" of such a section when you modify the Document means that it remains a section "Entitled XYZ" according to this definition.
The Document may include Warranty Disclaimers next to the notice which states that this License applies to the Document. These Warranty Disclaimers are considered to be included by reference in this License, but only as regards disclaiming warranties: any other implication that these Warranty Disclaimers may have is void and has no effect on the meaning of this License.
2. VERBATIM COPYING#
You may copy and distribute the Document in any medium, either commercially or noncommercially, provided that this License, the copyright notices, and the license notice saying this License applies to the Document are reproduced in all copies, and that you add no other conditions whatsoever to those of this License. You may not use technical measures to obstruct or control the reading or further copying of the copies you make or distribute. However, you may accept compensation in exchange for copies. If you distribute a large enough number of copies you must also follow the conditions in section 3.
You may also lend copies, under the same conditions stated above, and you may publicly display copies.
3. COPYING IN QUANTITY#
If you publish printed copies (or copies in media that commonly have printed covers) of the Document, numbering more than 100, and the Document’s license notice requires Cover Texts, you must enclose the copies in covers that carry, clearly and legibly, all these Cover Texts: Front-Cover Texts on the front cover, and Back-Cover Texts on the back cover. Both covers must also clearly and legibly identify you as the publisher of these copies. The front cover must present the full title with all words of the title equally prominent and visible. You may add other material on the covers in addition. Copying with changes limited to the covers, as long as they preserve the title of the Document and satisfy these conditions, can be treated as verbatim copying in other respects.
If the required texts for either cover are too voluminous to fit legibly, you should put the first ones listed (as many as fit reasonably) on the actual cover, and continue the rest onto adjacent pages.
If you publish or distribute Opaque copies of the Document numbering more than 100, you must either include a machine-readable Transparent copy along with each Opaque copy, or state in or with each Opaque copy a computer-network location from which the general network-using public has access to download using public-standard network protocols a complete Transparent copy of the Document, free of added material. If you use the latter option, you must take reasonably prudent steps, when you begin distribution of Opaque copies in quantity, to ensure that this Transparent copy will remain thus accessible at the stated location until at least one year after the last time you distribute an Opaque copy (directly or through your agents or retailers) of that edition to the public.
It is requested, but not required, that you contact the authors of the Document well before redistributing any large number of copies, to give them a chance to provide you with an updated version of the Document.
4. MODIFICATIONS#
You may copy and distribute a Modified Version of the Document under the conditions of sections 2 and 3 above, provided that you release the Modified Version under precisely this License, with the Modified Version filling the role of the Document, thus licensing distribution and modification of the Modified Version to whoever possesses a copy of it. In addition, you must do these things in the Modified Version:
Use in the Title Page (and on the covers, if any) a title distinct from that of the Document, and from those of previous versions (which should, if there were any, be listed in the History section of the Document). You may use the same title as a previous version if the original publisher of that version gives permission.
List on the Title Page, as authors, one or more persons or entities responsible for authorship of the modifications in the Modified Version, together with at least five of the principal authors of the Document (all of its principal authors, if it has fewer than five), unless they release you from this requirement.
State on the Title page the name of the publisher of the Modified Version, as the publisher.
Preserve all the copyright notices of the Document.
Add an appropriate copyright notice for your modifications adjacent to the other copyright notices.
Include, immediately after the copyright notices, a license notice giving the public permission to use the Modified Version under the terms of this License, in the form shown in the Addendum below.
Preserve in that license notice the full lists of Invariant Sections and required Cover Texts given in the Document’s license notice.
Include an unaltered copy of this License.
Preserve the section Entitled "History", Preserve its Title, and add to it an item stating at least the title, year, new authors, and publisher of the Modified Version as given on the Title Page. If there is no section Entitled "History" in the Document, create one stating the title, year, authors, and publisher of the Document as given on its Title Page, then add an item describing the Modified Version as stated in the previous sentence.
Preserve the network location, if any, given in the Document for public access to a Transparent copy of the Document, and likewise the network locations given in the Document for previous versions it was based on. These may be placed in the "History" section. You may omit a network location for a work that was published at least four years before the Document itself, or if the original publisher of the version it refers to gives permission.
For any section Entitled "Acknowledgements" or "Dedications", Preserve the Title of the section, and preserve in the section all the substance and tone of each of the contributor acknowledgements and/or dedications given therein.
Preserve all the Invariant Sections of the Document, unaltered in their text and in their titles. Section numbers or the equivalent are not considered part of the section titles.
Delete any section Entitled "Endorsements". Such a section may not be included in the Modified Version.
Do not retitle any existing section to be Entitled "Endorsements" or to conflict in title with any Invariant Section.
Preserve any Warranty Disclaimers.
If the Modified Version includes new front-matter sections or appendices that qualify as Secondary Sections and contain no material copied from the Document, you may at your option designate some or all of these sections as invariant. To do this, add their titles to the list of Invariant Sections in the Modified Version’s license notice. These titles must be distinct from any other section titles.
You may add a section Entitled "Endorsements", provided it contains nothing but endorsements of your Modified Version by various parties—for example, statements of peer review or that the text has been approved by an organization as the authoritative definition of a standard.
You may add a passage of up to five words as a Front-Cover Text, and a passage of up to 25 words as a Back-Cover Text, to the end of the list of Cover Texts in the Modified Version. Only one passage of Front-Cover Text and one of Back-Cover Text may be added by (or through arrangements made by) any one entity. If the Document already includes a cover text for the same cover, previously added by you or by arrangement made by the same entity you are acting on behalf of, you may not add another; but you may replace the old one, on explicit permission from the previous publisher that added the old one.
The author(s) and publisher(s) of the Document do not by this License give permission to use their names for publicity for or to assert or imply endorsement of any Modified Version.
5. COMBINING DOCUMENTS#
You may combine the Document with other documents released under this License, under the terms defined in section 4 above for modified versions, provided that you include in the combination all of the Invariant Sections of all of the original documents, unmodified, and list them all as Invariant Sections of your combined work in its license notice, and that you preserve all their Warranty Disclaimers.
The combined work need only contain one copy of this License, and multiple identical Invariant Sections may be replaced with a single copy. If there are multiple Invariant Sections with the same name but different contents, make the title of each such section unique by adding at the end of it, in parentheses, the name of the original author or publisher of that section if known, or else a unique number. Make the same adjustment to the section titles in the list of Invariant Sections in the license notice of the combined work.
In the combination, you must combine any sections Entitled "History" in the various original documents, forming one section Entitled "History"; likewise combine any sections Entitled "Acknowledgements", and any sections Entitled "Dedications". You must delete all sections Entitled "Endorsements".
6. COLLECTIONS OF DOCUMENTS#
You may make a collection consisting of the Document and other documents released under this License, and replace the individual copies of this License in the various documents with a single copy that is included in the collection, provided that you follow the rules of this License for verbatim copying of each of the documents in all other respects.
You may extract a single document from such a collection, and distribute it individually under this License, provided you insert a copy of this License into the extracted document, and follow this License in all other respects regarding verbatim copying of that document.
7. AGGREGATION WITH INDEPENDENT WORKS#
A compilation of the Document or its derivatives with other separate and independent documents or works, in or on a volume of a storage or distribution medium, is called an "aggregate" if the copyright resulting from the compilation is not used to limit the legal rights of the compilation’s users beyond what the individual works permit. When the Document is included in an aggregate, this License does not apply to the other works in the aggregate which are not themselves derivative works of the Document.
If the Cover Text requirement of section 3 is applicable to these copies of the Document, then if the Document is less than one half of the entire aggregate, the Document’s Cover Texts may be placed on covers that bracket the Document within the aggregate, or the electronic equivalent of covers if the Document is in electronic form. Otherwise they must appear on printed covers that bracket the whole aggregate.
8. TRANSLATION#
Translation is considered a kind of modification, so you may distribute translations of the Document under the terms of section 4. Replacing Invariant Sections with translations requires special permission from their copyright holders, but you may include translations of some or all Invariant Sections in addition to the original versions of these Invariant Sections. You may include a translation of this License, and all the license notices in the Document, and any Warranty Disclaimers, provided that you also include the original English version of this License and the original versions of those notices and disclaimers. In case of a disagreement between the translation and the original version of this License or a notice or disclaimer, the original version will prevail.
If a section in the Document is Entitled "Acknowledgements", "Dedications", or "History", the requirement (section 4) to Preserve its Title (section 1) will typically require changing the actual title.
9. TERMINATION#
You may not copy, modify, sublicense, or distribute the Document except as expressly provided for under this License. Any other attempt to copy, modify, sublicense or distribute the Document is void, and will automatically terminate your rights under this License. However, parties who have received copies, or rights, from you under this License will not have their licenses terminated so long as such parties remain in full compliance.
10. FUTURE REVISIONS OF THIS LICENSE#
The Free Software Foundation may publish new, revised versions of the GNU Free Documentation License from time to time. Such new versions will be similar in spirit to the present version, but may differ in detail to address new problems or concerns. See http://www.gnu.org/copyleft/.
Each version of the License is given a distinguishing version number. If the Document specifies that a particular numbered version of this License "or any later version" applies to it, you have the option of following the terms and conditions either of that specified version or of any later version that has been published (not as a draft) by the Free Software Foundation. If the Document does not specify a version number of this License, you may choose any version ever published (not as a draft) by the Free Software Foundation.
ADDENDUM: How to use this License for your documents#
Copyright (c) YEAR YOUR NAME.
   Permission is granted to copy, distribute and/or modify this document
   under the terms of the GNU Free Documentation License, Version 1.2
   or any later version published by the Free Software Foundation;
   with no Invariant Sections, no Front-Cover Texts, and no Back-Cover Texts.
   A copy of the license is included in the section entitled “GNU
   Free Documentation License”.
If you have Invariant Sections, Front-Cover Texts and Back-Cover Texts, replace the “ with…Texts.” line with this:
with the Invariant Sections being LIST THEIR TITLES, with the
   Front-Cover Texts being LIST, and with the Back-Cover Texts being LIST.
If you have Invariant Sections without Cover Texts, or some other combination of the three, merge those two alternatives to suit the situation.
If your document contains nontrivial examples of program code, we recommend releasing these examples in parallel under your choice of free software license, such as the GNU General Public License, to permit their use in free software.
