Oracle RAC on SUSE Linux Enterprise Server 12 SP1
Installation Guide for x86-64 Architectures
3rd party
In database computing, Oracle Real Application Clusters (RAC) provides software for clustering and high availability in Oracle database environments. Oracle includes RAC with the Standard Edition, provided the nodes are clustered using Oracle Clusterware.
SUSE Linux Enterprise Server provides Oracle customers a scalable platform for demanding workloads and applications such as Oracle Database. Oracle and SUSE have teamed up to enable Linux in enterprises with Oracle Database and have created a world-class solution that offers real-grid benefits for IT data centers today. This document provides the details for installing Oracle RAC 12.1.0.2.0 on SUSE Linux Enterprise Server 12 OS.
Disclaimer: Documents published as part of the SUSE Best Practices series have been contributed voluntarily by SUSE employees and third parties. They are meant to serve as examples of how particular actions can be performed. They have been compiled with utmost attention to detail. However, this does not guarantee complete accuracy. SUSE cannot verify that actions described in these documents do what is claimed or whether actions described have unintended consequences. SUSE LLC, its affiliates, the authors, and the translators may not be held liable for possible errors or the consequences thereof.
1 Introduction #
This document provides the details for installing Oracle RAC 12.1.0.2.0 on SUSE Linux Enterprise Server 12. For the example at hand, the x86_64 version of both the Oracle Database 12c Enterprise and SUSE Linux Enterprise Server is used. Similar steps apply to other platforms (x86, IA64, etc.). If you encounter any problem or have general questions, submit your query to <suse-oracle@listx.novell.com>.
The official Oracle product documentation is available at: http://docs.oracle.com/en/
2 Hardware and Software Requirements #
Hardware Requirements#
| Requirement | Minimum |
|---|---|
| RAM | 32 GB |
| Swap space | Approximately twice the size of RAM |
| Disk space in /tmp | 8 GB |
| Disk space for software files | 8 GB |
| Disk space for database files | 8 GB |
Software Requirements#
SUSE:
SUSE Linux Enterprise Server 12 SP1 (x86_64)
Oracle:
Database 12c Enterprise/Standard Editions (x86_64)
(http://www.oracle.com/technetwork/indexes/downloads/index.html#database)
3 Testing 4-Node Cluster Information #
HP DL360 Gen9 Server (Intel Xeon 2x12 core ~ 48 CPU) with 64GB RAM
4 NIC per server (two bonded as active/passive), plus a Static IP Address
Local HDD (500 GB)
Three shared SAN Partition ( ASM: 30 GB and NFS: 400 GB, Other: 600 B)
SUSE Linux Enterprise Server 12 SP1 (x86_64)
Kernel version: 3.12.49-11-default
4 Prerequisites #
4.1 Installing SUSE Linux Enterprise Server 12 #
Install SUSE Linux Enterprise Server 12 on each node of the cluster. To do so, follow the instructions in the official SUSE Linux Enterprise Server documentation at https://documentation.suse.com/sles/12-SP5/
4.2 Network Configuration #
The network configuration for your Oracle RAC installation should look as follows:
            #Private:
            10.1.1.1        c2n1-priv
            10.1.1.2        c2n2-priv
            10.1.1.3        c2n3-priv
            10.1.1.4        c2n4-priv

            #Public:
            137.65.135.72   c2n1.provo.novell.com c2n1
            137.65.135.73   c2n2.provo.novell.com c2n2
            137.65.135.74   c2n3.provo.novell.com c2n3
            137.65.135.75   c2n4.provo.novell.com c2n4

            #Virtual
            137.65.135.76               c2n1-vip        c2n1-vip.provo.novell.com
            137.65.135.77               c2n2-vip        c2n2-vip.provo.novell.com
            137.65.135.78               c2n3-vip        c2n3-vip.provo.novell.com
            137.65.135.79               c2n4-vip        c2n4-vip.provo.novell.com

            #SCAN:
            c2-scan.provo.novell.com (137.65.135.87)
            c2-scan.provo.novell.com (137.65.135.148)
            c2-scan.provo.novell.com (137.65.135.149)
5 Oracle RAC Installation #
The following sections explain how to perform your Oracle RAC installation.
5.1 Installing Oracle Grid Infrastructure #
5.1.1 Preparation #
Log in to the SUSE Linux Enterprise Server 12 64-bit OS as a non-administration user. Download the Oracle Database 12c Release 1 Grid Infrastructure (12.1.0.2.0) for Linux x86-64.
Extract grid.zip and run the installer
'./runInstaller' from Grid ShipHome.
5.1.2 Installation #
For the actual installation, follow the steps below:
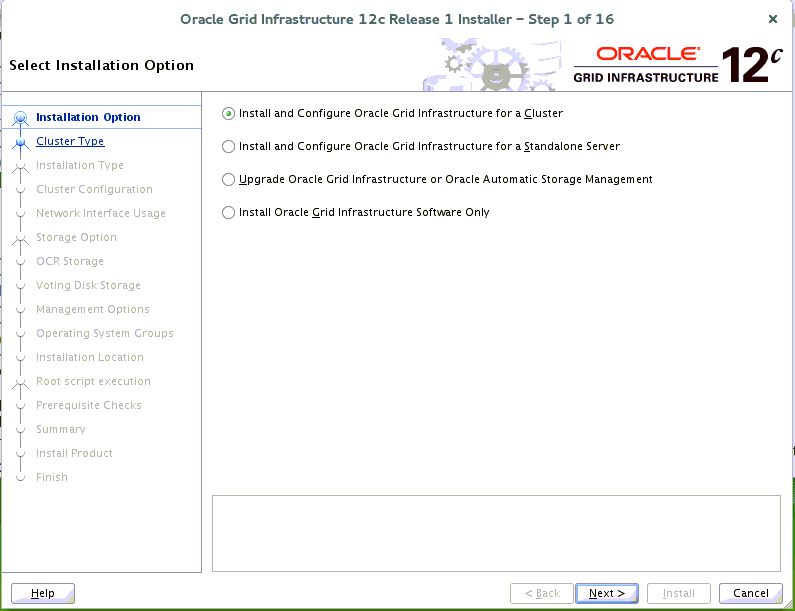
Select Installation Option.
Figure 1: Installation Option #Choose the option Install and Configure Oracle Grid Infrastructure for a Cluster", then click Next to continue.
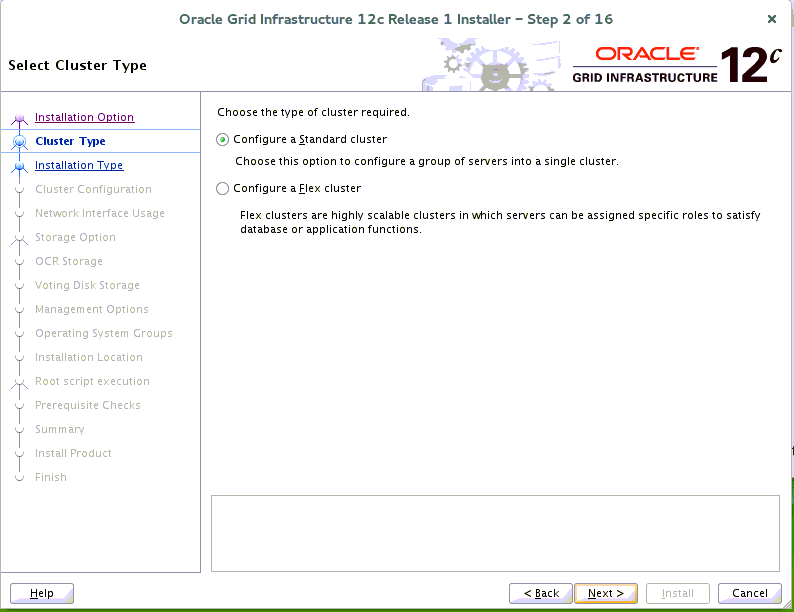
Proceed to Cluster Type.
Figure 2: Cluster Type #Choose the option Configure a Standard Cluster", then click Next to continue.
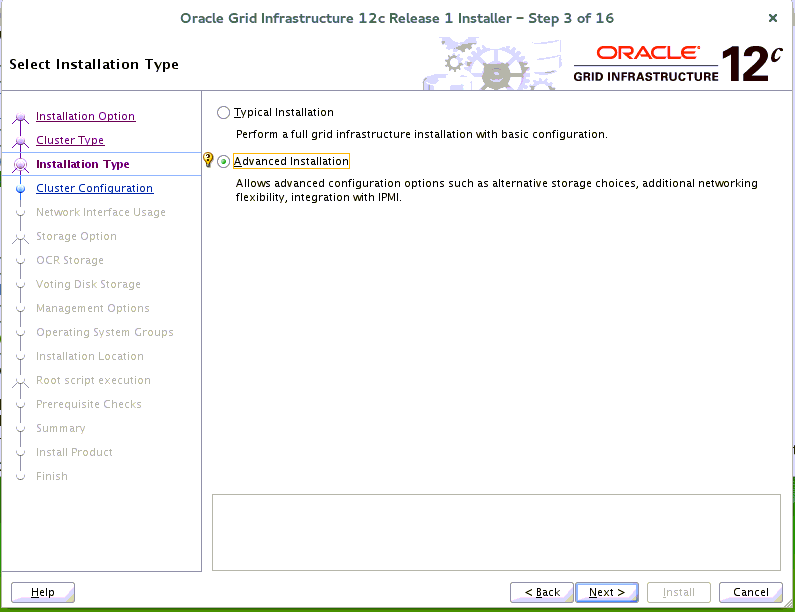
Proceed to Installation Type.
Figure 3: Installation Type #Choose the option Advanced Installation", then click Next to continue.
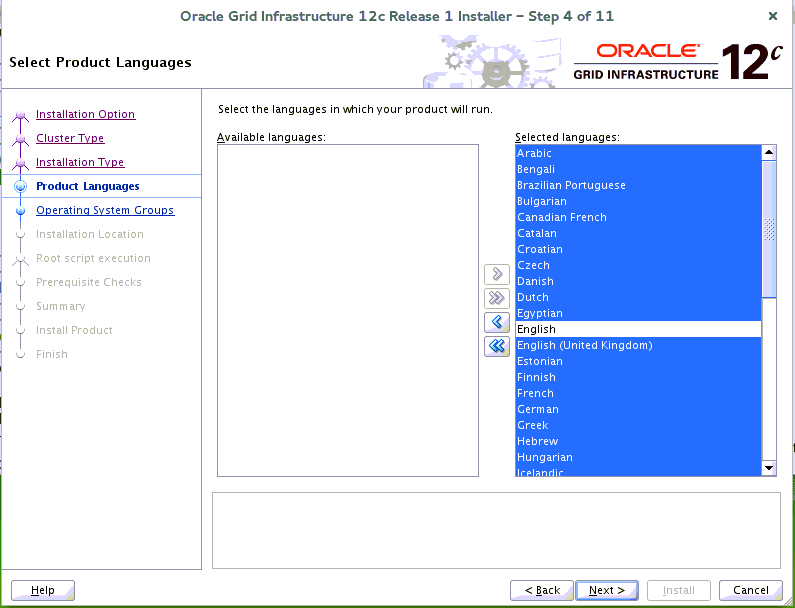
Proceed to Product Languages.
Figure 4: Product Languages #Select all languages, then click Next to continue.
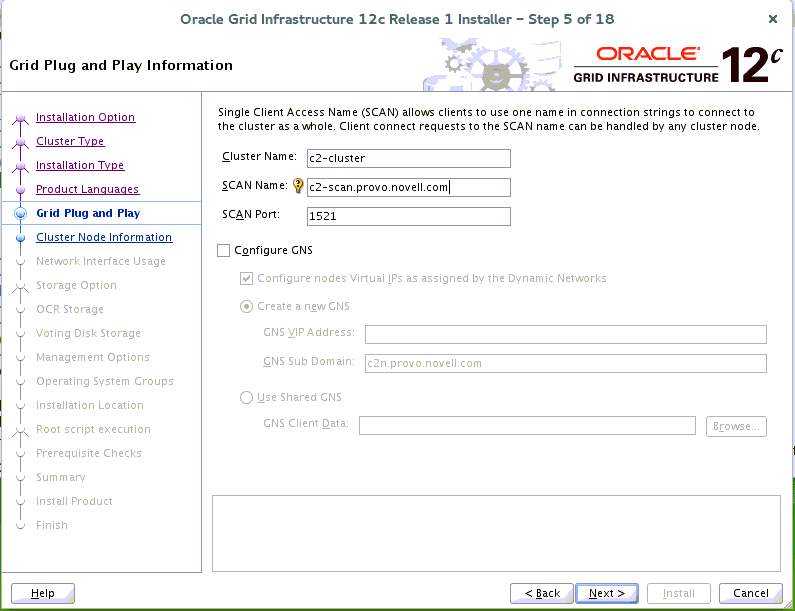
Fill in the required Grid Plug and Play Information.
Figure 5: Grid Plug and Play Information #Fill in the information as displayed in the screenshot, then click Next to continue.
For more details about the GNS configuration consult the official Oracle documentation at https://docs.oracle.com/database/121/CWLIN/toc.htm.
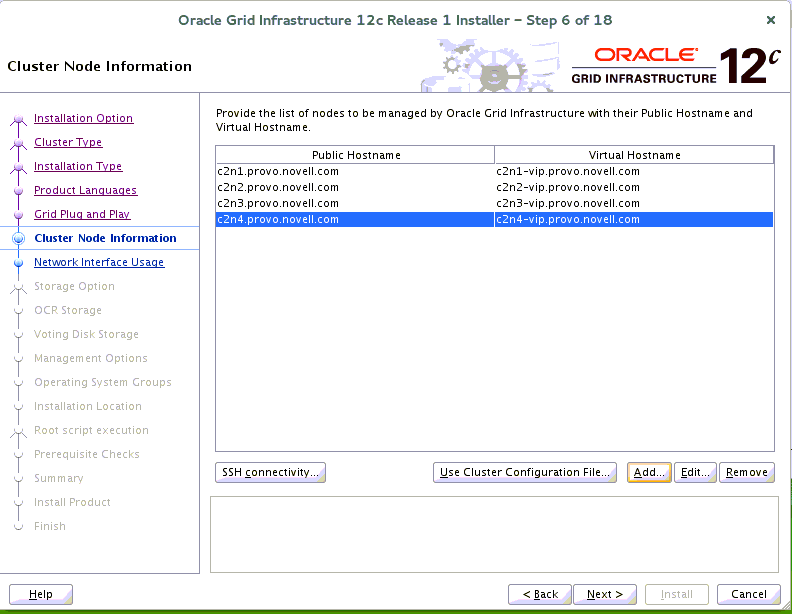
Proceed to Cluster Node Information.
Figure 6: Cluster Node Information #Provide the list of nodes with their public host name and virtual host name, then click Next to continue.
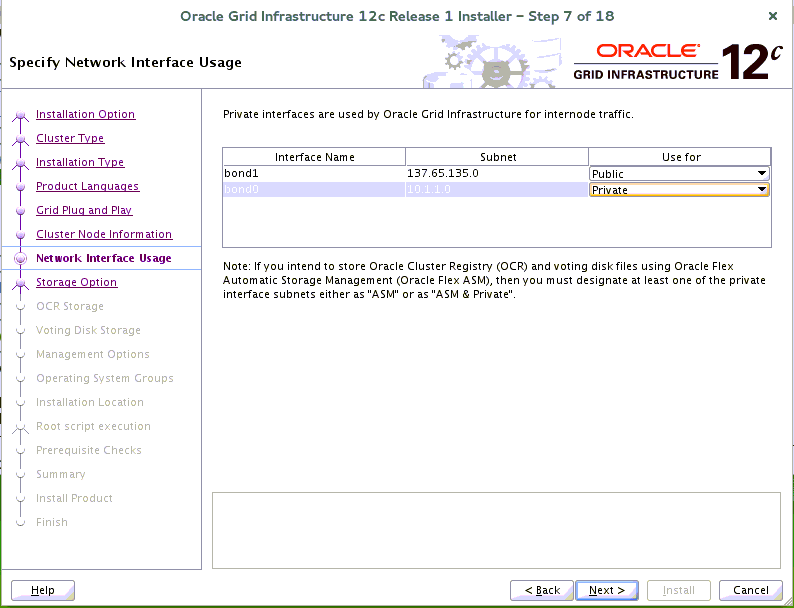
Specify the Network Interface Usage .
Figure 7: Network Interface Usage #Provide the details of the interfaces that are used by Oracle Grid for public and private traffic, then click Next to continue.
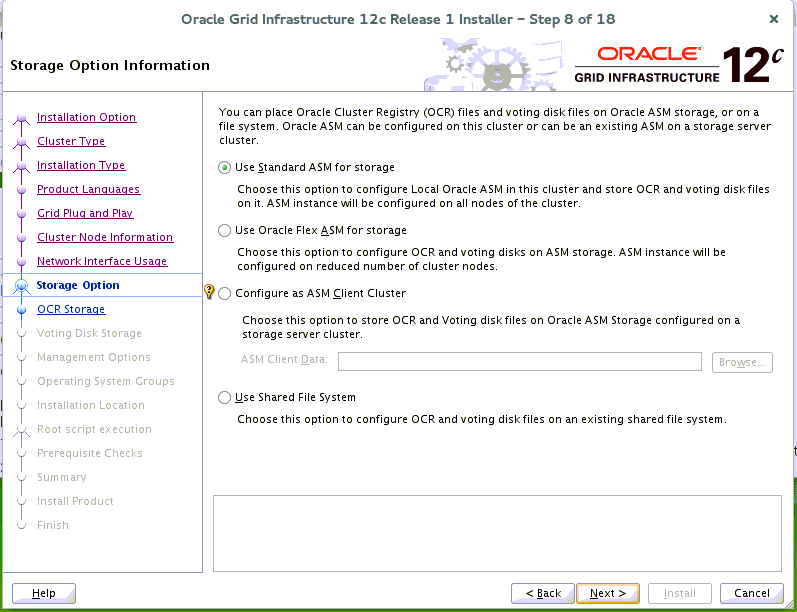
Fill in the Storage Option Information.
Figure 8: Storage Option Information #Choose the option Use Standard ASM for storage, then click Next to continue.
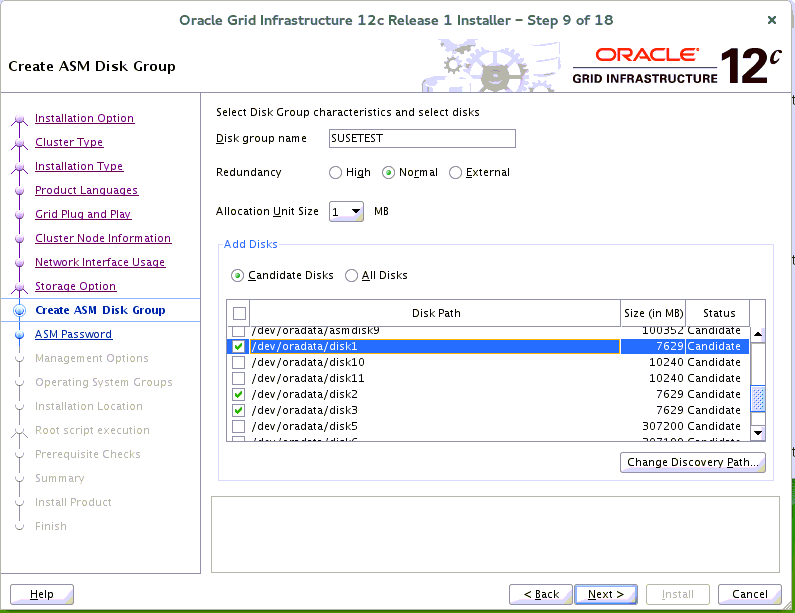
Proceed to Create ASM Disk Group.
Figure 9: Create AMS Disk Group #Depending on your needs, create an ASM Disk Group , then click Next to continue.
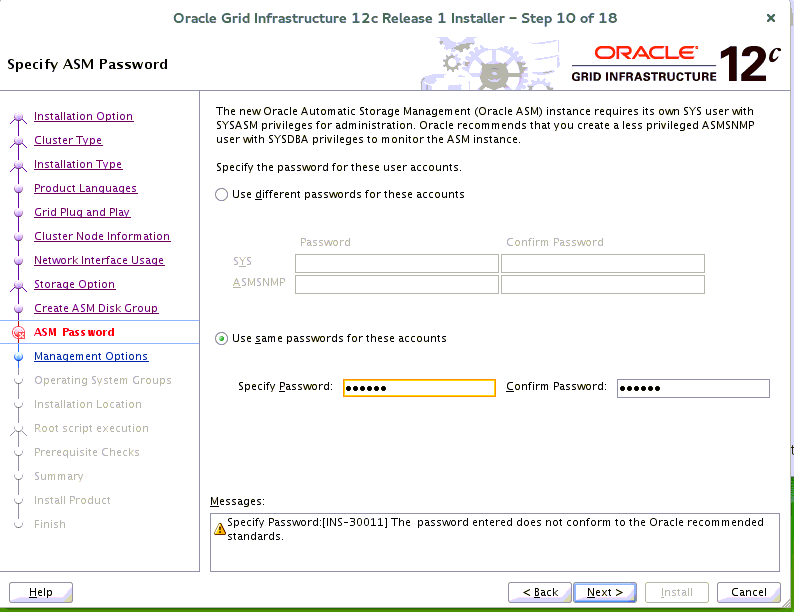
Specify the ASM Password.
Figure 10: ASM Password #Fill in the ASM Password as shown in the screenshot above, then click Next to continue.
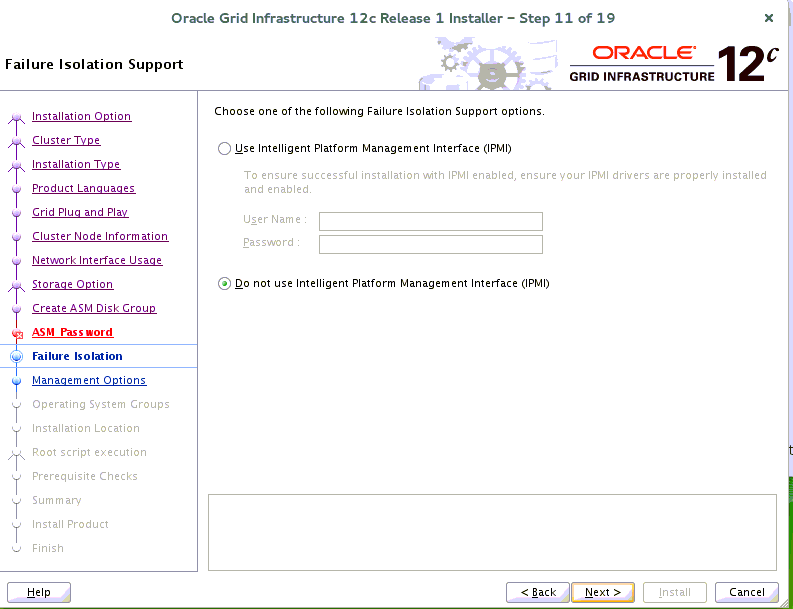
Define the Failure Isolation Support.
Figure 11: Failure Isolation Support #Choose the option Do not use IPMI, then click Next to continue.
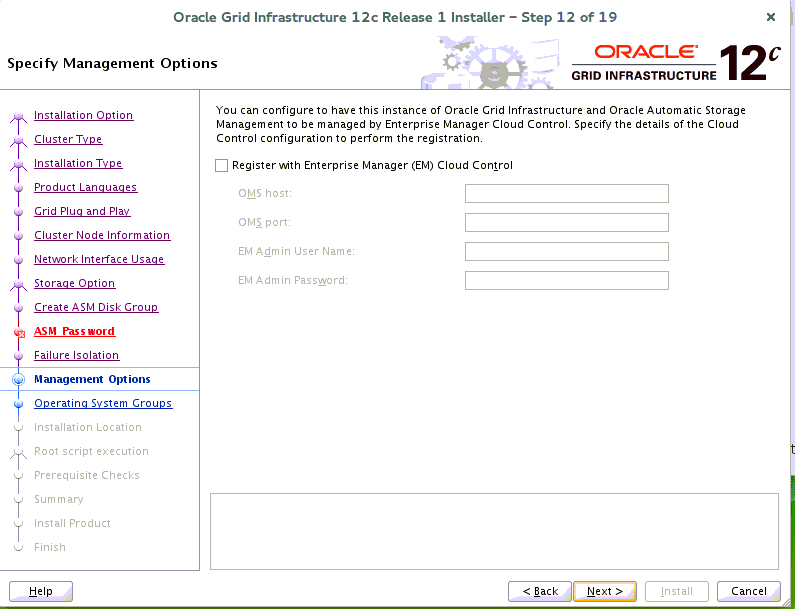
Specify the Management Options.
Figure 12: Management Options #If you select or deselect the option Register with EM depends on your needs. After you made your choice click Next to continue.
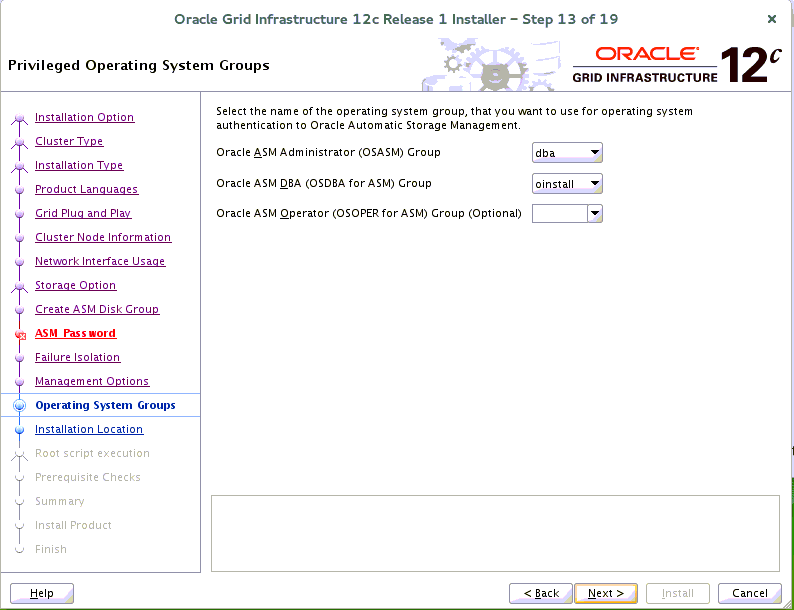
Proceed to Privileged Operating System Groups.
Figure 13: Privileged Operating System Groups #The operating system groups are selected by default. Click Next to continue.
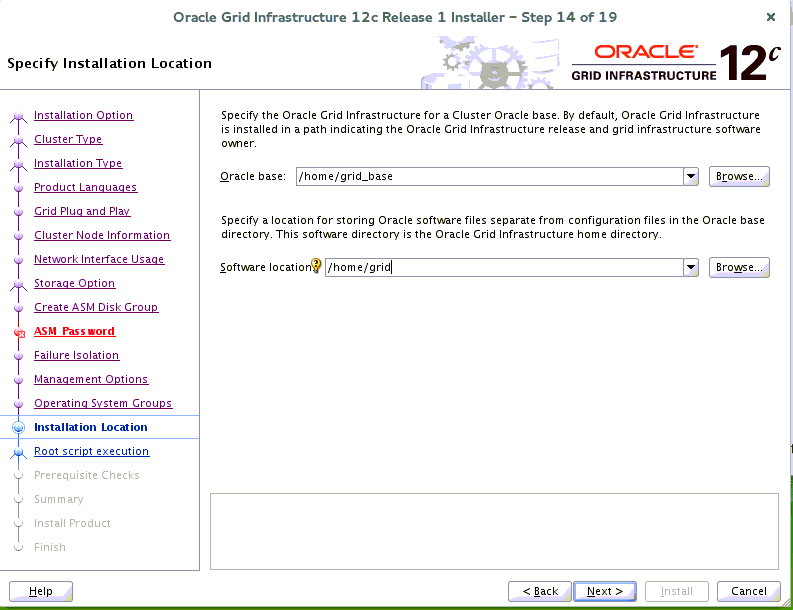
Specify the Installation Location.
Figure 14: Installation Location #Fill in the Oracle base and the Software location, then click Next to continue.
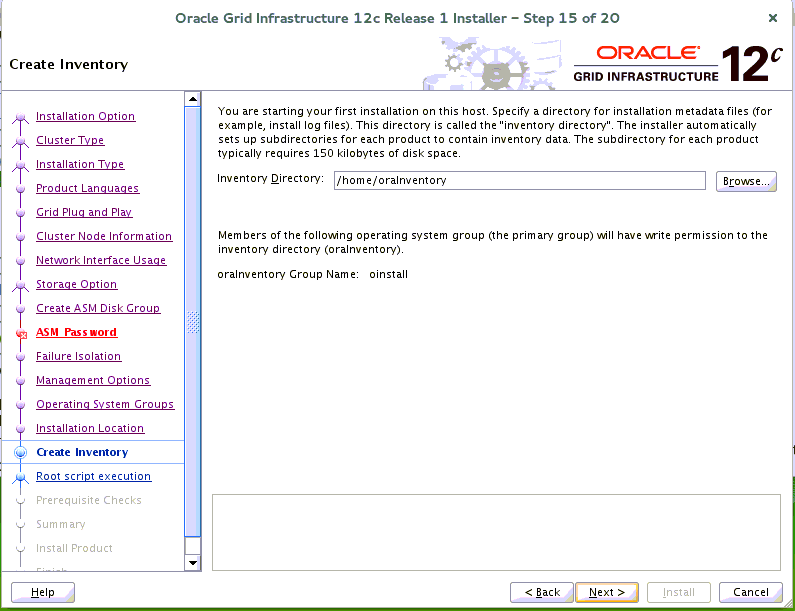
Create the Inventory.
Figure 15: Create Inventory #If this is your first installation on this host, specify a directory for the installation metadata files. Click Next to continue.
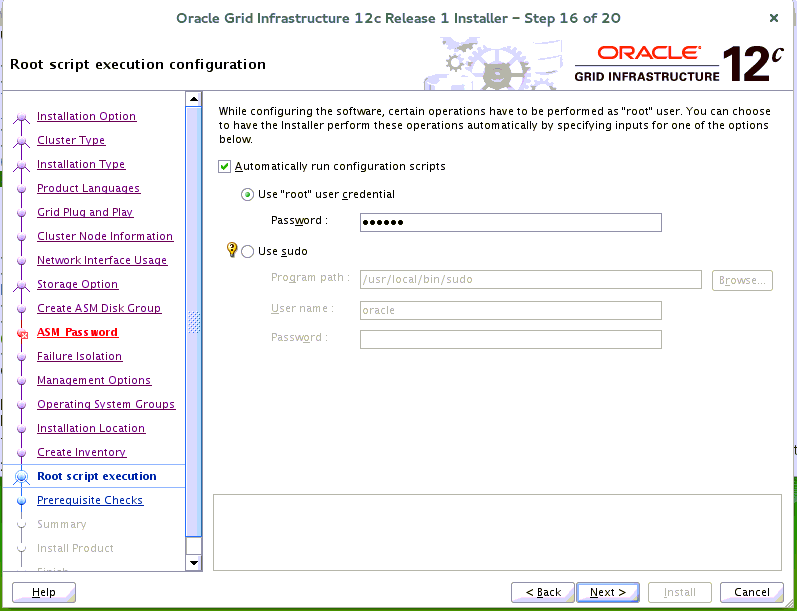
Proceed to Root Script Execution Configuration.
Figure 16: Root Script Execution Configuration #While configuring the software, you need to perform certain operations as root user. Choose the option as shown above. The Installer will then perform these operations automatically. Fill in the password for root user. Click Next to continue.
Proceed to Prerequisite Checks.
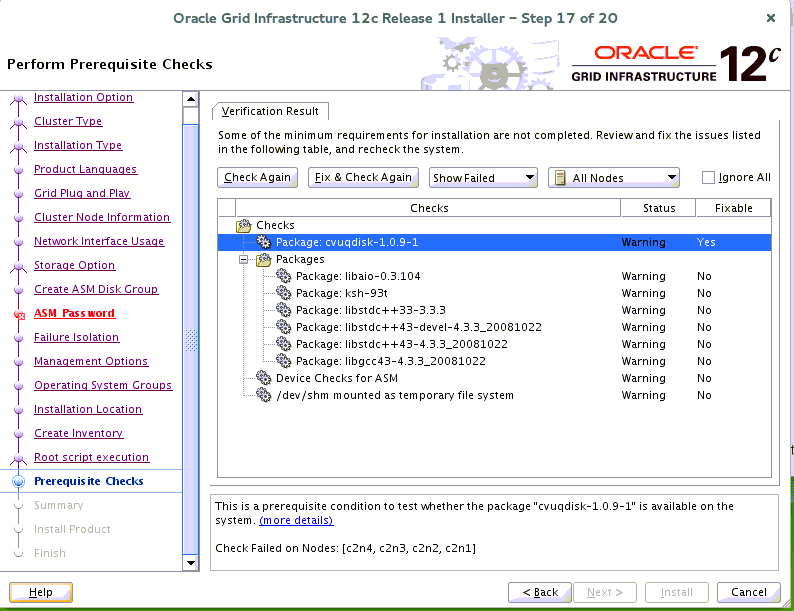
Figure 17: Prerequisite Checks 1 #Perform the prerequisite check as shown on the screen above. Click Fix&Check Again to recheck the system.
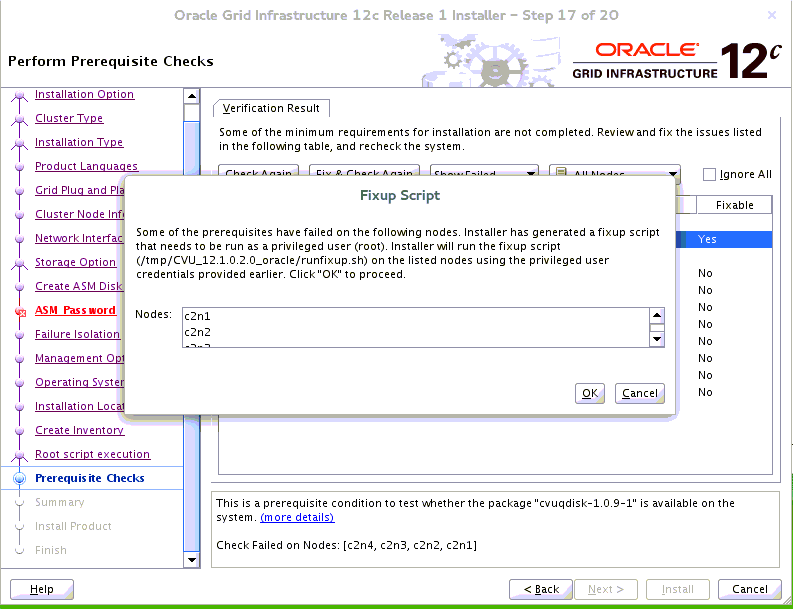
Figure 18: Prerequisite Checks 2 #Follow the prompts, and run the fixup script as root manually on each node. Click OK.
c2n1:/home # /tmp/CVU_12.1.0.2.0_oracle/runfixup.sh
All Fix-up operations were completed successfully.
c2n1:/home #
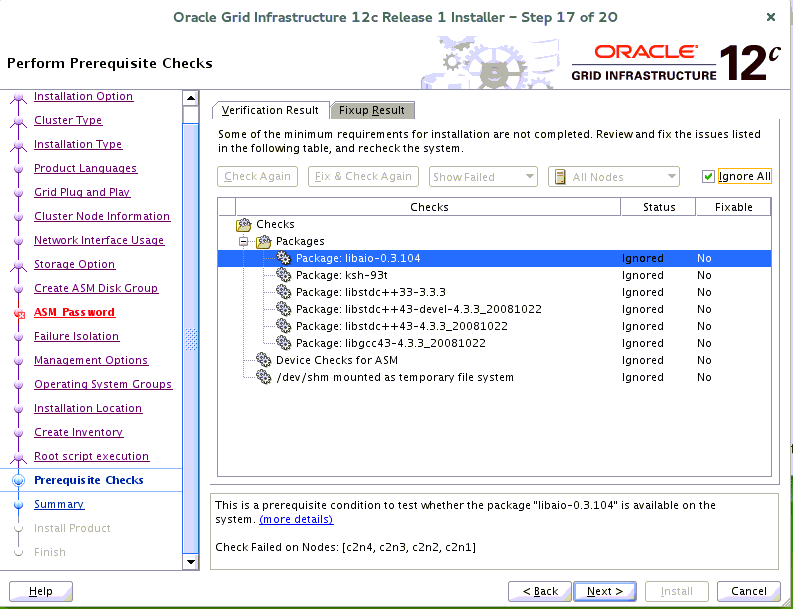
Figure 19: Prerequisite Checks 3 #On the Fixup Result tab, activate the option Ignore All. Click Next to continue.
Review the Summary.
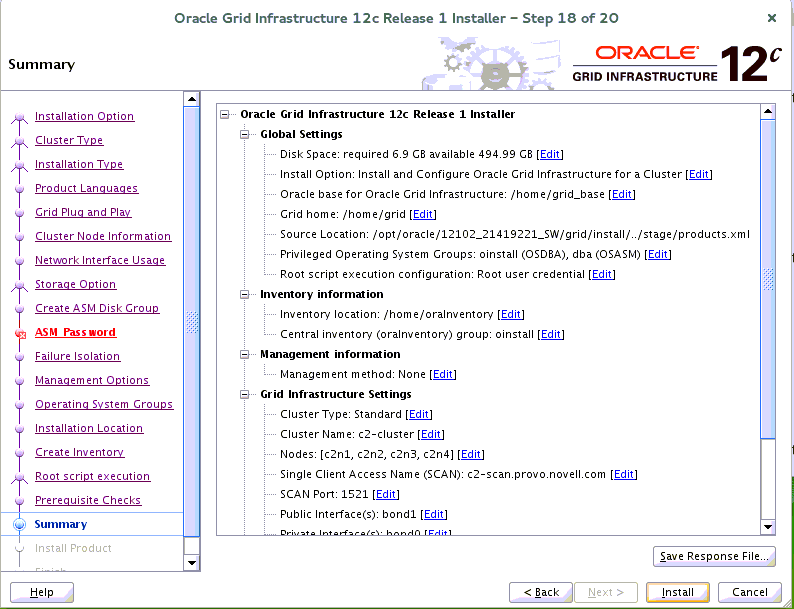
Figure 20: Summary #Review the installation Summary as shown above. If everything is correct, click Install to continue.
Install the product.
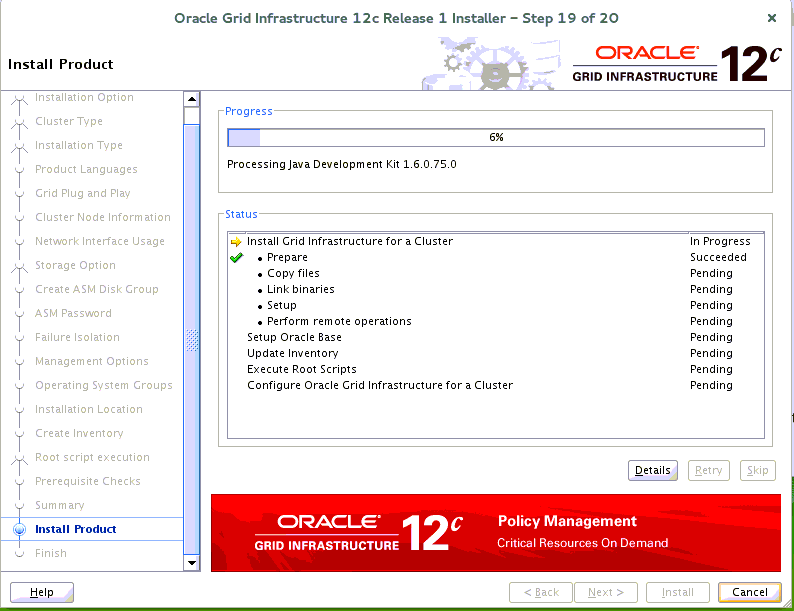
Figure 21: Install Product - Progress #The packages are being installed.
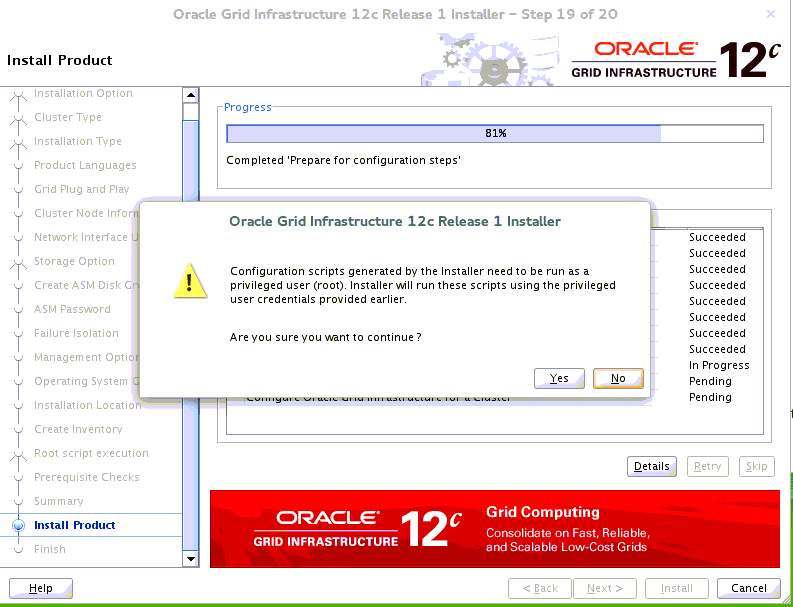
Figure 22: Install Product - Configuration Steps #The action prepare for configuration steps is to be completed. At this point you first need to install the Oracle Patch 18456643. After that, click Yes to run the configuration scripts.
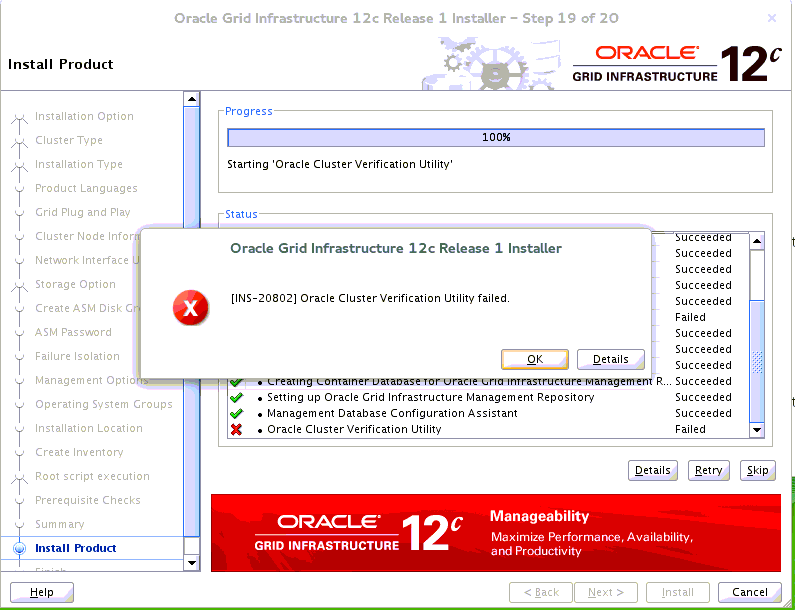
Figure 23: Install Product - Verification Utility #An error message will pop up Oracle Cluster Verification Utility failed. Ignore the error and click OK to continue.
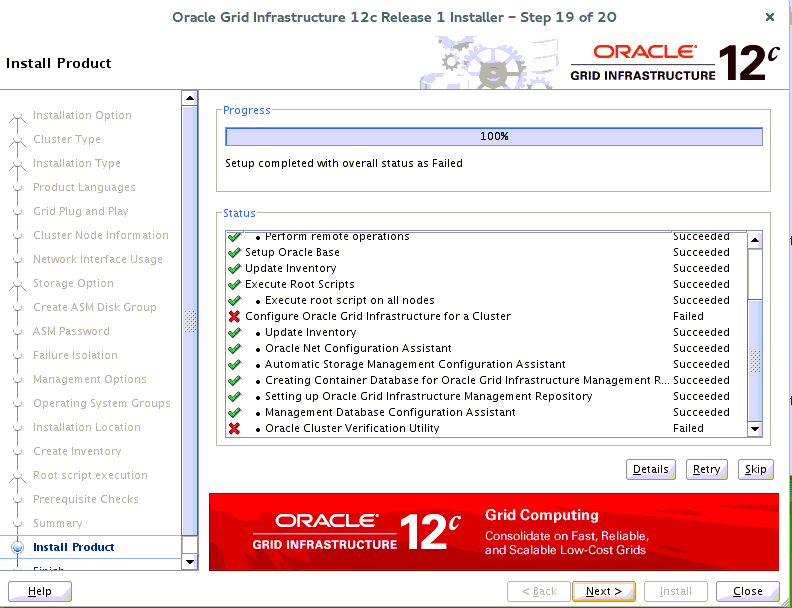
Figure 24: Install Product - Setup Completed #When the setup is completed, click Next to continue.
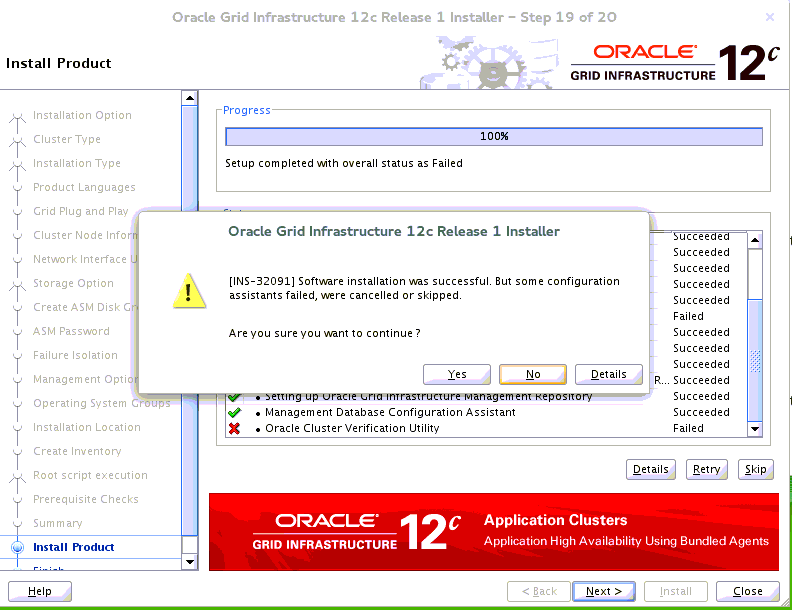
Figure 25: Install Product - Setup Completed Message #An error message will pop up to inform you about some configuration assistants that failed. Click Yes to confirm.
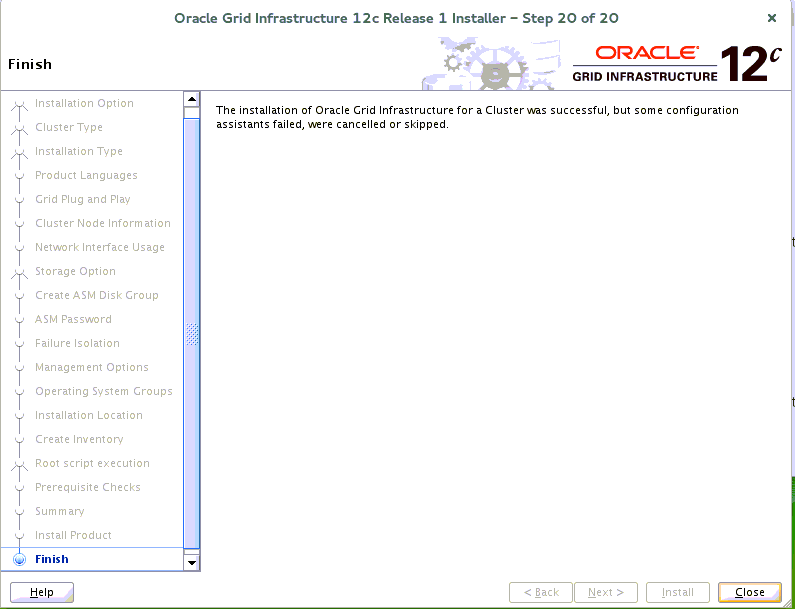
Figure 26: Install Product - Finish #You have now finished the installation of the Oracle Grid Infrastructure for a Cluster.
5.1.3 Post-Installation Checks #
Check the Oracle Clusterware health:
oracle@c2n1:~> /home/grid/bin/crsctl check cluster -all
**************************************************************
c2n1:
CRS-4537: Cluster Ready Services is online
CRS-4529: Cluster Synchronization Services is online
CRS-4533: Event Manager is online
**************************************************************
c2n2:
CRS-4537: Cluster Ready Services is online
CRS-4529: Cluster Synchronization Services is online
CRS-4533: Event Manager is online
**************************************************************
c2n3:
CRS-4537: Cluster Ready Services is online
CRS-4529: Cluster Synchronization Services is online
CRS-4533: Event Manager is online
**************************************************************
c2n4:
CRS-4537: Cluster Ready Services is online
CRS-4529: Cluster Synchronization Services is online
CRS-4533: Event Manager is online
**************************************************************
Check the Oracle Clusterware resources:
oracle@c2n1:~> /home/grid/bin/srvctl status nodeapps
VIP c2n1-vip.provo.novell.com is enabled
VIP c2n1-vip.provo.novell.com is running on node: c2n1
VIP c2n2-vip.provo.novell.com is enabled
VIP c2n2-vip.provo.novell.com is running on node: c2n2
VIP c2n3-vip.provo.novell.com is enabled
VIP c2n3-vip.provo.novell.com is running on node: c2n3
VIP c2n4-vip.provo.novell.com is enabled
VIP c2n4-vip.provo.novell.com is running on node: c2n4
Network is enabled
Network is running on node: c2n1
Network is running on node: c2n4
Network is running on node: c2n3
Network is running on node: c2n2
ONS is enabled
ONS daemon is running on node: c2n1
ONS daemon is running on node: c2n4
ONS daemon is running on node: c2n3
ONS daemon is running on node: c2n2
Check the status of the designated resources:
oracle@c2n1:~> /home/grid/bin/crsctl stat res -t
--------------------------------------------------------------------------------
Name        Target State      Server                   State details
--------------------------------------------------------------------------------
Local Resources
--------------------------------------------------------------------------------
ora.LISTENER.lsnr
         ONLINE  ONLINE       c2n1                     STABLE
         ONLINE  ONLINE       c2n2                     STABLE
         ONLINE  ONLINE       c2n3                     STABLE
         ONLINE  ONLINE       c2n4                     STABLE
ora.SUSETEST.dg
         ONLINE  ONLINE       c2n1                     STABLE
         ONLINE  ONLINE       c2n2                     STABLE
         ONLINE  ONLINE       c2n3                     STABLE
         ONLINE  ONLINE       c2n4                     STABLE
ora.SUSETEST01.dg
         ONLINE  ONLINE       c2n1                     STABLE
         ONLINE  ONLINE       c2n2                     STABLE
         ONLINE  ONLINE       c2n3                     STABLE
         ONLINE  ONLINE       c2n4                     STABLE
ora.asm
         ONLINE  ONLINE       c2n1                     Started,STABLE
         ONLINE  ONLINE       c2n2                     Started,STABLE
         ONLINE  ONLINE       c2n3                     Started,STABLE
         ONLINE  ONLINE       c2n4                     Started,STABLE
ora.net1.network
         ONLINE  ONLINE       c2n1                     STABLE
         ONLINE  ONLINE       c2n2                     STABLE
         ONLINE  ONLINE       c2n3                     STABLE
         ONLINE  ONLINE       c2n4                     STABLE
ora.ons
         ONLINE  ONLINE       c2n1                     STABLE
         ONLINE  ONLINE       c2n2                     STABLE
         ONLINE  ONLINE       c2n3                     STABLE
         ONLINE  ONLINE       c2n4                     STABLE
--------------------------------------------------------------------------------
Cluster Resources
--------------------------------------------------------------------------------
ora.LISTENER_SCAN1.lsnr
    1    ONLINE  ONLINE       c2n4                     STABLE
ora.LISTENER_SCAN2.lsnr
    1    ONLINE  ONLINE       c2n3                     STABLE
ora.LISTENER_SCAN3.lsnr
    1    ONLINE  ONLINE       c2n1                     STABLE
ora.MGMTLSNR
    1    ONLINE  ONLINE       c2n1                     169.254.38.57 10.1.1.1,STABLE
ora.c2n1.vip
    1    ONLINE  ONLINE       c2n1                     STABLE
ora.c2n2.vip
    1    ONLINE  ONLINE       c2n2                     STABLE
ora.c2n3.vip
    1    ONLINE  ONLINE       c2n3                     STABLE
ora.c2n4.vip
    1    ONLINE  ONLINE       c2n4                     STABLE
ora.cvu
    1    ONLINE  ONLINE       c2n1                     STABLE
ora.mgmtdb
    1    ONLINE  ONLINE       c2n1                     Open,STABLE
ora.oc4j
    1    ONLINE  ONLINE       c2n1                     STABLE
ora.scan1.vip
    1    ONLINE  ONLINE       c2n4                     STABLE
ora.scan2.vip
    1    ONLINE  ONLINE       c2n3                     STABLE
ora.scan3.vip
    1    ONLINE  ONLINE       c2n1                     STABLE
--------------------------------------------------------------------------------
Check OCR and the Voting disk files:
oracle@c2n1:~> /home/grid/bin/ocrcheck
Status of Oracle Cluster Registry is as follows :
        Version                  :          4
        Total space (kbytes)     :     409568
        Used space (kbytes)      :       1696
        Available space (kbytes) :     407872
        ID                       : 1286433802
        Device/File Name         :  +SUSETEST
                     Device/File integrity check succeeded

                     Device/File not configured

                     Device/File not configured

                     Device/File not configured

                     Device/File not configured

        Cluster registry integrity check succeeded

        Logical corruption check bypassed due to non-privileged user

oracle@c2n1:~> /home/grid/bin/crsctl query css votedisk
##  STATE    File Universal Id                File Name Disk group
--  -----    -----------------                --------- ---------
1. ONLINE   3195ba343d234f0cbf92bf2df0f7d3b9 (/dev/oradata/disk1) [SUSETEST]
2. ONLINE   3410554dce114fa1bfb86b8cd1f3288b (/dev/oradata/disk2) [SUSETEST]
3. ONLINE   69bb2fac7bac4f71bf4b3ec63154f76c (/dev/oradata/disk3) [SUSETEST]
Located 3 voting disk(s).
5.2 Installing Oracle Database #
5.2.1 Preparation #
Log in to the SUSE Linux Enterprise Server 12 64-bit OS as a non-admin user. Download the Oracle Database 12c Release 1 (12.1.0.2.0) for Linux x86-64.
Extract grid.zip and run the installer
'./runInstaller' from Database ShipHome.
5.2.2 Installation #
For the actual installation, follow the steps below:
Select Configure Security Updates
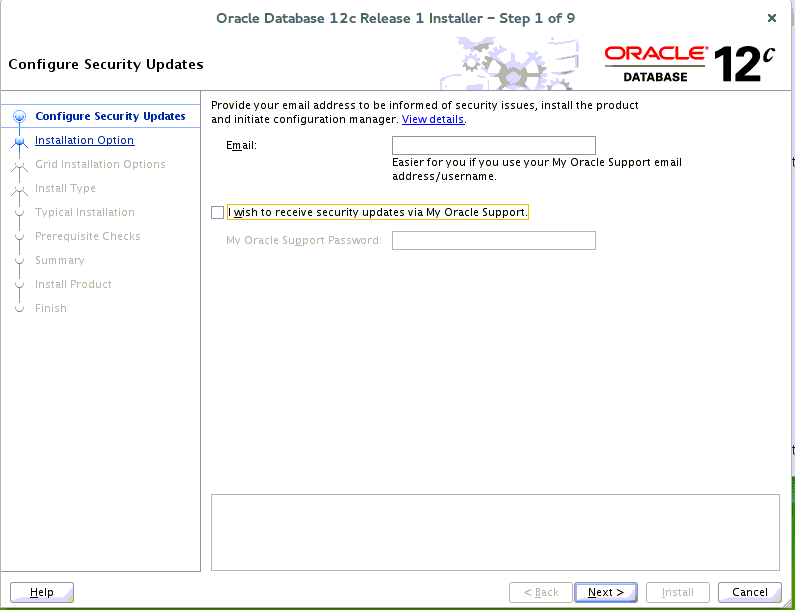
Figure 27: Configure Security Updates #Provide your e-mail address to be informed of security issues, then click Next to continue.
Proceed to Installation Option.
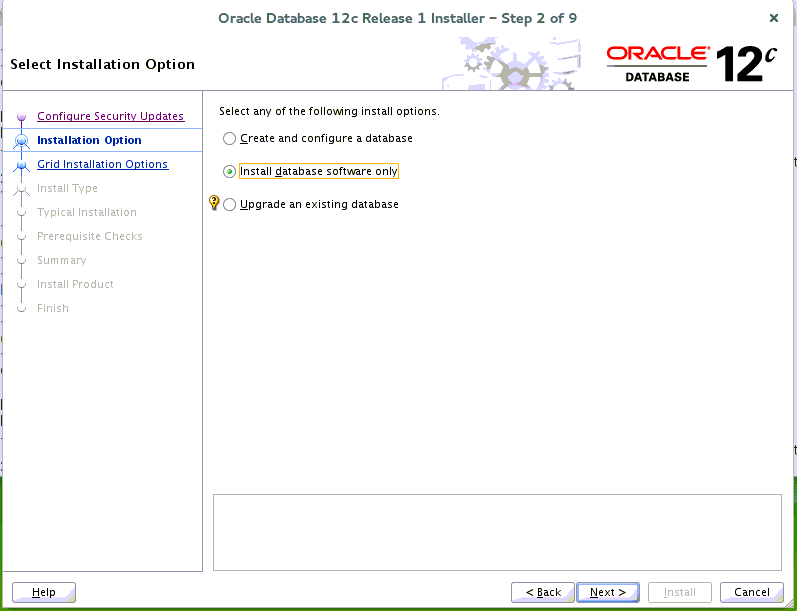
Figure 28: Installation Option #Choose the option Install database software only, then click Next to continue.
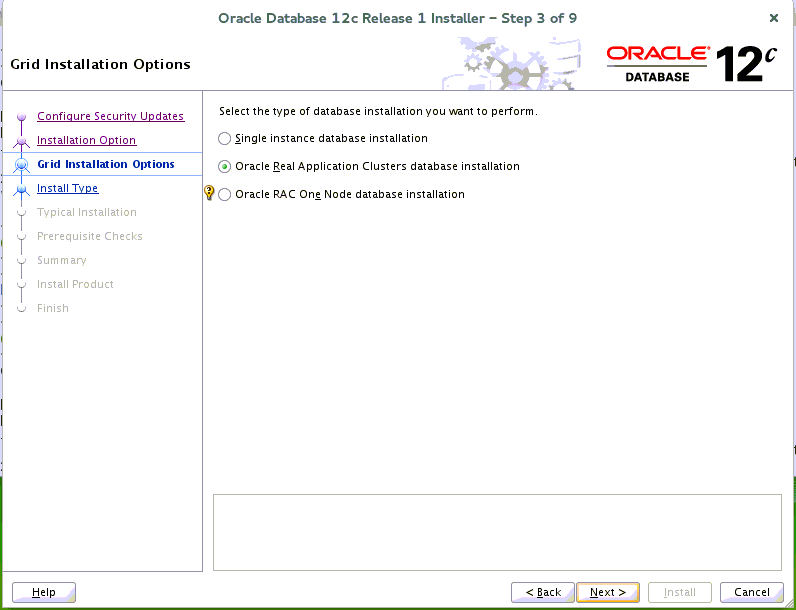
Proceed to Grid Installation Options.
Figure 29: Grid Installation Options #Choose the option Oracle Real Application Clusters database installation, then click Next to continue.
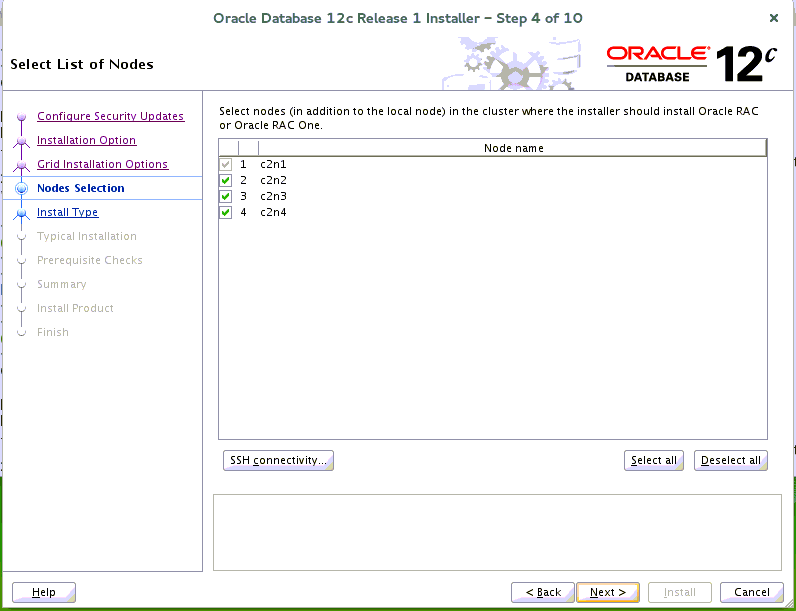
Go to Nodes Selection to select from the list of nodes.
Figure 30: Nodes Selection #Select all nodes in the cluster, then click Next to continue.
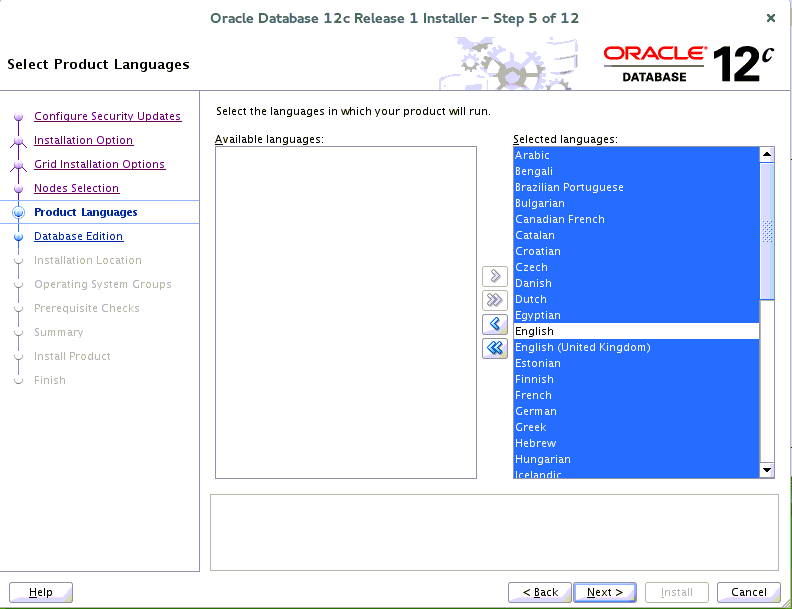
Proceed to Product Languages.
Figure 31: Product Languages #Select all languages, then click Next to continue.
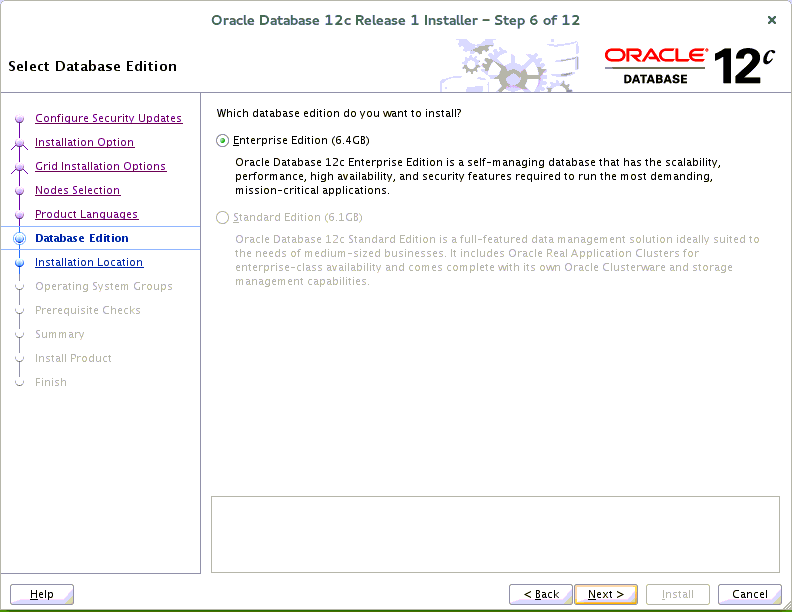
Select the Database Edition.
Figure 32: Database Edition #Choose the option Enterprise Edition, then click Next to continue.
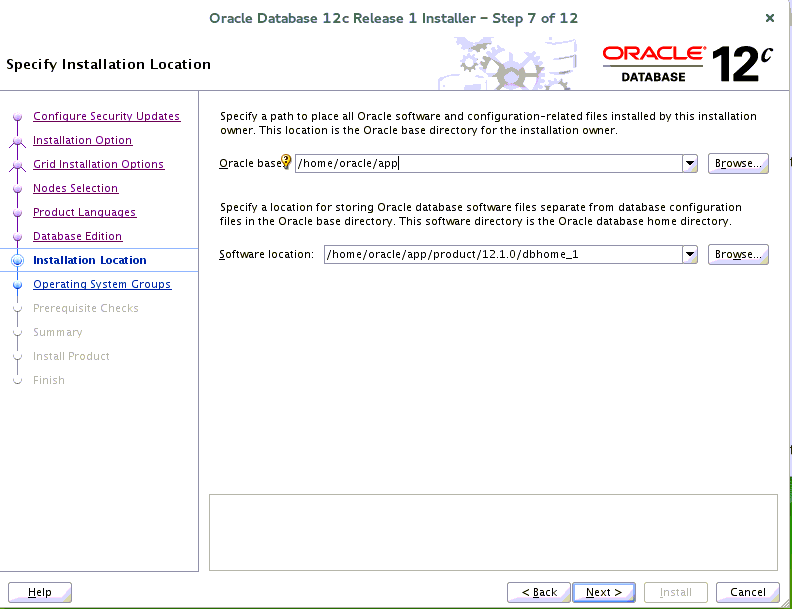
Specify the Installation Location.
Figure 33: Installation Location #Fill in the Oracle base and the Software location as shown above, then click Next to continue.
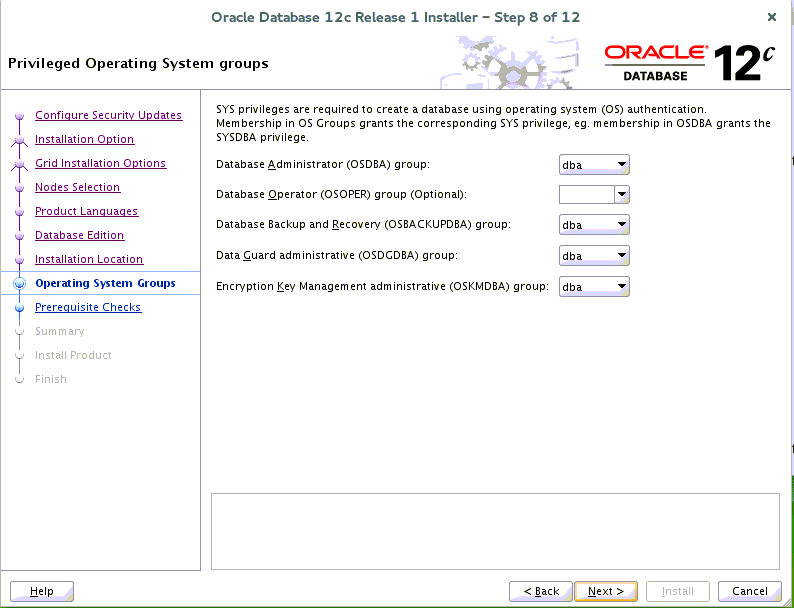
Define the privileged Operating System Groups.
Figure 34: Operating System Groups #The privileged Operating System groups are selected by default. Click Next to continue.
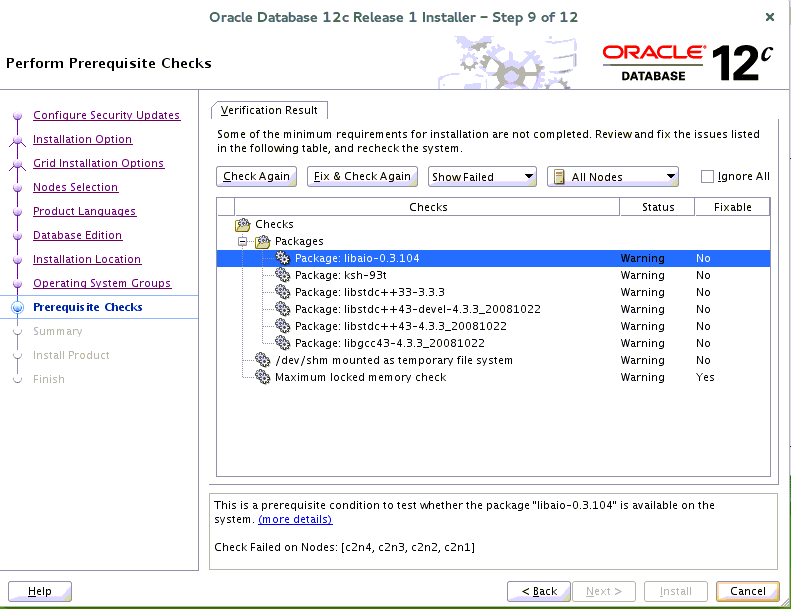
Perform the Prerequisite Checks .
Figure 35: Prerequisite Checks #Perform the pre-check as shown above; to recheck the system. Click Fix&Check Again to continue.
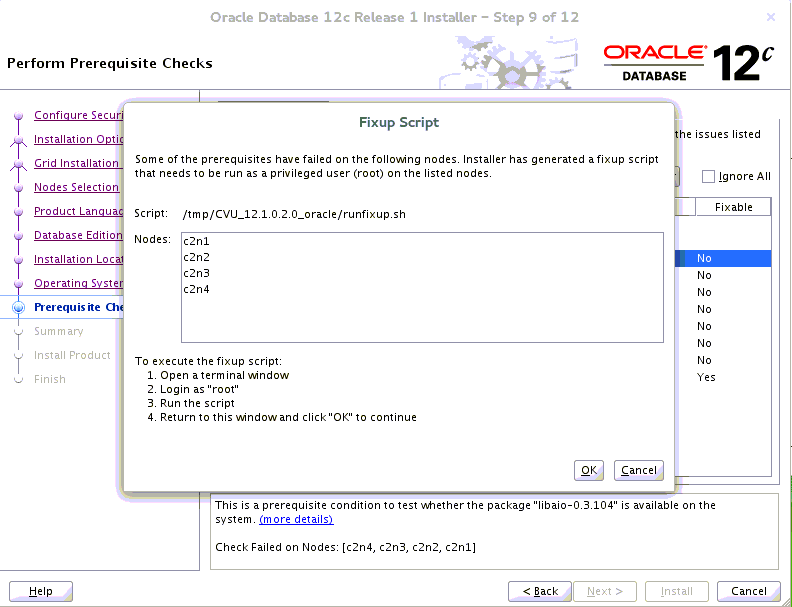
Figure 36: Fixup Script #Follow the prompts. Manually run the fixup script as “root” user on each node, then click OK.
You should see the following output:
c2n1 ~ #: /tmp/CVU_12.1.0.2.0_oracle/runfixup.sh
All Fix-up operations were completed successfully.
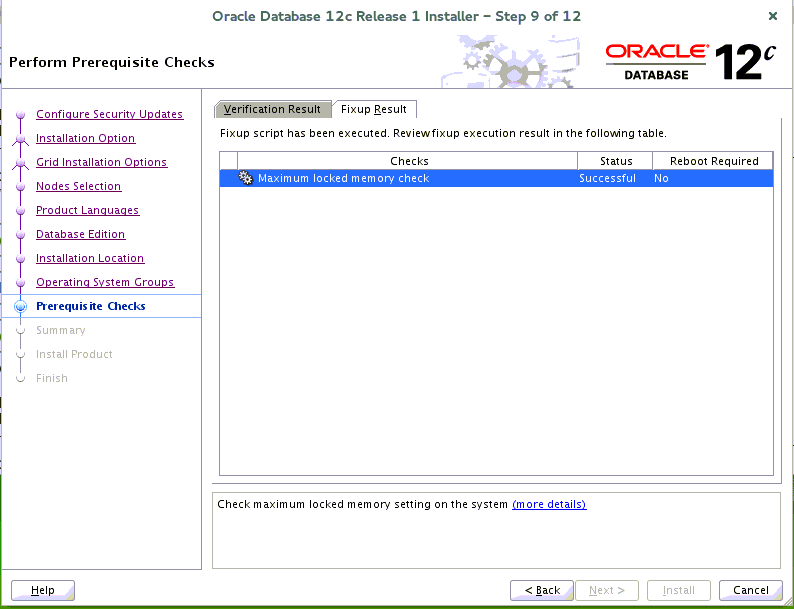
Check the Fixup Results here:
Figure 37: Fixup Results #Check the Verification Results here:
Figure 38: Verification Results #Select the option Ignore All, then click Next to continue.
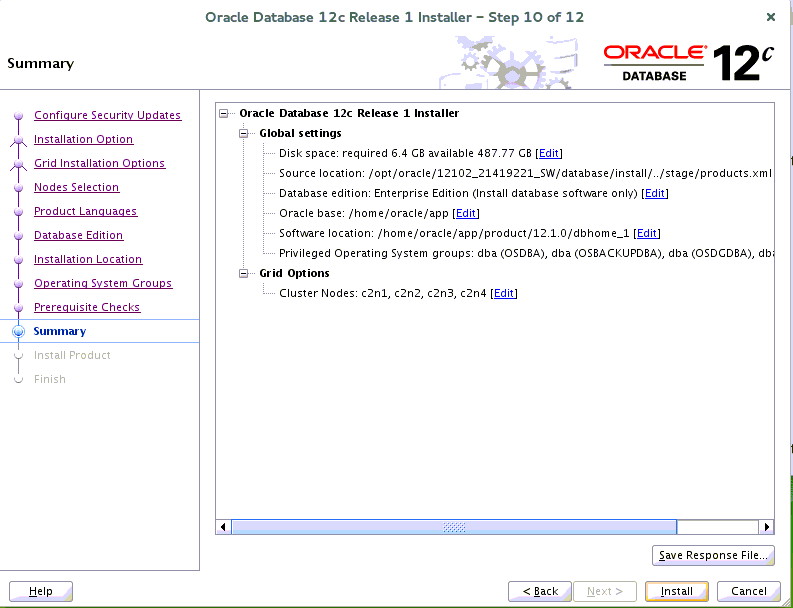
Review the Summary.
Figure 39: Summary #If you see the installation summary as shown above, click Install to continue.
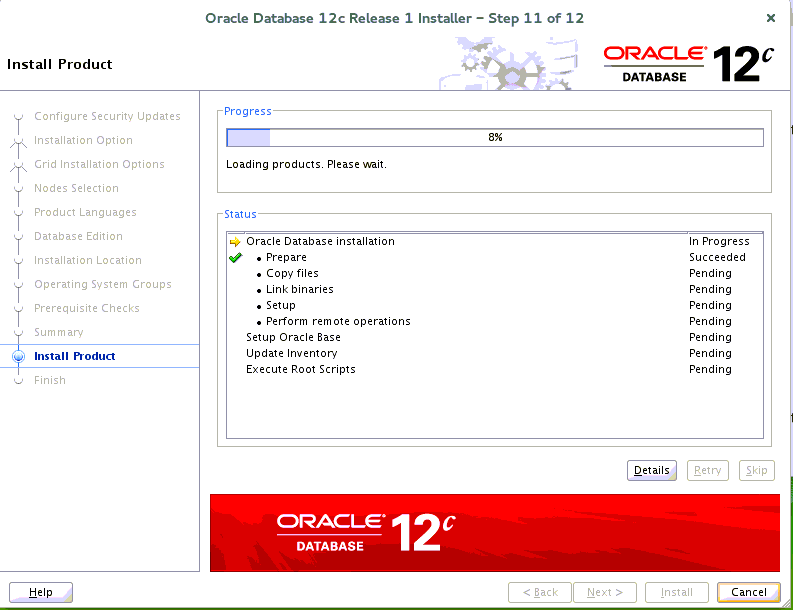
Proceed to Install Product.
Figure 40: Install Product #While the product loads, a window pops up where you can execute the configuration scripts.
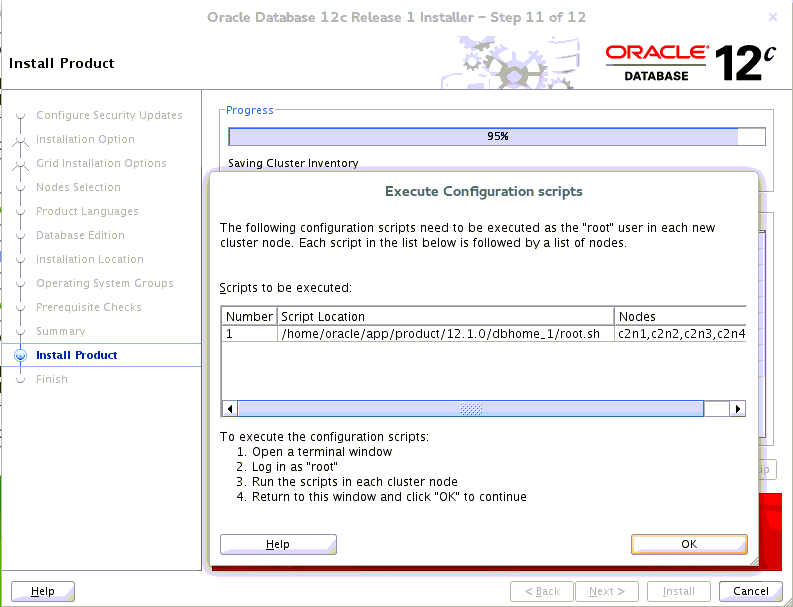
Figure 41: Execute Configuration Scripts #Execute
root.shas the root user in each cluster node, then click OK to continue.You will see the following output:
c2n1:~ # /home/oracle/app/product/12.1.0/dbhome_1/root.sh
Performing root user operation.

The following environment variables are set as:
    ORACLE_OWNER=oracle
    ORACLE_Home=/home/oracle/app/product/12.1.0/dbhome_1

Enter the full pathname of the local bin directory: [/usr/local/bin]
The contents of "dbhome" have not changed. No need to overwrite.
The contents of "oraenv" have not changed. No need to overwrite.
The contents of "coraenv" have not changed. No need to overwrite.

Entries will be added to the /etc/oratab file as needed by
Database Configuration Assistant when a database is created
Finished running generic part of root script.
Now product-specific root actions will be performed.
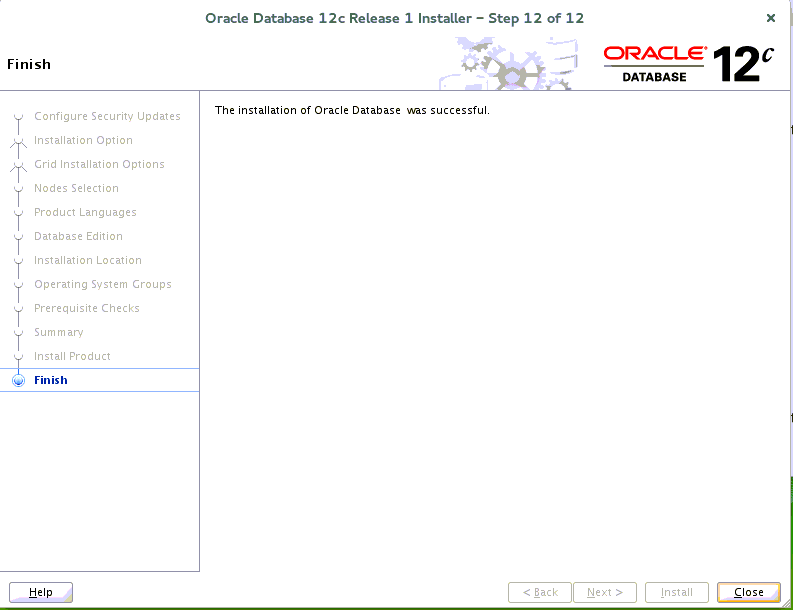
The next screen indicates that the installation has been finished successfully.
Figure 42: Finish #The installation of your Oracle Database is finished. Click Close to close the screen.
5.2.3 Create ASM Disk Group #
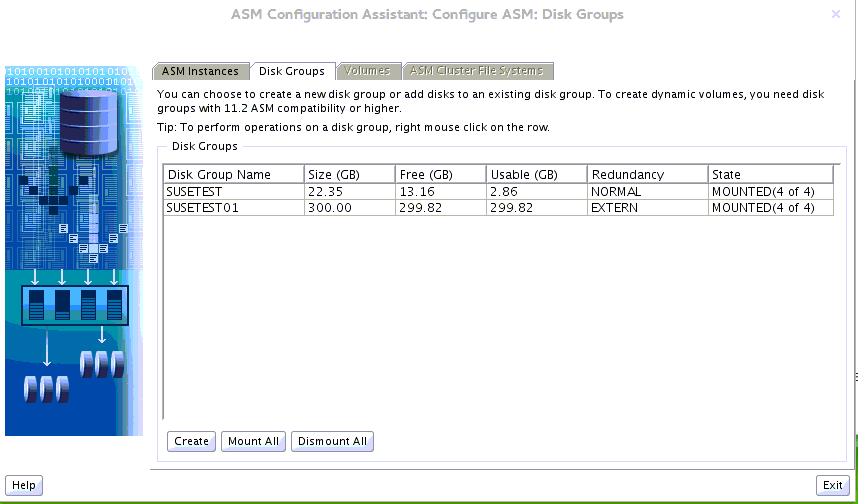
Use the ASM Configuration Assistant to create the ASM disk group for datafile storage.
Follow the instructions displayed on the screen.
5.2.4 Create Oracle RAC 12.1.0.2 Database #
Perform the following steps to create your Oracle RAC 12.1.0.2 database by using the Database Configuration Assistant:
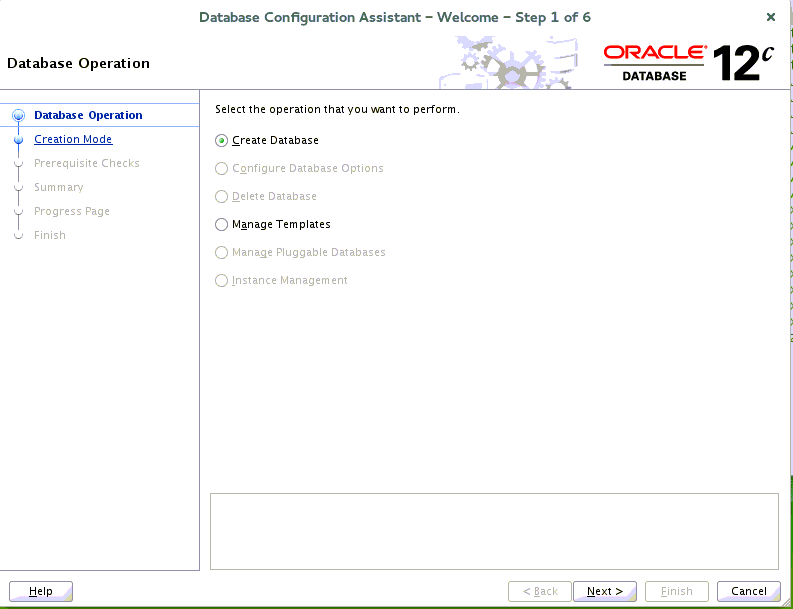
Select Database Operation.
Figure 44: Database Operation #Choose the option Create Database, then click Next to continue.
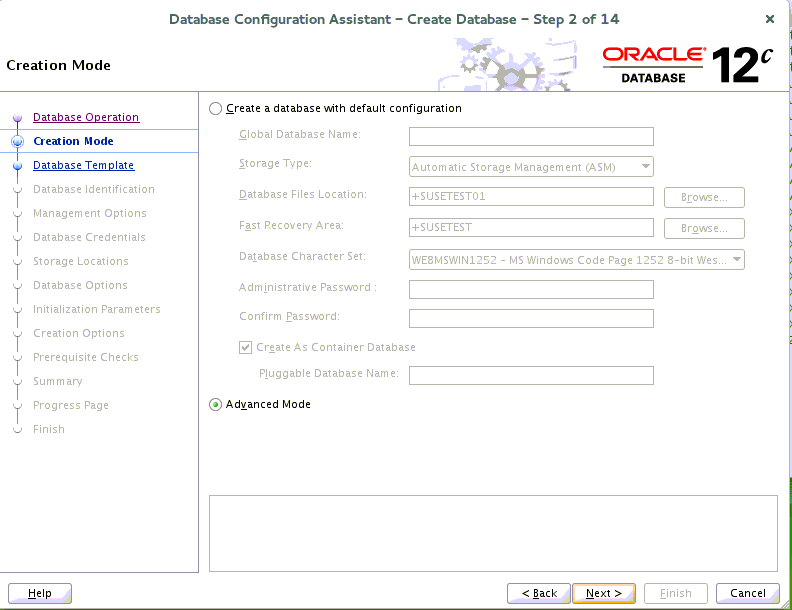
Proceed to Creation Mode.
Figure 45: Creation Mode #Choose the option Advanced Mode, then click Next to continue.
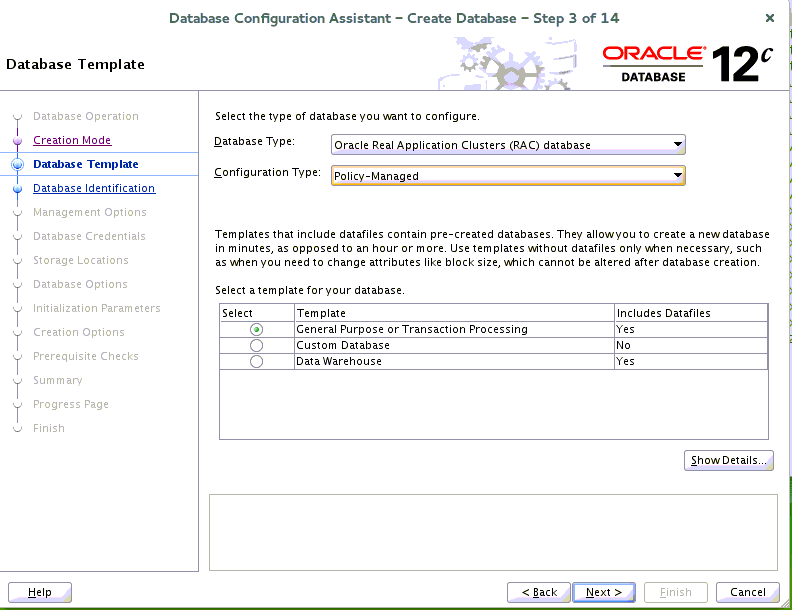
Define the Database Template.
Figure 46: Database Template #Select the type of database you want to configure, then click Next to continue.
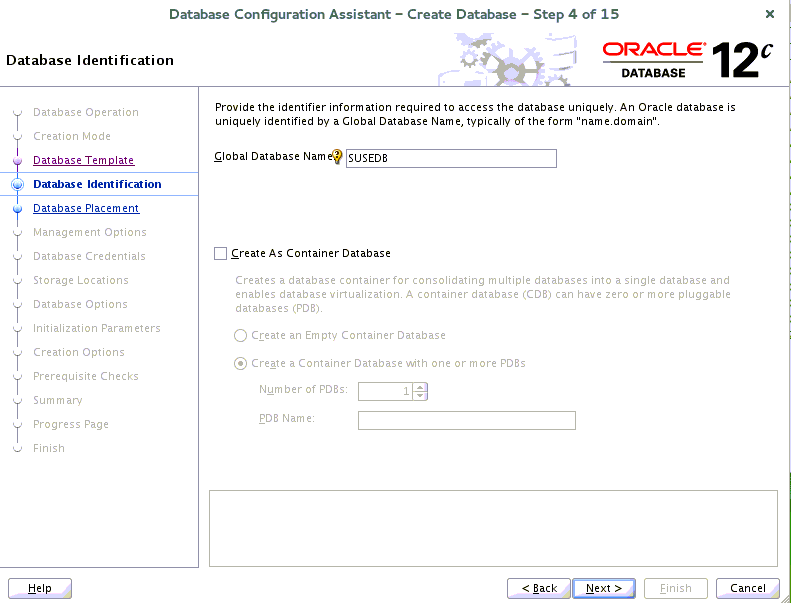
Proceed to Database Identification.
Figure 47: Database Identification #Fill in the Global Database Name as shown above, then click Next to continue.
Note: Container DatabaseOracle Database 12C supports the creation of a Container Database. This means you can also create a Container Database depending on your needs.
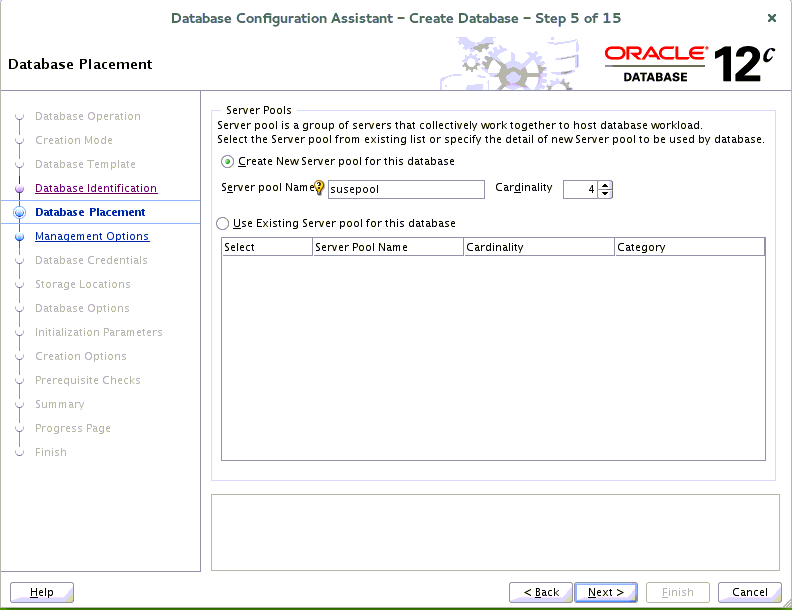
Proceed to Database Placement.
Figure 48: Database Placement #Review the Server Pools information as shown above. Click Next to continue.
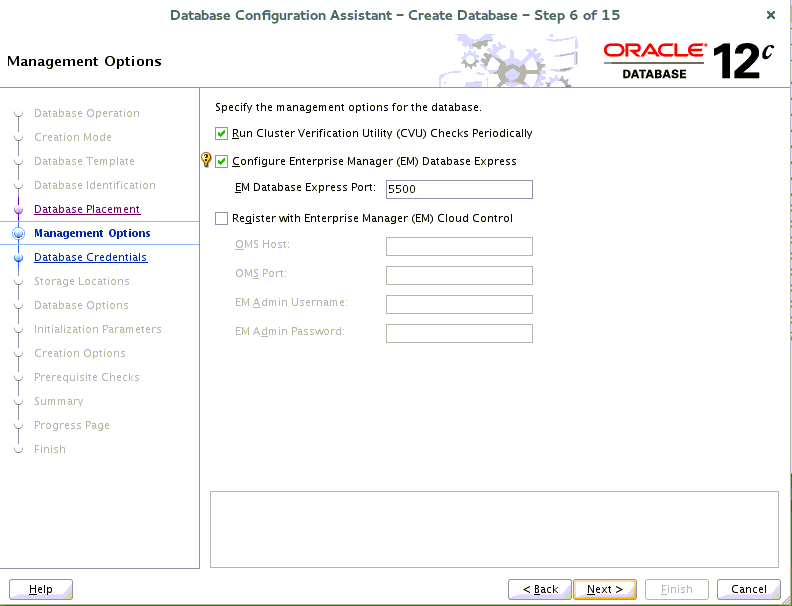
Specify the Management Options.
Figure 49: Management Options #Specify the management options for the database, then click Next to continue.
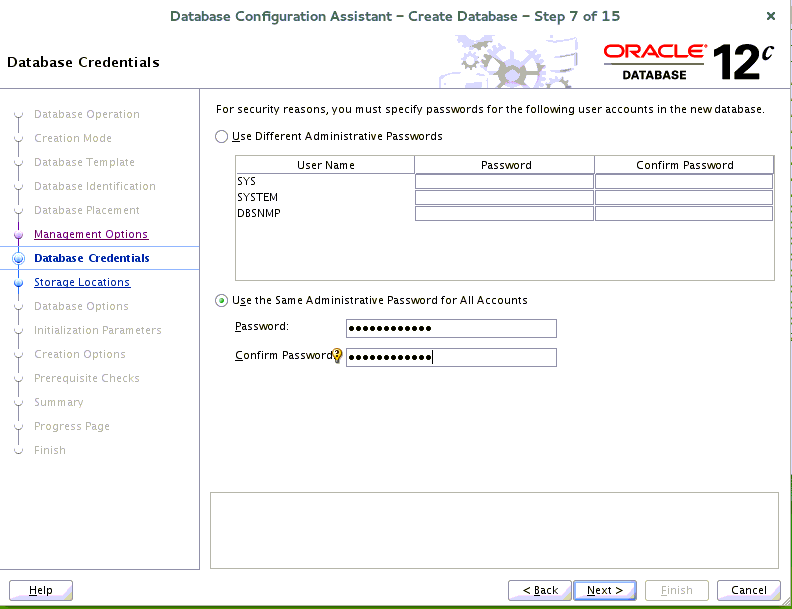
Proceed to Database Credentials.
Figure 50: Database Credentials #Specify the administrative password for the database users, then click Next to continue.
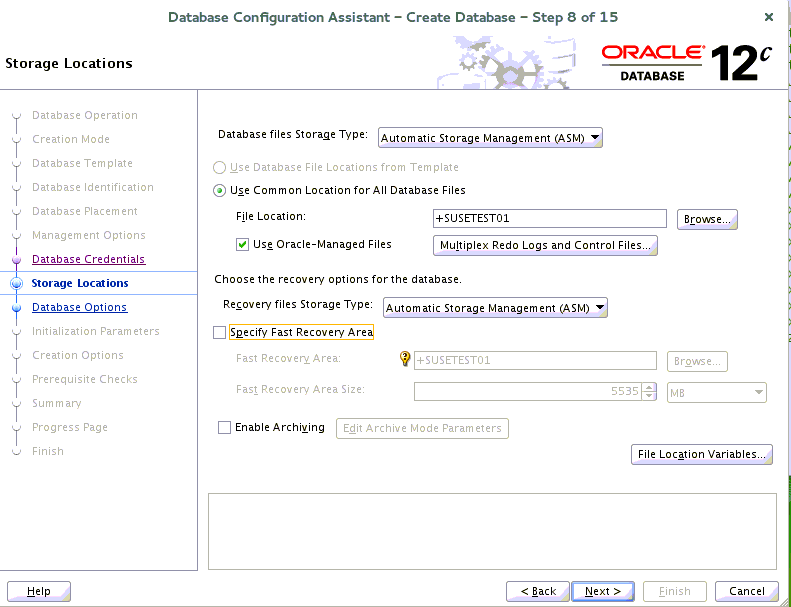
Proceed to Storage Locations.
Figure 51: Storage Locations #Specify the database files storage information as shown above, then click Next to continue.
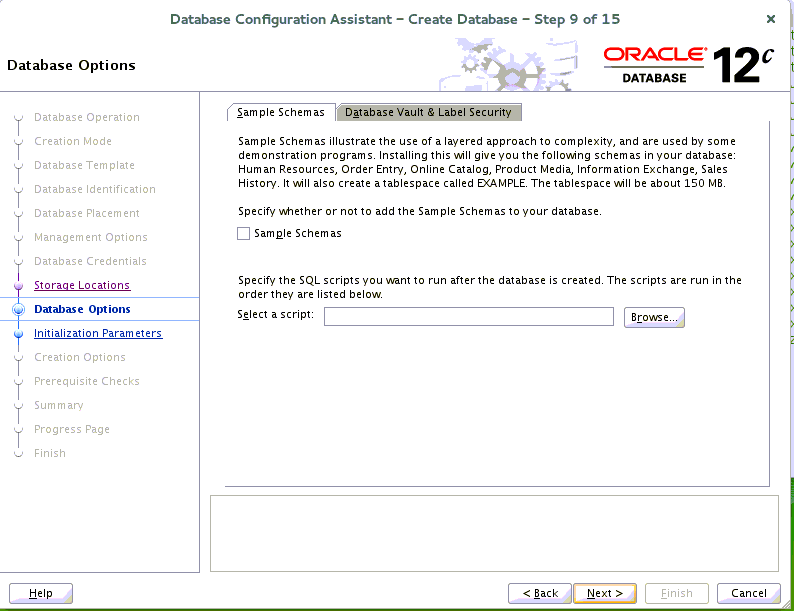
Proceed to Database Options.
Figure 52: Database Options #According to your needs, specify whether to add the schemas to your database. Click Next to continue.
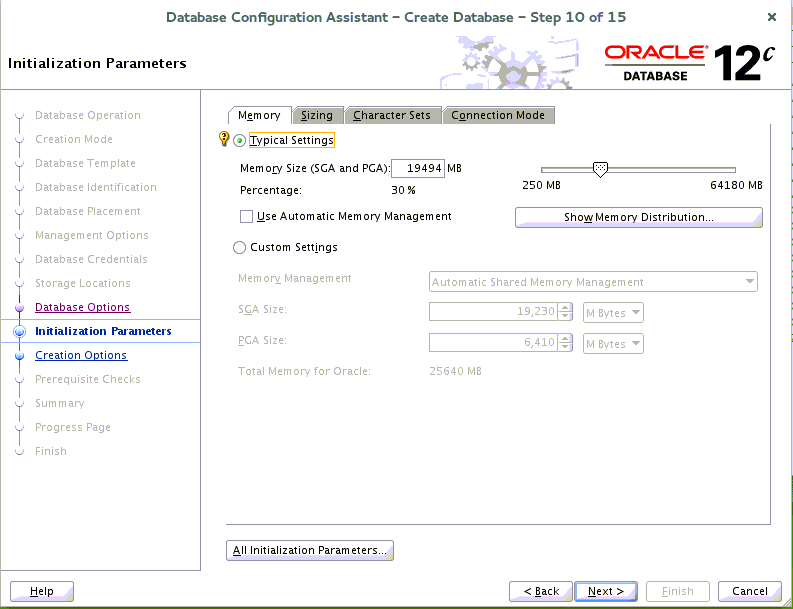
Proceed to Initialization Parameters.
Figure 53: Initialization Parameters #Choose the option Typical Settings and adjust the parameters to meet your requirements. Click Next to continue.
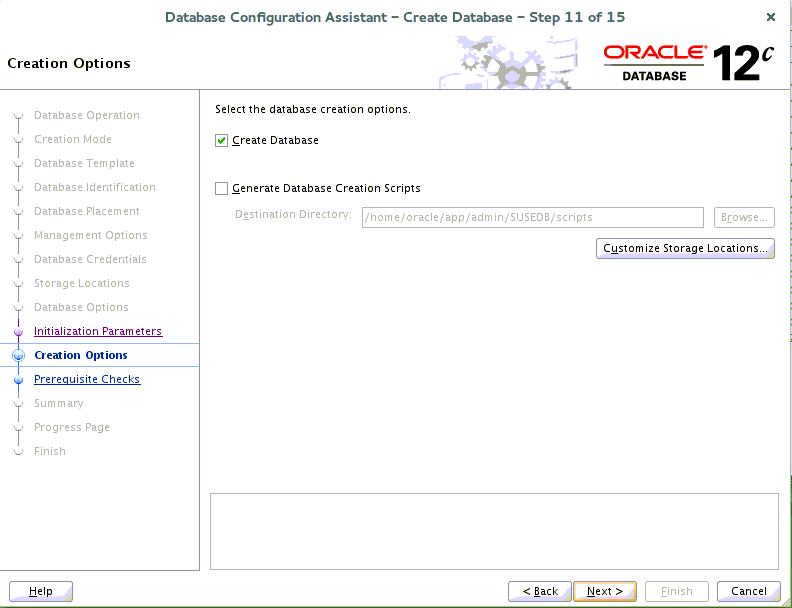
Proceed to Creation Options.
Figure 54: Creation Options #Select the database creation options as shown above, then click Next to continue.
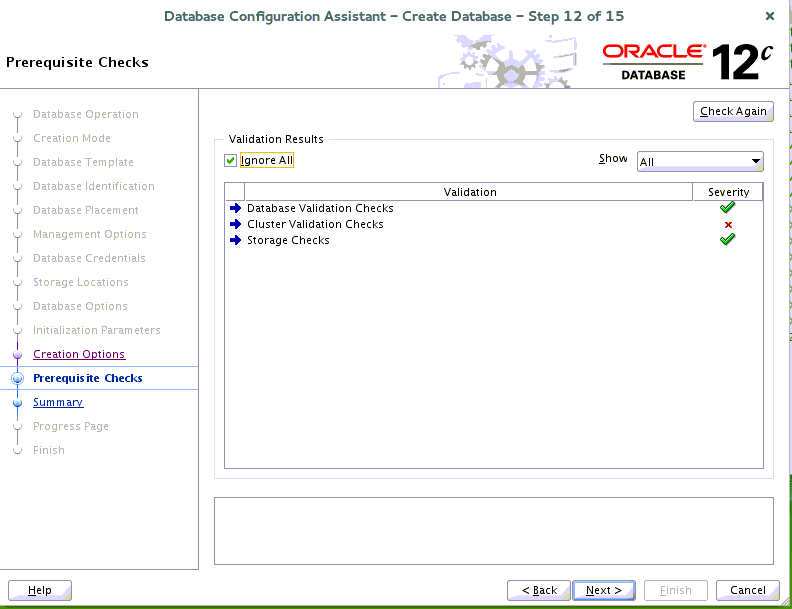
Perform the Prerequisite Checks.
Figure 55: Prerequisite Checks #Select the option Ignore All, then click Next to continue.
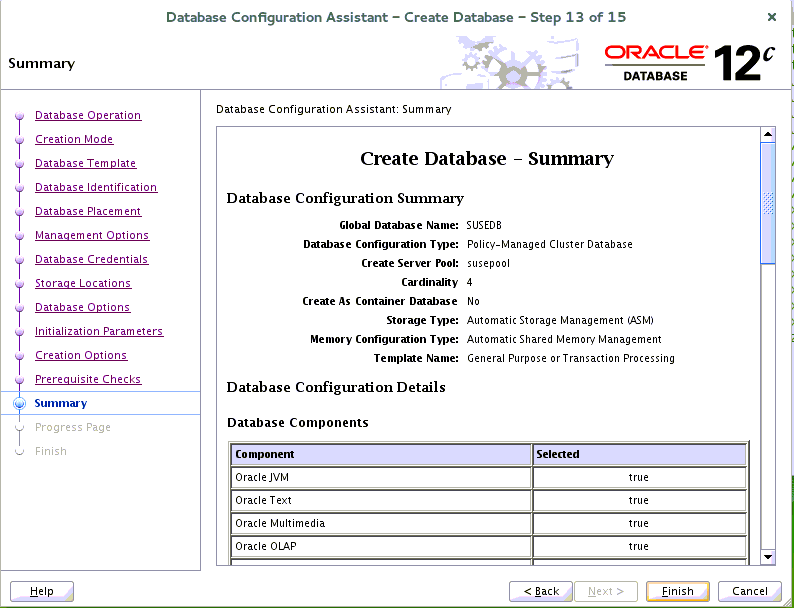
Review the Summary.
Figure 56: Summary #Review and check the information displayed in the Database Configuration Summary as shown above. Click Finish to continue.
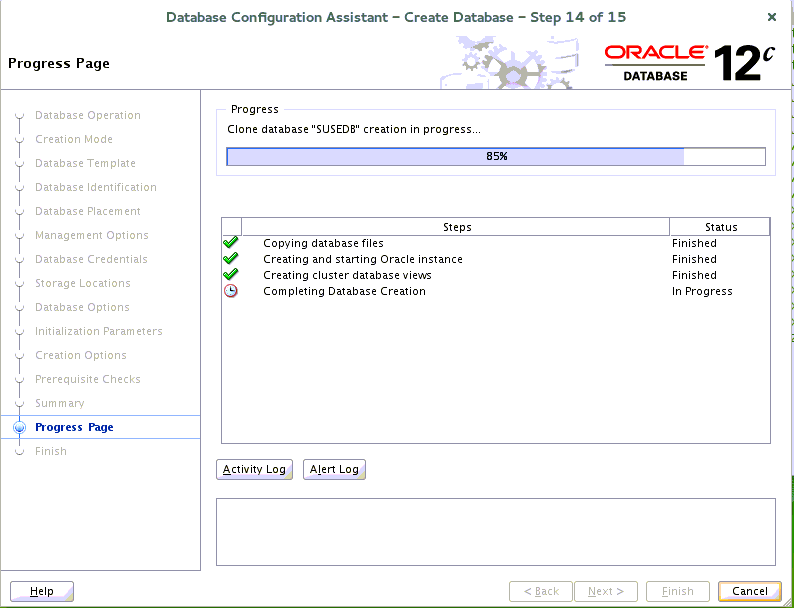
Review the Progress Page.
Figure 57: Progress Page #The creation of your database is now progressing as shown above. Wait until the creation process is completed.
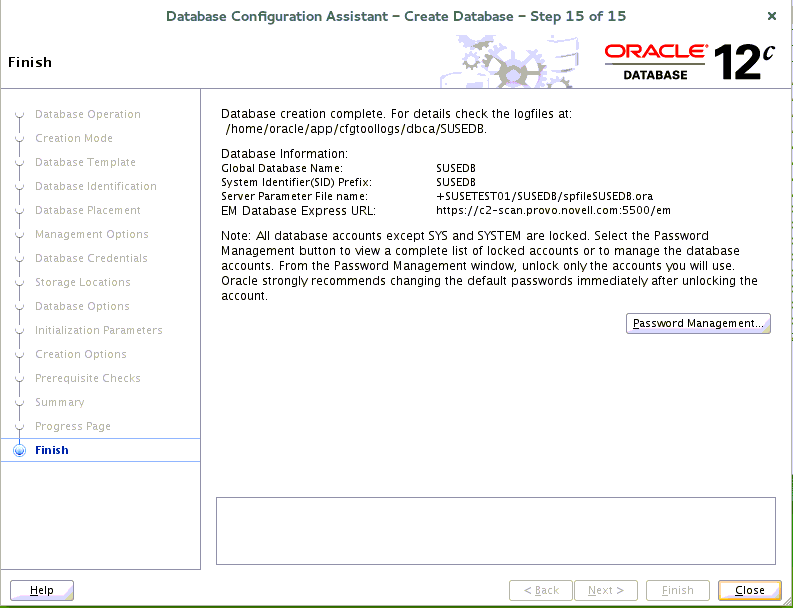
Proceed to Finish.
Figure 58: Finish #When the creation of the database is completed, some information is displayed on the screen as shown above. Click Close to close the screen.
5.2.5 Post-Installation Checks #
Verify the database status and the configuration.
oracle@c2n1:~> export ORACLE_HOME=/home/oracle/app/product/12.1.0/dbhome_1
oracle@c2n1:~> /home/oracle/app/product/12.1.0/dbhome_1/bin/srvctl status database -d susedb
Instance SUSEDB_1 is running on node c2n2
Instance SUSEDB_2 is running on node c2n3
Instance SUSEDB_3 is running on node c2n4
Instance SUSEDB_4 is running on node c2n1
oracle@c2n1:~> /home/oracle/app/product/12.1.0/dbhome_1/bin/srvctl config database -d susedb -a
Database unique name: SUSEDB
Database name: SUSEDB
Oracle home: /home/oracle/app/product/12.1.0/dbhome_1
Oracle user: oracle
Spfile: +SUSETEST01/SUSEDB/PARAMETERFILE/spfile.274.908484433
Password file: +SUSETEST01/SUSEDB/PASSWORD/pwdsusedb.256.908484093
Domain:
Start options: open
Stop options: immediate
Database role: PRIMARY
Management policy: AUTOMATIC
Server pools: susepool
Disk Groups: SUSETEST01
Mount point paths:
Services:
Type: RAC
Start concurrency:
Stop concurrency:
Database is enabled
Database is individually enabled on nodes:
Database is individually disabled on nodes:
OSDBA group: dba
OSOPER group:
Database instances:
Configured nodes:
Database is policy managed
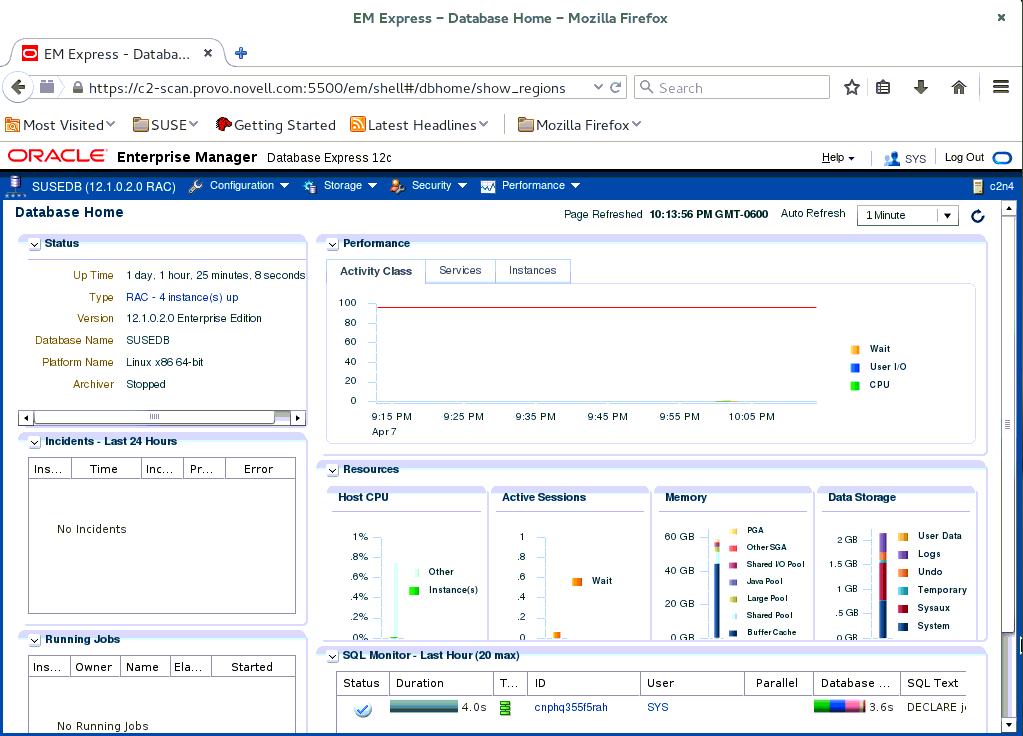
oracle@c2n1:~> /home/grid/bin/crsctl stat res -t -------------------------------------------------------------------------------- Name Target State Server State details -------------------------------------------------------------------------------- Local Resources -------------------------------------------------------------------------------- ora.LISTENER.lsnr ONLINE ONLINE c2n1 STABLE ONLINE ONLINE c2n2 STABLE ONLINE ONLINE c2n3 STABLE ONLINE ONLINE c2n4 STABLE ora.SUSETEST.dg ONLINE ONLINE c2n1 STABLE ONLINE ONLINE c2n2 STABLE ONLINE ONLINE c2n3 STABLE ONLINE ONLINE c2n4 STABLE ora.SUSETEST01.dg ONLINE ONLINE c2n1 STABLE ONLINE ONLINE c2n2 STABLE ONLINE ONLINE c2n3 STABLE ONLINE ONLINE c2n4 STABLE ora.asm ONLINE ONLINE c2n1 Started,STABLE ONLINE ONLINE c2n2 Started,STABLE ONLINE ONLINE c2n3 Started,STABLE ONLINE ONLINE c2n4 Started,STABLE ora.net1.network ONLINE ONLINE c2n1 STABLE ONLINE ONLINE c2n2 STABLE ONLINE ONLINE c2n3 STABLE ONLINE ONLINE c2n4 STABLE ora.ons ONLINE ONLINE c2n1 STABLE ONLINE ONLINE c2n2 STABLE ONLINE ONLINE c2n3 STABLE ONLINE ONLINE c2n4 STABLE -------------------------------------------------------------------------------- Cluster Resources -------------------------------------------------------------------------------- ora.LISTENER_SCAN1.lsnr 1 ONLINE ONLINE c2n4 STABLE ora.LISTENER_SCAN2.lsnr 1 ONLINE ONLINE c2n3 STABLE ora.LISTENER_SCAN3.lsnr 1 ONLINE ONLINE c2n1 STABLE ora.MGMTLSNR 1 ONLINE ONLINE c2n1 169.254.38.57 10.1.1.1,STABLE ora.c2n1.vip 1 ONLINE ONLINE c2n1 STABLE ora.c2n2.vip 1 ONLINE ONLINE c2n2 STABLE ora.c2n3.vip 1 ONLINE ONLINE c2n3 STABLE ora.c2n4.vip 1 ONLINE ONLINE c2n4 STABLE ora.cvu 1 ONLINE ONLINE c2n1 STABLE ora.mgmtdb 1 ONLINE ONLINE c2n1 Open,STABLE ora.oc4j 1 ONLINE ONLINE c2n1 STABLE ora.scan1.vip 1 ONLINE ONLINE c2n4 STABLE ora.scan2.vip 1 ONLINE ONLINE c2n3 STABLE ora.scan3.vip 1 ONLINE ONLINE c2n1 STABLE ora.susedb.db 1 ONLINE ONLINE c2n2 Open,STABLE 2 ONLINE ONLINE c2n3 Open,STABLE 3 ONLINE ONLINE c2n4 Open,STABLE 4 ONLINE ONLINE c2n1 Open,STABLE --------------------------------------------------------------------------------Verify the availability of your Oracle Enterprise Manager.
Figure 59: Oracle Enterprise Manager #
6 Additional Comments #
Edit the CV_ASSUME_DISTID=SUSE11 parameter in database/stage/cvu/cv/admin/cvu_config & grid/stage/cvu/cv/admin/cvu_config
Apply Patch 20737462 to address CVU issues relating to the lack of reference data
Install libcap1 (libcap2 libraries are installed by default); for example libcap1-1.10-59.61.x86_64 & libcap1-32bit-1.10-59.61.x86_64
ksh is replaced by mksh; that is mksh-50-2.13.x86_64
libaio has been renamed to libaio1 (that is libaio1-0.3.109-17.15.x86_64); ensure that libaio1 is installed
OUI may be invoked with -ignoreSysPreqs to temporarily workaround ongoing CVU check failures
7 Legal notice #
Copyright ©2006-2025 SUSE LLC and contributors. All rights reserved.
Permission is granted to copy, distribute and/or modify this document under the terms of the GNU Free Documentation License, Version 1.2 or (at your option) version 1.3; with the Invariant Section being this copyright notice and license. A copy of the license version 1.2 is included in the section entitled “GNU Free Documentation License”.
SUSE, the SUSE logo and YaST are registered trademarks of SUSE LLC in the United States and other countries. For SUSE trademarks, see http://www.suse.com/company/legal/. Linux is a registered trademark of Linus Torvalds. All other names or trademarks mentioned in this document may be trademarks or registered trademarks of their respective owners.
Documents published as part of the SUSE Best Practices series have been contributed voluntarily by SUSE employees and third parties. They are meant to serve as examples of how particular actions can be performed. They have been compiled with utmost attention to detail. However, this does not guarantee complete accuracy. SUSE cannot verify that actions described in these documents do what is claimed or whether actions described have unintended consequences. SUSE LLC, its affiliates, the authors, and the translators may not be held liable for possible errors or the consequences thereof.
Below we draw your attention to the license under which the articles are published.
8 GNU Free Documentation License #
Copyright (C) 2000, 2001, 2002 Free Software Foundation, Inc. 51 Franklin St, Fifth Floor, Boston, MA 02110-1301 USA. Everyone is permitted to copy and distribute verbatim copies of this license document, but changing it is not allowed.
0. PREAMBLE #
The purpose of this License is to make a manual, textbook, or other functional and useful document "free" in the sense of freedom: to assure everyone the effective freedom to copy and redistribute it, with or without modifying it, either commercially or non-commercially. Secondarily, this License preserves for the author and publisher a way to get credit for their work, while not being considered responsible for modifications made by others.
This License is a kind of "copyleft", which means that derivative works of the document must themselves be free in the same sense. It complements the GNU General Public License, which is a copyleft license designed for free software.
We have designed this License to use it for manuals for free software, because free software needs free documentation: a free program should come with manuals providing the same freedoms that the software does. But this License is not limited to software manuals; it can be used for any textual work, regardless of subject matter or whether it is published as a printed book. We recommend this License principally for works whose purpose is instruction or reference.
1. APPLICABILITY AND DEFINITIONS #
This License applies to any manual or other work, in any medium, that contains a notice placed by the copyright holder saying it can be distributed under the terms of this License. Such a notice grants a world-wide, royalty-free license, unlimited in duration, to use that work under the conditions stated herein. The "Document", below, refers to any such manual or work. Any member of the public is a licensee, and is addressed as "you". You accept the license if you copy, modify or distribute the work in a way requiring permission under copyright law.
A "Modified Version" of the Document means any work containing the Document or a portion of it, either copied verbatim, or with modifications and/or translated into another language.
A "Secondary Section" is a named appendix or a front-matter section of the Document that deals exclusively with the relationship of the publishers or authors of the Document to the Document's overall subject (or to related matters) and contains nothing that could fall directly within that overall subject. (Thus, if the Document is in part a textbook of mathematics, a Secondary Section may not explain any mathematics.) The relationship could be a matter of historical connection with the subject or with related matters, or of legal, commercial, philosophical, ethical or political position regarding them.
The "Invariant Sections" are certain Secondary Sections whose titles are designated, as being those of Invariant Sections, in the notice that says that the Document is released under this License. If a section does not fit the above definition of Secondary then it is not allowed to be designated as Invariant. The Document may contain zero Invariant Sections. If the Document does not identify any Invariant Sections then there are none.
The "Cover Texts" are certain short passages of text that are listed, as Front-Cover Texts or Back-Cover Texts, in the notice that says that the Document is released under this License. A Front-Cover Text may be at most 5 words, and a Back-Cover Text may be at most 25 words.
A "Transparent" copy of the Document means a machine-readable copy, represented in a format whose specification is available to the general public, that is suitable for revising the document straightforwardly with generic text editors or (for images composed of pixels) generic paint programs or (for drawings) some widely available drawing editor, and that is suitable for input to text formatters or for automatic translation to a variety of formats suitable for input to text formatters. A copy made in an otherwise Transparent file format whose markup, or absence of markup, has been arranged to thwart or discourage subsequent modification by readers is not Transparent. An image format is not Transparent if used for any substantial amount of text. A copy that is not "Transparent" is called "Opaque".
Examples of suitable formats for Transparent copies include plain ASCII without markup, Texinfo input format, LaTeX input format, SGML or XML using a publicly available DTD, and standard-conforming simple HTML, PostScript or PDF designed for human modification. Examples of transparent image formats include PNG, XCF and JPG. Opaque formats include proprietary formats that can be read and edited only by proprietary word processors, SGML or XML for which the DTD and/or processing tools are not generally available, and the machine-generated HTML, PostScript or PDF produced by some word processors for output purposes only.
The "Title Page" means, for a printed book, the title page itself, plus such following pages as are needed to hold, legibly, the material this License requires to appear in the title page. For works in formats which do not have any title page as such, "Title Page" means the text near the most prominent appearance of the work's title, preceding the beginning of the body of the text.
A section "Entitled XYZ" means a named subunit of the Document whose title either is precisely XYZ or contains XYZ in parentheses following text that translates XYZ in another language. (Here XYZ stands for a specific section name mentioned below, such as "Acknowledgements", "Dedications", "Endorsements", or "History".) To "Preserve the Title" of such a section when you modify the Document means that it remains a section "Entitled XYZ" according to this definition.
The Document may include Warranty Disclaimers next to the notice which states that this License applies to the Document. These Warranty Disclaimers are considered to be included by reference in this License, but only as regards disclaiming warranties: any other implication that these Warranty Disclaimers may have is void and has no effect on the meaning of this License.
2. VERBATIM COPYING #
You may copy and distribute the Document in any medium, either commercially or noncommercially, provided that this License, the copyright notices, and the license notice saying this License applies to the Document are reproduced in all copies, and that you add no other conditions whatsoever to those of this License. You may not use technical measures to obstruct or control the reading or further copying of the copies you make or distribute. However, you may accept compensation in exchange for copies. If you distribute a large enough number of copies you must also follow the conditions in section 3.
You may also lend copies, under the same conditions stated above, and you may publicly display copies.
3. COPYING IN QUANTITY #
If you publish printed copies (or copies in media that commonly have printed covers) of the Document, numbering more than 100, and the Document's license notice requires Cover Texts, you must enclose the copies in covers that carry, clearly and legibly, all these Cover Texts: Front-Cover Texts on the front cover, and Back-Cover Texts on the back cover. Both covers must also clearly and legibly identify you as the publisher of these copies. The front cover must present the full title with all words of the title equally prominent and visible. You may add other material on the covers in addition. Copying with changes limited to the covers, as long as they preserve the title of the Document and satisfy these conditions, can be treated as verbatim copying in other respects.
If the required texts for either cover are too voluminous to fit legibly, you should put the first ones listed (as many as fit reasonably) on the actual cover, and continue the rest onto adjacent pages.
If you publish or distribute Opaque copies of the Document numbering more than 100, you must either include a machine-readable Transparent copy along with each Opaque copy, or state in or with each Opaque copy a computer-network location from which the general network-using public has access to download using public-standard network protocols a complete Transparent copy of the Document, free of added material. If you use the latter option, you must take reasonably prudent steps, when you begin distribution of Opaque copies in quantity, to ensure that this Transparent copy will remain thus accessible at the stated location until at least one year after the last time you distribute an Opaque copy (directly or through your agents or retailers) of that edition to the public.
It is requested, but not required, that you contact the authors of the Document well before redistributing any large number of copies, to give them a chance to provide you with an updated version of the Document.
4. MODIFICATIONS #
You may copy and distribute a Modified Version of the Document under the conditions of sections 2 and 3 above, provided that you release the Modified Version under precisely this License, with the Modified Version filling the role of the Document, thus licensing distribution and modification of the Modified Version to whoever possesses a copy of it. In addition, you must do these things in the Modified Version:
Use in the Title Page (and on the covers, if any) a title distinct from that of the Document, and from those of previous versions (which should, if there were any, be listed in the History section of the Document). You may use the same title as a previous version if the original publisher of that version gives permission.
List on the Title Page, as authors, one or more persons or entities responsible for authorship of the modifications in the Modified Version, together with at least five of the principal authors of the Document (all of its principal authors, if it has fewer than five), unless they release you from this requirement.
State on the Title page the name of the publisher of the Modified Version, as the publisher.
Preserve all the copyright notices of the Document.
Add an appropriate copyright notice for your modifications adjacent to the other copyright notices.
Include, immediately after the copyright notices, a license notice giving the public permission to use the Modified Version under the terms of this License, in the form shown in the Addendum below.
Preserve in that license notice the full lists of Invariant Sections and required Cover Texts given in the Document's license notice.
Include an unaltered copy of this License.
Preserve the section Entitled "History", Preserve its Title, and add to it an item stating at least the title, year, new authors, and publisher of the Modified Version as given on the Title Page. If there is no section Entitled "History" in the Document, create one stating the title, year, authors, and publisher of the Document as given on its Title Page, then add an item describing the Modified Version as stated in the previous sentence.
Preserve the network location, if any, given in the Document for public access to a Transparent copy of the Document, and likewise the network locations given in the Document for previous versions it was based on. These may be placed in the "History" section. You may omit a network location for a work that was published at least four years before the Document itself, or if the original publisher of the version it refers to gives permission.
For any section Entitled "Acknowledgements" or "Dedications", Preserve the Title of the section, and preserve in the section all the substance and tone of each of the contributor acknowledgements and/or dedications given therein.
Preserve all the Invariant Sections of the Document, unaltered in their text and in their titles. Section numbers or the equivalent are not considered part of the section titles.
Delete any section Entitled "Endorsements". Such a section may not be included in the Modified Version.
Do not retitle any existing section to be Entitled "Endorsements" or to conflict in title with any Invariant Section.
Preserve any Warranty Disclaimers.
If the Modified Version includes new front-matter sections or appendices that qualify as Secondary Sections and contain no material copied from the Document, you may at your option designate some or all of these sections as invariant. To do this, add their titles to the list of Invariant Sections in the Modified Version's license notice. These titles must be distinct from any other section titles.
You may add a section Entitled "Endorsements", provided it contains nothing but endorsements of your Modified Version by various parties--for example, statements of peer review or that the text has been approved by an organization as the authoritative definition of a standard.
You may add a passage of up to five words as a Front-Cover Text, and a passage of up to 25 words as a Back-Cover Text, to the end of the list of Cover Texts in the Modified Version. Only one passage of Front-Cover Text and one of Back-Cover Text may be added by (or through arrangements made by) any one entity. If the Document already includes a cover text for the same cover, previously added by you or by arrangement made by the same entity you are acting on behalf of, you may not add another; but you may replace the old one, on explicit permission from the previous publisher that added the old one.
The author(s) and publisher(s) of the Document do not by this License give permission to use their names for publicity for or to assert or imply endorsement of any Modified Version.
5. COMBINING DOCUMENTS #
You may combine the Document with other documents released under this License, under the terms defined in section 4 above for modified versions, provided that you include in the combination all of the Invariant Sections of all of the original documents, unmodified, and list them all as Invariant Sections of your combined work in its license notice, and that you preserve all their Warranty Disclaimers.
The combined work need only contain one copy of this License, and multiple identical Invariant Sections may be replaced with a single copy. If there are multiple Invariant Sections with the same name but different contents, make the title of each such section unique by adding at the end of it, in parentheses, the name of the original author or publisher of that section if known, or else a unique number. Make the same adjustment to the section titles in the list of Invariant Sections in the license notice of the combined work.
In the combination, you must combine any sections Entitled "History" in the various original documents, forming one section Entitled "History"; likewise combine any sections Entitled "Acknowledgements", and any sections Entitled "Dedications". You must delete all sections Entitled "Endorsements".
6. COLLECTIONS OF DOCUMENTS #
You may make a collection consisting of the Document and other documents released under this License, and replace the individual copies of this License in the various documents with a single copy that is included in the collection, provided that you follow the rules of this License for verbatim copying of each of the documents in all other respects.
You may extract a single document from such a collection, and distribute it individually under this License, provided you insert a copy of this License into the extracted document, and follow this License in all other respects regarding verbatim copying of that document.
7. AGGREGATION WITH INDEPENDENT WORKS #
A compilation of the Document or its derivatives with other separate and independent documents or works, in or on a volume of a storage or distribution medium, is called an "aggregate" if the copyright resulting from the compilation is not used to limit the legal rights of the compilation's users beyond what the individual works permit. When the Document is included in an aggregate, this License does not apply to the other works in the aggregate which are not themselves derivative works of the Document.
If the Cover Text requirement of section 3 is applicable to these copies of the Document, then if the Document is less than one half of the entire aggregate, the Document's Cover Texts may be placed on covers that bracket the Document within the aggregate, or the electronic equivalent of covers if the Document is in electronic form. Otherwise they must appear on printed covers that bracket the whole aggregate.
8. TRANSLATION #
Translation is considered a kind of modification, so you may distribute translations of the Document under the terms of section 4. Replacing Invariant Sections with translations requires special permission from their copyright holders, but you may include translations of some or all Invariant Sections in addition to the original versions of these Invariant Sections. You may include a translation of this License, and all the license notices in the Document, and any Warranty Disclaimers, provided that you also include the original English version of this License and the original versions of those notices and disclaimers. In case of a disagreement between the translation and the original version of this License or a notice or disclaimer, the original version will prevail.
If a section in the Document is Entitled "Acknowledgements", "Dedications", or "History", the requirement (section 4) to Preserve its Title (section 1) will typically require changing the actual title.
9. TERMINATION #
You may not copy, modify, sublicense, or distribute the Document except as expressly provided for under this License. Any other attempt to copy, modify, sublicense or distribute the Document is void, and will automatically terminate your rights under this License. However, parties who have received copies, or rights, from you under this License will not have their licenses terminated so long as such parties remain in full compliance.
10. FUTURE REVISIONS OF THIS LICENSE #
The Free Software Foundation may publish new, revised versions of the GNU Free Documentation License from time to time. Such new versions will be similar in spirit to the present version, but may differ in detail to address new problems or concerns. See http://www.gnu.org/copyleft/.
Each version of the License is given a distinguishing version number. If the Document specifies that a particular numbered version of this License "or any later version" applies to it, you have the option of following the terms and conditions either of that specified version or of any later version that has been published (not as a draft) by the Free Software Foundation. If the Document does not specify a version number of this License, you may choose any version ever published (not as a draft) by the Free Software Foundation.
ADDENDUM: How to use this License for your documents #
Copyright (c) YEAR YOUR NAME.
Permission is granted to copy, distribute and/or modify this document
under the terms of the GNU Free Documentation License, Version 1.2
or any later version published by the Free Software Foundation;
with no Invariant Sections, no Front-Cover Texts, and no Back-Cover Texts.
A copy of the license is included in the section entitled "GNU
 Free Documentation License".
If you have Invariant Sections, Front-Cover Texts and Back-Cover Texts, replace the "with...Texts". line with this:
with the Invariant Sections being LIST THEIR TITLES, with the
Front-Cover Texts being LIST, and with the Back-Cover Texts being LIST.
If you have Invariant Sections without Cover Texts, or some other combination of the three, merge those two alternatives to suit the situation.
If your document contains nontrivial examples of program code, we recommend releasing these examples in parallel under your choice of free software license, such as the GNU General Public License, to permit their use in free software.
