Setting Up a PXE Boot Server
Preboot Execution Environment (PXE) is a network boot standard that enables systems to boot and install an operating system over the network instead of using local installation media. A PXE boot server simplifies and automates operating system deployment across multiple machines, reducing manual effort and improving consistency. On SUSE Linux Enterprise Server for SAP applications 16.0, you can configure a PXE boot server with support for UEFI Secure Boot and the Agama installer to create a scalable, network-based installation environment.
Prerequisites:
A SUSE Linux Enterprise Server for SAP applications 16.0 system with administrative privileges
Internet connection to fetch ISO images
Static IP configuration for the PXE server
1 Overview of PXE booting with SUSE Linux Enterprise Server for SAP applications 16.0 #
PXE booting enables machines to boot over the network into an installation or runtime environment without local storage. This section explains how PXE works with SUSE Linux Enterprise Server for SAP applications 16.0 using Agama and live installer images, with a focus on GRUB 2.
1.1 What is PXE booting? #
Preboot Execution Environment is a method that allows systems to retrieve boot loaders and OS installers from a network server using DHCP and TFTP or HTTP. It is widely used for provisioning machines without physical media or preinstalled operating systems.
1.2 Benefits of PXE booting #
PXE booting simplifies provisioning by removing the need for local installation media or manual setup. It enables:
Unattended installation of many systems over the network
Centralized management of installer versions and boot configurations
Support for diverse architectures and firmware types, including UEFI Secure Boot
Dynamic selection of installers or installation parameters using GRUB 2 menus
1.3 How PXE booting works in SUSE Linux Enterprise Server for SAP applications 16.0 #
PXE booting in SUSE Linux Enterprise Server for SAP applications 16.0 uses GRUB 2 as the boot loader and the Agama installer as the installation interface. Boot loaders and installer files are provided over the network using HTTP or TFTP, with GRUB 2 fetching the kernel, initrd and live image. PXE clients can use a variety of firmware (including the most common ones such as BIOS or UEFI), boot loader executable or image formats, as required by their architectures such as AMD64/Intel 64, AArch64, ppc64le and s390x. In addition, they must work in both IPv4 and IPv6 networks.
The boot loader passes kernel parameters such as root=live: to load the
squashfs-based root file system from a live ISO image, starting the Agama interface either
locally or as a Web service for a remote Web UI.
1.3.1 Backward compatibility with SLES for SAP 15.x #
The information in this article applies primarily to SUSE Linux Enterprise Server for SAP applications 16.0 and later. It focuses on PXE booting workflows that integrate with the Agama installer and rely on live installation images. In the context and scope of this article, SLES for SAP 16.0 and later versions differ from SLES for SAP 15.x in the following ways:
- Installer
Uses
dracutand Agama instead oflinuxrcand YaST.- DHCP server
Use of ISC DHCP is discontinued (EOL 2022). For a DHCP server, use either Kea or dnsmasq instead.
- Boot parameters
Uses
root=live:parameter to load the agama installer image and the optionalinst.install_url=for the non-default installation repository, instead of theinstall=parameter.
The boot loader choice (GRUB 2, pxelinux, etc.) remains flexible and is not version-dependent.
1.3.2 Different possible setups and steps #
This article consists of mandatory setup steps and optional or alternative configurations. Follow only the sections relevant to your deployment and skip any alternatives that do not apply to your deployment.
- Mandatory
Tasks like installing components, preparing the installer image, configuring GRUB 2, and validating the server must be completed in all setups.
- File delivery method
An HTTP server (recommended with Agama) like
nginxand/or a TFTP server liketftpordnsmasq. Note: TFTP is required for ppc64le
The ppc64le architecture uses IEEE 1275 (OpenFirmware), not UEFI. Its GRUB 2 netboot image (
core.elf) is retrieved exclusively over TFTP. HTTP Boot is not supported on ppc64le. A TFTP server is therefore mandatory in any setup that includes ppc64le clients, regardless of whether HTTP is used for other architectures.- DHCP server
Choose either Kea or dnsmasq.
Note: Limitations and features of your chosen methodUse Kea—the new DHCP server from ISC—as a modern replacement for ISC DHCP. For more information on Kea, refer to https://www.isc.org/kea/. For the ISC DHCP EOL notice, see https://www.isc.org/dhcp/. Kea is a DHCP server and requires separate TFTP server software. The Kea DHCP server supports options for TFTP/PXE boot over IPv4 and IPv6 as well as for HTTP boot via IPv4. The HTTP boot via IPv6 requires that the DHCPv6 server can send the
Vendor Class Option(seeRFC3315, Section 22.16), supposed to be used “by a client to identify the vendor,” back to the client and is currently not supported.dnsmasq is a combination of a DNS server, a DHCP server and a TFTP server. You can use it to serve the boot loader, kernel, initrd (and other files) over TFTP. For more information on dnsmasq, refer to https://thekelleys.org.uk/dnsmasq/doc.html. The dnsmasq DHCP server supports options for TFTP/PXE boot over IPv4 and IPv6 as well as for HTTP boot via IPv4. The HTTP boot via IPv6 requires that the DHCPv6 server can send the
Vendor Class Option(seeRFC3315, Section 22.16), supposed to be used “by a client to identify the vendor,” back to the client and is currently not supported.
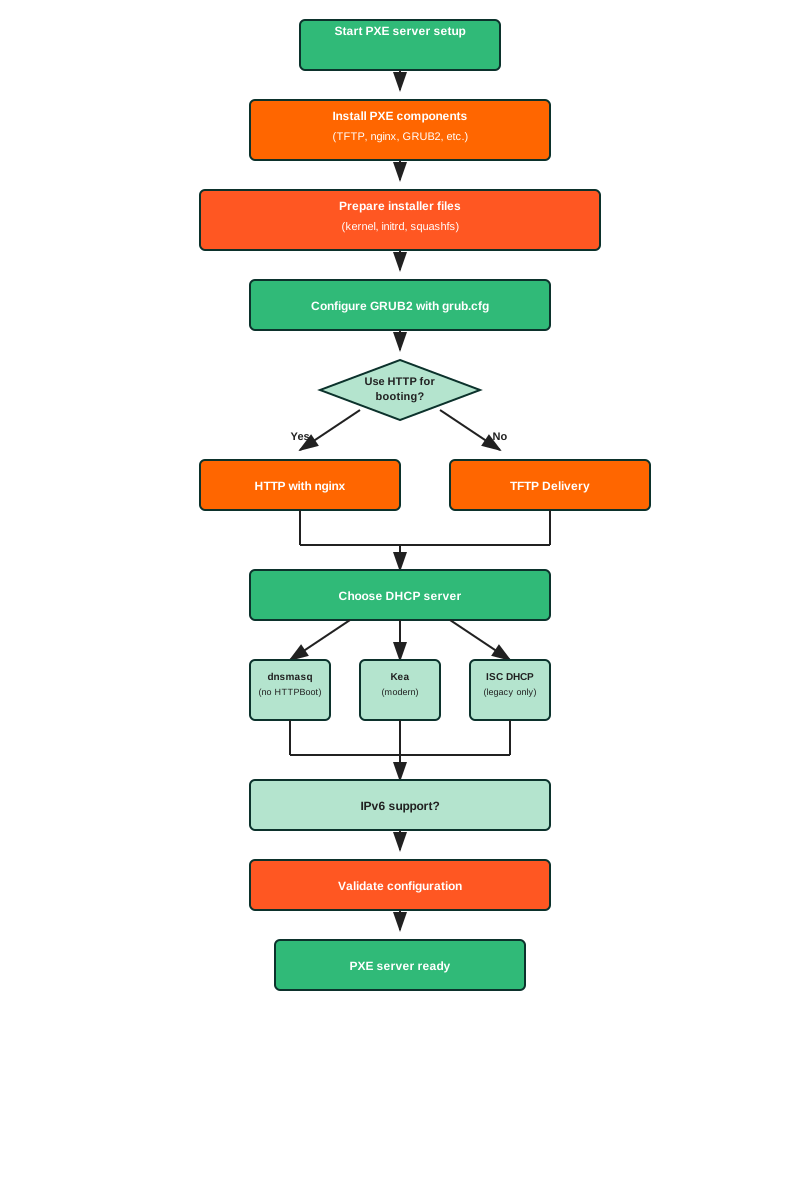
The “HTTP with nginx” and “TFTP Delivery” branches in the figure apply to UEFI-capable architectures (AMD64/Intel 64, AArch64) only. As noted above, TFTP delivery is mandatory for ppc64le, and HTTP Boot does not apply to it.
2 Preparing the network for PXE boot services #
This module describes the network infrastructure requirements for deploying PXE boot services on SUSE Linux Enterprise Server for SAP applications 16.0.
2.1 PXE network requirements #
A PXE server comprises three servers: a DHCP server providing the address and boot file (boot loader) location and a TFTP and/or HTTP server to retrieve the files. In addition, there might be a DNS server, an NTP server and a router with IPv6 support. These are usually separate from the PXE server in a production network. A PXE server running SUSE Linux Enterprise Server for SAP applications 16.0 may also need a specific network interface setup and certain persistent rules added to the firewall. This section illustrates a sample network with suitable IP ranges and the necessary firewall rules.
2.2 Configuring a sample PXE network environment #
In this article, we assume the following:
The PXE server is running on the
eno1network interface with the following network configuration:Table 1: Sample PXE network configuration #IPv4 IPv6 DNS Name PXE Network 192.168.1.0/24 2001:db8:0:1::/64 example.net PXE Server 192.168.1.200 2001:db8:0:1::200 pxe.example.net PXE Gateway 192.168.1.1 2001:db8:0:1::1 DNS Server 192.168.1.200 2001:db8:0:1::200 NTP Server 192.168.1.1 2001:db8:0:1::1 By default, the router, NTP and DNS servers are external and running on another machine. This article provides some hints, but does not cover their complete configuration.
2.3 Configuring network interfaces and firewall access for PXE services #
Configure the network interface and firewall to allow the network services required by the
PXE server. SELinux permissions for specific PXE services, such as
TFTP and HTTP, are covered in their respective sections later in this article.
Verify and assign the PXE network interface to the appropriate firewalld zone.
Check the currently active zones and their assigned interfaces:
>sudofirewall-cmd --get-active-zonesIf
eno1is not assigned to thepubliczone, assign it:>sudofirewall-cmd --zone=public --change-interface=eno1Make the interface assignment persistent across reboots:
>sudofirewall-cmd --permanent --zone=public --add-interface=eno1
Configure the firewall for DNS service access.
Allow DNS service for the current session:
>sudofirewall-cmd --zone=public --add-service=dnsMake the change persistent:
>sudofirewall-cmd --permanent --zone=public --add-service=dns
Configure the firewall for NTP service access.
Allow NTP service for the current session:
>sudofirewall-cmd --zone=public --add-service=ntpMake the change persistent:
>sudofirewall-cmd --permanent --zone=public --add-service=ntp
Configure the firewall for DHCP (IPv4) service access.
Allow DHCP service for the current session:
>sudofirewall-cmd --zone=public --add-service=dhcpMake the change persistent:
>sudofirewall-cmd --permanent --zone=public --add-service=dhcp
Configure the firewall for DHCPv6 service access.
Allow DHCPv6 service for the current session:
>sudofirewall-cmd --zone=public --add-service=dhcpv6Make the change persistent:
>sudofirewall-cmd --permanent --zone=public --add-service=dhcpv6
Configure the firewall for TFTP service access.
Allow TFTP service for the current session:
>sudofirewall-cmd --zone=public --add-service=tftpMake the change persistent:
>sudofirewall-cmd --permanent --zone=public --add-service=tftp
Configure the firewall for HTTP service access.
Allow HTTP service for the current session:
>sudofirewall-cmd --zone=public --add-service=httpMake the change persistent:
>sudofirewall-cmd --permanent --zone=public --add-service=http
Configure the firewall for HTTPS service access.
Allow HTTPS service for the current session:
>sudofirewall-cmd --zone=public --add-service=httpsMake the change persistent:
>sudofirewall-cmd --permanent --zone=public --add-service=https
2.4 Verifying PXE network readiness #
This procedure ensured that the PXE server's network interface and firewall were correctly configured for secure and functional operation.
Verified and assigned the PXE-serving interface (
eno1in this example) to thepublicfirewalld zone.Opened the required firewall services for PXE operation, including
dns,ntp,dhcp,dhcpv6,tftp,httpandhttps.
With these steps complete, the PXE server is securely configured and ready to serve client machines over the network using either IPv4 or IPv6.
3 Installing the required PXE server components #
This section explains how to install the necessary packages to support PXE booting in SUSE Linux Enterprise Server for SAP applications 16.0, including GRUB 2, DHCP, TFTP and/or HTTP components.
3.1 Required services and packages for a PXE boot server #
To configure a PXE boot server on SUSE Linux Enterprise Server for SAP applications 16.0, you need to install several services and tools. Depending on your setup, you may need the following:
The dnsmasq package provides a combination of a DNS server, a TFTP server and a DHCP server (DHCPv4 and DHCPv6) with limited IPv6 router advertisement (RA) support. It offers the following:
dnsmasq DHCP server: Supports conditional delivery of DHCP options depending on request and client architecture for:
PXE boot requests using DHCPv4 and DHCPv6
HTTP boot requests using DHCPv4
Note: Limitations of dnsmasq for HTTP boot over DHCPv6Currently, dnsmasq does not support sending the required
vendor-classDHCPv6 option.
dnsmasq TFTP server: Delivers boot loader files, kernel and initrd over TFTP during PXE boot.
dnsmasq DNS server: Provides recursive resolution of domain names and IP addresses for client firmware and
/etc/resolv.confin the Installer/OS.dnsmasq IPv6 RA: Supports sending IPv6 RA when the PXE server is also acting as a router (configurability limited to a “common RA pattern”).
The kea package is a DHCP server and a successor of the ISC DHCP server. It supports conditional delivery of DHCP options depending on request and client architecture for:
PXE boot requests using DHCPv4 and DHCPv6
HTTP boot requests using DHCPv4
Note: Limitations of Kea for HTTP Boot over DHCPv6Currently, Kea does not support sending the required
vendor-classDHCPv6 option. For more information, see https://kea.readthedocs.io/en/latest/arm/dhcp6-srv.html#id4.
A TFTP server delivers the boot loader files, kernel and initrd over TFTP. When using Kea for PXE boot, the tftp package provides this; it is not required for HTTP Boot. If you are using dnsmasq, you do not need the tftp package.
A Web server such as the nginx package to serve installer images over HTTP.
Note: Necessity for HTTP serversAn HTTP/HTTPS server like nginx is almost always required. Its use extends beyond just HTTP Boot. In particular, you may need it in the following scenarios:
It is a basic requirement for HTTP Boot.
We recommend it for providing the
squashfs.img. You can useroot=live:tftp://.../squashfs.imgin the boot command line.We also recommend it for providing RPMs to Agama in the
inst.install_url=http://.../install/boot command-line parameter on aSLES-16.0-Full-*.inline.iso, along with installation profiles and other files for unattended installation.
The GRUB 2 boot loader packages provide network boot for supported architectures and methods. For example, the AMD64/Intel 64 architecture offers two methods for network boot: BIOS and UEFI. Additionally, UEFI generally supports PXE (TFTP) and HTTP Boot. Other boot loaders, such as pxelinux, do not support UEFI and HTTP Boot.
Optionally, a router advertisement daemon for IPv6, such as the radvd package. It is required on SLES for SAP if it is also acting as a router for an installer network to perform the following:
Configure routing on a network for PXE or HTTP Boot clients.
Enable DHCPv6 use on a network for PXE or HTTP Boot clients.
3.2 Prerequisites for installing PXE server components #
A system running SUSE Linux Enterprise Server for SAP applications 16.0 with administrative privileges, registered to the SUSE Customer Center and configured with access to the appropriate online repositories using SUSEConnect.
Enabled SLE modules: Server Applications Module, Legacy Module and Base System Module.
Access to the SLE module repositories for network services and boot loaders.
A working internet connection to fetch packages.
3.3 Installing PXE boot server packages and services #
Use the following steps to install the core packages required for the PXE boot server.
Install the GRUB 2 boot loader and the nginx HTTP server as common requirements.
>sudozypper install grub2 nginxRun any of the following commands to install the required packages for your approach:
kea for the DHCP server, tftp for the TFTP server
>sudozypper install kea tftpdnsmasq as the common provider for DHCP, DNS and TFTP servers
>sudozypper install dnsmasq
Note: Limitations of DHCP servers provided by Kea and dnsmasqHTTP boot over IPv6 is currently not supported by DHCP servers provided by the kea and dnsmasq packages. It does not support sending a
vendor-classoption back to the HTTP client, as required by the UEFI specification.Optionally, install additional architecture-specific GRUB 2 targets if you plan to support other platforms.
For AMD64/Intel 64 architecture:
>sudozypper install grub2-x86_64-efi grub2-i386-pcFor AArch64 architecture:
>sudozypper install grub2-arm64-efiFor ppc64le architecture:
>sudozypper install grub2-powerpc-ieee1275
Note: How the PXE server delivers GRUB 2 packages to clients that are different from the server machine's architectureThe GRUB 2 architecture-specific noarch.rpm packages are included in the
noarchsubdirectory of the installation media/repository, regardless of the architecture of the machine on which the PXE server is set up. That is, you can install grub2-arm64-efi and grub2-powerpc-ieee1275 packages in a PXE server running on an AMD64/Intel 64 machine, in order to support clients with other architectures.Optionally, you may install the shim package if you need UEFI Secure Boot for AMD64/Intel 64 or AArch64, but do not want to use the files from the installation media ISO.
>sudozypper install shimOptionally, install the router advertisement daemon radvd if you want to use the PXE server as a router (not recommended for production networks).
>sudozypper install radvdInstall the rsync utility to conveniently copy or sync the ISO and directory tree.
>sudozypper install rsyncEnsure the services are installed but not yet started. Configuration will be covered in later sections.
4 Creating GRUB 2 NetBoot directories for PXE server #
This section explains creating GRUB 2 NetBoot directories for PXE servers using
grub2-mknetdir, which generates architecture-specific directories for
AMD64/Intel 64 (UEFI and BIOS), AArch64 and ppc64le systems. For Secure Boot support,
administrators must copy signed EFI files from installation media or use the
shim package to replace the default unsigned boot loader files.
4.1 GRUB 2NetBoot directory structure for PXE boot #
This section describes how to set up GRUB 2 NetBoot directories for PXE server deployment
across multiple architectures. The grub2-mknetdir command creates
architecture-specific directories under /srv/tftpboot/boot/grub2/ for
different platforms. For example, AMD64/Intel 64 systems generate both UEFI
(x86_64-efi) and legacy BIOS (i386-pc) directories,
and AArch64 systems create their UEFI directory in
arm64-efi. ppc64le systems (powerpc-ieee1275) use
OpenFirmware/OPAL rather than UEFI, and have their own Secure Boot mechanism separate from
UEFI Secure Boot; the GRUB 2 boot loader is in /boot/grub2/grub.elf on the
ISOs.

In the context of this section, Secure Boot applies to AMD64/Intel 64 and AArch64 architectures. GRUB 2 PXE Secure Boot for ppc64le (which uses a different platform-specific mechanism) is not covered here.
For Secure Boot support, which is not provided by the default unsigned
core.efi files, administrators must obtain signed EFI files.
The signed files can be obtained from either of the following sources:
The shim package installed on the PXE server (
zypper install
       shim
), which providesshim.efi,grub.efiandMokManager.efiunder/usr/share/efi/ARCH/. Note that the shim package provides files only for the architecture of the PXE server itself. To support a different architecture, use the installation media ISO or manually extract the files from the architecture-specific shim package.The installation media ISO (mounted and copied from
/mnt/EFI/BOOT/*.efi), which provides signed EFI files for the target architecture regardless of the PXE server architecture.
The files must be copied to the appropriate architecture directories. This ensures proper symbolic link resolution to keep all files within the TFTP root directory.
4.2 Requirements for creating GRUB 2 NetBoot directories #
Ensure that you have installed the following packages: grub2, tftp and the GRUB 2 platform package for every architecture you want to serve: grub2-x86_64-efi, grub2-i386-pc, grub2-arm64-efi and grub2-powerpc-ieee1275.
Ensure that you have either the installation media (ISO) available for mounting, or the shim package installed on the system. You can download the installation media (ISO) for your target architecture from the SUSE Customer Center.
4.3 Preparing NetBoot directories and configuring UEFI Secure Boot #
This procedure creates the required GRUB 2 directory structure for PXE network booting and optionally configures UEFI Secure Boot support across multiple architectures.
Create a GRUB 2 NetBoot directory structure:
>sudogrub2-mknetdir --net-directory=/srv/tftpboot --subdir=/boot/grub2Without an explicit
--directoryoption,grub2-mknetdirgenerates a directory for every GRUB 2 platform package installed on the PXE server, along with the sharedfonts/andlocale/directories. With the packages listed under Section 4.2, “Requirements for creating GRUB 2 NetBoot directories” installed, this creates/srv/tftpboot/boot/grub2/x86_64-efi,/srv/tftpboot/boot/grub2/i386-pc,/srv/tftpboot/boot/grub2/arm64-efi, and/srv/tftpboot/boot/grub2/powerpc-ieee1275. Warning
Do not manually overwrite the
grub.cfgfile created bygrub2-mknetdir.You can use the
/srv/tftpboot/boot/grub2/ARCH-efi/core.efifile installed by thegrub2-mknetdircommand for AMD64/Intel 64 or AArch64 architectures for UEFI PXE as well, without performing any of the steps below. However, it is not signed: a client with UEFI Secure Boot enabled in firmware rejects it and fails to boot. This is not a concern if UEFI Secure Boot is disabled in the client's firmware, which is the default on most hardware. Only perform the following steps if your PXE clients must keep UEFI Secure Boot enabled during boot.Note:core.efiand subdirectory setupsThe
core.efifile generated bygrub2-mknetdirhas/boot/grub2hardcoded as an embedded prefix. GRUB 2 always fetches modules and configuration from this prefix relative to the TFTP root, regardless of wherecore.efiitself was loaded from. If you need to serve multiple environments from subdirectories under one TFTP root, useshimandgrub.efifrom the installation media ISO or the shim package instead, as described below.To optionally enable UEFI Secure Boot for the supported AMD64/Intel 64 and AArch64 architectures, perform any of the following steps:
Copy the necessary files from the installation media ISO:
Mount the ISO image.
>sudomount -o loop /PATH/TO/SLES.ISO /mntCopy EFI files.
>sudocp -v /mnt/EFI/BOOT/*.efi /srv/tftpboot/boot/grub2/ARCH-efi/1Replace
ARCH-efiwithx86_64-efiorarm64-efi, the architectures that support Secure Boot.Unmount the installation media ISO.
>sudoumount /mnt
For AMD64/Intel 64 and AArch64 architectures, use the shim package if you do not want to use the files from the installation media ISO:
If not already installed, install the shim package.
>sudozypper install shimCopy the signed boot loader files for the necessary architecture:
Copy the
shim.efifile.For AMD64/Intel 64 architecture:
>sudocp -v -p -L /usr/share/efi/x86_64/shim.efi /srv/tftpboot/boot/grub2/x86_64-efi/bootx64.efiFor AArch64 architecture:
>sudocp -v -p -L /usr/share/efi/aarch64/shim.efi /srv/tftpboot/boot/grub2/arm64-efi/bootaa64.efi
Copy the
grub.efifile.For AMD64/Intel 64 architecture:
>sudocp -v -p -L /usr/share/efi/x86_64/grub.efi /srv/tftpboot/boot/grub2/x86_64-efi/For AArch64 architecture:
>sudocp -v -p -L /usr/share/efi/aarch64/grub.efi /srv/tftpboot/boot/grub2/arm64-efi/
Copy the
MokManager.efifile.For AMD64/Intel 64 architecture:
>sudocp -v -p -L /usr/share/efi/x86_64/MokManager.efi /srv/tftpboot/boot/grub2/x86_64-efi/For AArch64 architecture:
>sudocp -v -p -L /usr/share/efi/aarch64/MokManager.efi /srv/tftpboot/boot/grub2/arm64-efi/
NoteThe
-Lflag resolves symbolic links to ensure files stay within the TFTP root.
5 Preparing the installer image content #
This section describes how to extract and organize installer files from SUSE Linux Enterprise Server for SAP applications
16.0 installation media for PXE boot environments. It covers both
.install.iso images and RPM packages, with specific instructions for
different architectures and installation types.
5.1 Installer file requirements for Agama #
SUSE Linux Enterprise Server for SAP applications 16.0 provides installer files in multiple formats to support
different PXE boot scenarios. The Agama installer requires three files: the
kernel image (linux), the initial RAM disk
(initrd) and the compressed root file system
(squashfs.img). These files must be extracted from the installation
media and organized in a directory structure accessible via TFTP and HTTP.
This section covers preparation methods for both .install.iso images and
RPM packages, ensuring compatibility with various architectures and installation types
supported by SUSE Linux Enterprise Server for SAP applications 16.0.
5.2 Preparing sources and environment for installer file extraction #
SUSE Linux Enterprise Server for SAP applications 16.0 installation media, as available in SUSE Customer Center. Choose from:
Online ISO: Installer-only for network installations
For AMD64/Intel 64:
SLES-16.0-Online-x86_64-BUILD.install.isoFor AArch64:
SLES-16.0-Online-aarch64-BUILD.install.isoFor ppc64le:
SLES-16.0-Online-ppc64le-BUILD.install.iso
Full ISO: Installer with installation repository
For AMD64/Intel 64:
SLES-16.0-Full-x86_64-BUILD.install.isoFor AArch64:
SLES-16.0-Full-aarch64-BUILD.install.isoFor ppc64le:
SLES-16.0-Full-ppc64le-BUILD.install.iso
RPM packages:
For AMD64/Intel 64: tftpboot-agama-installer-SUSE_SLE_16_PXE-x86_64
For AArch64: tftpboot-agama-installer-SUSE_SLE_16_PXE-aarch64
For ppc64le: tftpboot-agama-installer-SUSE_SLE_16_PXE-ppc64le
A temporary mount point, such as
/mnt.Sufficient disk space under
/srv/tftpbootand/srv/www/htdocs/installfor your chosen installation method.Administrative privileges to create directories and copy files.
${BUILD} placeholder
Both the file names above and the commands below reference the downloaded ISO through a
${BUILD} shell variable. Export it once with the build identifier of the
file you download, then every file name and command that follows can be copied and pasted
exactly as shown:
>export BUILD=Build135.5>wget https://.../SLES-16.0-Online-x86_64-${BUILD}.install.iso
The build identifier is whatever the download source offers for your version. On
https://www.suse.com/download/sles/ it is a release tag such as
GM (and later maintenance updates such as QU2 or
QU3); on the internal build service it is a build number such as
Build135.5. It changes with every new build, so set it to match the file
you actually download.
5.3 Preparing installer files from ISO images #
ISO images provide a straightforward method for extracting installer files. The following procedures cover both Online and Full ISO types for different architectures.
5.3.1 Using Online ISO images #
Online ISO images contain only the installer components, requiring network access
to installation repositories during system installation. This corresponds to the
SLES-16.0 Online Installation boot menu entry in GRUB 2.
Create the directory structure for installer files.
For AMD64/Intel 64:
>sudomkdir -p /srv/tftpboot/boot/images/SLES-16.0/x86_64/For AArch64:
>sudomkdir -p /srv/tftpboot/boot/images/SLES-16.0/aarch64/For ppc64le:
>sudomkdir -p /srv/tftpboot/boot/images/SLES-16.0/ppc64le/
Mount the Online ISO image.
For AMD64/Intel 64:
>sudomount -oro,loop /srv/www/htdocs/install/iso/SLES-16.0-Online-x86_64-${BUILD}.install.iso /mntFor AArch64:
>sudomount -oro,loop /srv/www/htdocs/install/iso/SLES-16.0-Online-aarch64-${BUILD}.install.iso /mntFor ppc64le:
>sudomount -oro,loop /srv/www/htdocs/install/iso/SLES-16.0-Online-ppc64le-${BUILD}.install.iso /mnt
Copy the kernel and initrd files and the compressed root file system.
For AMD64/Intel 64:
>sudocp /mnt/boot/x86_64/loader/linux /srv/tftpboot/boot/images/SLES-16.0/x86_64/>sudocp /mnt/boot/x86_64/loader/initrd /srv/tftpboot/boot/images/SLES-16.0/x86_64/>sudocp /mnt/LiveOS/squashfs.img /srv/tftpboot/boot/images/SLES-16.0/x86_64/For AArch64:
>sudocp /mnt/boot/aarch64/loader/linux /srv/tftpboot/boot/images/SLES-16.0/aarch64/>sudocp /mnt/boot/aarch64/loader/initrd /srv/tftpboot/boot/images/SLES-16.0/aarch64/>sudocp /mnt/LiveOS/squashfs.img /srv/tftpboot/boot/images/SLES-16.0/aarch64/For ppc64le:
>sudocp /mnt/boot/ppc64le/linux /srv/tftpboot/boot/images/SLES-16.0/ppc64le/>sudocp /mnt/boot/ppc64le/initrd /srv/tftpboot/boot/images/SLES-16.0/ppc64le/>sudocp /mnt/LiveOS/squashfs.img /srv/tftpboot/boot/images/SLES-16.0/ppc64le/
Note: Path variation for ppc64le installation mediaThe
loadersubdirectory may or may not be present on ppc64le installation media depending on the version. Iflinuxandinitrdare not found at/mnt/boot/ppc64le/linuxand/mnt/boot/ppc64le/initrd, try/mnt/boot/ppc64le/loader/linuxand/mnt/boot/ppc64le/loader/initrdinstead.Unmount the ISO image:
>sudoumount /mnt
5.3.2 Using Full ISO images #
Full ISO images include both the installer and installation repositories, enabling local
installations without external network dependencies.
It corresponds to the SLES-16.0 Local Installation boot menu entry
in GRUB 2 with the additional
inst.install_url=http://pxe.example.net/install/SLES-16.0/${arch}
parameter.
Create the directory for installer files.
For AMD64/Intel 64:
>sudomkdir -p /srv/tftpboot/boot/images/SLES-16.0/x86_64/For AArch64:
>sudomkdir -p /srv/tftpboot/boot/images/SLES-16.0/aarch64/For ppc64le:
>sudomkdir -p /srv/tftpboot/boot/images/SLES-16.0/ppc64le/
Create the directory for the installation repository:
>sudomkdir -p /srv/www/htdocs/install/SLES-16.0Mount the Full ISO image:
For AMD64/Intel 64:
>sudomount -oro,loop /srv/www/htdocs/install/iso/SLES-16.0-Full-x86_64-${BUILD}.install.iso /mntFor AArch64:
>sudomount -oro,loop /srv/www/htdocs/install/iso/SLES-16.0-Full-aarch64-${BUILD}.install.iso /mntFor ppc64le:
>sudomount -oro,loop /srv/www/htdocs/install/iso/SLES-16.0-Full-ppc64le-${BUILD}.install.iso /mnt
Copy the kernel files.
For AMD64/Intel 64:
>sudocp /mnt/boot/x86_64/loader/linux /srv/tftpboot/boot/images/SLES-16.0/x86_64/For AArch64:
>sudocp /mnt/boot/aarch64/loader/linux /srv/tftpboot/boot/images/SLES-16.0/aarch64/For ppc64le:
>sudocp /mnt/boot/ppc64le/linux /srv/tftpboot/boot/images/SLES-16.0/ppc64le/
Copy the initrd files.
For AMD64/Intel 64:
>sudocp /mnt/boot/x86_64/loader/initrd /srv/tftpboot/boot/images/SLES-16.0/x86_64/For AArch64:
>sudocp /mnt/boot/aarch64/loader/initrd /srv/tftpboot/boot/images/SLES-16.0/aarch64/For ppc64le:
>sudocp /mnt/boot/ppc64le/initrd /srv/tftpboot/boot/images/SLES-16.0/ppc64le/
Note: Path variation for ppc64le installation mediaThe
loadersubdirectory may or may not be present on ppc64le installation media depending on the version. Iflinuxandinitrdare not found at/mnt/boot/ppc64le/linuxand/mnt/boot/ppc64le/initrd, try/mnt/boot/ppc64le/loader/linuxand/mnt/boot/ppc64le/loader/initrdinstead.Copy the compressed root file system.
For AMD64/Intel 64:
>sudocp /mnt/LiveOS/squashfs.img /srv/tftpboot/boot/images/SLES-16.0/x86_64/For AArch64:
>sudocp /mnt/LiveOS/squashfs.img /srv/tftpboot/boot/images/SLES-16.0/aarch64/For ppc64le:
>sudocp /mnt/LiveOS/squashfs.img /srv/tftpboot/boot/images/SLES-16.0/ppc64le/
Copy the installation repository for local HTTP server access.
For AMD64/Intel 64:
>sudorsync -avP /mnt/install/ /srv/www/htdocs/install/SLES-16.0/x86_64/For AArch64:
>sudorsync -avP /mnt/install/ /srv/www/htdocs/install/SLES-16.0/aarch64/For ppc64le:
>sudorsync -avP /mnt/install/ /srv/www/htdocs/install/SLES-16.0/ppc64le/
Unmount the ISO image:
>sudoumount /mnt
5.4 Preparing installer files from RPM packages #
RPM packages provide an alternative method for obtaining Online Installer files.
Install the required packages.
For AMD64/Intel 64:
>sudozypper in tftpboot-agama-installer-SUSE_SLE_16-x86_64For AArch64:
>sudozypper in tftpboot-agama-installer-SUSE_SLE_16-aarch64For ppc64le:
>sudozypper in tftpboot-agama-installer-SUSE_SLE_16-ppc64le
Create the directory for tftpboot and navigate to it.
For AMD64/Intel 64:
>sudomkdir -p /srv/tftpboot/boot/images/SLES-16.0/x86_64>sudocd /srv/tftpboot/boot/images/SLES-16.0/x86_64For AArch64:
>sudomkdir -p /srv/tftpboot/boot/images/SLES-16.0/aarch64>sudocd /srv/tftpboot/boot/images/SLES-16.0/aarch64For ppc64le:
>sudomkdir -p /srv/tftpboot/boot/images/SLES-16.0/ppc64le>sudocd /srv/tftpboot/boot/images/SLES-16.0/ppc64le
Copy the
linux,initrdandsquashfs.imgfiles into the tftpboot directory.For AMD64/Intel 64:
>sudocp -v \ /usr/share/tftpboot-installation/agama-installer-SUSE_SLE_16/x86_64/loader/linux \ /usr/share/tftpboot-installation/agama-installer-SUSE_SLE_16/x86_64/loader/initrd \ /usr/share/tftpboot-installation/agama-installer-SUSE_SLE_16/x86_64/loader/squashfs.img \ .For AArch64:
>sudocp -v \ /usr/share/tftpboot-installation/agama-installer-SUSE_SLE_16/aarch64/loader/linux \ /usr/share/tftpboot-installation/agama-installer-SUSE_SLE_16/aarch64/loader/initrd \ /usr/share/tftpboot-installation/agama-installer-SUSE_SLE_16/aarch64/loader/squashfs.img \ .For ppc64le:
>sudocp -v \ /usr/share/tftpboot-installation/agama-installer-SUSE_SLE_16/ppc64le/loader/linux \ /usr/share/tftpboot-installation/agama-installer-SUSE_SLE_16/ppc64le/loader/initrd \ /usr/share/tftpboot-installation/agama-installer-SUSE_SLE_16/ppc64le/loader/squashfs.img \ .
5.5 Recommended directory structure #
Organize the extracted files according to the following directory layout to ensure consistency and ease of maintenance. This structure supports multiple architectures and installation types.
/srv/tftpboot/
├── boot/
│   ├── grub2/
│   │   ├── x86_64-efi/
│   │   │   ├── bootx64.efi
│   │   │   └── grub.cfg
│   │   ├── i386-pc/
│   │   │   └── core.0
│   │   ├── arm64-efi/
│   │   │   └── bootaa64.efi
│   │   └── powerpc-ieee1275/
│   │       └── core.elf
│   └── images/
│       └── SLES-16.0/
│           ├── x86_64/
│           │   ├── linux 1
│           │   ├── initrd 2
│           │   └── squashfs.img 3
│           ├── aarch64/
│           └── ppc64le/
/srv/www/htdocs/install/
└── SLES-16.0/
    ├── x86_64/ 4
    ├── aarch64/
    └── ppc64le/
5.6 Resetting SELinux labels #
Reset the SELinux labels of the /srv/tftpboot directory to those defined in the policy.
>sudorestorecon -Rv /srv/tftpboot
5.7 Verifying the installation #
After extracting and organizing the installer files, verify that all required components are present and accessible.
Check that the required files are present.
For AMD64/Intel 64:
>ls -la /srv/tftpboot/boot/images/SLES-16.0/x86_64/*For AArch64:
>ls -la /srv/tftpboot/boot/images/SLES-16.0/aarch64/*For ppc64le:
>ls -la /srv/tftpboot/boot/images/SLES-16.0/ppc64le/*
Ensure proper file permissions:
>sudofind /srv/tftpboot/boot/images/ -type d -exec chmod 0755 {} \;>sudofind /srv/tftpboot/boot/images/ -type f -exec chmod 0644 {} \;
Ensure that all extracted files are readable by the TFTP and HTTP services. PXE clients access these files directly during boot, so incorrect permissions or service configuration will cause boot failures.
5.8 Next steps: Configure PXE services #
The installer files are now extracted and organized. Next:
Configure GRUB 2 for PXE boot with menu entries referencing these files.
Set up HTTP and TFTP services to serve the extracted content.
Configure DHCP to direct PXE clients to the appropriate boot loaders.
The extracted files will be referenced in GRUB 2 configuration using paths, such as:
For AMD64/Intel 64:
root=live:http://pxe.example.net/boot/images/SLES-16.0/x86_64/squashfs.imgFor AArch64:
root=live:http://pxe.example.net/boot/images/SLES-16.0/aarch64/squashfs.imgFor ppc64le:
root=live:http://pxe.example.net/boot/images/SLES-16.0/ppc64le/squashfs.img
6 Configuring GRUB 2 for PXE boot #
This section describes how to configure the GRUB 2 boot loader for PXE-based booting on SUSE Linux Enterprise Server for SAP applications 16.0. It covers creating the network boot directory structure, setting up architecture-specific boot loaders and building a boot menu that supports multiple architectures and installation types.
6.1 GRUB 2 PXE boot configuration structure #
GRUB 2 serves as the network boot loader for PXE clients, loading kernel and initrd files to start the Agama installer. This section shows how to build a GRUB 2 configuration that detects the client architecture, selects the correct network interface and provides one boot menu covering multiple installation types and target architectures.
The configuration is split into separate files for architecture detection, variable definitions and boot menu entries. This split lets you add machine-specific configurations and automated installation profiles without duplicating the shared setup.
6.2 Requirements for GRUB 2 PXE boot configuration #
Ensure that the GRUB 2 network boot directory structure is in place, as described in the previous sections.
Ensure that the installer files are properly organized as described in the previous sections.
GRUB 2 packages for all target architectures must be installed: grub2-x86_64-efi, grub2-i386-pc, grub2-arm64-efi and grub2-powerpc-ieee1275
The shim package for UEFI Secure Boot support (optional).
Administrative access to
/srv/tftpbootor equivalent PXE root.
6.3 Creating the GRUB 2 configuration #
The GRUB 2 configuration file handles three main tasks: detecting the client's architecture, managing network interfaces and loading other configuration files. This modular approach provides flexibility for different deployment scenarios.
grub.cfg file #Create the main GRUB 2 configuration file at
/srv/tftpboot/boot/grub2/grub.cfg:>sudocat > /srv/tftpboot/boot/grub2/grub.cfg << 'EOF'# Architecture detection and mapping if [ "$grub_cpu" == "i386" ]; then set arch='x86_64' elif [ "$grub_cpu" == "x86_64" ]; then set arch='x86_64' elif [ "$grub_cpu" == "arm64" ]; then set arch='aarch64' elif [ "$grub_cpu" == "powerpc" ]; then set arch='ppc64le' fi if [ "X$arch" == "X" ]; then echo "ERROR: No architecture found for ${grub_cpu}" exit else echo "Running on $arch CPU architecture" fi export arch # Network interface configuration for PXE-selected NIC # - dracut based images on SLE-16: set ipcfg="ifname=pxe0:${net_default_mac} ip=pxe0:dhcp" export ipcfg # - linuxrc installer on SLE-15: set ifcfg="ifcfg=${net_default_mac}=dhcp" export ifcfg # Define typical serial console kernel parameter #set sconsole="console=tty0 console=ttyS0,115200n8" #export sconsole # Load machine-specific configuration if available set config="/boot/config" export config if [ -s "${config}/${net_default_mac}/grub.cfg" ]; then ## Source a host specific configuration of grub menu: source "${config}/${net_default_mac}/grub.cfg" else ## Source default grub boot menu: source "${prefix}/menu.cfg" fi EOF
- Architecture detection
Maps GRUB 2 CPU types to distribution architectures, enabling unified menu entries that work across different hardware platforms.
- Network interface management
Defines an
${ipcfg}variable using the grub2 variable${net_default_mac}to activate dhcp only on the PXE boot interface namedpxe0, avoiding network probing issues on multi-interface systems.Note: Selecting a specific network interface on a multi-NIC machineThe default configuration above never needs to know an interface's real name: it binds a custom name (
pxe0) to whichever NIC actually performed the PXE boot, using dracut'sifname=<name>:<MAC>syntax. The machine-specific example later in this topic instead hardcodes a literal interface name (eno1). If a target machine has multiple NICs and you need to boot from a specific one, for example the third, identify its real interface name or MAC address on that machine first (for example, withip link show, or from the hardware vendor's documentation), then either reference that name directly inip=<interface>:dhcp, or bind a custom name to its MAC address withifname=the same way the default configuration does. dracut also accepts multipleip=parameters at once, but then requiresbootdev=<interface>to specify which one provides routing and netroot information.- Utility definitions
Defines a typical
${sconsole}variable with serial console parameters.- Machine-specific configuration
Loads optional per-machine configuration files based on MAC address, enabling customized per-machine boot parameters and automated installation profiles.
6.4 Creating the unified boot menu for multiple PXE installations #
The boot menu uses variables from the main configuration to provide architecture-agnostic menu entries that automatically adapt to different hardware platforms and installation types.
The menu entries use variables that are automatically populated based on the client
architecture and configuration. The ${arch} variable ensures the
correct files are loaded.
The optional ${ipcfg} variable causes only the PXE-selected
network interface to be set up.
The optional ${sconsole} variable enables a serial console in the
installer system.
GRUB 2 automatically prepends the protocol and server it booted from to every path it
loads, including the linux and initrd lines, so you
normally do not need to specify a protocol explicitly. Only specify it if you want GRUB 2
to load these particular files via a different protocol than the one
it booted with, for example booting via TFTP but fetching
linux and initrd over HTTP:
menuentry 'SLES-16.0 Online Installation' {
linux  (http,192.168.1.200)/boot/images/SLES-16.0/${arch}/linux showopts root=live:http://pxe.example.net/boot/images/SLES-16.0/${arch}/squashfs.img ${ipcfg} ${sconsole} ${autoinstall}
initrd (http,192.168.1.200)/boot/images/SLES-16.0/${arch}/initrd
}
Use an IP address rather than a host name in the protocol prefix. GRUB 2 itself resolves the boot server as an IP address, and using a host name here would trigger a separate DNS lookup for every path.
6.5 Machine-specific configurations #
For advanced deployments, you can create machine-specific configuration files that override default settings or provide automated installation parameters.
Create a directory for machine-specific configurations:
>sudomkdir -p /srv/tftpboot/boot/configFor a machine with a MAC address
aa:bb:cc:dd:ee:ff, create a specific configuration:>sudomkdir -p /srv/tftpboot/boot/config/aa:bb:cc:dd:ee:ffCreate the machine-specific
grub.cfg:>sudocat > /srv/tftpboot/boot/config/aa:bb:cc:dd:ee:ff/grub.cfg << 'EOF'# Machine-specific configuration for aa:bb:cc:dd:ee:ff set default='SLES-16.0 Local Installation' # Activate the menu-entry after 5sec timeout set timeout=5 # Use know predictable network interface name set ipcfg="ip=eno1:dhcp" # Set the autoinstall variable for this machine set autoinstall="inst.auto=http://pxe.example.net/install/profiles/aa:bb:cc:dd:ee:ff/sles16.json" export autoinstall # Load the default menu source "/boot/grub2/menu.cfg" EOFAlternatively, provide your own menu entry in the host-specific
grub.cfg, for example generated for a specific boot attempt:>sudocat > /srv/tftpboot/boot/config/aa:bb:cc:dd:ee:ff/grub.cfg << 'EOF'set default='SLES-16.0 Auto-Installation' set timeout=5 menuentry 'SLES-16.0 Auto-Installation' { linux /boot/images/SLES-16.0/${arch}/linux showopts root=live:http://pxe.example.net/boot/images/SLES-16.0/${arch}/squashfs.img inst.install_url=http://pxe.example.net/install/SLES-16.0/${arch} inst.auto=http://pxe.example.net/install/profiles/${net_default_mac}/sles16.json ip=eno1:dhcp initrd /boot/images/SLES-16.0/${arch}/initrd } EOF
defaultSpecifies which menu entry to boot automatically.
timeoutSets the boot timeout in seconds.
ipcfgOverrides network interface configuration for specific hardware.
autoinstallProvides machine-specific automated installation profile URLs, using the
inst.autokernel parameter. For a full list ofinst.*and other Agama boot parameters, including which are mandatory, their exact syntax, and defaults, refer to Agama boot options.
6.6 Verifying GRUB 2 configuration #
After creating the configuration files, verify that the setup is correct, and all required files are in place.
Check the GRUB 2 directory structure:
>find /srv/tftpboot/boot/grub2 -type f -name "*.cfg" -o -name "*.efi" -o -name "core.*"Verify the configuration file syntax by testing with GRUB 2 tools:
>grub2-script-check /srv/tftpboot/boot/grub2/grub.cfg>grub2-script-check /srv/tftpboot/boot/grub2/menu.cfgEnsure proper file permissions:
>sudochmod -R 644 /srv/tftpboot/boot/grub2/*.cfg>sudofind /srv/tftpboot/boot/grub2 -type d -exec chmod 0755 {} \;
Test the GRUB 2 configuration with actual PXE clients to ensure proper architecture
detection and menu functionality. The ${net_default_mac} variable is
only available during actual network boot scenarios.
6.7 Troubleshooting GRUB 2 configuration #
Common issues and their solutions when working with GRUB 2 PXE configurations. Each problem includes diagnostic steps and specific commands to resolve the issue.
6.7.1 Architecture detection fails #
When GRUB 2 fails to detect the correct architecture, clients may boot with incorrect binaries or fail to load altogether.
Add debug output to the GRUB 2 configuration to see detected values:
>sudocat >> /srv/tftpboot/boot/grub2/grub.cfg << 'EOF'# Debug architecture detection echo "Detected grub_cpu: ${grub_cpu}" echo "Mapped arch: ${arch}" sleep 3 EOFTest the configuration syntax:
>grub2-script-check /srv/tftpboot/boot/grub2/grub.cfgIf architecture mapping is incomplete, extend the detection logic:
>sudosed -i '/elif \[ "$grub_cpu" == "powerpc" \]/a\\nelif [ "$grub_cpu" == "riscv64" ]; then\n set arch='\''riscv64'\''\\' /srv/tftpboot/boot/grub2/grub.cfgVerify the architecture-specific directories exist:
>ls -la /srv/tftpboot/boot/grub2/
6.7.2 Network interface not found #
Some firmware implementations may not set the ${net_default_mac}
variable correctly, causing network configuration failures.
Add debug output to check network variables:
>sudosed -i '/set ipcfg=/i\\necho "Default MAC: ${net_default_mac}"\necho "Network variables set"\nsleep 2' /srv/tftpboot/boot/grub2/grub.cfgCreate a fallback network configuration:
>sudocat >> /srv/tftpboot/boot/grub2/grub.cfg << 'EOF'# Fallback network configuration if net_default_mac is empty if [ "X${net_default_mac}" == "X" ]; then set ipcfg="ip=dhcp" set ifcfg="ifcfg=*=dhcp" echo "WARNING: Using fallback network configuration" sleep 2 fi EOFTest network configuration with a specific interface:
>sudoecho 'set ipcfg="ip=eno1:dhcp"' > /srv/tftpboot/boot/config/test-network.cfgVerify network interface names on the target system:
>ip link show
6.7.3 File paths not found #
Incorrect file paths prevent GRUB 2 from loading kernel and initrd files, causing boot failures.
Check if the installer files exist in the expected locations:
>find /srv/tftpboot/boot/images -name "linux" -o -name "initrd" -o -name "squashfs.img"Verify TFTP access to boot files:
>tftp localhost -c get /boot/grub2/grub.cfg /tmp/test-grub.cfgTest HTTP access to installer files:
>curl -I http://localhost/boot/images/SLES-16.0/x86_64/linuxCheck file permissions and ownership:
>ls -la /srv/tftpboot/boot/images/SLES-16.0/*/Fix permissions if needed:
>sudochmod -R 644 /srv/tftpboot/boot/images/>sudofind /srv/tftpboot/boot/images/ -type d -exec chmod 755 {} \;Verify symbolic links are not broken:
>find /srv/tftpboot/boot/images/ -type l -exec ls -la {} \;
6.7.4 EFI boot failures #
EFI and Secure Boot issues can prevent proper boot loader initialization or cause authentication failures.
Verify Secure Boot files are present:
>ls -la /srv/tftpboot/boot/grub2/x86_64-efi/*.efiCheck that the shim file (either
bootx64.efiorshim.efi),grub.efiandMokManager.efiare properly copied:>file /srv/tftpboot/boot/grub2/x86_64-efi/bootx64.efiVerify EFI file integrity:
>sha256sum /srv/tftpboot/boot/grub2/x86_64-efi/*.efiTest if files are accessible via TFTP:
>tftp localhost -c get /boot/grub2/x86_64-efi/bootx64.efi /tmp/test-shim.efiFor aarch64 systems, verify ARM64 EFI files:
>ls -la /srv/tftpboot/boot/grub2/arm64-efi/*.efiCheck that the DHCP configuration provides the correct boot loader paths:
>grep -n "bootx64.efi\|shim.efi\|bootaa64.efi" /etc/dnsmasq.d/dhcp.conf /etc/kea/kea-dhcp?.conf /etc/dhcpd?.confIf files are missing, recopy them from the ISO mounted at
/mntor from the shim package files:>sudocp -v /mnt/EFI/BOOT/*.efi /srv/tftpboot/boot/grub2/x86_64-efi/>sudocp -pL /usr/share/efi/x86_64/*.efi /srv/tftpboot/boot/grub2/x86_64-efi/
6.7.6 Enabling detailed logging #
For persistent issues, enable logging to capture detailed information about the boot process.
Create a debug version of the main configuration:
>sudocp /srv/tftpboot/boot/grub2/grub.cfg /srv/tftpboot/boot/grub2/grub.cfg.backupAdd debug output:
>sudocat > /srv/tftpboot/boot/grub2/debug.cfg << 'EOF'# Debug configuration for GRUB troubleshooting set debug=all set pager=1 echo "=== GRUB Debug Information ===" echo "grub_cpu: ${grub_cpu}" echo "grub_platform: ${grub_platform}" echo "net_default_mac: ${net_default_mac}" echo "net_default_server: ${net_default_server}" echo "=============================" sleep 5 EOFInclude debug configuration in main file:
>sudosed -i '1i\source "${prefix}/debug.cfg"' /srv/tftpboot/boot/grub2/grub.cfgMonitor TFTP logs during boot attempts:
>sudo journalctl -f -u tftp.socketMonitor DHCP logs for PXE requests:
>sudo journalctl -f -u dhcpdDisable debug mode after troubleshooting:
>sudosed -i '/source "${prefix}\/debug.cfg"/d' /srv/tftpboot/boot/grub2/grub.cfg
6.8 Multi-environment subdirectory setups #
If you want to serve multiple independent PXE environments from subdirectories under one TFTP root (for example,
/srv/tftpboot/ENV1/boot/... and
/srv/tftpboot/ENV2/boot/...), the standard
/boot prefix used throughout this guide must be replaced with your custom
prefix consistently in all of the following places. Missing even one will cause boot failures.
DHCP boot file name: the boot filename delivered to the client must include the custom prefix. For example,
/ENV1/boot/grub2/x86_64-efi/bootx64.efi.nginx location alias: update the
location /bootblock in/etc/nginx/nginx.confto expose the custom prefix path.grub.cfgsource paths: update the hardcoded absolute paths inside/srv/tftpboot/boot/grub2/grub.cfg:source "${config}/${net_default_mac}/grub.cfg"source "${prefix}/menu.cfg"Both must use the custom prefix.
menu.cfgpaths: update all/boot/images/...paths insidemenu.cfgto use the custom prefix.Per-MAC host configurations: if you use machine-specific configurations, also update the
source "/boot/grub2/menu.cfg"line inside each per-MACgrub.cfgto use the custom prefix.SELinux file context: run
restoreconon your custom path:>sudorestorecon -Rv /srv/tftpboot/ENV1SELinux policy: running
setsebool -P
       httpd_serve_cobbler_files=1
only covers the standard/bootpath. A custom SELinux policy is required for a non-standard prefix. Useausearch -m avc -ts recentto identify denials and create the appropriate policy module.
6.9 Next steps: Completing the PXE setup #
GRUB 2 is now configured. The remaining tasks are:
Configure HTTP and TFTP services to serve the boot files and installer content.
Set up DHCP services to direct PXE clients to the appropriate boot loaders.
Test the complete PXE boot process on target hardware.
7 Configuring TFTP for PXE booting #
This section explains how to configure TFTP services to serve GRUB 2 boot loaders and PXE
boot content for SUSE Linux Enterprise Server for SAP applications 16.0 installations. It covers the traditional
in.tftpd server and the integrated TFTP functionality provided by
dnsmasq.
7.1 The role of TFTP in PXE boot #
TFTP serves boot loader files to PXE clients during the network boot process. SUSE Linux Enterprise Server for SAP applications
16.0 supports two TFTP server implementations: the traditional
in.tftpd server from the tftp package and the
integrated TFTP functionality within dnsmasq.
7.2 Requirements for configuring TFTP for PXE boot #
Either the tftp package or the dnsmasq package installed.
PXE boot files organized under
/srv/tftpboot.Administrative privileges to configure services.
7.3 Configuring the in.tftpd server #
The in.tftpd server uses the configuration file
/etc/sysconfig/tftp to define the TFTP root directory and server
options.
Optionally, enable verbose logging by setting TFTP options:
>sudosed -i 's/^TFTP_OPTIONS=.*/TFTP_OPTIONS="-v"/' /etc/sysconfig/tftpThe
-voption enables verbose logging to see the file names fetched via TFTP.Enable and start the TFTP service:
>sudosystemctl enable --now tftp.service
7.4 Configuring dnsmasq as a TFTP server #
dnsmasq provides a built-in TFTP server that can be enabled and
configured to use the /srv/tftpboot directory.
Create the TFTP configuration file:
>sudocat > /etc/dnsmasq.d/tftp.conf << 'EOF'enable-tftp tftp-root=/srv/tftpboot EOFEnable and start the dnsmasq service:
>sudosystemctl enable --now dnsmasq
7.5 Verifying TFTP server configuration #
Test the TFTP server functionality to ensure it can serve files to PXE clients.
Create a test file:
>echo "test file" | sudo tee /srv/tftpboot/test.txtRetrieve the test file via TFTP:
>tftp localhost -c get test.txt /tmp/tftp-test.txtVerify the file was retrieved successfully:
>cat /tmp/tftp-test.txtClean up test files:
>sudorm /srv/tftpboot/test.txt /tmp/tftp-test.txt
7.6 Troubleshooting TFTP configuration #
Common issues when configuring TFTP services for PXE boot environments.
7.6.1 Resolving TFTP service conflicts on port 69 #
Both in.tftpd and dnsmasq use UDP port 69
for TFTP services and cannot run simultaneously.
Check which services are running:
>systemctl status tftp.service dnsmasqCheck what is using port 69:
>ss -ulnp | grep :69Stop the conflicting service (example for dnsmasq):
>sudosystemctl stop dnsmasqStart your preferred TFTP service:
>sudosystemctl start tftp.service
7.6.2 Troubleshooting TFTP directory access issues #
Problems accessing the TFTP root directory can prevent file serving.
Verify the TFTP directory setting for in.tftpd:
>grep TFTP_DIRECTORY /etc/sysconfig/tftpVerify the TFTP directory setting for dnsmasq:
>grep tftp-root /etc/dnsmasq.d/tftp.confCheck if the directory exists:
>ls -la /srv/tftpboot/Create the directory if missing:
>sudomkdir -p /srv/tftpboot
7.6.3 Enabling TFTP logging #
Verbose logging helps identify file access issues with TFTP transfers.
Check the current TFTP options:
>grep TFTP_OPTIONS /etc/sysconfig/tftpEnable verbose logging:
>sudosed -i 's/^TFTP_OPTIONS=.*/TFTP_OPTIONS="-v"/' /etc/sysconfig/tftpRestart the TFTP service:
>sudosystemctl restart tftp.serviceMonitor TFTP logs:
>journalctl -u tftp.service -f
7.7 Next steps #
TFTP is now configured. Next, set up HTTP services to serve installer files and DHCP services to direct PXE clients to the appropriate boot loaders.
8 Configuring nginx for HTTP delivery #
This section explains how to configure nginx to serve PXE boot content over HTTP, allowing clients to load installer files like kernel, initrd and squashfs images from a central location. HTTP delivery provides better performance than TFTP for large files and is required for SUSE Linux Enterprise Server for SAP applications 16.0 Agama installations.
8.1 The role of nginx in PXE boot HTTP delivery #
nginx serves as the HTTP server for PXE boot environments, providing access to installer files through Web-based delivery. The HTTP server exposes the TFTP boot directory and installation repositories, enabling PXE clients to download kernel images, initrd files and the Agama installer components over HTTP rather than the slower TFTP protocol.
8.2 Requirements for configuring nginx for PXE boot #
The nginx package installed.
PXE boot files organized under
/srv/tftpboot/boot.Installation repositories available under
/srv/www/htdocs/install.Administrative privileges to modify nginx configuration.
8.3 Configuring nginx for PXE boot #
The nginx configuration exposes the TFTP boot directory through a dedicated location alias and serves installation repositories directly from the document root.
Edit the nginx configuration file:
>sudovim /etc/nginx/nginx.confConfigure the HTTP server block in the
httpsection:>sudocat > /etc/nginx/nginx.conf << 'EOF'http { include mime.types; default_type application/octet-stream; charset utf-8; sendfile on; keepalive_timeout 65; server { listen 80 default_server; listen [::]:80 default_server; location / { root /srv/www/htdocs/; index index.html index.htm; } error_page 500 502 503 504 /50x.html; location = /50x.html { root /srv/www/htdocs/; } # Expose TFTP boot directory for HTTP boot location /boot { alias /srv/tftpboot/boot; autoindex on; } } } events { worker_connections 1024; } EOFTest the nginx configuration syntax:
>sudonginx -tAllow nginx to serve files from the directory:
>sudosetsebool -P httpd_serve_cobbler_files=1Enable and start the nginx service:
>sudosystemctl enable --now nginx.service
8.4 Verifying nginx HTTP access #
Test the HTTP server functionality to ensure it can serve PXE boot files and installation content to clients.
Test HTTP access to boot files:
>curl -I http://localhost/boot/Test access to the installation directory:
>curl -I http://localhost/install/Verify a specific installer file is accessible:
For AMD64/Intel 64:
>curl -I http://localhost/boot/images/SLES-16.0/x86_64/squashfs.imgFor AArch64:
>curl -I http://localhost/boot/images/SLES-16.0/aarch64/squashfs.imgFor ppc64le:
>curl -I http://localhost/boot/images/SLES-16.0/ppc64le/squashfs.img
8.5 Troubleshooting nginx HTTP delivery issues for PXE boot #
This section describes common issues when configuring nginx for PXE boot HTTP delivery.
8.5.1 Configuration syntax errors #
Incorrect nginx configuration syntax prevents the service from starting or reloading properly.
Test the configuration syntax:
>sudonginx -tCheck nginx service status if startup fails:
>systemctl status nginx.serviceView detailed error logs:
>journalctl -u nginx.service -fCheck nginx error log file:
>tail -f /var/log/nginx/error.log
8.5.2 File access and permission issues #
nginx may fail to serve files due to incorrect permissions or missing directories.
Check if the boot directory exists and is accessible:
>ls -la /srv/tftpboot/boot/Check if the install directory exists:
>ls -la /srv/www/htdocs/install/Verify nginx can read the directories:
>sudo -u nginx ls /srv/tftpboot/boot/Create missing directories if needed:
>sudomkdir -p /srv/www/htdocs/installSet appropriate permissions:
>sudochmod -R 755 /srv/tftpboot/boot /srv/www/htdocs/installIf nginx still cannot serve files from
/srv/tftpboot/boot, restore the SELinux file context after placing or moving files into these directories:>sudorestorecon -Rv /srv/www/htdocs/install>sudorestorecon -Rv /srv/tftpboot/bootNote: Verifying SELinux accessThis step is needed in addition to
setsebool -P httpd_serve_cobbler_files=1. Runausearch -m avc -ts recentto check for SELinux denials; the command should produce no output once access is set up correctly. Do not work around remaining denials withaudit2allow. Instead, check the file context withls -lZormatchpathconand confirm the required booleans are enabled.
8.5.3 Port binding conflicts #
nginx may fail to start if another service is using port 80.
Check what is using port 80:
>ss -tlnp | grep :80Stop conflicting services if needed:
>sudosystemctl stop apache2Start nginx service:
>sudosystemctl start nginx.serviceVerify nginx is listening on port 80:
>ss -tlnp | grep :80
8.6 Next steps #
nginx is now ready to deliver boot files and installer content over HTTP. Next, configure DHCP services to direct PXE clients to the appropriate boot loaders and HTTP resources.
9 Configuring a DNS server using dnsmasq #
This section explains how to configure DNS services using dnsmasq to provide host name resolution for PXE clients accessing SUSE Linux Enterprise Server for SAP applications 16.0 installation resources. DNS configuration enables clients to use host names instead of IP addresses in boot URLs and DHCP configurations.
9.1 The role of DNS in PXE boot environments #
DNS services enable PXE clients to resolve host names in boot URLs and installation sources. While full DNS server configuration is beyond the scope of this document, this section provides a basic DNS configuration using dnsmasq that allows clients to resolve the PXE server host name (pxe.example.net) to its IP address.
Without DNS configuration, boot URLs must use IP addresses directly, such as
http://192.168.1.200/ or http://[2001:db8:0:1::200]/.
Some BIOS/UEFI firmware implementations do not support host names in DHCP TFTP URLs and
require IP addresses like tftp://[2001:db8:0:1::200]/.
9.2 Requirements for configuring dnsmasq DNS services #
The dnsmasq package installed.
Static IP addresses configured for the PXE server.
Administrative privileges to configure DNS services.
9.3 Configuring dnsmasq for PXE client host name resolution #
The dnsmasq DNS configuration provides local host name resolution and uses upstream name servers for external queries.
Create the DNS configuration file for dnsmasq:
>sudocat > /etc/dnsmasq.d/dns.conf << 'EOF'# DNS configuration file for dnsmasq # Log DNS queries log-queries # DNS cache behavior cache-size=10000 local-ttl=60 neg-ttl=10 # Never forward A or AAAA queries for plain names to upstream name servers domain-needed # Add local domain to simple names in /etc/hosts and DHCP expand-hosts # Specifies DNS domain and networks including local forward and reverse declarations domain=example.net,192.168.1.0/24,local domain=example.net,2001:db8:0:1::/64,local EOFAdd host name entries to the system hosts file:
>sudocat >> /etc/hosts << 'EOF'192.168.1.200 pxe.example.net 2001:db8:0:1::200 pxe.example.net EOFTest the dnsmasq configuration:
>sudodnsmasq --testEnable and start the dnsmasq service:
>sudosystemctl enable --now dnsmasq
By default, dnsmasq uses the name servers in /etc/resolv.conf as
forwarders and provides records from /etc/hosts. This allows the PXE
server to resolve external host names while providing local resolution for PXE-related
services.
9.4 Verifying DNS configuration #
Test the DNS server functionality to ensure host name resolution works for PXE clients.
Test IPv4 host name resolution:
>nslookup pxe.example.net localhostTest IPv6 host name resolution:
>nslookup pxe.example.net localhost | grep 2001:db8Test reverse DNS lookup for IPv4:
>nslookup 192.168.1.200 localhostVerify external DNS forwarding still works:
>nslookup google.com localhost
9.5 Troubleshooting dnsmasq DNS issues #
This section describes common issues when configuring dnsmasq for DNS services in PXE environments.
9.5.1 dnsmasq configuration and service issues #
dnsmasq may fail to start due to configuration errors or port conflicts.
Test the dnsmasq configuration syntax:
>sudodnsmasq --testCheck dnsmasq service status:
>systemctl status dnsmasqCheck what is using DNS port 53:
>ss -ulnp | grep :53View dnsmasq logs for errors:
>journalctl -u dnsmasq -fStop conflicting DNS services if needed:
>sudosystemctl stop systemd-resolved
9.5.2 PXE client host name resolution failures #
DNS queries may fail due to incorrect configuration or missing host name entries.
Check if host name entries exist in the hosts file:
>grep pxe.example.net /etc/hostsVerify domain configuration in dnsmasq:
>grep domain= /etc/dnsmasq.d/dns.confTest DNS query with verbose output:
>dig @localhost pxe.example.netMonitor dnsmasq query logs:
>journalctl -u dnsmasq | grep "query"Restart dnsmasq to reload the configuration:
>sudosystemctl restart dnsmasq
9.5.3 dnsmasq DNS forwarding problems #
External DNS queries may fail if the upstream name server configuration is incorrect.
Check the upstream name server configuration:
>cat /etc/resolv.confTest direct query to the upstream name server:
>nslookup google.com 8.8.8.8Check dnsmasq forwarding configuration:
>grep -E "server=|no-resolv" /etc/dnsmasq.d/dns.confAdd a specific upstream name server if needed:
>sudoecho "server=8.8.8.8" >> /etc/dnsmasq.d/dns.confRestart the dnsmasq service:
>sudosystemctl restart dnsmasq
9.6 Next steps #
DNS is now configured, and PXE clients can resolve host names in boot URLs and installation sources. Next, configure DHCP services that reference this DNS server for client configuration.
10 Configuring an NTP server using chrony #
This section explains how to configure NTP services using chrony
to keep the PXE server's clock accurate and, where needed, provide time synchronization to
PXE clients during SUSE Linux Enterprise Server for SAP applications 16.0 installations. Proper time
synchronization avoids certificate validation errors and keeps system logs accurately
timestamped during network-based installations.
10.1 The role of NTP time synchronization in PXE boot #
Synchronized time avoids certificate validation errors during HTTPS connections and keeps log timestamps accurate, though NTP is not strictly required for a PXE deployment to work. Whether the PXE server itself needs to serve time to PXE clients depends on your network:
If PXE clients can already reach an NTP source other than the PXE server, such as a gateway or router operated separately from it (the setup used throughout the rest of this article, where the sample network's NTP server is the gateway at
192.168.1.1), you only needchronyto keep the PXE server's own clock accurate. PXE clients get their NTP server address from that external source via DHCP, not from the PXE server.If the PXE server also acts as the network's gateway, for example in an air-gapped or isolated test network with no other NTP source reachable by clients, configure
chronyon the PXE server to also serve time to those clients, as shown below.
10.2 Requirements for configuring chrony NTP services #
The chrony package installed.
>sudozypper install chronyNetwork connectivity to upstream NTP servers.
Administrative privileges to configure NTP services.
10.3 Configuring chrony NTP service #
The chrony service provides NTP functionality with automatic time
synchronization to upstream servers and local time-serving capabilities for network clients.
chrony NTP server #Enable and start the
chronyservice:>sudosystemctl enable --now chronyd.serviceOptionally, allow PXE clients to sync time from this server if they cannot reach an NTP source other than the PXE server itself, for example because the PXE server also acts as the network's gateway:
>sudocat >> /etc/chrony.conf << 'EOF'# Allow NTP clients on the PXE network to sync from this server allow 192.168.1.0/24 allow 2001:db8:0:1::/64 EOFRestart
chronyto apply the change:>sudosystemctl restart chronyd.service
10.4 Verifying NTP configuration #
Test the NTP service functionality to ensure time synchronization works correctly.
Check
chronyservice status:>systemctl status chronyd.serviceView the current time synchronization status:
>chronyc trackingList configured NTP sources:
>chronyc sourcesCheck NTP server statistics:
>chronyc sourcestatsOptionally, if you configured
chronyto serve PXE clients, verify theallowdirective is in place:>grep allow /etc/chrony.conf
10.5 Troubleshooting NTP configuration #
This section describes common issues when configuring chrony for NTP services in PXE
environments.
10.5.1 chrony service startup issues #
chrony service may fail to start due to configuration errors or
network connectivity problems.
Check
chronyservice status and logs:>systemctl status chronyd.serviceView detailed service logs:
>journalctl -u chronyd.service -fTest
chronyconfiguration:>sudochronyd -QRestart the service if needed:
>sudosystemctl restart chronyd.service
10.5.2 Time synchronization failures #
Time synchronization may fail due to network issues or incorrect server configuration.
Check the current synchronization status:
>chronyc trackingView NTP source connectivity:
>chronyc sources -vForce immediate synchronization:
>sudochronyc makestepCheck system time against hardware clock:
>timedatectl statusVerify network connectivity to NTP servers:
>chronyc activity
10.5.3 Firewall and network issues #
NTP traffic may be blocked by firewall rules, preventing time synchronization.
Check if the NTP port is open in the firewall:
>firewall-cmd --list-services | grep ntpAdd NTP service to firewall if needed:
>sudofirewall-cmd --permanent --add-service=ntpReload firewall configuration:
>sudofirewall-cmd --reloadTest NTP connectivity manually:
>ntpdate -q pool.ntp.orgCheck
chronyport usage:>ss -ulnp | grep :123
10.6 Next steps #
NTP is now configured. Continue with the remaining PXE services needed for your deployment, such as DHCP.
11 Configuring IPv6 router advertisement #
This section describes how to configure IPv6 router advertisement functionality to provide adequate router advertisements for PXE clients. IPv6 RA enables IPv6 routing configuration and stateful DHCPv6 address automatic configuration for SUSE Linux Enterprise Server for SAP applications 16.0 installations.
11.1 The role of IPv6 router advertisement in PXE boot #
IPv6 router advertisement (RA) provides network configuration information to PXE
clients, including IPv6 routing and DHCPv6 address automatic configuration settings. If your
network does not already have an IPv6 router providing adequate router advertisements, this
section shows how to configure the PXE server to provide them: IPv6 routing to the network
and default route, and stateful DHCPv6 address automatic configuration using
AdvManagedFlag on.
11.2 Requirements for configuring IPv6 router advertisement #
The radvd package installed.
IPv6 network configuration on the server interface.
Administrative privileges to configure router advertisement services.
11.3 Configuring radvd for IPv6 router advertisement #
The radvd service provides IPv6 router advertisement functionality
using configuration defined in /etc/radvd.conf.
radvd IPv6 router advertisement #Configure the
radvdservice:>sudocat > /etc/radvd.conf << 'EOF'interface eno1 { # radvd options IgnoreIfMissing on; # Do not fail and exit when interface is missed AdvSendAdvert on; # Sending RAs on the interface is not disabled # Configuration settings AdvManagedFlag on; # Request IPv6 address and dns options via DHCPv6 AdvOtherConfigFlag off; # Request only dns info via DHCPv6, IP via SLAAC AdvDefaultLifetime 1800; # Add default route via this router for 1800sec prefix 2001:db8:0:1::/64 # Add direct route for this local network/prefix { AdvAutonomous off; # Assign IPv6 address via SLAAC AdvValidLifetime 7200; AdvPreferredLifetime 3600; }; }; EOFEnable and start the
radvdservice:>sudosystemctl enable --now radvd
11.4 Verifying IPv6 router advertisement #
Test the IPv6 RA functionality to ensure proper configuration and operation.
Check
radvdservice status:>systemctl status radvdReview and verify IPv6 RA settings using
radvdump:>radvdumpThe
radvdumputility displays IPv6 RA settings sent by the IPv6 router every few minutes.
11.5 Configuring IP forwarding for router functionality #
If the PXE server also acts as a router, IP forwarding must be enabled to allow the system to function in a router role.
Create the network configuration file:
>sudocat > /etc/sysctl.d/90-network.conf << 'EOF'# This machine is a router net.ipv4.conf.all.forwarding = 1 net.ipv6.conf.all.forwarding = 1 # Accept host autoconf on the router's uplink interface net.ipv6.conf.UPLINK.accept_ra = 2 EOFApply the network configuration settings:
>sudosysctl -p /etc/sysctl.d/90-network.conf
A router does not process IPv6 RAs for host automatic configuration by default. To accept
IPv6 RA on the router's uplink interface, the accept_ra = 2 sysctl
setting is required; replace UPLINK with the name of that
interface. Consult the Network Configuration section in the Administration Guide for
further details on router configuration, including firewall adjustments and other required
steps.
11.6 Troubleshooting IPv6 router advertisement issues #
This section describes common issues when configuring IPv6 router advertisement for PXE environments.
11.6.1 radvd service issues #
The radvd service may fail to start due to configuration errors or
interface problems.
radvd service problems #Check
radvdservice status and logs:>systemctl status radvdView detailed service logs:
>journalctl -u radvd -fTest
radvdconfiguration syntax:>sudoradvd -C /etc/radvd.confCheck if the specified interface exists:
>ip link show eno1Restart the service after fixing the configuration:
>sudosystemctl restart radvd
11.6.2 IP forwarding configuration issues #
Incorrect IP forwarding settings can prevent proper router functionality.
Check current IP forwarding status:
>sysctl net.ipv4.conf.all.forwardingCheck IPv6 forwarding status:
>sysctl net.ipv6.conf.all.forwardingVerify sysctl configuration file:
>cat /etc/sysctl.d/90-network.confApply configuration if values are incorrect:
>sudosysctl -p /etc/sysctl.d/90-network.confCheck the
accept_rasetting on the uplink interface (replace UPLINK with its name):>sysctl net.ipv6.conf.UPLINK.accept_ra
11.6.3 Router advertisement reception issues #
Clients may not receive or process IPv6 router advertisements correctly.
Monitor router advertisements using
radvdump:>radvdump -dCheck IPv6 interface configuration on clients:
>ip -6 addr showVerify IPv6 routing table on clients:
>ip -6 route showTest IPv6 connectivity to the router:
>ping6 2001:db8:0:1::1Check firewall rules for ICMPv6:
>firewall-cmd --list-protocols | grep ipv6-icmp
11.7 Next steps #
IPv6 router advertisement is now configured, giving PXE clients the network information they need for DHCPv6 and IPv6 connectivity during network-based installations.
12 Configuring a DHCP server using dnsmasq #
This section explains how to configure DHCP services using dnsmasq to provide network configuration and PXE boot information for SUSE Linux Enterprise Server for SAP applications 16.0 installations. The dnsmasq DHCP server uses tag-based configuration to support both IPv4 and IPv6 PXE clients with UEFI and BIOS boot capabilities.
12.1 Introduction #
The dnsmasq DHCP server provides network configuration and boot file information to PXE clients using a tag-based system to match client types and provide appropriate boot loaders. This configuration supports both PXEClient and HTTPClient matches that work for DHCPv4 and DHCPv6, enabling boot via UEFI and BIOS systems across multiple architectures.
dnsmasq version 2.90 and earlier does not support sending the vendor-class option6:16 back to DHCPv6 clients for HTTPClient configurations. For full HTTPClient support, consider using Kea or ISC DHCP servers.
12.2 Requirements #
The dnsmasq package installed.
PXE boot files properly organized under
/srv/tftpboot.Network interface configured for DHCP service.
Administrative privileges to configure DHCP services.
12.3 Configuring dnsmasq DHCP services #
The dnsmasq DHCP configuration includes client type matching, network ranges, and boot file assignments for both IPv4 and IPv6 networks.
Create the DHCP configuration file for dnsmasq:
>sudocat > /etc/dnsmasq.d/dhcp.conf << 'EOF'# DHCP configuration file for dnsmasq # Log DHCP processing log-dhcp # This is the only DHCP server, don't ignore unknown clients/send NAK dhcp-authoritative # Disable re-use of the DHCPv4 servername and filename fields as extra # option space, which may confuse old or broken clients dhcp-no-override # IPv4 PXE/HTTP boot client matches (no enterprise number) # Match client type in PXEClient:Arch and map to a tag dhcp-vendorclass=set:tftp_bios_x86_pc,PXEClient:Arch:00000 dhcp-vendorclass=set:tftp_uefi_x86_64,PXEClient:Arch:00007 dhcp-vendorclass=set:tftp_ieee_ppc_64,PXEClient:Arch:0000e dhcp-vendorclass=set:tftp_uefi_arm_64,PXEClient:Arch:00011 # Match client type in HTTPClient:Arch and map to a tag dhcp-vendorclass=set:http_uefi_x86_64,HTTPClient:Arch:00016 dhcp-vendorclass=set:http_uefi_arm_64,HTTPClient:Arch:00019 # IPv6 PXE/HTTP boot client matches (enterprise:343 intel) # Match client type in PXEClient:Arch and map to a tag dhcp-vendorclass=set:tftp_bios_x86_pc,enterprise:343,PXEClient:Arch:00000 dhcp-vendorclass=set:tftp_uefi_x86_64,enterprise:343,PXEClient:Arch:00007 dhcp-vendorclass=set:tftp_ieee_ppc_64,enterprise:343,PXEClient:Arch:0000e dhcp-vendorclass=set:tftp_uefi_arm_64,enterprise:343,PXEClient:Arch:00011 # Match client type in HTTPClient:Arch and map to a tag dhcp-vendorclass=set:http_uefi_x86_64,enterprise:343,HTTPClient:Arch:00016 dhcp-vendorclass=set:http_uefi_arm_64,enterprise:343,HTTPClient:Arch:00019 EOFConfigure IPv4 DHCP range and options:
>sudocat >> /etc/dnsmasq.d/dhcp.conf << 'EOF'# IPv4 range and options dhcp-range=set:net0v4,192.168.1.100,192.168.1.199,255.255.255.0,1h dhcp-option=tag:net0v4,option:domain-search,example.net dhcp-option=tag:net0v4,option:dns-server,192.168.1.200 dhcp-option=tag:net0v4,option:ntp-server,192.168.1.1 dhcp-option=tag:net0v4,option:router,192.168.1.1 EOFConfigure IPv4 PXE boot options:
>sudocat >> /etc/dnsmasq.d/dhcp.conf << 'EOF'# IPv4 PXEClient boot dhcp-boot=tag:net0v4,tag:tftp_bios_x86_pc,/boot/grub2/i386-pc/core.0,192.168.1.200 dhcp-boot=tag:net0v4,tag:tftp_uefi_x86_64,/boot/grub2/x86_64-efi/bootx64.efi,192.168.1.200 dhcp-boot=tag:net0v4,tag:tftp_ieee_ppc_64,/boot/grub2/powerpc-ieee1275/core.elf,192.168.1.200 dhcp-boot=tag:net0v4,tag:tftp_uefi_arm_64,/boot/grub2/arm64-efi/bootaa64.efi,192.168.1.200 # IPv4 HTTPClient boot dhcp-option-force=tag:net0v4,tag:http_uefi_x86_64,option:vendor-class,HTTPClient dhcp-boot=tag:net0v4,tag:http_uefi_x86_64,http://192.168.1.200/boot/grub2/x86_64-efi/bootx64.efi dhcp-option-force=tag:net0v4,tag:http_uefi_arm_64,option:vendor-class,HTTPClient dhcp-boot=tag:net0v4,tag:http_uefi_arm_64,http://192.168.1.200/boot/grub2/arm64-efi/bootaa64.efi EOFConfigure IPv6 DHCP range and options:
>sudocat >> /etc/dnsmasq.d/dhcp.conf << 'EOF'# IPv6 range and options dhcp-range=set:net0v6,2001:db8:0:1:d::,2001:db8:0:1:d::ffff,64,1h dhcp-option=tag:net0v6,option6:domain-search,example.net dhcp-option=tag:net0v6,option6:dns-server,[2001:db8:0:1::200] dhcp-option=tag:net0v6,option6:sntp-server,[2001:db8:0:1::1] EOFConfigure IPv6 PXE boot options:
>sudocat >> /etc/dnsmasq.d/dhcp.conf << 'EOF'# IPv6 PXEClient boot dhcp-option=tag:net0v6,tag:tftp_bios_x86_pc,option6:bootfile-url,tftp://[2001:db8:0:1::200]/boot/grub2/i386-pc/core.0 dhcp-option=tag:net0v6,tag:tftp_uefi_x86_64,option6:bootfile-url,tftp://[2001:db8:0:1::200]/boot/grub2/x86_64-efi/bootx64.efi dhcp-option=tag:net0v6,tag:tftp_ieee_ppc_64,option6:bootfile-url,tftp://[2001:db8:0:1::200]/boot/grub2/powerpc-ieee1275/core.elf dhcp-option=tag:net0v6,tag:tftp_uefi_arm_64,option6:bootfile-url,tftp://[2001:db8:0:1::200]/boot/grub2/arm64-efi/bootaa64.efi # IPv6 HTTPClient boot # Note: dnsmasq <= 2.90 does not support sending vendor-class option6:16 back to client EOFTest the dnsmasq configuration:
>sudodnsmasq --testEnable and start the dnsmasq service:
>sudosystemctl enable --now dnsmasq
The bootx64.efi and bootaa64.efi boot file
paths above are the signed files from the optional Secure Boot step in
Step 2.
If you did not perform that step, replace them with core.efi (still
under the respective x86_64-efi/arm64-efi
directory), which works as long as UEFI Secure Boot is disabled on the client.
12.4 Verifying DHCP configuration #
Test the DHCP server functionality to ensure proper network configuration and boot file delivery to PXE clients.
Check dnsmasq service status:
>systemctl status dnsmasqVerify DHCP port binding:
>ss -ulnp | grep :67Monitor DHCP lease assignments:
>journalctl -u dnsmasq -fCheck active DHCP leases:
>cat /var/lib/misc/dnsmasq.leases
12.5 Troubleshooting dnsmasq DHCP configuration #
Common issues when configuring dnsmasq for DHCP services in PXE environments.
12.5.1 Service startup and configuration issues #
dnsmasq may fail to start due to configuration errors or port conflicts with other DHCP services.
Test dnsmasq configuration syntax:
>sudodnsmasq --testCheck for DHCP port conflicts:
>ss -ulnp | grep :67Stop conflicting DHCP services:
>sudosystemctl stop dhcpdView detailed service logs:
>journalctl -u dnsmasq -fRestart dnsmasq after resolving conflicts:
>sudosystemctl restart dnsmasq
12.5.2 DHCP lease assignment problems #
Clients may fail to receive IP addresses due to range configuration or network connectivity issues.
Check DHCP range configuration:
>grep dhcp-range /etc/dnsmasq.d/dhcp.confMonitor DHCP requests in real-time:
>journalctl -u dnsmasq -f | grep DHCPCheck network interface status:
>ip addr showVerify DHCP authoritative setting:
>grep dhcp-authoritative /etc/dnsmasq.d/dhcp.confTest DHCP response with dhcping:
>dhcping -s 192.168.1.200
12.5.3 PXE boot file delivery issues #
PXE clients may receive IP addresses but fail to boot due to incorrect boot file configuration or client type matching problems.
Check client vendor class matching:
>grep dhcp-vendorclass /etc/dnsmasq.d/dhcp.confVerify boot file paths:
>grep dhcp-boot /etc/dnsmasq.d/dhcp.confTest TFTP access to boot files:
>tftp 192.168.1.200 -c get /boot/grub2/x86_64-efi/bootx64.efiMonitor PXE-specific DHCP logs:
>journalctl -u dnsmasq | grep -E "PXE|HTTP"Check tag assignment in logs:
>journalctl -u dnsmasq | grep "tags:"
12.5.4 IPv6 DHCP configuration issues #
IPv6 DHCP clients require proper router advertisement configuration and may have different addressing requirements than IPv4.
Verify IPv6 DHCP range configuration:
>grep "2001:db8" /etc/dnsmasq.d/dhcp.confCheck IPv6 router advertisement status:
>systemctl status radvdMonitor DHCPv6 requests:
>journalctl -u dnsmasq | grep "DHCPv6"Test IPv6 connectivity:
>ping6 2001:db8:0:1::200Check IPv6 option configuration:
>grep option6 /etc/dnsmasq.d/dhcp.conf
12.6 Next steps #
dnsmasq now provides network configuration and boot file information to PXE clients over both IPv4 and IPv6. Its tag-based system assigns the correct boot file for each client architecture and boot method.
13 Configuring a DHCP server using Kea #
This section explains how to configure DHCP services using Kea to provide network configuration and PXE boot information for SUSE Linux Enterprise Server for SAP applications 16.0 installations. Kea is a modern DHCP server that supports both IPv4 and IPv6 with client class matching for PXE and HTTP boot scenarios.
13.1 The role of Kea DHCP in PXE boot environments #
Kea is the modern DHCP server developed by ISC as the successor to the legacy ISC DHCP server. It supports both DHCPv4 and DHCPv6 with client classification capabilities that enable proper boot file delivery based on client architecture and boot method. Kea uses JSON-based configuration files and supports advanced features like vendor class identification for HTTP boot.
13.2 Requirements for configuring Kea DHCP services #
Kea DHCP packages installed: kea-dhcp4 and kea-dhcp6.
PXE boot files properly organized under
/srv/tftpboot.Network interface configured for DHCP service.
Administrative privileges to configure DHCP services.
13.3 Configuring the Kea DHCPv4 server #
The Kea DHCPv4 configuration uses client classes to match PXE and HTTP client types and provide appropriate boot files for different architectures.
Configure the Kea DHCPv4 server:
>sudocat > /etc/kea/kea-dhcp4.conf << 'EOF'{ "Dhcp4": { "interfaces-config": { "interfaces": [ "eno1" ] }, "control-socket": { "socket-type": "unix", "socket-name": "/tmp/kea4-ctrl-socket" }, "lease-database": { "type": "memfile", "persist": true, "name": "/var/lib/kea/dhcp4.leases", "lfc-interval": 3600 }, "expired-leases-processing": { "reclaim-timer-wait-time": 10, "flush-reclaimed-timer-wait-time": 25, "hold-reclaimed-time": 3600, "max-reclaim-leases": 100, "max-reclaim-time": 250, "unwarned-reclaim-cycles": 5 }, "renew-timer": 1800, "rebind-timer": 3150, "valid-lifetime": 3600, "option-data": [], "client-classes": [ { "name": "pxeclients#00000", "test": "substring(option[60].hex,0,20) == 'PXEClient:Arch:00000'", "next-server": "192.168.1.200", "boot-file-name": "/boot/grub2/i386-pc/core.0" }, { "name": "pxeclients#00007", "test": "substring(option[60].hex,0,20) == 'PXEClient:Arch:00007'", "next-server": "192.168.1.200", "boot-file-name": "/boot/grub2/x86_64-efi/bootx64.efi" }, { "name": "pxeclients#0000e", "test": "substring(option[60].hex,0,20) == 'PXEClient:Arch:0000e'", "next-server": "192.168.1.200", "boot-file-name": "/boot/grub2/powerpc-ieee1275/core.elf" }, { "name": "pxeclients#00011", "test": "substring(option[60].hex,0,20) == 'PXEClient:Arch:00011'", "next-server": "192.168.1.200", "boot-file-name": "/boot/grub2/arm64-efi/bootaa64.efi" }, { "name": "httpclients#00016", "test": "substring(option[60].hex,0,21) == 'HTTPClient:Arch:00016'", "boot-file-name": "http://192.168.1.200/boot/grub2/x86_64-efi/bootx64.efi", "option-data": [ { "name": "vendor-class-identifier", "data": "HTTPClient" } ] }, { "name": "httpclients#00019", "test": "substring(option[60].hex,0,21) == 'HTTPClient:Arch:00019'", "boot-file-name": "http://192.168.1.200/boot/grub2/arm64-efi/bootaa64.efi", "option-data": [ { "name": "vendor-class-identifier", "data": "HTTPClient" } ] } ], "subnet4": [ { "id": 1, "subnet": "192.168.1.0/24", "pools": [ { "pool": "192.168.1.100 - 192.168.1.199" } ], "option-data": [ { "name": "routers", "data": "192.168.1.1" }, { "name": "ntp-servers", "data": "192.168.1.1" }, { "name": "domain-name-servers", "data": "192.168.1.200" }, { "name": "domain-search", "data": "example.net" } ], "reservations": [] } ], "loggers": [ { "name": "kea-dhcp4", "output-options": [ { "output": "/var/log/kea/dhcp4.log" } ], "severity": "INFO", "debuglevel": 0 } ] } } EOFCreate the Kea log directory:
>sudomkdir -p /var/log/keaTest the Kea DHCPv4 configuration:
>sudokea-dhcp4 -t /etc/kea/kea-dhcp4.confEnable and start the Kea DHCPv4 service:
>sudosystemctl enable --now kea-dhcp4
13.4 Configuring Kea DHCPv6 server #
The Kea DHCPv6 configuration provides IPv6 address assignment and boot file information using vendor class matching for different client architectures.
Configure the Kea DHCPv6 server:
>sudocat > /etc/kea/kea-dhcp6.conf << 'EOF'{ "Dhcp6": { "interfaces-config": { "interfaces": [ "eno1" ] }, "control-socket": { "socket-type": "unix", "socket-name": "/tmp/kea6-ctrl-socket" }, "lease-database": { "type": "memfile", "persist": true, "name": "/var/lib/kea/dhcp6.leases", "lfc-interval": 3600 }, "expired-leases-processing": { "reclaim-timer-wait-time": 10, "flush-reclaimed-timer-wait-time": 25, "hold-reclaimed-time": 3600, "max-reclaim-leases": 100, "max-reclaim-time": 250, "unwarned-reclaim-cycles": 5 }, "renew-timer": 1800, "rebind-timer": 2880, "preferred-lifetime": 3600, "valid-lifetime": 7200, "option-data": [], "option-def": [], "client-classes": [ { "name": "pxeclients#00000", "test": "substring(option[16].hex,6,20) == 'PXEClient:Arch:00000'", "option-data": [ { "name": "bootfile-url", "data": "tftp://[2001:db8:0:1::200]/boot/grub2/i386-pc/core.0" } ] }, { "name": "pxeclients#00007", "test": "substring(option[16].hex,6,20) == 'PXEClient:Arch:00007'", "option-data": [ { "name": "bootfile-url", "data": "tftp://[2001:db8:0:1::200]/boot/grub2/x86_64-efi/bootx64.efi" } ] }, { "name": "pxeclients#0000e", "test": "substring(option[16].hex,6,20) == 'PXEClient:Arch:0000e'", "option-data": [ { "name": "bootfile-url", "data": "tftp://[2001:db8:0:1::200]/boot/grub2/powerpc-ieee1275/core.elf" } ] }, { "name": "pxeclients#00011", "test": "substring(option[16].hex,6,20) == 'PXEClient:Arch:00011'", "option-data": [ { "name": "bootfile-url", "data": "tftp://[2001:db8:0:1::200]/boot/grub2/arm64-efi/bootaa64.efi" } ] } ], "subnet6": [ { "id": 1, "subnet": "2001:db8:0:1::/64", "interface": "eno1", "pools": [ { "pool": "2001:db8:0:1:d::/112" } ], "option-data": [ { "name": "sntp-servers", "data": "2001:db8:0:1::1" }, { "name": "dns-servers", "data": "2001:db8:0:1::200" }, { "name": "domain-search", "data": "example.net" } ], "reservations": [] } ], "loggers": [ { "name": "kea-dhcp6", "output-options": [ { "output": "/var/log/kea/dhcp6.log" } ], "severity": "INFO", "debuglevel": 0 } ] } } EOFTest the Kea DHCPv6 configuration:
>sudokea-dhcp6 -t /etc/kea/kea-dhcp6.confEnable and start the Kea DHCPv6 service:
>sudosystemctl enable --now kea-dhcp6
The bootx64.efi and bootaa64.efi boot file
paths used above (in both the DHCPv4 and DHCPv6 configuration) are the signed files from
the optional Secure Boot step in
Step 2.
If you did not perform that step, replace them with core.efi (still
under the respective x86_64-efi/arm64-efi
directory), which works as long as UEFI Secure Boot is disabled on the client.
13.5 Verifying Kea DHCP configuration #
Test the Kea DHCP server functionality to ensure proper network configuration and boot file delivery to PXE clients.
Check Kea DHCPv4 service status:
>systemctl status kea-dhcp4Check Kea DHCPv6 service status:
>systemctl status kea-dhcp6Verify DHCP port binding:
>ss -ulnp | grep -E ":67|:547"Monitor DHCPv4 logs:
>tail -f /var/log/kea/dhcp4.logMonitor DHCPv6 logs:
>tail -f /var/log/kea/dhcp6.logCheck active DHCP leases:
>cat /var/lib/kea/dhcp4.leases
13.6 Troubleshooting Kea DHCP configuration #
Common issues when configuring Kea DHCP servers for PXE boot environments.
13.6.1 Kea configuration and service issues #
Kea services may fail to start due to JSON configuration errors or network interface problems.
Test DHCPv4 configuration syntax:
>sudokea-dhcp4 -t /etc/kea/kea-dhcp4.confTest DHCPv6 configuration syntax:
>sudokea-dhcp6 -t /etc/kea/kea-dhcp6.confCheck for JSON syntax errors:
>python3 -m json.tool /etc/kea/kea-dhcp4.confVerify network interface configuration:
>ip addr show eno1Check Kea service logs:
>journalctl -u kea-dhcp4 -f
13.6.2 Kea DHCP lease assignment problems #
Clients may fail to receive IP addresses due to subnet configuration or pool exhaustion issues.
Check subnet and pool configuration:
>grep -A 10 "subnet4\|pools" /etc/kea/kea-dhcp4.confMonitor lease assignments in real-time:
>tail -f /var/log/kea/dhcp4.log | grep -E "ALLOC|DISCOVER"Check lease database for conflicts:
>cat /var/lib/kea/dhcp4.leases | tail -20Verify interface binding:
>grep interfaces /etc/kea/kea-dhcp4.confClear lease database if needed:
>sudosystemctl stop kea-dhcp4>sudomv /var/lib/kea/dhcp4.leases /var/lib/kea/dhcp4.leases.backup>sudosystemctl start kea-dhcp4
13.6.3 PXE client class matching issues #
PXE clients may receive IP addresses but fail to get correct boot files due to client class configuration problems.
Check client class definitions:
>grep -A 5 "client-classes" /etc/kea/kea-dhcp4.confMonitor client class matching in logs:
>tail -f /var/log/kea/dhcp4.log | grep -i classVerify vendor class identifier patterns:
>grep "PXEClient\|HTTPClient" /etc/kea/kea-dhcp4.confTest boot file accessibility:
>curl -I http://192.168.1.200/boot/grub2/x86_64-efi/bootx64.efiEnable debug logging for detailed client analysis:
>sudosed -i 's/"debuglevel": 0/"debuglevel": 99/' /etc/kea/kea-dhcp4.conf>sudosystemctl restart kea-dhcp4
13.6.4 DHCPv6-specific issues #
IPv6 DHCP clients require proper router advertisement configuration and have different vendor class option handling than IPv4.
Check DHCPv6 subnet configuration:
>grep -A 10 "subnet6" /etc/kea/kea-dhcp6.confVerify IPv6 router advertisement status:
>systemctl status radvdMonitor DHCPv6 vendor class matching:
>tail -f /var/log/kea/dhcp6.log | grep "option\[16\]"Check IPv6 bootfile-url option format:
>grep "bootfile-url" /etc/kea/kea-dhcp6.confTest IPv6 connectivity to boot server:
>ping6 2001:db8:0:1::200
13.7 Next steps #
Kea now provides network configuration and boot file information to PXE clients over both IPv4 and IPv6. Its client classification system assigns the correct boot file for each client architecture and supports both traditional PXE and modern HTTP boot methods.
14 Configuring a DHCP server using ISC DHCP #
This section explains how to configure the ISC DHCP server to provide network configuration and PXE boot information. ISC DHCP remains fully supported on SUSE Linux Enterprise Server for SAP applications 15 (for example, SP7). On SUSE Linux Enterprise Server for SAP applications 16.0, the dhcp-server package is unsupported and is only available through the PackageHub/Backports-16.0 repository, not the standard module repositories. ISC DHCP uses class and subclass matching to support PXE and HTTP boot scenarios across different client architectures.
14.1 ISC DHCP support for PXE and HTTP boot environments #
ISC DHCP is the traditional DHCP server that provides network configuration and boot file information to PXE clients using a class and subclass system. While ISC has declared this server end-of-life as of 2022, it remains widely used in existing deployments and supports PXE and HTTP boot scenarios with vendor class identification.
ISC DHCP has been declared end-of-life by ISC in 2022. For new deployments, consider using Kea or dnsmasq instead. This configuration is provided for compatibility with existing ISC DHCP installations.
14.2 Requirements for configuring ISC DHCP services #
ISC DHCP packages installed: dhcp-server. On SUSE Linux Enterprise Server for SAP applications 16.0, this package requires the PackageHub/Backports-16.0 repository, since it is not part of the standard module repositories.
PXE boot files properly organized under
/srv/tftpboot.Network interface configured for DHCP service.
Administrative privileges to configure DHCP services.
14.3 Configuring the ISC DHCPv4 server #
The ISC DHCPv4 configuration uses class and subclass declarations to match PXE and HTTP client types and provide appropriate boot files for different architectures.
Configure the ISC DHCPv4 server:
>sudocat > /etc/dhcpd.conf << 'EOF'# /etc/dhcpd.conf # # Sample configuration file for ISC dhcpd # # *** PLEASE CONFIGURE IT FIRST *** # # Don't forget to set the DHCPD_INTERFACE in the # /etc/sysconfig/dhcpd file. # # if you want to use dynamical DNS updates, you should first read # read /usr/share/doc/packages/dhcp-server/DDNS-howto.txt # ddns-updates off; # Use this to enable / disable dynamic dns updates globally. ddns-update-style none; # default lease time default-lease-time 3600; max-lease-time 7200; ## ## PXE / HTTP boot option declarations ## class "pxeclients" { # PXEClient:Arch:00000:UNDI:002001 match substring (option vendor-class-identifier, 0, 20); } class "httpclients" { # HTTPClient:Arch:00016:UNDI:003001 match substring (option vendor-class-identifier, 0, 21); } ## ## PXE / HTTP boot subclass request matches ## subclass "pxeclients" "PXEClient:Arch:00000" { next-server 192.168.1.200; filename "/boot/grub2/i386-pc/core.0"; } subclass "pxeclients" "PXEClient:Arch:00007" { next-server 192.168.1.200; filename "/boot/grub2/x86_64-efi/bootx64.efi"; } subclass "pxeclients" "PXEClient:Arch:0000e" { next-server 192.168.1.200; filename "/boot/grub2/powerpc-ieee1275/core.elf"; } subclass "pxeclients" "PXEClient:Arch:00011" { next-server 192.168.1.200; filename "/boot/grub2/arm64-efi/bootaa64.efi"; } subclass "httpclients" "HTTPClient:Arch:00016" { option vendor-class-identifier "HTTPClient"; filename "http://192.168.1.200/boot/grub2/x86_64-efi/bootx64.efi"; } subclass "httpclients" "HTTPClient:Arch:00019" { option vendor-class-identifier "HTTPClient"; filename "http://192.168.1.200/boot/grub2/arm64-efi/bootaa64.efi"; } ## ## Subnet declaration for the pxe network ## subnet 192.168.1.0 netmask 255.255.255.0 { authoritative; range dynamic-bootp 192.168.1.100 192.168.1.199; option subnet-mask 255.255.255.0; option routers 192.168.1.1; option ntp-servers 192.168.1.1; option domain-name-servers 192.168.1.200; option domain-name "example.net"; option domain-search "example.net"; } EOFConfigure the DHCP interface in sysconfig:
>sudoecho 'DHCPD_INTERFACE="eno1"' > /etc/sysconfig/dhcpdTest the DHCPv4 configuration:
>sudodhcpd -t -cf /etc/dhcpd.confEnable and start the ISC DHCPv4 service:
>sudosystemctl enable --now dhcpd
14.4 Configuring the ISC DHCPv6 server #
The ISC DHCPv6 configuration provides IPv6 address assignment and boot file information using vendor class matching with proper DHCPv6 option handling.
Configure the ISC DHCPv6 server:
>sudocat > /etc/dhcpd6.conf << 'EOF'# /etc/dhcpd6.conf # # Sample DHCPv6 configuration file for ISC dhcpd # # *** PLEASE CONFIGURE IT FIRST *** # # Don't forget to set the DHCPD6_INTERFACE in the # /etc/sysconfig/dhcpd file. # # if you want to use dynamical DNS updates, you should first # read /usr/share/doc/packages/dhcp-server/DDNS-howto.txt ddns-updates off; # Use this to enable / disable dynamic dns updates globally. ddns-update-style none; # IPv6 address valid lifetime # (at the end the address is no longer usable by the client) # (set to 30 days, the usual IPv6 default) default-lease-time 7200; # IPv6 address preferred lifetime # (at the end the address is deprecated, i.e., the client should use # other addresses for new connections) # (set to 7 days, the usual IPv6 default) preferred-lifetime 3600; ## ## PXE / HTTP boot option declarations ## # The dhcp6 option 16 is in fact an: # { uint32 enterprise-number, array of { uint16 len, string tag} vendor-class-data } # this declaration is using the whole option data as string for substring match: option dhcp6.vendor-class-as-string code 16 = string; # this declaration is using the enterprise-number with 1st tag length and string: option dhcp6.vendor-class-en-len-tag code 16 = {integer 32, integer 16, string}; class "pxeclients" { # PXEClient:Arch:00000:UNDI:002001 # note: +6 to skip the enterprise-number+len until the PXEClient string match substring (option dhcp6.vendor-class-as-string, 6, 20); } class "httpclients" { # HTTPClient:Arch:00016:UNDI:003001 # note: +6 to skip the enterprise-number+len until the HTTPClient string match substring (option dhcp6.vendor-class-as-string, 6, 21); } ## ## PXE / HTTP boot subclass request matches ## subclass "pxeclients" "PXEClient:Arch:00000" { option dhcp6.bootfile-url "tftp://[2001:db8:0:1::200]/boot/grub2/i386-pc/core.0"; } subclass "pxeclients" "PXEClient:Arch:00007" { option dhcp6.bootfile-url "tftp://[2001:db8:0:1::200]/boot/grub2/x86_64-efi/bootx64.efi"; } subclass "pxeclients" "PXEClient:Arch:0000e" { option dhcp6.bootfile-url "tftp://[2001:db8:0:1::200]/boot/grub2/powerpc-ieee1275/core.elf"; } subclass "pxeclients" "PXEClient:Arch:00011" { option dhcp6.bootfile-url "tftp://[2001:db8:0:1::200]/boot/grub2/arm64-efi/bootaa64.efi"; } subclass "httpclients" "HTTPClient:Arch:00016" { option dhcp6.vendor-class-en-len-tag 343 10 "HTTPClient"; option dhcp6.bootfile-url "http://[2001:db8:0:1::200]/boot/grub2/x86_64-efi/bootx64.efi"; } subclass "httpclients" "HTTPClient:Arch:00019" { option dhcp6.vendor-class-en-len-tag 343 10 "HTTPClient"; option dhcp6.bootfile-url "http://[2001:db8:0:1::200]/boot/grub2/arm64-efi/bootaa64.efi"; } ## ## Subnet declaration for the pxe network ## subnet6 2001:db8:0:1::/64 { authoritative; range6 2001:db8:0:1:d:: 2001:db8:0:1:d::ffff; option dhcp6.sntp-servers 2001:db8:0:1::1; option dhcp6.name-servers 2001:db8:0:1::200; option dhcp6.domain-search "example.net"; } EOFConfigure the DHCPv6 interface in sysconfig:
>sudoecho 'DHCPD6_INTERFACE="eno1"' >> /etc/sysconfig/dhcpdTest the DHCPv6 configuration:
>sudodhcpd -6 -t -cf /etc/dhcpd6.confEnable and start the ISC DHCPv6 service:
>sudosystemctl enable --now dhcpd6
The bootx64.efi and bootaa64.efi boot file
paths used above (in both the DHCPv4 and DHCPv6 configuration) are the signed files from
the optional Secure Boot step in
Step 2.
If you did not perform that step, replace them with core.efi (still
under the respective x86_64-efi/arm64-efi
directory), which works as long as UEFI Secure Boot is disabled on the client.
14.5 Verifying the ISC DHCP configuration #
Test the ISC DHCP server functionality to ensure proper network configuration and boot file delivery to PXE clients.
Check ISC DHCPv4 service status:
>systemctl status dhcpdCheck ISC DHCPv6 service status:
>systemctl status dhcpd6Verify DHCP port binding:
>ss -ulnp | grep -E ":67|:547"Monitor DHCP logs:
>journalctl -u dhcpd -fCheck active DHCP leases:
>cat /var/lib/dhcp/dhcpd.leasesMonitor DHCPv6 activity:
>journalctl -u dhcpd6 -f
14.6 Troubleshooting ISC DHCP configuration #
This section describes common issues when configuring ISC DHCP servers for PXE boot environments.
14.6.1 ISC DHCP configuration and service issues #
ISC DHCP services may fail to start due to configuration syntax errors or interface binding problems.
Test DHCPv4 configuration syntax:
>sudodhcpd -t -cf /etc/dhcpd.confTest DHCPv6 configuration syntax:
>sudodhcpd -6 -t -cf /etc/dhcpd6.confCheck interface configuration:
>cat /etc/sysconfig/dhcpdVerify network interface status:
>ip addr show eno1Check for port conflicts:
>ss -ulnp | grep :67View detailed service logs:
>journalctl -u dhcpd -xe
14.6.2 DHCP lease assignment problems #
Clients may fail to receive IP addresses due to subnet configuration or authorization issues.
Check subnet and range configuration:
>grep -A 10 "subnet\|range" /etc/dhcpd.confVerify authoritative setting:
>grep authoritative /etc/dhcpd.confMonitor lease assignments in real time:
>tail -f /var/log/messages | grep dhcpdCheck lease database for errors:
>tail -20 /var/lib/dhcp/dhcpd.leasesTest DHCP response manually:
>dhcping -s 192.168.1.200 -h aa:bb:cc:dd:ee:ff
14.6.3 ISC DHCP class and subclass matching issues #
PXE clients may receive IP addresses but fail to get correct boot files due to class matching configuration problems.
Check class definitions:
>grep -A 3 "class.*clients" /etc/dhcpd.confVerify subclass entries:
>grep -A 5 "subclass" /etc/dhcpd.confMonitor vendor class identification:
>tail -f /var/log/messages | grep -E "PXEClient|HTTPClient"Test boot file accessibility:
>tftp 192.168.1.200 -c get /boot/grub2/x86_64-efi/bootx64.efiEnable detailed logging:
>sudosed -i '1i\log-facility local7;' /etc/dhcpd.conf>sudosystemctl restart dhcpd
14.6.4 ISC DHCPv6 vendor class option issues #
IPv6 DHCP clients have complex vendor class option handling that may require specific configuration for proper PXE boot support.
Check DHCPv6 option definitions:
>grep -A 3 "option dhcp6" /etc/dhcpd6.confVerify vendor class string parsing:
>grep "substring.*6.*20\|21" /etc/dhcpd6.confMonitor DHCPv6 vendor class matching:
>journalctl -u dhcpd6 | grep -i vendorCheck IPv6 bootfile-url format:
>grep "bootfile-url" /etc/dhcpd6.confVerify router advertisement dependency:
>systemctl status radvdTest IPv6 connectivity:
>ping6 2001:db8:0:1::200
14.7 Next steps #
ISC DHCP now provides network configuration and boot file information to PXE clients using the traditional class and subclass system. While ISC DHCP is end-of-life, this configuration keeps existing deployments running with PXE and HTTP boot support across multiple client architectures.
15 Validating PXE server setup #
This section describes how to validate and test the complete PXE server setup to ensure all components are working correctly for SUSE Linux Enterprise Server for SAP applications 16.0 network installations. It covers service verification, network connectivity testing and end-to-end PXE boot validation.
15.1 PXE server validation process #
After configuring all PXE server components, including TFTP, HTTP, DNS, DHCP and GRUB 2 boot loader services, validate that the complete system functions correctly. This validation ensures that PXE clients can successfully boot into the Agama installer and perform network-based installations of SUSE Linux Enterprise Server for SAP applications 16.0.
This section refers to bootx64.efi and bootaa64.efi,
the signed files from the optional Secure Boot step in
Step 2.
If you did not perform that step, substitute core.efi (still under
the respective x86_64-efi/arm64-efi directory)
wherever this section references those files.
15.2 Requirements for PXE server validation #
All PXE server components configured and running.
Test client systems capable of PXE booting.
Network connectivity between the PXE server and clients.
Administrative access to monitor server services.
15.3 Verifying PXE server services and component status #
Verify that all required PXE server services are running and properly configured before testing with PXE clients.
Verify TFTP service status:
>systemctl status tftp.socketExpected result: Service should be active and listening on port 69.
Check nginx HTTP service:
>systemctl status nginxExpected result: Service should be active and listening on port 80.
Verify DNS service (if using dnsmasq):
>systemctl status dnsmasqExpected result: Service should be active and listening on port 53.
Check the DHCP service status for your chosen DHCP server:
For ISC DHCP:
>systemctl status dhcpdFor dnsmasq DHCP:
>systemctl status dnsmasqFor Kea DHCP:
>systemctl status kea-dhcp4 kea-dhcp6
Expected result: DHCP service should be active and listening on appropriate ports.
Verify IPv6 router advertisement (if configured):
>systemctl status radvdExpected result: Service should be active for IPv6 environments.
Check NTP service:
>systemctl status chronydExpected result: Service should be active and synchronized.
15.4 Testing network connectivity and file access #
Validate that PXE clients can access boot files and installation content over the network using both TFTP and HTTP protocols.
Test TFTP access to boot loader files:
>tftp localhost -c get /boot/grub2/x86_64-efi/bootx64.efi /tmp/test-bootx64.efiVerify the file was retrieved:
>file /tmp/test-bootx64.efiClean up test file:
>rm /tmp/test-bootx64.efiTest HTTP access to GRUB 2 configuration:
>curl -I http://localhost/boot/grub2/grub.cfgExpected result: HTTP 200 OK response.
Verify HTTP access to installer files:
>curl -I http://localhost/boot/images/SLES-16.0/x86_64/liveiso/LiveOS/squashfs.imgExpected result: HTTP 200 OK response with appropriate content length.
Test DNS resolution (if local DNS configured):
>nslookup pxe.example.net localhostExpected result: Proper A and AAAA record resolution.
Verify directory browsing for autoindex locations:
>curl http://localhost/boot/Expected result: Directory listing showing boot files.
15.5 Validating DHCP functionality #
Test DHCP server responses and verify that proper boot information is provided to different client types.
Check DHCP port binding:
>ss -ulnp | grep -E ":67|:547"Expected result: DHCP services listening on ports 67 (IPv4) and 547 (IPv6).
Monitor DHCP requests in real time for your chosen DHCP server:
For ISC DHCP:
>journalctl -u dhcpd -fFor dnsmasq:
>journalctl -u dnsmasq -f
Leave this running to observe DHCP activity during testing.
Test DHCP response using dhcping (if available):
>dhcping -s 192.168.1.200Expected result: Successful DHCP response from server.
Check active DHCP leases for your chosen DHCP server:
For ISC DHCP:
>cat /var/lib/dhcp/dhcpd.leasesFor Kea:
>cat /var/lib/kea/dhcp4.leases
Expected result: Lease entries for test clients.
15.6 End-to-end PXE boot testing #
Perform complete PXE boot tests with actual client systems to validate the entire boot process from DHCP to Agama installer startup.
Prepare a test client system:
Configure BIOS/UEFI to enable network boot.
Set network boot as the first boot priority.
Connect the client to the same network as the PXE server.
Monitor PXE server logs during client boot:
>journalctl -f | grep -E "dhcp|tftp|nginx"Boot the test client and observe the following sequence:
Client should receive an IP address via DHCP.
Client should download the boot loader via TFTP.
The GRUB 2 menu should appear with installation options.
The kernel and initrd should load via HTTP.
The Agama installer should start successfully.
Verify client architecture detection by testing different client types:
Legacy BIOS x86_64 systems (should get
core.0).UEFI x86_64 systems (should get
bootx64.efi).UEFI aarch64 systems (should get
bootaa64.efi).
Test IPv6 PXE boot (if IPv6 configured):
Enable IPv6-only network configuration on the test client.
Verify DHCPv6 address assignment.
Confirm IPv6 bootfile-url delivery.
15.7 Validating Agama installer functionality #
Verify that the Agama installer starts correctly and can access installation sources for completing SUSE Linux Enterprise Server for SAP applications 16.0 installations.
Verify Agama Web interface accessibility:
During client boot, note the IP address assigned and access:
http://CLIENT_IP_ADDRESS
Expected result: Agama Web interface should load successfully.
Check Agama installer logs on the client:
Switch to the console (Alt+F2) and run:
#journalctl -u agama-web-server -fExpected result: No critical errors in Agama startup.
Verify installation source accessibility:
For Full ISO installations, check repository access:
#curl -I http://192.168.1.200/install/SLES-16.0/x86_64/Expected result: HTTP 403 Forbidden. Directory listing is intentionally not enabled for this location; a 403 response confirms nginx is serving requests from this path. Agama and
zypperaccess specific files in the repository directly and never need a directory listing.Test package installation capability:
In the Agama interface, verify that:
The system can detect available disks.
Network configuration is preserved.
Package repository is accessible.
Installation can proceed to completion.
15.8 Troubleshooting PXE server validation failures #
This section describes common issues during PXE server validation and their resolution steps.
15.8.1 DHCP assignment failures #
Clients fail to receive IP addresses during PXE boot.
Check DHCP service conflicts:
>ss -ulnp | grep :67Verify network interface is up:
>ip addr show eno1Check DHCP range availability:
>nmap -sn 192.168.1.100-199Monitor DHCP logs for errors:
>journalctl -u dhcpd | tail -50
15.8.2 Boot file delivery failures #
Clients receive IP addresses but fail to download boot files.
Verify TFTP service accessibility:
>tftp 192.168.1.200 -c get /boot/grub2/x86_64-efi/bootx64.efiCheck file permissions:
>ls -la /srv/tftpboot/boot/grub2/x86_64-efi/Monitor TFTP access logs:
>journalctl -u tftp.socket -fVerify client architecture detection:
>grep -E "PXEClient|HTTPClient" /var/log/messages
15.8.3 Agama installer startup failures #
Boot files load successfully but Agama installer fails to start.
Check HTTP access to installer files:
>curl -I http://192.168.1.200/boot/images/SLES-16.0/x86_64/liveiso/LiveOS/squashfs.imgVerify kernel parameter syntax in GRUB 2 configuration:
>grep "root=live:" /srv/tftpboot/boot/grub2/menu.cfgMonitor client boot process:
>journalctl -f | grep -E "kernel|initrd|agama"Check network configuration persistence:
#ip addr show
15.9 PXE server validation checklist #
Use this checklist to systematically verify all aspects of your PXE server configuration.
| Component | Validation Step | Status |
|---|---|---|
| TFTP Service | Service active, port 69 listening, files accessible | ☐ |
| HTTP Service | nginx active, port 80 listening, installer files accessible | ☐ |
| DNS Service | Host name resolution working, port 53 listening | ☐ |
| DHCP Service | IP assignment working, boot options delivered | ☐ |
| GRUB 2 Configuration | Menu loads, architecture detection working | ☐ |
| IPv6 Support | Router advertisement active, DHCPv6 functioning | ☐ |
| PXE Boot | Client boots successfully, receives correct boot loader | ☐ |
| Agama Installer | Installer starts; Web interface accessible | ☐ |
| Installation Source | Repository accessible, packages installable | ☐ |
| Network Persistence | Network configuration maintained during installation | ☐ |
15.10 Validation conclusion #
A properly validated PXE server should demonstrate successful end-to-end functionality from client network boot through Agama installer startup. All services should operate without errors, and clients should be able to complete SUSE Linux Enterprise Server for SAP applications 16.0 installations over the network. Regular validation testing ensures the continued reliability of the PXE infrastructure for automated deployments.
16 Legal Notice #
Copyright© 2006– 2026 SUSE LLC and contributors. All rights reserved.
Permission is granted to copy, distribute and/or modify this document under the terms of the GNU Free Documentation License, Version 1.2 or (at your option) version 1.3; with the Invariant Section being this copyright notice and license. A copy of the license version 1.2 is included in the section entitled “GNU Free Documentation License”.
For SUSE trademarks, see https://www.suse.com/company/legal/. All other third-party trademarks are the property of their respective owners. Trademark symbols (®, ™ etc.) denote trademarks of SUSE and its affiliates. Asterisks (*) denote third-party trademarks.
All information found in this book has been compiled with utmost attention to detail. However, this does not guarantee complete accuracy. Neither SUSE LLC, its affiliates, the authors, nor the translators shall be held liable for possible errors or the consequences thereof.