Virtualization on SUSE Linux with Benefits and Setup
Virtualization is a technology that allows a single physical server (host) to run multiple virtual machines (guests), each with its own operating system. Use it to reduce hardware costs, save power and space, and improve infrastructure flexibility and productivity. By the end of this article, you will understand the benefits of virtualization and the basic setup of a virtual machine host and guest environment.
1 Introduction to virtualization #
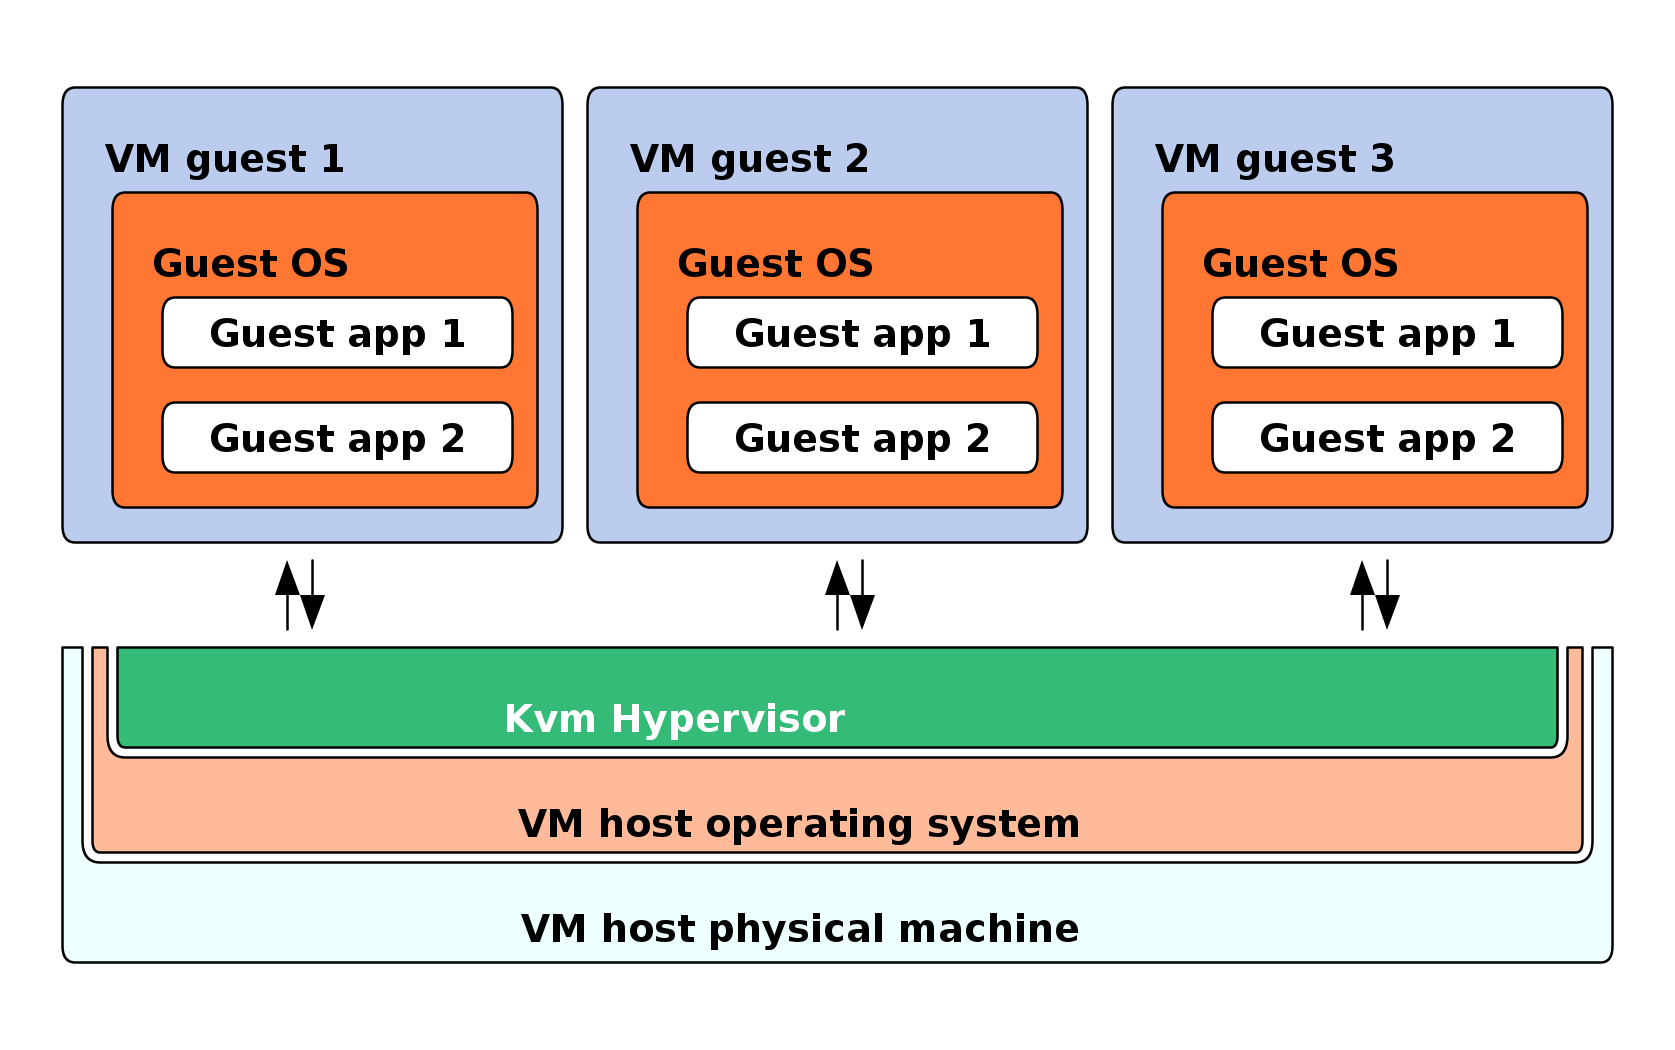
Virtualization is a technology that provides a way for a machine (VM Host Server) to run another operating system (VM Guest) on top of the host operating system.
1.1 How does virtualization work? #
The primary component of VM Host Server that enables virtualization is a hypervisor. A hypervisor is a layer of software that runs directly on VM Host Server's hardware. It controls platform resources, sharing them among multiple VM Guests and their operating systems by presenting virtualized hardware interfaces to each VM Guest.
1.2 Benefits of virtualization #
Virtualization brings a lot of advantages while providing the same service as a hardware server.
Virtualization reduces the cost of your infrastructure. Servers are mainly used to provide a service to a customer. A virtualized operating system can provide the same service but with the following advantages:
Less hardware: you can run several operating systems on one host, therefore all hardware maintenance is reduced.
Less power/cooling: less hardware means you do not need to invest more in electric power, backup power, and cooling if you need more service.
Save space: your data center space is saved because you do not need more hardware servers (fewer servers than services running).
Less management: using a VM Guest simplifies the administration of your infrastructure.
Agility and productivity: virtualization provides migration capabilities, live migration and snapshots. These features reduce downtime and bring an easy way to move your service from one place to another without any service interruption.
2 Installation of virtualization components #
To run a virtualization server (VM Host Server) that can host multiple guest systems (VM Guests), you need to install required virtualization components on the server. These components vary depending on which virtualization technology you want to use.
You can install the virtualization tools required to run a VM Host Server either when installing the system (see the manual installation), or from an already installed system by installing a virtualization pattern. The later option is described bellow:
>sudozypper install -t pattern PATTERN_NAME
Replace the PATTERN_NAME with one of the following values:
kvm_serverInstalls a basic VM Host Server with the KVM and QEMU environments.
kvm_toolsInstalls
libvirttools for managing and monitoring VM Guests in the KVM environment.
3 Virtualization modes #
Virtualization is a technology that provides a way for a machine (VM Host Server) to run another operating system (VM Guest) on top of the host operating system. There are two basic modes of hosting VM Guests on virtual machines—full virtualization mode and paravirtual mode.
- Full virtualization (FV)
FV lets virtual machines run unmodified operating systems. It uses either Binary Translation or hardware-assisted virtualization technology, such as AMD* Virtualization or Intel* Virtualization Technology, to improve performance on processors that support it. In FV mode, VM Guest is also called the Hardware Virtual Machine (HVM).
 Tip
TipCertain guest operating systems hosted in full virtualization mode can be configured to use drivers from the SUSE Virtual Machine Drivers Pack (VMDP) instead of drivers included in the operating system. Running virtual machine drivers improves performance on guest operating systems, such as Windows Server.
- Paravirtualization (PV)
PV normally requires that guest operating systems are modified for the virtualization environment. VM Guests running in paravirtual mode have better performance than those running under full virtualization. Operating systems currently modified to run in paravirtual mode are called paravirtualized operating systems and include SLES for SAP.
- PV on HVM (PVHVM)
PVHVM enhances HVM (see Full virtualization (FV)) with paravirtualized drivers, and handling of paravirtualized interrupts and timers.
4 Introduction to KVM virtualization #
KVM (Kernel Virtual Machine) is a full virtualization solution that transforms the Linux kernel into a hypervisor for running multiple isolated virtual environments.
4.1 Basic components #
KVM is a full virtualization solution for hardware architectures that support hardware virtualization.
VM Guests (virtual machines), virtual storage and virtual networks can
be managed with QEMU tools directly or with the libvirt-based stack.
The QEMU tools include qemu-system-ARCH, the QEMU
monitor, qemu-img, and qemu-nbd. A
libvirt-based stack includes libvirt itself, along with
libvirt-based applications such as virsh,
virt-manager, virt-install, and
virt-viewer.
4.2 KVM virtualization architecture #
This full virtualization solution consists of two main components:
A set of kernel modules (
kvm.ko,kvm-intel.ko, andkvm-amd.ko) that provides the core virtualization infrastructure and processor-specific drivers.A user space program (
qemu-system-ARCH) that provides emulation for virtual devices and control mechanisms to manage VM Guests (virtual machines).
The term KVM more properly refers to the kernel level virtualization functionality, but is in practice more commonly used to refer to the user space component.

5 Installation of virtualization components #
To run a virtualization server (VM Host Server) that can host one or more guest systems (VM Guests), you need to install required virtualization components on the server.
5.1 Installing virtualization components #
The virtualization components you need vary depending on which virtualization technology you want to use. You can install the virtualization tools required to run a VM Host Server in one of the following ways:
By selecting a specific system role during SUSE Linux Enterprise Server for SAP applications installation on the VM Host Server
By installing specific installation patterns on an already installed and running SUSE Linux Enterprise Server for SAP applications.
5.1.1 Specifying a system role #
You can install all the tools required for virtualization during the installation of SUSE Linux Enterprise Server for SAP applications on the VM Host Server. During the installation, you are presented with the screen.

Here you can select the role. The appropriate software selection and setup is automatically performed during SUSE Linux Enterprise Server for SAP applications installation.
Both virtualization system roles create a dedicated
/var/lib/libvirt partition, and enable the
firewalld and Kdump services.
5.1.2 Installing specific installation patterns #
Related software packages from SUSE Linux Enterprise Server for SAP applications software repositories are
organized into installation patterns. You can use
these patterns to install specific virtualization components on an
already running SUSE Linux Enterprise Server for SAP applications. Use zypper to install
them:
zypper install -t pattern PATTERN_NAMETo install the KVM environment, consider the following patterns:
kvm_serverInstalls basic VM Host Server with the KVM and QEMU environments.
kvm_toolsInstalls
libvirttools for managing and monitoring VM Guests in KVM environment.
5.2 Enable nested virtualization in KVM #

Nested virtualization in KVM is still a technology preview. It is provided for testing purposes and is not supported.
Nested guests are KVM guests run in a KVM guest. This section describes nested guests using the following virtualization layers:
- L0
A bare metal host running KVM.
- L1
A virtual machine running on L0. Because it can run another KVM, it is called a guest hypervisor.
- L2
A virtual machine running on L1. It is called a nested guest.
Nested virtualization has many advantages. You can benefit from it in the following scenarios:
Manage your own virtual machines directly with your hypervisor of choice in cloud environments.
Enable the live migration of hypervisors and their guest virtual machines as a single entity.
 Note
NoteLive migration of a nested VM Guest is not supported.
Use it for software development and testing.
To enable nesting temporarily, remove the module and reload it with the
nested KVM module parameter:
For Intel CPUs, run:
>sudomodprobe -r kvm_intel && modprobe kvm_intel nested=1For AMD CPUs, run:
>sudomodprobe -r kvm_amd && modprobe kvm_amd nested=1
To enable nesting permanently, enable the nested KVM
module parameter in the /etc/modprobe.d/kvm_*.conf
file, depending on your CPU:
For Intel CPUs, edit
/etc/modprobe.d/kvm_intel.confand add the following line:options kvm_intel nested=1
For AMD CPUs, edit
/etc/modprobe.d/kvm_amd.confand add the following line:options kvm_amd nested=1
When your L0 host is capable of nesting, you can start an L1 guest in one of the following ways:
Use the
-cpu hostQEMU command-line option.Add the
vmx(for Intel CPUs) or thesvm(for AMD CPUs) CPU feature to the-cpuQEMU command-line option, which enables virtualization for the virtual CPU.
5.2.1 VMware ESX as a guest hypervisor #
If you use VMware ESX as a guest hypervisor on top of a KVM bare metal hypervisor, you may experience unstable network communication. This problem occurs especially between nested KVM guests and the KVM bare metal hypervisor or external network. The following default CPU configuration of the nested KVM guest is causing the problem:
<cpu mode='host-model' check='partial'/>
To fix it, modify the CPU configuration as follows:
[...]
<cpu mode='host-passthrough' check='none'>
 <cache mode='passthrough'/>
</cpu>
[...]
6 Command-line tools #
libvirt includes several command-line utilities to manage virtual machines. A few of the command-line utilities are listed below:
virsh(Package: libvirt-client)A command-line tool to manage VM Guests with similar functionality as the Virtual Machine Manager. Allows you to change a VM Guest's status (start, stop, pause, etc.), to set up new guests and devices, or to edit existing configurations. virsh is also useful to script VM Guest management operations.
virt-install(Package: virt-install)A command-line tool for creating new VM Guests using the libvirt library. It supports graphical installations via VNC or SPICE protocols. Given suitable command-line arguments, virt-install can run completely unattended. This allows for easy automation of guest installs. virt-install is the default installation tool used by the Virtual Machine Manager.
remote-viewer(Package: virt-viewer)A simple viewer of a remote desktop. It supports SPICE and VNC protocols.
virt-clone(Package: virt-install)A tool for cloning existing virtual machine images using the libvirt hypervisor management library.
virt-host-validate(Package: libvirt-client)A tool that validates whether the host is configured in a suitable way to run libvirt hypervisor drivers.
7 Converting VMware virtual machines to KVM with virt-v2v #
virt-v2v converts virtual machines from VMware and other hypervisors to run on KVM. This guide covers the prerequisites, preparation, and conversion process, with a focus on converting Windows Server 2022 guests.
7.1 Overview #
virt-v2v is a command-line tool for converting third-party virtual machines into a format that runs on QEMU/KVM. It is part of the virt-v2v package and uses libguestfs under the hood.
SUSE Virtualization uses virt-v2v via the Forklift migration tool to convert VMware virtual machines. The same tool can be used directly on the command line for individual conversions.
virt-v2v supports conversion from VMware (VMX/VMDK), Xen, libvirt, and physical machines. This section covers VMware to KVM conversion.
7.2 Prerequisites #
Before converting a virtual machine, ensure the following requirements are met on the KVM host:
virt-v2vpackage installed:>sudozypper install virt-v2vguestfs-winsupportpackage installed (required for Windows guests):>sudozypper install guestfs-winsupportSUSE Linux Enterprise Virtual Machine Driver Pack ISO image. Download the latest SLE VMDP ISO from the SUSE Customer Center or the SUSE download portal.
Source VMware VM files (VMX and VMDK) accessible on the KVM host, either locally or via NFS.
Sufficient disk space on the target host to store the converted VM disk images.
7.3 Preparing the VMDP drivers #
For Windows guests, virt-v2v requires virtio drivers and Windows tools to be available on the host. The SLE VMDP ISO provides a helper script that sets up the correct directory structure.
7.3.1 Setting up VMDP drivers #
Mount the SLE VMDP ISO and run the virt-v2v-vmdp.sh script from the v2v_scripts directory:
Mount the SLE VMDP ISO:
>sudomount -o loop /path/to/vmdp-VERSION.iso /mntRun the setup script:
>sudo/mnt/v2v_scripts/virt-v2v-vmdp.sh /mnt/vmdp-VERSIONUnmount the ISO:
>sudoumount /mnt
The script performs the following actions:
Installs virtio drivers to
/usr/share/virtio-win/in the directory layout expected byvirt-v2v.Places
pvxsvc.exeand other required Windows tools in/usr/share/virt-tools/.Creates placeholder files for the QEMU Guest Agent MSI and Balloon Server to suppress non-critical warnings.
Do not manually extract and copy VMDP files to /usr/share/virt-tools/ or /usr/share/virtio-win/. The directory structure expected by virt-v2v on SLES for SAP 16.0 differs from earlier versions. Always use the virt-v2v-vmdp.sh script to ensure the correct layout.
7.4 Converting a VMware VM #
Use the virt-v2v command to convert the VMware VM. The following example converts a Windows Server 2022 VM:
>sudovirt-v2v -i vmx /path/to/windows2022.vmx \ -o local -of qcow2 -os /path/to/output/dir \ --network vmware-network-name:target-bridge-name
Key command options:
-i vmxInput mode: read VMware VMX configuration file.
-o localOutput mode: write disk image and XML configuration to the local filesystem. Use
-o libvirtto define the VM directly in libvirt (requires pre-configured storage pools).-of qcow2Output disk format.
qcow2is recommended for space efficiency.-osoutput-storageOutput storage path. For
-o local, this is a directory path. For-o libvirt, this is a libvirt storage pool name.--networksource:targetMap a VMware network name to a target bridge or libvirt network name. If omitted, the network device mapping may require manual adjustment in the generated XML.
7.4.1 Using libvirt output mode #
To define the converted VM directly in libvirt, use -o libvirt:
>sudovirt-v2v -i vmx /path/to/windows2022.vmx \ -o libvirt -of qcow2 -os default \ --network vm-network:default
The -os parameter specifies a libvirt storage pool name. Ensure the pool exists and has sufficient free space before running the conversion.
7.5 Post-conversion steps #
After a successful conversion, follow these steps to complete the migration:
Start the converted VM. On first boot, the VM will install virtio drivers. The VM may reboot one or two times during this process.
After the VM stabilizes, power it off and change the video adapter to virtio (viogpudo) for optimal graphics performance. This can be done via
virsh editor the Virtual Machine Manager GUI.Start the VM again. It will complete the driver installation and boot normally.
Verify that virtio drivers are active for disk, network, and graphics in the Windows Device Manager.
Windows Server 2022 and other modern Windows guests may require UEFI boot firmware on the target. virt-v2v detects this automatically and sets the appropriate firmware type. If the VM fails to boot, verify the firmware setting in the VM configuration.
7.6 Expected warnings during conversion #
The following warnings are informational and can be safely ignored:
- QEMU Guest Agent MSI not found
virt-v2v: warning: QEMU Guest Agent MSI not found on tools ISO/directory.SLE VMDP does not provide a standalone QEMU Guest Agent MSI package. The guest agent is included in the VMDP
setup.exeand is installed automatically during first boot of the converted VM.- Balloon Server not found
virt-v2v: warning: Balloon Server (blnsvr.exe) not found on tools ISO/directory.SLE VMDP uses
pvxsvc.exeinstead ofblnsvr.exeto provide balloon functionality. The service is installed during the first boot of the converted VM.- Random seed could not be set
virt-v2v: warning: random seed could not be set for this type of guestThis warning indicates that
virt-v2vwas unable to set a random seed for the guest. This does not affect the conversion result.
7.7 Troubleshooting #
7.7.1 Hivex.Error during inspection #
If virt-v2v fails with:
virt-v2v: error: libguestfs error: inspect_os: internal error:
inspect_os: unhandled exception thrown: Hivex.Error
This error occurs when libguestfs cannot parse the Windows registry hive files. Possible causes and resolutions:
Ensure you are running the latest version of
virt-v2vandguestfs-winsupport.Set the environment variable
LIBGUESTFS_BACKEND=directbefore running the conversion:>export LIBGUESTFS_BACKEND=directVerify that the source VMDK disk is not corrupted by running a disk check on the VMware VM before conversion.
7.7.2 Virtio drivers not found #
If you see the warning:
virt-v2v: warning: there are no virtio drivers available for this
version of Windows (10.0 x86_64 Server win2k22).  virt-v2v looks
for drivers in /usr/share/virtio-win
This means virt-v2v could not find the virtio drivers for the detected Windows version. The guest will be configured with slower emulated devices instead of virtio.
Resolution: run the virt-v2v-vmdp.sh script from the SLE VMDP ISO. The script installs drivers in the correct directory layout. On SLES 16, the expected driver path for Windows Server 2022 is /usr/share/virtio-win/drivers/amd64/2k22/.
While creating a symbolic link from 2k22 to another driver directory (e.g., win11) may suppress the warning, it is not a supported configuration. Always use the virt-v2v-vmdp.sh script with an up-to-date SLE VMDP ISO.
7.7.3 VM fails to boot after conversion (Windows Server 2019/2022/2025) #
After converting Windows Server 2019, 2022, or 2025, the VM may fail to boot with an “Inaccessible Boot Device” error or a page fault blue screen.
This issue is caused by the virtio block driver installation path. On these Windows versions, the VMDP setup installs the updated virtio block driver to the driver store directory (\windows\system32\driverstore\filerepository) using DIRID 13, while removing the driver from \windows\system32\drivers (DIRID 12). Windows fails to locate the block driver on next boot.
Resolution: ensure you are using a recent SLE VMDP ISO version (2.5 or later) that includes the fix. The updated VMDP setup.exe copies the driver to both locations, allowing the VM to boot correctly.
If the VM fails to boot with an older VMDP version, you can manually copy the virtio block driver from the driver store to \windows\system32\drivers to restore boot capability.
7.7.4 Network mapping issues #
If the --network mapping fails, the converted VM may not have a correctly configured network interface. To resolve:
Verify the source network name matches the network name defined in the VMware VMX file.
Ensure the target bridge or libvirt network exists on the host before conversion.
If using
-o libvirt, create a libvirt network with a matching name usingvirsh net-create.
7.7.5 Debugging virt-v2v #
To enable verbose output for debugging, run virt-v2v with the -v option:
>sudovirt-v2v -v -i vmx /path/to/vm.vmx -o local -of qcow2 -os /output/dir
For additional libguestfs debugging, set:
>export LIBGUESTFS_DEBUG=1
>export LIBGUESTFS_TRACE=1
7.8 VMDP ISO contents and other uses #
7.8.1 Installing drivers at VM creation #
The VMDP ISO can be loaded as a virtual CD in a KVM VM to provide VirtIO Block or SCSI drivers during Windows installation. On the screen, select and follow the prompts to select the appropriate driver.
7.8.2 Full VMDP contents for Xen and KVM #
The ISO also contains the full VMDP setup.exe along with expanded contents for installation flexibility.
These can be used for both Xen and KVM hosted Windows VMs.
7.9 Complete example: Windows Server 2022 #
The following example demonstrates a full conversion of a Windows Server 2022 VM from VMware to KVM:
Mount the SLE VMDP ISO:
>sudomount -o loop /data/isos/vmdp/vmdp-VERSION.iso /mntRun the setup script:
>sudo/mnt/v2v_scripts/virt-v2v-vmdp.sh /mnt/vmdp-VERSIONUnmount the ISO:
>sudoumount /mntWork around the
Hivex.Errorissue by using the direct back end:>export LIBGUESTFS_BACKEND=directConvert the VM and define it directly in libvirt:
>sudovirt-v2v -i vmx /srv/vmware/windows2022/windows2022.vmx \ -o libvirt -of qcow2 -os default \ --network "VM Network":default
After conversion completes:
Start the VM:
virsh start windows2022Allow the VM to reboot (virtio driver installation)
Once stable, power off and switch video to virtio
Restart and verify all virtio drivers are active
8 For more information #
For further steps in virtualization, refer to the following sources:
9 Legal Notice #
Copyright© 2006– 2026 SUSE LLC and contributors. All rights reserved.
Permission is granted to copy, distribute and/or modify this document under the terms of the GNU Free Documentation License, Version 1.2 or (at your option) version 1.3; with the Invariant Section being this copyright notice and license. A copy of the license version 1.2 is included in the section entitled “GNU Free Documentation License”.
For SUSE trademarks, see https://www.suse.com/company/legal/. All other third-party trademarks are the property of their respective owners. Trademark symbols (®, ™ etc.) denote trademarks of SUSE and its affiliates. Asterisks (*) denote third-party trademarks.
All information found in this book has been compiled with utmost attention to detail. However, this does not guarantee complete accuracy. Neither SUSE LLC, its affiliates, the authors, nor the translators shall be held liable for possible errors or the consequences thereof.