JeOS Quick Start
The following document provides an overview of SUSE Linux Enterprise Server JeOS and describes the setup procedure.
1 Introduction #
JeOS (Just enough Operating System) refers to a minimal customizable operating system that is tailored for a specific usage scenario: a container host, a virtual machine guest, an appliance base, or a small server image. JeOS acts as a foundation for building systems for use in a data center, creating desired virtual application images or appliances. You can choose what packages and components to install based on a specific use case. To that end, JeOS provides access to all regular software repositories.
If you already have SUSE Linux Enterprise Server certification, you are automatically certified for JeOS, as it is derived from the same code base. SUSE Linux Enterprise Server JeOS allows you to reduce the operating system to the packages essential for the specific usage scenario. This minimizes the number of packages and patches that need to be managed and applied. By removing unnecessary packages, you also reduce the number of potential vulnerabilities, thus making the resulting system more secure. Reducing the system's footprint also results in lower resource consumption and improved performance.
JeOS is delivered as pre-configured and ready-to-run virtual machine
images. The system comes with the jeos-firstboot
wizard for configuring system locales and the root password during the first
boot. JeOS ships with the SSH server enabled and excluded from the
firewall configuration. The supplied KIWI NG templates make it possible to
create customized JeOS images.
JeOS provides ready-to-deploy server images on the AMD64/Intel 64 architecture for the following usage scenarios:
KVM/Xen with HVM
Xen Paravirtualized
Microsoft Hyper-V
VMware
OpenStack Cloud
1.1 System requirements #
The minimum JeOS system requirements are similar to SUSE Linux Enterprise Server. For more information, refer to Section 2.1, “Hardware requirements”.
1.2 Differences between JeOS and SUSE Linux Enterprise Server #
There are several significant differences between JeOS and SUSE Linux Enterprise Server.
- jeos-firstboot
JeOS comes with the jeos-firstboot tool, which can be used to configure basic settings during the first boot. This includes keyboard layout and language, time zone, and root password.
The default network configuration is set to use DHCP, and the system automatically creates a Btrfs snapshot of the initial configuration.
- kernel-default-base
Because of size constraints, JeOS images use the kernel-default-base as the default kernel. Since the kernel does not contain drivers for bare metal, this allows for a smaller footprint.
If a specific usage scenario requires any of the omitted modules, install the kernel-default package to get a full tree of the kernel modules. This is the same kernel used by a regular SUSE Linux Enterprise Server installation.
- No repositories by default
When installing a SUSE Linux Enterprise Server from the installation media, the system automatically sets the installation media as the default offline channel.
JeOS has no channel by default, and you need to register your system to access online channels. Refer to Section 9.3.2, “Registering with SUSEConnect” for further information.
NoteThe jeos-firstboot, jeos-licenses, and live-langset-data receive updates only if the Development Tools Module is enabled. However, these packages are not essential for running JeOS instances, so they can be removed or left untouched.
- Zypper configuration
JeOS is a slimmed-down version of SUSE Linux Enterprise Server. The reduction in size is achieved in part by enabling the following two options in
/etc/zypp/zypp.conf:rpm.install.excludedocs = yes(excludes all files marked as documentation from being installed by default) andsolver.onlyRequires = true(disables installation of suggested and recommended packages by default).- Base packages
JeOS images are built using the KIWI NG tool. KIWI NG's configuration files, called templates, explicitly list packages that must be included in the images. Keep in mind that these base packages pull their dependencies during the image building process. Therefore, the list of preinstalled packages in an image usually contains more packages than the list of base packages.
The KIWI NG configuration files used to create the official JeOS images are available from the openSUSE Build Service at https://build.opensuse.org/.
Note: Specific host tools packagesEach SUSE Linux Enterprise Server JeOS flavor contains certain host tools packages. Refer to the specific flavors section in the documentation for further information.
- Disk layout
Unlike SUSE Linux Enterprise Server, which calculates the disk layout during installation, JeOS features the following fixed virtual image partitioning scheme:
2 MB BIOS boot
33 MB EFI system
24 GB Linux file system
To get additional disk space, you can either extend the existing disk from the virtual host or add a secondary disk to the virtual machine. If you choose the latter option, you must partition and format it manually.
- systemd-coredump disabled
Due to the limited amount of memory and disk space available by default on JeOS images, systemd-coredump is disabled by default on JeOS images. To collect application core dumps necessary for troubleshooting, follow these steps:
Install the systemd-coredump package, which contains
/usr/lib/sysctl.d/50-coredump.confTo apply the configuration changes to your system, reboot or use the
sysctl --systemcommand.
For further information, refer to https://documentation.suse.com/sles/html/SLES-all/cha-tuning-systemd-coredump.html.
2 Available image flavors #
Ready-to-use JeOS images are available for the x86_64 architecture only. You can download JeOS for the following deployment targets:
Fully Virtual JeOS for KVM and Xen (FV/HVM)
JeOS for VMware
JeOS for Microsoft Hyper-V
JeOS for OpenStack
Paravirtual JeOS for Xen (PV)
JeOS can run as a virtualization guest on the same virtualization hosts (hypervisors) as SUSE Linux Enterprise Server. See Section 7.3, “Supported host environments (hypervisors)” for more information on what hypervisors are supported.
2.1 JeOS Image for OpenStack Cloud #
JeOS for OpenStack Cloud is an image designed specifically for use in an OpenStack environment.
Instead of the jeos-firstboot tool, JeOS for OpenStack Cloud uses cloud-init for configuring the image. The image also uses the XFS file system and the following kernel configuration:
"plymouth.enable=0 console=ttyS0,115200 console=tty0 net.ifnames=0"
This means that the image ships without packages required by jeos-firstboot and Btrfs.
JeOS for OpenStack Cloud includes several OpenStack-related packages, such as cloud-init, cloud-init-config-suse, and xfsprogs.
2.1.1 cloud-init basics #
cloud-init automatically applies custom configuration
to running instances. The tool features a wide range of configuration
modules, and it can execute specific commands in the image during the boot
phase.
The default configuration for cloud-init is part of the
cloud-init-config-suse package, and it is located in
the /etc/cloud/cloud.cfg directory.
2.1.2 cloud-init configuration examples #
By default, cloud-init does not set a root password. Instead it creates a user account called sles that acts as the default user and has sudo rights. Use the following example to create passwords for both users.
#cloud-config
chpasswd:
  list: |
    root:$6$SalTsaLt$miA./Q1i1mKR0sYicn/yAzNHP6y32JjOdVIn5agAiaEKaSaZdC3X6CVTW2d/xslQfevCc20teWLurq12x8mbe1
    sles:$6$SalTsaLt$.cuqsgjNGxHJZSLmVqkI/j9.kWIiUQHqjlRswbHjTw9hIXdPomgey2DHzmp6Ho6wgqIKz3ufbOIKdQCnQHPSA1
  expire: False
To create the SHA-512 hashes used in the example, run the command:
openssl passwd -6 -salt SalTsaLt
     PASSWORD
.
To avoid potential security risks, do not use passwords in production environments. Even when using hashed passwords, you are exposed to dictionary attacks. For better security, use SSH authentication instead of passwords.
When creating users, keep in mind that logging in with a password is disabled by default, and that the newly-created users do not have sudo rights.
The following examples show configurations for creating various users.
#cloud-config
users:
  - default
  - name: USER
    shell: /bin/bash
    groups: users
    # lock_passwd: Disable password login. Defaults to true
    lock_passwd: false
    passwd: $6$SalTsaLt$.cuqsgjNGxHJZSLmVqkI/j9.kWIiUQHqjlRswbHjTw9hIXdPomgey2DHzmp6Ho6wgqIKz3ufbOIKdQCnQHPSA1
sudo: ALL=(ALL) NOPASSWD:ALL#cloud-config
users:
- name: USER
shell: /bin/bash
groups: users
ssh_import_id: None
lock_passwd: true
sudo: ALL=(ALL) NOPASSWD:ALL
ssh_authorized_keys:
- SSH_PUBLIC_KEY_1
- SSH_PUBLIC_KEY_2
To connect and register with the SUMA, RMT, or SUSEConnect, use the
runcmd module to run the desired commands, for example:
#cloud-config
runcmd:
  - SUSEConnect -r REGISTRATION_CODE -e EMAIL_ADDRESS
For further information, see https://documentation.suse.com/sles/html/SLES-all/cha-register-sle.html.
For RMT, the configuration is as follows:
#cloud-config
runcmd:
  - curl http://RMT_SERVER/tools/rmt-client-setup \ --output rmt-client-setup
  - sh rmt-client-setup https://RMT_SERVER/
For further information, see https://documentation.suse.com/sles/html/SLES-all/cha-rmt-client.html.
For SUMA, the configuration is as follows:
#cloud-config
runcmd:
  - curl -O http://suma01/pub/bootstrap/bootstrap.sh
  - /bin/bash bootstrap.sh
For further information, see https://documentation.suse.com/external-tree/en-us/suma/4.0/suse-manager/client-configuration/registration-bootstrap.html.
Finally, the following example shows a configuration that installs a package and starts a service during the first boot.
#cloud-config
packages:
  - qemu-guest-agent
runcmd:
  - systemctl enable qemu-guest-agent.service
  - systemctl start --no-block qemu-guest-agent.service
2.2 KVM/Xen and Xen flavor #
The JeOS image for KVM/Xen and Xen ships with the following packages:
xen-tools-domU
grub2-x86_64-xen
xen-libs
2.3 Microsoft Hyper-V flavor #
The JeOS image for Microsoft Hyper-V ships with hyper-v.
2.4 VMware flavor #
The JeOS image for VMware ships with open-vm-tools.
3 Installing and running JeOS on KVM #
Provided you have KVM installed on your local machine, you can use a ready-made JeOS image to create a virtual machine. This allows you to experiment with JeOS safely.
Download a 60-day trial JeOS image for KVM at https://www.suse.com/products/server/jeos/.
Refer to the following procedure to create a JeOS virtual machine in KVM.
Launch Virtual Machine Manager and choose › .
Select and click .
Click the button next to the field.
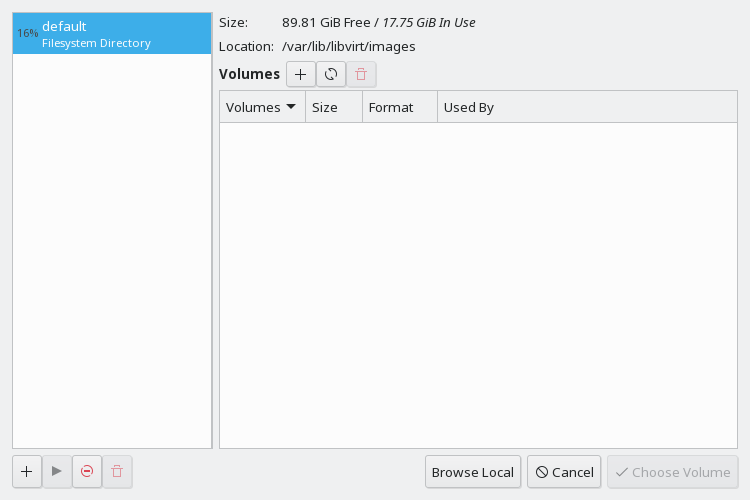
In the dialog, click , give the new pool a name, and select from the drop-down box. Click .
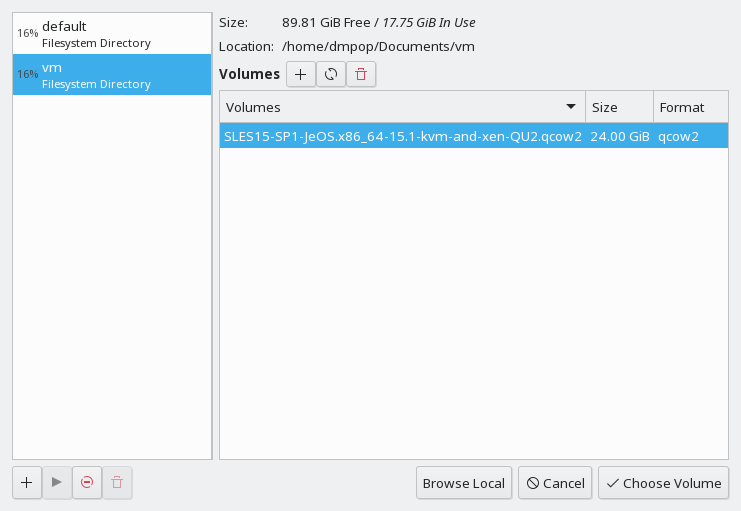
Click the button next to the field and select the directory containing the JeOS qcow2 image. Click .
Back in the dialog, select the created pool and choose the qcow2 image in the section. Then click .
Back in the dialog, enter
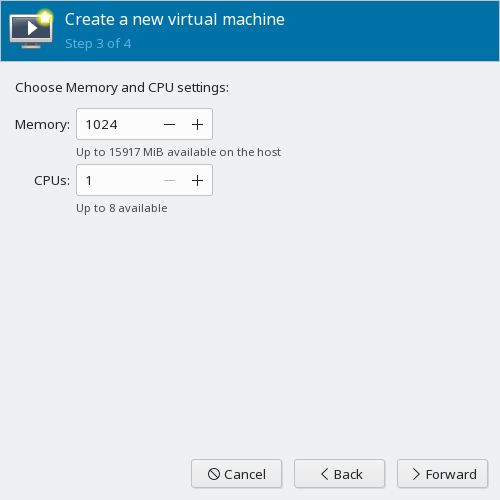
Genericin the field. Click .Set the RAM value to 1024, and the number of CPUs to 1. Click .
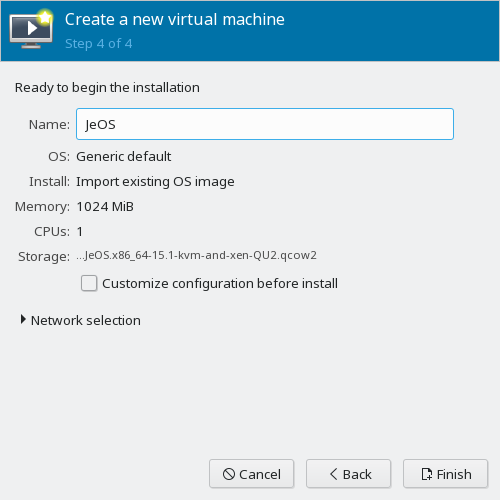
Give the new virtual machine a name (for example,
JeOS) and click .If prompted to start the virtual network, click .
After the system is booted, jeos-firstboot guides you through the initial system setup.
The JeOS image comes with the en_US locale only. You
can install and select the desired system locale after the setup is
completed by installing the glibc-locale package and
running the localectl set-locale
LANG=LOCALE command (replace
LOCALE with the desired language locale, for
example de_DE.UTF-8).
As the first step, you are prompted to select the appropriate keyboard layout using the keyboard selection dialog.
Next, read and accept the License Agreement. You cannot proceed without accepting the license agreement.
Specify the desired timezone.
When prompted, specify and confirm the desired root password.
As the last step, you are instructed to register your system. If you only plan to test JeOS, you can skip registration.
After the initial configuration is completed, you can log in to the system as
root, using the password you specified during the setup procedure.
After JeOS has been successfully installed and registered, we highly recommend to install the latest available online updates.


