Getting Started with GNOME Desktop
Basic information and instructions
- WHAT?
GNOME is a desktop environment with an easy-to-use graphical interface. Learn about the default configurations of GNOME Desktop, how to customize the settings to your needs, and how to perform regular tasks.
- WHY?
SUSE Linux Enterprise Server comes along with GNOME Desktop. This article helps you to get familiar with its basic settings and how to use it for your daily tasks.
- EFFORT
It takes approximately 35 minutes to read and understand this article.
- GOAL
Get a basic understanding of what GNOME Desktop offers, and how to customize it to match your preferences.
1 Introduction to GNOME Desktop #
SUSE Linux Enterprise Server comes along with GNOME Desktop, a desktop environment with an easy-to-use graphical interface. This article describes the default configuration of GNOME Desktop. If you or your system administrator modify the defaults, certain aspects might be different, such as appearance or key combinations.
1.1 What is GNOME Desktop? #
GNOME Desktop is a graphical environment for everything you see on the screen, like the login and home screen. It also offers several applications you need for your daily tasks like mail client, calendar, file browser, and many more.
Certain versions of SUSE Linux Enterprise Server ship with as many as four different session configurations based on GNOME. These are:
- GNOME (default)
A GNOME 4 configuration that is close to the upstream design. It focuses on interrupting users as little as possible. However, starting applications and switching between them works differently from many other desktop operating systems. It uses a single panel at the top of the screen.
- GNOME Classic and GNOME Classic on Xorg
GNOME classic is for users who prefer a more traditional desktop experience. It is based on GNOME 4 technologies but provides a number of changes to the user interface. GNOME Classic on Xorg starts on Xorg.
- IceWM session
A basic desktop designed to use little resources. It can act as a fallback if other options are unavailable or slow.
The version described here is the default configuration of SUSE Linux Enterprise Server, which is GNOME. The main difference between the configurations is the look and feel of the home screen and the main menu. Most of what is described in the following applies to all four configurations.
Both are full-featured, open source implementations of the X Window System, which provides the foundational graphical interface for Unix-like operating systems, including Linux. Xorg is a mature, highly compatible, but complex solution. Whereas Wayland is newer, using a simpler architecture, but it does not yet offer the wide range of compatibility and maturity as Xorg. Both protocols have their strengths and weaknesses. The choice between them depends on specific needs, including hardware compatibility, performance requirements, and the specific applications being used.
1.2 How does GNOME Desktop work? #
In GNOME Desktop, you can find and open any application in the . The settings of the desktop can be configured in the and menu.
1.3 Benefits of GNOME Desktop #
GNOME Desktop is a free, open source and easy-to-use desktop environment offering a variety of applications to help you organize and complete your daily tasks.
2 Visual overview of GNOME Desktop #
Learn how to use the overview, the and features and the menu.
2.1 overview #
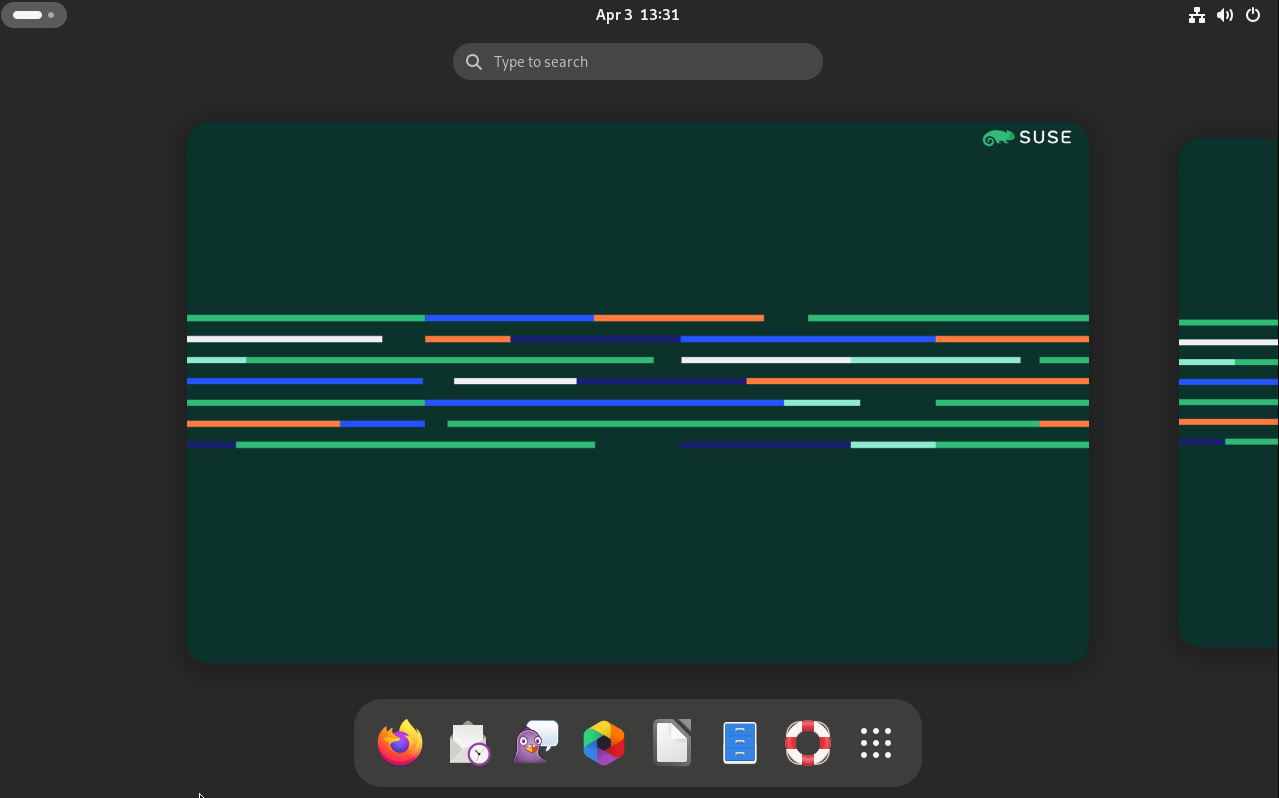
The overview shows a preview of all open windows and icons for favorite and running applications. It also integrates searching and browsing functionality.
To open the overview, you have the following options:
In the left corner of the top bar, click the button.
Move your mouse pointer to the upper-left hot corner.
Press the Meta key on your keyboard.
- Search box
Use the search box at the top to find applications, settings and files in your home directory.
To search, you do not need to click the search box. Begin typing directly after opening the overview. Search starts while you type, you do not need to press Enter.
-
dash The
dashis the bar positioned in the center at the bottom. It contains your favorite applications and running applications. If you move the mouse pointer over one of the icons, the name of the corresponding application is displayed nearby. A small dot underneath the icon indicates that the application is running.Right-clicking an icon opens a menu which offers different actions depending on the associated program. Using , you can place the application icon permanently in
dash. To remove a program icon fromdash, select . To rearrange an icon, use the mouse to drag it to a new position.
2.2 and #
Click the clock icon on the top bar to see the current day of the week and time. If you are using the calendar function from Evolution, the itself or any other calendar application that is supported by , it also shows your upcoming appointments and notifications.
3 First steps to work with GNOME Desktop #
Learn how to log in to GNOME Desktop, and how to pause or finish the session.
3.1 Starting a session #
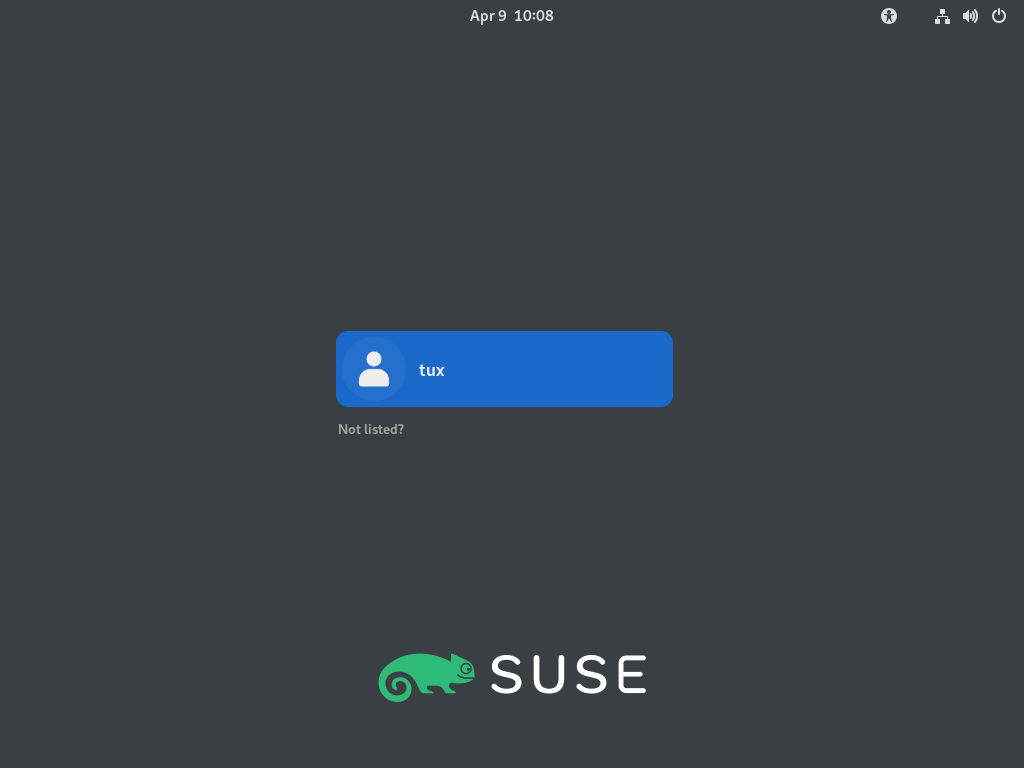
When starting your SUSE Linux Enterprise Server system, you first see a login screen, as all users must authenticate to start a session. The authentication step helps protect your personal information and data from unauthorized access.
In the login screen, select your user name.
If your user name is not listed, click . Then enter your user name and click .
Enter your password and confirm with Enter.
If a computer is used by a single person only, it is possible to enable Auto Login for this particular user at the system start. This saves time, but also impacts account security. Auto Login can be enabled or disabled during installation or at any time using the YaST User and Group Management module. For security reasons, Auto Login is not recommended.
3.2 Switching the session type #
On SUSE Linux Enterprise Server, you can choose between the session types described above in Section 1.1, “What is GNOME Desktop?”.
To try one of the additional GNOME session configurations or another desktop environment, follow the steps below.
On the login screen, click your user name or enter it, as you normally would.
To change the session type, click the cog wheel icon in the lower right corner. A menu appears.
Figure 3: Default GNOME login screen—session type #From the menu, select one of the entries. Depending on your configuration, there may be different choices.
Enter your password into the text box and confirm with Enter.
After switching to another session type once, the chosen session becomes your default session. To switch back, repeat the steps above.
3.3 Pausing or finishing your session #
To pause or close your session, open the menu in the upper-right corner of the top bar, click the button and choose one of the options listed.
. Pause your session and put the computer into a state where it consumes a minimal amount of energy. Suspend mode can be configured to lock your screen, so nobody can look at or change your work. Waking up the computer is generally much quicker than a full computer start.
This mode is also known as suspend-to-RAM, sleep or standby mode.
. Finish the current session and restart the computer. Restarting is necessary to apply the system updates.
. Finish the current session and turn off the computer.
or . Finish the current session, but leave the computer on, so other users can log in. This option is only available if you have more than one user account on your system.
3.4 Locking the screen #
To lock the screen, open the menu in the upper-right corner of the top bar and click the padlock icon.
When you lock your screen, a curtain with a clock appears first. After a certain amount of time, the screen turns black.
To unlock the screen, move the mouse or press a key to display the locked screen dialog. Enter your password and press Enter to unlock the screen.
3.5 Logging out or switching users #
The and entries only appear in the menu if you have more than one user account on your system.
Click the menu in the upper-right corner of the top bar and click the button to open the menu.
Select one of the following options:
Logs you out of the current session and returns you to the Login screen.
Suspends your session, allowing another user to log in and use the computer.
3.6 Restarting or shutting down the computer #
Click the menu in the upper-right corner of the top bar and click the button to open the menu.
Select one of the following options:
Pauses your session and puts the computer into a state where it consumes a minimal amount of energy. Suspend mode can be configured to lock your screen, so nobody can look at or change your work. Waking up the computer is generally much quicker than a full computer start.
Logs you out of the current session, then restarts the computer.
Logs you out of the current session, then turns off the computer.
3.7 Managing files and directories #
When starting your SUSE Linux Enterprise Server system, you first see a login screen, as all users must authenticate to start a session. The authentication step helps protect your personal information and data from unauthorized access.
In the login screen, select your user name.
If your user name is not listed, click . Then enter your user name and click .
Enter your password and confirm with Enter.
3.8 Accessing removable media #
To access devices like USB flash drives or CDs and DVDs, insert or attach the medium. An icon for the medium is automatically created on the desktop. For many types of removable media, a GNOME Files window pops up automatically. If GNOME Files does not open, double-click the icon for that drive on the desktop to view the contents. In GNOME Files, an item for the medium in the sidebar appears.
Do not physically remove devices immediately after using them. Even when the system does not indicate that data is being written, the drive may not be finished with a previous operation.
To safely remove a device, proceed as follows:
From the overview, open .
Locate the device in the sidebar and click the icon.
Now you can safely remove the device.
3.9 Assistive technologies #
The GNOME desktop includes assistive technologies to support users with helpful impairments and special needs, and to interact with common assistive devices. This chapter describes several assistive technology applications designed to meet the needs of users with physical disabilities like low vision or impaired motor skills.
3.9.1 Enabling assistive technologies #
To configure accessibility features, open the dialog by right-clicking the desktop and choosing . In the navigation pane, select . Each assistive feature can be enabled separately.
If you need a more direct access to individual assistive features, turn on . Now the top bar shows an icon which looks like a person surrounded by a circle.
3.9.2 Visual assistance #
In the section of the dialog, you can enable features that help people with impaired vision.
Turning on enables high-contrast black and white icons in the GNOME desktop.
Turning on enlarges the font used in the user interface.
Turning on enables a screen magnifier. You can set the magnification and magnifier behavior, including color effects.
By customizing the , you can increase the visibility of the mouse pointer.
If the is turned on, any UI element or text that receives keyboard focus is read aloud.
If the are turned on, a sound is played whenever Num Lock or Caps Lock is turned on.
3.9.3 Hearing assistance #
In the section of the dialog, you can enable features helping people with impaired hearing.
If the are turned on, a window title or the entire screen is flashed when an alert sound occurs for the respective application.
3.9.4 Keyboard and mouse #
In the and sections of the dialog, you can enable features that help people with mobility impairments.
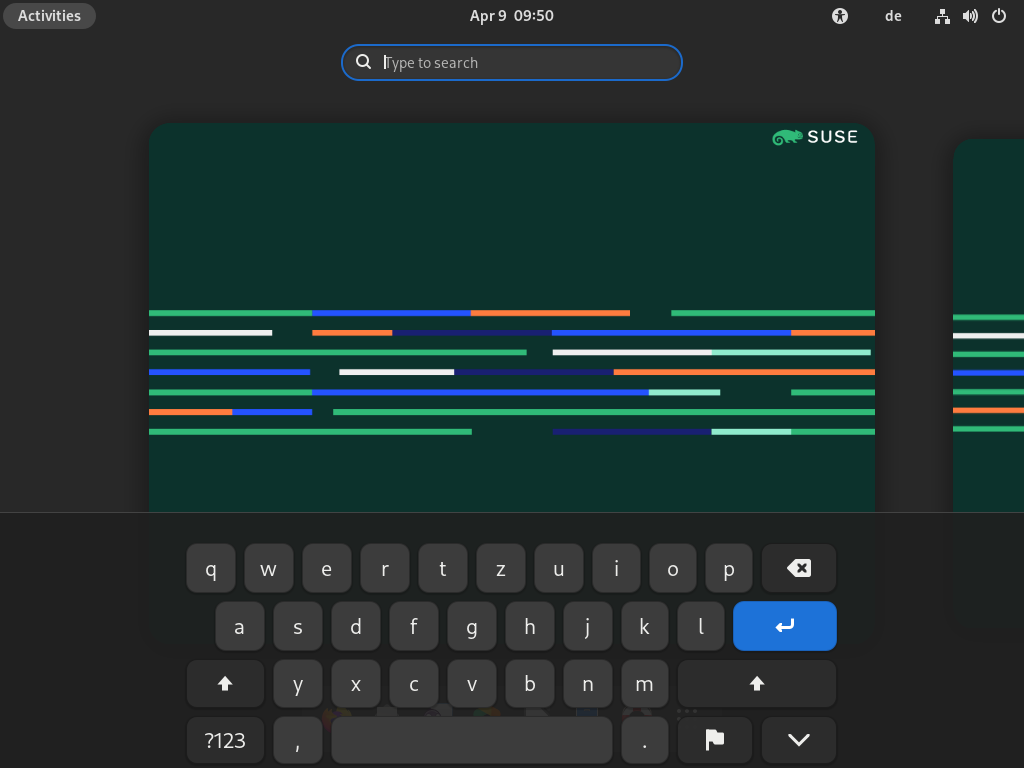
If the is turned on, an on-screen keyboard appears at the bottom of the screen when you next have the opportunity to type.
Figure 4: On-screen keyboard #To enter numbers and symbols, press the button first. More symbols are available if you press the button. To return to the alphabetic keyboard, press the button.
To temporarily hide the keyboard, press the button with the arrow down icon. The keyboard is shown again automatically in the next situation where you can use it. To change your keyboard layout or change settings, press the button with the flag icon.
lets you configure if a key is repeated when it is pressed for a longer time. You can either turn this feature or configure a and the by which keys are repeated.
Under you can configure if and at which speed the cursor blinks in text boxes (for example, in a terminal).
Click to open a dialog where you can enable more features that make typing easier:
With , you can turn accessibility features on or off by using the keyboard.
allows you to type key combinations one key at a time rather than having to hold down all keys at once. For example, the Alt–→| shortcut switches between windows.
With sticky keys turned off, you need to hold down both keys at the same time. With sticky keys turned on, press Alt and then →| to do the same.
Turn on if you want a delay between pressing a key and the letter being displayed on the screen. This means that you need to hold down each key you want to type for a little while before it appears. Use slow keys if you accidentally press several keys at a time when you type, or if you find it difficult to press the right key on the keyboard first time.
Turn on to ignore key presses that are rapidly repeated. This can help, for example, if you have hand tremors which cause you to press a key multiple times when you only want to press it once.
Turn on to control the mouse pointer using the numeric keypad on your keyboard.
Click to open a dialog where you can enable more features that make clicking easier: simulated secondary click and hover click.
Turn on to activate the secondary click (usually the right mouse button) by holding down the primary button for a predefined . This is useful if you find it difficult to move your fingers individually on one hand, or if your pointing device only has a single button.
Turn on to trigger a click by hovering your mouse pointer over an object on the screen. This is useful if you find it difficult to move the mouse and click at the same time. If this feature is turned on, a small hover click window opens and stays above all your other windows. Use this to choose what type of click should happen when you hover. When you hover your mouse pointer over a button and do not move it, the pointer gradually changes color. When it has fully changed color, the button is clicked.
Use the slider to adjust the according to your needs.
4 Customizing the settings for GNOME Desktop #
Learn how to customize the settings for GNOME Desktop, like changing the background or configuring language and keyboard settings to suit your personal taste and needs.
4.1 Configuring the desktop background #
The desktop background is the image or color that is applied to your desktop. You can also customize the image shown when the screen is locked.
To change the desktop background:
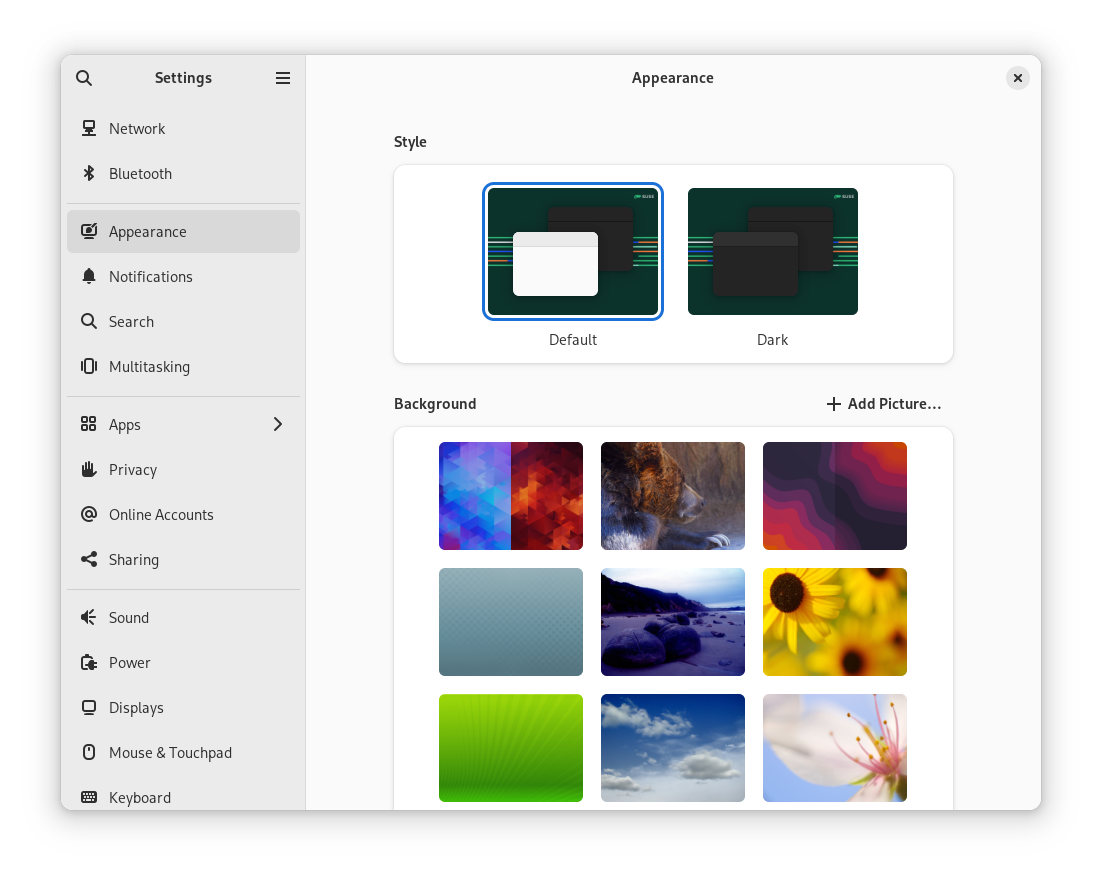
Right-click the desktop and choose .
Figure 5: GNOME Background settings #Select one of the wallpapers (preconfigured images distributed with your system) shown in the content area.
Alternatively, click to select an image from your
Picturesdirectory (~/Pictures) or another location in your file system.Close the dialog.
The new background is now shown on your desktop.
4.2 Configuring language settings #
SUSE Linux Enterprise Server can be configured to use any of several languages. The language setting determines the language of dialogs and menus and can also determine the keyboard and clock layout.
To configure your language settings, right-click the desktop and choose . Now choose .
Here you can choose:
. Choose a language from the list. For the change to take effect, you are prompted to the desktop session. To do so, you must log out of your session and log back in afterward.
. To change the formats for date, number, currency and related options, choose a country from the list. For the change to take effect, you must log out of your session and log back in afterward.
ibus-setup do not take effect
On GNOME, settings made using ibus-setup do
not take effect. ibus-setup can only be used to configure
IceWM. Instead, always use the application:
To change input methods, select in the navigation pane of the dialog.
To change the key combination that switches between input methods, use › . Then select the category and the entry .
4.3 Configuring the keyboard #
Refer to Section 3.9, “Assistive technologies” for additional settings, such as key auto-repetition and cursor blink rate, and accessibility features. To configure your keyboard layout, refer to Section 3.9.4, “Keyboard and mouse”.
To modify keyboard shortcuts, right-click the desktop and choose . Now select › .
This dialog shows the keyboard shortcuts that are configured for your system. To edit a key combination, click the entry that you want to change. To set a new key combination, press the respective keys. To disable a shortcut, press <— instead.
4.4 Using XCompose to type special characters #
GNOME supports fast input source (keyboard layout) switching
(Section 4.2, “Configuring language settings”). However, if you
are using xmodmap to create custom keymaps, it may not
work correctly when you switch between multiple input sources. For example,
you have two input sources, English and German. Your
xmodmap commands work fine in the first input source you
select, but when you switch to the second input source, the same
xmodmap commands produce incorrect output.
xmodmap is an older protocol and does not have a full
view of the keyboard layout, so in more complex situations it causes errors.
An alternative method is to use xcompose to assign
special symbols to sequences of key presses. This should work with any input
source. Install xcompose by installing the
libX11-devel package.
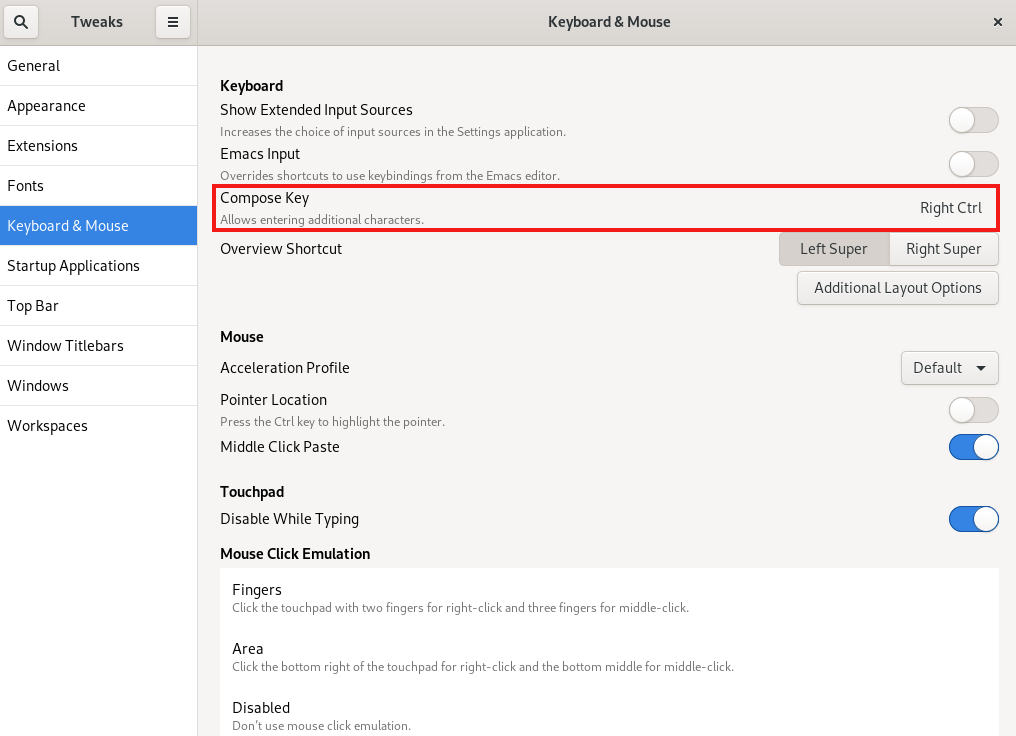
Next, assign a compose key with the tool in the overview. Press this key in sequence with one or two additional keys to print a special character. The keys must be pressed in the correct sequence, starting with the compose key.
In the tool, navigate to › and select your command key (Figure 6, “Enabling the compose key in tweaks”).
Next, create a ~/.XCompose file. This is the
default per-user configuration file. Enter your key mappings in this file,
as in this example:
include "%L"

<Multi_key> <a> : "α"
<Multi_key> <b> : "β"
<Multi_key> <exclam>  : "¡"
include "%L" includes the default compose file for your
locale, for example /usr/share/X11/locale/en_US.UTF-8.
The remaining lines specify the compose key, the other key presses, and the symbols they are intended to print. After you make changes to your compose file, you must log out of your session and log back in to activate the changes.
Your key assignments are case-sensitive.
~/.XCompose overrides the system files. Use the compose
file for your locale to see what is already configured, and to copy symbols
from it into your personal compose file. (These files may have a lot of
whitespace at the beginning but they are not empty, so keep scrolling.) As
always, watch out for conflicts with the other keymaps on your system.
For additional information, see man xcompose.
4.5 Configuring Bluetooth settings #
The Bluetooth module lets you set the visibility of your machine over Bluetooth and connect to available Bluetooth devices. To configure Bluetooth connectivity, follow these steps:
Right-click the desktop and choose . Now choose .
To use Bluetooth, set the switch at the top on.
Your computer is visible as long as the Bluetooth panel is open.
Note: Temporary visibilityThe switch is meant to be used only temporarily. You only need to turn it on for the initial setup of a connection to a Bluetooth device. After the connection has been established, turn off the switch.
On the device you want to connect, turn on Bluetooth connectivity and visibility, too.
If the device has been found and is shown in the list, click it to establish a connection to it.
You are asked whether the PINs of the two devices match.
If the PINs match, confirm this on both your computer and the device.
The pairing is now established. On your computer, the device in the list is shown as .
Depending on the device type, it is also now available in other applications, for example, as a storage device in GNOME Files, or a sound device in playback applications.
To connect to a paired Bluetooth device, select the device in the list. In the dialog that appears, turn the switch on. You can send files to the connected device by using the button. If you are connected to a device such as a mobile phone, you can use it as a network device by activating the appropriate option.
To remove a connected device from the list on your computer, click and confirm your choice. To remove the pairing, you also need to do so on your device.
4.6 Configuring power settings #
Settings available in this dialog depend on your hardware. In the following, the options that are typically available when using a laptop are described. On a workstation, many of the described options are not available.
Right-click the desktop and choose .
In the navigation pane, select .
In the of the content area, set after how many minutes to blank the screen (or to not blank it at all).
In the section of the dialog, configure a time after which the computer is paused after a certain period of inactivity.
4.7 Configuring mouse and touchpad #
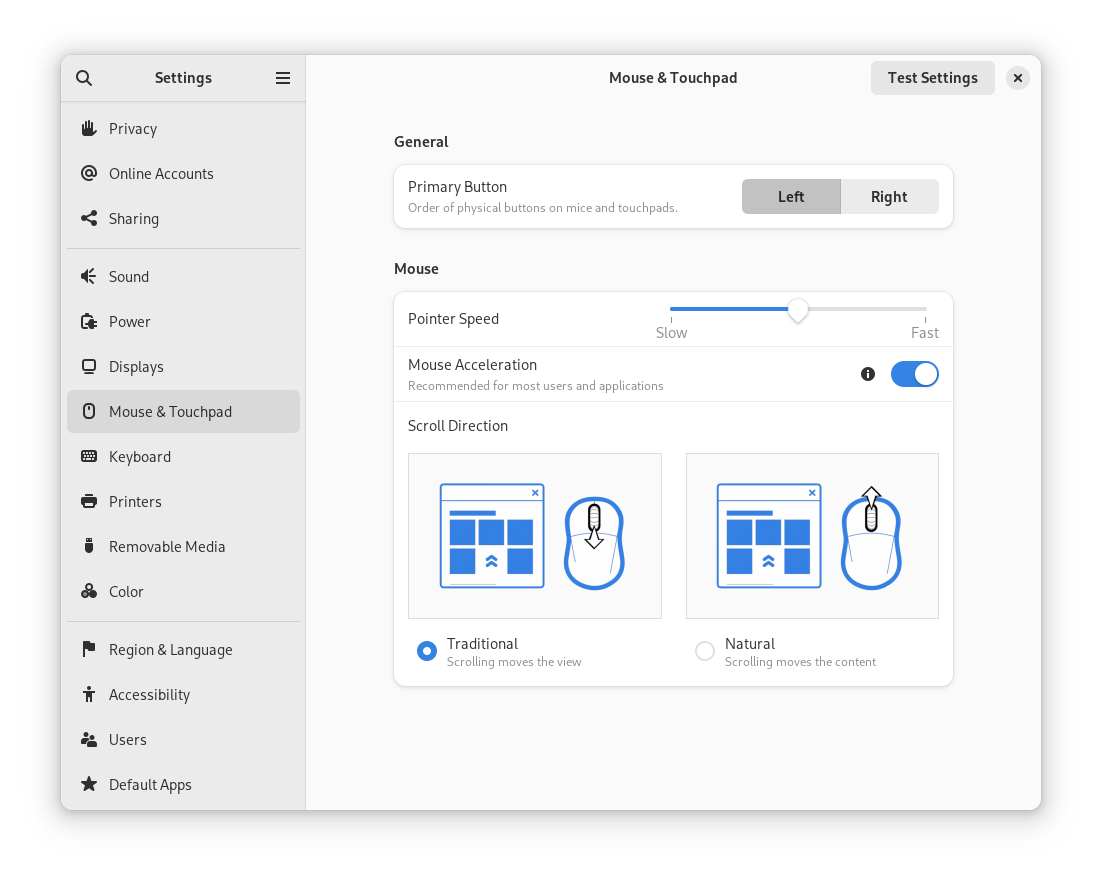
To modify mouse and touchpad options, right-click the desktop and choose . Then select .
In the section of the dialog, you can set the orientation (left or right).
In the section of the dialog, use to adjust the sensitivity of the mouse pointer.
With , you can set the direction in which the content moves when scrolling with the mouse. When natural scrolling is turned off, the content moves up while pushing the scroll wheel down. When natural scrolling is turned on, the content moves in the same direction as the mouse wheel.
To test your settings, click and try the pointing device.
For configuration of mouse accessibility options, refer to the Section 3.9.4, “Keyboard and mouse”.
4.8 Installing and configuring printers #
The dialog lets you connect to any available local or remote CUPS server and configure printers.
To start the Printers module, right-click the desktop and choose . Now choose . For detailed information, refer to https://help.gnome.org/users/gnome-help/stable/printing.html.en.
4.9 Configuring screens #
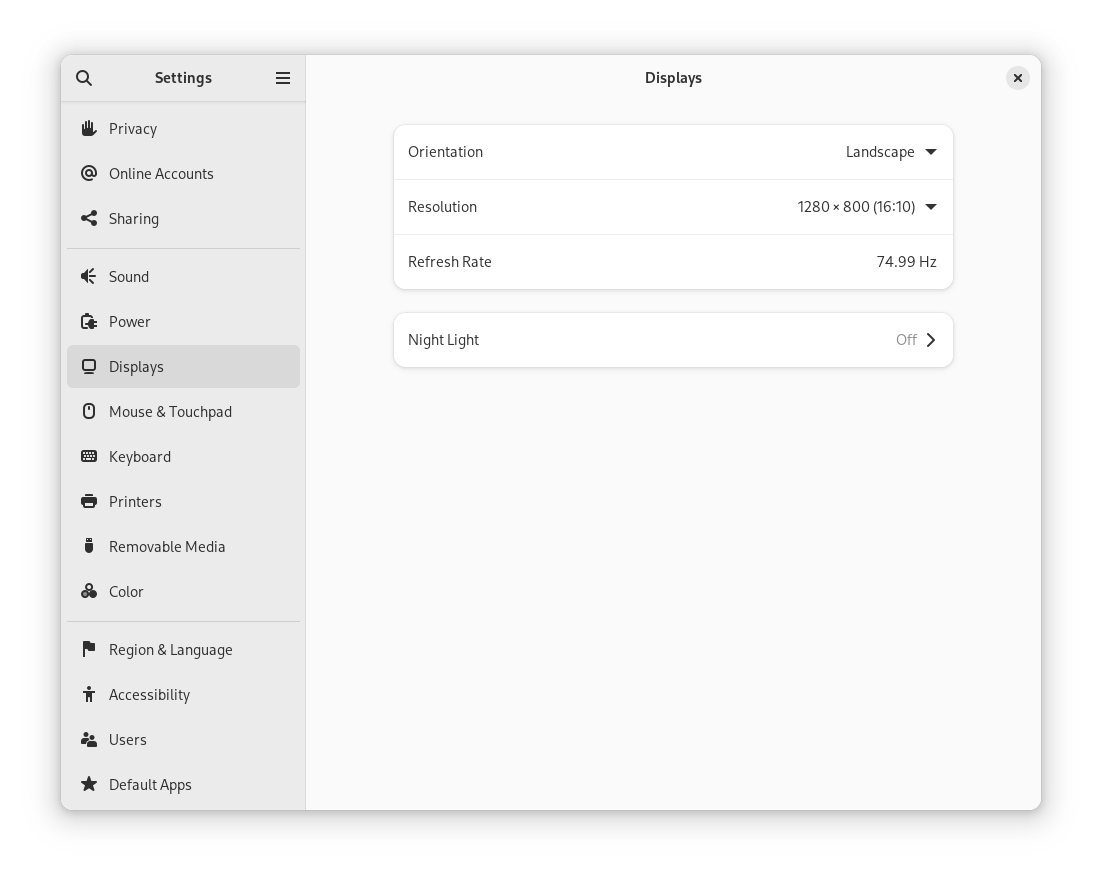
To specify resolution and orientation for your screen or to configure multiple screens, right-click the desktop and choose . The configuration options available in this dialog depend on whether you have a single or a multiple monitor setup.
4.9.1 Configuring single monitor setup #
If you use a monitor which can change its orientation, you need to adjust the display before turning the monitor. Use to do this. Choose the orientation your monitor supports, close the selection box and click .
To change the screen resolution, click . Choose a new value and click .
If you are working in a dark environment, your eyes can easily be strained by the monitor. To prevent this, change the screen's color palette to a warmer tone by turning on . Under , you can automate this setting by specifying at which time should be turned on and off.
4.9.2 Configuring multiple monitor setup #
To set up an additional monitor, connect the monitor to your computer. If your system does not recognize it immediately, or you want to adjust the settings, do the following:
Open the overview and start typing
Displays.Click to open the panel.
In the display arrangement diagram, drag your displays to the relative positions you want.
Click to choose your primary display.
The primary display is the one with the , and where the overview is shown.
Select the orientation, resolution or scale, and refresh rate.
Click . The new settings are applied for 20 seconds before reverting. If you are happy with the settings, click .
With two or more screens, these display modes are available:
- Join Display
The screen edges are joined so windows and dialogs can pass from one display to another.
- Mirror
The same content is shown on all displays, with the same resolution and orientation for all.
- Single display
Only one display is configured, effectively turning off the other displays. For example, an external monitor connected to a docked laptop with the lid closed.
4.10 Configuring sound settings #
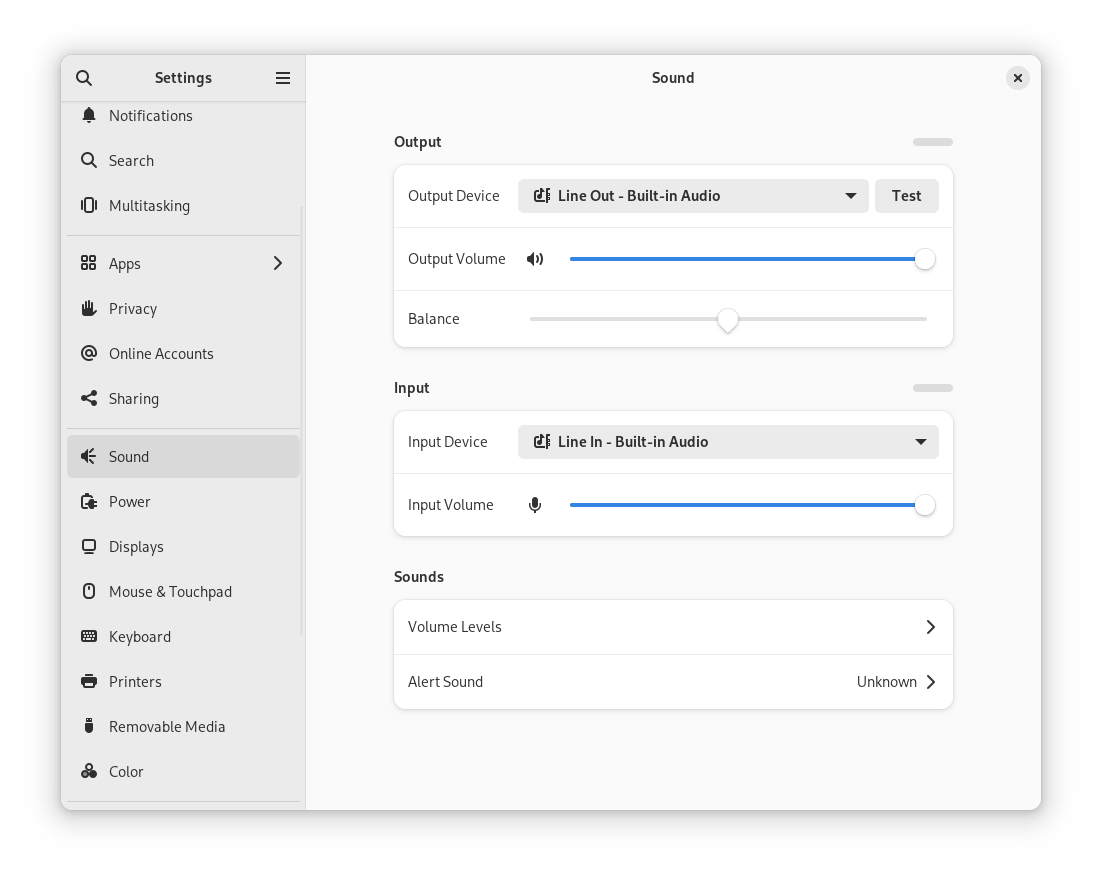
The tool lets you manage sound devices. Here you can select the general output volume or turn the sound off.
To open the sound settings, right-click the desktop and choose . Now choose .
Use the category to select the device for sound output. Choose the setting you prefer.
Use the category to set the input device volume or to mute the input temporarily. If you have more than one sound device, you can also select a default device for audio input in the list.
You can also choose an .
4.11 Configuring default applications #
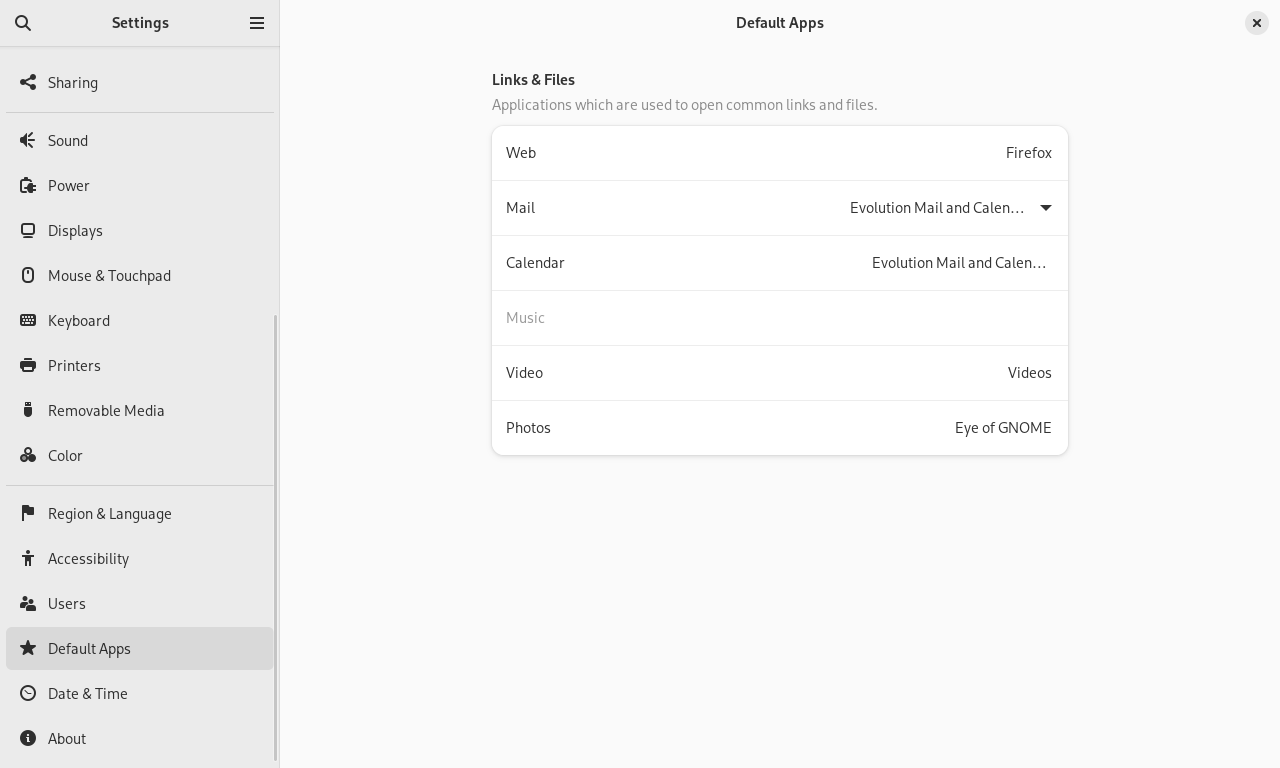
To change the default application for common tasks such as browsing the Internet, sending e-mails or playing multimedia files, right-click the desktop and select . Now choose .
Figure 10: Default applications #You can choose an application to handle Web, mail, calendar, music, videos or photographs. Select one of the available applications from the drop-down boxes for the task of your choice.
5 For more information #
SUSE Linux Enterprise Server comes with several sources of information and documentation, many of which are already integrated into your installed system.
To enter the Help of GNOME or LibreOffice directly from an application, click the button or press F1 key. Both options take you directly to the application's documentation in the help center.
You can also start the Help of GNOME by opening a terminal end entering
yelp or from the main menu by clicking › › .
For more information on how to work with GNOME Desktop, see https://help.gnome.org.
For more information on how to work with LibreOffice, see https://help.libreoffice.org.
6 Legal Notice #
Copyright© 2006–2026 SUSE LLC and contributors. All rights reserved.
Permission is granted to copy, distribute and/or modify this document under the terms of the GNU Free Documentation License, Version 1.2 or (at your option) version 1.3; with the Invariant Section being this copyright notice and license. A copy of the license version 1.2 is included in the section entitled “GNU Free Documentation License”.
For SUSE trademarks, see https://www.suse.com/company/legal/. All other third-party trademarks are the property of their respective owners. Trademark symbols (®, ™ etc.) denote trademarks of SUSE and its affiliates. Asterisks (*) denote third-party trademarks.
All information found in this book has been compiled with utmost attention to detail. However, this does not guarantee complete accuracy. Neither SUSE LLC, its affiliates, the authors, nor the translators shall be held liable for possible errors or the consequences thereof.
