MinIO Object Storage for SUSE Rancher #
Getting Started
This document provides a brief introduction to deploying MinIO object storage into a SUSE Rancher Kubernetes environment.
SUSE One Partner Solution Stack
SUSE One Partner Solution Stacks are featured, SUSE-confirmed solutions, collaboratively developed with SUSE and partner components and designed to empower users to address their needs.
Disclaimer: Documents published as part of the series SUSE Technical Reference Documentation have been contributed voluntarily by SUSE employees and third parties. They are meant to serve as examples of how particular actions can be performed. They have been compiled with utmost attention to detail. However, this does not guarantee complete accuracy. SUSE cannot verify that actions described in these documents do what is claimed or whether actions described have unintended consequences. SUSE LLC, its affiliates, the authors, and the translators may not be held liable for possible errors or the consequences thereof.
1 Introduction #
1.1 Motivation #
Kubernetes and object storage have fundamentally changed the modern application landscape, promising advantages of scale, agility, and efficiency that were impossible with monolithic application models and legacy architectures. Modern applications are cloud native. They are containerized, data-rich, and designed to run everywhere at hyperscale. But to achieve cloud native goals, you need the right tools.
SUSE Rancher is the enterprise Kubernetes and container management platform that simplifies and unifies multi-cluster management, enabling consistent operations, workload management, and enterprise-grade security across your entire Kubernetes landscape - on-premises, in the cloud, and at the edge.
MinIO provides Kubernetes-native, consistent, performant, and scalable object storage. MinIO is S3-compatible, ensuring a familiar API workspace for an entire ecosystem of developers and software platforms. MinIO natively integrates with SUSE Rancher and the Rancher toolchain, such as the kubectl CLI and the Istio service mesh, enabling infrastructure and DevOps teams with streamlined storage operations across multiple clouds and at the edge.
The combination of MinIO with SUSE Rancher empowers enterprises with a powerful, easy-to-use solution to scale and consistently manage applications across any multi-cloud and hybrid-cloud infrastructure.
1.2 Scope #
This guide introduces the basic concepts and steps to install, configure, and use MinIO object storage in a SUSE Rancher Kubernetes environment to support a variety of application workloads, such as Spark, Presto, and other AI/ML platforms.
1.3 Audience #
This document is intended for developers, DevOps and IT professionals, and application administrators who are responsible for building, managing, and using cloud native object storage resources.
2 Technical overview #
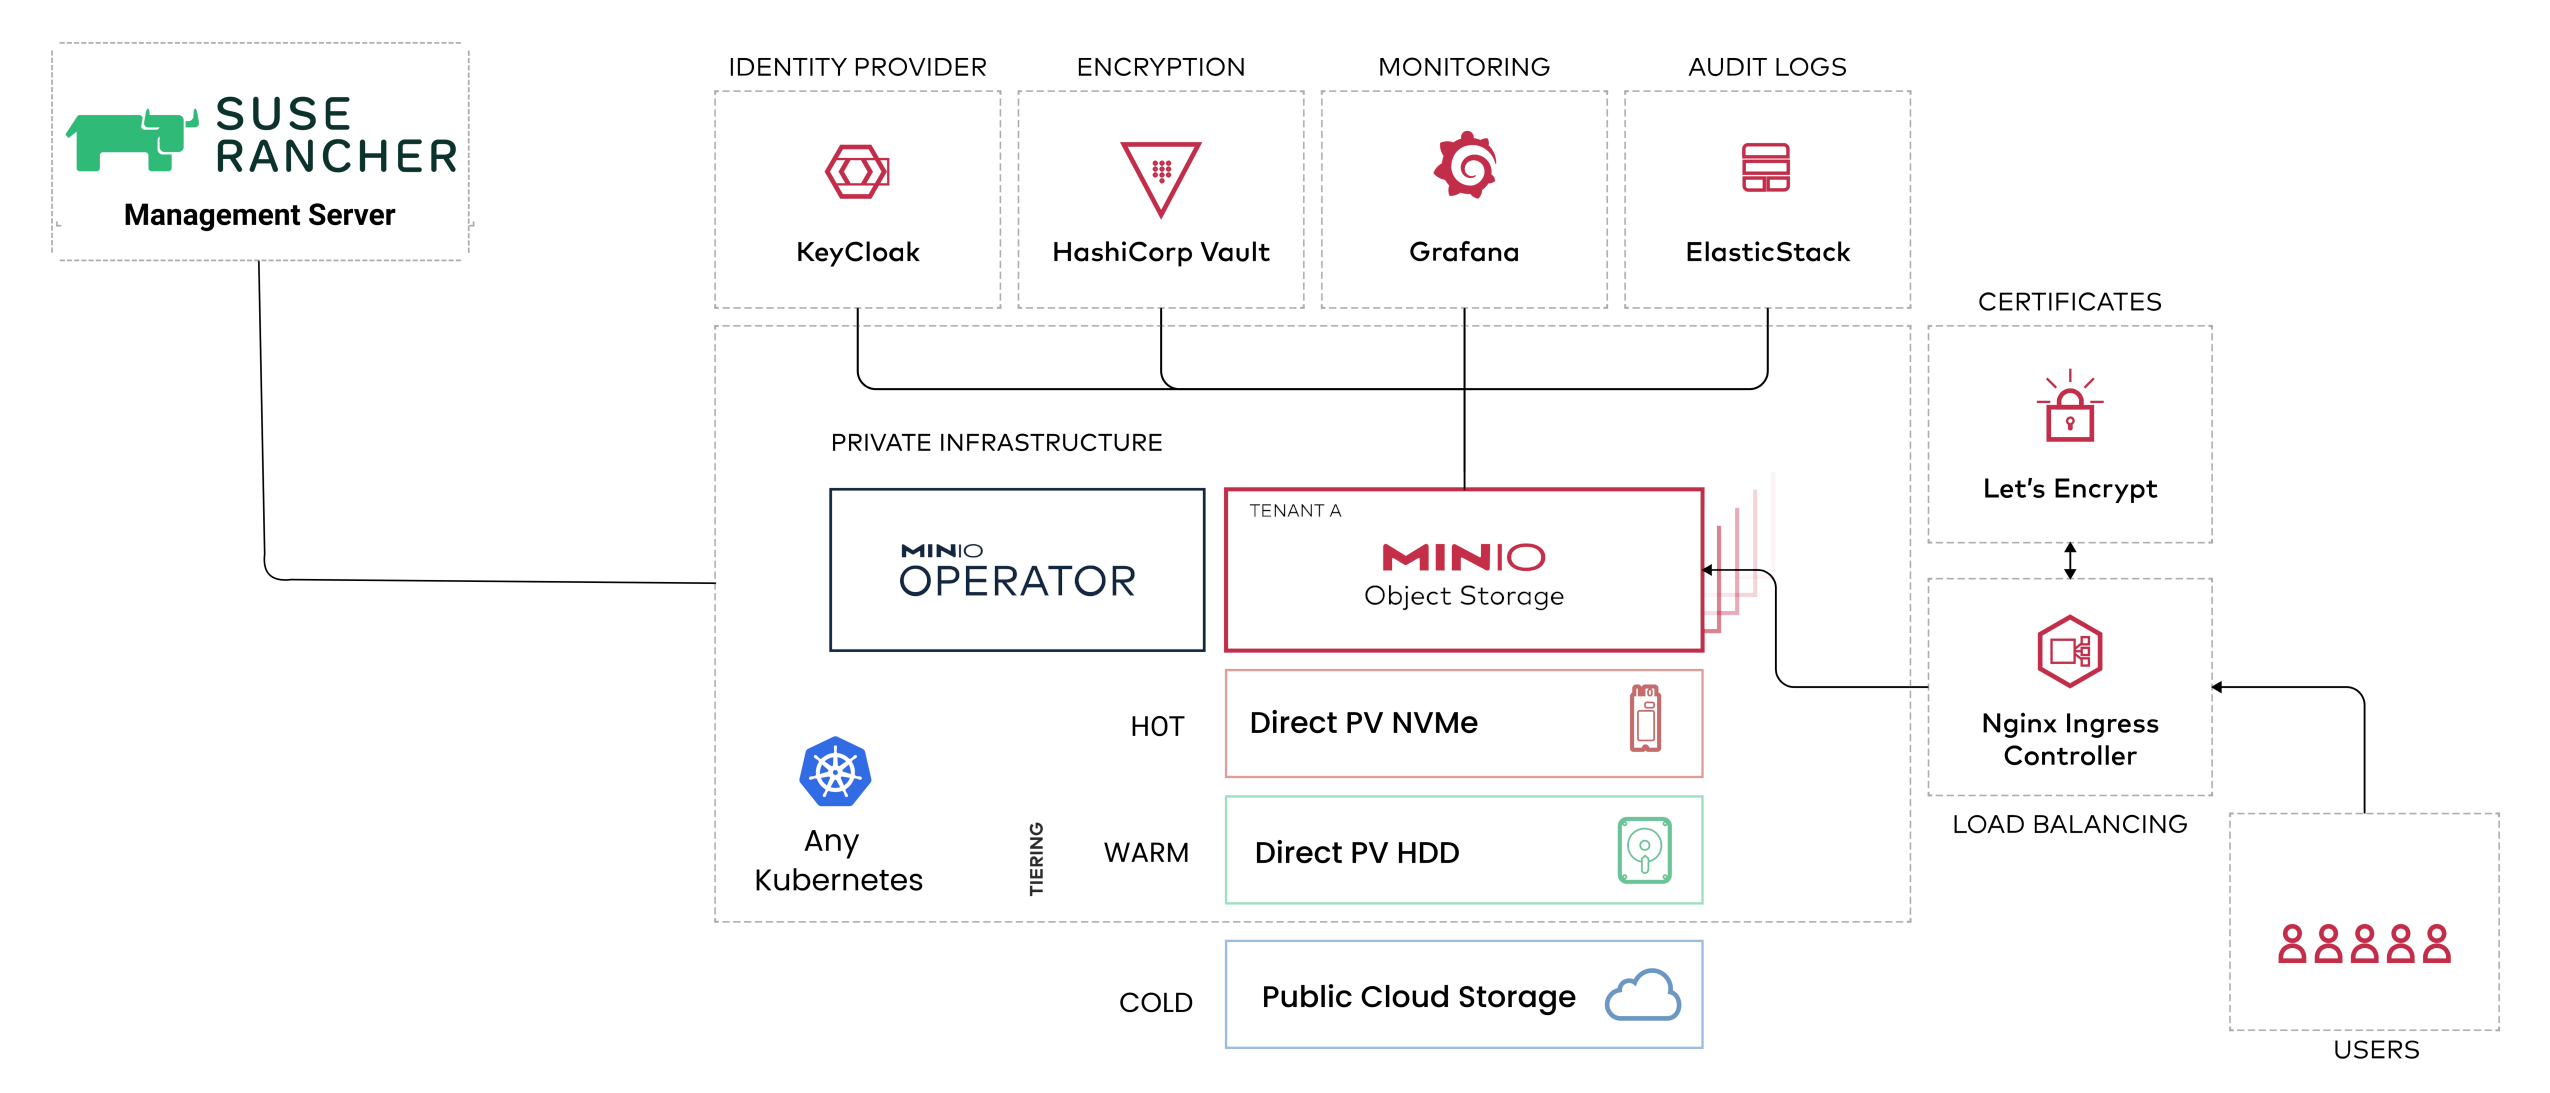
MinIO makes it easy to deliver robust object storage for Kubernetes-native applications running in your SUSE Rancher environment.
2.1 Components and tools #
Key MinIO components discussed in this guide are:
- MinIO Operator
This Kubernetes operator is deployed into your cluster and handles deployment and management of MinIO tenants.
- MinIO Tenant
Tenants represent the object stores to which your applications connect. MinIO tenants leverage storage locally attached to worker nodes, such as public cloud storage, spinning hard disks, and fast solid-state storage. Tenants can be configured to enable data tiering to satisfy workload and business use cases.
- MinIO Operator Console
This service provides a rich user interface to simplify management of MinIO object storage. The MinIO Operator Console is installed and configured automatically with the MinIO Operator.
- MinIO DirectPV
This CSI driver manages locally attached storage and automatically provisions persistent volumes to match incoming persistent volume claims.
- MinIO Kubernetes Plugin
This plugin for the
kubectlcommand line tool enables deployment of the MinIO Operator and creation of MinIO tenants.
Some additional components and tools discussed in this guide include:
2.2 Process overview #
Getting started with MinIO for SUSE Rancher is fairly easy. In general, the process is as follows:
Log in to your SUSE Rancher environment and select a managed cluster.
Create persistent volumes.
Install MinIO Operator.
Deploy a MinIO tenant.
Connect to the MinIO tenant.
3 Prerequisites #
This guide assumes that you have access to an existing Kubernetes cluster managed by SUSE Rancher Prime. A good place to start getting more details is the Rancher documentation.
The cluster should have at least four worker nodes for scheduling MinIO pods and services.
While MinIO is hardware agnostic and can function on consumer-grade hardware, the following recommendations for each worker node provide a baseline for high performance object storage:
8 vCPU cores: CPU availability primarily affects performance related to hashing and encryption operations, including TLS connections.
128 GiB of available (unused) RAM: Memory primarily affects the number of concurrent network connections per pod.
25 GbE Network Interface Card (NIC): Network is a primary performance factor and is most likely to constrain performance if throughput cannot satisfy the total aggregated storage of the MinIO tenant. For NVMe drives, 100 GbE NICs are recommended.
Locally-attached storage drives: Ensure all drives intended for use by the MinIO tenant are the same type and capacity (e.g., 4 TiB NVMe drives) for consistent performance. MinIO should have exclusive access to these drives for best results.
The MinIO Operator enforces the following requirements for each tenant:
The tenant must consist of at least 4 servers (4 MinIO pods).
The tenant must consist of at least 1 disk per server.
The worker nodes must have at least 2 GiB of RAM available per MinIO pod.
The worker nodes must have sufficient local PVs and capacity to support the number of drives in the deployment plus two additional drives for the LogSearch and Prometheus pods. For example, deploying a tenant with 16 drives requires 18 persistent volumes.
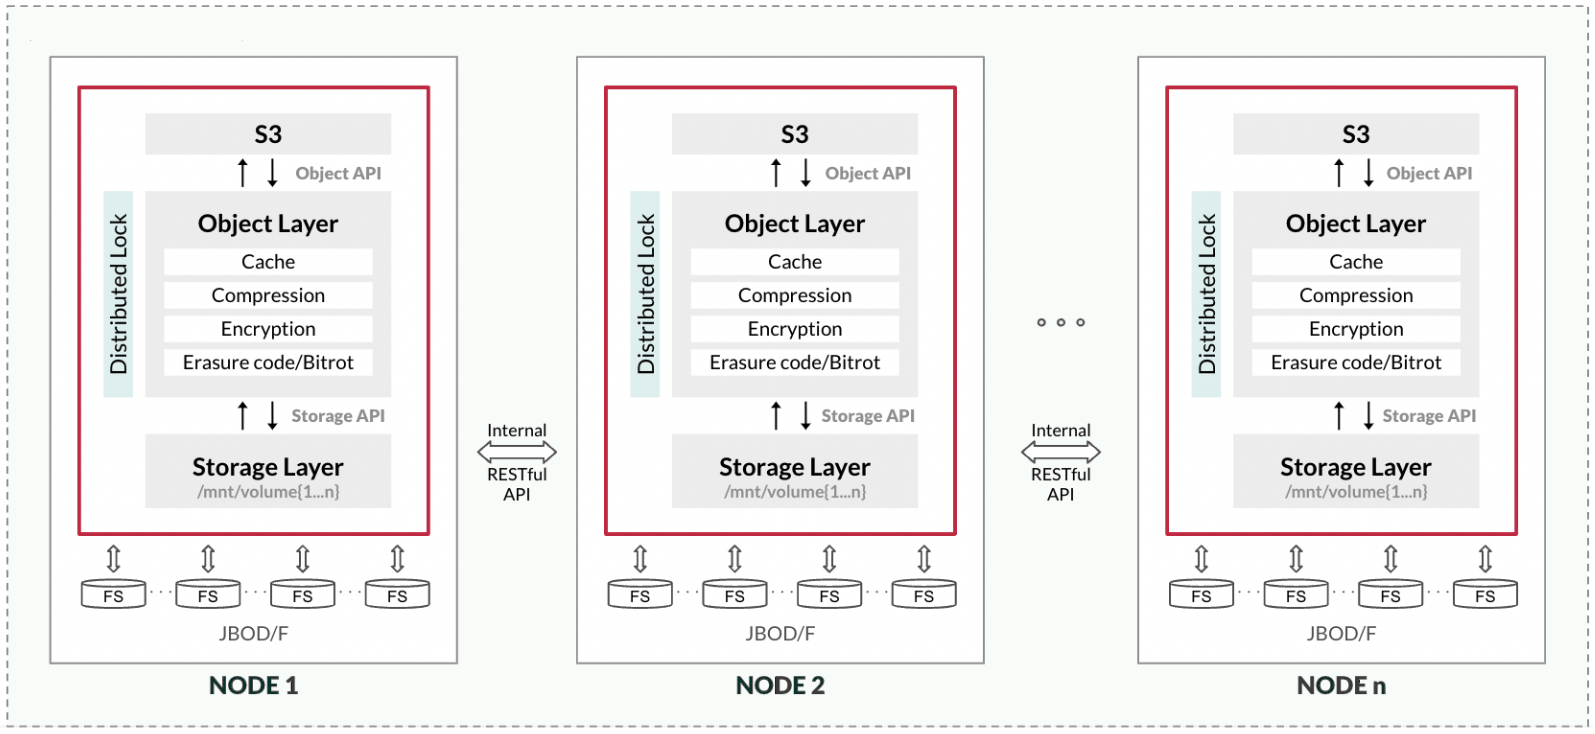
Be sure drives are provisioned in JBOD (Just a Bunch of Disks) mode with no RAID, ZFS pooling, or other redundancy, resiliency, or tooling layers. MinIO implements erasure coding to provide object-level healing and resiliency with less overhead than adjacent technologies, such as RAID or replication.
4 Create persistent volumes #
Before proceeding, review the concepts of persistent volumes (PVs), persistent volume claims (PVCs), and storage classes in the Rancher documentation.
MinIO strongly recommends using direct-attached storage on each worker node.
The MinIO Operator generates PVCs for each storage resource required by the tenant. When creating a MinIO tenant, you specify the storage class to assign to each PVC. Kubernetes must bind each generated PVC to a PV with matching storage class for the tenant to successfully start.
4.1 Install MinIO DirectPV #
MinIO DirectPV is a CSI driver that manages locally attached storage and automatically provisions PVs to match incoming PVCs from stateful applications. It is designed to be lightweight and scalable to tens of thousands of drives. For those clusters where DirectPV cannot be used, local PVs can be manually provisioned.
DirectPV is installed with Krew, the plugin manager for the kubectl command.
If not already installed on your system, install Krew before proceeding.
When you have Krew installed, you can install DirectPV with the following steps:
Install the DirectPV
kubectlplugin.kubectl krew install directpvUse the plugin to install DirectPV into your Kubernetes cluster.
kubectl directpv installVerify that DirectPV has successfully started.
kubectl directpv infoList available drives in your cluster.
kubectl directpv drives lsNoteDirectPV requires unformatted storage volumes and automatically excludes any formatted drives, including those used by an operating system.
4.2 Provision local storage #
At this point, you can use DirectPV to format and manage the drives in your cluster nodes.
Format the drives on your cluster nodes with the
kubectl directpv drives formatcommand.You can format all available drives on nodes kubeworker1, kubeworker2, kubeworker3, and kubeworker4:
kubectl directpv drives format --nodes 'kubeworker{1...4}'Or, you can be more specific about which drives to format:
kubectl directpv drives format --drives '/dev/sd{a...e}' --nodes 'kubeworker{1...4}'
Use the
kubectl directpv drives lscommand to view drive status.kubectl directpv drives ls DRIVE CAPACITY ALLOCATED FILESYSTEM VOLUMES NODE ACCESS-TIER STATUS /dev/sda2 1 TiB - LVM2_member - kubecontroller.local - Available /dev/sda2 1 TiB - LVM2_member - kubeworker1.local - Available /dev/sdb 7.68 TiB - xfs - kubeworker1.local - Ready /dev/sdc 7.68 TiB - xfs - kubeworker1.local - Ready /dev/sdd 7.68 TiB - xfs - kubeworker1.local - Ready /dev/sde 7.68 TiB - xfs - kubeworker1.local - Ready /dev/sda2 1 TiB - LVM2_member - kubeworker2.local - Available /dev/sdb 7.68 TiB - xfs - kubeworker2.local - Ready /dev/sdc 7.68 TiB - xfs - kubeworker2.local - Ready /dev/sdd 7.68 TiB - xfs - kubeworker2.local - Ready /dev/sde 7.68 TiB - xfs - kubeworker2.local - Ready /dev/sda2 1 TiB - LVM2_member - kubeworker3.local - Available /dev/sdb 7.68 TiB - xfs - kubeworker3.local - Ready /dev/sdc 7.68 TiB - xfs - kubeworker3.local - Ready /dev/sdd 7.68 TiB - xfs - kubeworker3.local - Ready /dev/sde 7.68 TiB - xfs - kubeworker3.local - Ready /dev/sda2 1 TiB - LVM2_member - kubeworker4.local - Available /dev/sdb 7.68 TiB - xfs - kubeworker4.local - Ready /dev/sdc 7.68 TiB - xfs - kubeworker4.local - Ready /dev/sdd 7.68 TiB - xfs - kubeworker4.local - Ready /dev/sde 7.68 TiB - xfs - kubeworker4.local - ReadyNoteDrives marked as 'Ready' are managed and DirectPV will respond to any persistent volume claim with a storage class of 'directpv-min-io'.
5 Deploy the MinIO Operator #
MinIO is designed for a streamlined installation process. In a bare metal environment, you can deploy a large distributed MinIO cluster using the MinIO binaries and a handful of environment variables.
In a Kubernetes environment, provisioning large stateful services requires care as the full lifecycle and behavior of pods, networking, and other transient resources come into play.
The MinIO Kubernetes Operator extends the Kubernetes API to support deploying MinIO tenants via the MinIO Operator Console GUI or using the kubectl minio plugin.
The MinIO Operator fully manages all underlying operations associated with deploying and managing Kubernetes resources, allowing DevOps teams to focus on deploying and using their object storage resource.
You can use one of the three methods described below to deploy the MinIO Operator into a Kubernetes cluster managed by SUSE Rancher.
5.1 Install MinIO from SUSE Rancher Apps & Marketplace #
The MinIO Operator can be easily installed through the SUSE Rancher Apps & Marketplace.
Log in to the SUSE Rancher UI and select the cluster where you intend to deploy and use MinIO object storage.
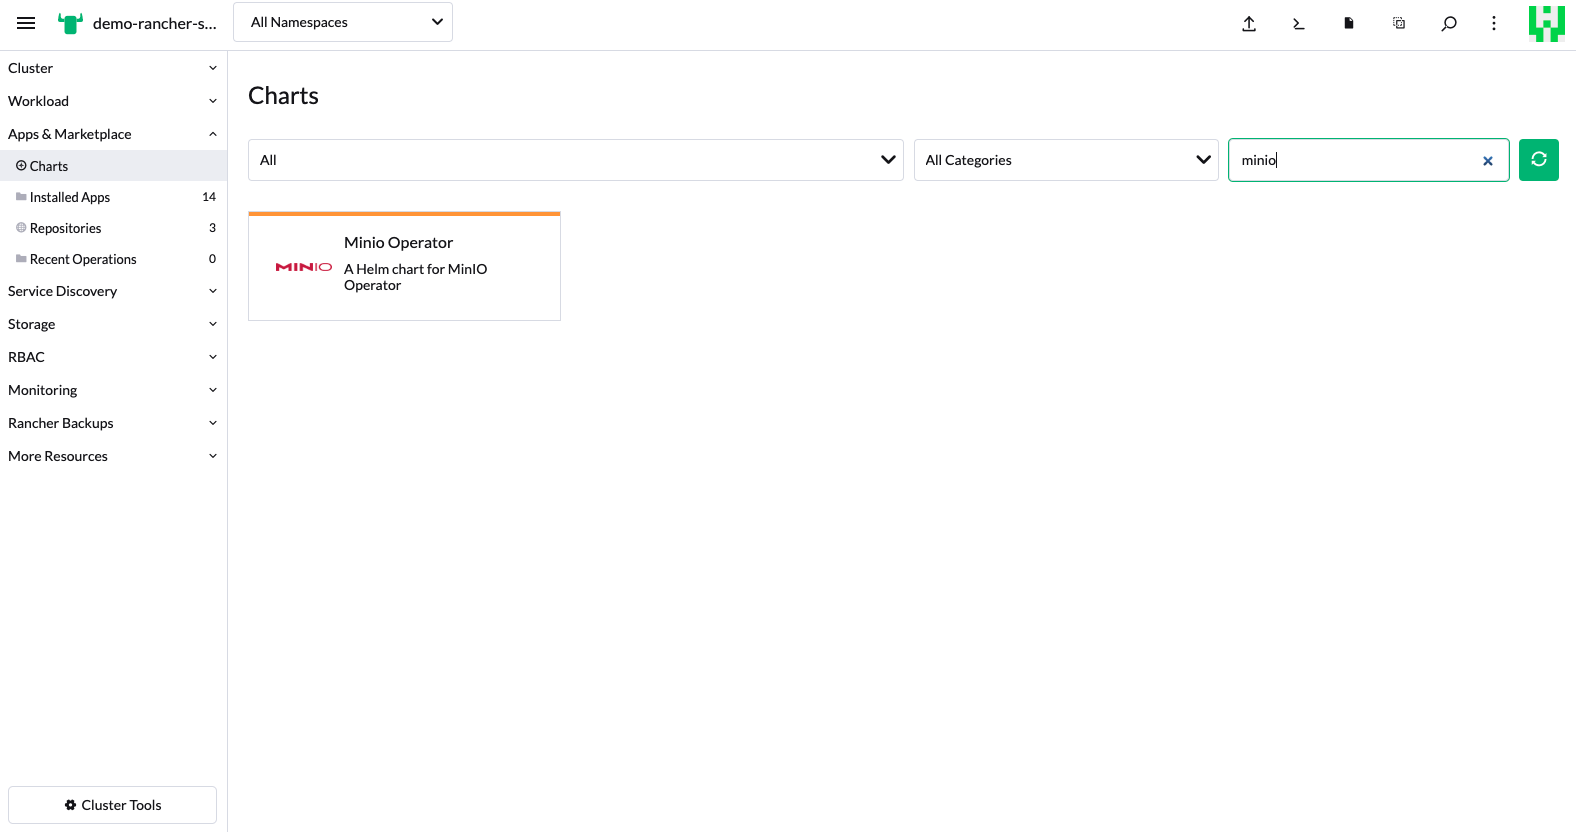
Navigate to Apps & Marketplace > Charts in the Rancher UI and search for 'minio'.
Select the "MinIO Operator" chart to proceed.
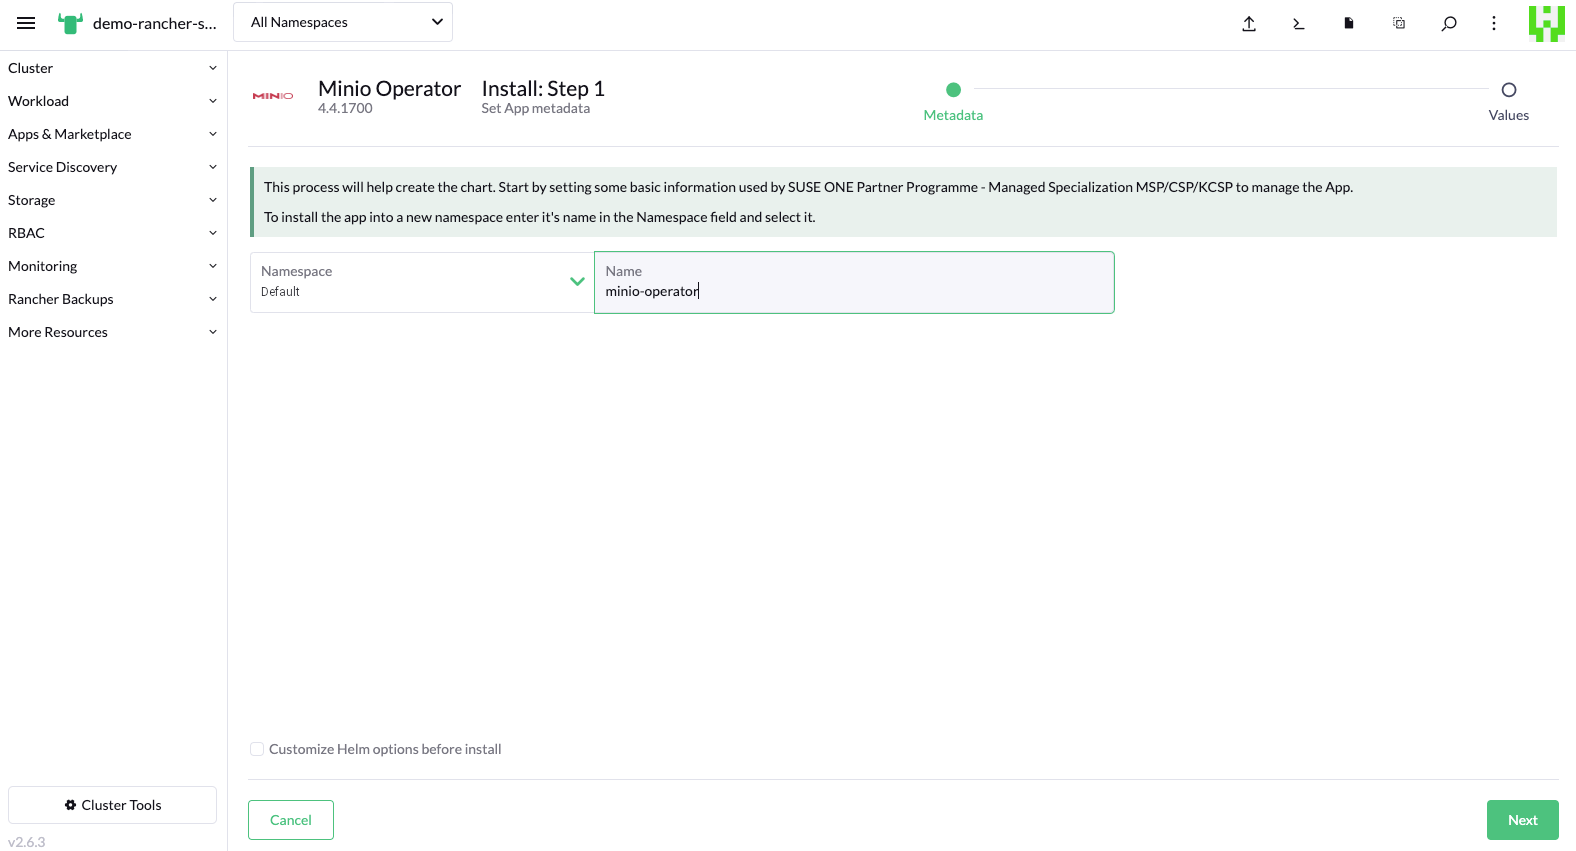
The MinIO Operator deploys to the "minio-operator" namespace by default. You can modify this during "Install: Step 1" or click Next to continue.
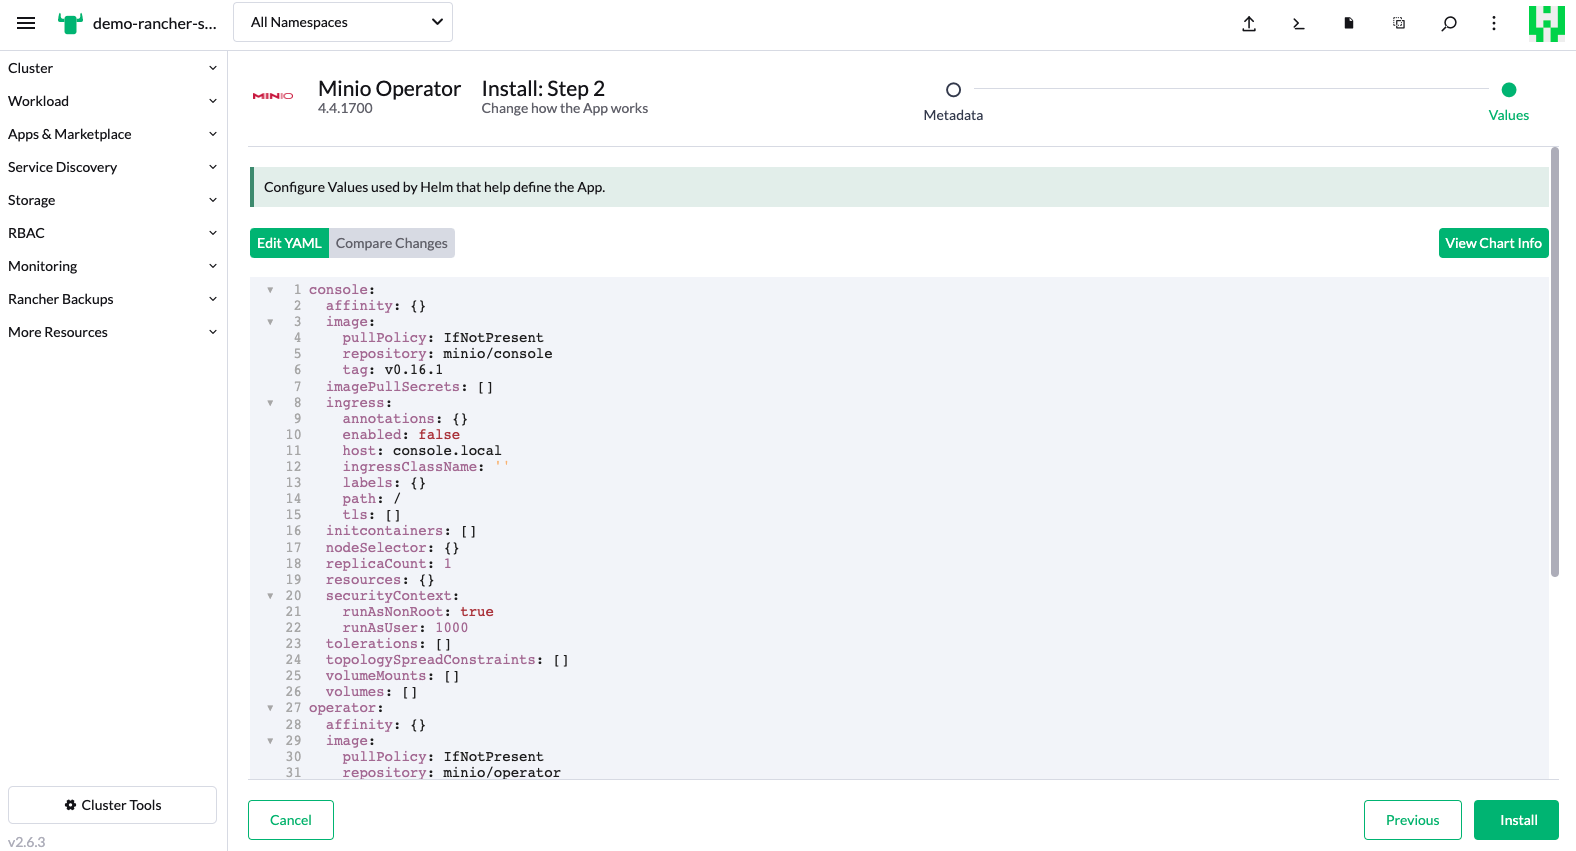
You can configure values used by Helm for installing the MinIO Operator in "Install: Step 2." When ready, click Install.
5.2 Install MinIO with the Helm chart #
MinIO maintains a Helm chart for the MinIO Operator. You can deploy the MinIO Operator into your cluster with the following steps:
Add the MinIO Helm repository.
helm repo add minio https://operator.min.io/Install the MinIO Operator with
helm.helm install \ --namespace minio-operator \ --create-namespace \ minio-operator minio/operator
5.3 Install MinIO with the MinIO Kubernetes Plugin #
The MinIO Kubernetes Plugin can be used to deploy the MinIO Operator, create tenant CRDs, define cluster roles and more.
Follow the steps below to install and use the MinIO Kubernetes Plugin:
Start by installing Krew on your local system. You can use Krew to help you discover kubectl plugins, install them, and keep them up-to-date.
Refresh your local copy of the plugin index.
kubectl krew updateDownload, verify, and install the MinIO Kubernetes Plugin.
kubectl krew install minioInstall the MinIO Operator.
kubectl minio initBy default, this command deploys the latest MinIO Operator into the 'minio-operator' namespace with the cluster domain of 'cluster.local'. Additional options can be passed with this command to customize these and other characteristics of the deployment.
5.4 Verify installation #
After you have performed one of the above installation methods, validate that the MinIO Operator is installed and running.
List the pods running in the 'minio-operator' namespace.
kubectl get all --namespace minio-operatorThis should produce output like the following:
NAME                                 READY   STATUS   RESTARTS    AGE
pod/minio-operator-54896fc474-r7pvw    1/1   Running     0        29s
pod/console-5bb9b6d8d9-gs6fg           1/1   Running     0        23s
pod/minio-operator-54896fc474-qvzbz    1/1   Running     0        29s

NAME              TYPE       CLUSTER-IP    EXTERNAL-IP  PORT(S)            AGE
service/operator  ClusterIP  10.43.156.98  <none>       4222/TCP,4221/TCP  34s
service/console   ClusterIP  10.43.141.45  <none>       9090/TCP,9443/TCP  26s

NAME                           READY    UP-TO-DATE    AVAILABLE    AGE
deployment.apps/minio-operator  2/2          2            2        30s
deployment.apps/console         1/1          1            1        26s

NAME                                      DESIRED   CURRENT   READY   AGE
replicaset.apps/minio-operator-54896fc474    2         2        2     30s
replicaset.apps/console-5bb9b6d8d9           1         1        1     24s
Verify that you see 'minio-operator' and 'console' pods in the 'Running' state and the 'service/operator' and 'service/console' assigned to cluster IP addresses.
Open the MinIO Operator Console.
You can temporarily forward traffic from the MinIO Operator Console service to your local machine by issuing:
kubectl minio proxyThis will produce output like the following:
Starting port forward of the Console UI.

To connect open a browser and go to \http://localhost:9090

Current JWT to login: <TOKEN>
where <TOKEN> is your unique JSON Web Token (JWT) that you must use to log in to the MinIO Operator Console.
With your Web browser, open http://localhost:9090 and log in with your JWT.
6 Deploy a MinIO tenant #
With the MinIO Operator installed, you can now deploy a MinIO tenant to your cluster. Choose one of the three methods detailed next.
6.1 Deploy a tenant with the MinIO Operator Console #
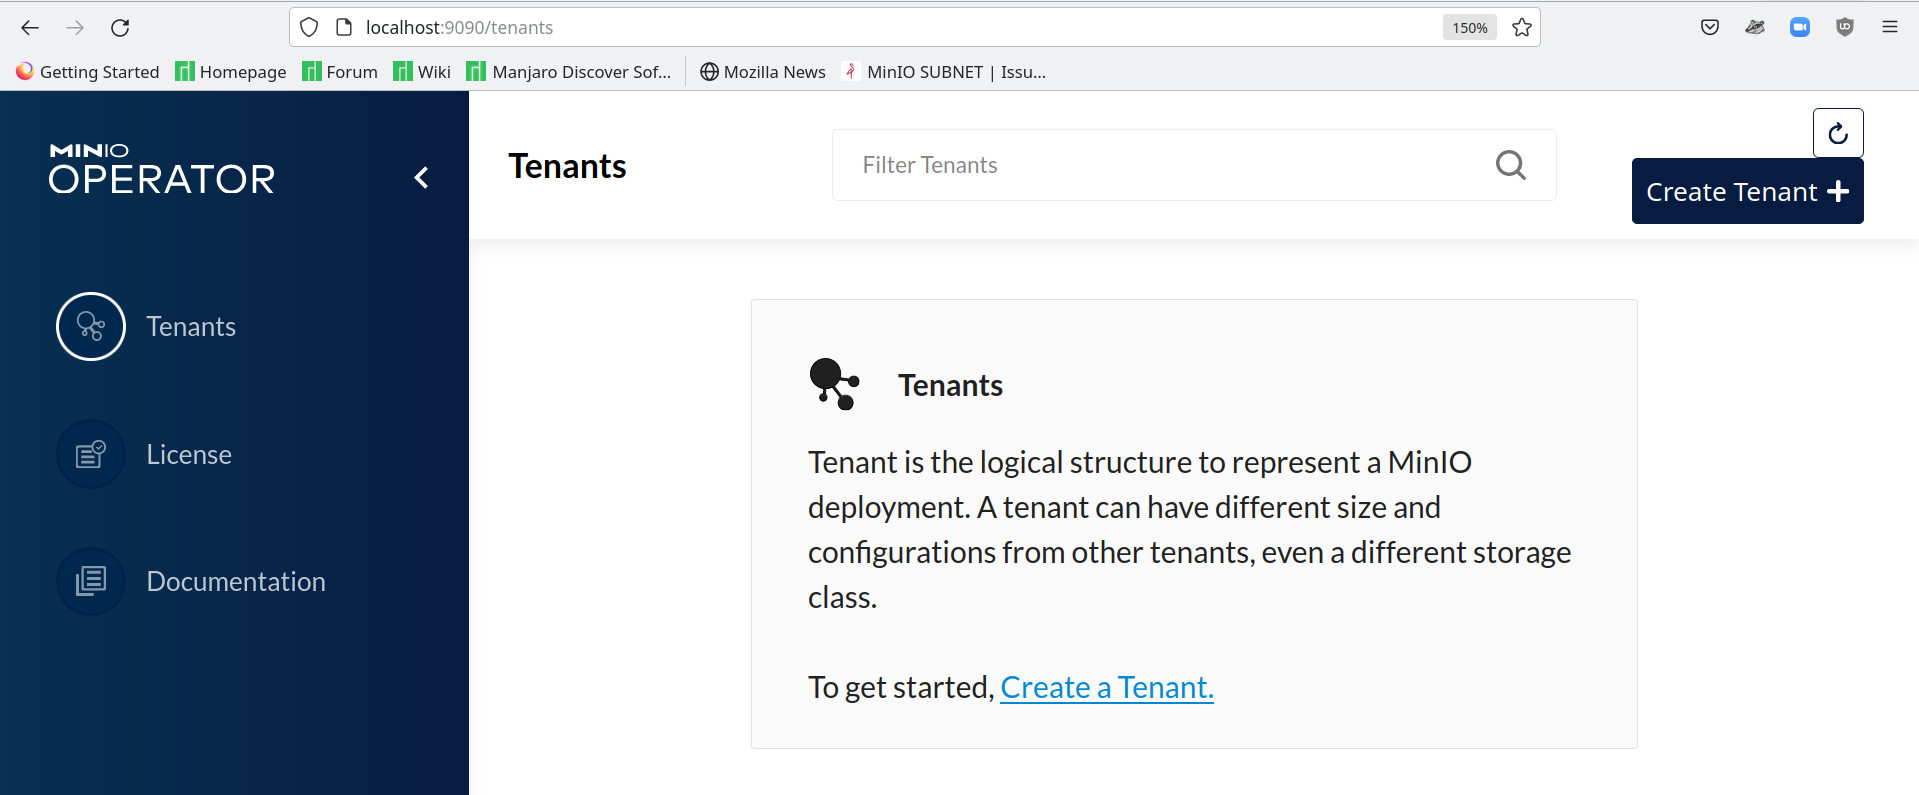
Open the MinIO Operator Console and select Tenants from the navigation pane.
Click the Create Tenant + button.
Follow the prompts to create and customize your tenant. See Deploy a MinIO tenant for additional details.
6.2 Deploy a tenant with the MinIO Kubernetes Plugin #
The MinIO Kubernetes Plugin supports creating tenants directly, or outputting a YAML file for further customization.
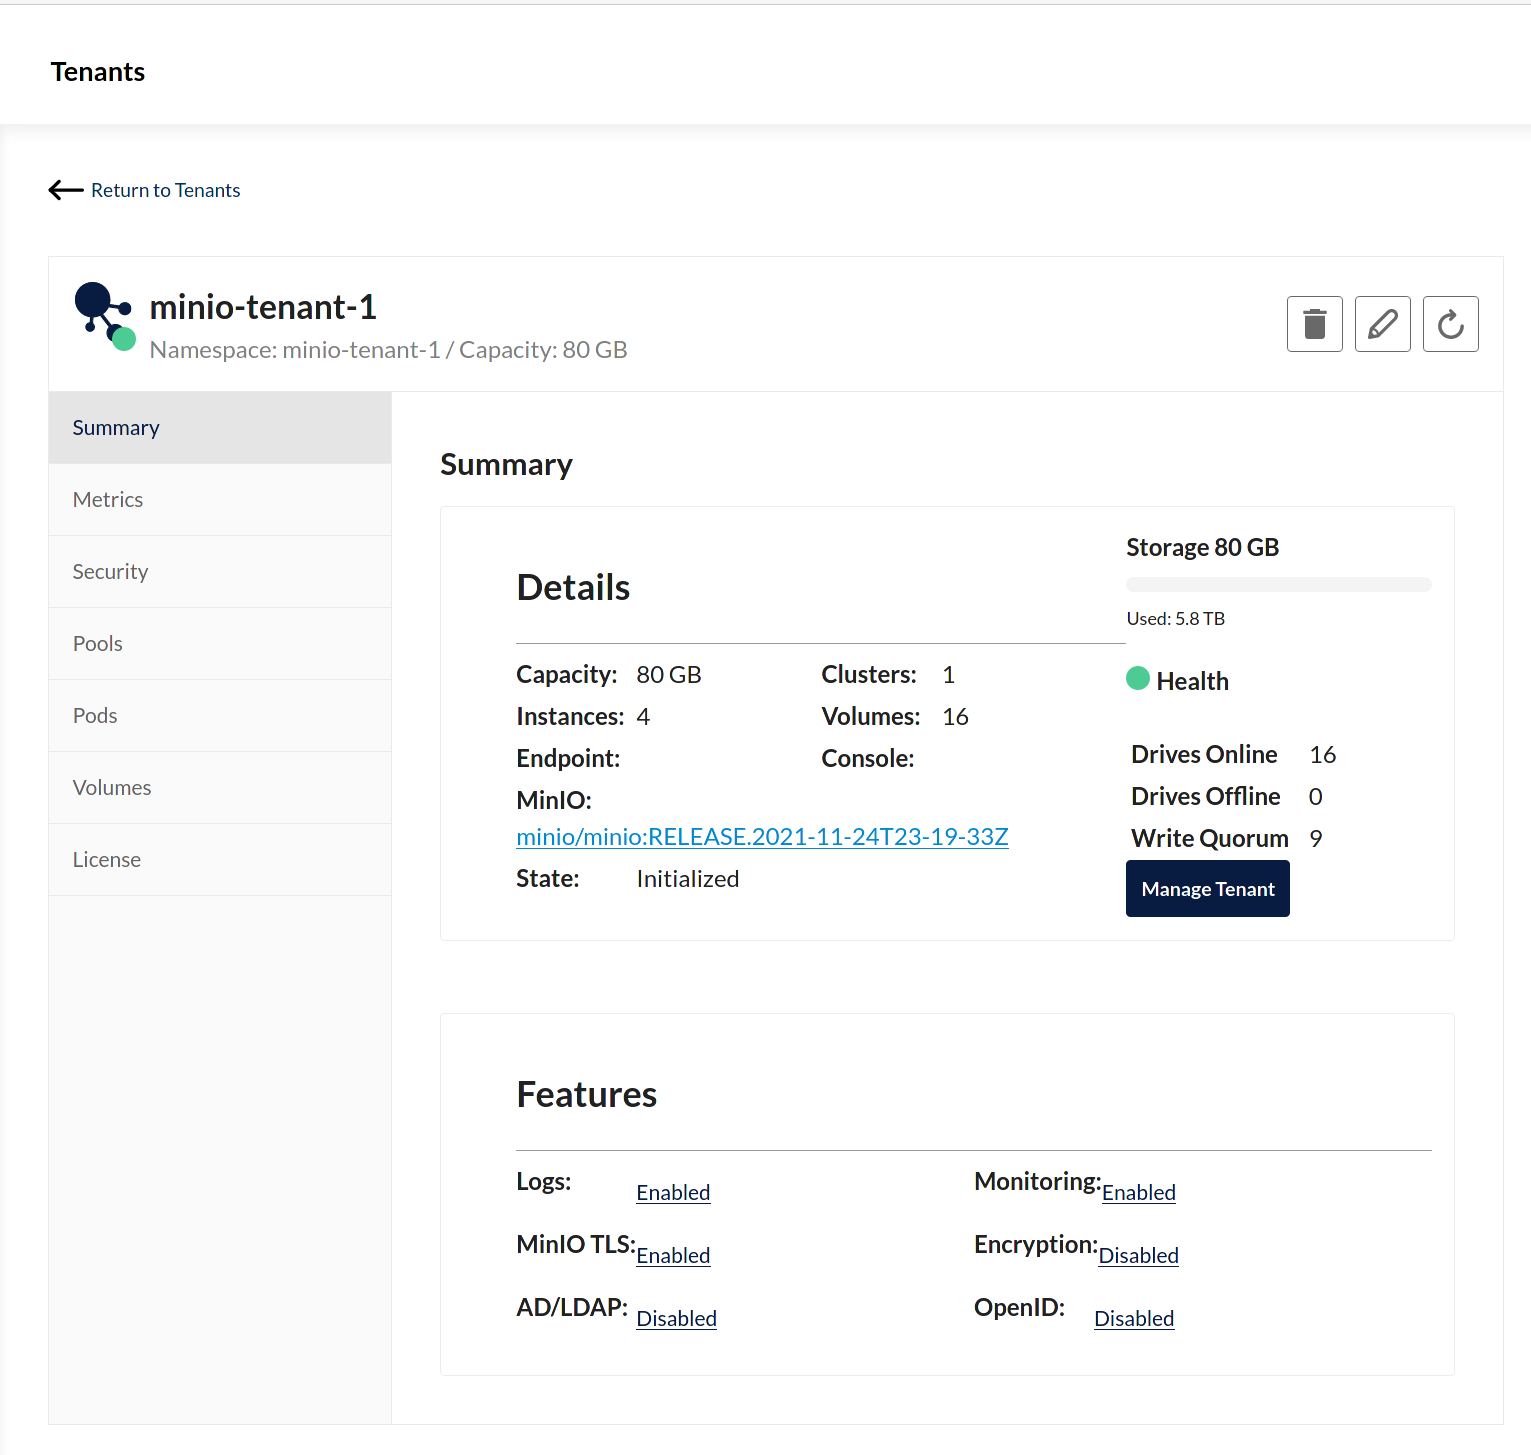
For example, the following command creates a MinIO tenant, named 'minio-tenant-1', with four nodes with four drives each, a capacity of 16 TiB, and using the 'directpv-min-io' storage class:
kubectl minio tenant create minio-tenant-1   	\
  --servers             	4                	\
  --volumes             	16               	\
  --capacity            	16TiB             	\
  --storage-class       	directpv-min-io	\
  --namespace           	minio-tenant-1
See the MinIO documentation for more details.
6.3 Deploy a MinIO tenant with Kustomize #
Kustomize is a stand-alone tool to customize Kubernetes objects programmatically.
Kustomize does this by referencing a kustomization, which can be in the form of a single file ('kustomization.yaml'), a directory containing that file along with others, a TAR archive of the directory, a GIT archive, etc.
MinIO publishes a base kustomization you can use as a template for programmatic deployment of object storage resources. The base kustomization template includes the requisite 'kustomization.yaml', 'tenant.yaml', and other files for customizing the deployment.
MinIO also publishes example kustomizations with more advanced configurations, such as external identity management, encryption, and TLS certificate management using CertManager.
To apply a kustomization, use:
kubectl apply --kustomize <KUSTOMIZATION>where <KUSTOMIZATION> is the path to the directory containing the 'kustomization.yaml' file.
7 Connect to the MinIO tenant #
Each Kubernetes cluster has its own internal network within which pods and services can communicate. Applications deployed within the same cluster can connect to the MinIO tenant over this network. Clients external to the Kubernetes cluster require use of special network components, like ingress controllers and load balancers. Depending on your Kubernetes cluster configuration, MinIO services can automatically request and obtain an external IP address from a cluster load balancer.
7.1 Connect as a Kubernetes pod or service #
MinIO tenants use the Kubernetes networking layer for communication. Each tenant deploys a Kubernetes service, 'service/minio', that acts as a load balancer between MinIO pods.
Verify the deployed MinIO tenant services with the kubectl get svc -n <NAMESPACE> command.
For example, issue this command to list the services for a MinIO tenant, called 'minio-tenant-1':
kubectl get all -n minio-tenant-1 -o wideOutput would look something like:
NAME             TYPE         CLUSTER-IP   EXTERNAL-IP       PORT(S)        AGE
minio            LoadBalancer 10.43.16.164 <pending>         443:31116/TCP  13m
minio-hl         ClusterIP    None         <none>            9000/TCP       13m
minio-console    LoadBalancer 10.43.86.196 192.168.1.198,... 9443:32153/TCP 13m
minio-log-hl-svc ClusterIP    None         <none>            5432/TCP       13m
minio-log-search-api
                 ClusterIP    10.43.33.82  <none>            8080/TCP       13m
minio-prometheus-hl-svc
                 ClusterIP    None         <none>            9090/TCP     9m30s
The 'minio' service provides access to applications, like Spark, for performing operations against the MinIO tenant object store. The service may be accessed on the displayed service port and cluster IP or domain name.
Kubernetes structures service URLs as: <service-name>.<namespace>.svc.<cluster-domain>:<service-port>. Thus, if the cluster domain is 'cluster.local' and the MinIO service is in the 'minio' namespace, the service URL would be: 'minio.minio.svc.cluster.local:443'.
Except for the '*-console' service, all other services support MinIO tenant operations and are not intended for consumption by users or administrators.
7.2 Connect as an external client #
By default, external applications cannot access the MinIO tenant.
With SUSE Rancher, you can set up either load balancers or ingress controllers to redirect service requests. Load balancers can only handle one IP address per service, while ingress works with one or more ingress controllers to dynamically route service requests.
It is recommended that you configure your cluster with an ingress.
Below is a sample ingress resource for MinIO:
apiVersion: networking.k8s.io/v1
kind: Ingress
metadata:
  name: ingress-minio
  namespace: tenant1-ns
  annotations:
    kubernetes.io/ingress.class: "nginx"
    ## Remove if using CA signed certificate
    nginx.ingress.kubernetes.io/proxy-ssl-verify: "off"
    nginx.ingress.kubernetes.io/backend-protocol: "HTTPS"
    nginx.ingress.kubernetes.io/rewrite-target: /
    nginx.ingress.kubernetes.io/proxy-body-size: "0"
    nginx.ingress.kubernetes.io/server-snippet: |
      client_max_body_size 0;
    nginx.ingress.kubernetes.io/configuration-snippet: |
      chunked_transfer_encoding off;
spec:
  tls:
  - hosts:
      - minio.example.com
    secretName: nginx-tls
  rules:
  - host: minio.example.com
    http:
      paths:
      - path: /
        pathType: Prefix
        backend:
          service:
            name: minio
            port:
number: 443S3 signature protocols require preserving HTTP headers. The nginx configuration must keep any HTTP headers as-is to ensure successful connectivity.
8 Enable Spark with MinIO #
Integration into S3 has become a standard feature even for Hadoop-based software like Spark and Presto. The S3A connector allows read/write directly to S3 buckets, and advances in the S3A connector have improved reliability and performance such that MinIO object storage can outperform HDFS on similar workloads. MinIO recommends using at least Spark 3.2.x and later with the corresponding 'hadoop-aws' library to access the most recent improvements to the S3A connector.
MinIO can act as the primary object storage resource for your AI/ML workloads, supporting migration from legacy HDFS onto your Kubernetes deployment. The MinIO Operator ensures a Kubernetes-native experience for deploying and managing MinIO tenants in support of AI/ML, in comparison to HDFS which has no native extensions and requires significant manual work to implement in a Kubernetes context.
To connect Spark to a MinIO tenant, the S3A connector requires the following minimum settings:
# Set these as part of the Spark job configuration:

"spark.hadoop.fs.s3a.access.key" : "MINIO_USER"
"spark.hadoop.fs.s3a.secret.key" : "MINIO_PASSWORD
"spark.hadoop.fs.s3a.path.style.access" : "true"
"spark.hadoop.fs.s3a.endpoint" : "https://minio.example.net:9000"
"spark.hadoop.fs.s3a.ssl.enabled" : "true"
"spark.hadoop.fs.s3a.impl" : "org.apache.hadoop.fs.s3a.S3AFileSystem"
"spark.hadoop.fs.s3a.aws.credentials.provider" : "org.apache.hadoop.fs.s3a.SimpleAWSCredentialsProvider"
The 'spark.hadoop.fs.s3a.endpoint' must correspond to the MinIO tenant 'minio' service. If Spark operates within the Kubernetes cluster, you can specify the Kubernetes host name of the tenant 'service/minio'. If Spark operates external to the Kubernetes cluster, you must specify the ingress-backed URL for the service.
If both the MinIO Tenant and ingress operate without TLS, set 'spark.hadoop.fs.s3a.ssl.enabled' to 'false'.
The 's3a.access.key' and 's3a.secret.key' should correspond to a user on the MinIO tenant.
You can create users as part of deploying the tenant.
Use the MinIO Console to create additional users or connect the MinIO Client (mc) to the tenant to perform IAM operations.
MinIO has published examples of using Spark 3.2.x with PySpark against a MinIO deployment. You can find these and other examples in the MinIO Training Repository to guide your own testing and evaluation of Spark or other applications which implement S3A in connection with MinIO.
9 Summary #
In this guide, you have explored the ease with which MinIO object storage can be deployed into your SUSE Rancher Kubernetes landscape for consumption by your cloud native applications through a consistent API across all infrastructure platforms.
Below are a few resources to help you continue your exploration of SUSE Rancher and MinIO:
10 Legal notice #
Copyright © 2006–2026 SUSE LLC and contributors. All rights reserved.
Permission is granted to copy, distribute and/or modify this document under the terms of the GNU Free Documentation License, Version 1.2 or (at your option) version 1.3; with the Invariant Section being this copyright notice and license. A copy of the license version 1.2 is included in the section entitled "GNU Free Documentation License".
SUSE, the SUSE logo and YaST are registered trademarks of SUSE LLC in the United States and other countries. For SUSE trademarks, see https://www.suse.com/company/legal/.
Linux is a registered trademark of Linus Torvalds. All other names or trademarks mentioned in this document may be trademarks or registered trademarks of their respective owners.
Documents published as part of the series SUSE Technical Reference Documentation have been contributed voluntarily by SUSE employees and third parties. They are meant to serve as examples of how particular actions can be performed. They have been compiled with utmost attention to detail. However, this does not guarantee complete accuracy. SUSE cannot verify that actions described in these documents do what is claimed or whether actions described have unintended consequences. SUSE LLC, its affiliates, the authors, and the translators may not be held liable for possible errors or the consequences thereof.
11 GNU Free Documentation License #
Copyright © 2000, 2001, 2002 Free Software Foundation, Inc. 51 Franklin St, Fifth Floor, Boston, MA 02110-1301 USA. Everyone is permitted to copy and distribute verbatim copies of this license document, but changing it is not allowed.
0. PREAMBLE#
The purpose of this License is to make a manual, textbook, or other functional and useful document "free" in the sense of freedom: to assure everyone the effective freedom to copy and redistribute it, with or without modifying it, either commercially or noncommercially. Secondarily, this License preserves for the author and publisher a way to get credit for their work, while not being considered responsible for modifications made by others.
This License is a kind of "copyleft", which means that derivative works of the document must themselves be free in the same sense. It complements the GNU General Public License, which is a copyleft license designed for free software.
We have designed this License in order to use it for manuals for free software, because free software needs free documentation: a free program should come with manuals providing the same freedoms that the software does. But this License is not limited to software manuals; it can be used for any textual work, regardless of subject matter or whether it is published as a printed book. We recommend this License principally for works whose purpose is instruction or reference.
1. APPLICABILITY AND DEFINITIONS#
This License applies to any manual or other work, in any medium, that contains a notice placed by the copyright holder saying it can be distributed under the terms of this License. Such a notice grants a world-wide, royalty-free license, unlimited in duration, to use that work under the conditions stated herein. The "Document", below, refers to any such manual or work. Any member of the public is a licensee, and is addressed as "you". You accept the license if you copy, modify or distribute the work in a way requiring permission under copyright law.
A "Modified Version" of the Document means any work containing the Document or a portion of it, either copied verbatim, or with modifications and/or translated into another language.
A "Secondary Section" is a named appendix or a front-matter section of the Document that deals exclusively with the relationship of the publishers or authors of the Document to the Document’s overall subject (or to related matters) and contains nothing that could fall directly within that overall subject. (Thus, if the Document is in part a textbook of mathematics, a Secondary Section may not explain any mathematics.) The relationship could be a matter of historical connection with the subject or with related matters, or of legal, commercial, philosophical, ethical or political position regarding them.
The "Invariant Sections" are certain Secondary Sections whose titles are designated, as being those of Invariant Sections, in the notice that says that the Document is released under this License. If a section does not fit the above definition of Secondary then it is not allowed to be designated as Invariant. The Document may contain zero Invariant Sections. If the Document does not identify any Invariant Sections then there are none.
The "Cover Texts" are certain short passages of text that are listed, as Front-Cover Texts or Back-Cover Texts, in the notice that says that the Document is released under this License. A Front-Cover Text may be at most 5 words, and a Back-Cover Text may be at most 25 words.
A "Transparent" copy of the Document means a machine-readable copy, represented in a format whose specification is available to the general public, that is suitable for revising the document straightforwardly with generic text editors or (for images composed of pixels) generic paint programs or (for drawings) some widely available drawing editor, and that is suitable for input to text formatters or for automatic translation to a variety of formats suitable for input to text formatters. A copy made in an otherwise Transparent file format whose markup, or absence of markup, has been arranged to thwart or discourage subsequent modification by readers is not Transparent. An image format is not Transparent if used for any substantial amount of text. A copy that is not "Transparent" is called "Opaque".
Examples of suitable formats for Transparent copies include plain ASCII without markup, Texinfo input format, LaTeX input format, SGML or XML using a publicly available DTD, and standard-conforming simple HTML, PostScript or PDF designed for human modification. Examples of transparent image formats include PNG, XCF and JPG. Opaque formats include proprietary formats that can be read and edited only by proprietary word processors, SGML or XML for which the DTD and/or processing tools are not generally available, and the machine-generated HTML, PostScript or PDF produced by some word processors for output purposes only.
The "Title Page" means, for a printed book, the title page itself, plus such following pages as are needed to hold, legibly, the material this License requires to appear in the title page. For works in formats which do not have any title page as such, "Title Page" means the text near the most prominent appearance of the work’s title, preceding the beginning of the body of the text.
A section "Entitled XYZ" means a named subunit of the Document whose title either is precisely XYZ or contains XYZ in parentheses following text that translates XYZ in another language. (Here XYZ stands for a specific section name mentioned below, such as "Acknowledgements", "Dedications", "Endorsements", or "History".) To "Preserve the Title" of such a section when you modify the Document means that it remains a section "Entitled XYZ" according to this definition.
The Document may include Warranty Disclaimers next to the notice which states that this License applies to the Document. These Warranty Disclaimers are considered to be included by reference in this License, but only as regards disclaiming warranties: any other implication that these Warranty Disclaimers may have is void and has no effect on the meaning of this License.
2. VERBATIM COPYING#
You may copy and distribute the Document in any medium, either commercially or noncommercially, provided that this License, the copyright notices, and the license notice saying this License applies to the Document are reproduced in all copies, and that you add no other conditions whatsoever to those of this License. You may not use technical measures to obstruct or control the reading or further copying of the copies you make or distribute. However, you may accept compensation in exchange for copies. If you distribute a large enough number of copies you must also follow the conditions in section 3.
You may also lend copies, under the same conditions stated above, and you may publicly display copies.
3. COPYING IN QUANTITY#
If you publish printed copies (or copies in media that commonly have printed covers) of the Document, numbering more than 100, and the Document’s license notice requires Cover Texts, you must enclose the copies in covers that carry, clearly and legibly, all these Cover Texts: Front-Cover Texts on the front cover, and Back-Cover Texts on the back cover. Both covers must also clearly and legibly identify you as the publisher of these copies. The front cover must present the full title with all words of the title equally prominent and visible. You may add other material on the covers in addition. Copying with changes limited to the covers, as long as they preserve the title of the Document and satisfy these conditions, can be treated as verbatim copying in other respects.
If the required texts for either cover are too voluminous to fit legibly, you should put the first ones listed (as many as fit reasonably) on the actual cover, and continue the rest onto adjacent pages.
If you publish or distribute Opaque copies of the Document numbering more than 100, you must either include a machine-readable Transparent copy along with each Opaque copy, or state in or with each Opaque copy a computer-network location from which the general network-using public has access to download using public-standard network protocols a complete Transparent copy of the Document, free of added material. If you use the latter option, you must take reasonably prudent steps, when you begin distribution of Opaque copies in quantity, to ensure that this Transparent copy will remain thus accessible at the stated location until at least one year after the last time you distribute an Opaque copy (directly or through your agents or retailers) of that edition to the public.
It is requested, but not required, that you contact the authors of the Document well before redistributing any large number of copies, to give them a chance to provide you with an updated version of the Document.
4. MODIFICATIONS#
You may copy and distribute a Modified Version of the Document under the conditions of sections 2 and 3 above, provided that you release the Modified Version under precisely this License, with the Modified Version filling the role of the Document, thus licensing distribution and modification of the Modified Version to whoever possesses a copy of it. In addition, you must do these things in the Modified Version:
Use in the Title Page (and on the covers, if any) a title distinct from that of the Document, and from those of previous versions (which should, if there were any, be listed in the History section of the Document). You may use the same title as a previous version if the original publisher of that version gives permission.
List on the Title Page, as authors, one or more persons or entities responsible for authorship of the modifications in the Modified Version, together with at least five of the principal authors of the Document (all of its principal authors, if it has fewer than five), unless they release you from this requirement.
State on the Title page the name of the publisher of the Modified Version, as the publisher.
Preserve all the copyright notices of the Document.
Add an appropriate copyright notice for your modifications adjacent to the other copyright notices.
Include, immediately after the copyright notices, a license notice giving the public permission to use the Modified Version under the terms of this License, in the form shown in the Addendum below.
Preserve in that license notice the full lists of Invariant Sections and required Cover Texts given in the Document’s license notice.
Include an unaltered copy of this License.
Preserve the section Entitled "History", Preserve its Title, and add to it an item stating at least the title, year, new authors, and publisher of the Modified Version as given on the Title Page. If there is no section Entitled "History" in the Document, create one stating the title, year, authors, and publisher of the Document as given on its Title Page, then add an item describing the Modified Version as stated in the previous sentence.
Preserve the network location, if any, given in the Document for public access to a Transparent copy of the Document, and likewise the network locations given in the Document for previous versions it was based on. These may be placed in the "History" section. You may omit a network location for a work that was published at least four years before the Document itself, or if the original publisher of the version it refers to gives permission.
For any section Entitled "Acknowledgements" or "Dedications", Preserve the Title of the section, and preserve in the section all the substance and tone of each of the contributor acknowledgements and/or dedications given therein.
Preserve all the Invariant Sections of the Document, unaltered in their text and in their titles. Section numbers or the equivalent are not considered part of the section titles.
Delete any section Entitled "Endorsements". Such a section may not be included in the Modified Version.
Do not retitle any existing section to be Entitled "Endorsements" or to conflict in title with any Invariant Section.
Preserve any Warranty Disclaimers.
If the Modified Version includes new front-matter sections or appendices that qualify as Secondary Sections and contain no material copied from the Document, you may at your option designate some or all of these sections as invariant. To do this, add their titles to the list of Invariant Sections in the Modified Version’s license notice. These titles must be distinct from any other section titles.
You may add a section Entitled "Endorsements", provided it contains nothing but endorsements of your Modified Version by various parties—for example, statements of peer review or that the text has been approved by an organization as the authoritative definition of a standard.
You may add a passage of up to five words as a Front-Cover Text, and a passage of up to 25 words as a Back-Cover Text, to the end of the list of Cover Texts in the Modified Version. Only one passage of Front-Cover Text and one of Back-Cover Text may be added by (or through arrangements made by) any one entity. If the Document already includes a cover text for the same cover, previously added by you or by arrangement made by the same entity you are acting on behalf of, you may not add another; but you may replace the old one, on explicit permission from the previous publisher that added the old one.
The author(s) and publisher(s) of the Document do not by this License give permission to use their names for publicity for or to assert or imply endorsement of any Modified Version.
5. COMBINING DOCUMENTS#
You may combine the Document with other documents released under this License, under the terms defined in section 4 above for modified versions, provided that you include in the combination all of the Invariant Sections of all of the original documents, unmodified, and list them all as Invariant Sections of your combined work in its license notice, and that you preserve all their Warranty Disclaimers.
The combined work need only contain one copy of this License, and multiple identical Invariant Sections may be replaced with a single copy. If there are multiple Invariant Sections with the same name but different contents, make the title of each such section unique by adding at the end of it, in parentheses, the name of the original author or publisher of that section if known, or else a unique number. Make the same adjustment to the section titles in the list of Invariant Sections in the license notice of the combined work.
In the combination, you must combine any sections Entitled "History" in the various original documents, forming one section Entitled "History"; likewise combine any sections Entitled "Acknowledgements", and any sections Entitled "Dedications". You must delete all sections Entitled "Endorsements".
6. COLLECTIONS OF DOCUMENTS#
You may make a collection consisting of the Document and other documents released under this License, and replace the individual copies of this License in the various documents with a single copy that is included in the collection, provided that you follow the rules of this License for verbatim copying of each of the documents in all other respects.
You may extract a single document from such a collection, and distribute it individually under this License, provided you insert a copy of this License into the extracted document, and follow this License in all other respects regarding verbatim copying of that document.
7. AGGREGATION WITH INDEPENDENT WORKS#
A compilation of the Document or its derivatives with other separate and independent documents or works, in or on a volume of a storage or distribution medium, is called an "aggregate" if the copyright resulting from the compilation is not used to limit the legal rights of the compilation’s users beyond what the individual works permit. When the Document is included in an aggregate, this License does not apply to the other works in the aggregate which are not themselves derivative works of the Document.
If the Cover Text requirement of section 3 is applicable to these copies of the Document, then if the Document is less than one half of the entire aggregate, the Document’s Cover Texts may be placed on covers that bracket the Document within the aggregate, or the electronic equivalent of covers if the Document is in electronic form. Otherwise they must appear on printed covers that bracket the whole aggregate.
8. TRANSLATION#
Translation is considered a kind of modification, so you may distribute translations of the Document under the terms of section 4. Replacing Invariant Sections with translations requires special permission from their copyright holders, but you may include translations of some or all Invariant Sections in addition to the original versions of these Invariant Sections. You may include a translation of this License, and all the license notices in the Document, and any Warranty Disclaimers, provided that you also include the original English version of this License and the original versions of those notices and disclaimers. In case of a disagreement between the translation and the original version of this License or a notice or disclaimer, the original version will prevail.
If a section in the Document is Entitled "Acknowledgements", "Dedications", or "History", the requirement (section 4) to Preserve its Title (section 1) will typically require changing the actual title.
9. TERMINATION#
You may not copy, modify, sublicense, or distribute the Document except as expressly provided for under this License. Any other attempt to copy, modify, sublicense or distribute the Document is void, and will automatically terminate your rights under this License. However, parties who have received copies, or rights, from you under this License will not have their licenses terminated so long as such parties remain in full compliance.
10. FUTURE REVISIONS OF THIS LICENSE#
The Free Software Foundation may publish new, revised versions of the GNU Free Documentation License from time to time. Such new versions will be similar in spirit to the present version, but may differ in detail to address new problems or concerns. See http://www.gnu.org/copyleft/.
Each version of the License is given a distinguishing version number. If the Document specifies that a particular numbered version of this License "or any later version" applies to it, you have the option of following the terms and conditions either of that specified version or of any later version that has been published (not as a draft) by the Free Software Foundation. If the Document does not specify a version number of this License, you may choose any version ever published (not as a draft) by the Free Software Foundation.
ADDENDUM: How to use this License for your documents#
Copyright (c) YEAR YOUR NAME.
   Permission is granted to copy, distribute and/or modify this document
   under the terms of the GNU Free Documentation License, Version 1.2
   or any later version published by the Free Software Foundation;
   with no Invariant Sections, no Front-Cover Texts, and no Back-Cover Texts.
   A copy of the license is included in the section entitled “GNU
   Free Documentation License”.
If you have Invariant Sections, Front-Cover Texts and Back-Cover Texts, replace the “ with…Texts.” line with this:
with the Invariant Sections being LIST THEIR TITLES, with the
   Front-Cover Texts being LIST, and with the Back-Cover Texts being LIST.
If you have Invariant Sections without Cover Texts, or some other combination of the three, merge those two alternatives to suit the situation.
If your document contains nontrivial examples of program code, we recommend releasing these examples in parallel under your choice of free software license, such as the GNU General Public License, to permit their use in free software.
