7 Configuring resource constraints #
Having all the resources configured is only part of the job. Even if the cluster knows all needed resources, it still might not be able to handle them correctly. Resource constraints let you specify which cluster nodes resources can run on, what order resources will load in, and what other resources a specific resource is dependent on.
7.1 Types of constraints #
There are three different kinds of constraints available:
- Resource location
Location constraints define on which nodes a resource may be run, may not be run or is preferred to be run.
- Resource colocation
Colocation constraints tell the cluster which resources may or may not run together on a node.
- Resource order
Order constraints define the sequence of actions.
Do not create colocation constraints for members of a resource group. Create a colocation constraint pointing to the resource group as a whole instead. All other types of constraints are safe to use for members of a resource group.
Do not use any constraints on a resource that has a clone resource or a promotable clone resource applied to it. The constraints must apply to the clone or promotable clone resource, not to the child resource.
7.2 Scores and infinity #
When defining constraints, you also need to deal with scores. Scores of all kinds are integral to how the cluster works. Practically everything from migrating a resource to deciding which resource to stop in a degraded cluster is achieved by manipulating scores in some way. Scores are calculated on a per-resource basis and any node with a negative score for a resource cannot run that resource. After calculating the scores for a resource, the cluster then chooses the node with the highest score.
INFINITY is currently defined as
1,000,000. Additions or subtractions with it stick to
the following three basic rules:
Any value + INFINITY = INFINITY
Any value - INFINITY = -INFINITY
INFINITY - INFINITY = -INFINITY
When defining resource constraints, you specify a score for each constraint. The score indicates the value you are assigning to this resource constraint. Constraints with higher scores are applied before those with lower scores. By creating additional location constraints with different scores for a given resource, you can specify an order for the nodes that a resource will fail over to.
7.3 Resource templates and constraints #
If you have defined a resource template (see Section 6.8, “Creating resource templates”), it can be referenced in the following types of constraints:
order constraints
colocation constraints
rsc_ticket constraints (for Geo clusters)
However, colocation constraints must not contain more than one reference to a template. Resource sets must not contain a reference to a template.
Resource templates referenced in constraints stand for all primitives which are derived from that template. This means, the constraint applies to all primitive resources referencing the resource template. Referencing resource templates in constraints is an alternative to resource sets and can simplify the cluster configuration considerably. For details about resource sets, refer to Section 7.7, “Using resource sets to define constraints”.
7.4 Adding location constraints #
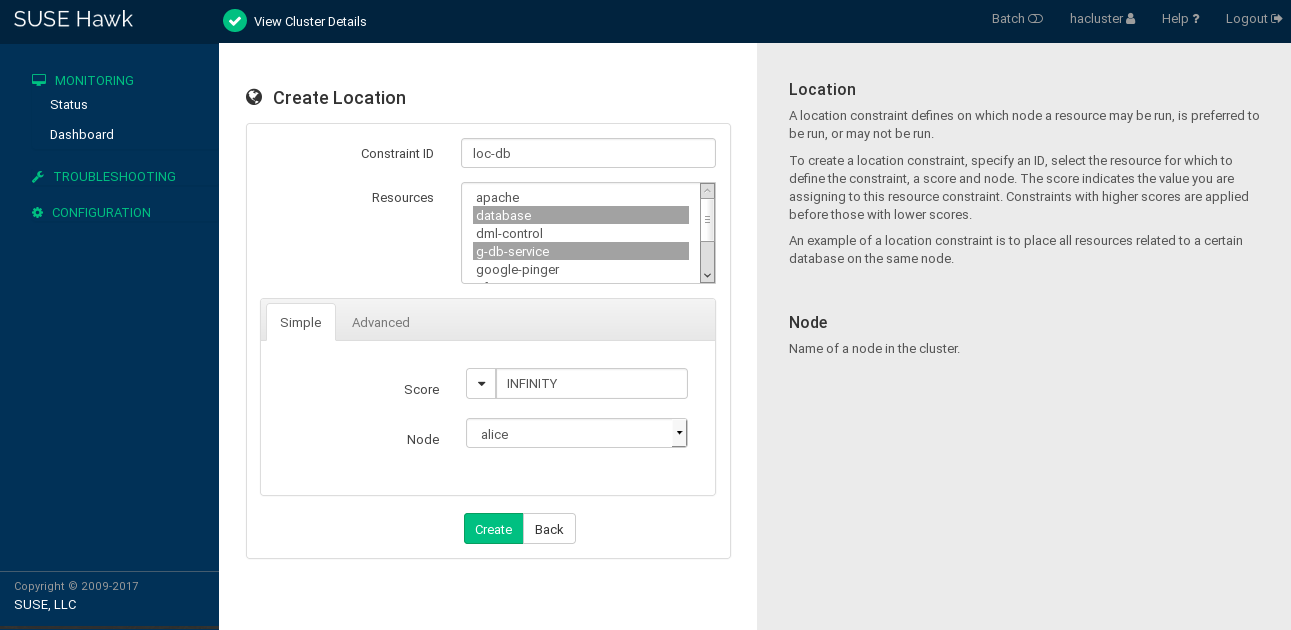
A location constraint determines on which node a resource may be run, is preferably run, or may not be run. An example of a location constraint is to place all resources related to a certain database on the same node. This type of constraint may be added multiple times for each resource. All location constraints are evaluated for a given resource.
You can add location constraints using either Hawk2 or crmsh.
7.4.1 Adding location constraints with Hawk2 #
Log in to Hawk2:
https://HAWKSERVER:7630/
From the left navigation bar, select › › .
Enter a unique .
From the list of select the resource or resources for which to define the constraint.
Enter a . The score indicates the value you are assigning to this resource constraint. Positive values indicate the resource can run on the you specify in the next step. Negative values mean it should not run on that node. Constraints with higher scores are applied before those with lower scores.
Some often-used values can also be set via the drop-down box:
To force the resources to run on the node, click the arrow icon and select
Always. This sets the score toINFINITY.If you never want the resources to run on the node, click the arrow icon and select
Never. This sets the score to-INFINITY, meaning that the resources must not run on the node.To set the score to
0, click the arrow icon and selectAdvisory. This disables the constraint. This is useful when you want to set resource discovery but do not want to constrain the resources.
Select a .
Click to finish the configuration. A message at the top of the screen shows if the action has been successful.
7.4.2 Adding location constraints with crmsh #
The location command defines on which nodes a resource
may be run, may not be run or is preferred to be run.
A simple example that expresses a preference to run the
resource fs1 on the node with the name
alice to 100 would be the
following:
crm(live)configure#location loc-fs1 fs1 100: alice
Another example is a location with ping:
crm(live)configure#primitive ping ping \ params name=ping dampen=5s multiplier=100 host_list="r1 r2" \ op monitor timeout=60s interval=10scrm(live)configure#clone cl-ping ping meta interleave=truecrm(live)configure#location loc-node_pref internal_www \ rule 50: #uname eq alice \ rule ping: defined ping
The parameter host_list is a space-separated list
of hosts to ping and count.
Another use case for location constraints are grouping primitives as a
resource set. This can be useful if several
resources depend on, for example, a ping attribute for network
connectivity. In former times, the -inf/ping rules
needed to be duplicated several times in the configuration, making it
unnecessarily complex.
The following example creates a resource set
loc-alice, referencing the virtual IP addresses
vip1 and vip2:
crm(live)configure#primitive vip1 IPaddr2 params ip=192.168.1.5 op monitor timeout=20s interval=10scrm(live)configure#primitive vip2 IPaddr2 params ip=192.168.1.6 op monitor timeout=20s interval=10scrm(live)configure#location loc-alice { vip1 vip2 } inf: alice
In some cases it is much more efficient and convenient to use resource
patterns for your location command. A resource
pattern is a regular expression between two slashes. For example, the
above virtual IP addresses can be all matched with the following:
crm(live)configure#location loc-alice /vip.*/ inf: alice
7.5 Adding colocation constraints #
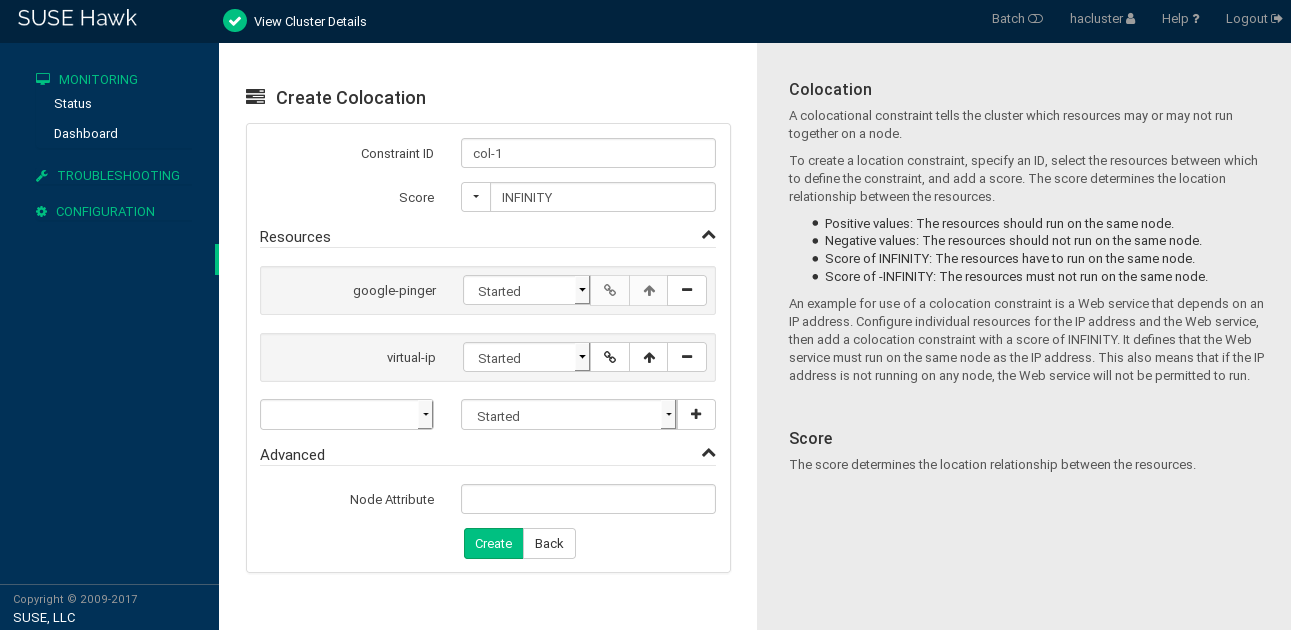
A colocation constraint tells the cluster which resources may or may not run together on a node. As a colocation constraint defines a dependency between resources, you need at least two resources to create a colocation constraint.
You can add colocation constraints using either Hawk2 or crmsh.
7.5.1 Adding colocation constraints with Hawk2 #
Log in to Hawk2:
https://HAWKSERVER:7630/
From the left navigation bar, select › › .
Enter a unique .
Enter a . The score determines the location relationship between the resources. Positive values indicate that the resources should run on the same node. Negative values indicate that the resources should not run on the same node. The score will be combined with other factors to decide where to put the resource.
Some often-used values can also be set via the drop-down box:
To force the resources to run on the same node, click the arrow icon and select
Always. This sets the score toINFINITY.If you never want the resources to run on the same node, click the arrow icon and select
Never. This sets the score to-INFINITY, meaning that the resources must not run on the same node.
To define the resources for the constraint:
From the drop-down box in the category, select a resource (or a template).
The resource is added and a new empty drop-down box appears beneath.
Repeat this step to add more resources.
As the topmost resource depends on the next resource and so on, the cluster will first decide where to put the last resource, then place the depending ones based on that decision. If the constraint cannot be satisfied, the cluster may not allow the dependent resource to run.
To swap the order of resources within the colocation constraint, click the arrow up icon next to a resource to swap it with the entry above.
If needed, specify further parameters for each resource (such as
Started,Stopped,Promote,Demote): Click the empty drop-down box next to the resource and select the desired entry.Click to finish the configuration. A message at the top of the screen shows if the action has been successful.
7.5.2 Adding colocation constraints with crmsh #
The colocation command is used to define what
resources should run on the same or on different hosts.
You can set a score of either +inf or -inf, defining resources that must always or must never run on the same node. You can also use non-infinite scores. In that case the colocation is called advisory and the cluster may decide not to follow them in favor of not stopping other resources if there is a conflict.
For example, to always run the resources resource1
and resource2 on the same host, use the following constraint:
crm(live)configure#colocation coloc-2resource inf: resource1 resource2
For a primary/secondary configuration, it is necessary to know if the current node is a primary in addition to running the resource locally.
7.6 Adding order constraints #
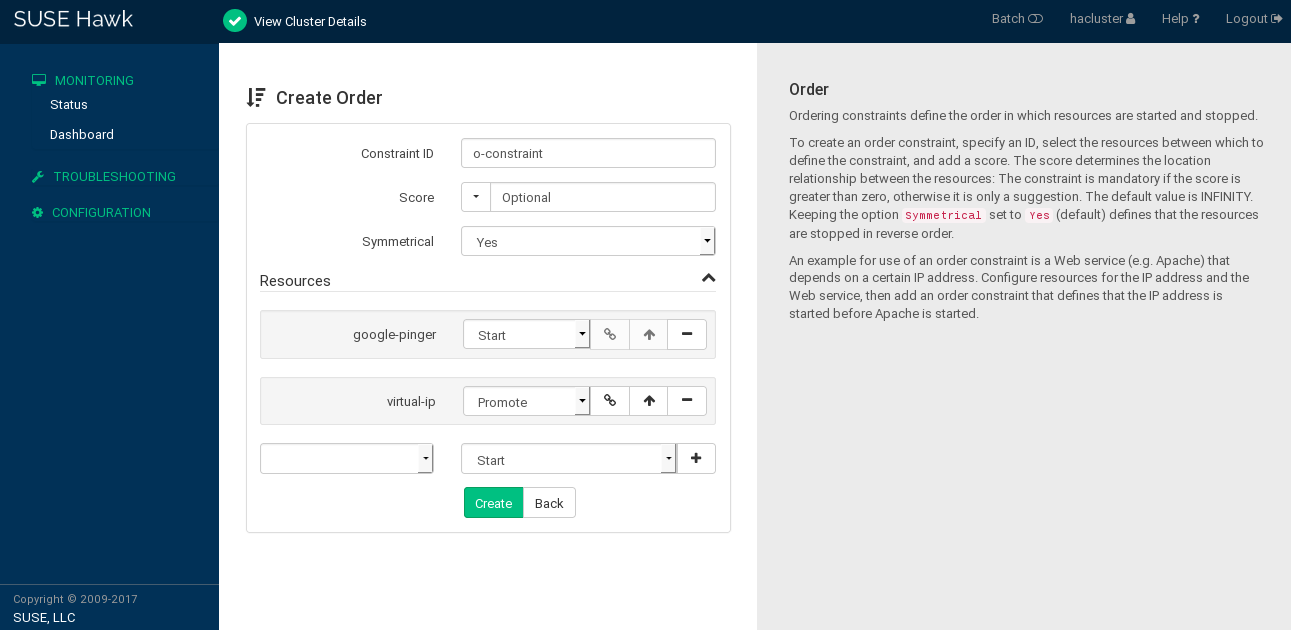
Order constraints can be used to start or stop a service right before or after a different resource meets a special condition, such as being started, stopped, or promoted to primary. For example, you cannot mount a file system before the device is available to a system. As an order constraint defines a dependency between resources, you need at least two resources to create an order constraint.
You can add order constraints using either Hawk2 or crmsh.
7.6.1 Adding order constraints with Hawk2 #
Log in to Hawk2:
https://HAWKSERVER:7630/
From the left navigation bar, select › › .
Enter a unique .
Enter a . If the score is greater than zero, the order constraint is mandatory, otherwise it is optional.
Some often-used values can also be set via the drop-down box:
To make the order constraint mandatory, click the arrow icon and select
Mandatory.To make the order constraint a suggestion only, click the arrow icon and select
Optional.Serialize: To ensure that no two stop/start actions occur concurrently for the resources, click the arrow icon and selectSerialize. This makes sure that one resource must complete starting before the other can be started. A typical use case are resources that put a high load on the host during start-up.
For order constraints, you can usually keep the option enabled. This specifies that resources are stopped in reverse order.
To define the resources for the constraint:
From the drop-down box in the category, select a resource (or a template).
The resource is added and a new empty drop-down box appears beneath.
Repeat this step to add more resources.
The topmost resource will start first, then the second, etc. Usually the resources will be stopped in reverse order.
To swap the order of resources within the order constraint, click the arrow up icon next to a resource to swap it with the entry above.
If needed, specify further parameters for each resource (like
Started,Stopped,Promote,Demote): Click the empty drop-down box next to the resource and select the desired entry.Confirm your changes to finish the configuration. A message at the top of the screen shows if the action has been successful.
7.6.2 Adding order constraints using crmsh #
The order command defines a sequence of action.
For example, to always start resource1 before
resource2, use the following constraint:
crm(live)configure#order res1_before_res2 Mandatory: resource1 resource2
7.7 Using resource sets to define constraints #
As an alternative format for defining location, colocation, or order constraints, you can use resource sets, where primitives are grouped together in one set. Previously this was possible either by defining a resource group (which could not always accurately express the design), or by defining each relationship as an individual constraint. The latter caused a constraint explosion as the number of resources and combinations grew. The configuration via resource sets is not necessarily less verbose, but is easier to understand and maintain.
You can configure resource sets using either Hawk2 or crmsh.
7.7.1 Using resource sets to define constraints with Hawk2 #
To use a resource set within a location constraint:
Proceed as outlined in Procedure 7.1, “Adding a location constraint”, apart from Step 4: Instead of selecting a single resource, select multiple resources by pressing Ctrl or Shift and mouse click. This creates a resource set within the location constraint.
To remove a resource from the location constraint, press Ctrl and click the resource again to deselect it.
To use a resource set within a colocation or order constraint:
Proceed as described in Procedure 7.2, “Adding colocation constraints” or Procedure 7.3, “Adding an order constraint”, apart from the step where you define the resources for the constraint (Step 5.a or Step 6.a):
Add multiple resources.
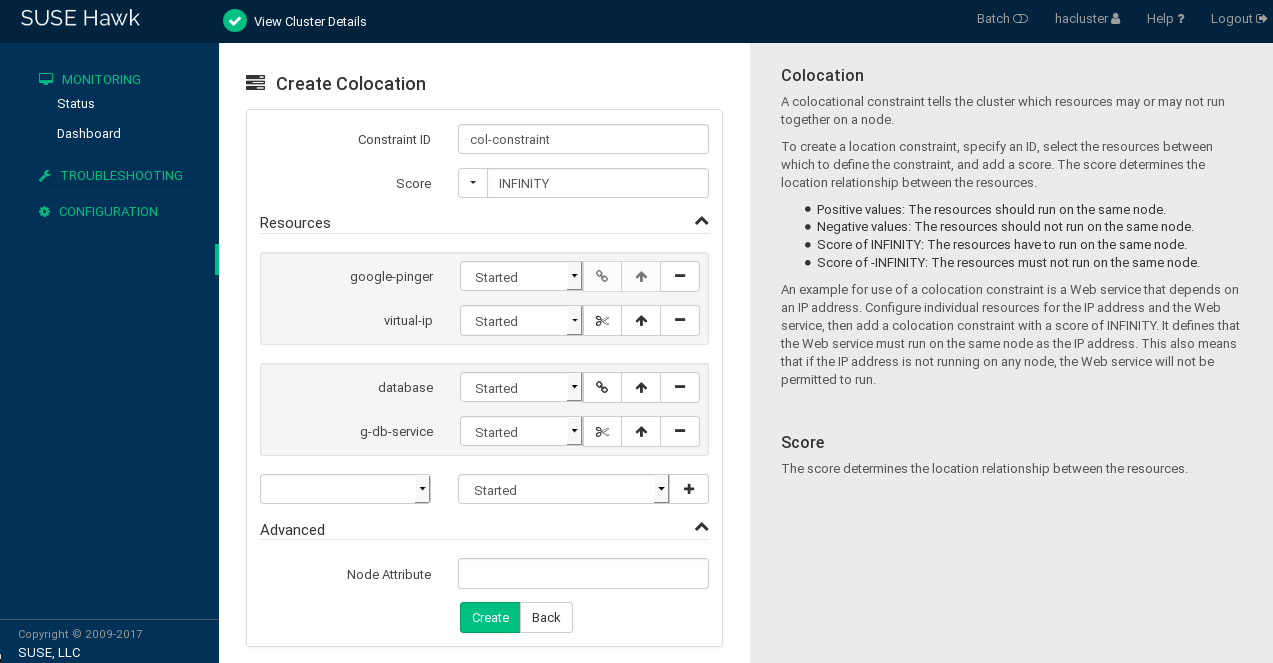
To create a resource set, click the chain icon next to a resource to link it to the resource above. A resource set is visualized by a frame around the resources belonging to a set.
You can combine multiple resources in a resource set or create multiple resource sets.
Figure 7.4: Hawk2—two resource sets in a colocation constraint #To unlink a resource from the resource above, click the scissors icon next to the resource.
Confirm your changes to finish the constraint configuration.
7.7.2 Using resource sets to define constraints with crmsh #
For example, you can use the following configuration of a resource
set (loc-alice) in the crmsh to place
two virtual IPs (vip1 and vip2)
on the same node, alice:
crm(live)configure#primitive vip1 IPaddr2 params ip=192.168.1.5 op monitor timeout=20s interval=10scrm(live)configure#primitive vip2 IPaddr2 params ip=192.168.1.6 op monitor timeout=20s interval=10scrm(live)configure#location loc-alice { vip1 vip2 } inf: alice
If you want to use resource sets to replace a configuration of colocation constraints, consider the following two examples:
<constraints>
    <rsc_colocation id="coloc-1" rsc="B" with-rsc="A" score="INFINITY"/>
    <rsc_colocation id="coloc-2" rsc="C" with-rsc="B" score="INFINITY"/>
    <rsc_colocation id="coloc-3" rsc="D" with-rsc="C" score="INFINITY"/>
</constraints>
The same configuration expressed by a resource set:
<constraints>
   <rsc_colocation id="coloc-1" score="INFINITY" >
    <resource_set id="colocated-set-example" sequential="true">
     <resource_ref id="A"/>
     <resource_ref id="B"/>
     <resource_ref id="C"/>
     <resource_ref id="D"/>
    </resource_set>
   </rsc_colocation>
</constraints>
If you want to use resource sets to replace a configuration of order constraints, consider the following two examples:
<constraints>
    <rsc_order id="order-1" first="A" then="B" />
    <rsc_order id="order-2" first="B" then="C" />
    <rsc_order id="order-3" first="C" then="D" />
</constraints>
The same purpose can be achieved by using a resource set with ordered resources:
<constraints>
    <rsc_order id="order-1">
    <resource_set id="ordered-set-example" sequential="true">
    <resource_ref id="A"/>
    <resource_ref id="B"/>
    <resource_ref id="C"/>
    <resource_ref id="D"/>
    </resource_set>
    </rsc_order>
</constraints>
Sets can be either ordered (sequential=true) or
unordered (sequential=false). Furthermore, the
require-all attribute can be used to switch between
AND and OR logic.
7.7.3 Collocating sets for resources without dependency #
Sometimes it is useful to place a group of resources on the same node (defining a colocation constraint), but without having hard dependencies between the resources. For example, you want two resources to be placed on the same node, but you do not want the cluster to restart the other one if one of them fails.
This can be achieved on the CRM Shell by using the weak-bond command:
#crm configure assist weak-bond resource1 resource2
The weak-bond command creates a dummy resource and
a colocation constraint with the given resources automatically.
7.8 Specifying resource failover nodes #
A resource will be automatically restarted if it fails. If that cannot
be achieved on the current node, or it fails N times
on the current node, it tries to fail over to another node. Each time
the resource fails, its fail count is raised. You can define several
failures for resources (a migration-threshold), after
which they will migrate to a new node. If you have more than two nodes
in your cluster, the node a particular resource fails over to is chosen
by the High Availability software.
However, you can specify the node a resource will fail over to by
configuring one or several location constraints and a
migration-threshold for that resource.
You can specify resource failover nodes using either Hawk2 or crmsh.
For example, let us assume you have configured a location constraint
for resource rsc1 to preferably run on
alice. If it fails there,
migration-threshold is checked and compared to the
fail count. If failcount >= migration-threshold, then the resource is
migrated to the node with the next best preference.
After the threshold has been reached, the node will no longer be
allowed to run the failed resource until the resource's fail count is
reset. This can be done manually by the cluster administrator or by
setting a failure-timeout option for the resource.
For example, a setting of migration-threshold=2 and
failure-timeout=60s would cause the resource to
migrate to a new node after two failures. It would be allowed to move
back (depending on the stickiness and constraint scores) after one
minute.
There are two exceptions to the migration threshold concept, occurring when a resource either fails to start or fails to stop:
Start failures set the fail count to
INFINITYand thus always cause an immediate migration.Stop failures cause fencing (when
stonith-enabledis set totruewhich is the default).In case there is no STONITH resource defined (or
stonith-enabledis set tofalse), the resource will not migrate.
7.8.1 Specifying resource failover nodes with Hawk2 #
Log in to Hawk2:
https://HAWKSERVER:7630/
Configure a location constraint for the resource as described in Procedure 7.1, “Adding a location constraint”.
Add the
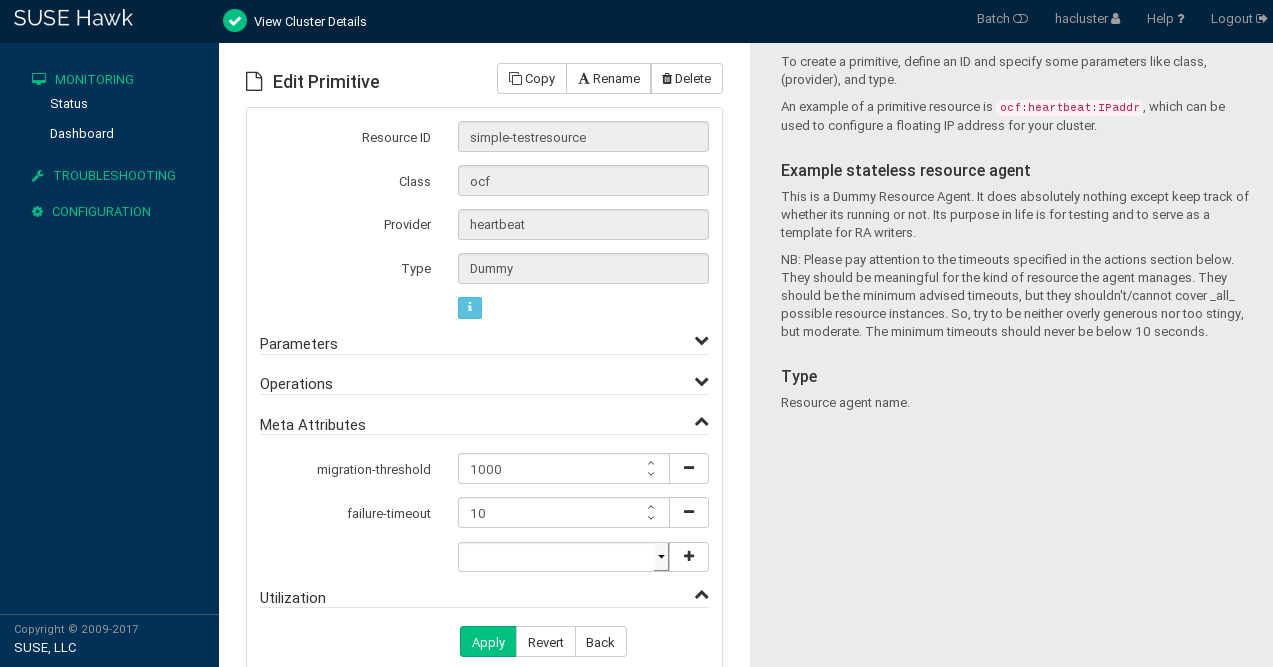
migration-thresholdmeta attribute to the resource as described in Procedure 8.1: Modifying a resource or group, Step 5 and enter a value for the migration-threshold. The value should be positive and less than INFINITY.If you want to automatically expire the fail count for a resource, add the
failure-timeoutmeta attribute to the resource as described in Procedure 6.2: Adding a primitive resource with Hawk2, Step 5 and enter a for thefailure-timeout.If you want to specify additional failover nodes with preferences for a resource, create additional location constraints.
Instead of letting the fail count for a resource expire automatically, you can also clean up fail counts for a resource manually at any time. Refer to Section 8.5.1, “Cleaning up cluster resources with Hawk2” for details.
7.8.2 Specifying resource failover nodes with crmsh #
To determine a resource failover, use the meta attribute
migration-threshold. If the fail count exceeds
migration-threshold on all nodes, the resource
will remain stopped. For example:
crm(live)configure#location rsc1-alice rsc1 100: alice
Normally, rsc1 prefers to run on alice.
If it fails there, migration-threshold is checked and compared
to the fail count. If failcount >= migration-threshold,
then the resource is migrated to the node with the next best preference.
Start failures set the fail count to inf depend on the
start-failure-is-fatal option. Stop failures cause
fencing. If there is no STONITH defined, the resource will not migrate.
7.9 Specifying resource failback nodes (resource stickiness) #
A resource might fail back to its original node when that node is back online and in the cluster. To prevent a resource from failing back to the node that it was running on, or to specify a different node for the resource to fail back to, change its resource stickiness value. You can either specify resource stickiness when you are creating a resource or afterward.
Consider the following implications when specifying resource stickiness values:
- Value is
0: The resource is placed optimally in the system. This may mean that it is moved when a “better” or less loaded node becomes available. The option is almost equivalent to automatic failback, except that the resource may be moved to a node that is not the one it was previously active on. This is the Pacemaker default.
- Value is greater than
0: The resource will prefer to remain in its current location, but may be moved if a more suitable node is available. Higher values indicate a stronger preference for a resource to stay where it is.
- Value is less than
0: The resource prefers to move away from its current location. Higher absolute values indicate a stronger preference for a resource to be moved.
- Value is
INFINITY: The resource will always remain in its current location unless forced off because the node is no longer eligible to run the resource (node shutdown, node standby, reaching the
migration-threshold, or configuration change). This option is almost equivalent to completely disabling automatic failback.- Value is
-INFINITY: The resource will always move away from its current location.
7.9.1 Specifying resource failback nodes with Hawk2 #
Log in to Hawk2:
https://HAWKSERVER:7630/
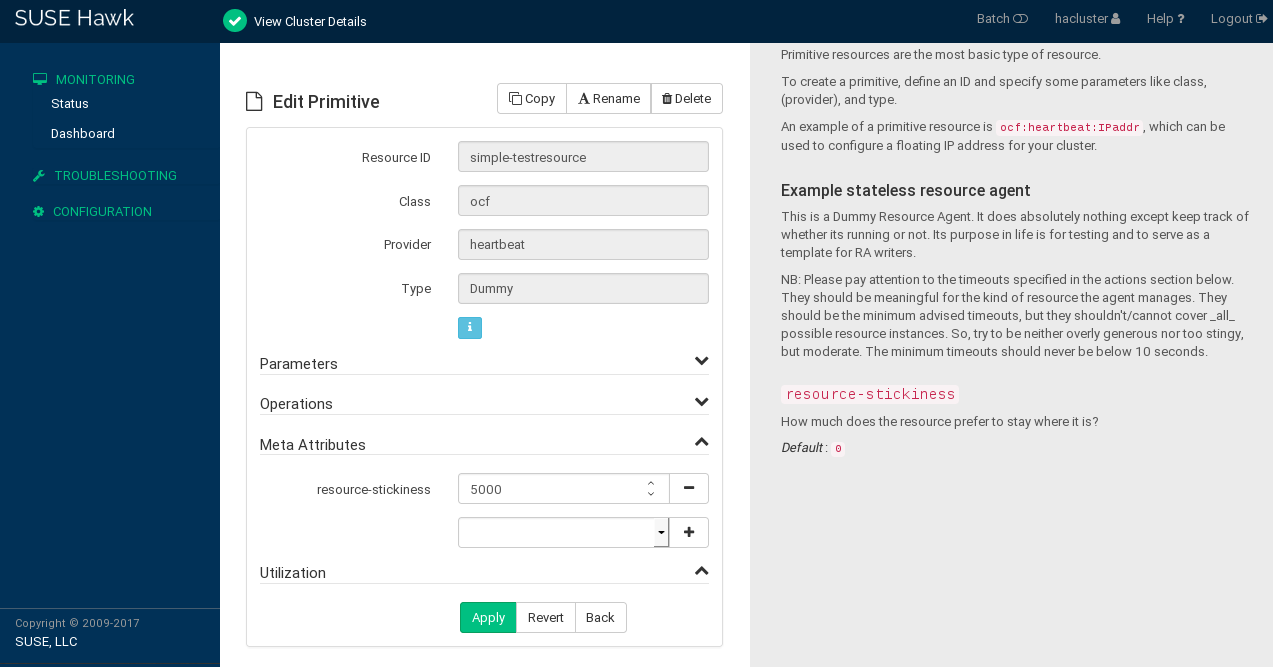
Add the
resource-stickinessmeta attribute to the resource as described in Procedure 8.1: Modifying a resource or group, Step 5.Specify a value between
-INFINITYandINFINITYforresource-stickiness.
7.10 Placing resources based on their load impact #
Not all resources are equal. Some, such as Xen guests, require that the node hosting them meets their capacity requirements. If resources are placed such that their combined need exceed the provided capacity, the resources diminish in performance (or even fail).
To take this into account, SUSE Linux Enterprise High Availability allows you to specify the following parameters:
The capacity a certain node provides.
The capacity a certain resource requires.
An overall strategy for placement of resources.
You can configure these setting using either Hawk2 or crmsh:
A node is considered eligible for a resource if it has sufficient free capacity to satisfy the resource's requirements. To manually configure the resource's requirements and the capacity a node provides, use utilization attributes. You can name the utilization attributes according to your preferences and define as many name/value pairs as your configuration needs. However, the attribute's values must be integers.
If multiple resources with utilization attributes are grouped or have colocation constraints, SUSE Linux Enterprise High Availability takes that into account. If possible, the resources is placed on a node that can fulfill all capacity requirements.
It is impossible to set utilization attributes directly for a resource group. However, to simplify the configuration for a group, you can add a utilization attribute with the total capacity needed to any of the resources in the group.
SUSE Linux Enterprise High Availability also provides the means to detect and configure both node capacity and resource requirements automatically:
The NodeUtilization resource agent checks the
capacity of a node (regarding CPU and RAM).
To configure automatic detection, create a clone resource of the
following class, provider, and type:
ocf:pacemaker:NodeUtilization. One instance of the
clone should be running on each node. After the instance has started, a
utilization section will be added to the node's configuration in CIB.
For more information, see crm ra info NodeUtilization.
For automatic detection of a resource's minimal requirements (regarding
RAM and CPU) the Xen resource agent has been
improved. Upon start of a Xen resource, it will
reflect the consumption of RAM and CPU. Utilization attributes will
automatically be added to the resource configuration.
The ocf:heartbeat:Xen resource agent should not be
used with libvirt, as libvirt expects
to be able to modify the machine description file.
For libvirt, use the
ocf:heartbeat:VirtualDomain resource agent.
Apart from detecting the minimal requirements, you can also
monitor the current utilization via the
VirtualDomain resource agent. It detects CPU
and RAM use of the virtual machine. To use this feature, configure a
resource of the following class, provider and type:
ocf:heartbeat:VirtualDomain. The following instance
attributes are available:
autoset_utilization_cpuautoset_utilization_hv_memory(for Xen) orautoset_utilization_host_memory(for KVM)
These attributes default to true. This updates the utilization
values in the CIB during each monitoring cycle. For more information, see
crm ra info VirtualDomain.
hv_memory and host_memory
In the NodeUtilization and VirtualDomain
resource agents, hv_memory and host_memory
both default to true. However, Xen only requires
hv_memory, and KVM only requires host_memory.
To avoid confusion, we recommend disabling the unnecessary attributes. For example:
hv_memory disabled ##crm configure primitive p_nu NodeUtilization \ params utilization_hv_memory=false \ op monitor timeout=20s interval=60#crm configure primitive p_vm VirtualDomain \ params autoset_utilization_hv_memory=false \ op monitor timeout=30s interval=10s
host_memory disabled ##crm configure primitive p_nu NodeUtilization \ params utilization_host_memory=false \ op monitor timeout=20s interval=60#crm configure primitive p_vm VirtualDomain \ params autoset_utilization_host_memory=false \ op monitor timeout=30s interval=10s
For either virtualization type, make sure to clone the NodeUtilization
resource so it can run on all nodes:
#crm configure cl_nu p_nu
You can set the placement-strategy property to balanced
with the following command:
#crm configure property placement-strategy=balanced
Independent of manually or automatically configuring capacity and
requirements, the placement strategy must be specified with the
placement-strategy property (in the global cluster
options). The following values are available:
default(default value)Utilization values are not considered. Resources are allocated according to location scoring. If scores are equal, resources are evenly distributed across nodes.
utilizationUtilization values are considered when deciding if a node has enough free capacity to satisfy a resource's requirements. However, load-balancing is still done based on the number of resources allocated to a node.
minimalUtilization values are considered when deciding if a node has enough free capacity to satisfy a resource's requirements. An attempt is made to concentrate the resources on as few nodes as possible (to achieve power savings on the remaining nodes).
balancedUtilization values are considered when deciding if a node has enough free capacity to satisfy a resource's requirements. An attempt is made to distribute the resources evenly, thus optimizing resource performance.
The available placement strategies are best-effort—they do not yet use complex heuristic solvers to always reach optimum allocation results. Ensure that resource priorities are properly set so that your most important resources are scheduled first.
7.10.1 Placing resources based on their load impact with Hawk2 #
Utilization attributes are used to configure both the resource's requirements and the capacity a node provides. You first need to configure a node's capacity before you can configure the capacity a resource requires.
Log in to Hawk2:
https://HAWKSERVER:7630/
From the left navigation bar, select › .
On the tab, select the node whose capacity you want to configure.
In the column, click the arrow down icon and select .
The screen opens.
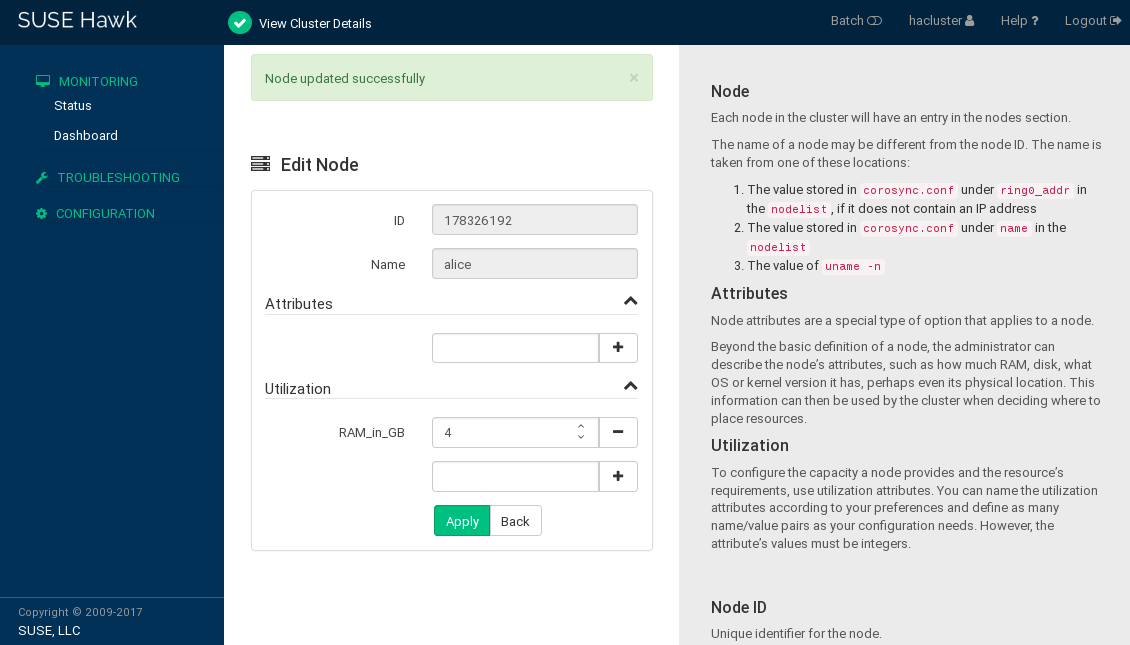
Below , enter a name for a utilization attribute into the empty drop-down box.
The name can be arbitrary (for example,
RAM_in_GB).Click the icon to add the attribute.
In the empty text box next to the attribute, enter an attribute value. The value must be an integer.
Add as many utilization attributes as you need and add values for all of them.
Confirm your changes. A message at the top of the screen shows if the action has been successful.
Configure the capacity a certain resource requires from a node either when creating a primitive resource or when editing an existing primitive resource.
Before you can add utilization attributes to a resource, you need to have set utilization attributes for your cluster nodes as described in Procedure 7.7.
Log in to Hawk2:
https://HAWKSERVER:7630/
To add a utilization attribute to an existing resource: Go to › and open the resource configuration dialog as described in Section 8.2.1, “Editing resources and groups with Hawk2”.
If you create a new resource: Go to › and proceed as described in Section 6.4.1, “Creating primitive resources with Hawk2”.
In the resource configuration dialog, go to the category.
From the empty drop-down box, select one of the utilization attributes that you have configured for the nodes in Procedure 7.7.
In the empty text box next to the attribute, enter an attribute value. The value must be an integer.
Add as many utilization attributes as you need and add values for all of them.
Confirm your changes. A message at the top of the screen shows if the action has been successful.
After you have configured the capacities your nodes provide and the capacities your resources require, set the placement strategy in the global cluster options. Otherwise the capacity configurations have no effect. Several strategies are available to schedule the load: for example, you can concentrate it on as few nodes as possible, or balance it evenly over all available nodes.
Log in to Hawk2:
https://HAWKSERVER:7630/
From the left navigation bar, select › to open the respective screen. It shows global cluster options and resource and operation defaults.
From the empty drop-down box in the upper part of the screen, select
placement-strategy.By default, its value is set to , which means that utilization attributes and values are not considered.
Depending on your requirements, set to the appropriate value.
Confirm your changes.
7.10.2 Placing resources based on their load impact with crmsh #
To configure the resource's requirements and the capacity a node
provides, use utilization attributes.
You can name the utilization attributes according to your preferences
and define as many name/value pairs as your configuration needs. In
certain cases, some agents update the utilization themselves, for
example the VirtualDomain.
In the following example, we assume that you already have a basic configuration of cluster nodes and resources. You now additionally want to configure the capacities a certain node provides and the capacity a certain resource requires.
crm #Log in as
rootand start thecrminteractive shell:#crm configureTo specify the capacity a node provides, use the following command and replace the placeholder NODE_1 with the name of your node:
crm(live)configure#node NODE_1 utilization hv_memory=16384 cpu=8With these values, NODE_1 would be assumed to provide 16GB of memory and 8 CPU cores to resources.
To specify the capacity a resource requires, use:
crm(live)configure#primitive xen1 Xen ... \ utilization hv_memory=4096 cpu=4This would make the resource consume 4096 of those memory units from NODE_1, and 4 of the CPU units.
Configure the placement strategy with the
propertycommand:crm(live)configure#property...The following values are available:
default(default value)Utilization values are not considered. Resources are allocated according to location scoring. If scores are equal, resources are evenly distributed across nodes.
utilizationUtilization values are considered when deciding if a node has enough free capacity to satisfy a resource's requirements. However, load-balancing is still done based on the number of resources allocated to a node.
minimalUtilization values are considered when deciding if a node has enough free capacity to satisfy a resource's requirements. An attempt is made to concentrate the resources on as few nodes as possible (to achieve power savings on the remaining nodes).
balancedUtilization values are considered when deciding if a node has enough free capacity to satisfy a resource's requirements. An attempt is made to distribute the resources evenly, thus optimizing resource performance.
Note: Configuring resource prioritiesThe available placement strategies are best-effort—they do not yet use complex heuristic solvers to always reach optimum allocation results. Ensure that resource priorities are properly set so that your most important resources are scheduled first.
Commit your changes before leaving
crmsh:crm(live)configure#commit
The following example demonstrates a three node cluster of equal nodes, with four virtual machines:
crm(live)configure#node alice utilization hv_memory="4000"crm(live)configure#node bob utilization hv_memory="4000"crm(live)configure#node charlie utilization hv_memory="4000"crm(live)configure#primitive xenA Xen \ utilization hv_memory="3500" meta priority="10" \ params xmfile="/etc/xen/shared-vm/vm1" \ op monitor timeout=30s interval=10scrm(live)configure#primitive xenB Xen \ utilization hv_memory="2000" meta priority="1" \ params xmfile="/etc/xen/shared-vm/vm2" \ op monitor timeout=30s interval=10scrm(live)configure#primitive xenC Xen \ utilization hv_memory="2000" meta priority="1" \ params xmfile="/etc/xen/shared-vm/vm3" \ op monitor timeout=30s interval=10scrm(live)configure#primitive xenD Xen \ utilization hv_memory="1000" meta priority="5" \ params xmfile="/etc/xen/shared-vm/vm4" \ op monitor timeout=30s interval=10scrm(live)configure#property placement-strategy="minimal"
With all three nodes up, xenA will be placed onto a node first, followed by xenD. xenB and xenC would either be allocated together or one of them with xenD.
If one node failed, too little total memory would be available to host them all. xenA would be ensured to be allocated, as would xenD. However, only one of xenB or xenC could still be placed, and since their priority is equal, the result is not defined yet. To resolve this ambiguity as well, you would need to set a higher priority for either one.
7.11 For more information #
For more information on configuring constraints and detailed background information about the basic concepts of ordering and colocation, see https://clusterlabs.org/projects/pacemaker/doc/.
