6 Setting Up an SAP HANA Cluster #
You can use a YaST wizard to set up SAP HANA or SAP S/4HANA Database Server clusters according to best practices, including SAP HANA system replication. A summary of the setup options is given in Section 1.1.3, “Simplified SAP HANA System Replication Setup”.
The following Best Practices from the SUSE Linux Enterprise Server for SAP applications Resource Library (https://www.suse.com/products/sles-for-sap/resource-library/) contain setup instructions:
Performance-optimized scenario and multi-tier/chained scenario: Setting up a SAP HANA SR Performance Optimized Infrastructure
Cost-optimized scenario: Setting up a SAP HANA SR Cost Optimized Infrastructure
The YaST wizard described in the following can only be used for the initial cluster configuration.
To reconfigure a cluster, use the separate YaST module (available from package yast2-cluster). For more information about its usage, see Administration Guide, Part “Installation, Setup and Upgrade”, Chapter “Using the YaST Cluster Module” at https://documentation.suse.com/sle-ha-12.
The instructions in the following sections are suitable for deployments on physical machines. They are not intended for cloud-based deployments.
6.1 Prerequisites #
The following procedure has prerequisites:
Two machines which both have an SAP HANA installation created by the SAP Installation Wizard or SAP HANA Application Lifecycle Management. Both machines need to be on the same L2 network (subnet).
In the case of a multi-tier/chained scenario, there must also be a third machine elsewhere.
The machines are not yet set up as a high-availability cluster.
openSSH is running on both machines and the nodes can reach each other via SSH. However, if that has not already happened, the wizard will perform the SSH key exchange itself.
For more information about SSH, see Security and Hardening Guide, Part “Network Security”, Chapter “SSH: Secure Network Operations” at https://documentation.suse.com/sles-12.
A disk device that is available to both nodes under the same path for SBD. It must not use host-based RAID, cLVM2 or reside on a DRBD instance. The device can have a small size, for example, 100 MB.
You have created either:
A key in the SAP HANA Secure User Store on the primary node
An initial SAP HANA backup on the primary node
The package yast2-sap-ha is installed on both the primary and the secondary node.
HANA-Firewall is set up on both computers with the rules
HANA_HIGH_AVAILABILITYandHANA_SYSTEM_REPLICATIONon all relevant network interfaces.For information about setting up HANA-Firewall, see Section 9.2, “Configuring HANA-Firewall”.
Cost-optimized scenario only: The secondary node has a second SAP HANA installation. The database may be running but will be stopped automatically by the wizard.
Cost-optimized scenario only: For the non-production SAP HANA instance, you have created an SAP HANA Secure User Store key
QASSAPDBCTRLfor monitoring purposes. For more information, see SAP HANA SR Cost Optimized Scenario, Chapter “Installing the SAP HANA Databases on both cluster nodes”, Section “Postinstallation configuration”, Section “Install the non-productive SAP HANA database (QAS)” at https://www.suse.com/products/sles-for-sap/resource-library/.
6.2 Setup #
The following procedure needs to be executed on the primary node (also called the “master”). Before proceeding, make sure the prerequisites listed in Section 6.1, “Prerequisites” are fulfilled.
Open the YaST control center. In it, click in the category .
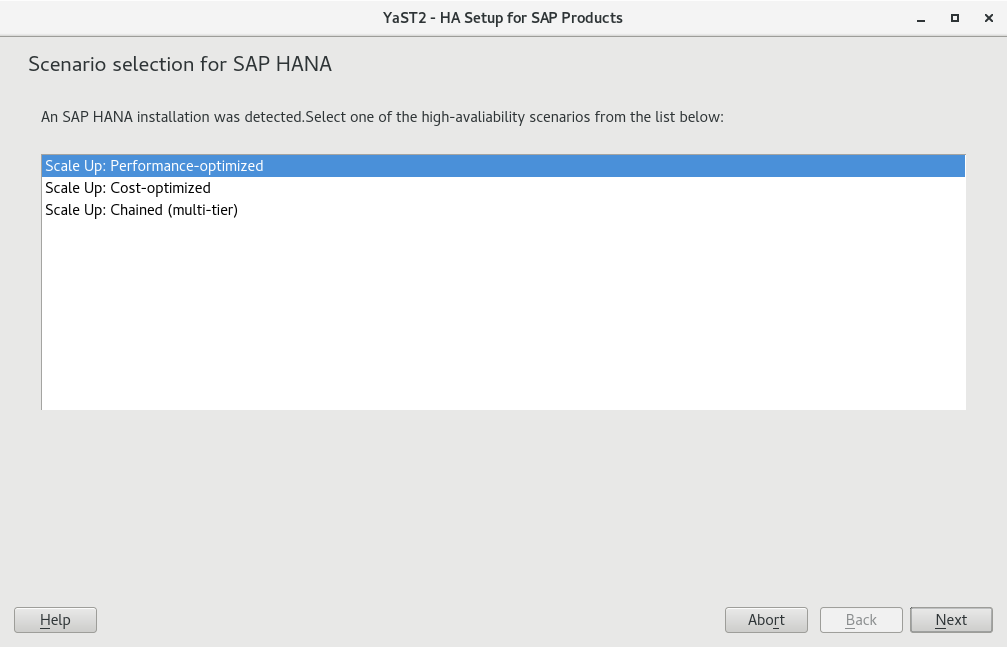
If an SAP HANA instance has been detected, you can choose between the scale-up scenarios , , or . For information about these scale-up scenarios, see Section 1.1.3, “Simplified SAP HANA System Replication Setup”.
Continue with .
This step of the wizard presents a list of prerequisites for the chosen scale-up scenario. These prerequisites are the same as those presented in Section 6.1, “Prerequisites”.
Continue with .
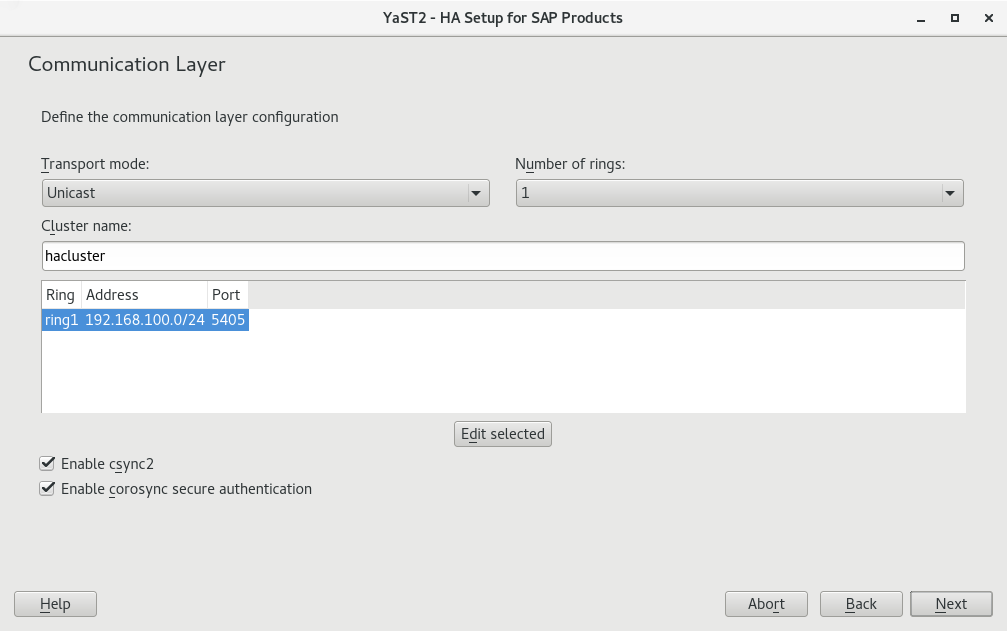
The next step lets you configure the communication layer of your cluster.
Provide a name for the cluster.
The default transport mode is usually appropriate.
Under , a single communication ring usually suffices.
For redundancy, it is often better to use network interface bonding instead of multiple communication rings. For more information, see Administration Guide, Part “Configuration and Administration”, Chapter “Network Device Bonding” at https://documentation.suse.com/sle-ha-12.
From the list of communication rings, configure each enabled ring. To do so, click , then select a network mask () and a port () to communicate over.
Finish with .
Additionally, decide whether to enable the configuration synchronization service Csync2 and Corosync secure authentication using HMAC/SHA1.
For more information about Csync2, see Administration Guide Part “Installation, Setup and Upgrade”, Chapter “Using the YaST Cluster Module”, Section “Transferring the Configuration to All Nodes” at https://documentation.suse.com/sle-ha-12.
For more information about Corosync secure authentication, see Administration Guide, Part “Installation, Setup and Upgrade”, Chapter “Using the YaST Cluster Module”, Section “Defining Authentication Settings” at https://documentation.suse.com/sle-ha-12.
Proceed with .
The wizard will now check whether it can connect to the secondary machine using SSH. If it can, it will ask for the
rootpassword to the machine.Enter the
rootpassword.The next time, the primary machine needs to connect to the secondary machine, it will connect using an SSH certificate instead of a password.
For both machines, set up the host names and IP address (for each ring).
Host names chosen here are independent from the virtual host names chosen in SAP HANA. However, to avoid issues with SAP HANA, host names must not include hyphen characters (
-).If this has not already been done before, host names of all cluster servers must now be added to the file
/etc/hosts. For this purpose, activate .Proceed with .
If NTP is not yet set up, do so. This avoids the two machines from running into issues because of time differences.
Click .
On the tab , activate .
Add a time server by clicking . Click and . Then specify the IP address of a time server outside of the cluster. Test the connection to the server by clicking .
To use a public time server, click › and select a time server. Finish with .
Proceed with .
On the tab , activate .
Proceed with .
In the next step, choose fencing options. The YaST wizard only supports the fencing mechanism SBD (STONITH block device). To avoid split-brain situations, SBD uses a disk device which stores cluster state.
The chosen disk must be available from all machines in the cluster under the same path. Ideally, use either or for identification.
The disk must not use host-based RAID, cLVM2 or reside on a DRBD instance. The device can have a small size, for example, 100 MB.
Warning: Data on Device Will Be LostAll data on the chosen SBD device or devices will be deleted.
To define a device to use, click , then choose an identification method such as and select the appropriate device. Click .
To define additional SBD command line parameters, add them to .
If your machines reboot particularly fast, activate .
For more information about fencing, see the Administration Guide at https://documentation.suse.com/sle-ha-12.
Proceed with .
The following page allows configuring watchdogs. They protect against the failure of the SBD daemon itself and force a reboot of the machine in such a case.
It also lists watchdogs already configured using YaST and watchdogs that are currently loaded (as detected by
lsmod).To configure a watchdog, use . Then choose the correct watchdog for your hardware and leave the dialog with .
For testing, you can use the watchdog
softdog. However, we highly recommend using a hardware watchdog in production environments instead ofsoftdog. For more information about selecting watchdogs, see Administration Guide, Part “Storage and Data Replication”, Chapter “Storage Protection”, Section “Conceptual Overview”, Section “Setting Up Storage-based Protection”, Section “Setting up the Watchdog” at https://documentation.suse.com/sle-ha-12.Proceed with .
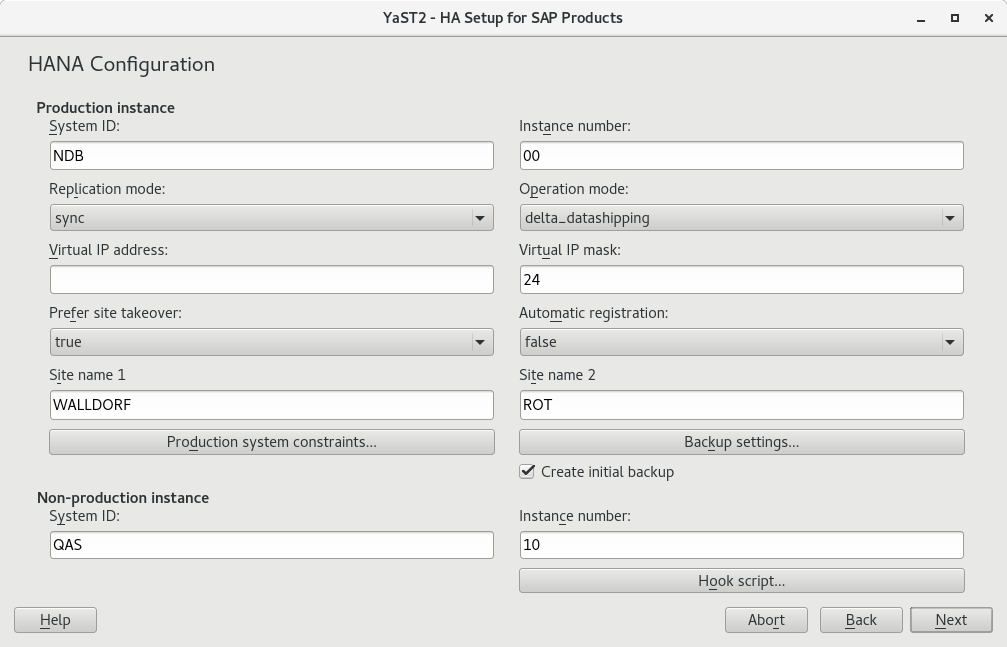
Set up the parameters for your SAP HANA installation or installations. If you have selected the cost-optimized scenario, additionally, fill out details related to the non-production SAP HANA instance.
- Production SAP HANA Instance
Make sure that the and match those of your SAP HANA configuration.
and usually do not need to be changed.
For more information about these parameters, see the HANA Administration Guide provided to you by SAP.
Under , specify a virtual IP address for the primary SAP HANA instance. Under , set the length of the subnetwork mask in CIDR format to be applied to the .
defines whether the secondary instance should take over the job of the primary instance automatically (). Alternatively, the cluster will restart SAP HANA on the primary machine.
determines whether primary and secondary machine should switch roles after a takeover.
Specify the site names for the production SAP HANA instance on the two nodes in and .
Having a backup of the database is a precondition for setting up SAP HANA replication.
If you have not previously created a backup, activate . Under , configure the and the for the backup. The key in the SAP HANA Secure User Store on the primary node must have been created before starting the wizard.
For more information, see the documentation provided to you by SAP.
Cost-optimized scenario only: Within , configure how the production instance of SAP HANA should behave while inactive on the secondary node.
Setting the allows directly limiting memory usage. Activating will increase memory usage.
For information about the necessary global allocation limit, see documentation provided to you by SAP such as How to Perform System Replication for SAP HANA at https://archive.sap.com/documents/docs/DOC-47702.
- Cost-optimized Scenario Only: Non-production SAP HANA Instance
Make sure that the and match those of your non-production SAP HANA instance.
These parameters are needed to allow monitoring the status of the non-production SAP HANA instance using the SAPInstance resource agent.
Generate a hook script for stopping the non-production instance and starting the production instance and removing the constraints on the production system. The script is written in Python 2 and can be modified as necessary later.
Click and then set up the correct user name and password for the database. Then click .
You can now manually verify and change the details of the generated hook script. When you are done, click to save the hook script at
/hana/shared/SID/srHook.Warning: Passwords Stored in Plain TextBy default, the hook script stores all credentials in plain text. To improve security, modify the script yourself.
Proceed with .
Figure 6.1: SAP HANA Options (Cost-Optimized Scenario) #On the page , check that the setup is correct.
To change any of the configuration details, return to the appropriate wizard page by clicking one of the underlined headlines.
Proceed with .
When asked whether to install additional software, confirm with .
After the setup is done, there is a screen showing a log of the cluster setup.
To be able to reuse the configuration file for an unattended installation, click . (For more details about unattended cluster installations, see Section 6.3, “Unattended Installation of Cluster Servers”.)
To close the dialog, click .
Multi-tier/chain scenario only: Using the administrative user account for the production SAP HANA instance, register the out-of-cluster node for system replication:
SIDadm >hdbnsutil-sr_register --remoteHost=SECONDARY_HOST_NAME \ --remoteInstance=INSTANCE_NUMBER --replicationMode=async \ --name=SITE_NAME
6.3 Unattended Installation of Cluster Servers #
On bare-metal servers, you can run the YaST module in an unattended mode. This speeds up the time it takes to configure additional servers with the same configuration.
As a prerequisite, you need a configuration file from a previous run of the YaST wizard .
Copy the configuration file to the target machine.
Validate the configuration file:
#yast2 sap_ha readconfig CONFIGURATION_FILE_PATHImport, validate, and install the cluster unattendedly:
#yast2 sap_ha readconfig CONFIGURATION_FILE_PATH unattended
6.4 Using Hawk #
After you have set up the cluster using the wizard, you can open Hawk. directly from the last screen of the wizard.
To revisit Hawk, open a browser. As the URL, enter the IP address or host name of any cluster node running the Hawk Web service. Alternatively, enter the virtual IP address you configured in Section 6.2, “Setup”.
https://HAWKSERVER:7630/
On the Hawk login screen, use the following login credentials:
:
hacluster:
linux
Replace the default password with a secure one as soon as possible:
#passwd hacluster
For more information about Hawk, see Administration Guide, Part “Configuration and Administration”, Chapter “Configuring and Managing Cluster Resources with Hawk” (https://documentation.suse.com/sle-ha-12).


