14 The boot loader GRUB 2 #
This chapter describes how to configure GRUB 2, the boot loader used in SUSE® Linux Enterprise Server. It is the successor to the traditional GRUB boot loader—now called “GRUB Legacy”. GRUB 2 has been the default boot loader in SUSE® Linux Enterprise Server since version 12. A YaST module is available for configuring the most important settings. The boot procedure as a whole is outlined in Chapter 12, Introduction to the boot process. For details on Secure Boot support for UEFI machines, see Chapter 13, UEFI (Unified Extensible Firmware Interface).
14.1 Main differences between GRUB legacy and GRUB 2 #
The configuration is stored in different files.
More file systems are supported (for example, Btrfs).
Can directly read files stored on LVM or RAID devices.
The user interface can be translated and altered with themes.
Includes a mechanism for loading modules to support additional features, such as file systems, etc.
Automatically searches for and generates boot entries for other kernels and operating systems, such as Windows.
Includes a minimal Bash-like console.
14.2 Configuration file structure #
The configuration of GRUB 2 is based on the following files:
/boot/grub2/grub.cfgThis file contains the configuration of the GRUB 2 menu items. It replaces
menu.lstused in GRUB Legacy.grub.cfgshould not be edited—it is automatically generated by the commandgrub2-mkconfig -o /boot/grub2/grub.cfg./boot/grub2/custom.cfgThis optional file is directly sourced by
grub.cfgat boot time and can be used to add custom items to the boot menu. Starting with SUSE Linux Enterprise Server 12 SP2 these entries are also parsed when usinggrub2-once./etc/default/grubThis file controls the user settings of GRUB 2 and normally includes additional environmental settings such as backgrounds and themes.
- Scripts under
/etc/grub.d/ The scripts in this directory are read during execution of the command
grub2-mkconfig -o
            /boot/grub2/grub.cfg
. Their instructions are integrated into the main configuration file/boot/grub/grub.cfg./etc/sysconfig/bootloaderThis configuration file holds certain basic settings like the boot loader type and whether to enable UEFI Secure Boot support.
/boot/grub2/x86_64-efi,/boot/grub2/power-ieee1275,/boot/grub2/s390xThese configuration files contain architecture-specific options.
GRUB 2 can be controlled in various ways. Boot entries from an existing
configuration can be selected from the graphical menu (splash screen). The
configuration is loaded from the file
/boot/grub2/grub.cfg which is compiled from other
configuration files (see below). All GRUB 2 configuration files are
considered system files, and you need root privileges to edit them.
After having manually edited GRUB 2 configuration files, you need to
run grub2-mkconfig -o /boot/grub2/grub.cfg to
activate the changes. However, this is not necessary when changing the
configuration with YaST, because YaST automatically runs this
command.
14.2.1 The file /boot/grub2/grub.cfg #
The graphical splash screen with the boot menu is based on the GRUB 2
configuration file /boot/grub2/grub.cfg, which
contains information about all partitions or operating systems that can be
booted by the menu.
Every time the system is booted, GRUB 2 loads the menu file directly from
the file system. For this reason, GRUB 2 does not need to be re-installed
after changes to the configuration file. grub.cfg is
automatically rebuilt with kernel installations or removals.
grub.cfg is compiled from the file
/etc/default/grub and scripts found in the
/etc/grub.d/ directory when running the command
grub2-mkconfig -o
        /boot/grub2/grub.cfg
. Therefore you should never
edit the file manually. Instead, edit the related source files or use the
YaST module to modify the configuration as
described in Section 14.3, “Configuring the boot loader with YaST”.
14.2.2 The file /etc/default/grub #
More general options of GRUB 2 belong in this file, such as the time the menu is displayed, or the default OS to boot. To list all available options, see the output of the following command:
> grep "export GRUB_DEFAULT" -A50 /usr/sbin/grub2-mkconfig | grep GRUB_
You can introduce custom variables and use them later in the scripts
found in the /etc/grub.d directory.
After having edited /etc/default/grub, update the
main configuration file with grub2-mkconfig -o
/boot/grub2/grub.cfg.
All options specified in this file are general options that affect all
boot entries. Options specific to a Xen hypervisor include the
_XEN_ substring.
More complex options with spaces require quoting so that they are processed as one option. Such inner quotes need to be correctly escaped, for example:
GRUB_CMDLINE_LINUX_XEN="debug loglevel=9 log_buf_len=5M \"ddebug_query=file drivers/xen/xen-acpi-processor.c +p\""
GRUB_DEFAULTSets the boot menu entry that is booted by default. Its value can be a numeric value, the complete name of a menu entry, or “saved”.
GRUB_DEFAULT=2boots the third (counted from zero) boot menu entry.GRUB_DEFAULT="2>0"boots the first submenu entry of the third top-level menu entry.GRUB_DEFAULT="Example boot menu entry"boots the menu entry with the title “Example boot menu entry”.GRUB_DEFAULT=savedboots the entry specified by thegrub2-onceorgrub2-set-defaultcommands. Whilegrub2-rebootsets the default boot entry for the next reboot only,grub2-set-defaultsets the default boot entry until changed.grub2-editenv listlists the next boot entry.GRUB_HIDDEN_TIMEOUTWaits the specified number of seconds for the user to press a key. During the period no menu is shown unless the user presses a key. If no key is pressed during the time specified, the control is passed to
GRUB_TIMEOUT.GRUB_HIDDEN_TIMEOUT=0first checks whether Shift is pressed and shows the boot menu if yes, otherwise immediately boots the default menu entry. This is the default when only one bootable OS is identified by GRUB 2.GRUB_HIDDEN_TIMEOUT_QUIETIf
falseis specified, a countdown timer is displayed on a blank screen when theGRUB_HIDDEN_TIMEOUTfeature is active.GRUB_TIMEOUTTime period in seconds the boot menu is displayed before automatically booting the default boot entry. If you press a key, the timeout is cancelled and GRUB 2 waits for you to make the selection manually.
GRUB_TIMEOUT=-1causes the menu to be displayed until you select the boot entry manually.GRUB_CMDLINE_LINUXEntries on this line are added at the end of the boot entries for normal and recovery modes. Use it to add kernel parameters to the boot entry.
GRUB_CMDLINE_LINUX_DEFAULTSame as
GRUB_CMDLINE_LINUXbut the entries are appended in the normal mode only.GRUB_CMDLINE_LINUX_RECOVERYSame as
GRUB_CMDLINE_LINUXbut the entries are appended in the recovery mode only.GRUB_CMDLINE_LINUX_XEN_REPLACEThis entry replaces the
GRUB_CMDLINE_LINUXparameters for all Xen boot entries.GRUB_CMDLINE_LINUX_XEN_REPLACE_DEFAULTSame as
GRUB_CMDLINE_LINUX_XEN_REPLACEbut it only replaces parameters ofGRUB_CMDLINE_LINUX_DEFAULT.GRUB_CMDLINE_XENThese entries are passed to the Xen hypervisor Xen menu entries for normal and recovery modes. For example:
GRUB_CMDLINE_XEN="loglvl=all guest_loglvl=all"
Tip: Xen hypervisor optionsFind a complete list of Xen hypervisor options in https://xenbits.xen.org/docs/unstable/misc/xen-command-line.html
GRUB_CMDLINE_XEN_DEFAULTSame as
GRUB_CMDLINE_XENbut the entries are appended in the normal mode only.GRUB_TERMINALEnables and specifies an input/output terminal device. Can be
console(PC BIOS and EFI consoles),serial(serial terminal),ofconsole(Open Firmware console), or the defaultgfxterm(graphics-mode output). It is also possible to enable more than one device by quoting the required options, for example,GRUB_TERMINAL="console serial".GRUB_GFXMODEThe resolution used for the
gfxtermgraphical terminal. You can only use modes supported by your graphics card (VBE). The default is ‘auto’, which tries to select a preferred resolution. You can display the screen resolutions available to GRUB 2 by typingvideoinfoin the GRUB 2 command line. The command line is accessed by typing C when the GRUB 2 boot menu screen is displayed.You can also specify a color depth by appending it to the resolution setting, for example,
GRUB_GFXMODE=1280x1024x24.GRUB_BACKGROUNDSet a background image for the
gfxtermgraphical terminal. The image must be a file readable by GRUB 2 at boot time, and it must end with the.png,.tga,.jpg, or.jpegsuffix. If necessary, the image is scaled to fit the screen.GRUB_DISABLE_OS_PROBERIf this option is set to
true, automatic searching for other operating systems is disabled. Only the kernel images in/boot/and the options from your own scripts in/etc/grub.d/are detected.SUSE_BTRFS_SNAPSHOT_BOOTINGIf this option is set to
true, GRUB 2 can boot directly into Snapper snapshots. For more information, see Section 7.3, “System rollback by booting from snapshots”.
For a complete list of options, see the GNU GRUB manual.
14.2.3 Scripts in /etc/grub.d #
The scripts in this directory are read during execution of the command
grub2-mkconfig -o /boot/grub2/grub.cfg. Their
instructions are incorporated into
/boot/grub2/grub.cfg. The order of menu items in
grub.cfg is determined by the order in which the
files in this directory are run. Files with a leading numeral are
executed first, beginning with the lowest number.
00_header is run before
10_linux, which would run before
40_custom. If files with alphabetic names are
present, they are executed after the numerically named files. Only
executable files generate output to grub.cfg
during execution of grub2-mkconfig. By default all
files in the /etc/grub.d directory are executable.
grub.cfg
Because /boot/grub2/grub.cfg is recompiled each
time grub2-mkconfig is run, any custom content is
lost. To insert your lines directly into
/boot/grub2/grub.cfg without losing them after
grub2-mkconfig is run, insert them between
### BEGIN /etc/grub.d/90_persistent ###
and
### END /etc/grub.d/90_persistent ###
The 90_persistent script ensures that such
content is preserved.
A list of the most important scripts follows:
00_headerSets environmental variables such as system file locations, display settings, themes and previously saved entries. It also imports preferences stored in the
/etc/default/grub. Normally you do not need to make changes to this file.10_linuxIdentifies Linux kernels on the root device and creates relevant menu entries. This includes the associated recovery mode option if enabled. Only the latest kernel is displayed on the main menu page, with additional kernels included in a submenu.
30_os-proberThis script uses
os-proberto search for Linux and other operating systems and places the results in the GRUB 2 menu. There are sections to identify specific other operating systems, such as Windows or macOS.40_customThis file provides a simple way to include custom boot entries into
grub.cfg. Make sure that you do not change theexec tail -n +3 $0part at the beginning.
The processing sequence is set by the preceding numbers with the lowest number being executed first. If scripts are preceded by the same number the alphabetical order of the complete name decides the order.
/boot/grub2/custom.cfg
If you create /boot/grub2/custom.cfg and fill it
with content, it is automatically included into
/boot/grub2/grub.cfg right after
40_custom at boot time.
14.2.4 Mapping between BIOS drives and Linux devices #
In GRUB Legacy, the device.map configuration file
was used to derive Linux device names from BIOS drive numbers. The
mapping between BIOS drives and Linux devices cannot always be guessed
correctly. For example, GRUB Legacy would get a wrong order if the boot
sequence of IDE and SCSI drives is exchanged in the BIOS configuration.
GRUB 2 avoids this problem by using device ID strings (UUIDs) or file
system labels when generating grub.cfg. GRUB 2
utilities create a temporary device map on the fly, which is normally
sufficient, particularly for single-disk systems.
However, if you need to override the GRUB 2's automatic device mapping
mechanism, create your custom mapping file
/boot/grub2/device.map. The following example
changes the mapping to make DISK 3 the boot disk.
GRUB 2 partition numbers start with 1 and
not with 0 as in GRUB 2 Legacy.
(hd0)  /dev/disk-by-id/DISK3 ID
(hd1)  /dev/disk-by-id/DISK1 ID
(hd2)  /dev/disk-by-id/DISK2 ID
14.2.6 Setting a boot password #
Even before the operating system is booted, GRUB 2 enables access to file systems. Users without root permissions can access files in your Linux system to which they have no access after the system is booted. To block this kind of access or to prevent users from booting certain menu entries, set a boot password.
If set, the boot password is required on every boot, which means the system does not boot automatically.
Proceed as follows to set a boot password. Alternatively use YaST ( ).
Encrypt the password using
grub2-mkpasswd-pbkdf2:>sudogrub2-mkpasswd-pbkdf2 Password: **** Reenter password: **** PBKDF2 hash of your password is grub.pbkdf2.sha512.10000.9CA4611006FE96BC77A...Paste the resulting string into the file
/etc/grub.d/40_customtogether with theset superuserscommand.set superusers="root" password_pbkdf2 root grub.pbkdf2.sha512.10000.9CA4611006FE96BC77A...
To import the changes into the main configuration file, run:
>sudogrub2-mkconfig -o /boot/grub2/grub.cfg
After you reboot, GRUB 2 prompts you for a user name and a password
when trying to boot a menu entry. Enter root and the
password you typed during the grub2-mkpasswd-pbkdf2
command. If the credentials are correct, the system boots the
selected boot entry.
For more information, see https://www.gnu.org/software/grub/manual/grub.html#Security.
14.2.7 Authorized access to boot menu entries #
You can configure GRUB 2 to allow access to boot menu entries depending on the level of authorization. You can configure multiple user accounts protected with passwords and assign them access to different menu entries. To configure authorization in GRUB 2, follow these steps:
Create and encrypt one password for each user account you want to use in GRUB 2. Use the
grub2-mkpasswd-pbkdf2command as described in Section 14.2.6, “Setting a boot password”.Delete the content of the
/etc/grub.d/10_linuxfile and save it. This prevents outputting the default GRUB 2 menu entries.Edit the
/boot/grub2/custom.cfgfile and add custom menu entries manually. The following template is just an example, adjust it to better match your use case:set superusers=admin password admin ADMIN_PASSWORD password maintainer MAINTAINER_PASSWORD menuentry 'Operational mode' { insmod ext2 set root=hd0,1 echo 'Loading Linux ...' linux /boot/vmlinuz root=/dev/vda1 $GRUB_CMDLINE_LINUX_DEFAULT $GRUB_CMDLINE_LINUX mode=operation echo 'Loading Initrd ...' initrd /boot/initrd } menuentry 'Maintenance mode' --users maintainer { insmod ext2 set root=hd0,1 echo 'Loading Linux ...' linux /boot/vmlinuz root=/dev/vda1 $GRUB_CMDLINE_LINUX_DEFAULT $GRUB_CMDLINE_LINUX mode=maintenance echo 'Loading Initrd ...' initrd /boot/initrd }Import the changes into the main configuration file:
>sudogrub2-mkconfig -o /boot/grub2/grub.cfg
In the above example:
The GRUB 2 menu has two entries, and .
If no user is specified, both boot menu entries are accessible, but no one can access GRUB 2 command line nor edit existing menu entries.
adminuser can access GRUB 2 command line and edit existing menu entries.maintenanceuser can select the recovery menu item.
14.3 Configuring the boot loader with YaST #
The easiest way to configure general options of the boot loader in your SUSE Linux Enterprise Server system is to use the YaST module. In the , select › . The module shows the current boot loader configuration of your system and allows you to make changes.
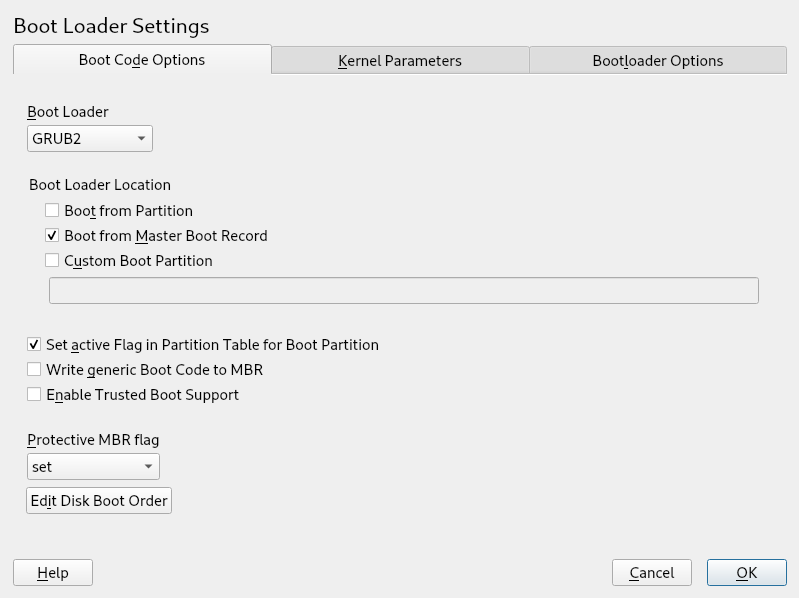
Use the tab to view and change settings related to type, location and advanced loader settings. You can choose whether to use GRUB 2 in standard or EFI mode.
If you have an EFI system you can only install GRUB2-EFI, otherwise your system is no longer bootable.
To reinstall the boot loader, make sure to change a setting in YaST and then change it back. For example, to reinstall GRUB2-EFI, select first and then immediately switch back to .
Otherwise, the boot loader may only be partially reinstalled.
To use a boot loader other than the ones listed, select . Read the documentation of your boot loader carefully before choosing this option.
14.3.1 Boot loader location and boot code options #
The default location of the boot loader depends on the partition setup and
is either the Master Boot Record (MBR) or the boot sector of the
/ partition. To modify the location of the boot loader,
follow these steps:
Select the tab and then choose one of the following options for :
This installs the boot loader in the MBR of the disk containing the directory
/boot. Usually this will be the disk mounted to/, but if/bootis mounted to a separate partition on a different disk, the MBR of that disk will be used.This installs the boot loader in the boot sector of the
/partition.Use this option to specify the location of the boot loader manually.
Click to apply the changes.
The tab includes the following additional options:
Activates the partition that contains the
/bootdirectory. For POWER systems it activates the PReP partition. Use this option on systems with old BIOS and/or legacy operating systems because they may fail to boot from a non-active partition. It is safe to leave this option active.If MBR contains a custom 'non-GRUB' code, this option replaces it with a generic, operating system independent code. If you deactivate this option, the system may become unbootable.
Starts TrustedGRUB2, which supports trusted computing functionality (Trusted Platform Module (TPM)). For more information refer to https://github.com/Sirrix-AG/TrustedGRUB2.
The section includes the following options:
This is appropriate for traditional legacy BIOS booting.
This is appropriate for UEFI booting.
This is usually the best choice if you have an already working system.
In most cases YaST defaults to the appropriate choice.
14.3.2 Adjusting the disk order #
If your computer has more than one hard disk, you can specify the boot sequence of the disks. The first disk in the list is where GRUB 2 will be installed in the case of booting from MBR. It is the disk where SUSE Linux Enterprise Server is installed by default. The rest of the list is a hint for GRUB 2's device mapper (see Section 14.2.4, “Mapping between BIOS drives and Linux devices”).
The default value is usually valid for almost all deployments. If you change the boot order of disks wrongly, the system may become unbootable on the next reboot. For example, if the first disk in the list is not part of the BIOS boot order, and the other disks in the list have empty MBRs.
Open the tab.
Click .
If more than one disk is listed, select a disk and click or to reorder the displayed disks.
Click two times to save the changes.
14.3.3 Configuring advanced options #
Advanced boot parameters can be configured via the tab.
14.3.3.1 tab #
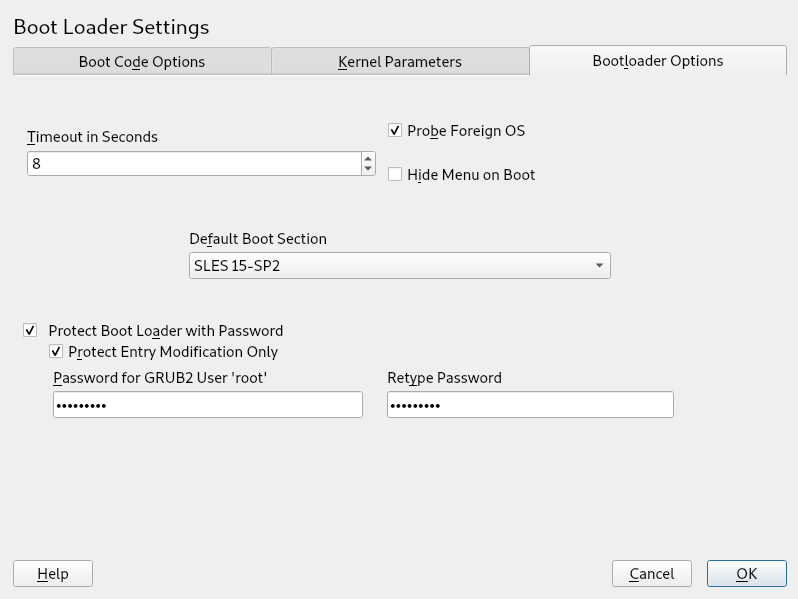
Change the value of by typing in a new value and clicking the appropriate arrow key with your mouse.
When selected, the boot loader searches for other systems like Windows or other Linux installations.
Hides the boot menu and boots the default entry.
Select the desired entry from the “Default Boot Section” list. Note that the “>” sign in the boot entry name delimits the boot section and its subsection.
Protects the boot loader and the system with an additional password. For details on manual configuration, see Section 14.2.6, “Setting a boot password”. If this option is activated, the boot password is required on every boot, which means the system does not boot automatically. However, if you prefer the behavior of GRUB 1, additionally enable . With this setting, anybody is allowed to select a boot entry and boot the system, whereas the password for the GRUB 2
rootuser is only required for modifying boot entries.
14.3.3.2 tab #
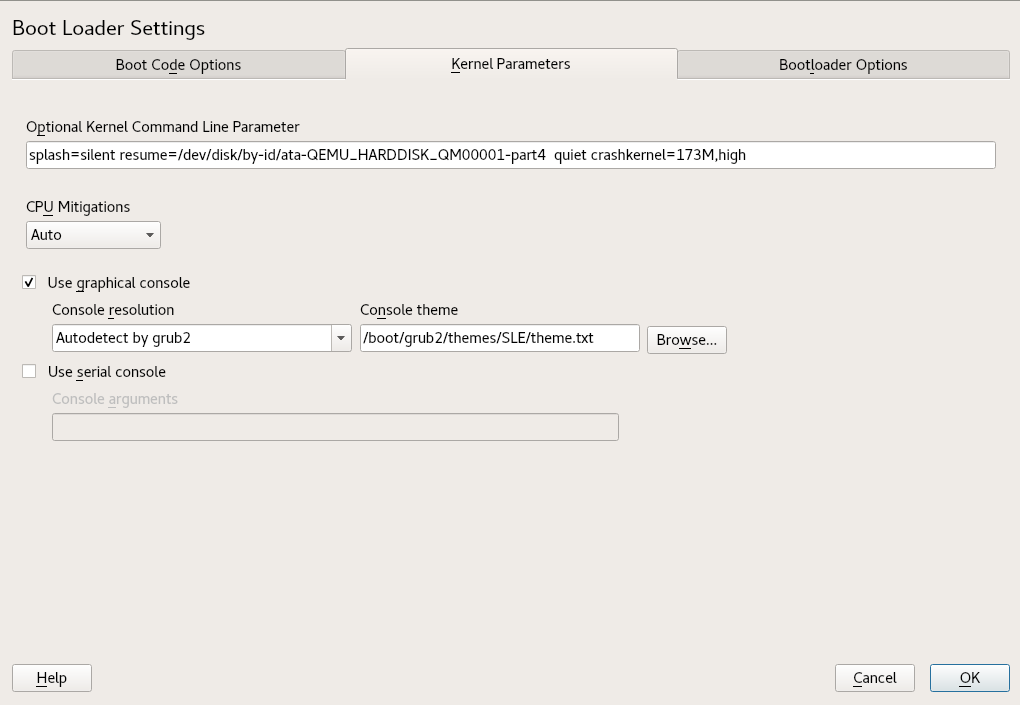
Specify optional kernel parameters here to enable/disable system features, add drivers, etc.
SUSE has released one or more kernel boot command line parameters for all software mitigations that have been deployed to prevent CPU side-channel attacks. Some of those may result in performance loss. Choose one the following options to strike a balance between security and performance, depending on your setting:
. Enables all mitigations required for your CPU model, but does not protect against cross-CPU thread attacks. This setting may impact performance to some degree, depending on the workload.
. Provides the full set of available security mitigations. Enables all mitigations required for your CPU model. In addition, it disables Simultaneous Multithreading (SMT) to avoid side-channel attacks across multiple CPU threads. This setting may further impact performance, depending on the workload.
. Disables all mitigations. Side-channel attacks against your CPU are possible, depending on the CPU model. This setting has no impact on performance.
. Does not set any mitigation level. Specify your CPU mitigations manually by using the kernel command line options.
When checked, the boot menu appears on a graphical splash screen rather than in a text mode. The resolution of the boot screen is set automatically by default, but you can manually set it via . The graphical theme definition file can be specified with the file chooser. Only change this if you want to apply your own, custom-made theme.
If your machine is controlled via a serial console, activate this option and specify which COM port to use at which speed. See
info
       grub
or http://www.gnu.org/software/grub/manual/grub.html#Serial-terminal
14.4 Differences in terminal usage on IBM Z #
On 3215 and 3270 terminals there are some differences and limitations on how to move the cursor and how to issue editing commands within GRUB 2.
14.4.1 Limitations #
- Interactivity
Interactivity is strongly limited. Typing often does not result in visual feedback. To see where the cursor is, type an underscore (_).
Note: 3270 compared to 3215The 3270 terminal is much better at displaying and refreshing screens than the 3215 terminal.
- Cursor movement
“Traditional” cursor movement is not possible. Alt, Meta, Ctrl and the cursor keys do not work. To move the cursor, use the key combinations listed in Section 14.4.2, “Key combinations”.
- Caret
The caret (^) is used as a control character. To type a literal ^ followed by a letter, type ^, ^, LETTER.
- Enter
The Enter key does not work, use ^–J instead.
14.4.2 Key combinations #
|
Common Substitutes: |
^–J |
engage (“Enter”) |
|
^–L |
abort, return to previous “state” | |
|
^–I |
tab completion (in edit and shell mode) | |
|
Keys Available in Menu Mode: |
^–A |
first entry |
|
^–E |
last entry | |
|
^–P |
previous entry | |
|
^–N |
next entry | |
|
^–G |
previous page | |
|
^–C |
next page | |
|
^–F |
boot selected entry or enter submenu (same as ^–J) | |
|
E |
edit selected entry | |
|
C |
enter GRUB-Shell | |
|
Keys Available in Edit Mode: |
^–P |
previous line |
|
^–N |
next line | |
|
^–B |
backward char | |
|
^–F |
forward char | |
|
^–A |
beginning of line | |
|
^–E |
end of line | |
|
^–H |
backspace | |
|
^–D |
delete | |
|
^–K |
kill line | |
|
^–Y |
yank | |
|
^–O |
open line | |
|
^–L |
refresh screen | |
|
^–X |
boot entry | |
|
^–C |
enter GRUB-Shell | |
|
Keys Available in Command Line Mode: |
^–P |
previous command |
|
^–N |
next command from history | |
|
^–A |
beginning of line | |
|
^–E |
end of line | |
|
^–B |
backward char | |
|
^–F |
forward char | |
|
^–H |
backspace | |
|
^–D |
delete | |
|
^–K |
kill line | |
|
^–U |
discard line | |
|
^–Y |
yank |
14.5 Helpful GRUB 2 commands #
grub2-mkconfigGenerates a new
/boot/grub2/grub.cfgbased on/etc/default/gruband the scripts from/etc/grub.d/.Example 14.1: Usage of grub2-mkconfig #grub2-mkconfig -o /boot/grub2/grub.cfg
Tip: Syntax checkRunning
grub2-mkconfigwithout any parameters prints the configuration to STDOUT where it can be reviewed. Usegrub2-script-checkafter/boot/grub2/grub.cfghas been written to check its syntax.Important:grub2-mkconfigcannot repair UEFI Secure Boot tablesIf you are using UEFI Secure Boot and your system is not reaching GRUB 2 correctly anymore, you may need to additionally reinstall the Shim and regenerate the UEFI boot table. To do so, use:
#shim-install --config-file=/boot/grub2/grub.cfggrub2-mkrescueCreates a bootable rescue image of your installed GRUB 2 configuration.
Example 14.2: Usage of grub2-mkrescue #grub2-mkrescue -o save_path/name.iso iso
grub2-script-checkChecks the given file for syntax errors.
Example 14.3: Usage of grub2-script-check #grub2-script-check /boot/grub2/grub.cfg
grub2-onceSet the default boot entry for the next boot only. To get the list of available boot entries use the
--listoption.Example 14.4: Usage of grub2-once #grub2-once number_of_the_boot_entry
Tip:grub2-oncehelpCall the program without any option to get a full list of all possible options.
14.6 Rescue mode #
Rescue mode is a specific root user session
for troubleshooting and repairing systems where the booting process
fails. It offers a single-user environment with local file systems and
core system services active. Network interfaces are not activated. To
enter the rescue mode, follow these steps.
Reboot the system. The boot screen appears, offering the GRUB 2 boot menu.
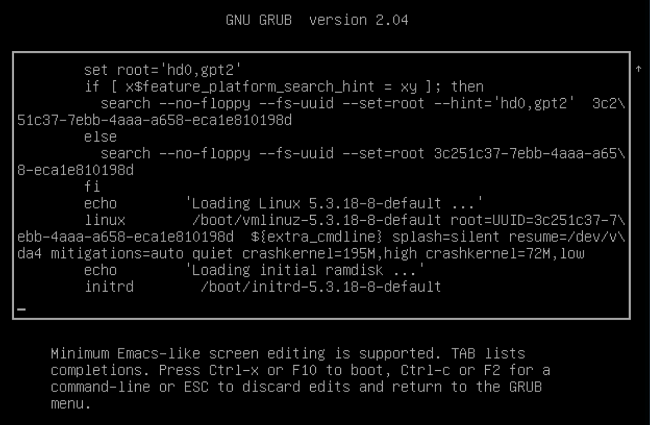
Select the menu entry to boot and press e to edit the boot line.
Append the following parameter to the line containing the kernel parameters:
systemd.unit=rescue.target
Press Ctrl+X to boot with these settings.
Enter the password for
root.Make all the necessary changes.
Enter normal operating target again by entering
systemctl isolate multi-user.targetorsystemctl isolate graphical.targetat the command line.
14.7 More information #
Extensive information about GRUB 2 is available at https://www.gnu.org/software/grub/. Also refer to the
grub info page. You can also
search for the keyword “GRUB 2” in the Technical Information
Search at https://www.suse.com/support to get
information about special issues.


