SAP Digital Manufacturing Edge on SUSE #
SAP

SUSE® offers a complete stack for container workloads. This best practice document describeshow to use these offerings for installations of Digital Manufacturing Edge included with SAP Digital Manufacturing Cloud. This document does not cover operating SAP Digital Manufacturing Edge or SAP Digital Manufacturing Cloud.
Disclaimer: Documents published as part of the SUSE Best Practices series have been contributed voluntarily by SUSE employees and third parties. They are meant to serve as examples of how particular actions can be performed. They have been compiled with utmost attention to detail. However, this does not guarantee complete accuracy. SUSE cannot verify that actions described in these documents do what is claimed or whether actions described have unintended consequences. SUSE LLC, its affiliates, the authors, and the translators may not be held liable for possible errors or the consequences thereof.
1 Introduction #
This document describes how to prepare your infrastructure to install Digital Manufacturing Edge on Rancher Kubernetes Engine 2 using SUSE Rancher Prime. It guides you through the following steps:
Installing SUSE Rancher Prime
Setting up Rancher Kubernetes Engine 2 clusters
Deploying required components for Digital Manufacturing Edge
2 Supported and used versions #
The following support matrix lists the software versions used in this guide.
| Product | Version |
|---|---|
SUSE Linux Micro | 6.2 |
Rancher Kubernetes Engine 2 | 1.34 |
SUSE Rancher Prime | 2.14.1 |
SUSE Storage | 1.11.3 |
cert-manager | 1.20.3 |
MetalLB | 0.16.1 |
PostgreSQL | 16.14 |
Istio | 1.30.3 |
Dex | 2.45.1 |
External Secrets Operator | 2.8.0 |
Strimzi Kafka Operator | 1.1.0 |

You can use other versions, but they are not tested.
3 Prerequisites #
Get subscriptions for:
Rancher for SAP applications *
SUSE Linux Enterprise High Availability **
* The Rancher for SAP applications subscription contains support for all required components like SUSE Linux Micro, SUSE Rancher Prime and SUSE Storage.
** Only needed if you want to set up SUSE Rancher Prime in a high availability setup.
Additionally,
check the storage requirements.
get an SAP S-user ID to access software and documentation from SAP.
read the relevant SAP documentation:
SAP provides an overview of tested Kubernetes versions which need to be taken into account before deploying Digital Manufacturing Edge: https://help.sap.com/docs/sap-digital-manufacturing/setup-and-operations-guide-for-sap-digital-manufacturing-for-edge-computing/release-process-and-strategy?locale=en-US#tested-kubernetes-distributions-and-versions
The same applies for the databases known to work with Digital Manufacturing Edge: https://help.sap.com/docs/sap-digital-manufacturing/setup-and-operations-guide-for-sap-digital-manufacturing-for-edge-computing/postgresql-database?locale=en-US
Before installing the clusters, ensure that you meet all SAP requirements.
4 Installing SUSE Linux Micro 6.2 #
You can install SUSE Linux Micro 6.2 using several methods. This best practice guide uses the graphical installer. However, for cloud-native deployments, we recommend using infrastructure-as-code technologies to automate deployment and lifecycle management.
4.1 Installing and configuring SUSE Linux Enterprise Micro #
On each server in your environment for Edge Integration Cell and SUSE Rancher Prime, install SUSE Linux Enterprise Micro 6.0 as the operating system. There are several methods to install SUSE Linux Enterprise Micro 6.0 on your hardware or virtual machine. A list of all possible solutions are available in our Documentation SLE Micro 6.0.
At the end of the installation process, in the summary window, you need to verify that the following security settings are configured:
The firewall will be disabled.
The SSH service will be enabled.
SELinux will be set in permissive mode.
Set SELinux to permissive mode, because otherwise, some components of the Edge Integration Cell will violate SELinux rules, and the application will not work.

If you have already set up all machines and the operating system, skip this chapter.
4.2 Registering your system #
To get your system up-to-date, you need to register it with SUSE Manager, an RMT server, or directly with the SCC Portal. Find the registration process with a direct connection to SCC described in the instructions below. For more information, see the SUSE Linux Enterprise Micro documentation.
Registering the system is possible from the command line using the transactional-update register command.
For information that goes beyond the scope of this section, refer to the inline documentation with SUSEConnect --help.
To register SUSE Linux Enterprise Micro with SUSE Customer Center, run transactional-update register as follows:
sudo transactional-update register -r REGISTRATION_CODE -e EMAIL_ADDRESSTo register with a local registration server, additionally specify the URL to the server:
sudo  transactional-update register -r REGISTRATION_CODE -e EMAIL_ADDRESS \
--url "https://suse_register.example.com/"
Do not forget to replace
REGISTRATION_CODE with the registration code you received with your copy of SUSE Linux Enterprise Micro.
EMAIL_ADDRESS with the e-mail address associated with the SUSE account you or your organization uses to manage subscriptions.
Reboot your system to switch to the latest snapshot. SUSE Linux Enterprise Micro is now registered.
Find more information about registering your system in the SUSE Linux Enterprise Micro 6.0 Deployment Guide section Deploying selfinstall images.
4.3 Updating your system #
Log in to the system. After your system is registered, you can update it with the transactional-update command.
sudo transactional-update4.4 Disabling automatic reboot #
By default SUSE Linux Enterprise Micro runs a timer for transactional-update in the background which could automatically reboot your system.
Disable it with the following command:
sudo systemctl --now disable transactional-update.timer4.5 Preparing for SUSE Storage #
For SUSE Storage, some preparation steps are required. First, install some additional packages on all worker nodes. Then, attach a second disk to the worker nodes, create a file system on top of it, and mount it to the default SUSE Storage location. The size of the second disk will depend on your use case.
Install some packages as a requirement for SUSE Storage and Logical Volume Management for adding a file system to SUSE Storage.
sudo transactional-update pkg install lvm2 jq nfs-client cryptsetup open-iscsiAfter the required packages are installed, you need to reboot your machine.
sudo rebootNow you can enable the iscsid server.
sudo systemctl enable iscsid --now4.5.1 Creating file system for SUSE Storage #
The next step is to create a new logical volume with the Logical Volume Management.
First, you need to create a new physical volume. In our case, the second disk is called vdb. Use this as SUSE Storage volume.
sudo pvcreate /dev/vdbAfter the physical volume is created, create a volume group called vgdata:
sudo vgcreate vgdata /dev/vdbNow create the logical volume; use 100% of the disk.
sudo lvcreate -n lvlonghorn -l100%FREE vgdataOn the logical volume, create the XFS file system. You do not need to create a partition on top of it.
sudo mkfs.xfs /dev/vgdata/lvlonghornBefore you can mount the device, you need to create the directory structure.
sudo mkdir -p /var/lib/longhornAdd an entry to fstab to ensure that the mount of the file system is persistent:
sudo echo -e "/dev/vgdata/lvlonghorn /var/lib/longhorn xfs defaults 0 0" >> /etc/fstabFinally, you can mount the file system as follows:
sudo mount -a5 Installing SUSE Rancher Prime cluster #
At this point, the operating system is installed on every Kubernetes node, and you are ready to install the SUSE Rancher Prime cluster.
5.1 Preparation #
To provide a highly available SUSE Rancher Prime setup, you need a load balancer for your SUSE Rancher Prime nodes. If you already have a load balancer, you can use that to make SUSE Rancher Prime highly available.
If you do not plan to set up a highly available SUSE Rancher Prime cluster, you can skip this section.
5.1.1 Installing a haproxy-based load balancer #
This section describes how to set up a custom load balancer using haproxy.
Set up a virtual machine or a bare metal server with SUSE Linux Enterprise Server and SUSE Linux Enterprise High Availability or use SUSE Linux Enterprise Server for SAP applications.
Install the haproxy package.
sudo zypper in haproxyCreate the configuration for haproxy.
Find an example configuration file for haproxy below and adapt for the actual environment.
sudo cat <<EOF > /etc/haproxy/haproxy.cfg
global
        log /dev/log    local0
        log /dev/log    local1 notice
        chroot /var/lib/haproxy
        # stats socket /run/haproxy/admin.sock mode 660 level admin
        stats timeout 30s
        user haproxy
        group haproxy
        daemon

        # general hardlimit for the process of connections to handle, this is separate to backend/listen
        # Added in 'global' AND 'defaults'!!! - global affects only system limits (ulimit/maxsock) and defaults affects only listen/backend-limits - hez
        maxconn 400000

        # Default SSL material locations
        ca-base /etc/ssl/certs
        crt-base /etc/ssl/private

        tune.ssl.default-dh-param 2048

        # Default ciphers to use on SSL-enabled listening sockets.
        # For more information, see ciphers(1SSL). This list is from:
        #  https://hynek.me/articles/hardening-your-web-servers-ssl-ciphers/
        ssl-default-bind-ciphers ECDH+AESGCM:DH+AESGCM:ECDH+AES256:DH+AES256:ECDH+AES128:DH+AES:ECDH+3DES:DH+3DES:RSA+AESGCM:RSA+AES:RSA+3DES:!aNULL:!MD5:!DSS
        ssl-default-bind-options ssl-min-ver TLSv1.2 no-tls-tickets

defaults
        mode tcp
        log     global
        option  tcplog
        option  redispatch
        option  tcpka
        option  dontlognull
        retries 2
        timeout connect 5s
        timeout client  5s
        timeout server  5s
        timeout tunnel  86400s
        maxconn 400000

listen stats
        bind *:9000
        mode http
        stats hide-version
        stats uri /stats

listen rancher_apiserver
        bind my_lb_address:6443
        option httpchk GET /healthz
        http-check expect status 401
        server mynode1 mynode1.domain.local:6443 check check-ssl verify none
        server mynode2 mynode2.domain.local:6443 check check-ssl verify none
        server mynode3 mynode3.domain.local:6443 check check-ssl verify none
listen rancher_register
        bind my_lb_address:9345
        option httpchk GET /ping
        http-check expect status 200
        server mynode1 mynode1.domain.local:9345 check check-ssl verify none
        server mynode2 mynode2.domain.local:9345 check check-ssl verify none
        server mynode3 mynode3.domain.local:9345 check check-ssl verify none

listen rancher_ingress80
        bind my_lb_address:80
        option httpchk GET /
        http-check expect status 404
        server mynode1 mynode1.domain.local:80 check
        server mynode2 mynode2.domain.local:80 check
        server mynode3 mynode3.domain.local:80 check

listen rancher_ingress443
        bind my_lb_address:443
        option httpchk GET /
        http-check expect status 404
        server mynode1 mynode1.domain.local:443 check check-ssl verify none
        server mynode2 mynode2.domain.local:443 check check-ssl verify none
        server mynode3 mynode3.domain.local:443 check check-ssl verify none
EOF
Check the configuration file:
haproxy -f /path/to/your/haproxy.conf -cEnable and start the haproxy load balancer:
sudo systemctl enable haproxy
sudo systemctl start haproxy
Do not forget to restart or reload haproxy if any changes are made to the haproxy configuration file.
5.2 Installing RKE2 #
To install RKE2, the script provided at https://get.rke2.io can be used as follows:
sudo curl -sfL https://get.rke2.io | INSTALL_RKE2_VERSION=v1.31.7+rke2r1 shFor HA setups, you must create RKE2 cluster configuration files in advance. On the first master node, do the following:
sudo mkdir -p /etc/rancher/rke2
cat <<EOF > /etc/rancher/rke2/config.yaml
token: 'your cluster token'
system-default-registry: registry.rancher.com
tls-san:
  - FQDN of fixed registration address on load balancer
  - other hostname
  - IP v4 address
EOF
Create configuration files for additional cluster nodes:
cat <<EOF > /etc/rancher/rke2/config.yaml
server: https://"FQDN of registration address":9345
token: 'your cluster token'
system-default-registry: registry.rancher.com
tls-san:
  - FQDN of fixed registration address on load balancer
  - other hostname
  - IP v4 address
EOFYou also need to consider taking etcd snapshots and perform backups of your Rancher instance. These topics are not covered in this document, but you can find more information in our official documentation. Helpful links are https://documentation.suse.com/cloudnative/rke2/latest/en/backup_restore.html and https://documentation.suse.com/cloudnative/rancher-manager/latest/en/rancher-admin/back-up-restore-and-disaster-recovery/back-up-restore-and-disaster-recovery.html. IMPORTANT: For security reasons, we generally recommend activating the CIS profile when installing RKE2. This is currently still being validated and will be included in the documentation at a later date.
Now enable and start the RKE2 components and run the following command on each cluster node:
sudo systemctl enable rke2-server --nowTo verify the installation, run the following command:
/var/lib/rancher/rke2/bin/kubectl --kubeconfig /etc/rancher/rke2/rke2.yaml get nodesFor convenience, you can add the kubectl binary to the $PATH and set the specified kubeconfig
via an environment variable:
export PATH=$PATH:/var/lib/rancher/rke2/bin/
export KUBECONFIG=/etc/rancher/rke2/rke2.yaml
5.3 Installing Helm #
To install SUSE Rancher Prime and some of its required components, you need to use Helm.
One way to install Helm is to run:
curl https://raw.githubusercontent.com/helm/helm/main/scripts/get-helm-3 | bash5.4 Installing cert-manager #
To install the cert-manager package, do the following:
kubectl create namespace cert-managerTo install cert-manager from the application-collection, you must create an imagePullSecret.
How to create the imagePullSecret is described in the Section 10.1, “Creating an imagePullSecret for the Rancher Application Collection”.
5.4.1 Installing the application #
Before you can install the application, you need to login into the registry. You can find the instruction in Section 10.2, “Logging in to the Application Collection Registry”.
helm install cert-manager oci://dp.apps.rancher.io/charts/cert-manager \
    --set crds.enabled=true \
    --set-json 'global.imagePullSecrets=[{"name":"application-collection"}]' \
    --namespace=cert-manager \
    --version 1.15.2
5.5 Installing SUSE Rancher Prime #
To install SUSE Rancher Prime, you need to add the related Helm repository. To achieve that, use the following command:
helm repo add rancher-prime https://charts.rancher.com/server-charts/primeNext, create the cattle-system namespace in Kubernetes as follows:
kubectl create namespace cattle-systemThe Kubernetes cluster is now ready for the installation of SUSE Rancher Prime:
helm install rancher rancher-prime/rancher \
    --namespace cattle-system \
    --set hostname=<your.domain.com> \
    --set replicas=3
During the rollout of SUSE Rancher Prime, you can monitor the progress using the following command:
kubectl -n cattle-system rollout status deploy/rancherWhen the deployment is done, you can access the SUSE Rancher Prime cluster at https://<your.domain.com>[]. Here you will also find a description about how to log in for the first time.
6 Installing RKE2 using SUSE Rancher Prime #
After having installed the SUSE Rancher Prime cluster, use it to create Rancher Kubernetes Engine 2 clusters for Digital Manufacturing Edge. SAP recommends setting up separate development and QA systems for Digital Manufacturing Edge in addition to a production landscape.
Creating new RKE2 clusters is straightforward when using SUSE Rancher Prime.
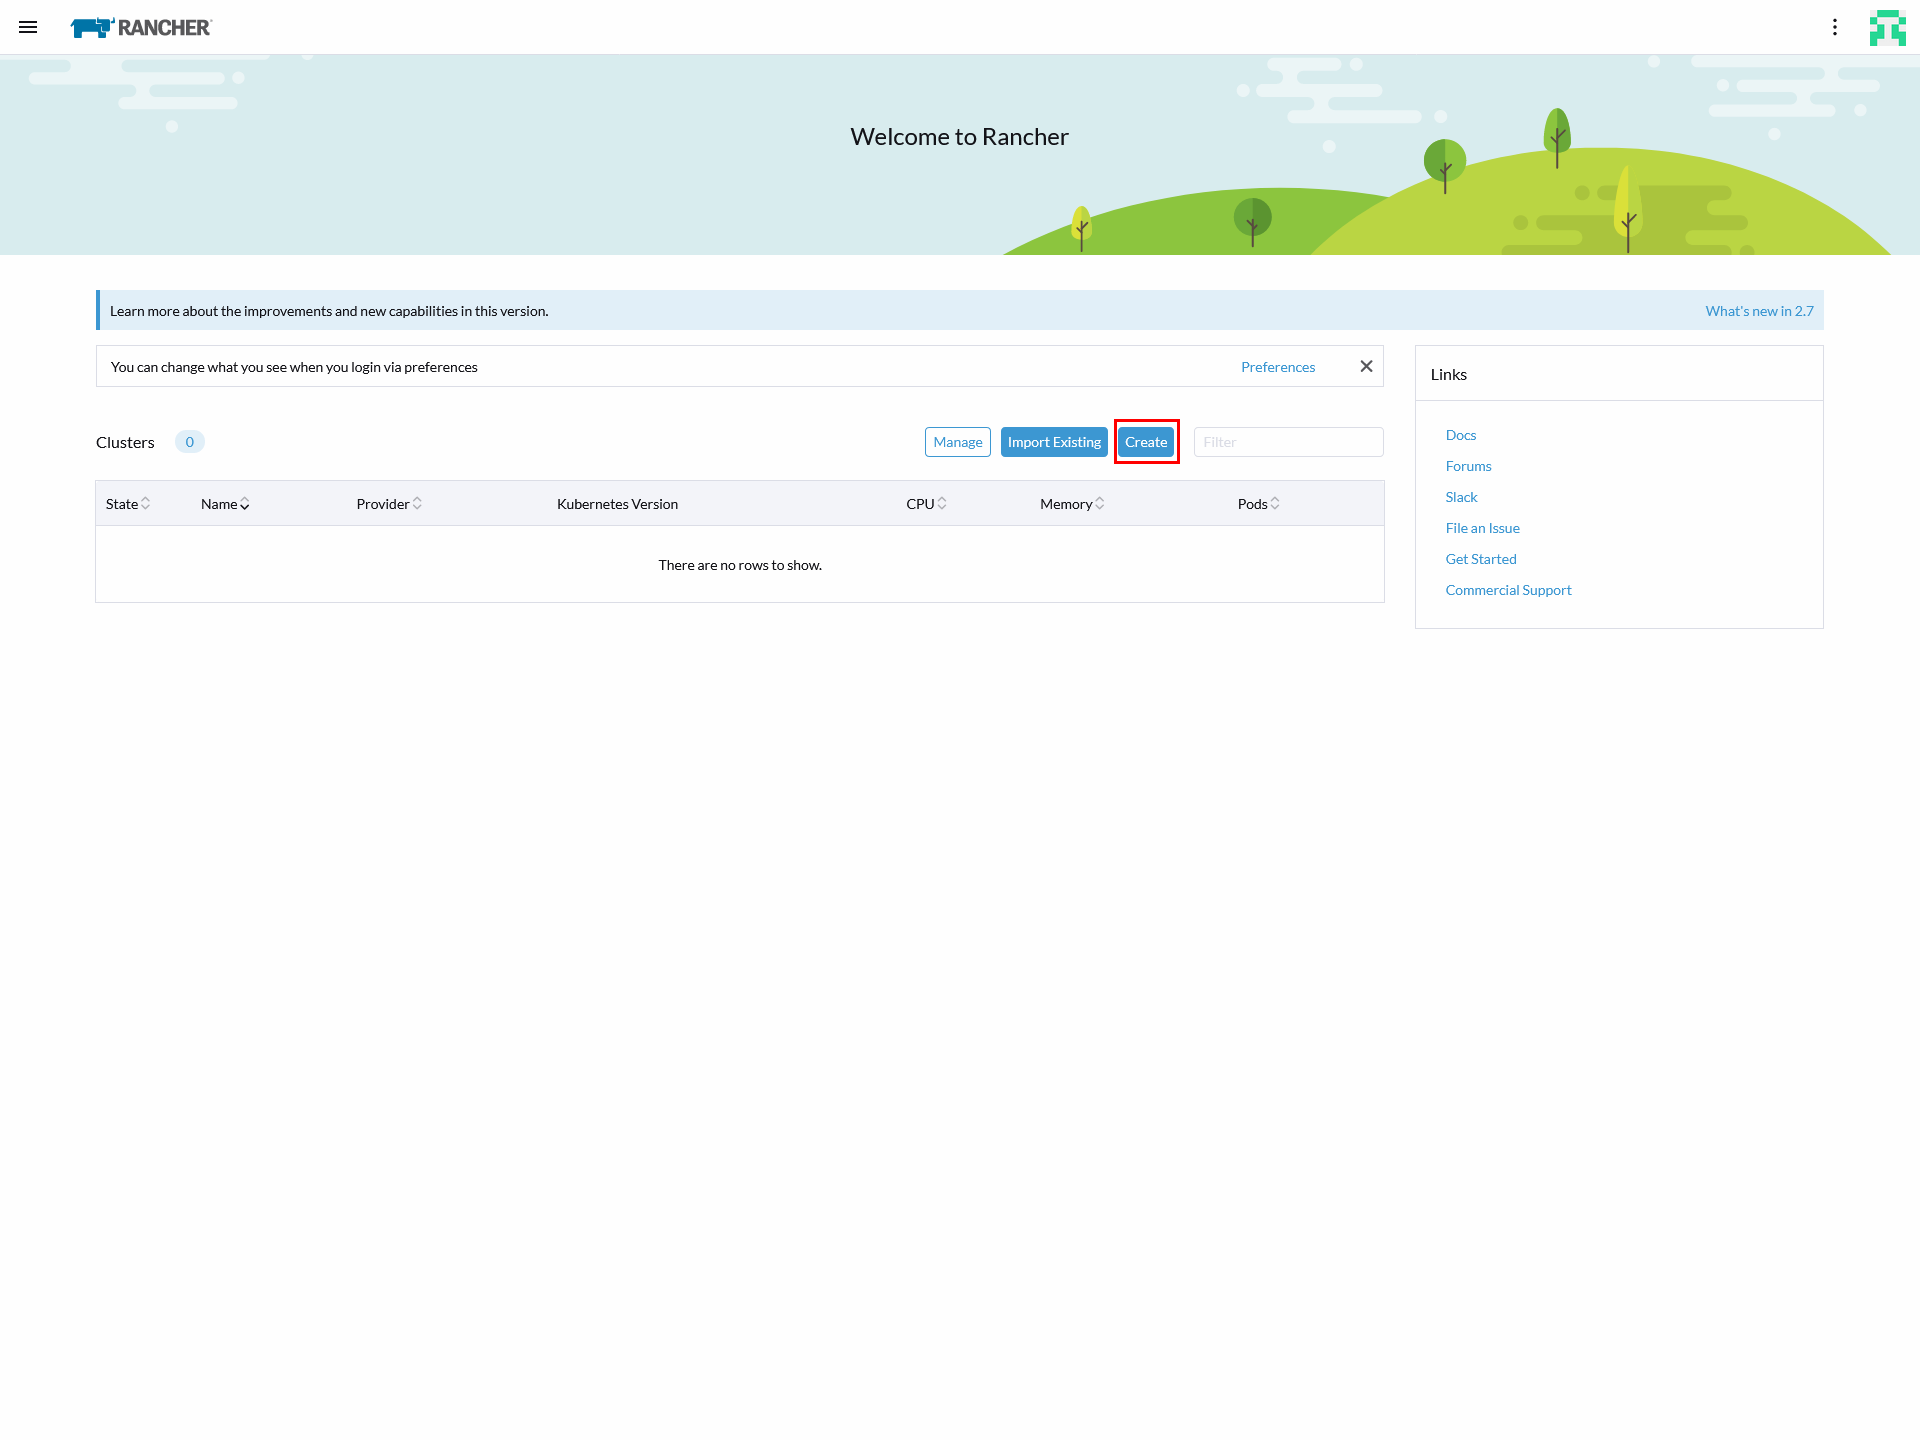
Navigate to the home menu of the SUSE Rancher Prime instance and click the Create button:
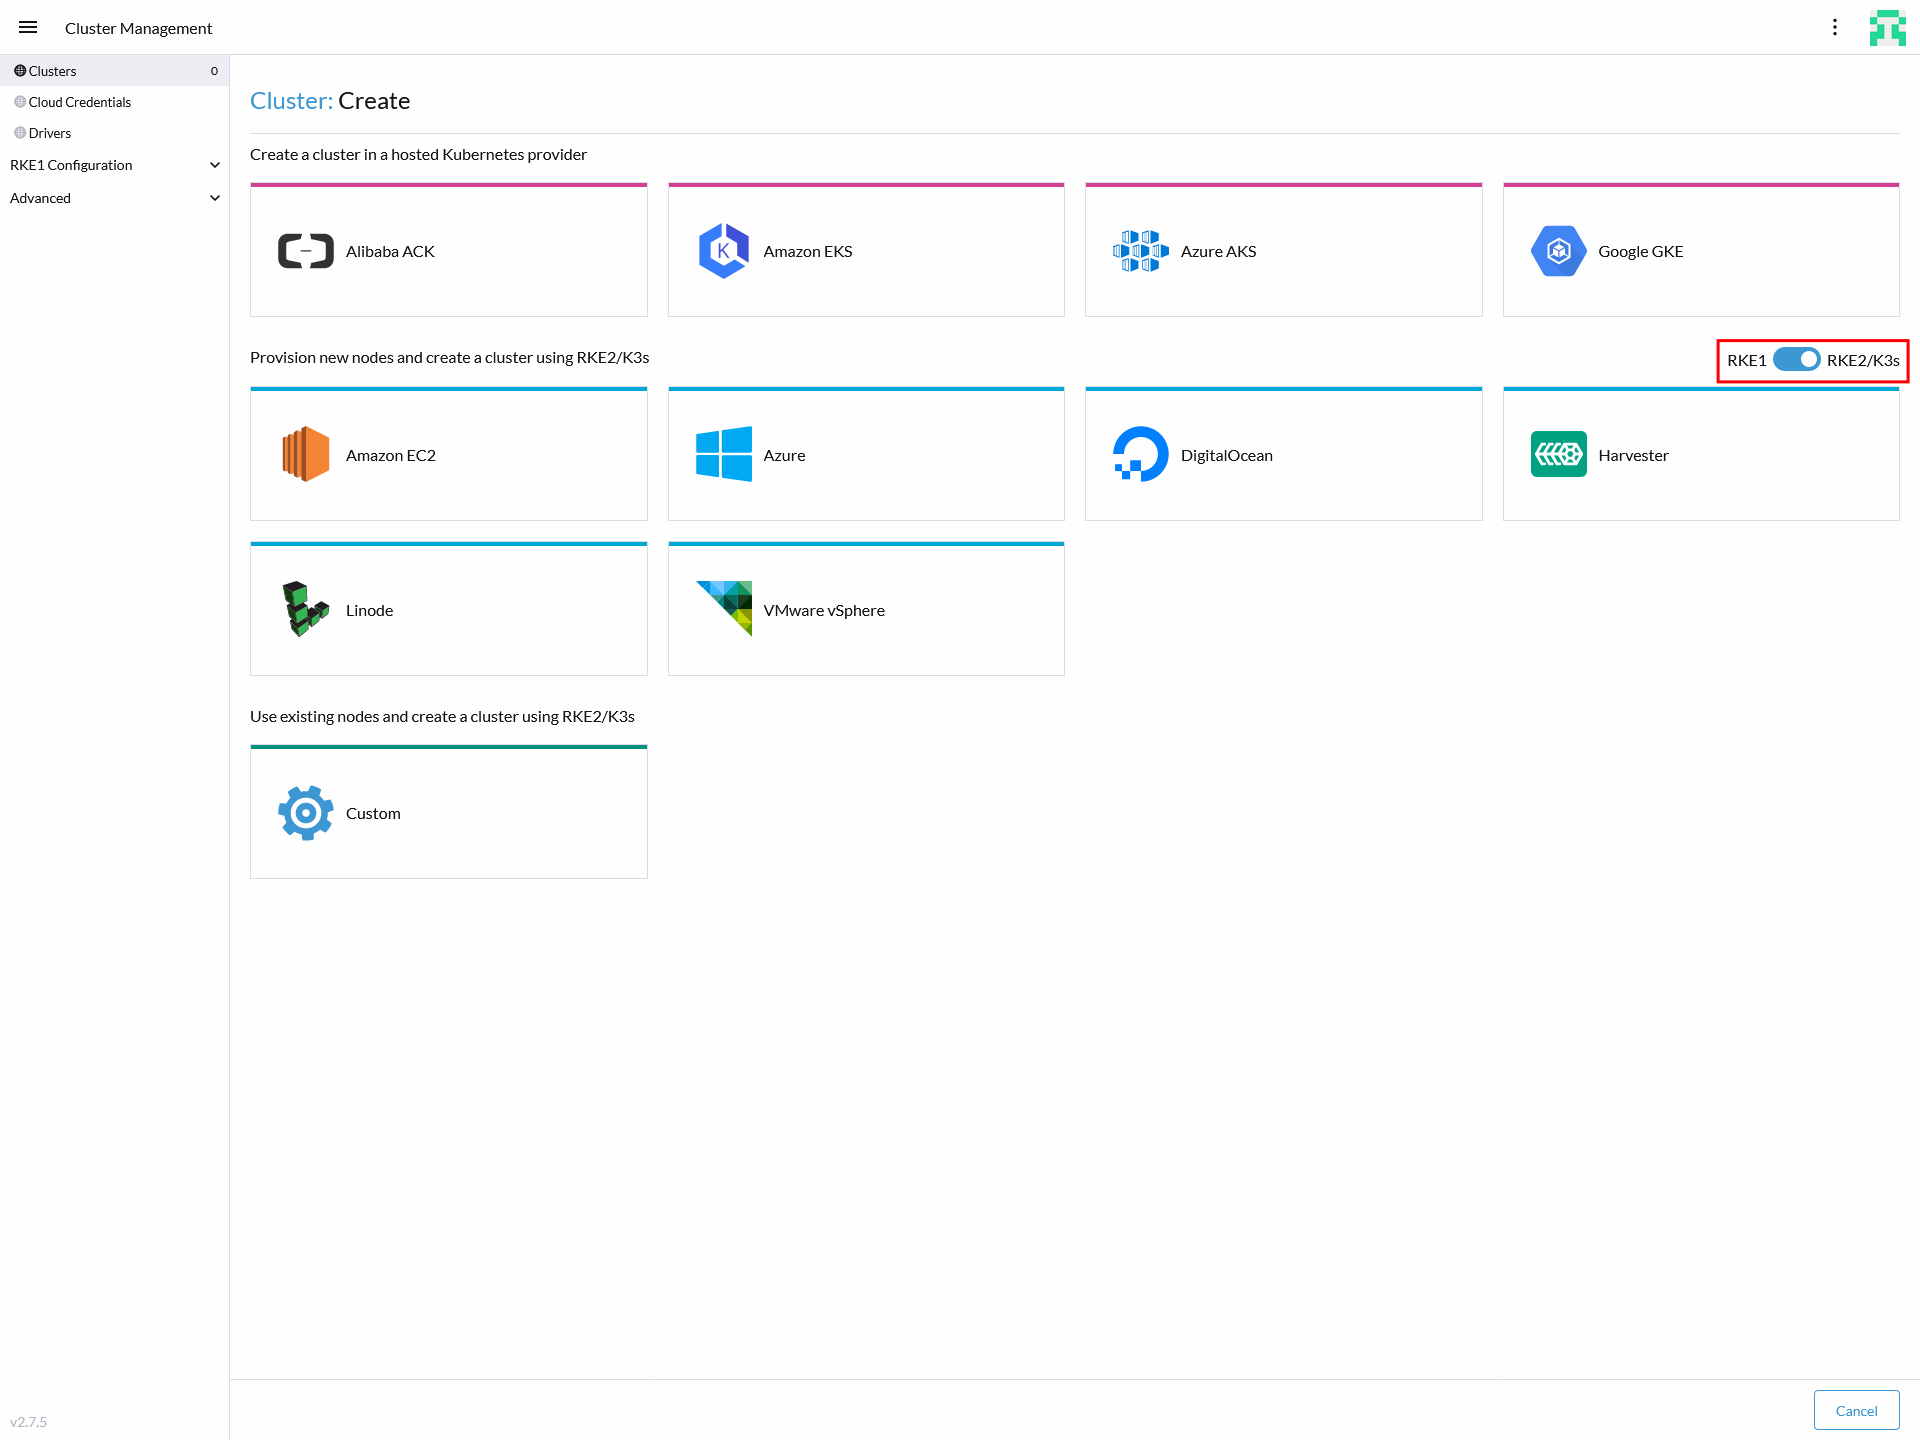
The window displays the available options for creating new Kubernetes clusters. Ensure the toggle button on the right side of the screen is set to RKE2/K3s:
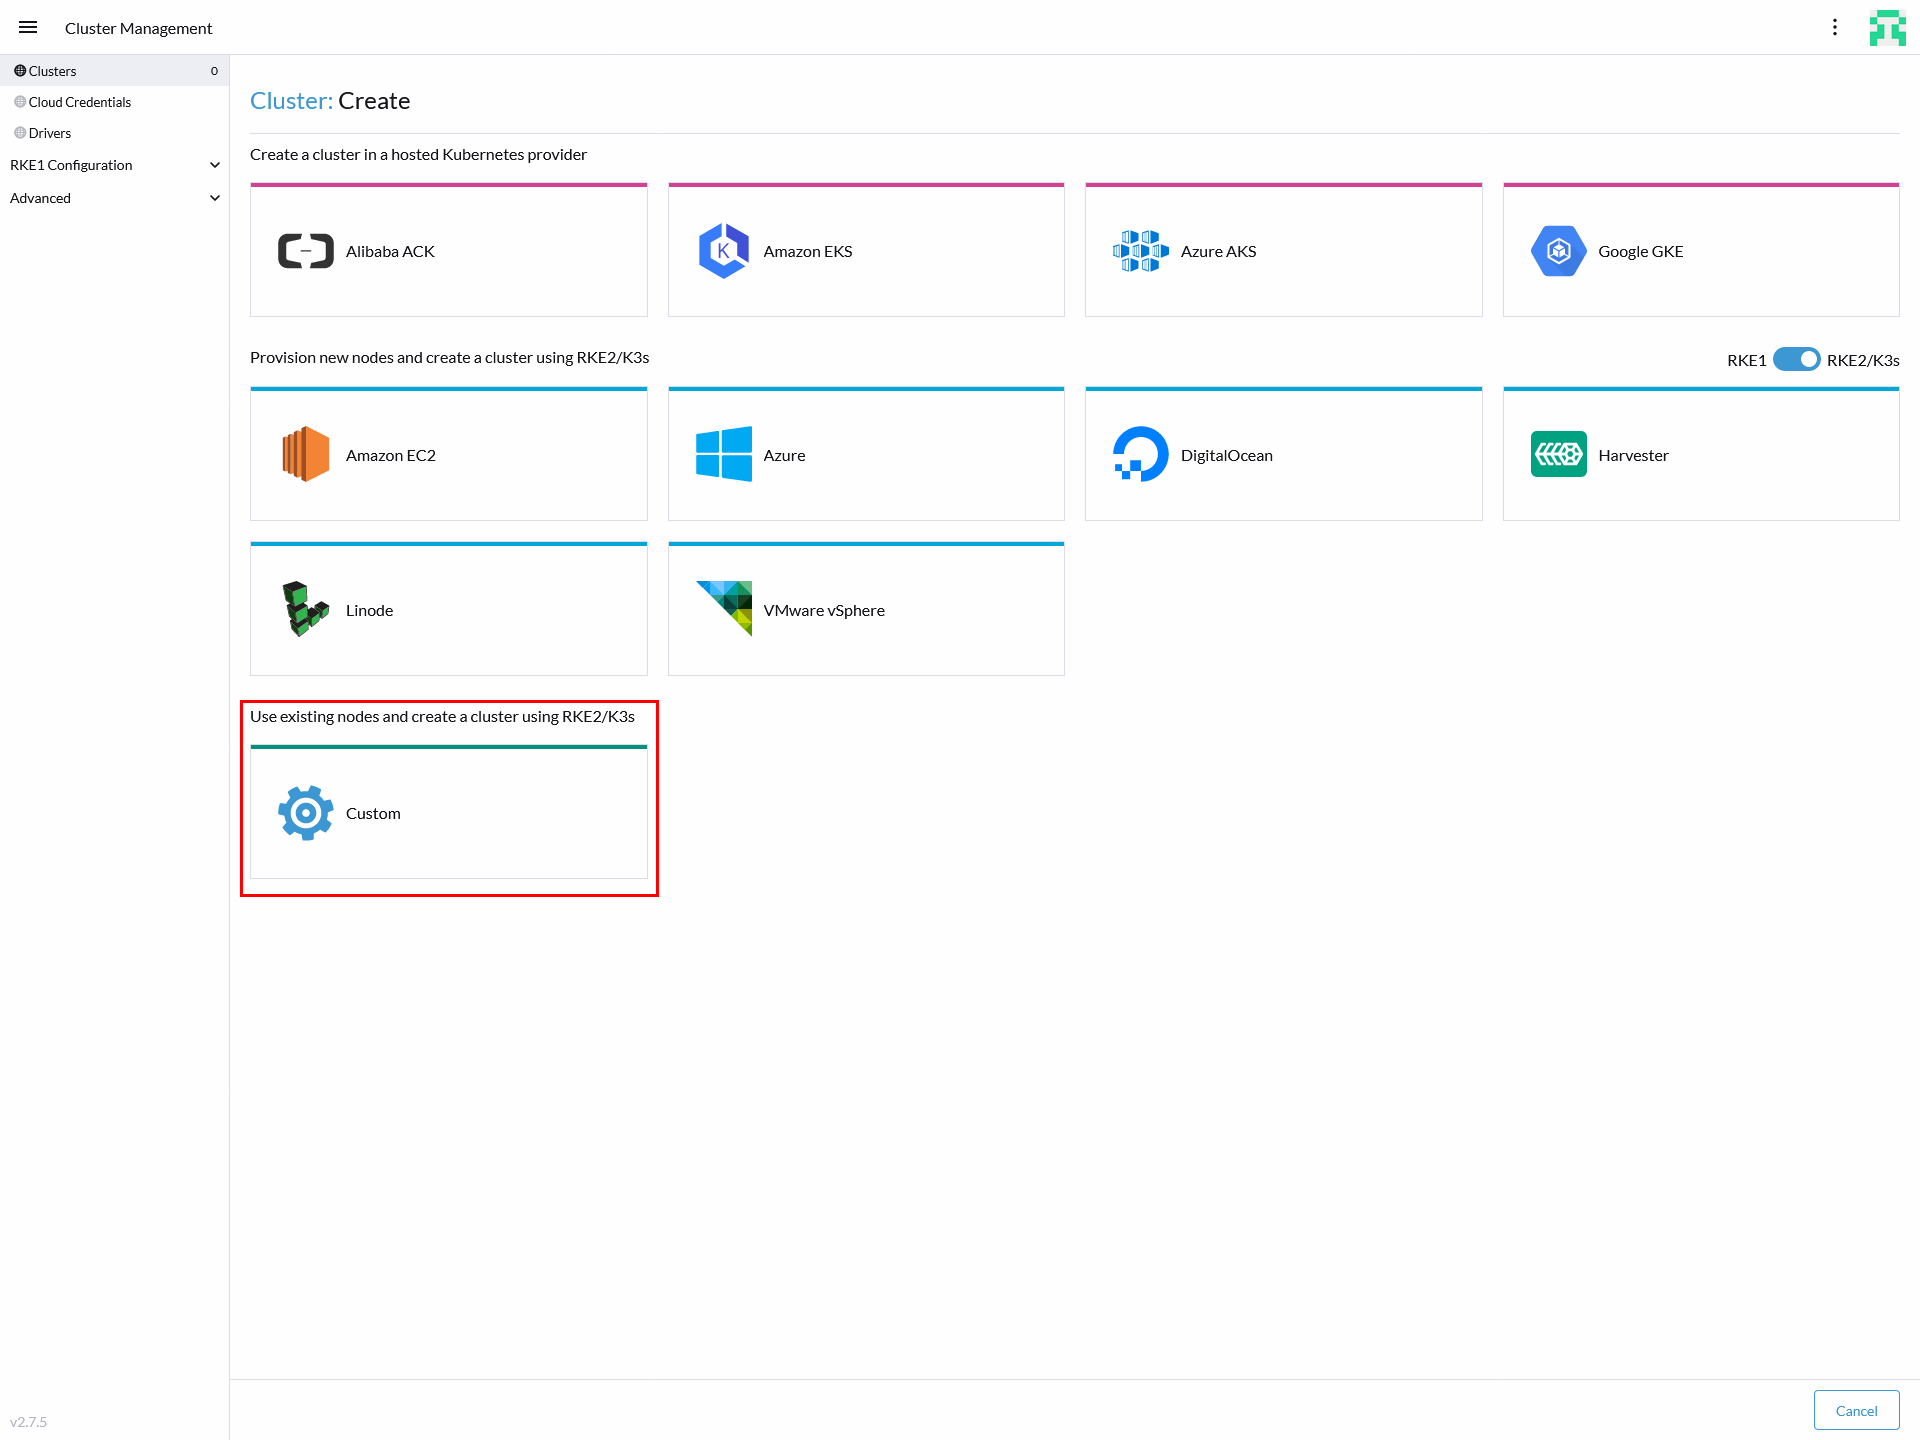
To create Kubernetes clusters on existing (virtual) machines, select the Custom option at the very bottom:
The Kubernetes cluster configuration window appears as shown in the following figure:
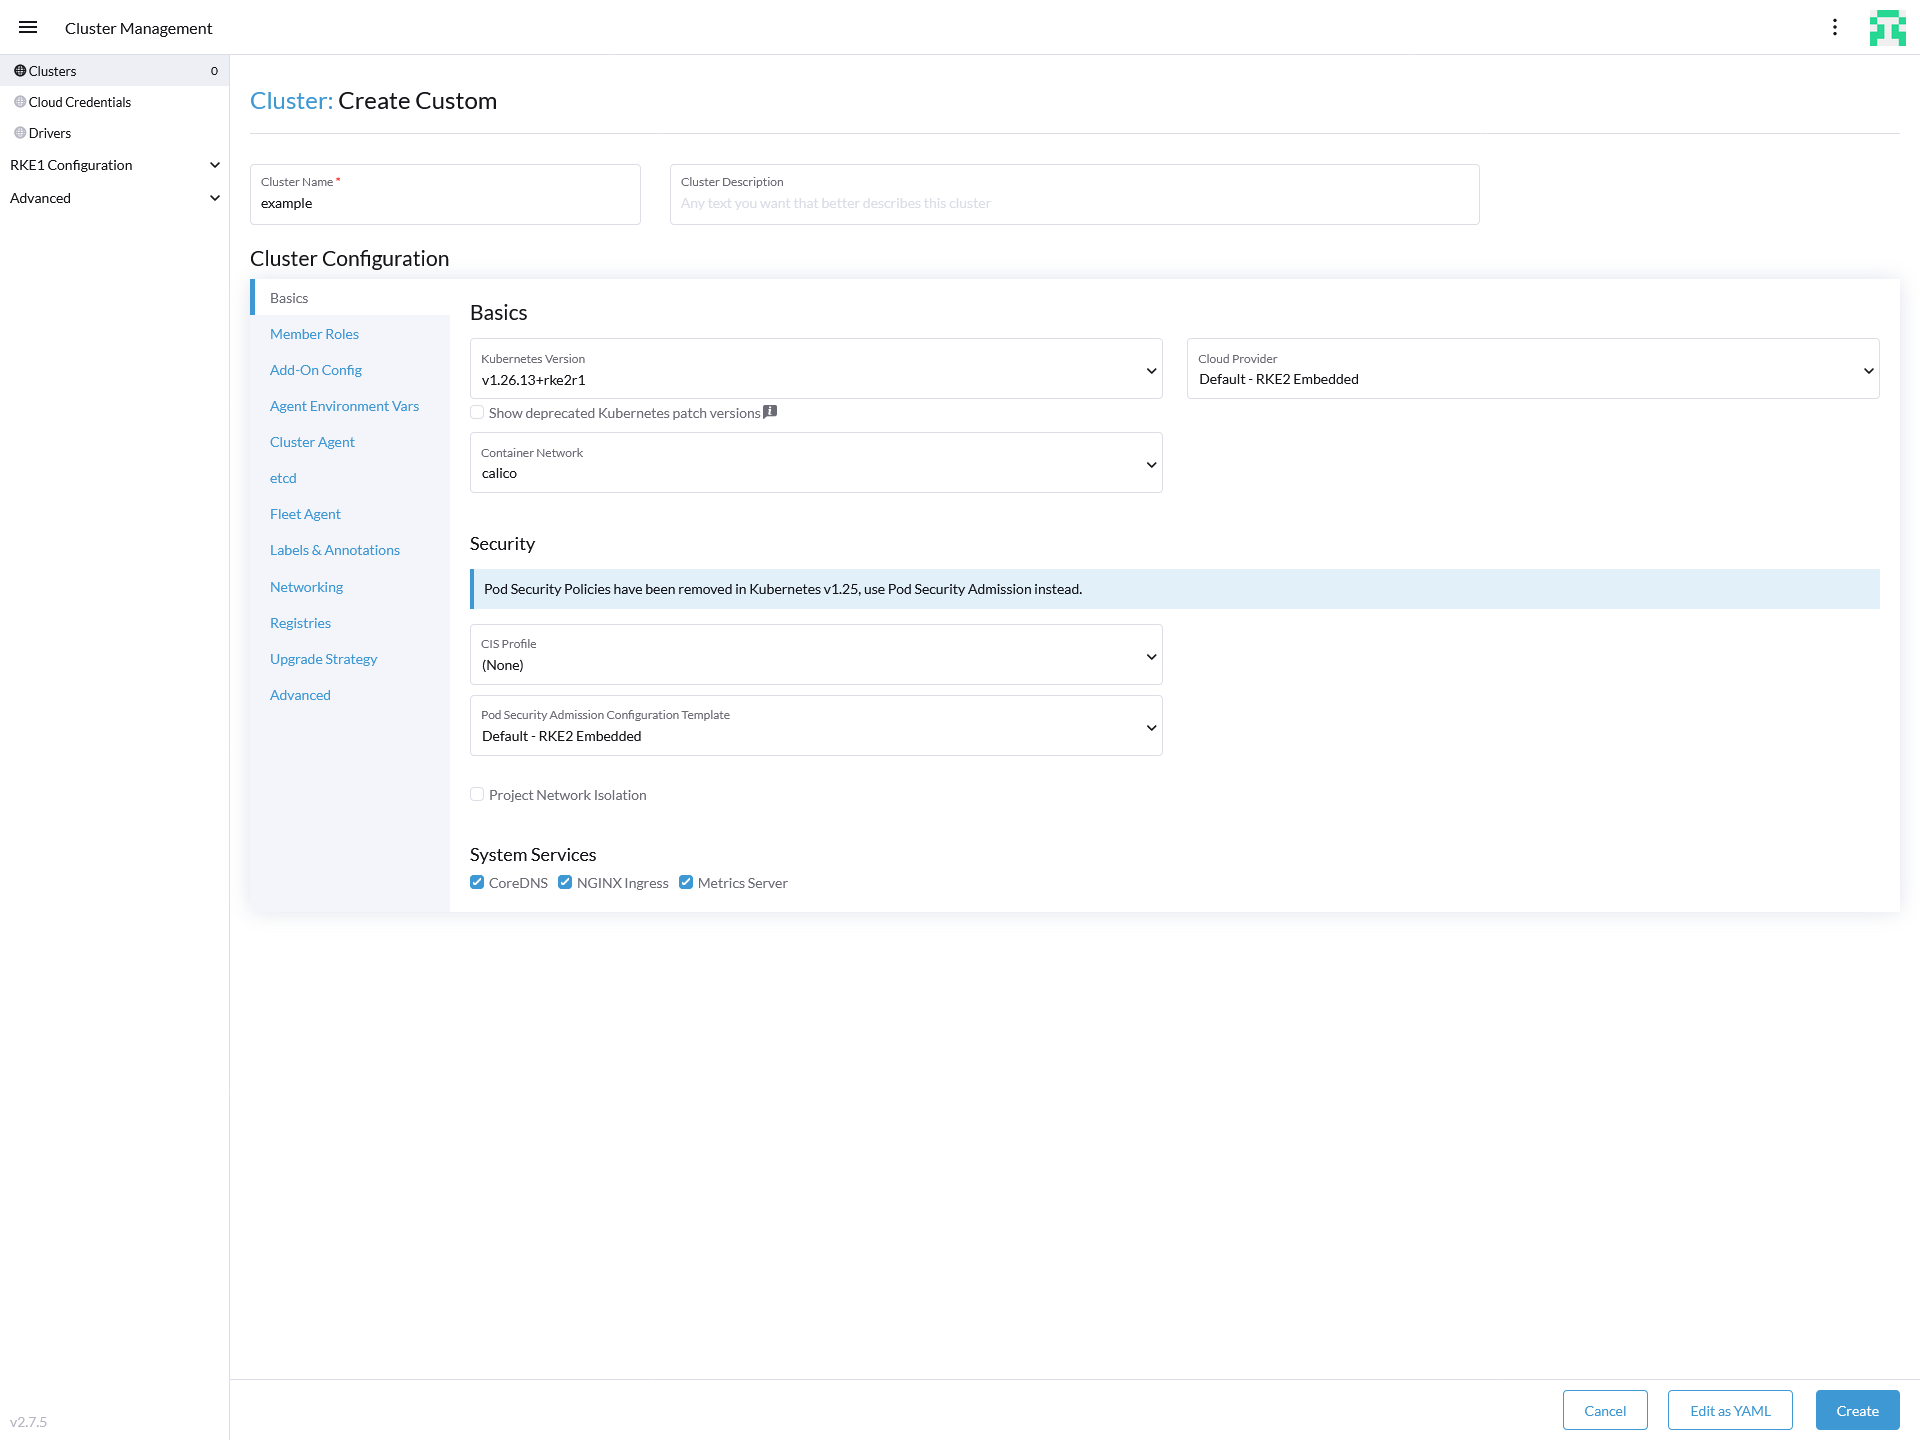
Enter a cluster name. The name is used only within SUSE Rancher Prime and does not affect workloads. Next, select a Kubernetes version supported by the target workload.
If no additional Kubernetes requirements exist, click Create at the very bottom. Otherwise, consult your administrator before making changes.
After clicking Create, the cluster registration view appears as shown in the following figure:
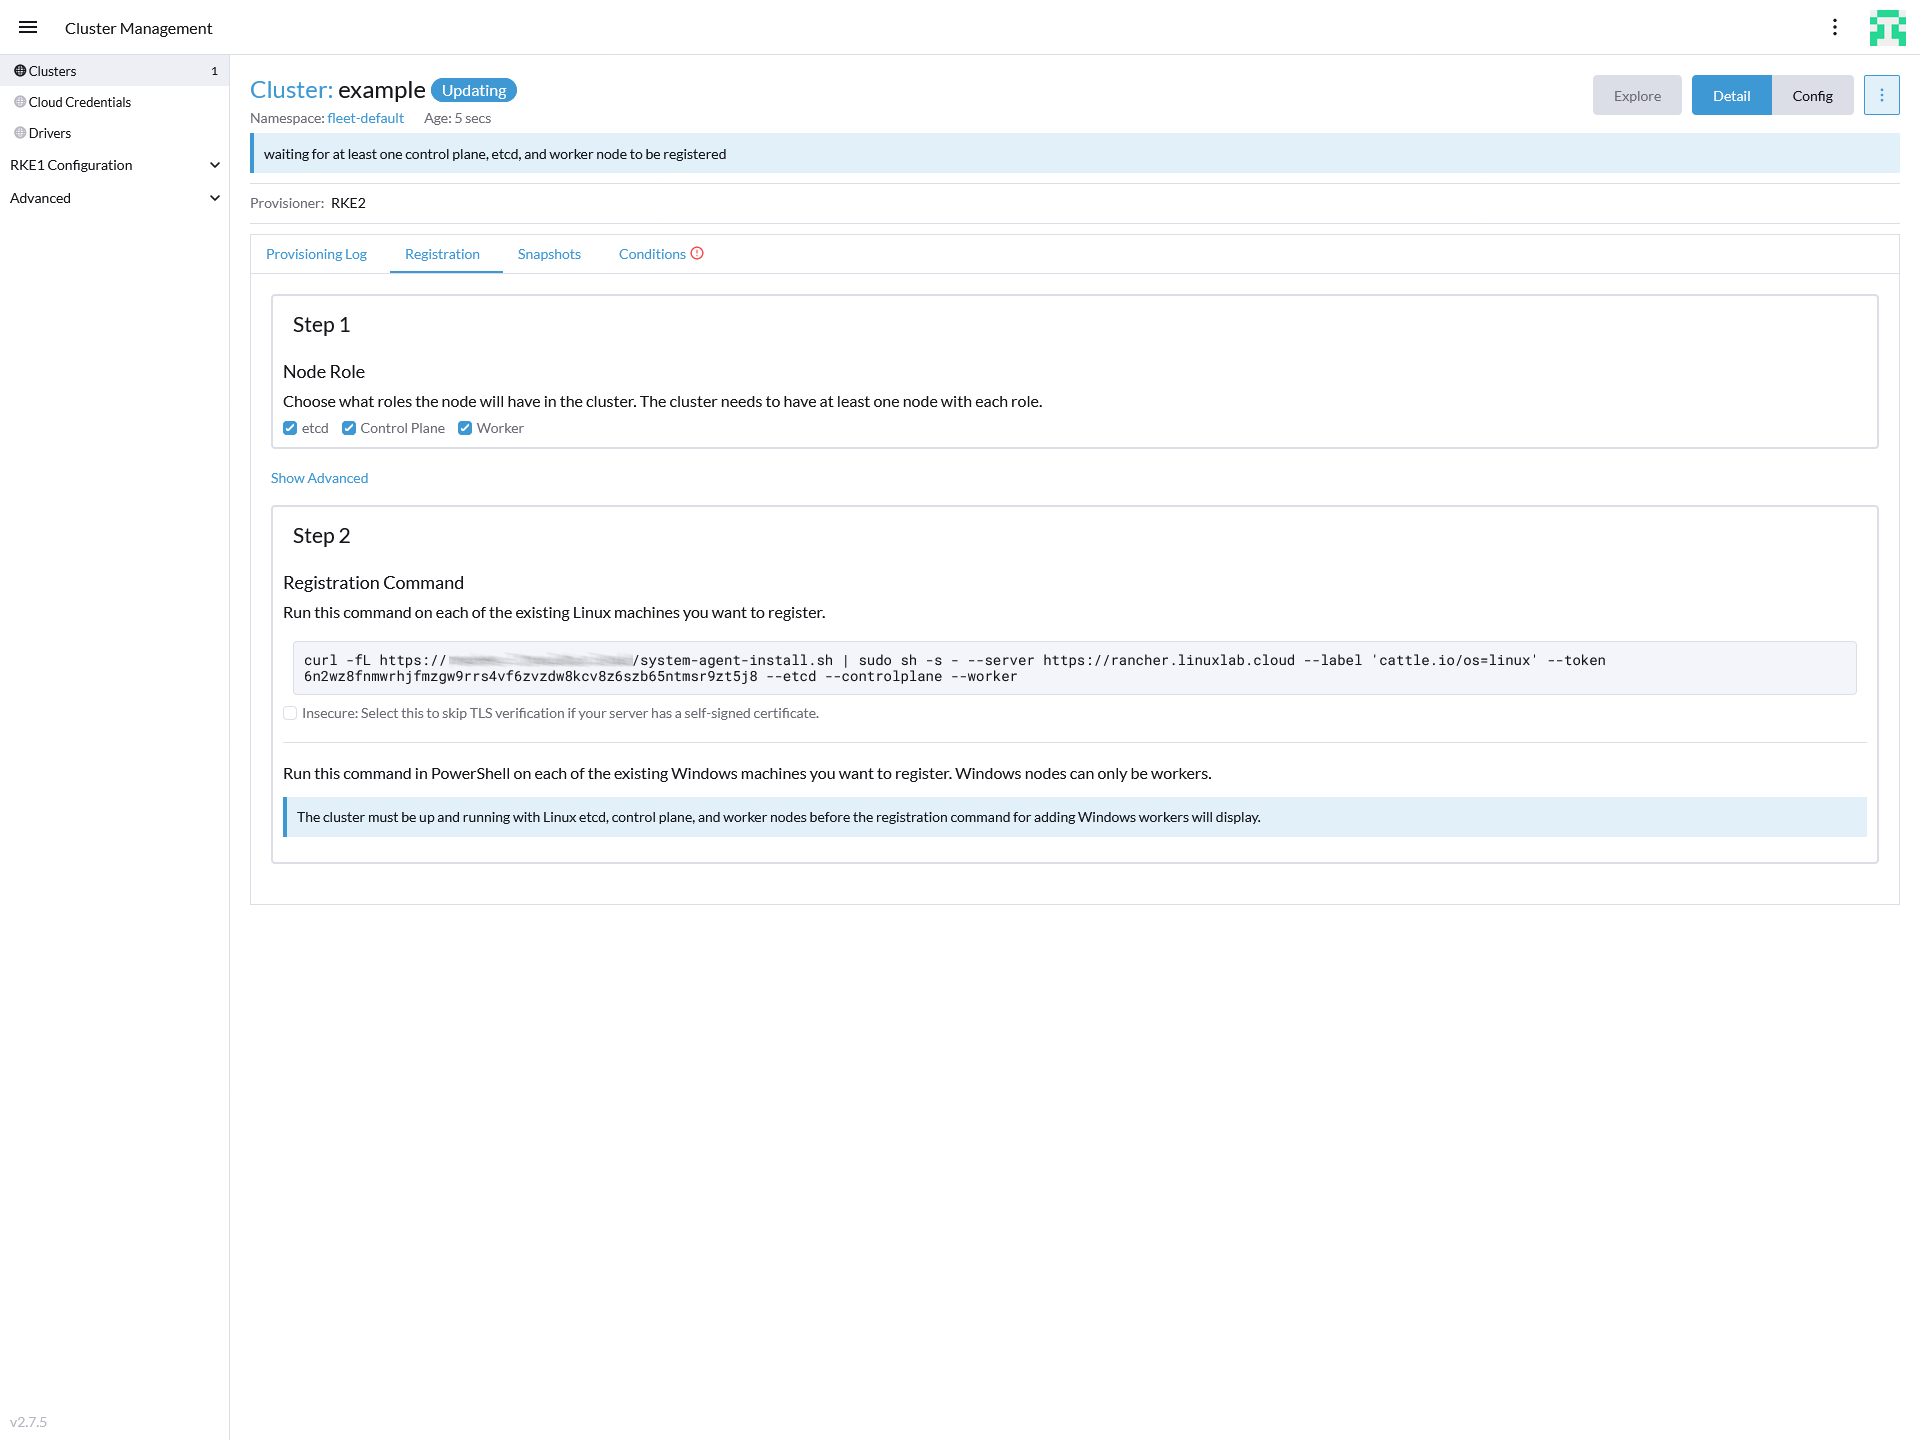
Select the roles for the nodes. A typical high-availability setup consists of:
Three etcd / control plane nodes
Three worker nodes
Copy the registration command to the shell of each target machines and execute it. If the SUSE Rancher Prime instance uses a self-signed certificate, ensure to activate the check box for the text bar containing the registration command.
You can run the command on all nodes in parallel. When all nodes are registered, cluster status at the top changes from "updating" to "active". The Kubernetes cluster is now ready for use.
7 Preparing storage #
To make storage available for Kubernetes workloads, prepare the selected storage solution. This chapter describes how to set up storage and prepare it for Digital Manufacturing Edge.
7.1 Installing SUSE Storage #
To deploy the chart, create the related namespace and imagePullSecret first. To create the namespace, run:
kubectl create namespace longhorn-systemFind instructions how to create the imagePullSecret in Section 10.1, “Creating an imagePullSecret for the Rancher Application Collection”.
Before you can install the application, you need to log in to the registry. Find the instructions in Section 10.2, “Logging in to the Application Collection Registry”.
Create a values.yaml file with the following configuration:
global:
  imagePullSecrets:
    - name: application-collection
Then install the SUSE Storage application:
helm install longhorn oci://dp.apps.rancher.io/charts/suse-storage \
  -f values.yaml \
  --namespace longhorn-system \
  --version 1.11.3
For more details, visit https://documentation.suse.com/en-us/cloudnative/storage/.
7.1.1 Configuring SAP Digital Manufacturing Edge to use SUSE Storage #
After successfully installing SUSE Storage, you must configure the SAP Digital Manufacturing Edge Helm chart to use it as the storage provider.
Add the following storage configuration to the values.yaml file for SAP Digital Manufacturing Edge deployment:
global:
  storageClass: "longhorn"
8 Installing mandatory infrastructure components for Digital Manufacturing Edge #
This chapter presents an example setup for MetalLB and SUSE Private Registry.

Keep in mind that the following instructions might differ from the deployment required for your specific infrastructure and use cases.
8.1 Logging in to Rancher Application Collection #
To access Rancher Application Collection, log in using the console and Helm client. The easiest way to do so is to use the built-in shell in SUSE Rancher Prime. To open the shell, navigate to the cluster and select Kubectl Shell:

A shell will open:
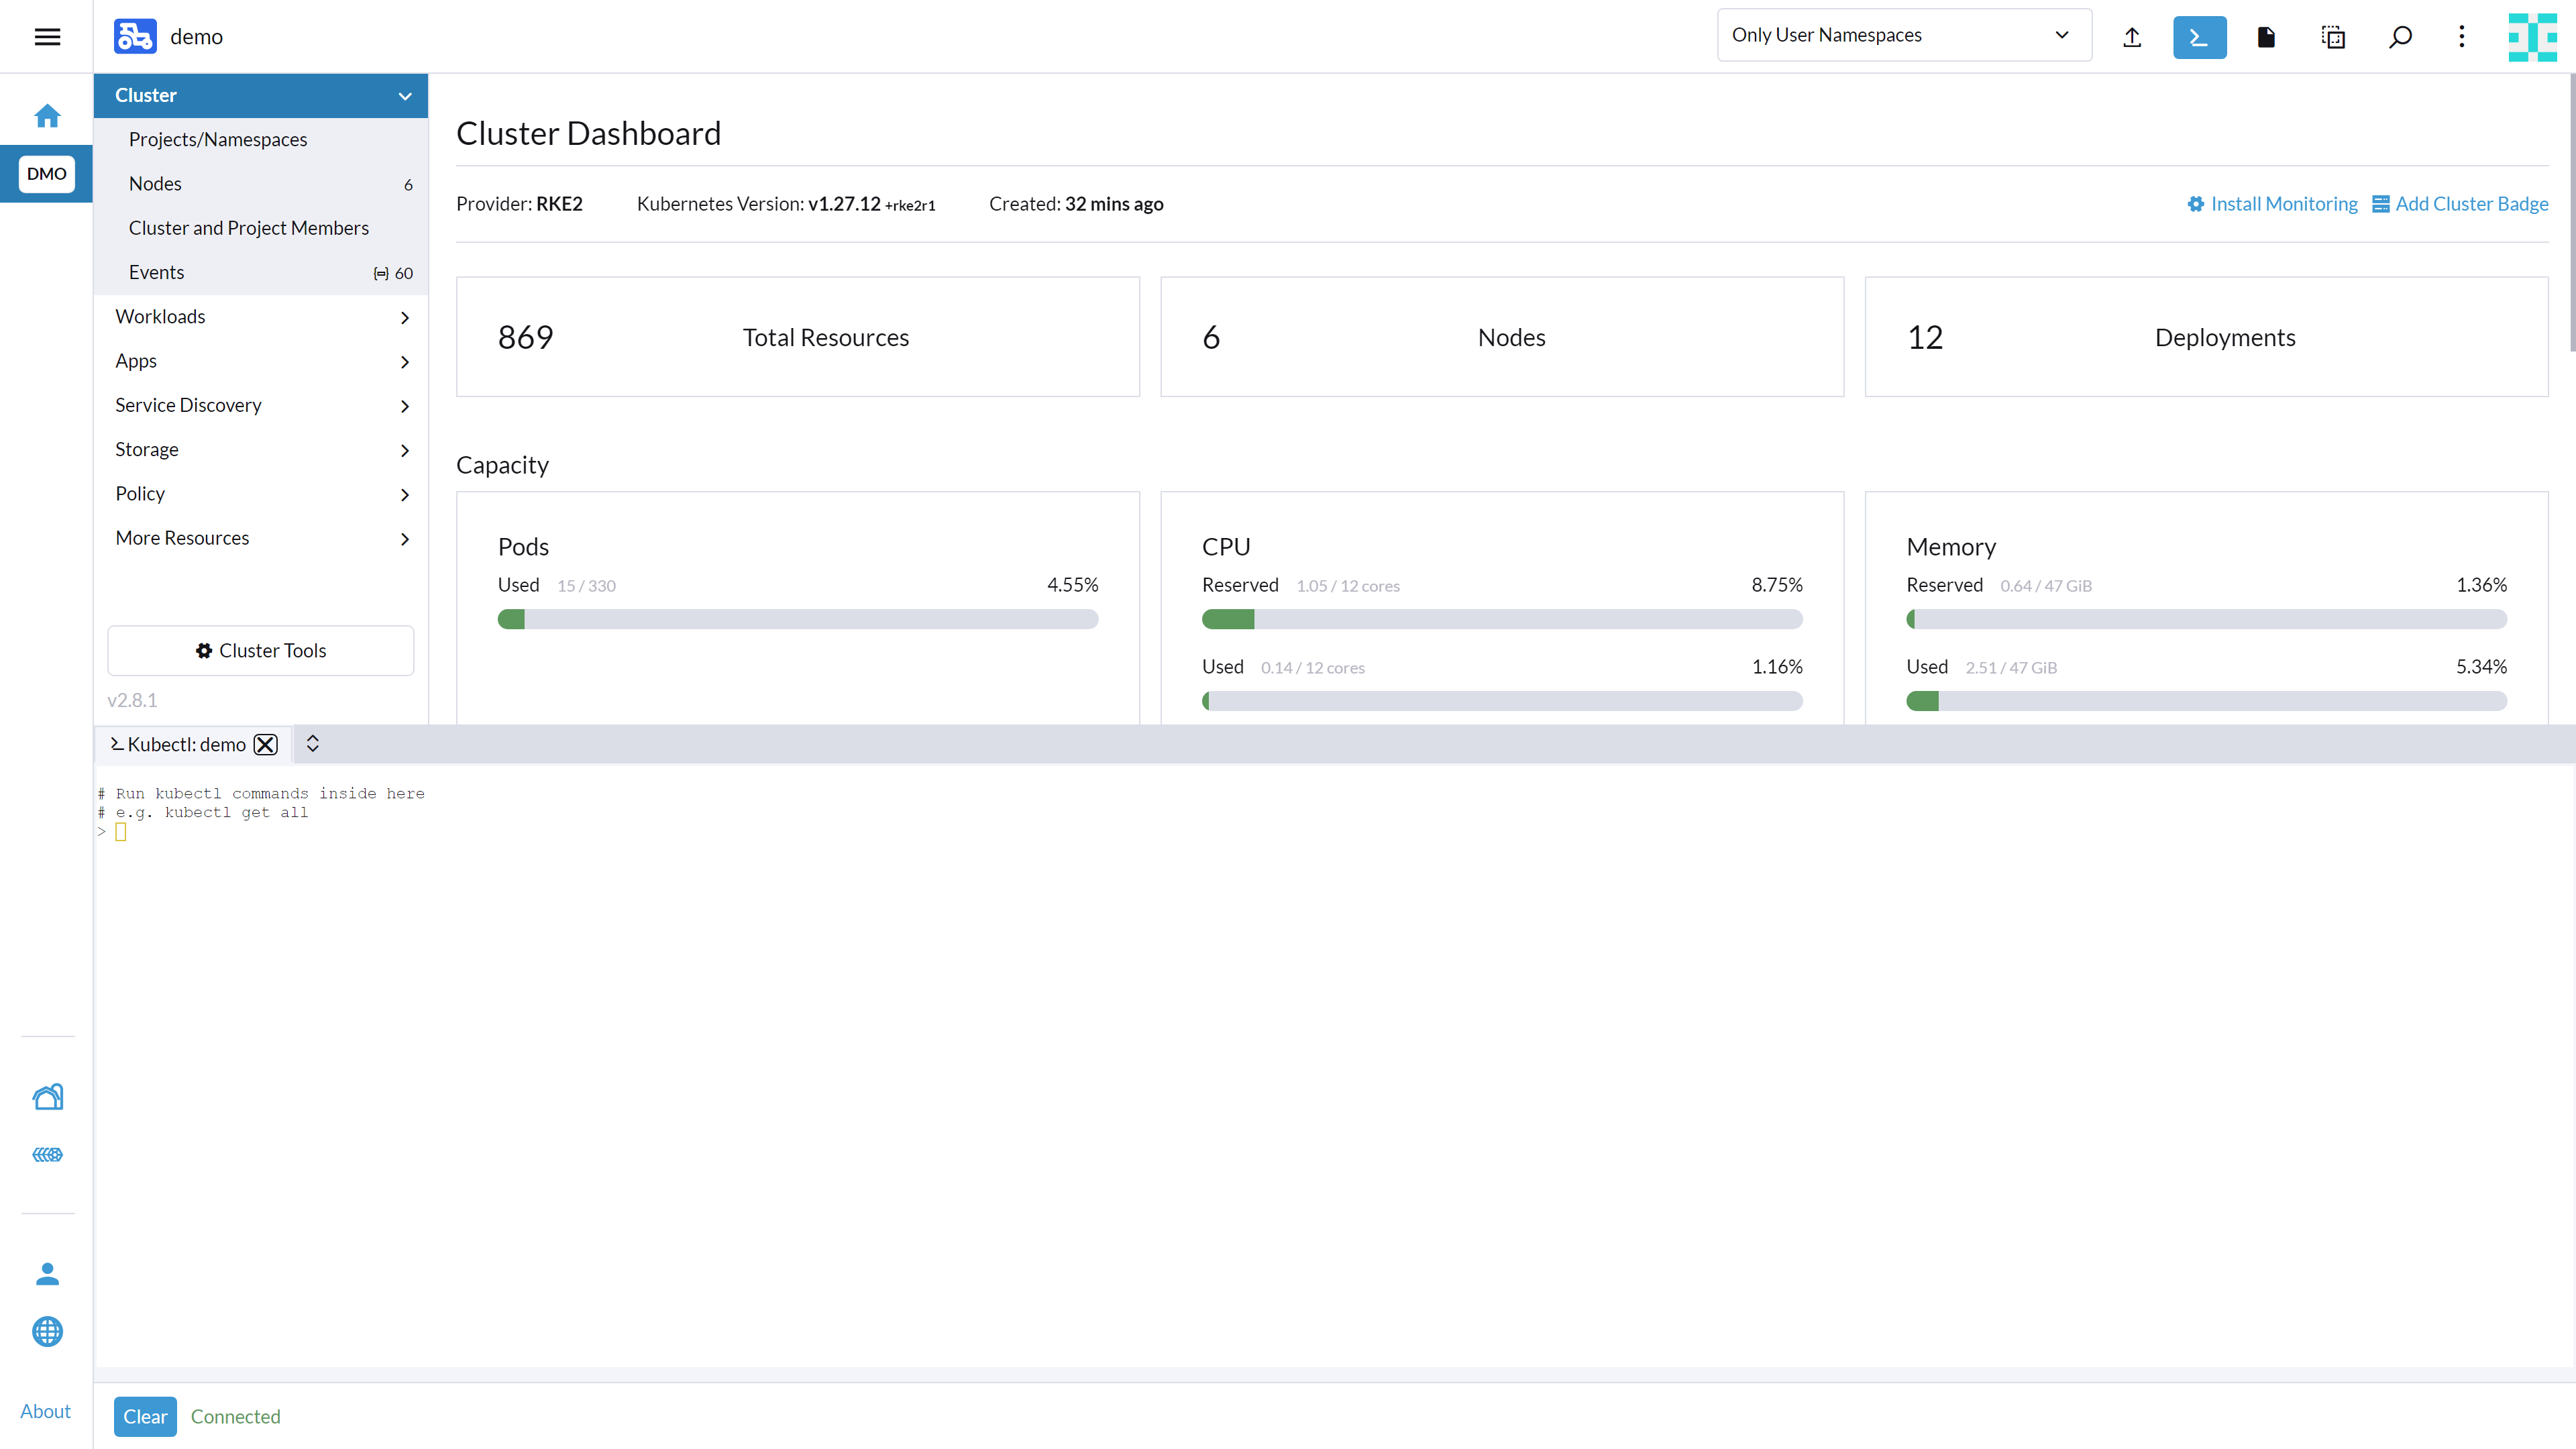
To log in to Rancher Application Collection, proceed as follows:
helm registry login dp.apps.rancher.io/charts -u <yourUser> -p <your-token>8.2 Preparing the Digital Manufacturing Edge name space #
Several subsequent components, such as Istio, Dex, ESO, and Digital Manufacturing Edge, require the target name space to exist first.
Create the dm-edge name space:
kubectl create namespace dm-edgeFollow the instructions in Section 10.1, “Creating an imagePullSecret for the Rancher Application Collection” to ensure the application-collection secret is available in the dm-edge name space.
8.3 Installing MetalLB on Kubernetes cluster #
The following chapter guides through the installation and configuration of MetalLB on a Kubernetes cluster used for Digital Manufacturing Edge.
Before proceeding, ensure that the following networking resources are available for configuration:
A static IP address allocated for the MetalLB IPAddressPool. This address must be outside the DHCP pool range, but routable within the network cluster.
A configured DNS record (A or AAAA) matching the desired domain name that points directly to the allocated IP address.
The DNS name is used later in this guide and is called <LB-address>.
If you do not control the DNS and are running a proof-of-concept setup, append .sslip.io to your IP address. Do not use this approach in production environments.
8.3.1 Installing and configuring MetalLB #
There are multiple ways to install the MetalLB software. In this guide, we cover how to install MetalLB using kubectl or Helm.
A complete overview and more details about MetalLB can be found at official website for MetalLB.
8.3.1.1 Prerequisites #
Before starting the installation, ensure that all requirements are met. In particular, you should pay attention to network add-on compatibility. If you are trying to run MetalLB on a cloud platform, you should also look at the cloud compatibility page and make sure your cloud platform works with MetalLB (note that most cloud platforms do not).
There are several ways to deploy MetalLB. In this guide, we describe how to use the Rancher Application Collection to deploy MetalLB.
Make sure to have one IP address available for configuring MetalLB.
Before you can deploy MetalLB from Rancher Application Collection, you need to create the namespace and an imagePullSecret. To create the related namespace, run:
kubectl create namespace metallbInstructions how to create the imagePullSecret can be found in Section 10.1, “Creating an imagePullSecret for the Rancher Application Collection”.
8.3.1.2 Installing MetalLB #
Before you can install the application, you need to log in to the registry. You can find the instructions in Section 10.2, “Logging in to the Application Collection Registry”.
Create a values.yaml file with the following configuration:
global:
  imagePullSecrets:
    - name: application-collection
Then install the metallb application.
helm install metallb oci://dp.apps.rancher.io/charts/metallb \
-f values.yaml \
--namespace=metallb \
--version 0.16.1
8.3.1.3 Configuring MetalLB #
MetalLB needs two configurations to function properly:
IP address pool
L2 advertisement configuration
Create the configuration files for the MetalLB IP address pool:
cat <<EOF >iprange.yaml
apiVersion: metallb.io/v1beta1
kind: IPAddressPool
metadata:
  name: first-example-pool
  namespace: metallb
spec:
  addresses:
  - 192.168.1.240/32
EOF
Create the layer 2 network advertisement:
cat <<EOF > l2advertisement.yaml
apiVersion: metallb.io/v1beta1
kind: L2Advertisement
metadata:
  name: example
  namespace: metallb
EOF
Apply the configuration:
kubectl apply -f iprange.yaml
kubectl apply -f l2advertisement.yaml
8.4 Installing SUSE Private Registry (optional) #
This chapter describes how to set up a SUSE Private Registry. Find more details about the SUSE Private Registry at https://documentation.suse.com/cloudnative/suse-private-registry/html/private-registry/pr-introduction.html
Installing SUSE Private Registry is optional when deploying Digital Manufacturing Edge. To proceed without a SUSE Private Registry, skip to Section 8.6, “Gateways”.
8.4.1 Prerequisites #
Before starting the deployment, ensure that all requirements for your selected environment are met:
As the referenced Persistent Volume (PV) provisioner, SUSE Storage can be used.
8.4.2 Deployment #
This chapter describes how to deploy a basic SUSE Private Registry without high availability.

The example deployment uses self-signed certificates. Self-signed certificates present security risks in production environments. We recommend using certificates signed by a trusted certificate authority (CA) in production environments.
Before starting the deployment, create a Kubernetes secret that stores the login credentials as described in the documentation at https://documentation.suse.com/en-us/cloudnative/suse-private-registry/html/private-registry/pr-deployment.html#pr-deployment-kube-secrets
8.4.2.1 Gathering login information #
Before deploying SUSE Private Registry, gather the login credentials for the official SUSE registry and save them in a Secret in the Kubernetes cluster.
For the most up-to-date deployment guide, see https://documentation.suse.com/en-us/cloudnative/suse-private-registry/html/private-registry/pr-deployment.html#pr-deployment-kube-secrets.
To retrieve login credentials, log in to SUSE Customer Center and select the organization holding the Registry subscription. Click Proxies as shown in the image below:

The Mirroring credentials section on the right discplays your user name and password:

To reveal the password, click the eye icon. Ongoing, this guide refers to these credentials as PRIVATE_REGISTRY_USERNAME and PRIVATE_REGISTRY_PASSWORD.
Next, save the PRIVATE_REGISTRY_PASSWORD to a password.txt file.
To log in and verify that your credentials work, run the following command:
head -1 ./password.txt | helm registry login registry.suse.com --username <PRIVATE_REGISTRY_USERNAME> --password-stdinCreate a namespace for the registry-related resources.
kubectl create namespace <PRIVATE_REGISTRY_NAMESPACE>The deployment requires an imagePullSecret saved in the previously created namespace:
kubectl create secret docker-registry suse-registry \
  --namespace <PRIVATE_REGISTRY_NAMESPACE> \
  --docker-server=registry.suse.com \
  --docker-username=<PRIVATE_REGISTRY_USERNAME> \
  --docker-password=$(head -1 ./password.txt)
In this example, the secret is named suse-registry. The next chapter references this secret.
8.4.2.2 Deploying without high availability #
Deploying without high availability is the most basic approach because it requires no keystore or database dependencies.
By default, the SUSE Private Registry Helm chart allocates low storage capacity for the image registry volume, which can cause disk saturation. Before deployment, adjust this value based on application sizing requirements.
For more information about customizating storage sizes, see the official SUSE Private Registry Persistence Parameters Documentation.
The following configuration shows example values for deploying the registry with Helm using a NodePort service for exposure, including the persistence configuration parameter:
expose:
  type: nodePort
  nodePort:
    annotations: {}
    labels: {}
    name: harbor
    ports:
      http:
        nodePort: 30002
        port: 80
      https:
        nodePort: 30003
        port: 443
  tls:
    auto:
      commonName: <PRIVATE_REGISTRY_FQDN>
externalURL: https://<PRIVATE_REGISTRY_FQDN>
harborAdminPassword: "<MY_PASSWORD>"
imagePullPolicy: IfNotPresent
imagePullSecrets:
- name: suse-registry

persistence:
  persistentVolumeClaim:
    registry:
size: "5Gi" # Adjust this size based on your requirementsThe example configuration creates a self-signed TLS certificate. Self-signed certificates present security risks in production environments. In production environments, we recommend using certificates signed by a trusted certificate authority (CA).
To actually deploy, save the preceeding configuration to a values.yaml.
To deploy SUSE Private Registry, run the following command:
helm install suse-registry oci://registry.suse.com/private-registry/private-registry-helm -f values.yaml --namespace <PRIVATE_REGISTRY_NAMESPACE>8.4.3 Configuring the Registry #
This section describes how to configure the registry after deployment, including how to create a registry user and the corresponding project.
8.4.3.1 Create a registry user #
We recommend creating a new registry user to share credentials with deployment tools or Kubernetes clusters.
If you already have an existing user or want to continue the deployment as admin, proceed to the project creation section below (see Section 8.4.3.2, “Create a Proxy Cache Project”).
To create a new user, log in with an account that has user creation permissions, for example, an administrator account.

8.4.3.2 Create a Proxy Cache Project #
Configure the SUSE Private Registry as a transparent proxy cache. This eliminates the need to manually transfer images or maintain replication rules. When the cluster requests an image, SUSE Private Registry automatically fetches it from the source registry, caches it locally, and serves it seamlessly.
8.4.3.2.1 Create the Registry Endpoint #
Before creating a Proxy Cache Project, define a Registry Endpoint that points to an external, upstream container registry. To do so, log in to your registry and perform the following steps:
Navigate to Administration → Registries.
Click NEW ENDPOINT.
 Figure 11: Create Registry Endpoint #
Configure the following parameters:
Provider:
Docker RegistryName: A generic name (for example,
source-registry-endpoint).Endpoint URL: The URL of the source registry where the images to be cached are located (for example,
https://<SOURCE_REGISTRY_URL>).Access ID / Access Secret: Your user credentials for the source registry.
Click TEST CONNECTION to validate, then click OK.
8.4.3.2.2 Create the Proxy Cache Project #
After the Registry Endpoint is set up, create the Proxy Cache Project. To do so, perform the following steps:
Navigate to Projects and click NEW PROJECT.
 Figure 12: Create Registry Project #
Enter a project name (for example,
proxy-cache-project).Enable the Proxy Cache toggle switch.
 Figure 13: Enable Proxy Cache Configuration #
Select the previously created endpoint (for example,
source-registry-endpoint) from the Endpoint drop-down menu.Click OK.
Tag Retention Policy: When the project is created, navigate to Configuration > Policy to adjust retention rules (for example, to prevent deleting cached images or to apply custom criteria).
8.4.4 Updating Helm values for the Proxy Cache #
To route image requests through the newly created SUSE Private Registry Proxy Cache (configured in Section 8.4.3, “Configuring the Registry”), you must update the SAP Digital Manufacturing Edge Helm values.yaml file.
Locate the global.dockerRegistry parameter in your custom values.yaml file and update it to point to your SUSE Private Registry FQDN and the specific proxy cache project name.
Modify your values.yaml file as follows:
global:
  dockerRegistry: "<PRIVATE_REGISTRY_FQDN>/<PROXY_PROJECT_NAME>"
  # Example: "suse-registry.example.com/proxy-cache-project"
  security:
    imageCredentials:
      username: "<SPR_USERNAME>"
password: "<SPR_PASSWORD>"Ensure that the user name and password provided in the imageCredentials block correspond to a registry account that has at least read permissions (Pull role) assigned within the specified proxy project.
8.5 Installing Cert-Manager #
This chapter describes how to install cert-manager and prepare it for the usage with other mandatory components like the Gateways or Dex.
8.5.1 Prerequisites #
To deploy the chart, create the related namespace and imagePullSecret first. To create the namespace, run:
kubectl create namespace cert-managerFind istructions how to create the imagePullSecret in Section 10.1, “Creating an imagePullSecret for the Rancher Application Collection”.
Before you can install the application, you need to log in to the registry. Find the instructions in Section 10.2, “Logging in to the Application Collection Registry”.
8.5.2 Deploying the chart #
Create a values.yaml file to store configurations for the cert-manager Helm chart.
The configuration looks like the following:
global:
    imagePullSecrets: ['application-collection']
installCRDs: true
To install the application, run:
helm install ingressgateway oci://dp.apps.rancher.io/charts/cert-manager \
-f values.yaml \
--namespace=cert-manager \
--version 1.20.3
8.5.3 Using self-signed certificates #
8.5.3.1 Define self-signed Issuer #
To bootstrap the certificate chain, create a self-signed Issuer.
This component generates a temporary local signing authority.
Save the content below into a selfsigned-issuer.yaml file:
apiVersion: cert-manager.io/v1
kind: Issuer
metadata:
  name: selfsigned-bootstrap-issuer
  namespace: cert-manager
spec:
  selfSigned: {}
8.5.3.2 Define root CA #
Next, create the root certificate used by the final ClusterIssuer to sign other certificates.
Save the following configuration to a my-ca-cert.yaml file:
apiVersion: cert-manager.io/v1
kind: Certificate
metadata:
  name: root-ca
  namespace: cert-manager
spec:
  isCA: true
  commonName: "self-signed-root-ca"
  secretName: ca-key-pair
  privateKey:
    algorithm: RSA
    size: 4096
  issuerRef:
    name: selfsigned-bootstrap-issuer
    kind: Issuer
Applying this configuration creates the root-ca secret in the cert-manager namespace.
8.5.3.3 Defining the global ClusterIssuer #
Create a ClusterIssuer so that certificates issued by this resource are signed by the root CA.
Using a ClusterIssuer allows issuing certificates across multiple namespaces.
Save the following content to a my-ca-issuer.yaml file and ensure that the secretName matches the secretName of your root CA.
apiVersion: cert-manager.io/v1
kind: ClusterIssuer
metadata:
  name: my-cluster-ca-issuer
spec:
  ca:
    secretName: ca-key-pair
8.5.3.4 Apply the issuers #
To apply the configurations you previously created, run:
kubectl apply -f selfsigned-issuer.yaml
kubectl apply -f my-ca-cert.yaml
kubectl apply -f my-ca-issuer.yaml
8.6 Gateways #
Digital Manufacturing Edge requires a Kubernetes Ingress Controller to be installed in the cluster, which handles the traffic routing to Digital Manufacturing Edge components. As of today, there are two supported Gateways:
Istio
NGINX
This chapter describes how to deploy both of them and how to prepare them for Digital Manufacturing Edge.
8.6.1 Istio #
8.6.2 Installing Istio #
This chapter describes how to install Istio in an RKE2 cluster using Helm.
8.6.2.1 Prerequisites #
To deploy the chart, create the related name space and imagePullSecret first. To create the name space, run:
kubectl create namespace istio-systemFind instructions how to create the imagePullSecret in Section 10.1, “Creating an imagePullSecret for the Rancher Application Collection”.
Before you can install the application, you need to log in to the registry. Find the instructions in Section 10.2, “Logging in to the Application Collection Registry”.
8.6.2.2 Deploying the chart #
Create a values.yaml file to store the configuration for the Istio Helm chart.
The file content can resemble the following example:
base:
  '*': null
  enabled: true
  profile: ''
cni:
  '*': null
  enabled: false
  profile: ''
gateway:
  '*': null
  enabled: true
  profile: ''
global:
  '*': null
  imagePullSecrets: ['application-collection']
  imageRegistry: ''
  platform: ''
istiod:
  '*': null
  enabled: true
  profile: ''
ztunnel:
  '*': null
  enabled: false
profile: ''Because of a known bug in the chart, name the helm installation ingressgateway.
To install the application, run:
helm install ingressgateway oci://dp.apps.rancher.io/charts/istio \
-f values.yaml \
--namespace=istio-system \
--version 1.3.3
This deploys the Istio application, including a LoadBalancer Service that consumes the IP address configured in Section 8.3.1.3, “Configuring MetalLB”.
To allow Digital Manufacturing Edge to properly route traffic using the Istio service mesh, enable automatic sidecar injection on the target name space.
To label the dm-edge name space, run the following command:
kubectl label namespace dm-edge istio-injection=enabledFor more information on installing and configuring Istio, check the Istio reference guide.
8.6.3 Certificates #
To allow TLS encrypted traffic through the Istio gateway, configure the certificates.
8.6.3.1 Istio Gateway server certificate #
The first certificate needed is the Istio server certificate. Its purpose is to terminate HTTPS traffic at the Istio Gateway and present the server identity for the *.<LB-address> domains to inbound connections.
Save the following configuration to an istio-server-cert.yaml file, and fill out the required fields:
apiVersion: cert-manager.io/v1
kind: Certificate
metadata:
  name: istio-server-cert
  namespace: istio-system
spec:
  secretName: tls-secret
  duration: 8760h
  renewBefore: 720h
  commonName: "<LB-address>"
  isCA: false
  privateKey:
    algorithm: RSA
    size: 4096
  usages:
    - server auth
  dnsNames:
    - "server.local"
    - "localhost"
    - "<LB-address>"
    - "*.<LB-address>"
  issuerRef:
    name: my-cluster-ca-issuer
    kind: ClusterIssuer
To apply it, run:
kubectl apply -f istio-server-cert.yamlThis creates a secret in the istio-system name space called tls-secret.
8.6.3.2 Client Certificate #
The next required certificate is the client certificate.
It serves as a client-side identity (client.crt and client.key) to authenticate requests to the cluster.
Save the following configuration to a my-client-cert.yaml file:
apiVersion: cert-manager.io/v1
kind: Certificate
metadata:
  name: my-client-cert
  namespace: istio-system
spec:
  secretName: client-tls-secret
  duration: 8760h
  renewBefore: 720h
  commonName: "dm-edge-services"
  isCA: false
  privateKey:
    algorithm: RSA
    size: 4096
  usages:
    - client auth
  issuerRef:
    name: my-cluster-ca-issuer
    kind: ClusterIssuer
To apply it, run:
kubectl apply -f my-client-cert.yamlThis creates a secret in the istio-system name space called client-tls-secret.
8.6.3.3 Istio CA Bundle #
Finally, create a placeholder certificate to automate copying the root ca.crt into istio-system.
This satisfies the hardcoded <ingressServerCertificate>-cacert naming requirement for SAP DM Edge.
Save the following configuration to a my-client-cert.yaml file:
apiVersion: cert-manager.io/v1
kind: Certificate
metadata:
  name: istio-ingress-ca-bundle
  namespace: istio-system
spec:
  secretName: tls-secret-cacert
  commonName: "dummy-istio-ca"
  duration: 8760h
  isCA: false
  issuerRef:
    name: my-cluster-ca-issuer
    kind: ClusterIssuer
To apply it, run:
kubectl apply -f my-client-cert.yamlThis creates a secret in the istio-system name space called tls-secret-cacert.
8.6.4 NGINX #
Ingress NGINX reached end of life in March 2026. For more information, see https://kubernetes.io/blog/2025/11/11/ingress-nginx-retirement/. Thus, we recommend using Istio with Digital Manufacturing Edge.
By default, NGINX is deployed on Rancher Kubernetes Engine 2 for Rancher Kubernetes Engine 2 cluster versions earlier than 1.36. This means, unless you opt out in the SUSE Rancher Prime UI during cluster creation or use installation script suffixes when using the installation script, NGINX is deployed on those clusters.
For Rancher Kubernetes Engine 2 clusters after version 1.36, you can still select NGINX in the SUSE Rancher Prime UI during cluster creation.
8.7 Database #
SAP Digital Manufacturing Edge requires a database to operate. While embedded databases can be used for PoC purposes, an external database is recommended for production environments.
8.7.1 Installing PostgreSQL #
This chapter describes how to set up an external PostgreSQL database for the Digital Manufacturing Edge deployment.
- IMPORTANT
SUSE does not offer 3rd level database support for PostgreSQL or CloudNativePG on Kubernetes. Find information about support options at The PostgreSQL Global Development Group.
- IMPORTANT
The instructions below describe only one variant of installing a PostgreSQL database with the CloudNativePG operator. There are other possible ways to set up PostgreSQL which are not covered in this guide. It is also possible to install PostgreSQL as a single instance on the operating system. This section describes how to install PostgreSQL in a Kubernetes cluster using the CloudNativePG operator. Using the CloudNativePG operator requires a Rancher Prime for SAP applications subscription or Rancher Prime Suite. For more information, see https://docs.apps.rancher.io/get-started/subscriptions
8.7.1.1 Deploying PostgreSQL #
We recommend using Rancher Application Collection, although CloudNativePG is available in SUSE Rancher Prime Apps. For the CloudNativePG chart, see https://apps.rancher.io/applications/cloudnative-pg.
8.7.1.1.1 Deploying the operator #
To deploy the operator chart, create the related name space and an imagePullSecret first.
To create the name space, run:
kubectl create namespace cnpg-systemInstructions how to create the imagePullSecret can be found in Section 10.1, “Creating an imagePullSecret for the Rancher Application Collection”.
Before installing the application, log in to the registry. Find the instructions in Section 10.2, “Logging in to the Application Collection Registry”.
Next, install the operator using Helm by running the following command.
Make sure to replace <your_pg_version> with the actual version of PostgreSQL:
helm install cloudnative-pg oci://dp.apps.rancher.io/charts/cloudnative-pg \
  --namespace=cnpg-system \
  --set global.imagePullSecrets={application-collection} \
--set images.postgresql.tag=<your_pg_version>To get a complete list of available PostgreSQL versions, visit https://apps.rancher.io/applications/postgresql/components
8.7.1.1.2 Deploying the database cluster #
Create the name space where the database will be deployed:
kubectl create namespace edgedbLike the operator, database pods also pull images from the registry.
Ensure you create the imagePullSecret in this new name space as described in Section 10.1, “Creating an imagePullSecret for the Rancher Application Collection”.
8.7.1.1.2.1 Configuring database credentials #
The CloudNativePG operator requires two separate credentials: one for the database superuser (which manages the PostgreSQL cluster) and one for the application user (which accesses the specific application database).
Create a file named create_user_secret.yaml to define these credentials:
apiVersion: v1
kind: Secret
metadata:
  name: cluster-pg-superuser
  namespace: edgedb
type: kubernetes.io/basic-auth
stringData:
  username: postgres
  password: "<your_password>"
---
apiVersion: v1
kind: Secret
metadata:
  name: cluster-pg-appuser
  namespace: edgedb
  annotations:
  labels:
type: kubernetes.io/basic-auth
stringData:
  username: appuser
  password: "<your_password>"
Apply the configuration to the cluster:
kubectl apply -f create_user_secret.yaml8.7.1.1.2.2 Configuring TLS certificates #
To secure internal and external database connections, create Kubernetes secrets containing the TLS certificates using cert-manager.
This example issues a server certificate with DNS names matching the CloudNativePG services and a client certificate required for PostgreSQL streaming replication.
The global my-cluster-ca-issuer signs both certificates.
Create a file named edgedb-certificate.yaml with the following content:
apiVersion: cert-manager.io/v1
kind: Certificate
metadata:
  name: my-edgedb-server-cert
  namespace: edgedb
spec:
  secretName: my-edgedb-server-cert
  secretTemplate:
    labels:
      # CRITICAL: This label tells the CloudNativePG operator to
      # automatically reload the database when this cert renews.
      cnpg.io/reload: ""
  usages:
    - server auth
    - digital signature
  dnsNames:
    - postgres-rw
    - postgres-rw.edgedb
    - postgres-rw.edgedb.svc
    - postgres-ro
    - postgres-ro.edgedb
    - postgres-ro.edgedb.svc
    - postgres-r
    - postgres-r.edgedb
    - postgres-r.edgedb.svc
  issuerRef:
    name: my-cluster-ca-issuer
    kind: ClusterIssuer
---
apiVersion: cert-manager.io/v1
kind: Certificate
metadata:
  name: my-edgedb-client-cert
  namespace: edgedb
spec:
  secretName: my-edgedb-client-cert
  secretTemplate:
    labels:
      cnpg.io/reload: ""
  usages:
    - client auth
  commonName: streaming_replica
  issuerRef:
    name: my-cluster-ca-issuer
kind: ClusterIssuerIn this guide, the database is created on the same cluster running Digital Manufacturing Edge, using internal database service names.
If in your setup PostgreSQL runs outside the cluster, change the dnsNames values.
Apply the certificate configuration to the cluster:
kubectl apply -f edgedb-certificate.yaml8.7.1.1.2.3 Creating the database #
Create a file named postgres-values.yaml with the following configuration for the PostgreSQL cluster database:
apiVersion: postgresql.cnpg.io/v1
kind: Cluster
metadata:
  name: postgres
  namespace: edgedb
spec:
  imageName: dp.apps.rancher.io/containers/postgresql:16.14-31.5
  instances: 3

  superuserSecret:
    name: cluster-pg-superuser

  bootstrap:
    initdb:
      database: edgedb   # The name of the application database to create
      owner: appuser                # The username (must match the 'username' key in the secret)
      secret:
        name: cluster-pg-appuser

  # Configure CNPG to use the cert-manager secrets (from previous steps)
  certificates:
    serverTLSSecret: my-edgedb-server-cert
    serverCASecret: my-edgedb-server-cert
    replicationTLSSecret: my-edgedb-client-cert
    clientCASecret: my-edgedb-client-cert

  storage:
    size: 50Gi
Apply the configuration to deploy the database cluster:
kubectl apply -f postgres-values.yamlVerify the status of the cluster by using kubectl:
kubectl get clusters.postgresql.cnpg.io -A
NAMESPACE   NAME       AGE   INSTANCES   READY   STATUS                     PRIMARY
edgedb      postgres   10m   3           3       Cluster in healthy state   postgres-1
8.7.1.1.3 Configuring SAP Digital Manufacturing Edge to use the database #
After successfully deploying the PostgreSQL cluster, configure the SAP Digital Manufacturing Edge Helm chart to connect to it instead of using the embedded database.
Add the following database configuration to your values.yaml file for the SAP Digital Manufacturing Edge deployment:
global:
  database:
    useEmbedded: false
    type: postgresql
    auth:
      host: "postgres-rw.edgedb.svc.cluster.local"
      port: 5432
      database: "edgedb"
      username: "appuser"
      password: "<your_password>"
8.8 Installing Dex #
This chapter covers the deployment of Dex for the usage with Digital Manufacturing Edge.
Refer to official SAP documentation to get latest information about the configuration of Dex.
For the purpose of this guide, the installation of Dex within a Kubernetes cluster and how to expose it through Istio or NGINX is described. For the Digital Manufacturing Edge setup, this can be the same cluster used for the Digital Manufacturing Edge workload.
8.8.1 Setup SUSE Rancher Prime as an OIDC provider #
Dex supports integration with various OIDC providers. For a list of supported connectors, see the Dex Connectors documentation. This guide describes how to use Dex with SUSE Rancher Prime.
You can use SUSE Rancher Prime as the OIDC provider for Dex. For complete configuration instructions, see: Configure Rancher as an OIDC provider
8.8.1.1 Using SUSE Rancher Prime #
To set up SUSE Rancher Prime, open the application and select Users & Authentication in the left navigation panel, as shown below:

Next, In the left navigation panel, select OIDC Apps:

Make a note of the Issuer URL, which is required when configuring Dex. To allow the SAP Digital Manufacturing Edge application to authenticate through Dex, create a new OIDC App. To do so, click Add Application in the upper right corner, as shown below:

The OIDC creation page opens:

Enter a name for the OIDC application and specify the callback URL which must be <your-Dex-URL>/callback. Use this callback URL as the redirectURL value in the Dex Helm chart.
After clicking the Add Application button, the overview page for the OIDC application opens, displaying the Client ID and the Client Secrets. These values are used to configure Dex and are referenced in this guide as <clientID> and <clientSecret>.
8.8.1.2 Using a manifest #
You can also apply a manifest to the SUSE Rancher Prime local cluster to create a new OIDC application.
Upload the following manifest using the SUSE Rancher Prime UI or save the content and apply it using kubectl:
apiVersion: management.cattle.io/v3
kind: OIDCClient
metadata:
  name: sap-dme-dex-client
spec:
  description: "OIDC Client für Digital Manufacturing Edge Dex"
  redirectURIs:
    - "https://<your-Dex-URL>/callback" # This must be used for the redirectURL later
  tokenExpirationSeconds: 3600
  refreshTokenExpirationSeconds: 86400
8.8.1.3 Gathering the client secret #
SUSE Rancher Prime automatically generates a Kubernetes Secret in the cattle-oidc-client-secrets namespace for each OIDCClient resource.
The Secret’s name matches the OIDCClient client ID. Initially, the Secret contains a single client secret.
To retrieve the client secret, query it using kubectl as follows:
kubectl get secret <client-name> -n cattle-oidc-client-secrets -o jsonpath="{.data.client-secret-1}" | base64 -d8.8.2 Creating the Dex server certificate for Ingress (Only for nginx) #
If you are using nginx, you need a certificate for incoming Ingress traffic.
apiVersion: cert-manager.io/v1
kind: Certificate
metadata:
  name: dex-server-cert
  namespace: auth
spec:
  secretName: dex-server-tls-secret # Put this name into your Helm values under `secretName`
  duration: 8760h
  renewBefore: 720h
  commonName: "dex-dex-idp.auth.svc.cluster.local"  # Match your Dex service name in Kubernetes
  isCA: false
  privateKey:
    algorithm: RSA
    size: 2048
  usages:
    - server auth
  dnsNames:
    - "dex-dex-idp.auth.svc.cluster.local"   # Match your Dex service name in Kubernetes
    - "<your-Dex-URL>"
  issuerRef:
    name: my-cluster-ca-issuer
    kind: ClusterIssuer
8.8.3 Prerequisites #
To deploy the chart, create the related namespace and imagePullSecret first. To create the namespace, run:
kubectl create namespace authInstructions how to create the imagePullSecret can be found in Section 10.1, “Creating an imagePullSecret for the Rancher Application Collection”.
Before you can install the application, you need to log in to the registry. You can find the instructions in Section 10.2, “Logging in to the Application Collection Registry”.
8.8.4 Deploying Dex #
You are now set to deploy Dex.
Create a values.yaml file to store the configurations for the Dex Helm chart.
The file content can resemble the following example:
config:
  issuer: https://<your-Dex-URL>/ # This must match your dex server address
  oauth2:
    skipApprovalScreen: true
  # Refer to https://dexidp.io/docs/configuration/storage/#kubernetes-custom-resource-definitions-crds
  storage:
    type: kubernetes
    config:
      inCluster: true
  connectors:
  - config:
      clientID: <clientID>
      clientSecret: <clientSecret>
      issuer: https://<your-Rancher-URL>/oidc
      insecureSkipVerify: true
      redirectURI: https://<your-Dex-URL>/callback  # This must match your configured Callback URL for your OIDC app
      scopes:
      - openid
      - profile
      - email
      - groups
      userIDKey: sub
      userNameKey: email
      insecureEnableGroups: true  # Ensures that group information is included in the ID token for DM Edge access
    id: rancher-oidc
    name: Rancher Login
    type: oidc
    getUserInfo: true
  expiry:
    idTokens: 10m
    refreshTokens:
      validIfNotUsedFor: 15m # Define a value which is no shorter than 15 minutes (15m) and no longer than 24 hours (24h)
      absoluteLifetime: 24h
      disableRotation: false
      reuseInterval: 1m
  # Register a UI application (DM Edge or your own custom UI application) with dex as a client
  staticClients:
  - id: sap-dm-edge-client # Define an ID for the UI application
    secret: "super-secret-password-shared-with-sap-dm" # Define a secure secret for the UI application
    name: 'SAP Digital Manufacturing for Edge Computing' # Define a meaningful name for the UI application
    # Callback URL for Dex to redirect the user post authentication
    redirectURIs:
- https://edge-ui.<your-Dex-URL>/callbackEnsure the clientID and clientSecret match the configuration in Section 8.8.1, “Setup SUSE Rancher Prime as an OIDC provider”.
Also, ensure that the <your-Dex-URL> matches the address where the Dex server is accessible.
To access Dex through an Ingress controller, add the following snippet to the values.yaml file.
This will create and configure Ingress for Dex:
ingress:
  enabled: true
  className: nginx
  hosts:
    - host: <your-Dex-URL>
      paths:
        - path: /
          pathType: Prefix
  tls:
    - hosts:
        - <your-Dex-URL>
      # Specify the secret you created previously for the Dex server certificate
secretName: dex-server-tls-secretEnsure the secretName matches the secretName value configured in Section 8.8.2, “Creating the Dex server certificate for Ingress (Only for nginx)”.
To install the application, run:
helm install dex oci://dp.apps.rancher.io/charts/dex-idp \
-f values.yaml \
--namespace=auth \
--version 0.24.1
8.8.5 Creating a secret for Dex #
To deliver the root ca.crt into the dme namespace, create a placeholder certificate.
SAP Digital Manufacturing Edge mounts this secret to mathematically verify that OIDC tokens issued by Dex are valid and signed by a trusted source.
apiVersion: cert-manager.io/v1
kind: Certificate
metadata:
  name: dex-ca-bundle
  namespace: dm-edge
spec:
  secretName: dex-ca-secret
  commonName: "dummy-dex-ca"
  duration: 8760h
  isCA: false
  issuerRef:
    name: my-cluster-ca-issuer
    kind: ClusterIssuer
8.8.6 Using Istio #
To route traffic to Dex using Istio, configure the required Istio routes.
A dedicated Gateway specifies the domain name and certificate, while
a VirtualService routes incoming traffic through the gateway to the Dex service.
Save the following configuration in a dex_istio.yaml file:
apiVersion: networking.istio.io/v1
kind: Gateway
metadata:
  name: dex-gateway
  namespace: auth # Deploy in the same namespace as DEX
spec:
  selector:
    istio: ingressgateway # Must match the name of the Istio gateway pod
  servers:
    - hosts:
        - <your-Dex-URL>
      port:
        name: https
        number: 443
        protocol: HTTPS
      tls:
        credentialName: tls-secret
        mode: SIMPLE
---
apiVersion: networking.istio.io/v1alpha3
kind: VirtualService
metadata:
  name: dex-route
  namespace: auth # Deploy in the same namespace as DEX
spec:
  hosts:
    - "<your-Dex-URL>"
  gateways:
    - dex-gateway # Must match the gateway used by the wildcard service
  http:
    - match:
        - uri:
            prefix: /dex
      route:
        - destination:
            host: dex-dex-idp.auth.svc.cluster.local # Your actual internal DEX service K8s DNS
            port:
number: 5556 # Your DEX service portIf you followed the guide and configured MetalLB and Istio, the value of <your-Dex-URL> can be a subdomain of <LB-address>. For example, if <LB-address> is 192.168.1.66.sslip.io, the <your-Dex-URL> can be dex.192.168.1.66.sslip.io.
Now apply the manifests to create the resources in the Kubernetes cluster:
kubectl apply -f dex_istio.yaml8.8.6.1 Verifying reachability (optional) #
To verify if your deployed Dex works as expected, use the following commands:
kubectl get secret dex-ca-secret -n dm-edge -o jsonpath='{.data.tls\.crt}' | base64 -d > client.crt
kubectl get secret dex-ca-secret -n dm-edge -o jsonpath='{.data.tls\.key}' | base64 -d > client.key
kubectl get secret dex-ca-secret -n dm-edge -o jsonpath='{.data.ca\.crt}' | base64 -d > ca.crt

curl -v -i \
  --cacert ca.crt \
  --cert client.crt \
  --key client.key \
  https://<your-Dex-URL>/.well-known/openid-configuration
The command produces output similar to the following example:
{
  "issuer": "https://{dex-server-URL}",
  "authorization_endpoint": "https://{dex-server-URL}/auth",
  "token_endpoint": "https://{dex-server-URL}/token",
  "jwks_uri": "https://{dex-server-URL}/keys",
  "userinfo_endpoint": "https://{dex-server-URL}/userinfo",
  "device_authorization_endpoint": "https://{dex-server-URL}/device/code",
  "introspection_endpoint": "https://{dex-server-URL}/token/introspect",
  "grant_types_supported": [
    "authorization_code",
    "refresh_token",
    "urn:ietf:params:oauth:grant-type:device_code",
    "urn:ietf:params:oauth:grant-type:token-exchange"
  ],
  "response_types_supported": [
    "code"
  ],
  "subject_types_supported": [
    "public"
  ],
  "id_token_signing_alg_values_supported": [
    "RS256"
  ],
  "code_challenge_methods_supported": [
    "S256",
    "plain"
  ],
  "scopes_supported": [
    "openid",
    "email",
    "groups",
    "profile",
    "offline_access"
  ],
  "token_endpoint_auth_methods_supported": [
    "client_secret_basic",
    "client_secret_post"
  ],
  "claims_supported": [
    "iss",
    "sub",
    "aud",
    "iat",
    "exp",
    "email",
    "email_verified",
    "locale",
    "name",
    "preferred_username",
    "at_hash"
  ]
}
When using a custom Dex instance, adjust the Helm values for the deployment of Digital Manufacturing Edge accordingly. When following this guide, the values can resemble the following example:
global:
    dex:
        useEmbedded: false
    dexIssuer: https://{dex-server-URL}
    dexCACertificate: dex-ca-secret
    dexClient:
        clientID: sap-dm-edge-client
        clientSecret: super-secret-password-shared-with-sap-dm
    idpLogoutUrl: https:/{rancher-URL}/oidc/logout
8.9 Installing Kafka #
To configure Kafka for Digital Manufacturing Edge, use the Strimzi Kafka Operator. This operator natively handles the lifecycle, security, and scaling of the Kafka cluster on Rancher Kubernetes Engine 2.
For more information about configuring and connecting Strimzi Kafka to Digital Manufacturing Edge, see https://help.sap.com/docs/sap-digital-manufacturing/setup-and-operations-guide-for-sap-digital-manufacturing-for-edge-computing/appendix-4-set-up-and-connect-to-strimzi-kafka
8.9.1 Prerequisites #
Before deploying the Strimzi Operator, create the related name space and imagePullSecret. To create the name space, run:
kubectl create namespace kafkaFind instructions on how to create the imagePullSecret in Section 10.1, “Creating an imagePullSecret for the Rancher Application Collection”.
Before you can install the application, you need to log in to the registry. Find the instructions in Section 10.2, “Logging in to the Application Collection Registry”.
8.9.2 Deploying the Strimzi Operator #
Install the Strimzi Cluster Operator using Helm from the Rancher Application Collection:
helm install strimzi-cluster-operator oci://dp.apps.rancher.io/charts/strimzi-kafka-operator \
  --namespace kafka \
  --set global.imagePullSecrets={application-collection} \
  --set replicas=3 \
  --version 1.1.0
8.9.3 Deploying the Kafka Cluster #
When the Strimzi Operator pods are running, you can deploy a Kafka cluster.
To deploy the cluster, create a file named strimzi-kafka.yaml with the following configuration:
apiVersion: kafka.strimzi.io/v1
kind: KafkaNodePool
metadata:
  name: controller
  namespace: kafka
  labels:
    strimzi.io/cluster: kafka-cluster
spec:
  replicas: 3
  roles:
    - controller
  storage:
    type: jbod
    volumes:
      - id: 0
        type: persistent-claim
        size: 5Gi
        kraftMetadata: shared
        deleteClaim: false
        class: longhorn
---
apiVersion: kafka.strimzi.io/v1
kind: KafkaNodePool
metadata:
  name: broker
  namespace: kafka
  labels:
    strimzi.io/cluster: kafka-cluster
spec:
  replicas: 3
  roles:
    - broker
  storage:
    type: jbod
    volumes:
      - id: 0
        type: persistent-claim
        size: 128Gi
        deleteClaim: false
        class: longhorn
---
apiVersion: kafka.strimzi.io/v1
kind: Kafka
metadata:
  name: kafka-cluster
  namespace: kafka
spec:
  kafka:
    version: "4.3.0"
    metadataVersion: "4.3"
    authorization:
      type: simple
    listeners:
      - name: plain
        port: 9092
        type: internal
        tls: false
        authentication:
          type: scram-sha-512
      - name: tls
        port: 9093
        type: internal
        tls: true
        authentication:
          type: scram-sha-512
    config:
      offsets.topic.replication.factor: 3
      transaction.state.log.replication.factor: 3
      transaction.state.log.min.isr: 2
      default.replication.factor: 3
      min.insync.replicas: 2
  entityOperator:
    topicOperator: {}
userOperator: {}- NOTE
The configuration above creates a Kafka cluster with 3 brokers and 3 controllers, each with persistent storage. Adjust the sizes according to your environment.
Apply the configuration to the cluster:
kubectl apply -f strimzi-kafka.yaml8.9.4 Creating the Kafka User and ACLs #
After the Kafka cluster is deployed, create a Kafka user for Digital Manufacturing Edge and configure the necessary Access Control Lists (ACLs) to allow Digital Manufacturing Edge to read and write to its internal topics.
Create a file named strimzi-kafka-user.yaml with the following content:
apiVersion: kafka.strimzi.io/v1
kind: KafkaUser
metadata:
  name: kafka-user
  namespace: kafka
  labels:
    strimzi.io/cluster: kafka-cluster
spec:
  authentication:
    type: scram-sha-512
  authorization:
    type: simple
    acls:
      - resource:
          type: topic
          name: com.sap.dsc.dm.
          patternType: prefix
        operations:
          - Read
          - Write
          - Create
          - Describe
          - Delete
      - resource:
          type: group
          name: "*"
          patternType: literal
        operations:
          - Read
          - Describe
Apply the user configuration:
kubectl apply -f strimzi-kafka-user.yamlThe Strimzi operator automatically generates a Kubernetes Secret containing the user’s credentials. Retrieve and decode the password, as you will need it for the Digital Manufacturing Edge installation (Section 8.9.5, “Connecting SAP Digital Manufacturing Edge to Strimzi Kafka”):
kubectl get secret kafka-user -n kafka -o jsonpath='{.data.password}' | base64 -d8.9.5 Connecting SAP Digital Manufacturing Edge to Strimzi Kafka #
When the Kafka cluster and user are ready, configure the SAP Digital Manufacturing Edge Helm values.yaml to disable the embedded Kafka and point to the external Strimzi deployment.
The configuration example below uses the standard in-cluster Kubernetes DNS address (kafka-cluster-kafka-bootstrap.kafka.svc.cluster.local:9092).
If your Kafka cluster uses a different name space, custom domain name, or DNS endpoint, make sure to update the brokers field with the actual server address and port.
Update the values.yaml file with the connection details and the decoded password retrieved in the previous step (Section 8.9.4, “Creating the Kafka User and ACLs”):
global:
  kafka:
    useEmbedded: false
    auth:
      brokers: 'kafka-cluster-kafka-bootstrap.kafka.svc.cluster.local:9092'
      username: 'kafka-user'
      password: '<your-kafka-password>'
8.10 External Secrets Operator (ESO) #
External Secrets Operator allows you to manage sensitive information in a secure and centralized manner. It is a collection of custom API resources (such as ExternalSecret and SecretStore) that provide a user-friendly abstraction for an external API that stores and manages the lifecycle of secrets for you.
The operator reads information from external APIs and creates native Kubernetes secrets based on the retrieved information, updating them automatically when the external secret changes.
Installing External Secrets Operator is optional when deploying Digital Manufacturing Edge. Without External Secrets Operator, you must manage passwords and credentials manually in the Helm values file. To proceed without External Secrets Operator, skip to Section 9, “Deploying Digital Manufacturing Edge”.
8.10.1 Prerequisites #
Before installing the operator, ensure the target namespace exists.
kubectl create namespace external-secretsFollow the instructions in Section 10.1, “Creating an imagePullSecret for the Rancher Application Collection” to create the imagePullSecret in the external-secrets namespace.
Before you can install the application, you need to log in to the registry. Find the instructions in Section 10.2, “Logging in to the Application Collection Registry”.
8.10.2 Installing External Secrets Operator #
Install External Secrets Operator via Helm using the SUSE Application Collection repository. For more information on the available configuration options, refer to reference guide at https://docs.apps.rancher.io/reference-guides/external-secrets-operator.
helm install external-secrets-operator oci://dp.apps.rancher.io/charts/external-secrets-operator \
  --namespace external-secrets \
  --set global.imagePullSecrets={application-collection} \
--version 2.8.0The command above performs a standard deployment. Harden the operator’s permissions (for example, by restricting global ServiceAccount token creation or disabling unused cluster-wide resources). Refer to the official Security Best Practices to secure your setup.
8.10.3 Configuring the Kubernetes Provider #
In this guide, External Secrets Operator is configured using the Kubernetes provider. This enables the operator to retrieve credentials directly from native Kubernetes secrets in the cluster.
For a complete list of supported providers, refer to the official site https://external-secrets.io and navigate to the "Provider" tab.
Setting up the Kubernetes provider involves creating a SecretStore resource.
This resource acts as the connection bridge, pointing the operator to the Kubernetes API and defining the authentication method.
For detailed technical information and advanced settings, refer to the official Kubernetes provider documentation.
8.10.3.1 Provisioning the ServiceAccount Token #
To configure the Kubernetes provider, create a service account token that External Secrets Operator can use to authenticate with the Kubernetes API.
This token is used to access secrets in the dm-edge namespace.
Execute the following command to create a service account token:
cat <<EOF | kubectl apply -f -
apiVersion: v1
kind: Secret
metadata:
  name: default-sa-token
  namespace: dm-edge
  annotations:
    kubernetes.io/service-account.name: default
type: kubernetes.io/service-account-token
EOFThe default service account is used here for simplicity.
In a production environment, consider creating a dedicated service account with limited permissions, or using a different authentication method.
Refer to the official documentation at https://external-secrets.io/latest/provider/kubernetes/#authentication.
8.10.3.2 Applying RBAC Permissions #
After generating the authentication token, you must grant the necessary permissions for External Secrets Operator to operate securely within the dm-edge namespace.
This step creates a Role and a RoleBinding that allow the default service account to read secrets (get, list, watch).
This also enables the operator to validate its access through the selfsubjectrulesreviews API.
Execute the following command to apply the RBAC configuration:
cat <<EOF | kubectl apply -f -
apiVersion: rbac.authorization.k8s.io/v1
kind: Role
metadata:
  name: eso-secret-reader-role
  namespace: dm-edge
rules:
  - apiGroups: [""]
    resources: ["secrets"]
    verbs: ["get", "list", "watch"]
  - apiGroups: ["authorization.k8s.io"]
    resources: ["selfsubjectrulesreviews"]
    verbs: ["create"]
---
apiVersion: rbac.authorization.k8s.io/v1
kind: RoleBinding
metadata:
  name: eso-secret-reader-binding
  namespace: dm-edge
subjects:
  - kind: ServiceAccount
    name: default
    namespace: dm-edge
roleRef:
  kind: Role
  name: eso-secret-reader-role
  apiGroup: rbac.authorization.k8s.io
EOF
8.10.3.3 Provisioning Secrets #
This step creates the source secrets in the dm-edge namespace.
These secrets serve as the local vault for External Secrets Operator.
Digital Manufacturing Edge allows integrating external secrets for various components. Execute the following commands as needed for your specific deployment. Ensure you replace the placeholder values with your actual credentials.
# 1. Kafka Credentials
kubectl create secret generic kafka-credentials \
  --namespace dm-edge \
  --from-literal=KAFKA_USERNAME="kafka-user" \
  --from-literal=KAFKA_PASSWORD="<your-kafka-password>"

# 2. UAA Credentials
kubectl create secret generic uaa-credentials \
  --namespace dm-edge \
  --from-literal=CLIENT_ID='your-dm-uaa-client-id' \
  --from-literal=CLIENT_SECRET='your$strong$uaa$secret' \
  --from-literal=URL='https://<your-authentication-url>'

# 3. Database Credentials (Password only)
kubectl create secret generic database-credentials \
  --namespace dm-edge \
  --from-literal=DB_PASSWORD='SuperStrongDatabasePassword123$'

# 4. Docker Registry Credentials
kubectl create secret generic registry-credentials \
  --namespace dm-edge \
  --from-literal=DOCKER_REGISTRY_USERNAME='your-registry-username' \
  --from-literal=DOCKER_REGISTRY_PASSWORD='your$registry$password'
8.10.3.4 Creating the SecretStore #
When the secrets are provisioned, establish the connection bridge.
The SecretStore resource instructs External Secrets Operator about where to find the secrets and how to authenticate securely.
In this configuration, the operator connects to the internal Kubernetes API (https://kubernetes.default.svc).
It validates the internal TLS connection using the cluster’s default Certificate Authority (kube-root-ca.crt),
and authenticates using the default-sa-token created in the previous steps (Section 8.10.3.1, “Provisioning the ServiceAccount Token”).
Using an internal Kubernetes DNS route, such as kubernetes.default.svc, requires the referenced service to be deployed and accessible within the same Kubernetes cluster.
If the deployment setup differs, update the url field accordingly.
Execute the following command to create the SecretStore:
cat <<EOF | kubectl apply -f -
apiVersion: external-secrets.io/v1
kind: SecretStore
metadata:
  name: dme-secret-store
  namespace: dm-edge
spec:
  provider:
    kubernetes:
      remoteNamespace: dm-edge
      server:
        url: "https://kubernetes.default.svc"
        caProvider:
          type: ConfigMap
          name: kube-root-ca.crt
          key: ca.crt
      auth:
        token:
          bearerToken:
            name: default-sa-token
            key: token
EOF
8.10.4 Configuring the Chart with External Secrets Operator #
Finally, configure the Digital Manufacturing Edge Helm chart to consume the SecretStore.
By enabling this feature, the chart delegates credential management to External Secrets Operator by deploying ExternalSecret manifests.
These manifests fetch the credentials provisioned earlier in Section 8.10.3.3, “Provisioning Secrets”.
Update the values.yaml file to map each application component to its corresponding remote secret key:
global:
  security:
    externalSecrets:
      enabled: true
      secretStoreRefKind: SecretStore
      secretStoreRefName: "dme-secret-store"

      database:
        enabled: true
        remoteRefKey: "database-credentials"

      dockerRegistry:
        enabled: true
        remoteRefKey: "registry-credentials"

      serviceKey:
        enabled: true
        remoteRefKey: "uaa-credentials"

      kafka:
        enabled: true
remoteRefKey: "kafka-credentials"When externalSecrets.enabled is set to true, ensure that you remove or leave empty the corresponding plain-text passwords in other sections of your values.yaml (such as global.uaaClientSecret, global.database.auth.password, etc.) to prevent configuration conflicts.
9 Deploying Digital Manufacturing Edge #
At this point, all mandatory components are installed and you are ready to deploy Digital Manufacturing Edge. First, create an edge device as described in https://help.sap.com/docs/sap-digital-manufacturing/setup-and-operations-guide-for-sap-digital-manufacturing-for-edge-computing/create-edge-device.
Afterward, follow the instructions at https://help.sap.com/docs/sap-digital-manufacturing/setup-and-operations-guide-for-sap-digital-manufacturing-for-edge-computing/install-with-helm. Skip the certificate creation, as certificates were created in previous chapters.
If you followed this entire guide, you can find an example of what the values.yaml looks like:
The following excerpt shows an example using Istio, Dex, PostgreSQL and Kafka with values described in this guide. For clarity, it displays the values without the External Secrets option.
deviceId: '<your-device-id>'
connectionString: <your-connection-string>
global:
    tenantId: '<your-tenant>'
    dockerRegistry: '<RSBC-Repository-URL>'
    gateway:
        hostname: <LB-address>
    storageClass: longhorn
    uaaUrl: '<your-uaaURL>'
    uaaClientId: <your-uaaClient>
    uaaClientSecret: <your-uaaClient-Password>
    ingressType: istio
    istioNamespace: istio-system
    ingressCACertificate: tls-secret-cacert
    ingressServerCertificate: tls-secret
    dex:
        useEmbedded: false
    dexIssuer: https://<dex-server-URL>
    dexCACertificate: dex-ca-secret
    dexClient:
        clientID: sap-dm-edge-client
        clientSecret: super-secret-password-shared-with-sap-dm
    idpLogoutUrl: https://<your-Rancher-URL>/oidc/logout
    database:
        useEmbedded: false
        type: postgresql
        auth:
            host: "postgres-rw.edgedb.svc.cluster.local"
            port: 5432
            database: "edgedb"
            username: "appuser"
            password: "<your_password>"
    kafka:
        useEmbedded: false
        auth:
          brokers: 'kafka-cluster-kafka-bootstrap.kafka.svc.cluster.local:9092'
          username: 'kafka-user'
          password: '<YOUR_DECODED_KAFKA_PASSWORD>'
    security:
        imageCredentials:
            username: <RBSC-docker-registry-username>
            password: <RBSC-docker-registry-password>
        externalSecrets:
            enabled: false
    size: production
edge-object-store:
    storageClass: longhorn
    hasRWXSupport: true
To get a better understanding of the values, refer to https://help.sap.com/docs/sap-digital-manufacturing/setup-and-operations-guide-for-sap-digital-manufacturing-for-edge-computing/helm-values
When the helm install command succeeds, Digital Manufacturing Edge is deployed and ready to use.
For subsequent steps, follow the official SAP documentation at https://help.sap.com/docs/sap-digital-manufacturing/setup-and-operations-guide-for-sap-digital-manufacturing-for-edge-computing/enable-and-trigger-initial-load?locale=en-US
10 Appendix #
10.1 Creating an imagePullSecret for the Rancher Application Collection #
To make the resources available for deployment, you need to create an imagePullSecret. In this guide, we use the name application-collection for it.
For details on authenticating with the Rancher Application Collection, refer to the Rancher Application Collection.
If you do not want to create multiple imagePullSecrets, you can also add the application collection as a registry to your cluster. Therefore add dp.apps.rancher.io as a registry as described in Section 10.4, “Adding a registry”. If you do so, make sure to create an HTTP Basic Auth Secret with your access token or service account credentials.
10.1.1 Creating an imagePullSecret using kubectl #
Using kubectl to create the imagePullSecret is quite easy.
Get your user name and your access token for the Rancher Application Collection.
Then run:
kubectl -n <namespace> create secret docker-registry application-collection --docker-server=dp.apps.rancher.io --docker-username=<yourUser> --docker-password=<yourPassword>As secrets are namespace-sensitive, you need to create this for every required namespace.
10.1.2 Creating an imagePullSecret using SUSE Rancher Prime #
You can also create an imagePullSecret using SUSE Rancher Prime. To do so, open SUSE Rancher Prime and enter your cluster.
Navigate to Storage → Secrets as shown below:

Click the Create button in the top right corner.

A window will appear asking you to select the secret type. Select Registry as shown here:

Enter a name such as application-collection for the secret. In the text box Registry Domain Name, enter dp.apps.rancher.io. Enter your user name and password and click the Create button at the bottom right.

10.2 Logging in to the Application Collection Registry #
To install the Helm charts from the application-collection, you need to log in to the registry. This needs to be done with the Helm client.
To log in to the Rancher Application Collection, run:
helm registry login dp.apps.rancher.io/charts -u <yourUser> -p <your-token>The login process is needed for the following application installations:
Cert-Manager (Section 5.4.1, “Installing the application”)
MetalLB (Section 8.3.1.2, “Installing MetalLB”)
Kafka (Section 8.9, “Installing Kafka”)
10.3 Fully removing SUSE Rancher Prime #
While helm uninstall triggers the removal of the SUSE Rancher Prime components, timeouts can occur, leaving residual components on your cluster. Therefore, we recommend to fully uninstall SUSE Rancher Prime from your Kubernetes cluster using the cleanup script found at https://github.com/rancher/rancher-cleanup .
To run the script without cloning the repository, use the following command:
kubectl create -f https://raw.githubusercontent.com/rancher/rancher-cleanup/refs/heads/main/deploy/rancher-cleanup.yamlTo keep track of the deletion process, you can run:
kubectl -n kube-system logs -l job-name=cleanup-job -fTo verify the deletion was successful, run the following commands. You should receive an empty output:
kubectl create -f https://raw.githubusercontent.com/rancher/rancher-cleanup/refs/heads/main/deploy/verify.yaml
kubectl  -n kube-system logs -l job-name=verify-job  -f | grep -v "is deprecated"
10.4 Adding a registry #
To avoid creating identical imagePullSecrets in multiple namespaces, you can also introduce a registry in your cluster configuration. This can be configured in the Cluster Configuration at the tab Registries as shown below:

When opened, click Show Advanced as displayed in the picture below:

Scroll to the very bottom and enter your registry FQDN, as shown below:

There’s no need to start with http:// or https:// prefix, neither with the /project as a suffix. If you are using certificates from an unknown CA, make sure to enable Skip TLS Verifications.
11 Legal notice #
Copyright © 2006-2026 SUSE LLC and contributors. All rights reserved.
Permission is granted to copy, distribute and/or modify this document under the terms of the GNU Free Documentation License, Version 1.2 or (at your option) version 1.3; with the Invariant Section being this copyright notice and license. A copy of the license version 1.2 is included in the section entitled "GNU Free Documentation License".
SUSE, the SUSE logo and YaST are registered trademarks of SUSE LLC in the United States and other countries. For SUSE trademarks, see https://www.suse.com/company/legal/.
Linux is a registered trademark of Linus Torvalds. All other names or trademarks mentioned in this document may be trademarks or registered trademarks of their respective owners.
Documents published as part of the SUSE Best Practices series have been contributed voluntarily by SUSE employees and third parties. They are meant to serve as examples of how particular actions can be performed. They have been compiled with utmost attention to detail. However, this does not guarantee complete accuracy. SUSE cannot verify that actions described in these documents do what is claimed or whether actions described have unintended consequences. SUSE LLC, its affiliates, the authors, and the translators may not be held liable for possible errors or the consequences thereof.
Below we draw your attention to the license under which the articles are published.
12 GNU Free Documentation License #
Copyright © 2000, 2001, 2002 Free Software Foundation, Inc. 51 Franklin St, Fifth Floor, Boston, MA 02110-1301 USA. Everyone is permitted to copy and distribute verbatim copies of this license document, but changing it is not allowed.
0. PREAMBLE#
The purpose of this License is to make a manual, textbook, or other functional and useful document "free" in the sense of freedom: to assure everyone the effective freedom to copy and redistribute it, with or without modifying it, either commercially or noncommercially. Secondarily, this License preserves for the author and publisher a way to get credit for their work, while not being considered responsible for modifications made by others.
This License is a kind of "copyleft", which means that derivative works of the document must themselves be free in the same sense. It complements the GNU General Public License, which is a copyleft license designed for free software.
We have designed this License in order to use it for manuals for free software, because free software needs free documentation: a free program should come with manuals providing the same freedoms that the software does. But this License is not limited to software manuals; it can be used for any textual work, regardless of subject matter or whether it is published as a printed book. We recommend this License principally for works whose purpose is instruction or reference.
1. APPLICABILITY AND DEFINITIONS#
This License applies to any manual or other work, in any medium, that contains a notice placed by the copyright holder saying it can be distributed under the terms of this License. Such a notice grants a world-wide, royalty-free license, unlimited in duration, to use that work under the conditions stated herein. The "Document", below, refers to any such manual or work. Any member of the public is a licensee, and is addressed as "you". You accept the license if you copy, modify or distribute the work in a way requiring permission under copyright law.
A "Modified Version" of the Document means any work containing the Document or a portion of it, either copied verbatim, or with modifications and/or translated into another language.
A "Secondary Section" is a named appendix or a front-matter section of the Document that deals exclusively with the relationship of the publishers or authors of the Document to the Document’s overall subject (or to related matters) and contains nothing that could fall directly within that overall subject. (Thus, if the Document is in part a textbook of mathematics, a Secondary Section may not explain any mathematics.) The relationship could be a matter of historical connection with the subject or with related matters, or of legal, commercial, philosophical, ethical or political position regarding them.
The "Invariant Sections" are certain Secondary Sections whose titles are designated, as being those of Invariant Sections, in the notice that says that the Document is released under this License. If a section does not fit the above definition of Secondary then it is not allowed to be designated as Invariant. The Document may contain zero Invariant Sections. If the Document does not identify any Invariant Sections then there are none.
The "Cover Texts" are certain short passages of text that are listed, as Front-Cover Texts or Back-Cover Texts, in the notice that says that the Document is released under this License. A Front-Cover Text may be at most 5 words, and a Back-Cover Text may be at most 25 words.
A "Transparent" copy of the Document means a machine-readable copy, represented in a format whose specification is available to the general public, that is suitable for revising the document straightforwardly with generic text editors or (for images composed of pixels) generic paint programs or (for drawings) some widely available drawing editor, and that is suitable for input to text formatters or for automatic translation to a variety of formats suitable for input to text formatters. A copy made in an otherwise Transparent file format whose markup, or absence of markup, has been arranged to thwart or discourage subsequent modification by readers is not Transparent. An image format is not Transparent if used for any substantial amount of text. A copy that is not "Transparent" is called "Opaque".
Examples of suitable formats for Transparent copies include plain ASCII without markup, Texinfo input format, LaTeX input format, SGML or XML using a publicly available DTD, and standard-conforming simple HTML, PostScript or PDF designed for human modification. Examples of transparent image formats include PNG, XCF and JPG. Opaque formats include proprietary formats that can be read and edited only by proprietary word processors, SGML or XML for which the DTD and/or processing tools are not generally available, and the machine-generated HTML, PostScript or PDF produced by some word processors for output purposes only.
The "Title Page" means, for a printed book, the title page itself, plus such following pages as are needed to hold, legibly, the material this License requires to appear in the title page. For works in formats which do not have any title page as such, "Title Page" means the text near the most prominent appearance of the work’s title, preceding the beginning of the body of the text.
A section "Entitled XYZ" means a named subunit of the Document whose title either is precisely XYZ or contains XYZ in parentheses following text that translates XYZ in another language. (Here XYZ stands for a specific section name mentioned below, such as "Acknowledgements", "Dedications", "Endorsements", or "History".) To "Preserve the Title" of such a section when you modify the Document means that it remains a section "Entitled XYZ" according to this definition.
The Document may include Warranty Disclaimers next to the notice which states that this License applies to the Document. These Warranty Disclaimers are considered to be included by reference in this License, but only as regards disclaiming warranties: any other implication that these Warranty Disclaimers may have is void and has no effect on the meaning of this License.
2. VERBATIM COPYING#
You may copy and distribute the Document in any medium, either commercially or noncommercially, provided that this License, the copyright notices, and the license notice saying this License applies to the Document are reproduced in all copies, and that you add no other conditions whatsoever to those of this License. You may not use technical measures to obstruct or control the reading or further copying of the copies you make or distribute. However, you may accept compensation in exchange for copies. If you distribute a large enough number of copies you must also follow the conditions in section 3.
You may also lend copies, under the same conditions stated above, and you may publicly display copies.
3. COPYING IN QUANTITY#
If you publish printed copies (or copies in media that commonly have printed covers) of the Document, numbering more than 100, and the Document’s license notice requires Cover Texts, you must enclose the copies in covers that carry, clearly and legibly, all these Cover Texts: Front-Cover Texts on the front cover, and Back-Cover Texts on the back cover. Both covers must also clearly and legibly identify you as the publisher of these copies. The front cover must present the full title with all words of the title equally prominent and visible. You may add other material on the covers in addition. Copying with changes limited to the covers, as long as they preserve the title of the Document and satisfy these conditions, can be treated as verbatim copying in other respects.
If the required texts for either cover are too voluminous to fit legibly, you should put the first ones listed (as many as fit reasonably) on the actual cover, and continue the rest onto adjacent pages.
If you publish or distribute Opaque copies of the Document numbering more than 100, you must either include a machine-readable Transparent copy along with each Opaque copy, or state in or with each Opaque copy a computer-network location from which the general network-using public has access to download using public-standard network protocols a complete Transparent copy of the Document, free of added material. If you use the latter option, you must take reasonably prudent steps, when you begin distribution of Opaque copies in quantity, to ensure that this Transparent copy will remain thus accessible at the stated location until at least one year after the last time you distribute an Opaque copy (directly or through your agents or retailers) of that edition to the public.
It is requested, but not required, that you contact the authors of the Document well before redistributing any large number of copies, to give them a chance to provide you with an updated version of the Document.
4. MODIFICATIONS#
You may copy and distribute a Modified Version of the Document under the conditions of sections 2 and 3 above, provided that you release the Modified Version under precisely this License, with the Modified Version filling the role of the Document, thus licensing distribution and modification of the Modified Version to whoever possesses a copy of it. In addition, you must do these things in the Modified Version:
Use in the Title Page (and on the covers, if any) a title distinct from that of the Document, and from those of previous versions (which should, if there were any, be listed in the History section of the Document). You may use the same title as a previous version if the original publisher of that version gives permission.
List on the Title Page, as authors, one or more persons or entities responsible for authorship of the modifications in the Modified Version, together with at least five of the principal authors of the Document (all of its principal authors, if it has fewer than five), unless they release you from this requirement.
State on the Title page the name of the publisher of the Modified Version, as the publisher.
Preserve all the copyright notices of the Document.
Add an appropriate copyright notice for your modifications adjacent to the other copyright notices.
Include, immediately after the copyright notices, a license notice giving the public permission to use the Modified Version under the terms of this License, in the form shown in the Addendum below.
Preserve in that license notice the full lists of Invariant Sections and required Cover Texts given in the Document’s license notice.
Include an unaltered copy of this License.
Preserve the section Entitled "History", Preserve its Title, and add to it an item stating at least the title, year, new authors, and publisher of the Modified Version as given on the Title Page. If there is no section Entitled "History" in the Document, create one stating the title, year, authors, and publisher of the Document as given on its Title Page, then add an item describing the Modified Version as stated in the previous sentence.
Preserve the network location, if any, given in the Document for public access to a Transparent copy of the Document, and likewise the network locations given in the Document for previous versions it was based on. These may be placed in the "History" section. You may omit a network location for a work that was published at least four years before the Document itself, or if the original publisher of the version it refers to gives permission.
For any section Entitled "Acknowledgements" or "Dedications", Preserve the Title of the section, and preserve in the section all the substance and tone of each of the contributor acknowledgements and/or dedications given therein.
Preserve all the Invariant Sections of the Document, unaltered in their text and in their titles. Section numbers or the equivalent are not considered part of the section titles.
Delete any section Entitled "Endorsements". Such a section may not be included in the Modified Version.
Do not retitle any existing section to be Entitled "Endorsements" or to conflict in title with any Invariant Section.
Preserve any Warranty Disclaimers.
If the Modified Version includes new front-matter sections or appendices that qualify as Secondary Sections and contain no material copied from the Document, you may at your option designate some or all of these sections as invariant. To do this, add their titles to the list of Invariant Sections in the Modified Version’s license notice. These titles must be distinct from any other section titles.
You may add a section Entitled "Endorsements", provided it contains nothing but endorsements of your Modified Version by various parties—for example, statements of peer review or that the text has been approved by an organization as the authoritative definition of a standard.
You may add a passage of up to five words as a Front-Cover Text, and a passage of up to 25 words as a Back-Cover Text, to the end of the list of Cover Texts in the Modified Version. Only one passage of Front-Cover Text and one of Back-Cover Text may be added by (or through arrangements made by) any one entity. If the Document already includes a cover text for the same cover, previously added by you or by arrangement made by the same entity you are acting on behalf of, you may not add another; but you may replace the old one, on explicit permission from the previous publisher that added the old one.
The author(s) and publisher(s) of the Document do not by this License give permission to use their names for publicity for or to assert or imply endorsement of any Modified Version.
5. COMBINING DOCUMENTS#
You may combine the Document with other documents released under this License, under the terms defined in section 4 above for modified versions, provided that you include in the combination all of the Invariant Sections of all of the original documents, unmodified, and list them all as Invariant Sections of your combined work in its license notice, and that you preserve all their Warranty Disclaimers.
The combined work need only contain one copy of this License, and multiple identical Invariant Sections may be replaced with a single copy. If there are multiple Invariant Sections with the same name but different contents, make the title of each such section unique by adding at the end of it, in parentheses, the name of the original author or publisher of that section if known, or else a unique number. Make the same adjustment to the section titles in the list of Invariant Sections in the license notice of the combined work.
In the combination, you must combine any sections Entitled "History" in the various original documents, forming one section Entitled "History"; likewise combine any sections Entitled "Acknowledgements", and any sections Entitled "Dedications". You must delete all sections Entitled "Endorsements".
6. COLLECTIONS OF DOCUMENTS#
You may make a collection consisting of the Document and other documents released under this License, and replace the individual copies of this License in the various documents with a single copy that is included in the collection, provided that you follow the rules of this License for verbatim copying of each of the documents in all other respects.
You may extract a single document from such a collection, and distribute it individually under this License, provided you insert a copy of this License into the extracted document, and follow this License in all other respects regarding verbatim copying of that document.
7. AGGREGATION WITH INDEPENDENT WORKS#
A compilation of the Document or its derivatives with other separate and independent documents or works, in or on a volume of a storage or distribution medium, is called an "aggregate" if the copyright resulting from the compilation is not used to limit the legal rights of the compilation’s users beyond what the individual works permit. When the Document is included in an aggregate, this License does not apply to the other works in the aggregate which are not themselves derivative works of the Document.
If the Cover Text requirement of section 3 is applicable to these copies of the Document, then if the Document is less than one half of the entire aggregate, the Document’s Cover Texts may be placed on covers that bracket the Document within the aggregate, or the electronic equivalent of covers if the Document is in electronic form. Otherwise they must appear on printed covers that bracket the whole aggregate.
8. TRANSLATION#
Translation is considered a kind of modification, so you may distribute translations of the Document under the terms of section 4. Replacing Invariant Sections with translations requires special permission from their copyright holders, but you may include translations of some or all Invariant Sections in addition to the original versions of these Invariant Sections. You may include a translation of this License, and all the license notices in the Document, and any Warranty Disclaimers, provided that you also include the original English version of this License and the original versions of those notices and disclaimers. In case of a disagreement between the translation and the original version of this License or a notice or disclaimer, the original version will prevail.
If a section in the Document is Entitled "Acknowledgements", "Dedications", or "History", the requirement (section 4) to Preserve its Title (section 1) will typically require changing the actual title.
9. TERMINATION#
You may not copy, modify, sublicense, or distribute the Document except as expressly provided for under this License. Any other attempt to copy, modify, sublicense or distribute the Document is void, and will automatically terminate your rights under this License. However, parties who have received copies, or rights, from you under this License will not have their licenses terminated so long as such parties remain in full compliance.
10. FUTURE REVISIONS OF THIS LICENSE#
The Free Software Foundation may publish new, revised versions of the GNU Free Documentation License from time to time. Such new versions will be similar in spirit to the present version, but may differ in detail to address new problems or concerns. See https://www.gnu.org/copyleft/.
Each version of the License is given a distinguishing version number. If the Document specifies that a particular numbered version of this License "or any later version" applies to it, you have the option of following the terms and conditions either of that specified version or of any later version that has been published (not as a draft) by the Free Software Foundation. If the Document does not specify a version number of this License, you may choose any version ever published (not as a draft) by the Free Software Foundation.
ADDENDUM: How to use this License for your documents#
Copyright (c) YEAR YOUR NAME.
   Permission is granted to copy, distribute and/or modify this document
   under the terms of the GNU Free Documentation License, Version 1.2
   or any later version published by the Free Software Foundation;
   with no Invariant Sections, no Front-Cover Texts, and no Back-Cover Texts.
   A copy of the license is included in the section entitled “GNU
   Free Documentation License”.
If you have Invariant Sections, Front-Cover Texts and Back-Cover Texts, replace the “ with…Texts.” line with this:
with the Invariant Sections being LIST THEIR TITLES, with the
   Front-Cover Texts being LIST, and with the Back-Cover Texts being LIST.
If you have Invariant Sections without Cover Texts, or some other combination of the three, merge those two alternatives to suit the situation.
If your document contains nontrivial examples of program code, we recommend releasing these examples in parallel under your choice of free software license, such as the GNU General Public License, to permit their use in free software.