Using Open WebUI for Effective AI Model Interaction #
- WHAT?
Open WebUI is a Web-based application that allows you to interact with AI models.
- WHY?
To understand what Open WebUI is and learn how to use it to effectively interact with AI models.
- EFFORT
It takes less than an hour to understand the basics of Open WebUI.
- REQUIREMENTS
The descriptions and procedures in this article assume that the following requirements are already fulfilled:
You have successfully deployed the SUSE AI.
You can access the Open WebUI interface in your Web browser.
Your Open WebUI user account has been created, and you have received the login credentials.
You have navigated your Web browser to the URL of your instance of Open WebUI and logged in with your credentials.
1 What is Open WebUI? #
Open WebUI is a Web-based interface that allows you to interact with AI models, such as large language models (LLM). It simplifies working with AI by providing a graphical user interface (GUI) instead of relying on command-line tools. The goal of Open WebUI is to make AI accessible to a broader audience, including those without technical expertise in AI development.
1.1 What are the key benefits of using Open WebUI? #
- Interaction with AI models
You can load a preferred AI model and interact with it using prompts in your natural language.
- Custom data handling for RAG workflows
Open WebUI allows you to upload documents or specify URLs of pages that the AI can parse and reference during interaction, which is particularly useful for RAG workflows.
- User-friendly interface
By providing a graphical user interface, Open WebUI makes AI tools more accessible to non-technical users. It helps them use the power of advanced AI models with no need for technical knowledge.
- Data privacy
You can deploy Open WebUI locally or in a private environment. Such deployment is required for users concerned about privacy and data security.
1.2 How does an AI chatbot process user queries? #
When you enter a user prompt, several processes happen in the background to generate the response.
Input processing. The AI first processes the text of your prompt to understand its meaning. This involves identifying the subject, intent and any details or context provided. This process is called Natural Language Understanding (NLU).
Contextual analysis. If you are interacting with AI in a session where you have already asked previous questions, the AI considers the context of the conversation. This results in more relevant and coherent answers.
Knowledge retrieval. The AI retrieves information from its pre-trained knowledge base. This database includes facts, data and concepts that the AI has been trained on. AI models can also utilize retrieval-augmented generation (RAG) systems to get contextual information from the data provided by the organization. If the AI has access to real-time data, it can search for the latest information online to provide an up-to-date response.
Response generation. Using natural language generation (NLG) techniques, the AI constructs a coherent and grammatically correct response based on the information it retrieved.
Output. The AI delivers the response in a requested form, usually in a human-readable format. This can be a detailed explanation, a step-by-step guide, or a customized image, depending on the complexity of your query.
Feedback Loop (Optional). In specific AI systems, your feedback or follow-up questions can help refine future responses, allowing the AI to improve its answers over time.
2 User interface basics #
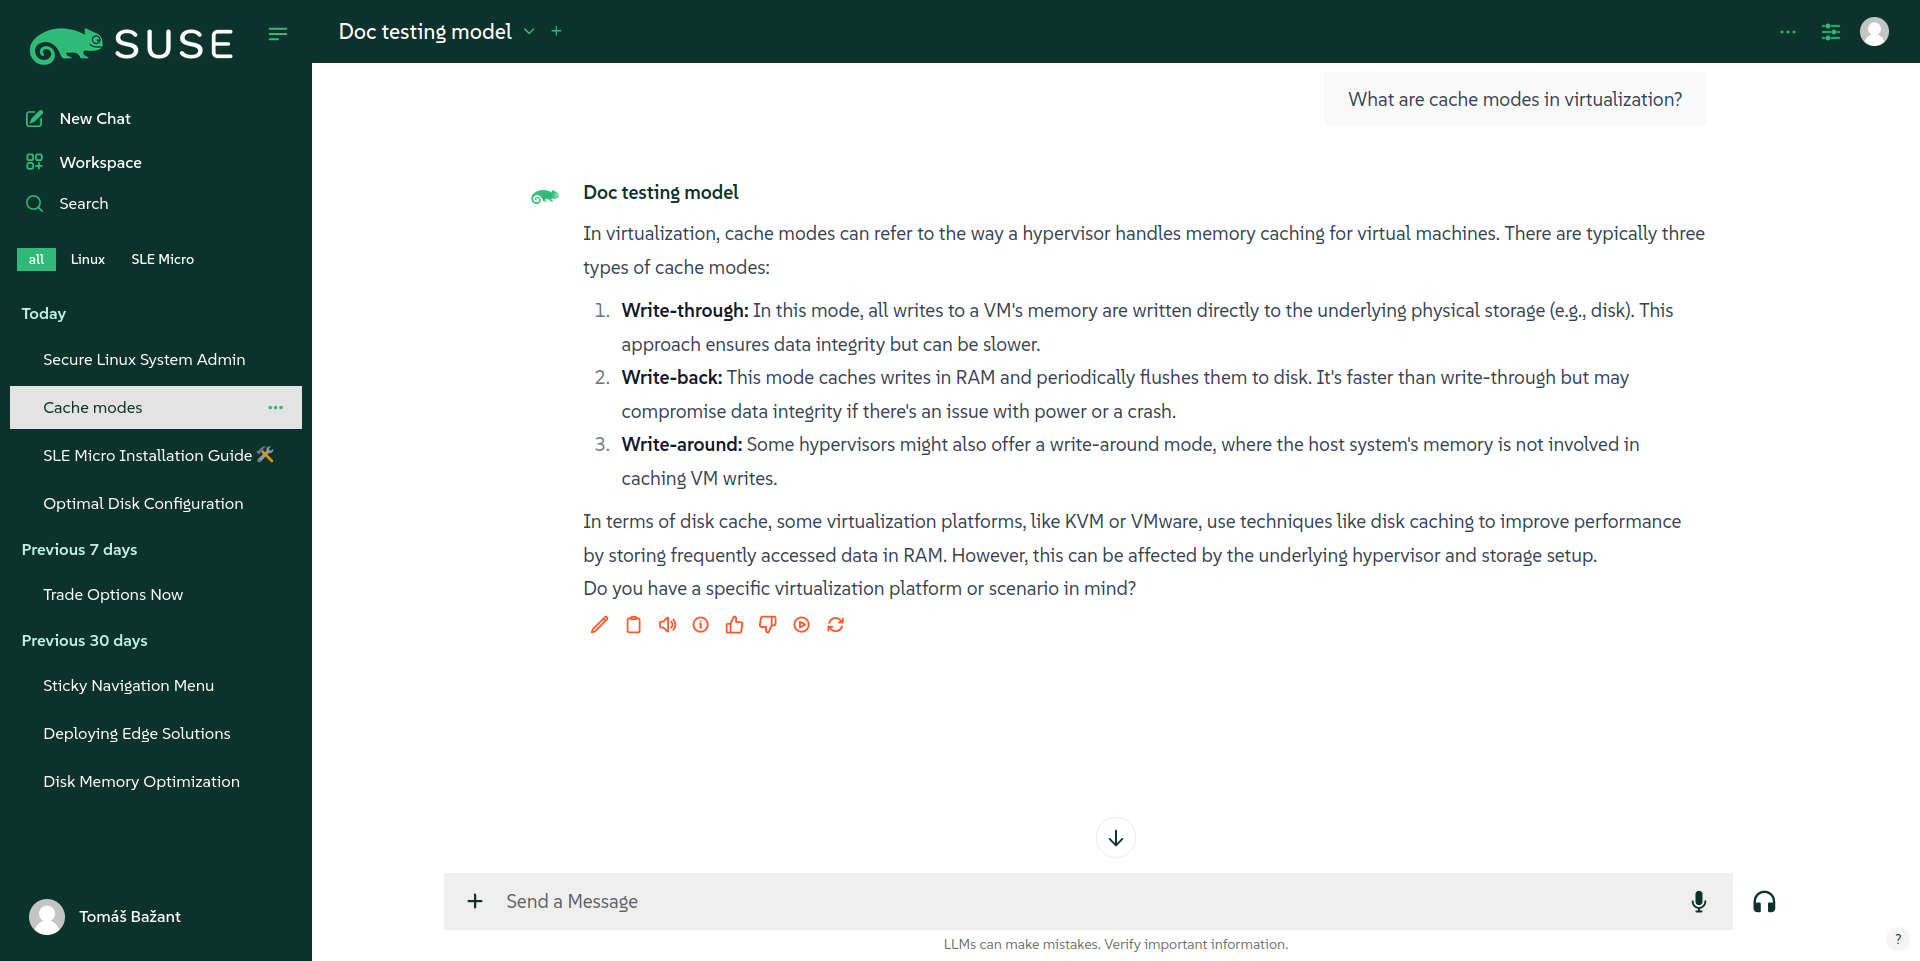
The Open WebUI interface consists of three main parts.
- Top panel
Contains controls to manage tasks related to the current chat, such as:
Maximizing the chat window
Selecting an AI model for the current chat
Viewing and managing advanced settings for the current chat
Changing settings related to the current user
Viewing archived chats of the current user
Accessing the
- Left sidebar
Contains links to perform the following tasks:
Start a new chat
Access the administrator’s
Search the content of the current chat
Browse through the history of your chats
- Main chat window
Displays your recent queries and corresponding answers provided by the AI. By using the prompt field at the bottom, you can accomplish the following tasks related to the current chat:
Enter the query that you want the AI to answer
Upload custom documents that you want the AI to process and use as a source of information when answering
Select a document, collection of documents, or URL to extend the AI model’s knowledge base
Select a preconfigured AI model for the current chat
Interrupt the chatbot from answering if you are already satisfied with the provided information
2.1 Workspace #
You must have Open WebUI administrator privileges to access configuration screens or settings mentioned in this section.
The area of the Open WebUI is a place where you can manage important parts of the AI stack. To access it, click at the top of the left panel. consists of the following parts:
- Models
Manage existing AI modules or add your custom AI module based on an existing one. Refer to https://documentation.suse.com/suse-ai/1.0/html/openwebui-configuring/index.html#openwebui-managing-models for more details and related procedures.
- Knowledge
Manage information sources—such as custom documents—that the users can use to enhance the current AI model’s knowledge base. This helps making the model’s responses more contextual. Refer to https://documentation.suse.com/suse-ai/1.0/html/openwebui-configuring/index.html#openwebui-managing-knowledgebase for more details and related procedures.
- Prompts
Define the system prompts that guide the AI model to respond accurately in the style and format that you prefer. Refer to https://documentation.suse.com/suse-ai/1.0/html/openwebui-configuring/index.html#openwebui-managing-prompts for more details and related procedures.
- Tools
include a collection of Python snippets that enhance interaction and expand functionality for working with AI models. Tools can, for example, integrate additional data sources into the model knowledge base, such as databases.
2.2 Admin Panel #
You must have Open WebUI administrator privileges to access configuration screens or settings mentioned in this section.
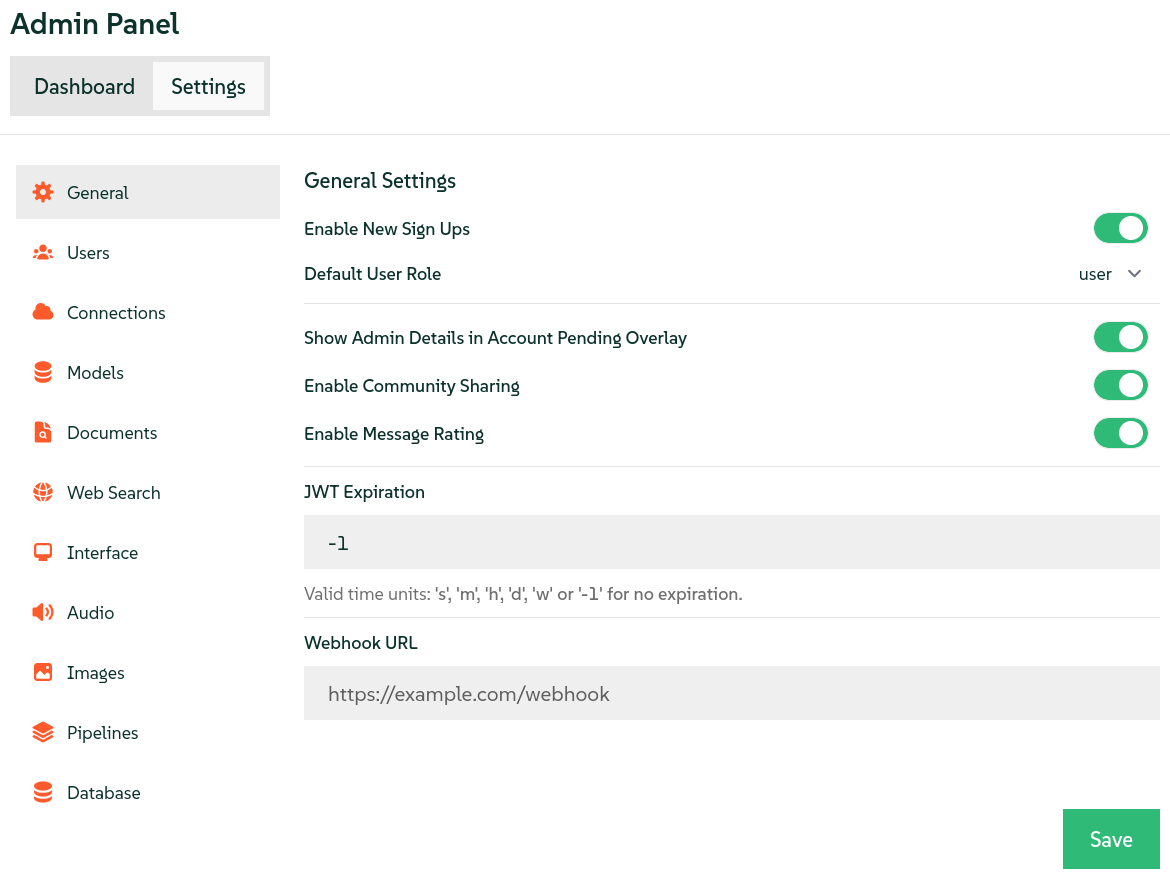
The is a centralized control interface for administrators to manage system settings, user accounts and overall application functionality.
To access the , click your avatar button at the top right of the Open WebUI screen and select .
3 The chat window #
The chat window is the primary interface for interacting with the AI, allowing you to send prompts and receive responses.
This procedure describes the basic steps for interacting with an AI model using the Open WebUI chat window.
At the top left of the chat window, verify that an AI model is selected. If no model is selected, select the preferred one from the drop-down list.
Tip: Your default modelTo make the selected model your default one, click next to the AI model name.
Tip: Multiple AI modulesYou can select multiple AI modules by clicking the plus sign next to the name of the already selected module.
Enter your prompt that you want AI to process in the chat input field.
Tip: Audio promptIf you prefer speaking rather than writing, click the small microphone icon to the right of the chat input field. Then say your prompt aloud and click the small check mark when finished.
Confirm with Enter or click the "up" arrow on the right of the chat input field so that the AI model can process your prompt. Wait for the response. .AI answering with two models openwebui_2_responses
Depending on the number of selected AI models, one or multiple responses arrive. Below each response, there is a set of icons that help you perform the following tasks on the response:
Edit the response in a Markdown format in case you want to copy it for later use.
Copy the response to the clipboard.
Let Open WebUI read the response aloud.
Mark the response as good or bad. This way, the model learns to more effectively address the same or related subjects.
Regenerate the response if you are not happy with its current version. You can then cycle between individual versions of responses with the small left and right arrows.
4 The chat input field #
For a new chat, the chat input field is located at the center of the Open WebUI chat window. During a chat session, the chat window slides to the bottom. Its main purpose is to accept a user prompt so that the AI can process it and respond (see Section 3, “The chat window”). Besides that, the chat input field provides extended functionality that can help you achieve the following tasks.
4.1 The chat input field #
For a new chat, the chat input field is located at the center of the Open WebUI chat window. During a chat session, the chat window slides to the bottom. Its main purpose is to accept a user prompt so that the AI can process it and respond. Besides that, the chat input field provides extended functionality that can help you achieve the following tasks.
4.1.1 Selecting an AI model from the chat input field #
You can specify which model you want the AI to use when responding to the prompts in your current chat. The selected model temporarily overrides your default model or the model you selected in the top-right corner of the chat window.
At least one AI model must be downloaded and available to Open WebUI. Refer to the section Setting base AI models for more details.
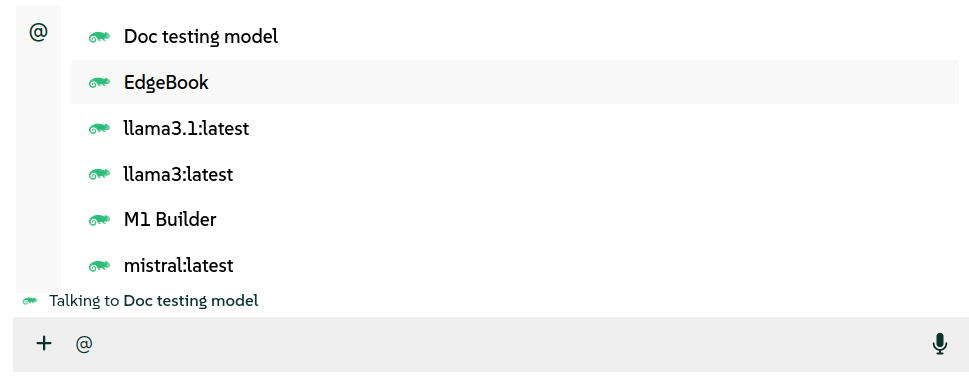
In the chat input field, type the
@character.From the drop-down list that appears, select one of the preconfigured AI models you want to talk to. You can only select one model at a time.
Figure 3: Selecting an AI model #Your selection is confirmed by the message right above the chat input field.
Type your prompt and confirm with Enter or by clicking the "up" arrow to the right of the chat input field.
Figure 4: Prompt for a selected model #To deactivate the previously selected model from the current chat, click the "cross" icon to the right of the model name.
4.2 Specifying preconfigured documents, collections or external URLs from the chat input field #
Besides prompting preconfigured AI models, you can "talk" to documents or collections of documents uploaded by the administrator. You can also specify external URLs whose content will be processed. AI then responds to your prompts based on the specified information sources.
This procedure describes how to select preconfigured documents, collections of documents, or external URLs as information sources for AI answers from the chat input field.
At least one knowledge base collection needs to be preconfigured. Refer to Managing a knowledge base to learn how to create one.
In the chat input field, type the
#character.From the drop-down list that appears, select one of the preconfigured documents or a collection of documents whose content you want AI to use as an information source. You can select multiple documents, one by one.
Figure 5: Selecting documents and collections #Instead of selecting the preconfigured documents, you can start typing
http:followed by the full valid URL to the page that you want AI to process. After you confirm it with Enter, AI starts processing it.Figure 6: Adding a URL source #Type your prompt and confirm with Enter or by clicking the "up" arrow to the right of the chat input field.
Figure 7: Prompt with selected documents and collections #To deactivate the previously selected document from the current chat, hover over its name and click the "cross" icon to the right of its name.
4.3 Adding custom data sources from the chat input field #
Besides prompting preconfigured AI models, you can "talk" to custom data sources specified in the chat input field. AI processes these sources so that it can respond based on their content.
This procedure describes how to upload custom documents as information sources for AI answers from the chat input field.
Click the
+sign to the left of the chat input field.Click and specify the document from your disk to process. You can upload multiple documents at the same time.
Type your prompt and confirm with Enter or by clicking the "up" arrow to the right of the chat input field.
Figure 8: Prompt with uploaded documents #To deactivate the previously selected document from the current chat, hover over its name and click the "cross" icon to the right of its name.
4.4 Selecting a preconfigured system prompt from the chat input field #
System prompts define the mood, context or style for user interactions. This section details how to select a preconfigured system prompt from the input field.
At least one system prompt must be preconfigured. Refer to Managing system prompts to learn how to create one.
In the chat input field, type the
/character.From the drop-down list that appears, select the system prompt that you want to apply for the current chat.
Figure 9: Preconfigured system prompt #The content of the selected system prompt is pasted to the chat input field. Confirm it with Enter or by clicking the "up" arrow to the right of the chat input field.
4.5 Selecting mcpo services from the chat input field #
MCP servers offer additional services that enhance the AI model responses and make them more specific. This section details how to enable individual mcpo services from the input field.
At least one MCP server must be preconfigured. Refer to Installing mcpo to learn how to configure one.
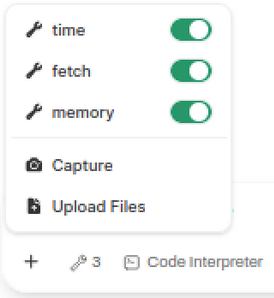
Click the "+" sign to the left of the chat input field.
From the drop-down list that appears, select the MCP service that you want to include for the current chat.
Figure 10: Selecting MCP services selecting_mcp_services #Enter a prompt that triggers a call to one of the selected MCP services. You should see the tool invocation listed below the response.
Figure 11: Response from an MCP service selecting_mcp_answer #
For more details about mcpo integration and usage with Open WebUI, refer to the Open WebUI integration documentation.
4.6 Enabling native function calling #
Native function calling is a process in which a client—such as the SUSE AI chatbot—instructs its LLM to query an MCP server directly, bypassing the mcpo proxy.
It involves the following steps:
A client LLM connects to an MCP server.
The MCP server exposes tools (functions) with names, argument schemas and returns.
The client calls a suitable tool and its functions with appropriate arguments.
The tool then returns the result of the function call to the client and the client includes the result in its response.
For this to work effectively, the selected model must support native tool calling. Certain models may claim such support but often produce poor results. For the best experience, Open WebUI recommends using GPT-4o or another OpenAI model that supports function calling natively.
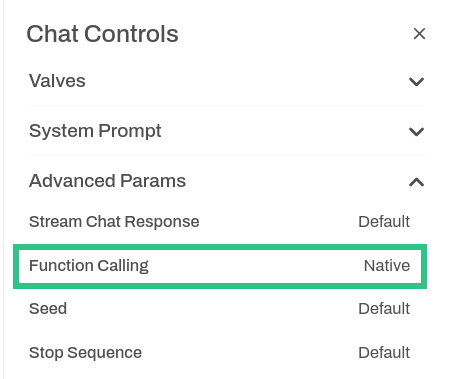
In the top right of the Open WebUI window, click the icon.
Unfold the tab and set the from
DefaulttoNative.Figure 12: Enabling native function calling fig_owui_enabling_nfc #Close the window to apply the change.
4.6.1 For more information #
You may find the following information sources useful:
