Administration Guide
- About This Guide
- I Installation, Setup and Upgrade
- II Configuration and Administration
- 6 Configuration and Administration Basics
- 7 Configuring and Managing Cluster Resources with Hawk2
- 8 Configuring and Managing Cluster Resources (Command Line)
- 9 Adding or Modifying Resource Agents
- 10 Fencing and STONITH
- 11 Storage Protection and SBD
- 12 Access Control Lists
- 13 Network Device Bonding
- 14 Load Balancing
- 15 Geo Clusters (Multi-Site Clusters)
- 16 Executing Maintenance Tasks
- III Storage and Data Replication
- IV Appendix
- Glossary
- E GNU Licenses
7 Configuring and Managing Cluster Resources with Hawk2 #
Abstract#
To configure and manage cluster resources, either use HA Web Konsole (Hawk2), or the crm shell (crmsh) command line utility. If you upgrade from an earlier version of SUSE® Linux Enterprise High Availability Extension where Hawk was installed, the package will be replaced with the current version, Hawk2.
Hawk2's Web-based user-interface allows you to monitor and administer your Linux cluster from non-Linux machines. Furthermore, it is the ideal solution in case your system only provides a minimal graphical user interface.
- 7.1 Hawk2 Requirements
- 7.2 Logging In
- 7.3 Hawk2 Overview: Main Elements
- 7.4 Configuring Global Cluster Options
- 7.5 Configuring Cluster Resources
- 7.6 Configuring Constraints
- 7.7 Managing Cluster Resources
- 7.8 Monitoring Clusters
- 7.9 Using the Batch Mode
- 7.10 Viewing the Cluster History
- 7.11 Verifying Cluster Health
7.1 Hawk2 Requirements #
Before users can log in to Hawk2, the following requirements need to be fulfilled:
The
hawk2package must be installed on all cluster nodes you want to connect to with Hawk2.On the machine from which to access a cluster node using Hawk2, you need a (graphical) Web browser (with JavaScript and cookies enabled) to establish the connection.
To use Hawk2, the respective Web service must be started on the node that you want to connect to via the Web interface. See Procedure 7.1, “Starting Hawk2 Services”.
If you have set up your cluster with the scripts from the
ha-cluster-bootstrappackage, the Hawk2 service is already enabled.Hawk2 users must be members of the
haclientgroup. The installation creates a Linux user namedhacluster, who is added to thehaclientgroup. When using theha-cluster-initscript for setup, a default password is set for thehaclusteruser.Before starting Hawk2, set or change the password for the
haclusteruser. Alternatively, create a new user which is a member of thehaclientgroup.Do this on every node you will connect to with Hawk2.
Procedure 7.1: Starting Hawk2 Services #
On the node you want to connect to, open a shell and log in as
root.Check the status of the service by entering
root #systemctlstatus hawkIf the service is not running, start it with
root #systemctlstart hawkIf you want Hawk2 to start automatically at boot time, execute the following command:
root #systemctlenable hawk
7.2 Logging In #
The Hawk2 Web interface uses the HTTPS protocol and port
7630.
Instead of logging in to an individual cluster node with Hawk2, you can
configure a floating, virtual IP address (IPaddr or
IPaddr2) as a cluster resource. It does not need any
special configuration. It allows clients to connect to the Hawk service no
matter which physical node the service is running on.
When setting up the cluster with the
ha-cluster-bootstrap scripts,
you will be asked whether to configure a virtual IP for cluster
administration.
Procedure 7.2: Logging In to the Hawk2 Web Interface #
On any machine, start a Web browser and enter the following URL:
https://HAWKSERVER:7630/
Replace HAWKSERVER with the IP address or host name of any cluster node running the Hawk Web service. If a virtual IP address has been configured for cluster administration with Hawk2, replace HAWKSERVER with the virtual IP address.
Note: Certificate Warning
If a certificate warning appears when you try to access the URL for the first time, a self-signed certificate is in use. Self-signed certificates are not considered trustworthy by default.
To verify the certificate, ask your cluster operator for the certificate details.
To proceed anyway, you can add an exception in the browser to bypass the warning.
For information on how to replace the self-signed certificate with a certificate signed by an official Certificate Authority, refer to Replacing the Self-Signed Certificate.
On the Hawk2 login screen, enter the and of the
haclusteruser (or of any other user that is a member of thehaclientgroup).Click .
7.3 Hawk2 Overview: Main Elements #
After logging in to Hawk2, you will see a navigation bar on the left-hand side and a top-level row with several links on the right-hand side.
Note: Available Functions in Hawk2
By default, users logged in as root or
hacluster have full
read-write access to all cluster configuration tasks. However,
Access Control Lists (ACLs) can be used to
define fine-grained access permissions.
If ACLs are enabled in the CRM, the available functions in Hawk2 depend
on the user role and their assigned access permissions. The
in Hawk2 can only be executed by the
user hacluster.
7.3.2 Top-Level Row #
Hawk2's top-level row shows the following entries:
: Click to switch to batch mode. This allows you to simulate and stage changes and to apply them as a single transaction. For details, see Section 7.9, “Using the Batch Mode”.
: Allows you to set preferences for Hawk2 (for example, the language for the Web interface, or whether to display a warning if STONITH is disabled).
: Access the SUSE Linux Enterprise High Availability Extension documentation, read the release notes or report a bug.
: Click to log out.
7.4 Configuring Global Cluster Options #
Global cluster options control how the cluster behaves when confronted with certain situations. They are grouped into sets and can be viewed and modified with cluster management tools like Hawk2 and crmsh. The predefined values can usually be kept. However, to ensure the key functions of your cluster work correctly, you need to adjust the following parameters after basic cluster setup:
Procedure 7.3: Modifying Global Cluster Options #
Log in to Hawk2:
https://HAWKSERVER:7630/
From the left navigation bar, select .
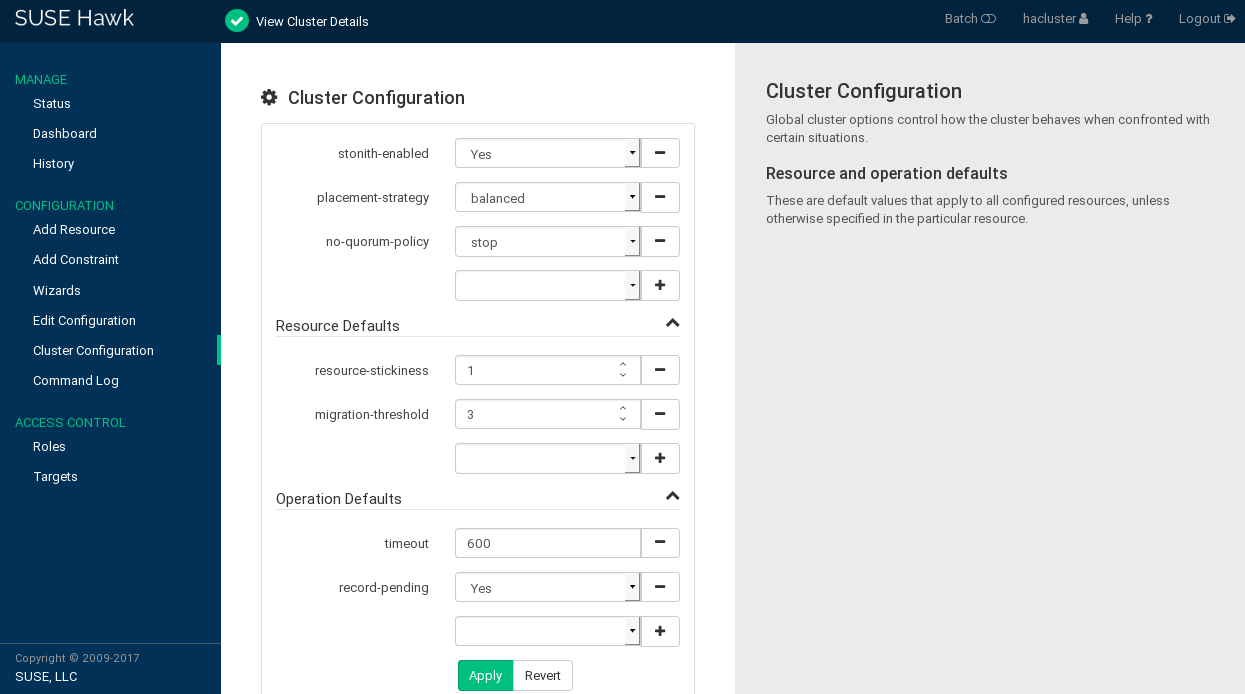
The screen opens. It displays the global cluster options and their current values.
To display a short description of the parameter on the right-hand side of the screen, hover your mouse over a parameter.
Figure 7.1: Hawk2—Cluster Configuration #
Check the values for and and adjust them, if necessary:
Set to the appropriate value. See Section 6.2.2, “Global Option
no-quorum-policy” for more details.If you need to disable fencing for any reason, set to
no. By default, it is set totrue, because using STONITH devices is necessary for normal cluster operation. According to the default value, the cluster will refuse to start any resources if no STONITH resources have been configured.Important: No Support Without STONITH
You must have a node fencing mechanism for your cluster.
The global cluster options
stonith-enabledandstartup-fencingmust be set totrue. When you change them, you lose support.
To remove a parameter from the cluster configuration, click the icon next to the parameter. If a parameter is deleted, the cluster will behave as if that parameter had the default value.
To add a new parameter to the cluster configuration, choose one from the drop-down box.
If you need to change or , proceed as follows:
To adjust a value, either select a different value from the drop-down box or edit the value directly.
To add a new resource default or operation default, choose one from the empty drop-down box and enter a value. If there are default values, Hawk2 proposes them automatically.
To remove a parameter, click the icon next to it. If no values are specified for and , the cluster uses the default values that are documented in Section 6.3.6, “Resource Options (Meta Attributes)” and Section 6.3.8, “Resource Operations”.
Confirm your changes.
7.5 Configuring Cluster Resources #
A cluster administrator needs to create cluster resources for every resource or application that runs on the servers in your cluster. Cluster resources can include Web sites, mail servers, databases, file systems, virtual machines, and any other server-based applications or services you want to make available to users at all times.
For an overview of the resource types you can create, refer to Section 6.3.3, “Types of Resources”. After you have specified the resource basics (ID, class, provider, and type), Hawk2 shows the following categories:
- Parameters (Instance Attributes)
Determines which instance of a service the resource controls. For more information, refer to Section 6.3.7, “Instance Attributes (Parameters)”.
When creating a resource, Hawk2 automatically shows any required parameters. Edit them to get a valid resource configuration.
- Operations
Needed for resource monitoring. For more information, refer to Section 6.3.8, “Resource Operations”.
When creating a resource, Hawk2 displays the most important resource operations (
monitor,start, andstop).- Meta Attributes
Tells the CRM how to treat a specific resource. For more information, refer to Section 6.3.6, “Resource Options (Meta Attributes)”.
When creating a resource, Hawk2 automatically lists the important meta attributes for that resource (for example, the
target-roleattribute that defines the initial state of a resource. By default, it is set toStopped, so the resource will not start immediately).- Utilization
Tells the CRM what capacity a certain resource requires from a node. For more information, refer to Section 7.6.8, “Configuring Placement of Resources Based on Load Impact”.
You can adjust the entries and values in those categories either during resource creation or later.
7.5.1 Showing the Current Cluster Configuration (CIB) #
Sometimes a cluster administrator needs to know the cluster configuration. Hawk2 can show the current configuration in crm shell syntax, as XML and as a graph. To view the cluster configuration in crm shell syntax, from the left navigation bar select and click . To show the configuration in raw XML instead, click . Click for a graphical representation of the nodes and resources configured in the CIB. It also shows the relationships between resources.
7.5.2 Adding Resources with the Wizard #
The Hawk2 wizard is a convenient way of setting up simple resources like a virtual IP address or an SBD STONITH resource, for example. It is also useful for complex configurations that include multiple resources, like the resource configuration for a DRBD block device or an Apache Web server. The wizard guides you through the configuration steps and provides information about the parameters you need to enter.
Procedure 7.4: Using the Resource Wizard #
Log in to Hawk2:
https://HAWKSERVER:7630/
From the left navigation bar, select .
Expand the individual categories by clicking the arrow down icon next to them and select the desired wizard.
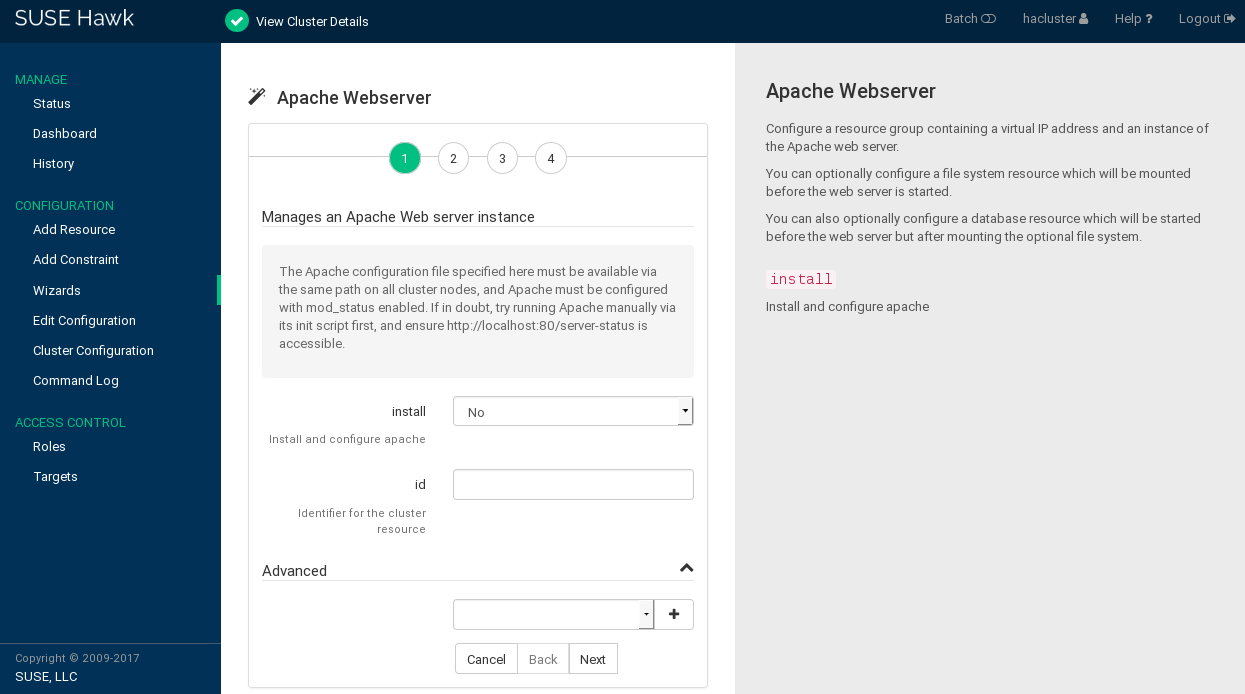
Follow the instructions on the screen. After the last configuration step, the values you have entered.
Hawk2 shows which actions it is going to perform and what the configuration looks like. Depending on the configuration, you might be prompted for the
rootpassword before you can the configuration.
Figure 7.2: Hawk2—Wizard for Apache Web Server #
7.5.3 Adding Simple Resources #
To create the most basic type of resource, proceed as follows:
Procedure 7.5: Adding a Primitive Resource #
Log in to Hawk2:
https://HAWKSERVER:7630/
From the left navigation bar, select › .
Enter a unique .
In case a resource template exists on which you want to base the resource configuration, select the respective . For details about configuring templates, see Procedure 7.6, “Adding a Resource Template”.
Select the resource agent you want to use:
lsb,ocf,service,stonith, orsystemd. For more information, see Section 6.3.2, “Supported Resource Agent Classes”.If you selected
ocfas class, specify the of your OCF resource agent. The OCF specification allows multiple vendors to supply the same resource agent.From the list, select the resource agent you want to use (for example, or ). A short description for this resource agent is displayed.
With that, you have specified the resource basics.
Note
The selection you get in the list depends on the (and for OCF resources also on the ) you have chosen.
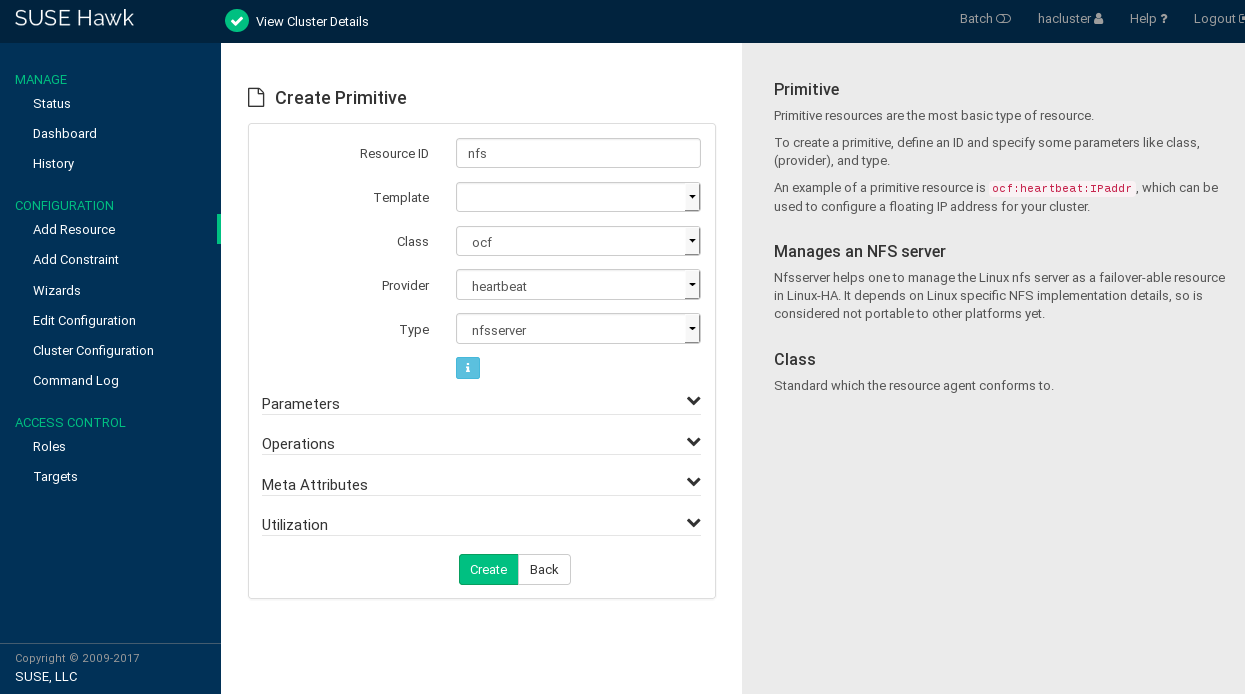
Figure 7.3: Hawk2—Primitive Resource #
To keep the , , and as suggested by Hawk2, click to finish the configuration. A message at the top of the screen shows if the action has been successful.
To adjust the parameters, operations, or meta attributes, refer to Section 7.5.5, “Modifying Resources”. To configure attributes for the resource, see Procedure 7.21, “Configuring the Capacity a Resource Requires”.
7.5.4 Adding Resource Templates #
To create lots of resources with similar configurations, defining a resource template is the easiest way. After being defined, it can be referenced in primitives or in certain types of constraints. For detailed information about function and use of resource templates, refer to Section 6.5.3, “Resource Templates and Constraints”.
Procedure 7.6: Adding a Resource Template #
Resource templates are configured like primitive resources.
Log in to Hawk2:
https://HAWKSERVER:7630/
From the left navigation bar, select › .
Enter a unique .
Follow the instructions in Procedure 7.5, “Adding a Primitive Resource”, starting from Step 5.
7.5.5 Modifying Resources #
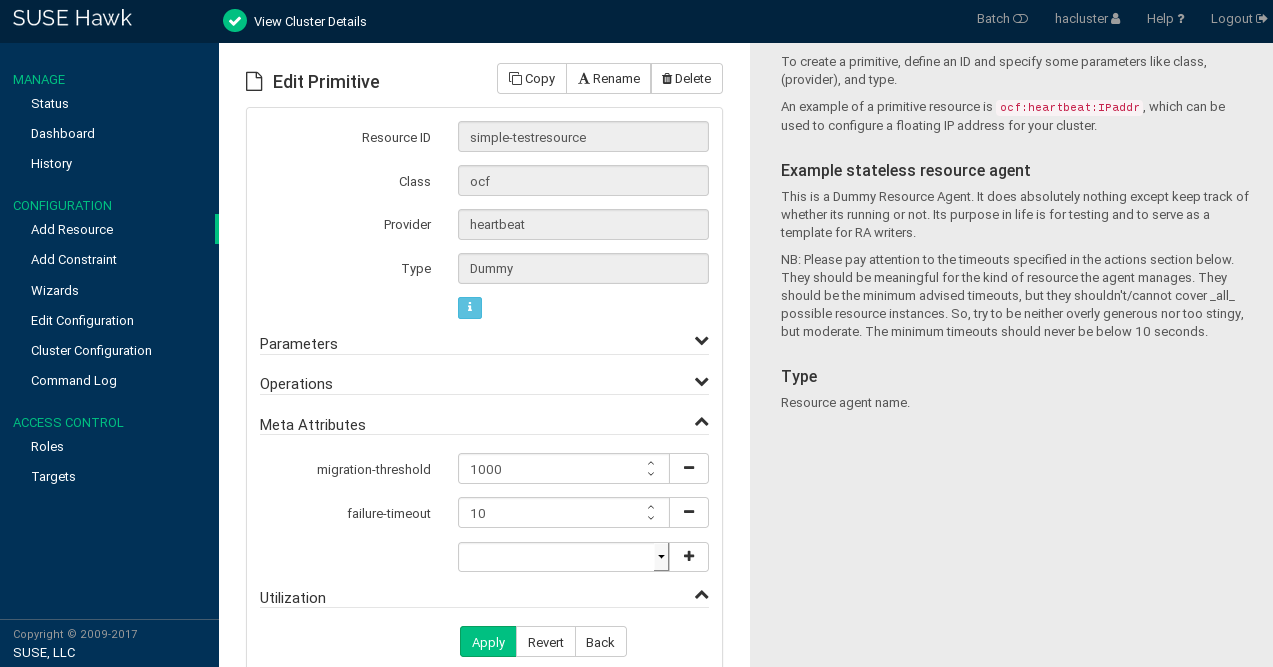
If you have created a resource, you can edit its configuration at any time by adjusting parameters, operations, or meta attributes as needed.
Procedure 7.7: Modifying Parameters, Operations, or Meta Attributes for a Resource #
Log in to Hawk2:
https://HAWKSERVER:7630/
On the Hawk2 screen, go to the list.
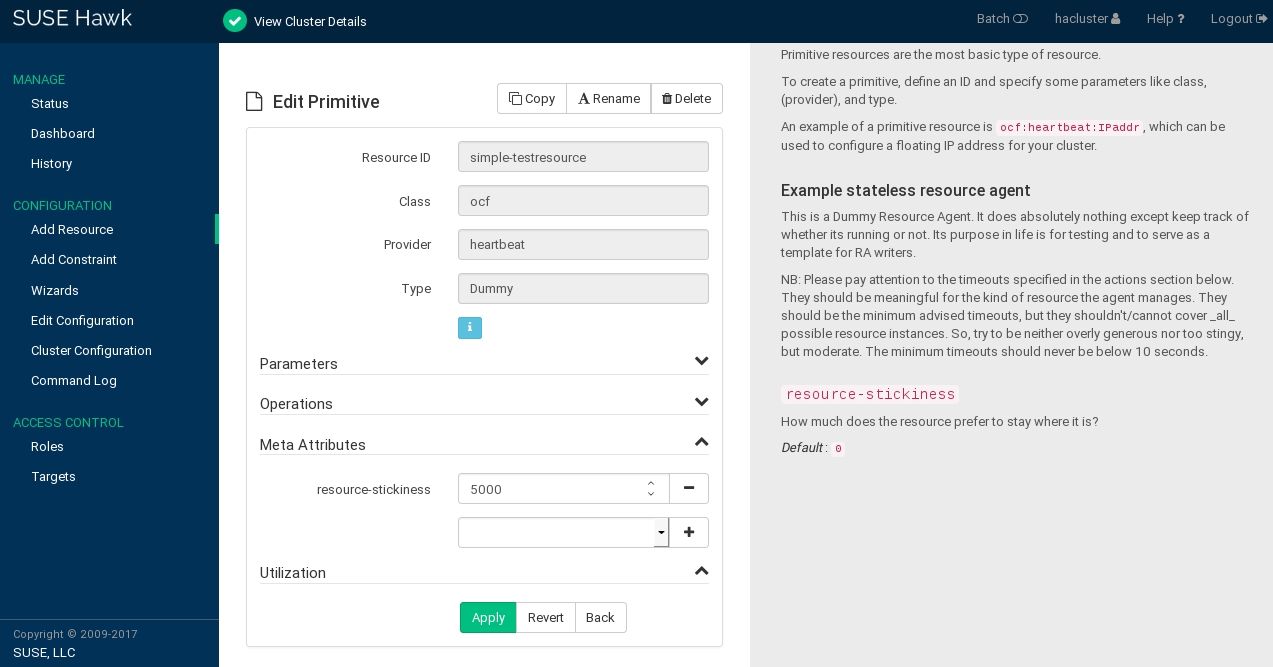
In the column, click the arrow down icon next to the resource or group you want to modify and select .
The resource configuration screen opens.
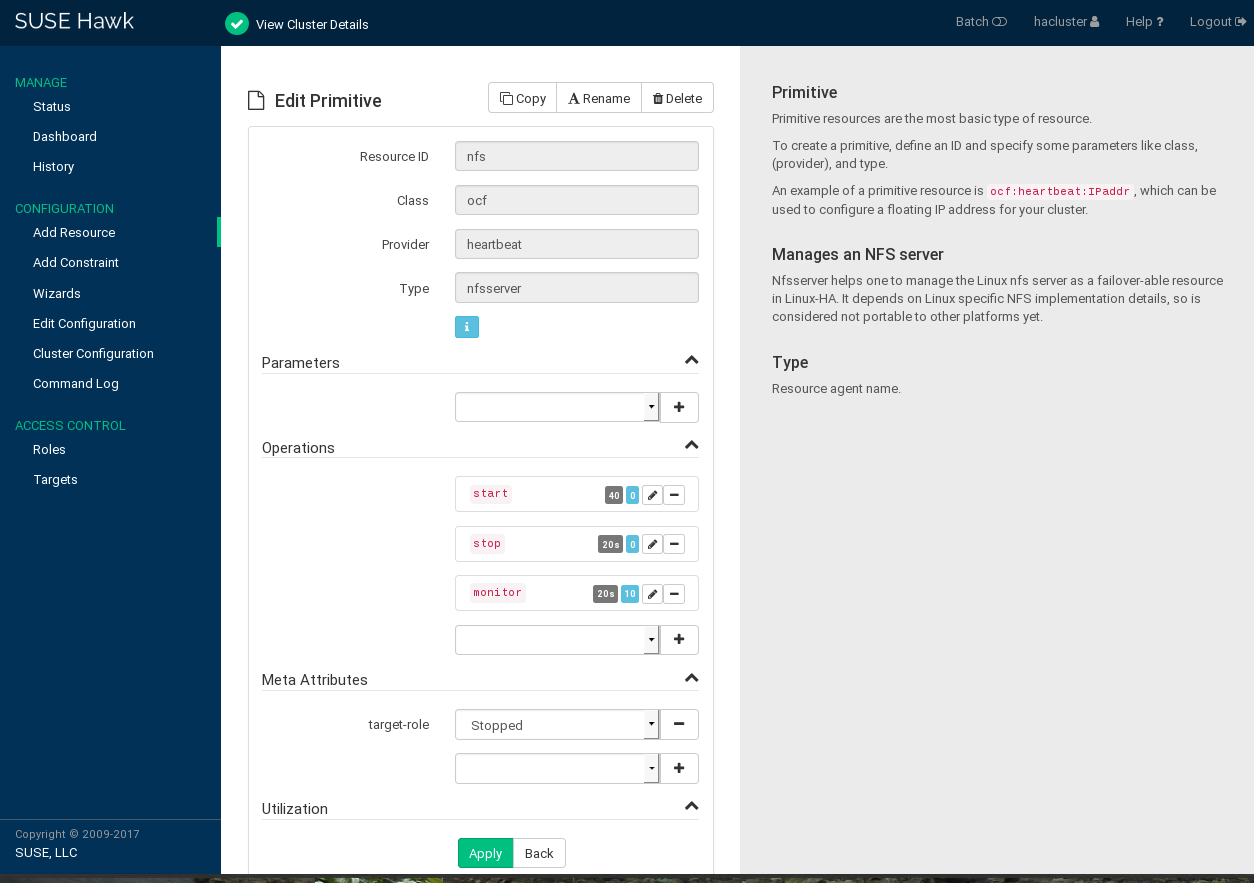
Figure 7.4: Hawk2—Editing A Primitive Resource #
To add a new parameter, operation, or meta attribute, select an entry from the empty drop-down box.
To edit any values in the category, click the icon of the respective entry, enter a different value for the operation, and click .
When you are finished, click the button in the resource configuration screen to confirm your changes to the parameters, operations, or meta attributes.
A message at the top of the screen shows if the action has been successful.
7.5.6 Adding STONITH Resources #
Important: No Support Without STONITH
You must have a node fencing mechanism for your cluster.
The global cluster options
stonith-enabledandstartup-fencingmust be set totrue. When you change them, you lose support.
By default, the global cluster option stonith-enabled is
set to true. If no STONITH resources have been defined,
the cluster will refuse to start any resources. Configure one or more
STONITH resources to complete the STONITH setup. To add a STONITH
resource for SBD, for libvirt (KVM/Xen) or for vCenter/ESX Server, the
easiest way is to use the Hawk2 wizard (see
Section 7.5.2, “Adding Resources with the Wizard”). While STONITH resources
are configured similarly to other resources, their behavior is different in
some respects. For details refer to Section 10.3, “STONITH Resources and Configuration”.
Procedure 7.8: Adding a STONITH Resource #
Log in to Hawk2:
https://HAWKSERVER:7630/
From the left navigation bar, select › .
Enter a unique .
From the list, select the resource agent class .
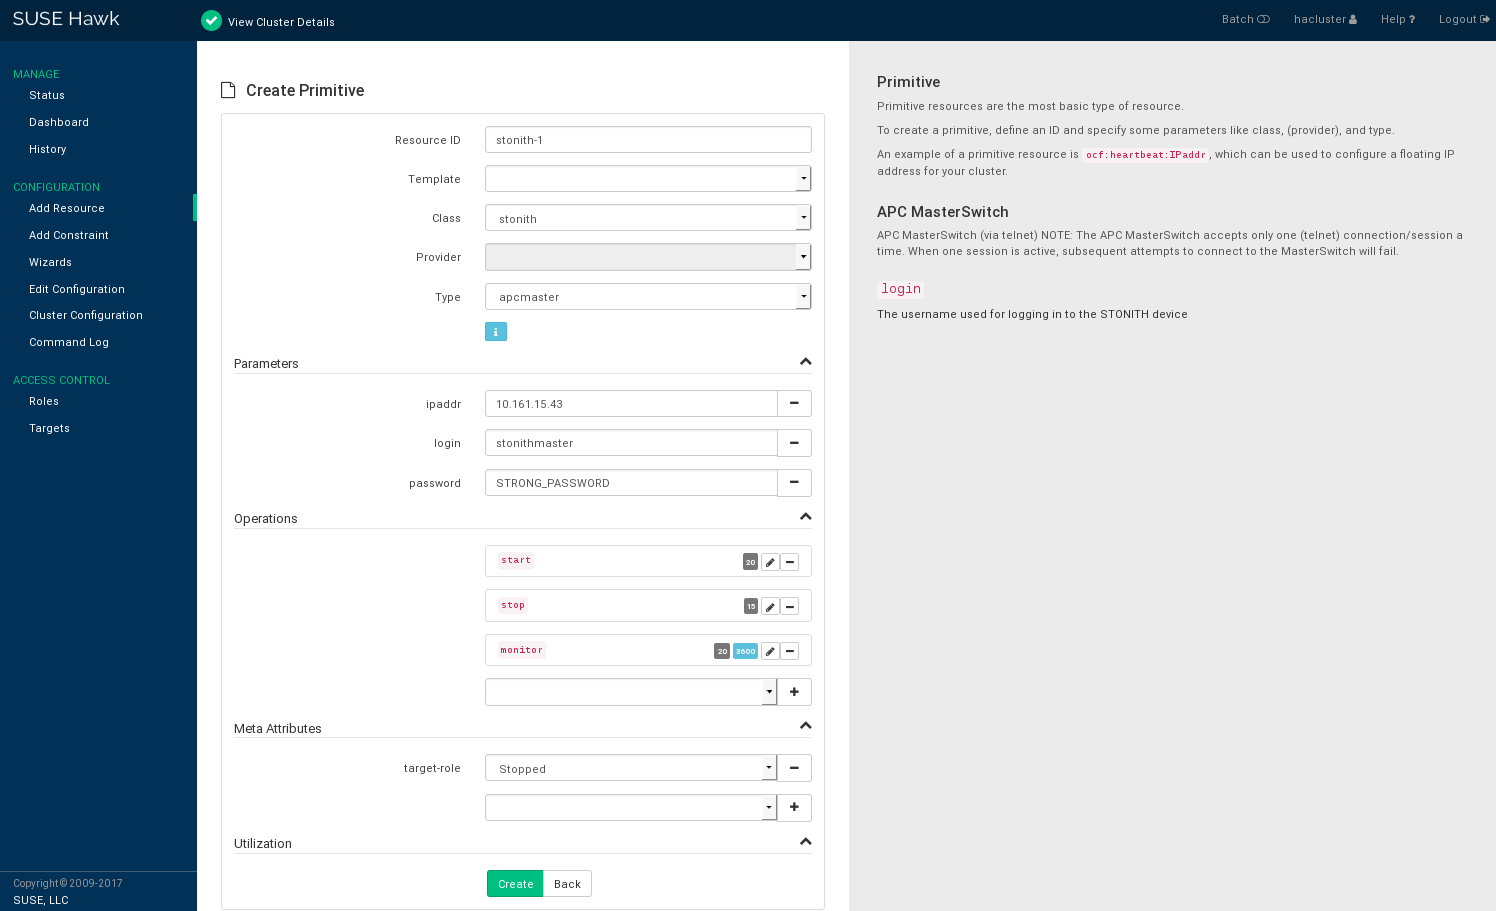
From the list, select the STONITH plug-in to control your STONITH device. A short description for this plug-in is displayed.
Hawk2 automatically shows the required for the resource. Enter values for each parameter.
Hawk2 displays the most important resource and proposes default values. If you do not modify any settings here, Hawk2 adds the proposed operations and their default values when you confirm.
If there is no reason to change them, keep the default settings.
Figure 7.5: Hawk2—STONITH Resource #
Confirm your changes to create the STONITH resource.
A message at the top of the screen shows if the action has been successful.
To complete your fencing configuration, add constraints. For more details, refer to Chapter 10, Fencing and STONITH.
7.5.7 Adding Cluster Resource Groups #
Some cluster resources depend on other components or resources. They require that each component or resource starts in a specific order and runs on the same server. To simplify this configuration SUSE Linux Enterprise High Availability Extension supports the concept of groups.
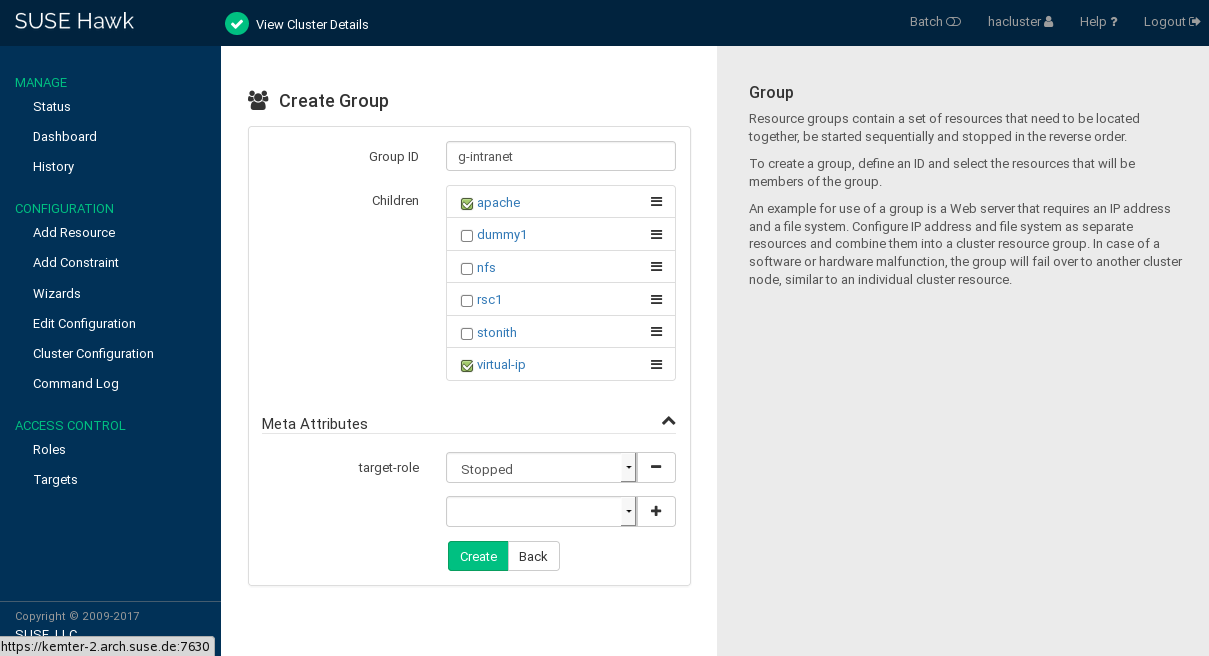
Resource groups contain a set of resources that need to be located together, be started sequentially and stopped in the reverse order. For an example of a resource group and more information about groups and their properties, refer to Section 6.3.5.1, “Groups”.
Note: Empty Groups
Groups must contain at least one resource, otherwise the configuration is not valid. While creating a group, Hawk2 allows you to create more primitives and add them to the group. For details, see Section 7.7.1, “Editing Resources and Groups”.
Procedure 7.9: Adding a Resource Group #
Log in to Hawk2:
https://HAWKSERVER:7630/
From the left navigation bar, select › .
Enter a unique .
To define the group members, select one or multiple entries in the list of . Re-sort group members by dragging and dropping them into the order you want by using the “handle” icon on the right.
If needed, modify or add .
Click to finish the configuration. A message at the top of the screen shows if the action has been successful.
Figure 7.6: Hawk2—Resource Group #
7.5.8 Adding Clone Resources #
If you want certain resources to run simultaneously on multiple nodes in
your cluster, configure these resources as clones. An example of a resource
that can be configured as a clone is
ocf:pacemaker:controld for cluster file systems like
OCFS2. Any regular resources or resource groups can be cloned. Instances of
cloned resources may behave identically. However, they may also be
configured differently, depending on which node they are hosted on.
For an overview of the available types of resource clones, refer to Section 6.3.5.2, “Clones”.
Note: Child Resources for Clones
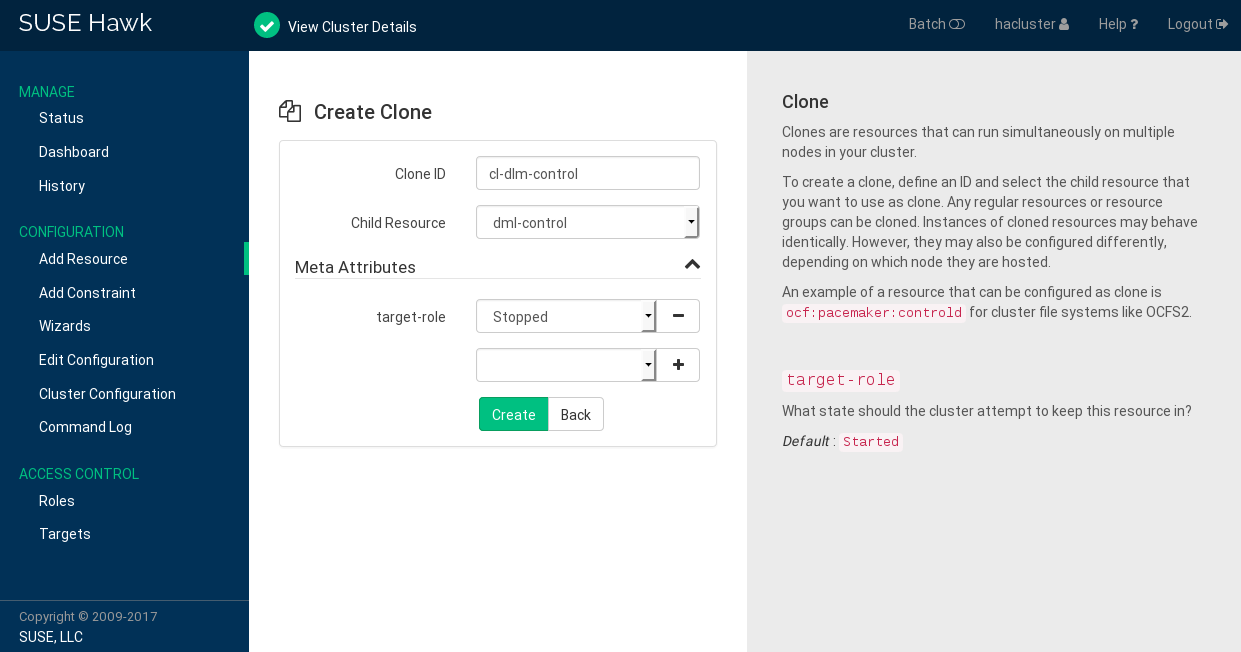
Clones can either contain a primitive or a group as child resources. In Hawk2, child resources cannot be created or modified while creating a clone. Before adding a clone, create child resources and configure them as desired. For details, refer to Section 7.5.3, “Adding Simple Resources” or Section 7.5.7, “Adding Cluster Resource Groups”.
Procedure 7.10: Adding a Clone Resource #
Log in to Hawk2:
https://HAWKSERVER:7630/
From the left navigation bar, select › .
Enter a unique .
From the list, select the primitive or group to use as a sub-resource for the clone.
If needed, modify or add .
Click to finish the configuration. A message at the top of the screen shows if the action has been successful.
Figure 7.7: Hawk2—Clone Resource #
7.5.9 Adding Multi-state Resources #
Multi-state resources are a specialization of clones. They allow the
instances to be in one of two operating modes (called
active/passive, primary/secondary, or
master/slave). Multi-state resources must contain exactly
one group or one regular resource.
When configuring resource monitoring or constraints, multi-state resources have different requirements than simple resources. For details, see Pacemaker Explained, available from http://www.clusterlabs.org/doc/. Refer to section Multi-state - Resources That Have Multiple Modes.
Note: Child Resources for Multi-state Resources
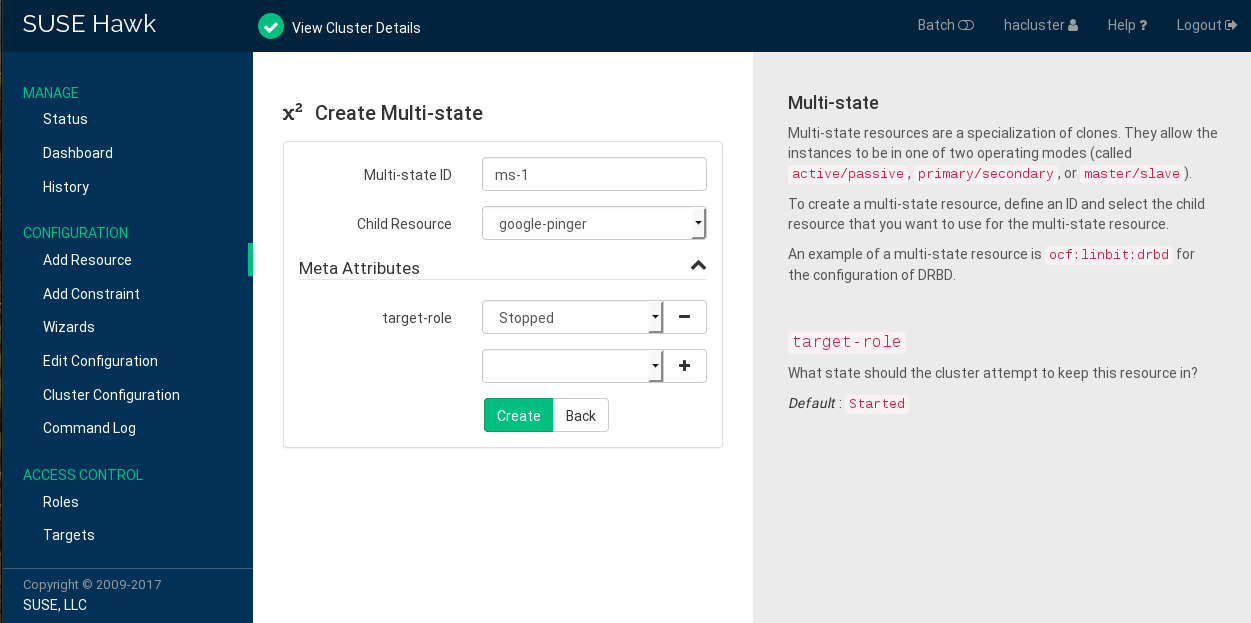
Multi-state resources can either contain a primitive or a group as child resources. In Hawk2, child resources cannot be created or modified while creating a multi-state resource. Before adding a multi-state resource, create child resources and configure them as desired. For details, refer to Section 7.5.3, “Adding Simple Resources” or Section 7.5.7, “Adding Cluster Resource Groups”.
Procedure 7.11: Adding a Multi-state Resource #
Log in to Hawk2:
https://HAWKSERVER:7630/
From the left navigation bar, select › .
Enter a unique .
From the list, select the primitive or group to use as a sub-resource for the multi-state resource.
If needed, modify or add .
Click to finish the configuration. A message at the top of the screen shows if the action has been successful.
Figure 7.8: Hawk2—Multi-state Resource #
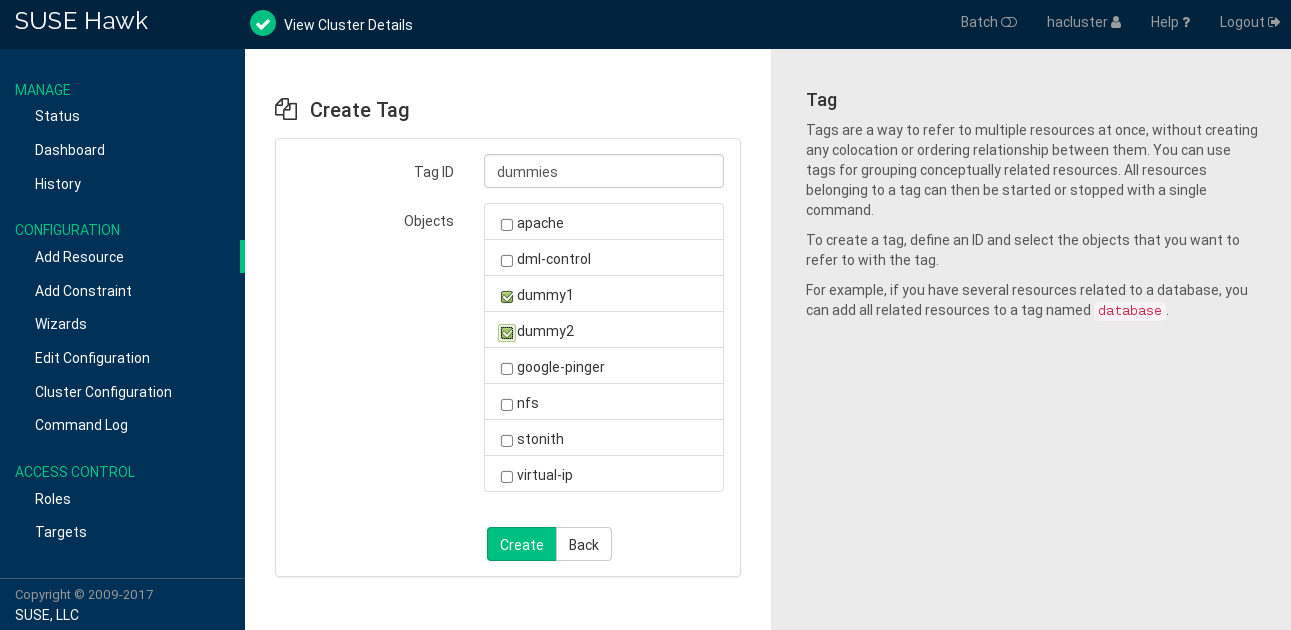
7.5.10 Grouping Resources by Using Tags #
Tags are a way to refer to multiple resources at once, without creating any
colocation or ordering relationship between them. You can use tags for
grouping conceptually related resources. For example, if you have several
resources related to a database, you can add all related resources to a tag
named database.
All resources belonging to a tag can be started or stopped with a single command.
Procedure 7.12: Adding a Tag #
Log in to Hawk2:
https://HAWKSERVER:7630/
From the left navigation bar, select › .
Enter a unique .
From the list, select the resources you want to refer to with the tag.
Click to finish the configuration. A message at the top of the screen shows if the action has been successful.
Figure 7.9: Hawk2—Tag #
7.5.11 Configuring Resource Monitoring #
The High Availability Extension does not only detect node failures, but also when an individual
resource on a node has failed. If you want to ensure that a resource is
running, configure resource monitoring for it. Usually, resources are only
monitored by the cluster while they are running. However, to detect
concurrency violations, also configure monitoring for resources which are
stopped. For resource monitoring, specify a timeout and/or start delay
value, and an interval. The interval tells the CRM how often it should check
the resource status. You can also set particular parameters such as
timeout for start or
stop operations.
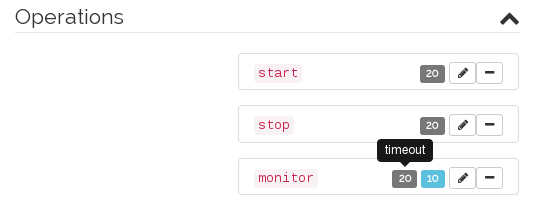
Procedure 7.13: Adding and Modifying an Operation #
Log in to Hawk2:
https://HAWKSERVER:7630/
Add a resource as described in Procedure 7.5, “Adding a Primitive Resource” or select an existing primitive to edit.
Hawk2 automatically shows the most important (
start,stop,monitor) and proposes default values.To see the attributes belonging to each proposed value, hover the mouse pointer over the respective value.
To change the suggested
timeoutvalues for thestartorstopoperation:Click the pen icon next to the operation.
In the dialog that opens, enter a different value for the
timeoutparameter, for example10, and confirm your change.
To change the suggested value for the
monitoroperation:Click the pen icon next to the operation.
In the dialog that opens, enter a different value for the monitoring
interval.To configure resource monitoring in the case that the resource is stopped:
Select the
roleentry from the empty drop-down box below.From the
roledrop-down box, selectStopped.Click to confirm your changes and to close the dialog for the operation.
Confirm your changes in the resource configuration screen. A message at the top of the screen shows if the action has been successful.
For the processes that take place if the resource monitor detects a failure, refer to Section 6.4, “Resource Monitoring”.
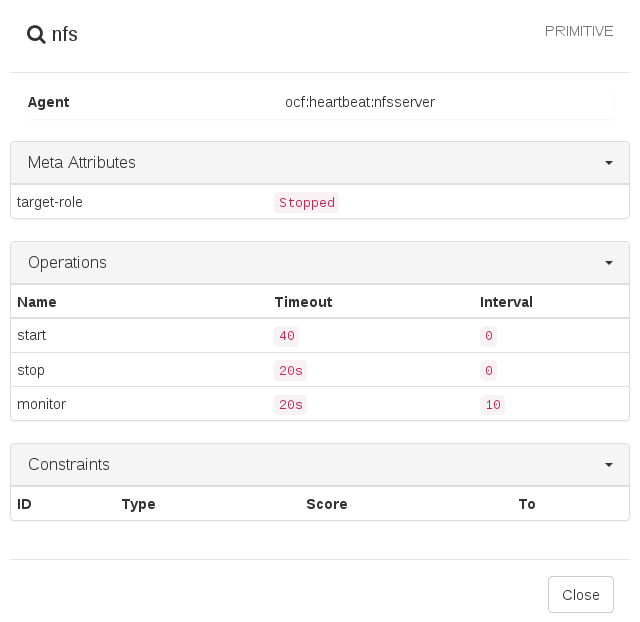
To view resource failures, switch to the screen in Hawk2 and select the resource you are interested in. In the column click the arrow down icon and select . The dialog that opens lists recent actions performed for the resource. Failures are displayed in red. To view the resource details, click the magnifier icon in the column.
Figure 7.10: Hawk2—Resource Details #
7.6 Configuring Constraints #
After you have configured all resources, specify how the cluster should handle them correctly. Resource constraints let you specify on which cluster nodes resources can run, in which order to load resources, and what other resources a specific resource depends on.
For an overview of available types of constraints, refer to Section 6.5.1, “Types of Constraints”. When defining constraints, you also need to specify scores. For more information on scores and their implications in the cluster, see Section 6.5.2, “Scores and Infinity”.
7.6.1 Adding Location Constraints #
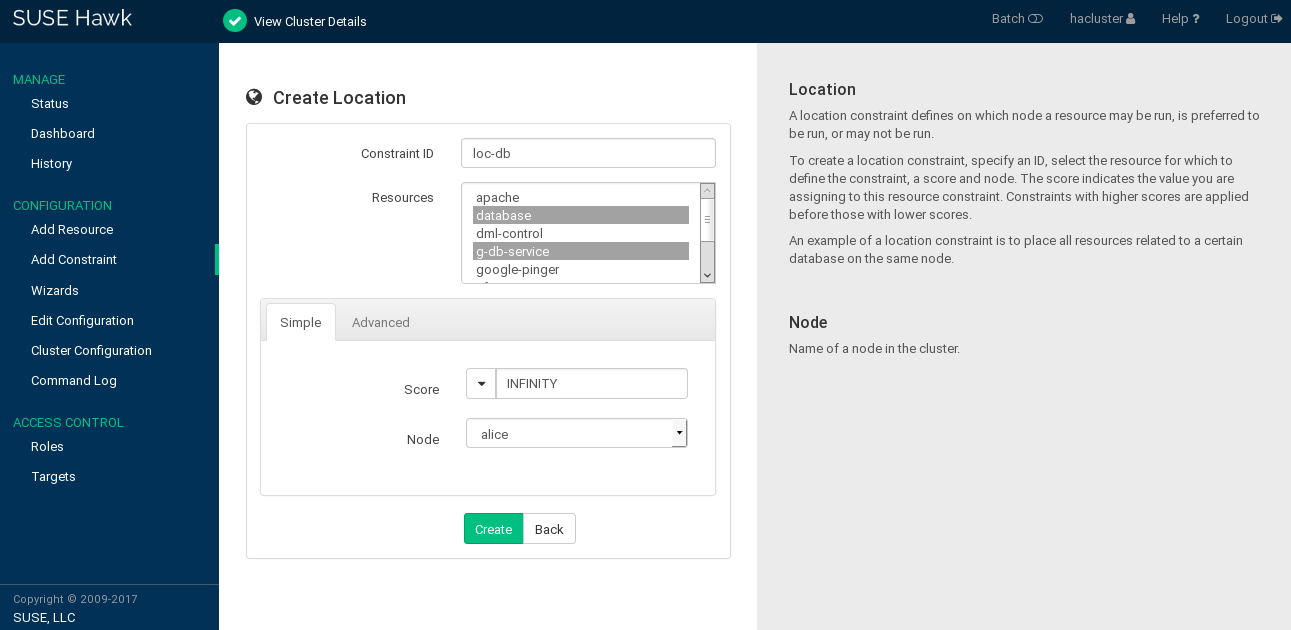
A location constraint determines on which node a resource may be run, is preferably run, or may not be run. An example of a location constraint is to place all resources related to a certain database on the same node.
Procedure 7.14: Adding a Location Constraint #
Log in to Hawk2:
https://HAWKSERVER:7630/
From the left navigation bar, select › .
Enter a unique .
From the list of select the resource or resources for which to define the constraint.
Enter a . The score indicates the value you are assigning to this resource constraint. Positive values indicate the resource can run on the you specify in the next step. Negative values mean it should not run on that node. Constraints with higher scores are applied before those with lower scores.
Some often-used values can also be set via the drop-down box:
To force the resources to run on the node, click the arrow icon and select
Always. This sets the score toINFINITY.If you never want the resources to run on the node, click the arrow icon and select
Never. This sets the score to-INFINITY, meaning that the resources must not run on the node.To set the score to
0, click the arrow icon and selectAdvisory. This disables the constraint. This is useful when you want to set resource discovery but do not want to constrain the resources.
Select a .
Click to finish the configuration. A message at the top of the screen shows if the action has been successful.
Figure 7.11: Hawk2—Location Constraint #
7.6.2 Adding Colocation Constraints #
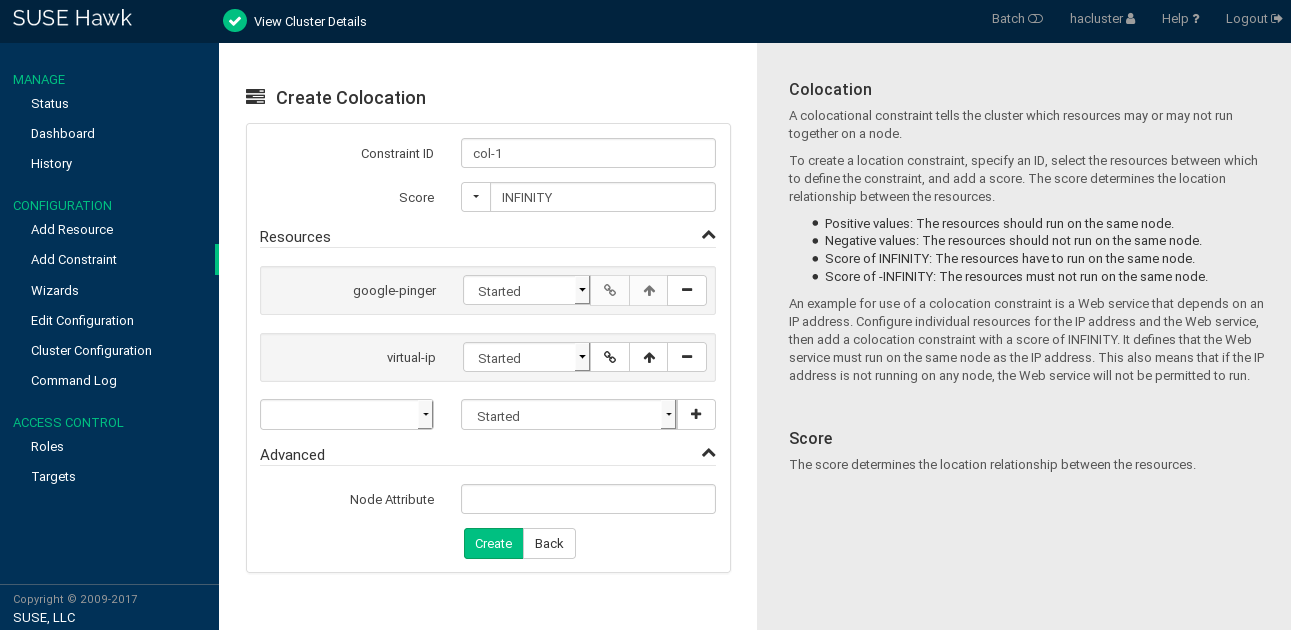
A colocational constraint tells the cluster which resources may or may not run together on a node. As a colocation constraint defines a dependency between resources, you need at least two resources to create a colocation constraint.
Procedure 7.15: Adding a Colocation Constraint #
Log in to Hawk2:
https://HAWKSERVER:7630/
From the left navigation bar, select › .
Enter a unique .
Enter a . The score determines the location relationship between the resources. Positive values indicate that the resources should run on the same node. Negative values indicate that the resources should not run on the same node. The score will be combined with other factors to decide where to put the resource.
Some often-used values can also be set via the drop-down box:
If you want to force the resources to run on the same node, click the arrow icon and select
Always. This sets the score toINFINITY.If you never want the resources to run on the same node, click the arrow icon and select
Never. This sets the score to-INFINITY, meaning that the resources must not run on the same node.
To define the resources for the constraint:
From the drop-down box in the category, select a resource (or a template).
The resource is added and a new empty drop-down box appears beneath.
Repeat this step to add more resources.
As the topmost resource depends on the next resource and so on, the cluster will first decide where to put the last resource, then place the depending ones based on that decision. If the constraint cannot be satisfied, the cluster may not allow the dependent resource to run.
To swap the order of resources within the colocation constraint, click the arrow up icon next to a resource to swap it with the entry above.
If needed, specify further parameters for each resource (such as
Started,Stopped,Master,Slave,Promote,Demote): Click the empty drop-down box next to the resource and select the desired entry.Click to finish the configuration. A message at the top of the screen shows if the action has been successful.
Figure 7.12: Hawk2—Colocation Constraint #
7.6.3 Adding Order Constraints #
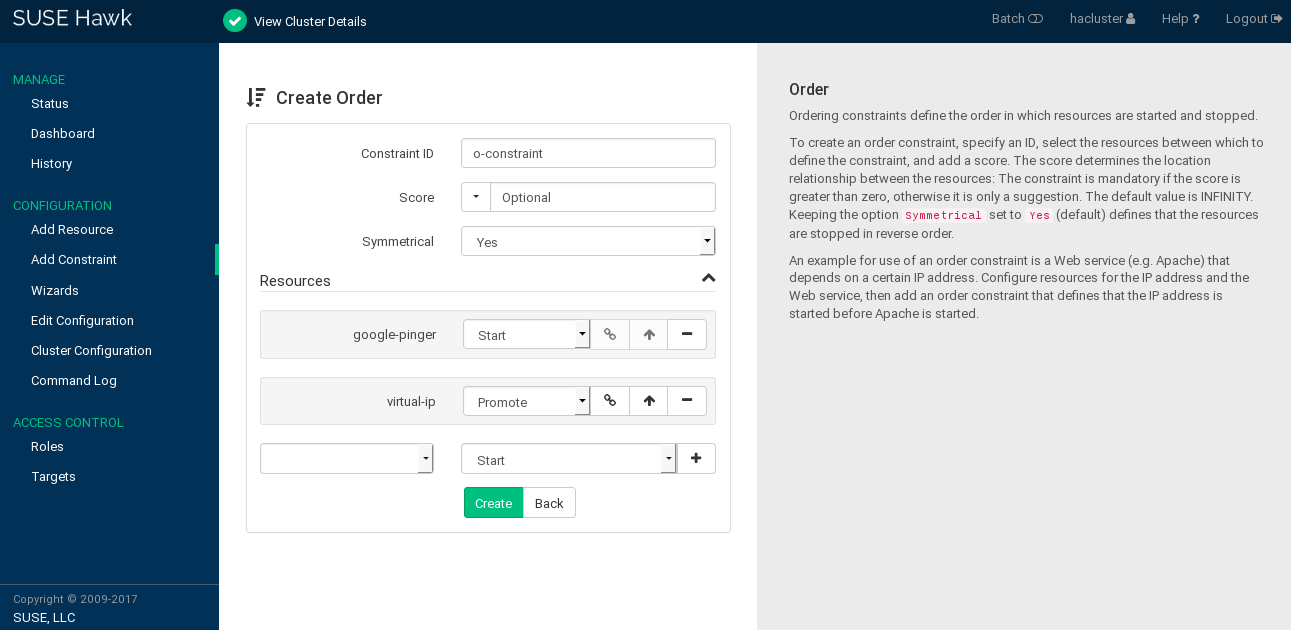
Order constraints define the order in which resources are started and stopped. As an order constraint defines a dependency between resources, you need at least two resources to create an order constraint.
Procedure 7.16: Adding an Order Constraint #
Log in to Hawk2:
https://HAWKSERVER:7630/
From the left navigation bar, select › .
Enter a unique .
Enter a . If the score is greater than zero, the order constraint is mandatory, otherwise it is optional.
Some often-used values can also be set via the drop-down box:
To make the order constraint mandatory, click the arrow icon and select
Mandatory.If you want the order constraint to be a suggestion only, click the arrow icon and select
Optional.Serialize: To ensure that no two stop/start actions occur concurrently for the resources, click the arrow icon and selectSerialize. This makes sure that one resource must complete starting before the other can be started. A typical use case are resources that put a high load on the host during start-up.
For order constraints, you can usually keep the option enabled. This specifies that resources are stopped in reverse order.
To define the resources for the constraint:
From the drop-down box in the category, select a resource (or a template).
The resource is added and a new empty drop-down box appears beneath.
Repeat this step to add more resources.
The topmost resource will start first, then the second, etc. Usually the resources will be stopped in reverse order.
To swap the order of resources within the order constraint, click the arrow up icon next to a resource to swap it with the entry above.
If needed, specify further parameters for each resource (like
Started,Stopped,Master,Slave,Promote,Demote): Click the empty drop-down box next to the resource and select the desired entry.Confirm your changes to finish the configuration. A message at the top of the screen shows if the action has been successful.
Figure 7.13: Hawk2—Order Constraint #
7.6.4 Using Resource Sets for Constraints #
As an alternative format for defining constraints, you can use Resource Sets. They have the same ordering semantics as Groups.
Procedure 7.17: Using a Resource Set for Constraints #
To use a resource set within a location constraint:
Proceed as outlined in Procedure 7.14, “Adding a Location Constraint”, apart from Step 4: Instead of selecting a single resource, select multiple resources by pressing Ctrl or Shift and mouse click. This creates a resource set within the location constraint.
To remove a resource from the location constraint, press Ctrl and click the resource again to deselect it.
To use a resource set within a colocation or order constraint:
Proceed as described in Procedure 7.15, “Adding a Colocation Constraint” or Procedure 7.16, “Adding an Order Constraint”, apart from the step where you define the resources for the constraint (Step 5.a or Step 6.a):
Add multiple resources.
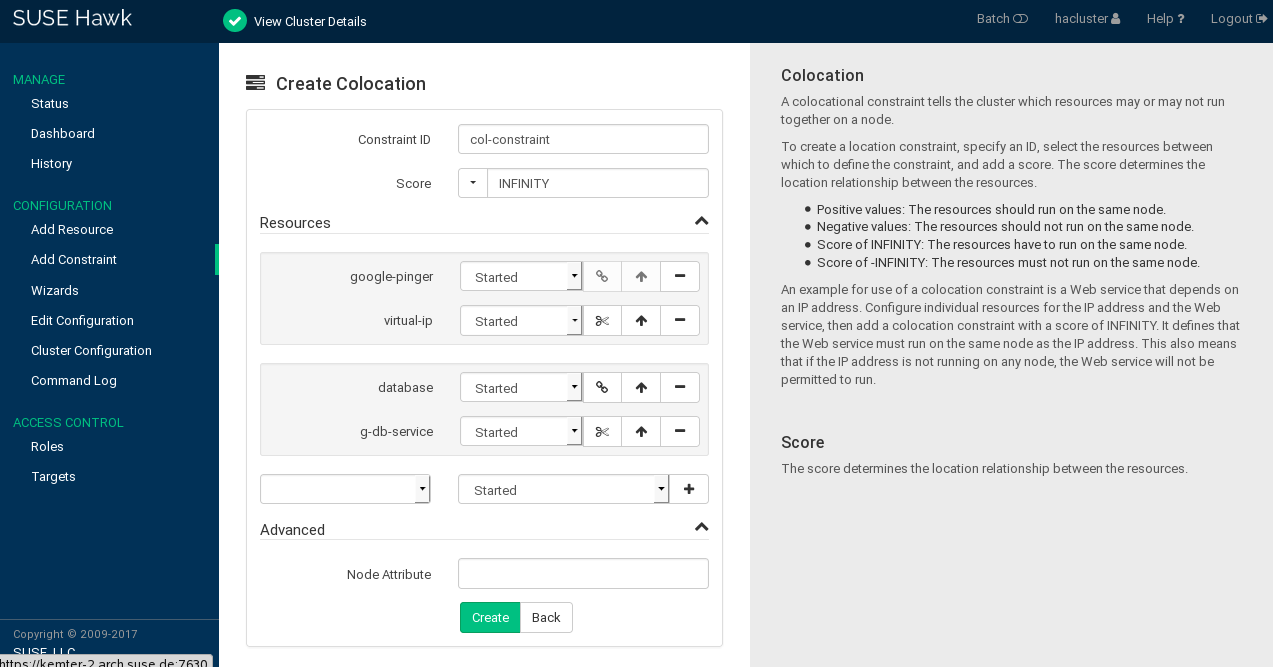
To create a resource set, click the chain icon next to a resource to link it to the resource above. A resource set is visualized by a frame around the resources belonging to a set.
You can combine multiple resources in a resource set or create multiple resource sets.
Figure 7.14: Hawk2—Two Resource Sets in a Colocation Constraint #
To unlink a resource from the resource above, click the scissors icon next to the resource.
Confirm your changes to finish the constraint configuration.
7.6.5 For More Information #
For more information on configuring constraints and detailed background information about the basic concepts of ordering and colocation, refer to the documentation available at http://www.clusterlabs.org/doc/:
Pacemaker Explained, chapter Resource Constraints
Colocation Explained
Ordering Explained
7.6.6 Specifying Resource Failover Nodes #
A resource will be automatically restarted if it fails. If that cannot be
achieved on the current node, or it fails N times
on the current node, it will try to fail over to another node. You can
define several failures for resources (a
migration-threshold), after which they will migrate to a
new node. If you have more than two nodes in your cluster, the node to which
a particular resource fails over is chosen by the High Availability software.
You can specify a specific node to which a resource will fail over by proceeding as follows:
Procedure 7.18: Specifying a Failover Node #
Log in to Hawk2:
https://HAWKSERVER:7630/
Configure a location constraint for the resource as described in Procedure 7.14, “Adding a Location Constraint”.
Add the
migration-thresholdmeta attribute to the resource as described in Procedure 7.7: Modifying Parameters, Operations, or Meta Attributes for a Resource, Step 4 and enter a value for the migration-threshold. The value should be positive and less than INFINITY.If you want to automatically expire the failcount for a resource, add the
failure-timeoutmeta attribute to the resource as described in Procedure 7.5: Adding a Primitive Resource, Step 4 and enter a for thefailure-timeout.If you want to specify additional failover nodes with preferences for a resource, create additional location constraints.
The process flow regarding migration thresholds and failcounts is demonstrated in Example 6.8, “Migration Threshold—Process Flow”.
Instead of letting the failcount for a resource expire automatically, you can also clean up failcounts for a resource manually at any time. Refer to Section 7.7.3, “Cleaning Up Resources” for details.
7.6.7 Specifying Resource Failback Nodes (Resource Stickiness) #
A resource may fail back to its original node when that node is back online and in the cluster. To prevent this or to specify a different node for the resource to fail back to, change the stickiness value of the resource. You can either specify the resource stickiness when creating it or afterward.
For the implications of different resource stickiness values, refer to Section 6.5.5, “Failback Nodes”.
Procedure 7.19: Specifying Resource Stickiness #
Log in to Hawk2:
https://HAWKSERVER:7630/
Add the
resource-stickinessmeta attribute to the resource as described in Procedure 7.7: Modifying Parameters, Operations, or Meta Attributes for a Resource, Step 4.Specify a value between
-INFINITYandINFINITYforresource-stickiness.
7.6.8 Configuring Placement of Resources Based on Load Impact #
Not all resources are equal. Some, such as Xen guests, require that the node hosting them meets their capacity requirements. If resources are placed so that their combined needs exceed the provided capacity, the performance of the resources diminishes or they fail.
To take this into account, the High Availability Extension allows you to specify the following parameters:
The capacity a certain node provides.
The capacity a certain resource requires.
An overall strategy for placement of resources.
For more details and a configuration example, refer to Section 6.5.6, “Placing Resources Based on Their Load Impact”.
Utilization attributes are used to configure both the resource's requirements and the capacity a node provides. You first need to configure a node's capacity before you can configure the capacity a resource requires.
Procedure 7.20: Configuring the Capacity a Node Provides #
Log in to Hawk2:
https://HAWKSERVER:7630/
In the left navigation bar, select .
On the tab, select the node whose capacity you want to configure.
In the column, click the arrow down icon and select .
The screen opens.
Below , enter a name for a utilization attribute into the empty drop-down box.
The name can be arbitrary (for example,
RAM_in_GB).Click the icon to add the attribute.
In the empty text box next to the attribute, enter an attribute value. The value must be an integer.
Add as many utilization attributes as you need and add values for all of them.
Confirm your changes. A message at the top of the screen shows if the action has been successful.
Procedure 7.21: Configuring the Capacity a Resource Requires #
Configure the capacity a certain resource requires from a node either when creating a primitive resource or when editing an existing primitive resource.
Before you can add utilization attributes to a resource, you need to have set utilization attributes for your cluster nodes as described in Procedure 7.20.
Log in to Hawk2:
https://HAWKSERVER:7630/
To add a utilization attribute to an existing resource: Go to › and open the resource configuration dialog as described in Section 7.7.1, “Editing Resources and Groups”.
If you create a new resource: Go to › and proceed as described in Section 7.5.3, “Adding Simple Resources”.
In the resource configuration dialog, go to the category.
From the empty drop-down box, select one of the utilization attributes that you have configured for the nodes in Procedure 7.20.
In the empty text box next to the attribute, enter an attribute value. The value must be an integer.
Add as many utilization attributes as you need and add values for all of them.
Confirm your changes. A message at the top of the screen shows if the action has been successful.
After you have configured the capacities your nodes provide and the capacities your resources require, set the placement strategy in the global cluster options. Otherwise the capacity configurations have no effect. Several strategies are available to schedule the load: for example, you can concentrate it on as few nodes as possible, or balance it evenly over all available nodes. For more information, refer to Section 6.5.6, “Placing Resources Based on Their Load Impact”.
Procedure 7.22: Setting the Placement Strategy #
Log in to Hawk2:
https://HAWKSERVER:7630/
In the left navigation bar, select to open the respective screen. It shows global cluster options and resource and operation defaults.
From the empty drop-down box in the upper part of the screen, select
placement-strategy.By default, its value is set to , which means that utilization attributes and values are not considered.
Depending on your requirements, set to the appropriate value.
Confirm your changes.
7.7 Managing Cluster Resources #
In addition to configuring your cluster resources, Hawk2 allows you to manage existing resources from the screen. For a general overview of the screen refer to Section 7.8.1, “Monitoring a Single Cluster”.
7.7.1 Editing Resources and Groups #
In case you need to edit existing resources, go to the screen. In the column, click the arrow down icon next to the resource or group you want to modify and select .
The editing screen appears. If you edit a primitive resource, the following operations are available:
Operations for Primitives #
Copying the resource.
Renaming the resource (changing its ID).
Deleting the resource.
If you edit a group, the following operations are available:
Operations for Groups #
Creating a new primitive which will be added to this group.
Renaming the group (changing its ID).
Re-sort group members by dragging and dropping them into the order you want using the “handle” icon on the right.
7.7.2 Starting Resources #
Before you start a cluster resource, make sure it is set up correctly. For example, if you use an Apache server as a cluster resource, set up the Apache server first. Complete the Apache configuration before starting the respective resource in your cluster.
Note: Do Not Touch Services Managed by the Cluster
When managing a resource via the High Availability Extension, the resource must not be started or stopped otherwise (outside of the cluster, for example manually or on boot or reboot). The High Availability Extension software is responsible for all service start or stop actions.
However, if you want to check if the service is configured properly, start it manually, but make sure that it is stopped again before the High Availability Extension takes over.
For interventions in resources that are currently managed by the cluster,
set the resource to maintenance mode first. For details,
see Procedure 16.5, “Putting a Resource into Maintenance Mode with Hawk2”.
When creating a resource with Hawk2, you can set its initial state with
the target-role meta attribute. If you set its value to
stopped, the resource does not start automatically after
being created.
Procedure 7.23: Starting A New Resource #
Log in to Hawk2:
https://HAWKSERVER:7630/
In the left navigation bar, select . The list of also shows the .
Select the resource to start. In its column click the icon. To continue, confirm the message that appears.
When the resource has started, Hawk2 changes the resource's to green and shows on which node it is running.
7.7.3 Cleaning Up Resources #
A resource will be automatically restarted if it fails, but each failure increases the resource's failcount.
If a migration-threshold has been set for the resource,
the node will no longer run the resource when the number of failures reaches
the migration threshold.
A resource's failcount can either be reset automatically (by setting a
failure-timeout option for the resource) or it can be
reset manually as described below.
Procedure 7.24: Cleaning Up A Resource #
Log in to Hawk2:
https://HAWKSERVER:7630/
In the left navigation bar, select . The list of also shows the .
Go to the resource to clean up. In the column click the arrow down button and select . To continue, confirm the message that appears.
This executes the command
crm resource cleanupand cleans up the resource on all nodes.
7.7.4 Removing Cluster Resources #
If you need to remove a resource from the cluster, follow the procedure below to avoid configuration errors:
Procedure 7.25: Removing a Cluster Resource #
Log in to Hawk2:
https://HAWKSERVER:7630/
Clean up the resource on all nodes as described in Procedure 7.24, “Cleaning Up A Resource”.
Stop the resource:
In the left navigation bar, select . The list of also shows the .
In the column click the button next to the resource.
To continue, confirm the message that appears.
The column will reflect the change when the resource is stopped.
Delete the resource:
In the left navigation bar, select .
In the list of , go to the respective resource. From the column click the icon next to the resource.
To continue, confirm the message that appears.
7.7.5 Migrating Cluster Resources #
As mentioned in Section 7.6.6, “Specifying Resource Failover Nodes”, the cluster will fail over (migrate) resources automatically in case of software or hardware failures—according to certain parameters you can define (for example, migration threshold or resource stickiness). You can also manually migrate a resource to another node in the cluster. Or you decide to move the resource away from the current node and let the cluster decide where to put it.
Procedure 7.26: Manually Migrating a Resource #
Log in to Hawk2:
https://HAWKSERVER:7630/
In the left navigation bar, select . The list of also shows the .
In the list of , select the respective resource.
In the column click the arrow down button and select .
In the window that opens you have the following choices:
: This creates a location constraint with a
-INFINITYscore for the current node.Alternatively, you can move the resource to another node. This creates a location constraint with an
INFINITYscore for the destination node.
Confirm your choice.
To allow a resource to move back again, proceed as follows:
Procedure 7.27: Unmigrating a Resource #
Log in to Hawk2:
https://HAWKSERVER:7630/
In the left navigation bar, select . The list of also shows the .
In the list of , go to the respective resource.
In the column click the arrow down button and select . To continue, confirm the message that appears.
Hawk2 uses the
crm_resource-Ucommand. The resource can move back to its original location or it may stay where it is (depending on resource stickiness).
For more information, see Pacemaker Explained, available from http://www.clusterlabs.org/doc/. Refer to section Resource Migration.
7.8 Monitoring Clusters #
Hawk2 has different screens for monitoring single clusters and multiple clusters: the and the screen.
7.8.1 Monitoring a Single Cluster #
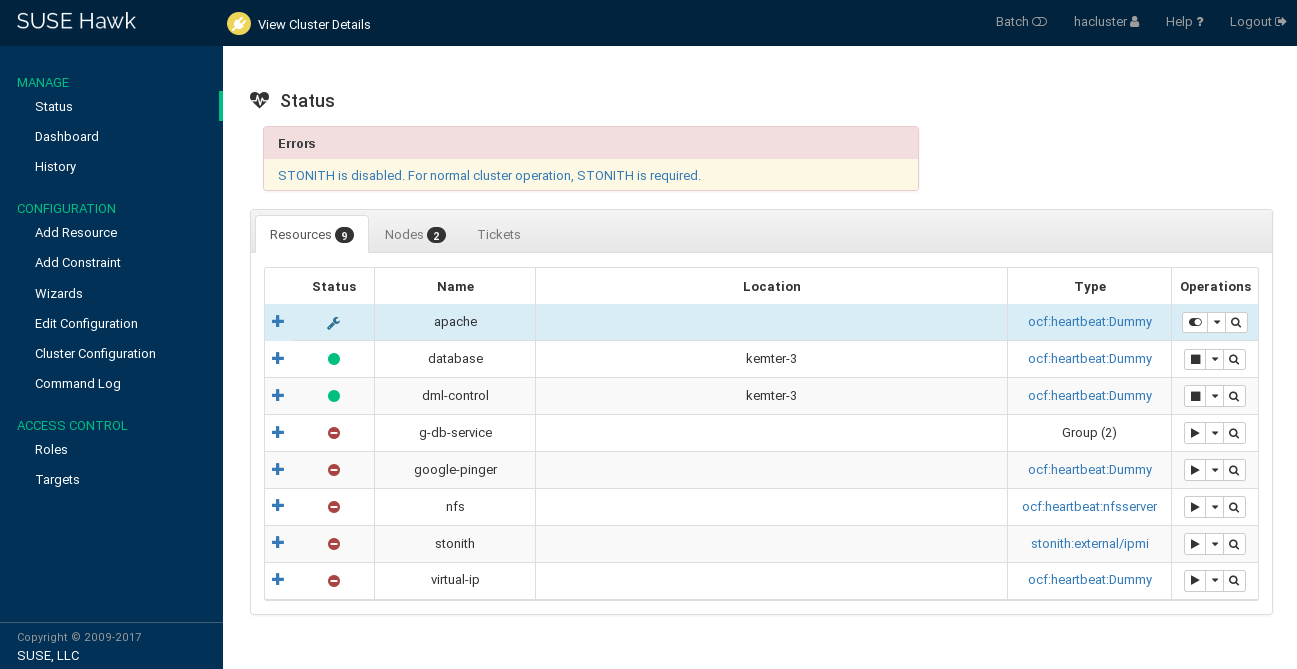
To monitor a single cluster, use the screen. After you have logged in to Hawk2, the screen is displayed by default. An icon in the upper right corner shows the cluster status at a glance. For further details, have a look at the following categories:
- Errors
If errors have occurred, they are shown at the top of the page.
- Resources
Shows the configured resources including their , (ID), (node on which they are running), and resource agent . From the column, you can start or stop a resource, trigger several actions, or view details. Actions that can be triggered include setting the resource to maintenance mode (or removing maintenance mode), migrating it to a different node, cleaning up the resource, showing any recent events, or editing the resource.
- Nodes
Shows the nodes belonging to the cluster site you are logged in to, including the nodes' and . In the and columns, you can set or remove the
maintenanceorstandbyflag for a node. The column allows you to view recent events for the node or further details: for example, if autilization,standbyormaintenanceattribute is set for the respective node.- Tickets
Only shown if tickets have been configured (for use with Geo clustering).
Figure 7.15: Hawk2—Cluster Status #
7.8.2 Monitoring Multiple Clusters #
To monitor multiple clusters, use the Hawk2 . The cluster information displayed in the screen is stored on the server side. It is synchronized between the cluster nodes (if passwordless SSH access between the cluster nodes has been configured). For details, see Section D.2, “Configuring a Passwordless SSH Account”. However, the machine running Hawk2 does not even need to be part of any cluster for that purpose—it can be a separate, unrelated system.
In addition to the general Hawk2 Requirements, the following prerequisites need to be fulfilled to monitor multiple clusters with Hawk2:
Prerequisites #
All clusters to be monitored from Hawk2's must be running SUSE Linux Enterprise High Availability Extension 12 SP5.
If you did not replace the self-signed certificate for Hawk2 on every cluster node with your own certificate (or a certificate signed by an official Certificate Authority) yet, do the following: Log in to Hawk2 on every node in every cluster at least once. Verify the certificate (or add an exception in the browser to bypass the warning). Otherwise Hawk2 cannot connect to the cluster.
Procedure 7.28: Monitoring Multiple Clusters with the Dashboard #
Log in to Hawk2:
https://HAWKSERVER:7630/
In the left navigation bar, select .
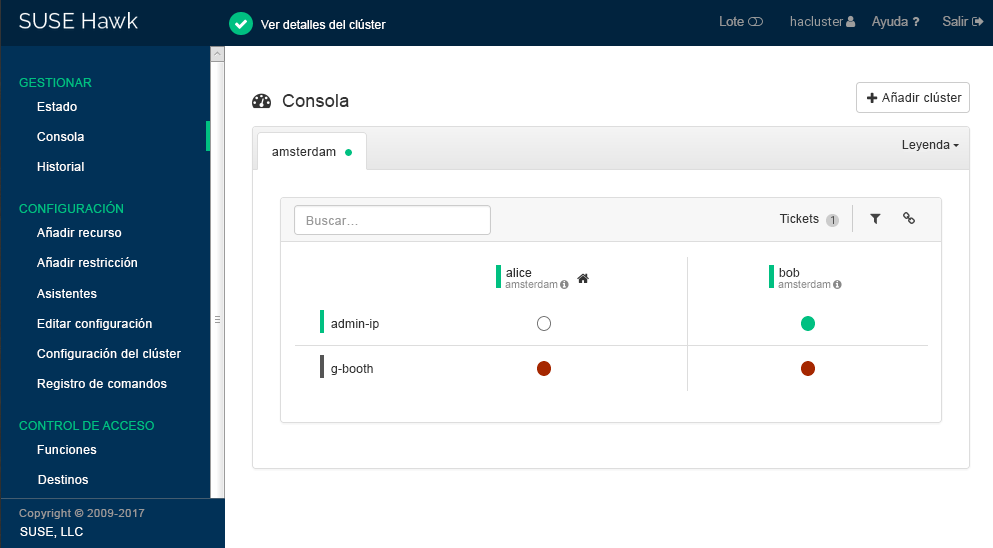
Hawk2 shows an overview of the resources and nodes on the current cluster site. In addition, it shows any that have been configured for use with a Geo cluster. If you need information about the icons used in this view, click . To search for a resource ID, enter the name (ID) into the text box. To only show specific nodes, click the filter icon and select a filtering option.
Figure 7.16: Hawk2 Dashboard with One Cluster Site (
amsterdam) #To add dashboards for multiple clusters:
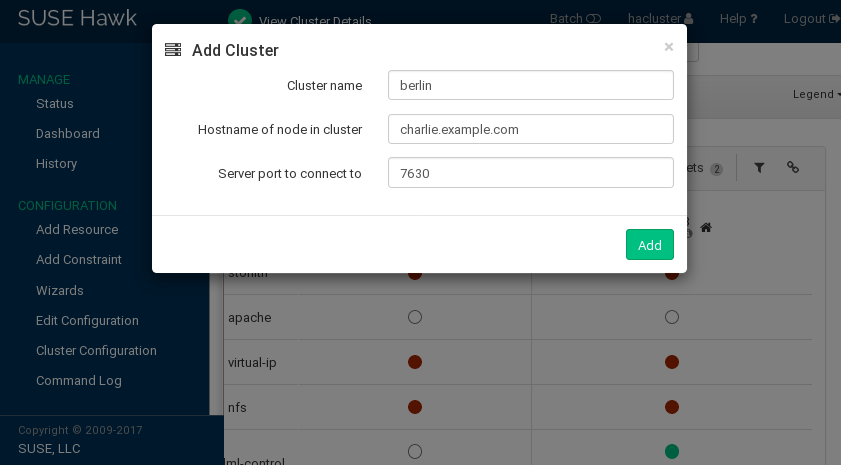
Click .
Enter the with which to identify the cluster in the . For example,
berlin.Enter the fully qualified host name of one of the nodes in the second cluster. For example,
charlie.Click . Hawk2 will display a second tab for the newly added cluster site with an overview of its nodes and resources.
Note: Connection Error
If instead you are prompted to log in to this node by entering a password, you probably did not connect to this node yet and have not replaced the self-signed certificate. In that case, even after entering the password, the connection will fail with the following message:
Error connecting to server. Retrying every 5 seconds...
To proceed, see Replacing the Self-Signed Certificate.
To view more details for a cluster site or to manage it, switch to the site's tab and click the chain icon.
Hawk2 opens the view for this site in a new browser window or tab. From there, you can administer this part of the Geo cluster.
To remove a cluster from the dashboard, click the
xicon on the right-hand side of the cluster's details.
7.9 Using the Batch Mode #
Hawk2 provides a , including a cluster simulator. It can be used for the following:
Staging changes to the cluster and applying them as a single transaction, instead of having each change take effect immediately.
Simulating changes and cluster events, for example, to explore potential failure scenarios.
For example, batch mode can be used when creating groups of resources that depend on each other. Using batch mode, you can avoid applying intermediate or incomplete configurations to the cluster.
While batch mode is enabled, you can add or edit resources and constraints or change the cluster configuration. It is also possible to simulate events in the cluster, including nodes going online or offline, resource operations and tickets being granted or revoked. See Procedure 7.30, “Injecting Node, Resource or Ticket Events” for details.
The cluster simulator runs automatically after every change and shows the expected outcome in the user interface. For example, this also means: If you stop a resource while in batch mode, the user interface shows the resource as stopped—while actually, the resource is still running.
Important: Wizards and Changes to the Live System
Some wizards include actions beyond mere cluster configuration. When using those wizards in batch mode, any changes that go beyond cluster configuration would be applied to the live system immediately.
Therefore wizards that require root permission cannot be executed in
batch mode.
Procedure 7.29: Working with the Batch Mode #
Log in to Hawk2:
https://HAWKSERVER:7630/
To activate the batch mode, select from the top-level row.
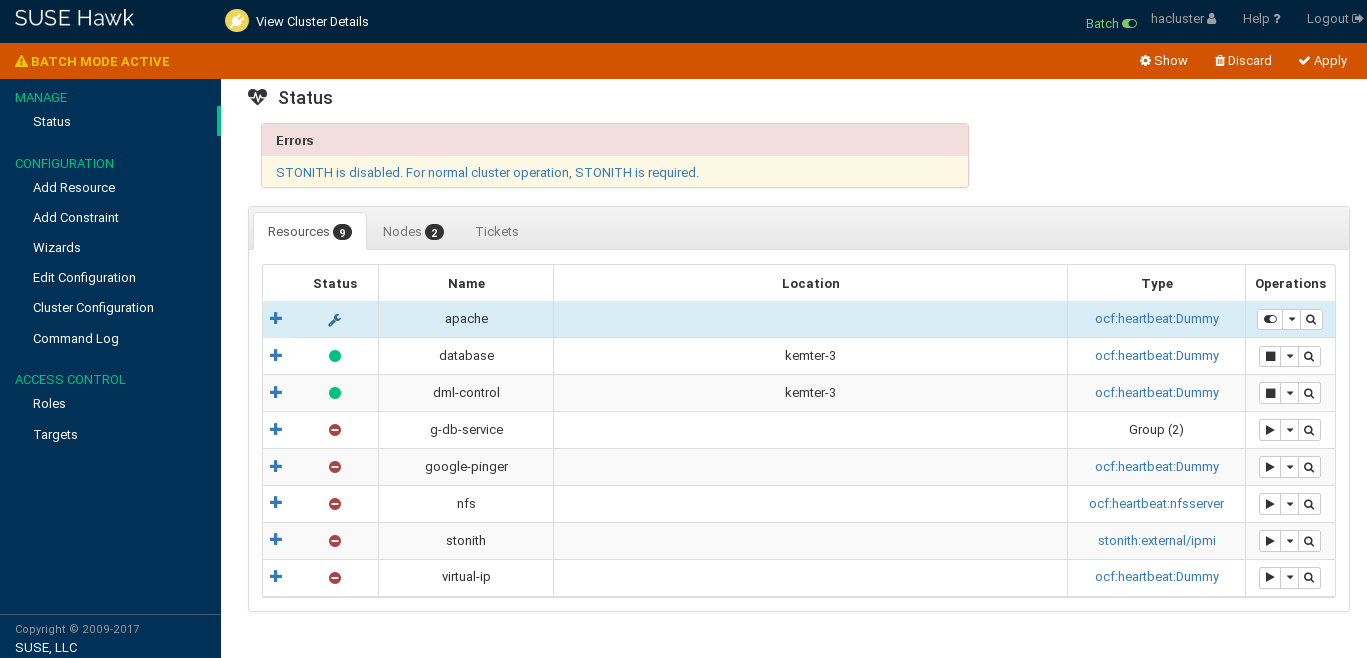
An additional bar appears below the top-level row. It indicates that batch mode is active and contains links to actions that you can execute in batch mode.
Figure 7.17: Hawk2 Batch Mode Activated #
While batch mode is active, perform any changes to your cluster, like adding or editing resources and constraints or editing the cluster configuration.
The changes will be simulated and shown in all screens.
To view details of the changes you have made, select from the batch mode bar. The window opens.
For any configuration changes it shows the difference between the live state and the simulated changes in crmsh syntax: Lines starting with a
-character represent the current state whereas lines starting with+show the proposed state.To inject events or view even more details, see Procedure 7.30. Otherwise the window.
Choose to either or the simulated changes and confirm your choice. This also deactivates batch mode and takes you back to normal mode.
When running in batch mode, Hawk2 also allows you to inject and .
Let you change the state of a node. Available states are , , and .
Let you change some properties of a resource. For example, you can set an operation (like
start,stop,monitor), the node it applies to, and the expected result to be simulated.Let you test the impact of granting and revoking tickets (used for Geo clusters).
Procedure 7.30: Injecting Node, Resource or Ticket Events #
Log in to Hawk2:
https://HAWKSERVER:7630/
If batch mode is not active yet, click at the top-level row to switch to batch mode.
In the batch mode bar, click to open the window.
To simulate a status change of a node:
Click › .
Select the you want to manipulate and select its target .
Confirm your changes. Your event is added to the queue of events listed in the dialog.
To simulate a resource operation:
Click › .
Select the you want to manipulate and select the to simulate.
If necessary, define an .
Select the on which to run the operation and the targeted . Your event is added to the queue of events listed in the dialog.
Confirm your changes.
To simulate a ticket action:
Click › .
Select the you want to manipulate and select the to simulate.
Confirm your changes. Your event is added to the queue of events listed in the dialog.
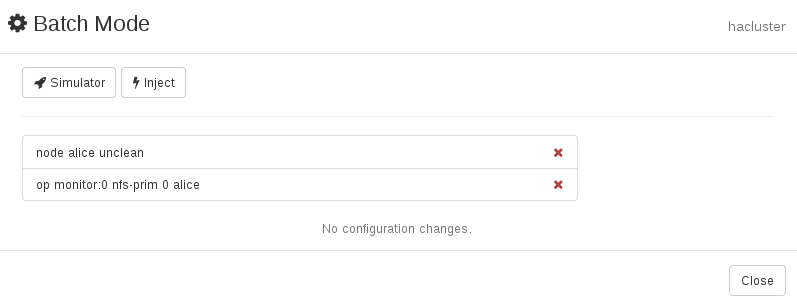
The dialog (Figure 7.18) shows a new line per injected event. Any event listed here is simulated immediately and is reflected on the screen.
If you have made any configuration changes, too, the difference between the live state and the simulated changes is shown below the injected events.
Figure 7.18: Hawk2 Batch Mode—Injected Invents and Configuration Changes #
To remove an injected event, click the icon next to it. Hawk2 updates the screen accordingly.
To view more details about the simulation run, click and choose one of the following:
Shows a detailed summary.
- /
shows the initial CIB state. shows what the CIB would look like after the transition.
Shows a graphical representation of the transition.
Shows an XML representation of the transition.
If you have reviewed the simulated changes, close the window.
To leave the batch mode, either or the simulated changes.
7.10 Viewing the Cluster History #
Hawk2 provides the following possibilities to view past events on the cluster (on different levels and in varying detail):
7.10.1 Viewing Recent Events of Nodes or Resources #
Log in to Hawk2:
https://HAWKSERVER:7630/
In the left navigation bar, select . It lists and .
To view recent events of a resource:
Click and select the respective resource.
In the column for the resource, click the arrow down button and select .
Hawk2 opens a new window and displays a table view of the latest events.
To view recent events of a node:
Click and select the respective node.
In the column for the node, select .
Hawk2 opens a new window and displays a table view of the latest events.
7.10.2 Using the History Explorer for Cluster Reports #
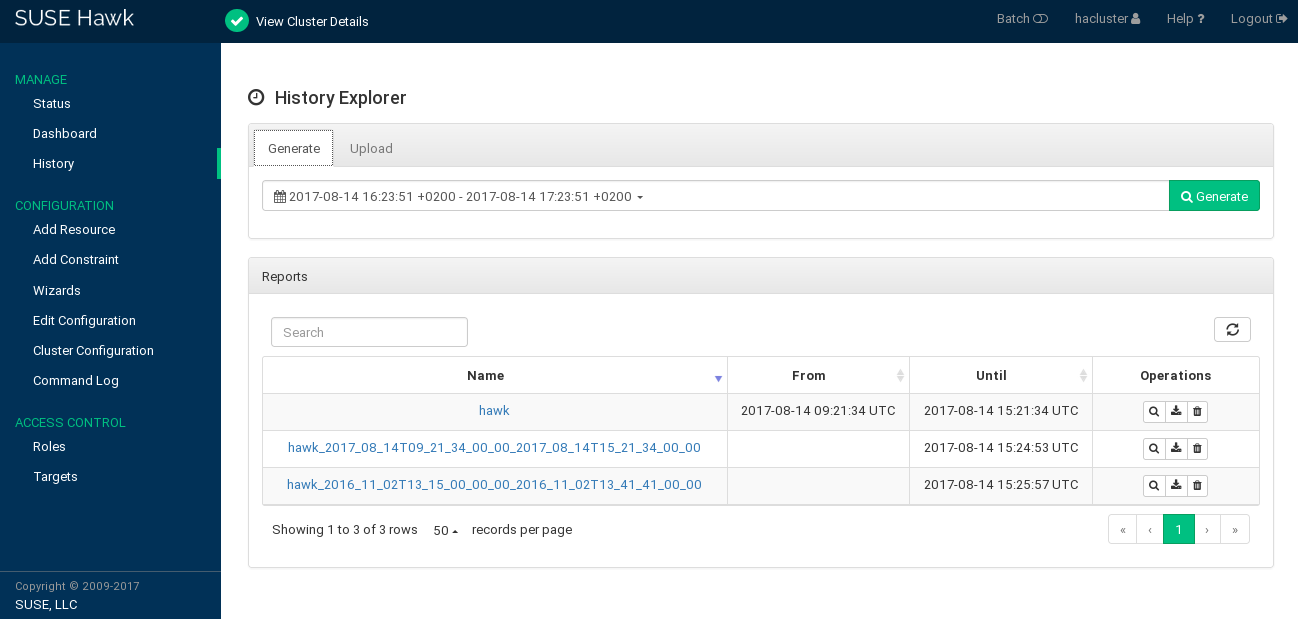
From the left navigation bar, select to access the . The allows you to create detailed cluster reports and view transition information. It provides the following options:
Create a cluster report for a certain time. Hawk2 calls the
crm reportcommand to generate the report.Allows you to upload
crm reportarchives that have either been created with the crm shell directly or even on a different cluster.
After reports have been generated or uploaded, they are shown below . From the list of reports, you can show a report's details, download or delete the report.
Figure 7.19: Hawk2—History Explorer Main View #
Procedure 7.31: Generating or Uploading a Cluster Report #
Log in to Hawk2:
https://HAWKSERVER:7630/
In the left navigation bar, select .
The screen opens in the view. By default, the suggested time frame for a report is the last hour.
To create a cluster report:
To immediately start a report, click .
To modify the time frame for the report, click anywhere on the suggested time frame and select another option from the drop-down box. You can also enter a start date, end date and hour, respectively. To start the report, click .
After the report has finished, it is shown below .
To upload a cluster report, the
crm reportarchive must be located on a file system that you can access with Hawk2. Proceed as follows:Switch to the tab.
for the cluster report archive and click .
After the report is uploaded, it is shown below .
To download or delete a report, click the respective icon next to the report in the column.
To view Report Details in History Explorer, click the report's name or select from the column.
Return to the list of reports by clicking the button.
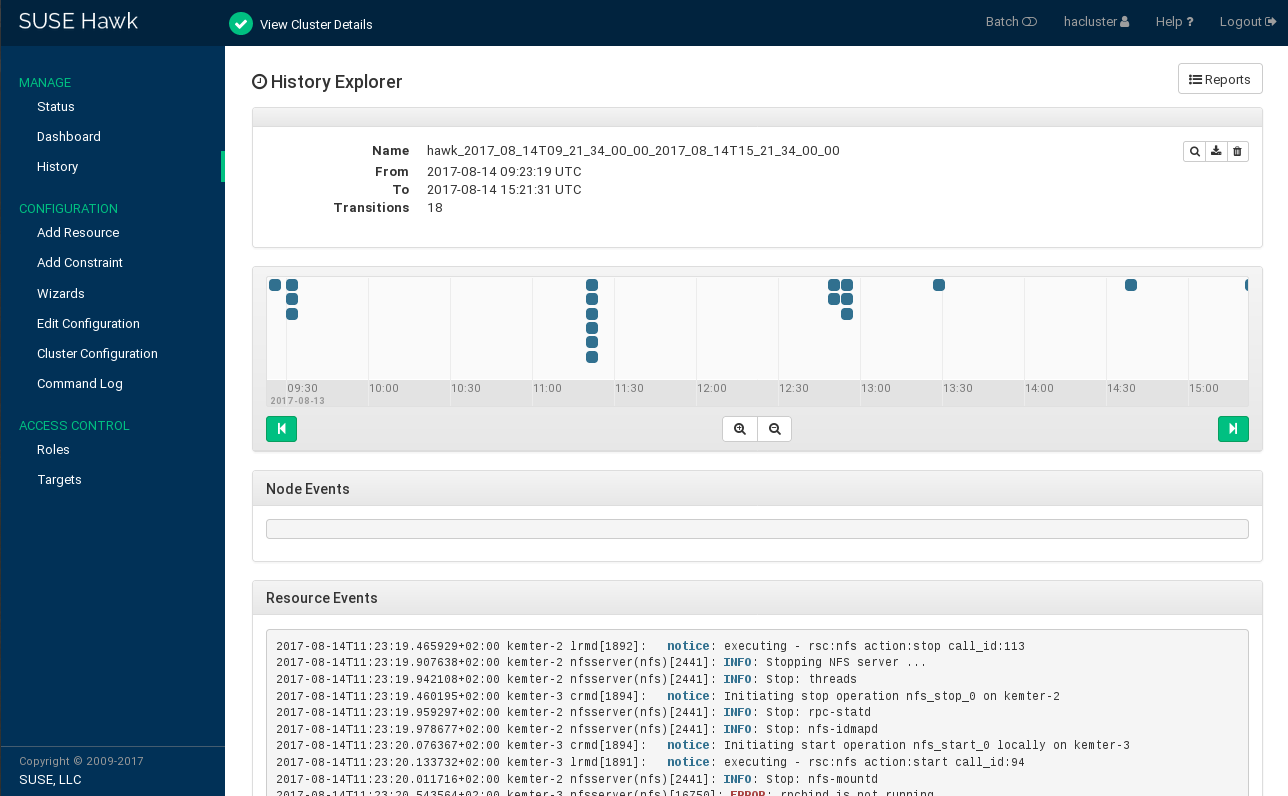
Report Details in History Explorer #
Name of the report.
Start time of the report.
End time of the report.
Number of transitions plus time line of all transitions in the cluster that are covered by the report. To learn how to view more details for a transition, see Section 7.10.3.
Node events.
Resource events.
7.10.3 Viewing Transition Details in the History Explorer #
For each transition, the cluster saves a copy of the state which it provides
as input to the policy engine (PE). The path to this archive is logged. All
pe-input* files are generated on the Designated
Coordinator (DC). As the DC can change in a cluster, there may be
pe-input* files from several nodes. Any
pe-input* files show what the PE
planned to do.
In Hawk2, you can display the name of each pe-input*
file plus the time and node on which it was created. In addition, the
can visualize the following details,
based on the respective pe-input* file:
Transition Details in the History Explorer #
Shows snippets of logging data that belongs to the transition. Displays the output of the following command (including the resource agents' log messages):
crm history transition peinput
Shows the cluster configuration at the time that the
pe-input*file was created.Shows the differences of configuration and status between the selected
pe-input*file and the following one.Shows snippets of logging data that belongs to the transition. Displays the output of the following command:
crm history transition log peinput
This includes details from the
pengine,crmd, andlrmd.Shows a graphical representation of the transition. If you click , the PE is re-invoked (using the
pe-input*files), and generates a graphical visualization of the transition.
Procedure 7.32: Viewing Transition Details #
Log in to Hawk2:
https://HAWKSERVER:7630/
In the left navigation bar, select .
If reports have already been generated or uploaded, they are shown in the list of . Otherwise generate or upload a report as described in Procedure 7.31.
Click the report's name or select from the column to open the Report Details in History Explorer.
To access the transition details, you need to select a transition point in the transition time line that is shown below. Use the and icons and the and icons to find the transition that you are interested in.
To display the name of a
pe-input*file plus the time and node on which it was created, hover the mouse pointer over a transition point in the time line.To view the Transition Details in the History Explorer, click the transition point for which you want to know more.
To show , , , or , click the respective buttons to show the content described in Transition Details in the History Explorer.
To return to the list of reports, click the button.
7.11 Verifying Cluster Health #
Hawk2 provides a wizard which checks and detects issues with your cluster.
After the analysis is complete, Hawk2 creates a cluster report with further
details. To verify cluster health and generate the report, Hawk2 requires
passwordless SSH access between the nodes. Otherwise it can only collect data
from the current node. If you have set up your cluster with the bootstrap scripts,
provided by the
ha-cluster-bootstrap
package, passwordless SSH access is already configured. In case you need to
configure it manually, see Section D.2, “Configuring a Passwordless SSH Account”.
Log in to Hawk2:
https://HAWKSERVER:7630/
From the left navigation bar, select .
Expand the category.
Select the wizard.
Confirm with .
Enter the root password for your cluster and click . Hawk2 will generate the report.

