Inicialização Rápida da Instalação #
Esta Inicialização Rápida orienta você passo a passo na instalação do SUSE® Linux Enterprise Server 15 SP6.
1 Bem-vindo ao SUSE Linux Enterprise Server #
Siga os procedimentos abaixo para instalar o produto em todas as plataformas de hardware suportadas. É considerado que você já tenha feito a inicialização/IPL no sistema de instalação com êxito. Para obter instruções de instalação mais detalhadas e estratégias de implantação, consulte o Guia de Implantação. Para saber os preparativos específicos da plataforma necessários para inicializar ou reinicializar (IPL) no sistema de instalação, consulte as seguintes partes do guia mencionado anteriormente:
1.1 O instalador unificado #
A partir do SUSE Linux Enterprise Server 15, o meio de instalação consiste apenas no Instalador Unificado, em um sistema mínimo para instalação, atualização e registro de todos os produtos base do SUSE Linux Enterprise. Durante a instalação, você pode adicionar funcionalidades selecionando módulos e extensões para ser instalados em coexistência com o Instalador Unificado.
1.2 Instalando offline ou sem registro #
O meio de instalação padrão SLE-15-SP6-Online-ARCH-GM-media1.iso tem o tamanho otimizado e não inclui módulos e extensões. Portanto, a instalação requer acesso à rede para registrar seu produto e recuperar os dados do repositório referentes aos módulos e extensões.
Para instalação sem registrar o sistema, use a imagem SLE-15-SP6-Full-ARCH-GM-media1.iso de https://www.suse.com/download/sles/ e consulte o Seção 9.7.3, “Instalando sem registro” para obter instruções.
Use o comando a seguir para copiar o conteúdo da imagem de instalação para um disco flash removível.
>sudodd if=IMAGE of=FLASH_DISK bs=4M && sync
IMAGE precisa ser substituído pelo caminho para o arquivo de imagem SLE-15-SP6-Online-ARCH-GM-media1.iso ou SLE-15-SP6-Full-ARCH-GM-media1.iso. Substitua FLASH_DISK pelo dispositivo flash. Para identificar o dispositivo, insira-o e execute:
# grep -Ff <(hwinfo --disk --short) <(hwinfo --usb --short)
disk:
  /dev/sdc             General USB Flash Disk
Verifique se o tamanho do dispositivo é suficiente para a imagem desejada. Você pode verificar o tamanho do dispositivo com o seguinte comando:
# fdisk -l /dev/sdc | grep -e "^/dev"
     /dev/sdc1  *     2048 31490047 31488000  15G 83 Linux
Neste exemplo, o dispositivo tem uma capacidade de 15 GB. O comando a ser usado para o SLE-15-SP6-Full-ARCH-GM-media1.iso será:
dd if=SLE-15-SP6-Full-ARCH-GM-media1.iso of=/dev/sdc bs=4M && sync
O dispositivo não deve ser montado durante a execução do comando dd. Observe que todos os dados na partição serão apagados!
2 O procedimento de instalação #
Para instalar o SUSE Linux Enterprise Server, faça a inicialização ou reinicialização (IPL) no instalador usando o meio Instalador Unificado e inicie a instalação.
2.1 Seleção de idioma, teclado e produto #
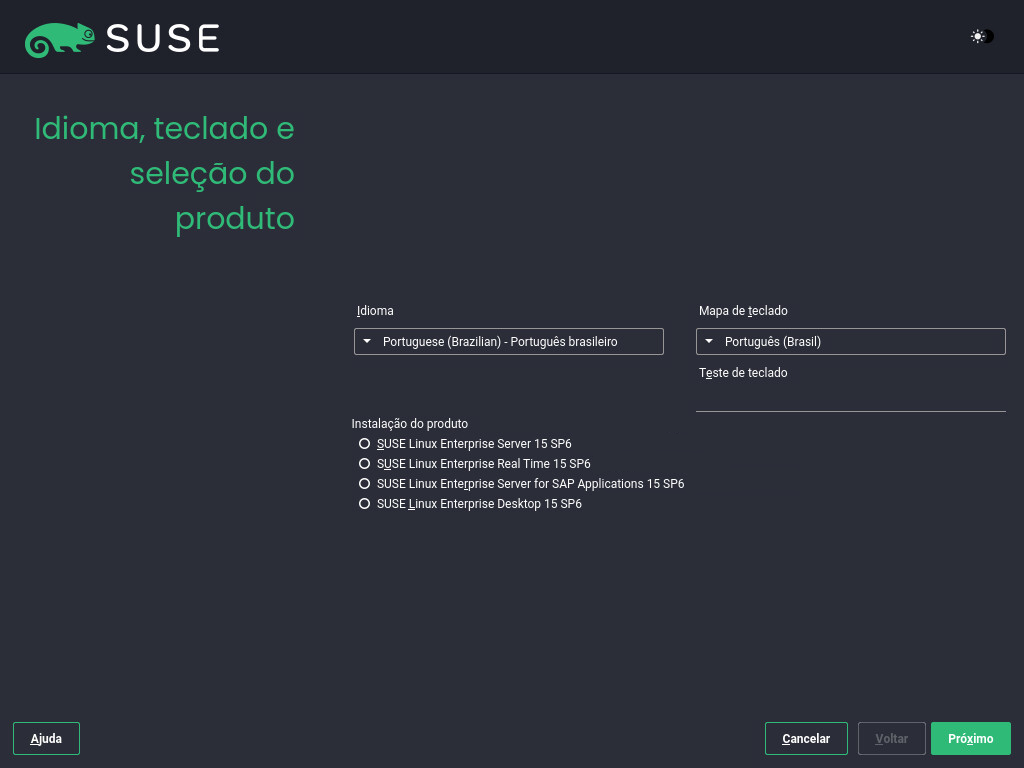
As configurações de e são inicializadas com o idioma que você escolheu na tela de boot. Se você não mudou o padrão, ele é Inglês (EUA). Mude as configurações aqui, se necessário. Use a caixa de texto para testar o layout.
Com o Instalador Unificado, você pode instalar todos os produtos base do SUSE Linux Enterprise:
SUSE Linux Enterprise Server 15 SP6 (explicado aqui)
SUSE Linux Enterprise Desktop 15 SP6 (para obter instruções de instalação, acesse https://documentation.suse.com/sled/)
SUSE Linux Enterprise Real Time 15 SP6 (para obter instruções de instalação, acesse https://documentation.suse.com/sle-rt/)
SUSE Linux Enterprise Server for SAP Applications 15 SP6 (para obter instruções de instalação, acesse https://documentation.suse.com/sles-sap)
SUSE Manager Server 5.0 (para obter instruções de instalação, acesse https://documentation.suse.com/suma/)
SUSE Manager Proxy 5.0 (para obter instruções de instalação, acesse https://documentation.suse.com/suma/)
SUSE Manager Retail Branch Server 5.0 (para obter instruções de instalação, acesse https://documentation.suse.com/suma-retail)
Selecione um produto para instalação. Você precisa ter um código de registro para o respectivo produto. Neste documento, supomos que você escolheu SUSE Linux Enterprise Server. Continue com .
Se você tiver dificuldades ao ler os rótulos no instalador, poderá mudar as cores e o tema do widget.
Clique no botão ou pressione Shift–F3 para abrir uma caixa de diálogo de seleção de tema. Selecione um tema na lista e clique em na caixa de diálogo.
Shift–F4 alterna para o esquema de cores voltado a usuários com deficiência visual. Pressione os botões novamente para voltar ao esquema padrão.
2.2 Contrato de licença #
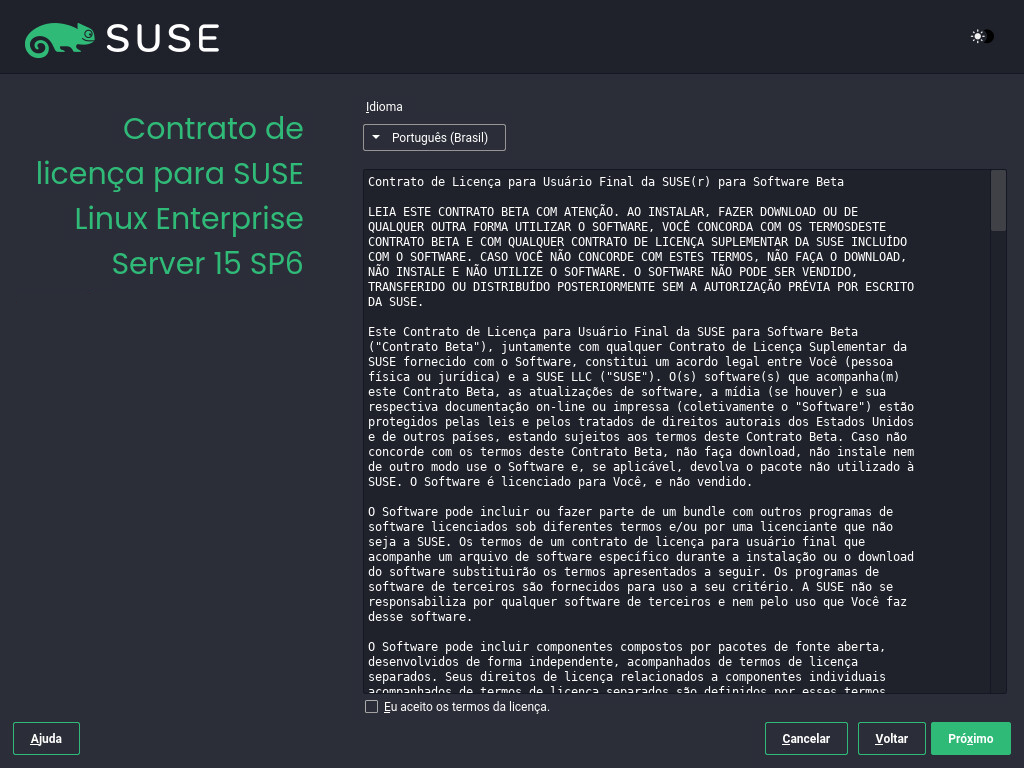
Leia o Contrato de Licença. Ele é apresentado no idioma que você escolheu na tela de boot. As traduções estão disponíveis na caixa suspensa . Você precisa aceitar o contrato marcando para instalar o SUSE Linux Enterprise Server. Continue com .
2.3 Configurações de rede #
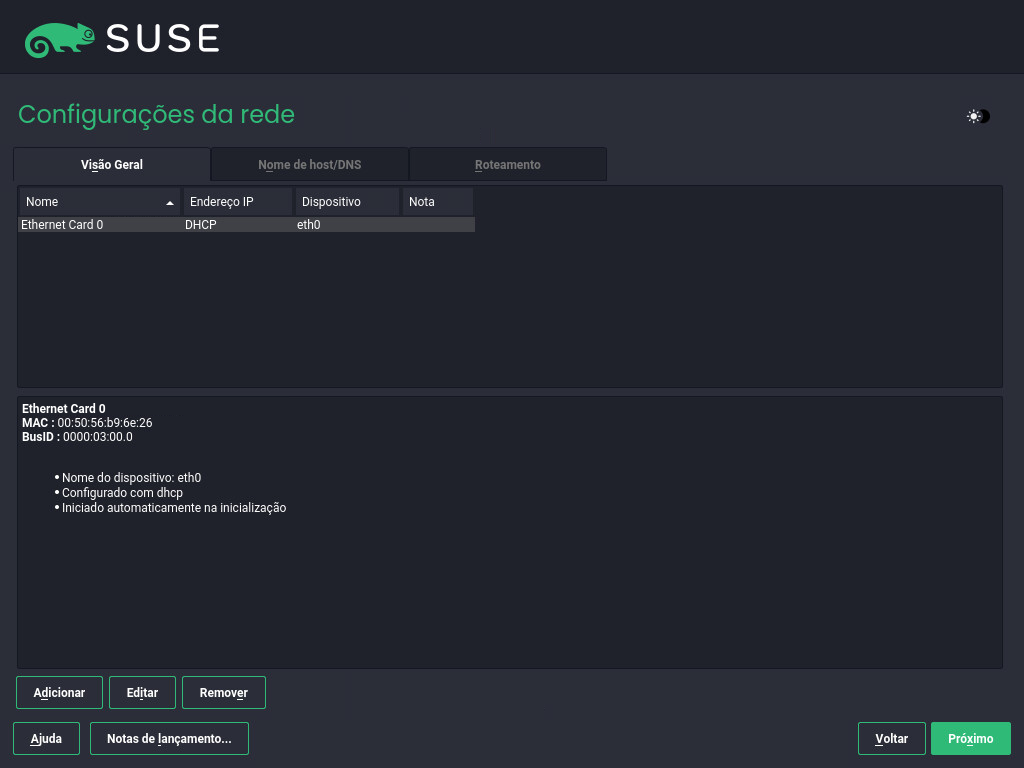
É realizada uma análise do sistema na qual o instalador investiga os dispositivos de armazenamento e tenta localizar outros sistemas instalados. Se a rede foi configurada automaticamente por DHCP durante a inicialização da instalação, você é levado para a etapa de registro.
Se a rede ainda não foi configurada, a caixa de diálogo é aberta. Escolha uma interface de rede na lista e configure-a com a opção . Se preferir, uma interface manualmente. Consulte o Seção 9.6, “Configurações de rede” e o Section 23.4, “Configuring a network connection with YaST” para obter mais informações. Para fazer uma instalação sem acesso à rede, ignore esta etapa sem fazer nenhuma mudança e clique em para prosseguir.
2.4 IBM Z: ativação do disco #
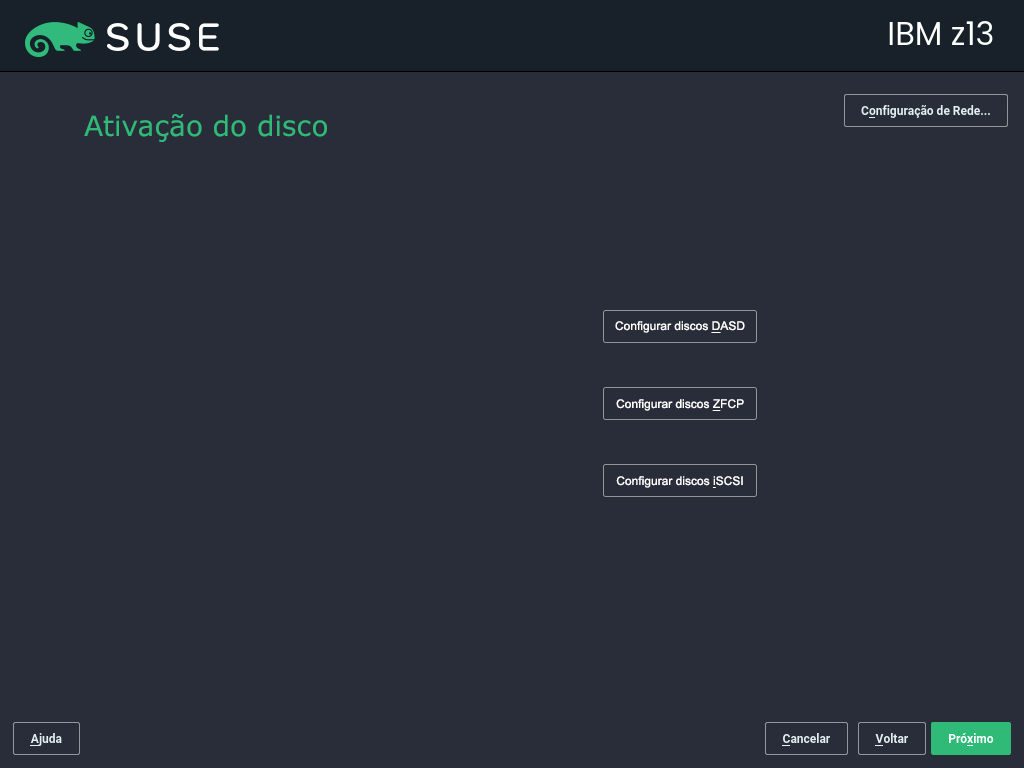
Ignore esta etapa se você não está instalando em hardware do IBM Z.
Configure os discos rígidos conectados. Selecione DASD, Discos SCSI Conectados a Fibre Channel (zFCP) ou iSCSI para instalação do SUSE Linux Enterprise Server. Os botões de configuração DASD e zFCP só ficam disponíveis com os dispositivos correspondentes anexados. Clique em para prosseguir e configurar o tipo de disco selecionado. Para obter mais informações, consulte o Seção 9.5, “IBM Z: ativação do disco”.
2.5 Registro #
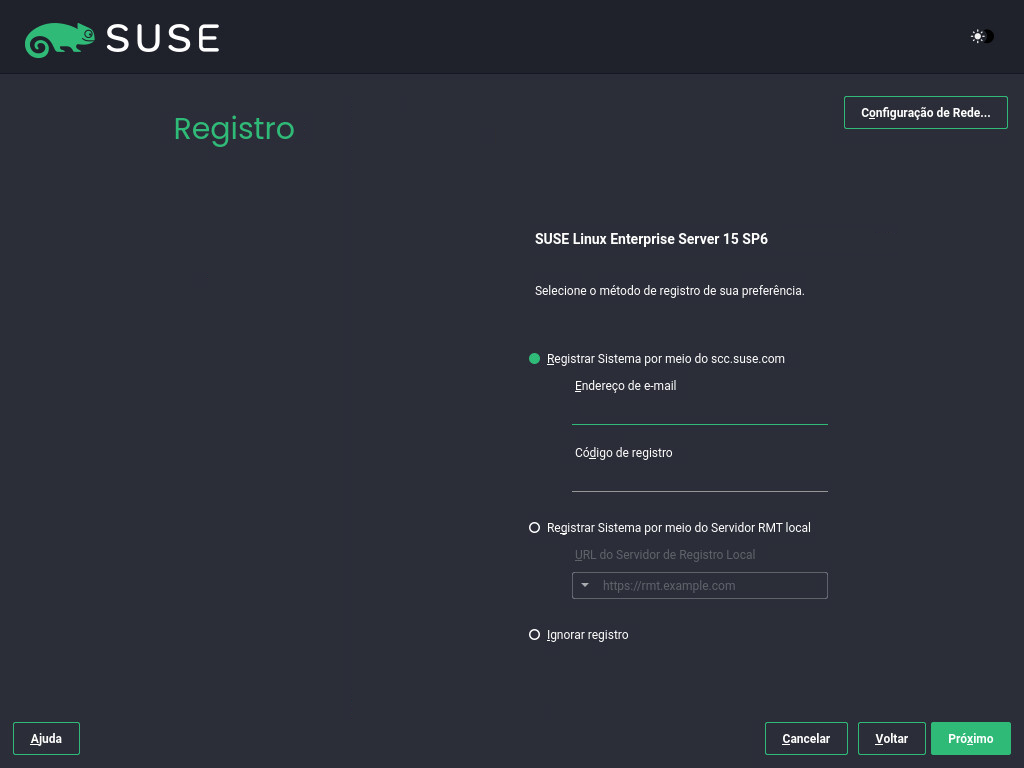
Para obter suporte técnico e atualizações de produtos, você precisa registrar e ativar o SUSE Linux Enterprise Server no SUSE Customer Center ou em um servidor de registro local. O registro do produt nesta fase também concede a você acesso imediato ao repositório de atualização. Assim, você pode instalar o sistema com as atualizações e patches mais recentes disponíveis.
Ao registrar, os repositórios e as dependências de módulos e extensões são carregados do servidor de registro.
Para efetuar o registro no SUSE Customer Center, digite o associado à sua conta do SUSE Customer Center e o para o SUSE Linux Enterprise Server. Continue com .
Alternativamente, você pode efetuar o registro em um servidor de registro local, caso ele seja fornecido pela sua organização. Ative e escolha um URL na caixa suspensa ou digite um endereço. Continue com .
Se você estiver offline ou quiser ignorar esse registro, ative . Aceite o aviso clicando em e prossiga clicando em .
Importante: Ignorando o registroSeu sistema e as extensões precisam ser registrados para recuperar as atualizações e ter direito a suporte. Apenas é possível ignorar o registro ao instalar da imagem
SLE-15-SP6-Full-ARCH-GM-media1.iso.Se você não efetuar o registro durante a instalação, poderá fazer isso a qualquer momento com o sistema em execução. Para fazer isso, execute › ou a ferramenta de linha de comando
SUSEConnect.
Após o registro bem-sucedido do SUSE Linux Enterprise Server, você terá de informar se deseja instalar as últimas atualizações online disponíveis durante a instalação. Se você escolher , o sistema será instalado com os pacotes mais atuais sem a necessidade de aplicar as atualizações após a instalação. Recomenda-se ativar essa opção.
Por padrão, o firewall no SUSE Linux Enterprise Server bloqueia apenas as conexões de entrada. Se o seu sistema estiver protegido por outro firewall que bloqueia o tráfego de saída, permita conexões com https://scc.suse.com/ e https://updates.suse.com nas portas 80 e 443 para receber atualizações.
2.6 Seleção de extensão e módulo #
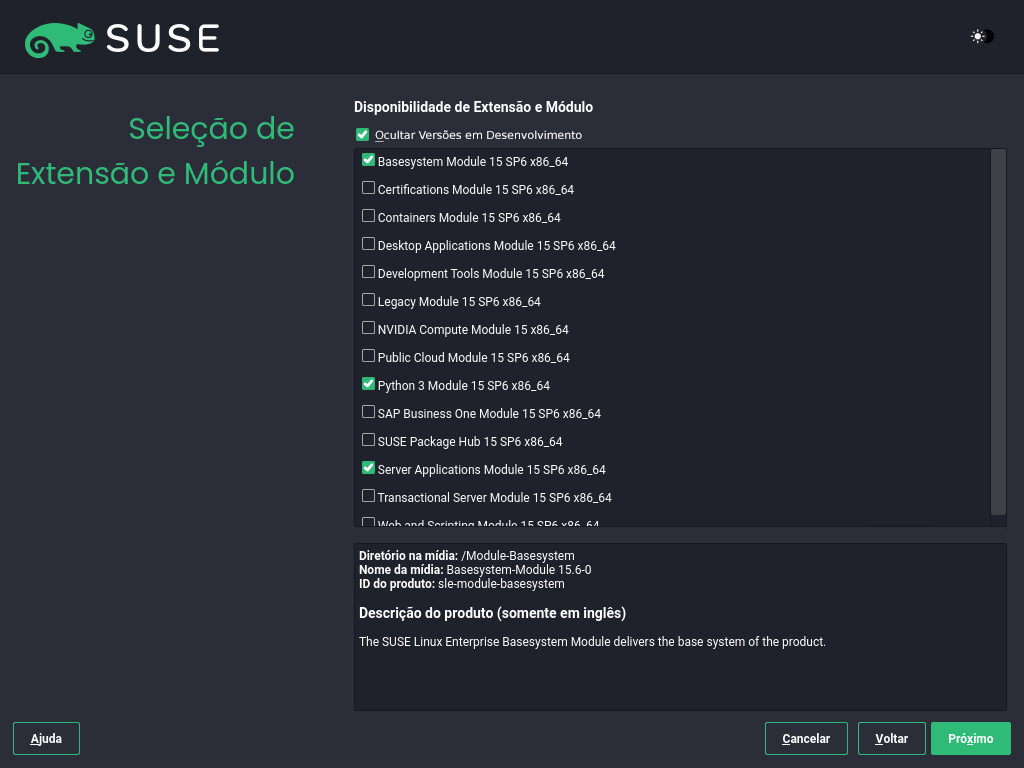
Após o registro bem-sucedido do sistema, o instalador listará os módulos e as extensões disponíveis para o SUSE Linux Enterprise Server. Os módulos são componentes que permitem personalizar o produto de acordo com as suas necessidades. Eles estão incluídos em sua assinatura do SUSE Linux Enterprise Server. As extensões adicionam funcionalidade ao produto. Elas devem ser adquiridas separadamente.
A disponibilidade de determinados módulos ou extensões depende do produto que você selecionou na primeira etapa da instalação. Para obter uma descrição dos módulos e dos ciclos de vida deles, selecione um módulo para ver o texto que o acompanha. Informações mais detalhadas estão disponíveis na Modules and Extensions Quick Start (Inicialização Rápida de Módulos e Extensões).
A seleção dos módulos afeta indiretamente o escopo da instalação, pois define quais fontes de software (repositórios) estão disponíveis para instalação e no sistema em execução.
Os módulos e as extensões a seguir estão disponíveis para o SUSE Linux Enterprise Server:
- Módulo Basesystem
Esse módulo adiciona um sistema básico em coexistência com o Instalador Unificado. Ele é necessário para todos os outros módulos e extensões. O escopo de uma instalação que contém apenas o sistema básico pode ser comparado com o padrão de instalação do minimal system das versões anteriores do SUSE Linux Enterprise Server. Por padrão, esse módulo está selecionado para instalação e não deve ser desmarcado.
Dependências: Nenhuma
- Módulo Certifications
Contém os pacotes de certificação FIPS.
Dependências: Basesystem
- Módulo Containers
Inclui suporte e ferramentas para containers.
Dependências: Basesystem
- Módulo Desktop Applications
Adiciona uma interface gráfica do usuário e aplicativos essenciais de área de trabalho ao sistema.
Dependências: Basesystem
- Módulo Development Tools
Contém compiladores (inclusive gcc) e bibliotecas necessárias para compilar e depurar aplicativos. Substitui o SDK (Software Development Kit) anterior.
Dependências: Basesystem, Desktop Applications
- Módulo HPC (High Performance Computing – Computação de Alta Performance)
Fornece ferramentas específicas normalmente usadas para cargas de trabalho de alto desempenho e com uso intensivo de números.
Dependências: Basesystem
- Módulo Legacy
Ajuda você a migrar aplicativos de versões anteriores do SUSE Linux Enterprise Server e de outros sistemas para o SLES 15 SP6, fornecendo pacotes que foram descontinuados no SUSE Linux Enterprise. Os pacotes nesse módulo são selecionados com base no requisito de migração e no nível de complexidade da configuração.
Esse módulo é recomendado durante a migração de uma versão anterior do produto.
Dependências: Basesystem, Server Applications
- Módulo NVIDIA Compute
Contém os drivers NVIDIA CUDA (Compute Unified Device Architecture).
O software nesse módulo é fornecido pela NVIDIA sob o CUDA End User License Agreement e não é suportado pela SUSE.
Dependências: Basesystem
- Módulo Public Cloud
Inclui todas as ferramentas necessárias para criar imagens para implantação do SUSE Linux Enterprise Server em ambientes de nuvem, como Amazon Web Services (AWS), Microsoft Azure, Google Compute Platform ou OpenStack.
Dependências: Basesystem, Server Applications
- Módulo Python 3
Esse módulo contém a versão mais recente dos pacotes selecionados do Python 3.
Dependências: Basesystem
- Servidor SAP Business One
Esse módulo contém pacotes e configurações de sistema específicos para o Servidor SAP Business One. Ele é mantido e suportado pela assinatura do produto SUSE Linux Enterprise Server.
Dependências: Basesystem, Server Applications, Desktop Applications, Development Tools
- Módulo Server Applications
Adiciona a funcionalidade de servidor fornecendo serviços de rede, como servidor DHCP, servidor de nomes ou servidor Web. Por padrão, esse módulo está selecionado para instalação. Não é recomendado anular a seleção dele.
Dependências: Basesystem
- SUSE Linux Enterprise High Availability
Adiciona suporte a cluster para configurações críticas ao SUSE Linux Enterprise Server. Essa extensão requer uma chave de licença separada.
Dependências: Basesystem, Server Applications
- SUSE Linux Enterprise Live Patching
Adiciona suporte para execução de patches críticos sem a necessidade de encerrar o sistema. Essa extensão requer uma chave de licença separada.
Dependências: Basesystem, Server Applications
- SUSE Linux Enterprise Workstation Extension
Estende a funcionalidade do SUSE Linux Enterprise Server com pacotes do SUSE Linux Enterprise Desktop, como aplicativos da área de serviço adicionais (Office Suite, cliente de e-mail, editor gráfico etc.) e bibliotecas. Ela permite combinar os dois produtos para criar uma estação de trabalho com recursos completos. Essa extensão requer uma chave de licença separada.
Dependências: Basesystem, Desktop Applications
- SUSE Package Hub
Concede acesso aos pacotes para o SUSE Linux Enterprise Server mantidos pela comunidade openSUSE. Esses pacotes são entregues sem suporte L3 e não interferem no suporte do SUSE Linux Enterprise Server. Para obter mais informações, consulte https://packagehub.suse.com/.
Dependências: Basesystem
- Módulo Transactional Server
Adiciona suporte a atualizações transacionais. As atualizações são aplicadas ao sistema todo em uma única transação ou não são aplicadas. Isso ocorre sem influenciar o sistema em execução. Em caso de falha em uma atualização, ou se a atualização bem-sucedida for considerada incompatível ou, de alguma forma, incorreta, ela poderá ser descartada para imediatamente retornar o sistema ao seu estado de funcionamento anterior.
Dependências: Basesystem
- Módulo Web and Scripting
Contém os pacotes destinados a um servidor Web em execução.
Dependências: Basesystem, Server Applications
Alguns módulos dependem da instalação de outros módulos. Portanto, ao selecionar um módulo, é possível que outros módulos sejam automaticamente selecionados para atender às dependências.
Dependendo do produto, o servidor de registro pode marcar módulos e extensões conforme recomendado. Os módulos e as extensões recomendados estão pré-selecionados para registro e instalação. Para evitar a instalação dessas recomendações, anule a seleção manualmente.
Selecione os módulos e a extensão que você deseja instalar e clique em para prosseguir. Caso tenha escolhido uma ou mais extensões, será solicitado que você forneça os respectivos códigos de registro. Dependendo da sua escolha, talvez seja necessário aceitar contratos de licença adicionais.
Ao executar uma instalação offline do SLE-15-SP6-Full-ARCH-GM-media1.iso, por padrão, apenas o está selecionado. Para instalar o conjunto de pacotes padrão completo do SUSE Linux Enterprise Server, selecione também o .
2.7 Produto complementar #
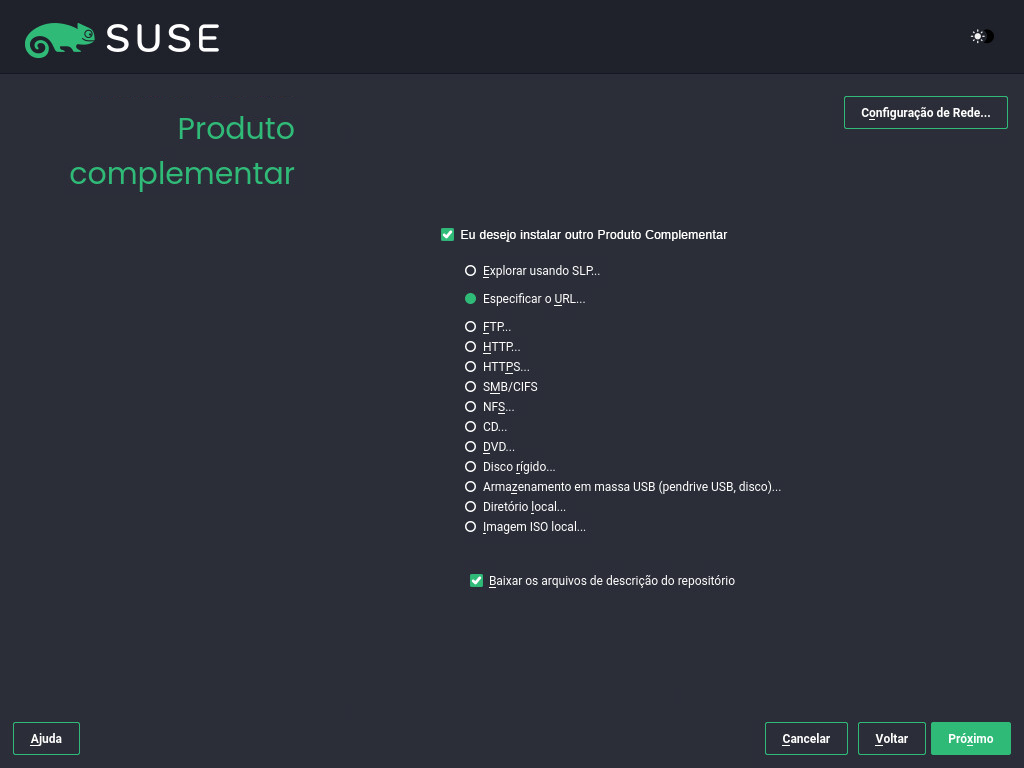
A caixa de diálogo permite adicionar outras fontes de software (chamadas de “repositórios”) ao SUSE Linux Enterprise Server, que não são fornecidas pelo SUSE Customer Center. Os produtos complementares podem incluir produtos e drivers de terceiros ou outros softwares para seu sistema.
É possível também adicionar repositórios de atualização de driver na caixa de diálogo . As atualizações de driver para o SUSE Linux Enterprise estão disponíveis em https://drivers.suse.com/. Esses drivers foram criados pelo SUSE SolidDriver Program.
Para ignorar esta etapa, prossiga com . Do contrário, ative . Especifique o tipo de mídia, o caminho local ou o recurso de rede que hospeda o repositório e siga as instruções na tela.
Marque para fazer download dos arquivos que descrevem o repositório agora. Se desativado, o download dos arquivos será feito após o início da instalação. Prossiga com e insira o meio, se necessário. Dependendo do conteúdo do produto, talvez seja necessário aceitar contratos de licença adicionais. Continue com . Se você escolheu um produto complementar que exige uma chave de registro, é solicitado que você a digite antes de continuar na próxima etapa.
2.8 Função do sistema #
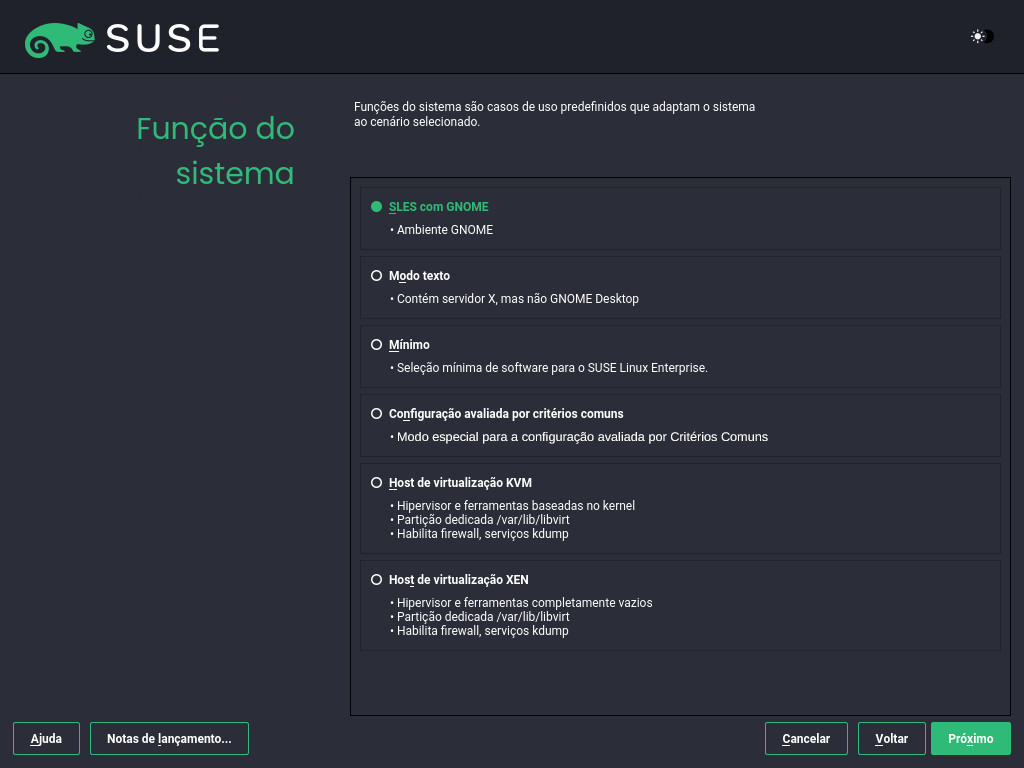
A disponibilidade das funções do sistema depende da sua seleção de módulos e extensões. As funções do sistema definem, por exemplo, o conjunto de padrões de software que será pré-selecionado para instalação. Consulte a descrição na tela para fazer sua escolha. Selecione uma função e clique em para continuar. Com base nos módulos habilitados, se nenhuma ou apenas uma função for adequada ao respectivo produto base, a caixa de diálogo será omitida.
A partir deste momento, é possível ver as Notas de Versão em qualquer tela durante o processo de instalação selecionando .
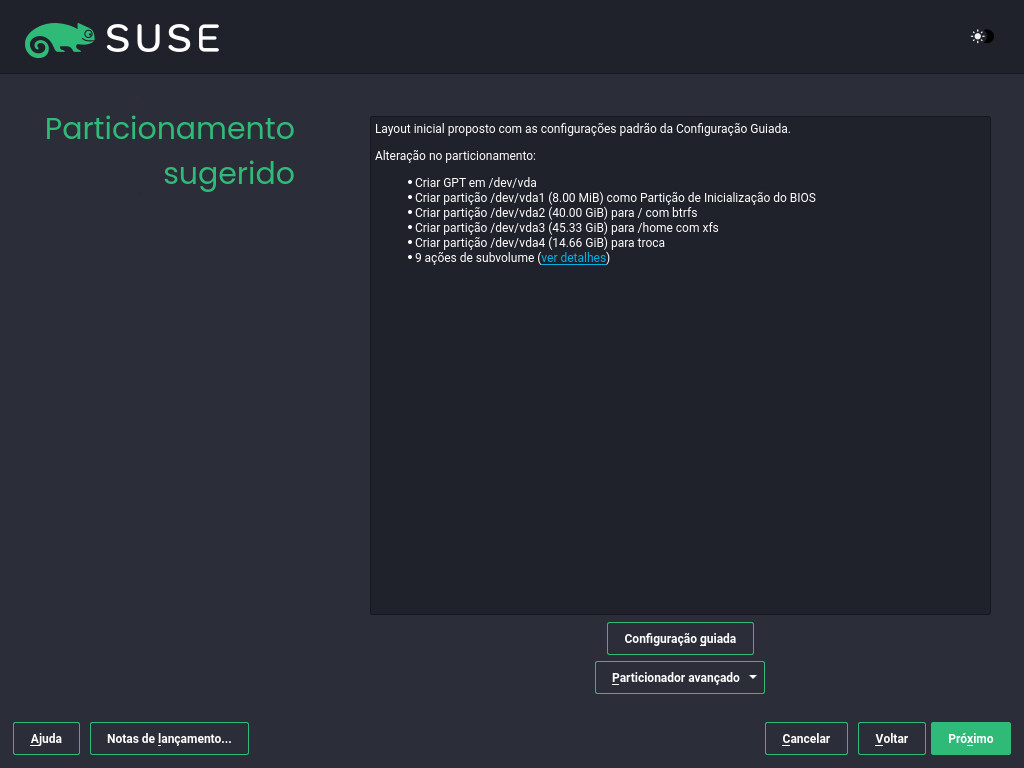
2.9 Particionamento sugerido #
Revise a configuração da partição proposta pelo sistema. Se necessário, mude-a. As opções disponíveis são:
Inicia um assistente que permite refinar a proposta de particionamento. As opções disponíveis nele dependem da configuração do sistema. Se ele tiver mais do que um disco rígido, você poderá escolher qual(is) disco(s) será(ão) usado(s) e onde colocar a partição raiz. Se o(s) disco(s) já tiver(em) partições, decida se deseja removê-las ou redimensioná-las.
Nas etapas seguintes, você também pode adicionar suporte a LVM e criptografia de disco. Você pode mudar o sistema de arquivos para a partição raiz e decidir se deseja ou não ter uma partição home separada.
Abre o descrito no Seção 11.1, “Usando o ”. Dessa forma, você tem total controle sobre a configuração de particionamento e pode criar uma configuração personalizada. Essa opção é voltada para especialistas.
Observe que, para fins de particionamento, o espaço em disco é medido em unidades binárias, em vez de unidades decimais. Por exemplo, se você inserir os tamanhos 1GiB, 1GB ou 1G, todos eles significarão 1 GiB (Gibibyte), e não 1 GB (Gigabyte).
- Binário
1 GiB = 1 073 741 824 bytes.
- Decimal
1 GB = 1 000 000 000 bytes.
- Diferença
1 GiB ≈ 1,07 GB.
Para aceitar a configuração proposta sem nenhuma mudança, escolha para prosseguir.
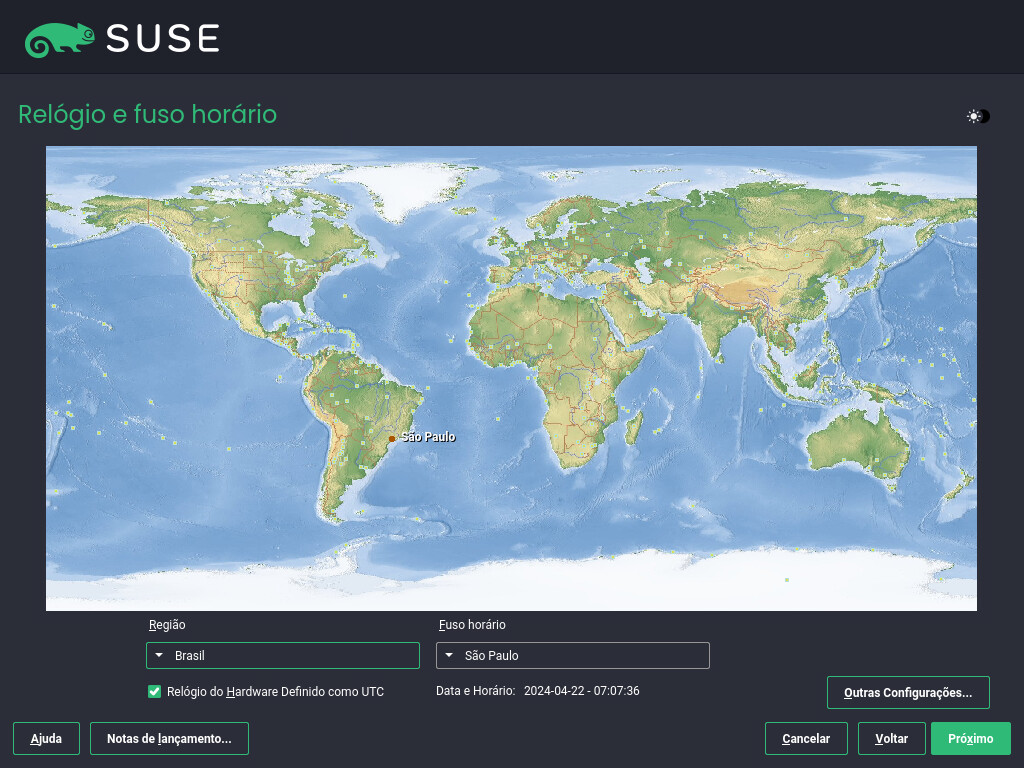
2.10 Relógio e fuso horário #
Selecione o relógio e o fuso horário a serem usados no sistema. Para ajustar o horário manualmente ou configurar um servidor NTP para sincronização de horário, escolha . Consulte o Seção 9.12, “Relógio e fuso horário” para obter as informações detalhadas. Continue com .
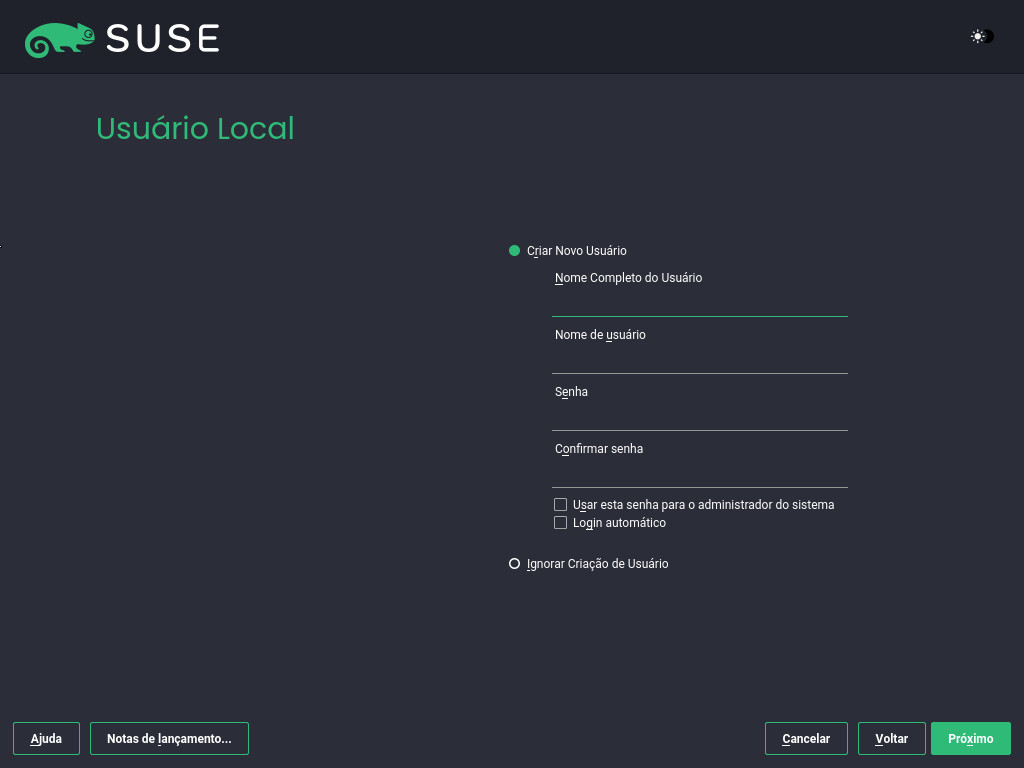
2.11 Usuário local #
Para criar um usuário local, digite o nome e o sobrenome no campo , o nome de login no campo e a senha no campo .
A senha deve ter pelo menos oito caracteres e incluir letras maiúsculas e minúsculas e números. As senhas podem ter até 72 caracteres e diferenciam maiúsculas de minúsculas.
Por questões de segurança, recomendamos enfaticamente não habilitar o . Você também não deve ; em vez disso, informe uma senha de root separada na próxima etapa de instalação.
Se você instalar em um sistema em que uma instalação anterior do Linux foi encontrada, poderá . Clique em para obter uma lista das contas de usuário disponíveis. Selecione um ou mais usuários.
Em um ambiente no qual os usuários são gerenciados centralmente (por exemplo, por NIS ou LDAP), você pode ignorar a criação de usuários locais. Nesse caso, selecione .
Continue com .
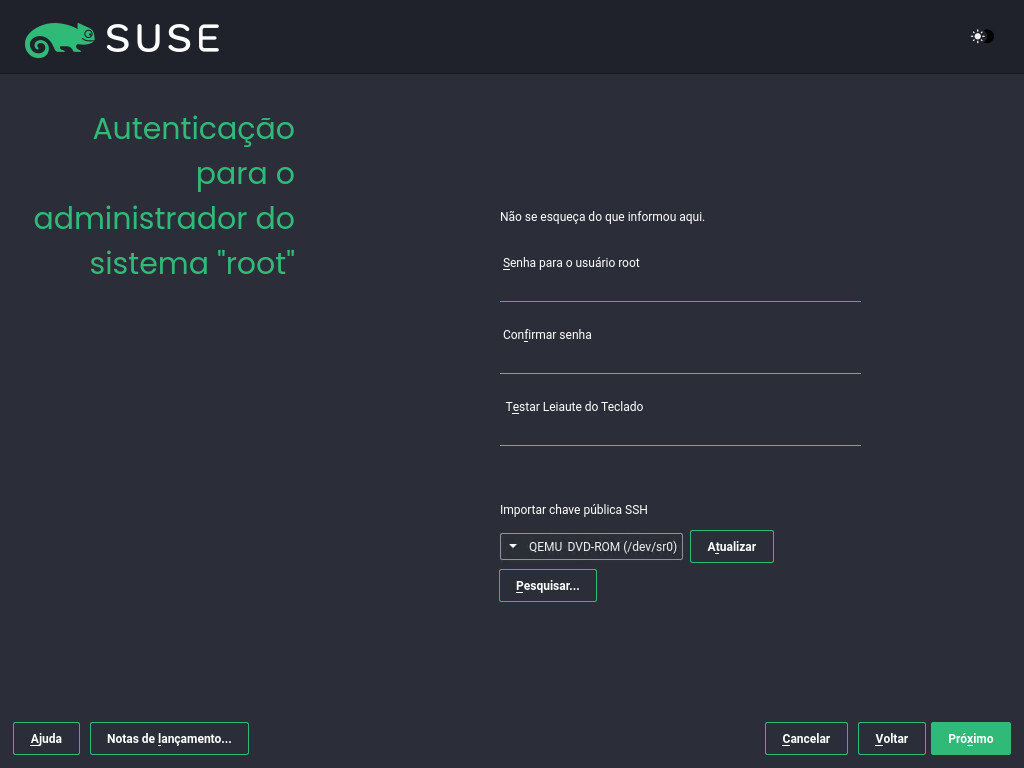
2.12 Autenticação para o administrador do sistema “root” #
Digite uma senha para o administrador do sistema (chamado de usuário root) ou insira uma chave pública SSH. Se desejado, você poderá usar os dois.
Como o usuário root possui permissões abrangentes, a senha deve ser escolhida com cuidado. Nunca se esqueça da senha de root. Depois de digitá-la aqui, a senha não poderá ser recuperada.
É recomendável usar apenas caracteres US-ASCII. Em caso de erro no sistema ou quando você tiver que iniciar o sistema no modo de recuperação, um teclado talvez não esteja traduzido.
Para acessar o sistema remotamente por SSH usando uma chave pública, importe uma chave de uma mídia removível ou de uma partição existente. Consulte o Seção 9.14, “Autenticação para o administrador do sistema root” para obter mais informações.
Continue com .
2.13 Configurações da instalação #
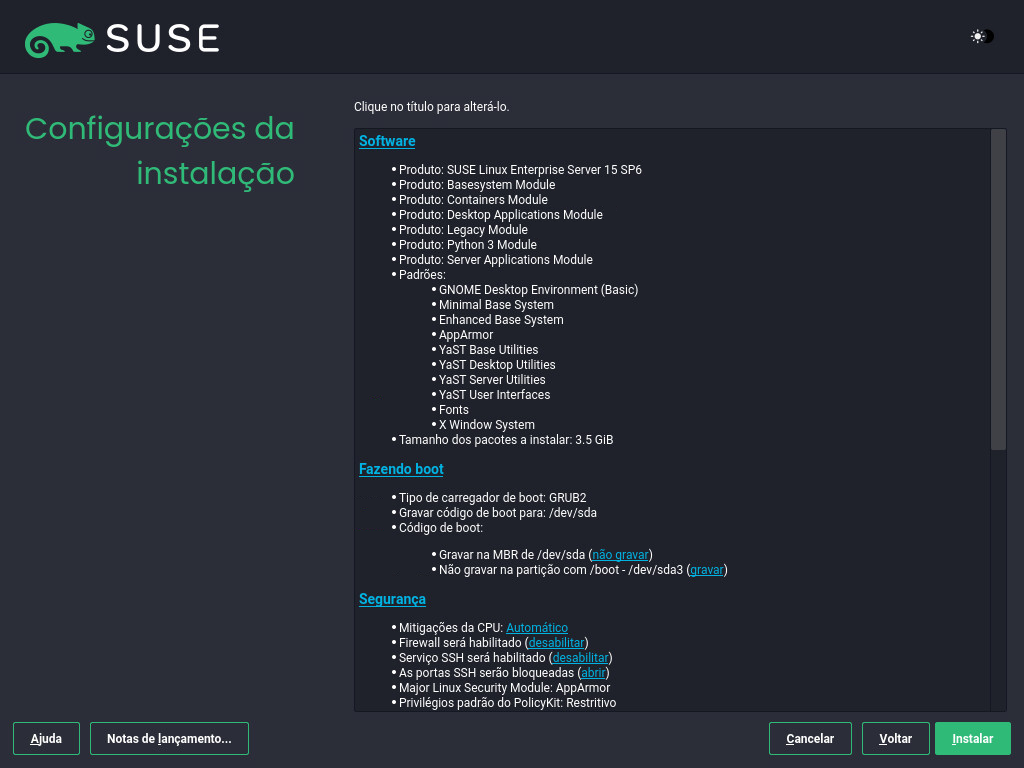
Use a tela para revisar e, se necessário, mudar várias configurações de instalação propostas. A configuração atual é listada para cada definição. Para mudá-la, clique no título. Algumas configurações, como firewall ou SSH, podem ser mudadas diretamente clicando nos respectivos links.
As mudanças que você faz aqui também podem ser feitas posteriormente no sistema instalado. No entanto, se você precisar de acesso remoto logo após a instalação, talvez seja necessário abrir a porta SSH nas configurações de .
O escopo da instalação é definido pelos módulos e extensões selecionados para essa instalação. No entanto, dependendo da sua seleção, nem todos os pacotes disponíveis em um módulo são selecionados para instalação.
Clique em para abrir a tela , na qual é possível mudar a seleção de software marcando ou desmarcando padrões. Cada padrão contém vários pacotes de software necessários para funções específicas (por exemplo, ). Para obter uma seleção mais detalhada com base nos pacotes de software a serem instalados, escolha para alternar para o do YaST. Consulte o Chapter 8, Installing or removing software para obter mais informações.
Esta seção mostra a configuração do carregador de boot. Só é recomendado mudar os padrões quando realmente necessário. Consulte o Chapter 18, The boot loader GRUB 2 para obter os detalhes.
As referem-se aos parâmetros de linha de comando de boot do kernel para mitigações de software que foram implantadas com a finalidade de evitar ataques de temporização na CPU. Clique na entrada selecionada para escolher uma opção diferente. Para obter os detalhes, consulte o .
Por padrão, o está habilitado em todas as interfaces de rede configuradas. Para desabilitar o
firewalldcompletamente, clique em (não recomendado). Consulte Chapter 23, Masquerading and firewalls para obter mais detalhes.Nota: Configurações de firewall para receber atualizaçõesPor padrão, o firewall no SUSE Linux Enterprise Server bloqueia apenas as conexões de entrada. Se o seu sistema estiver protegido por outro firewall que bloqueia o tráfego de saída, permita conexões com
https://scc.suse.com/ehttps://updates.suse.comnas portas 80 e 443 para receber atualizações.Por padrão, o está habilitado, mas sua porta (22) está fechada no firewall. Clique em para abri-la ou em para desabilitar o serviço. Se o SSH estiver desabilitado, observe que os logins remotos não serão possíveis. Consulte o Chapter 22, Securing network operations with OpenSSH para obter mais informações.
O é . Para desabilitá-lo, selecione como o módulo nas configurações
Clique para a política de segurança
Defense Information Systems Agency STIG. Se alguma configuração de instalação for incompatível com a política, será solicitado para você modificá-la de maneira apropriada. Algumas configurações podem ser ajustadas automaticamente, outras exigem intervenção do usuário.A habilitação de um perfil de segurança permite uma correção completa do SCAP na primeira inicialização. Você também pode executar ou e corrigir manualmente o sistema com o OpenSCAP mais tarde. Para obter mais informações, consulte o Seção 9.15.4, “”.
Exibe a configuração de rede atual. Por padrão,
wickedé usado para instalações de servidor, e o NetworkManager para cargas de trabalho de desktop. Clique em para mudar as configurações. Para obter os detalhes, consulte o Section 23.4, “Configuring a network connection with YaST”.Importante: Suporte para NetworkManagerO SUSE suporta apenas o NetworkManager para cargas de trabalho de desktop com SLED ou a extensão Workstation. Todas as certificações de servidor são feitas com o
wickedcomo a ferramenta de configuração de rede, e o uso do NetworkManager pode invalidá-las. O NetworkManager não é suportado pelo SUSE para cargas de trabalho de servidor.O Kdump grava a imagem da memória (“dump de memória”) no sistema de arquivos para o caso de falha do kernel. Dessa forma, você pode descobrir a causa da falha depurando o arquivo de dump. O Kdump vem pré-configurado e está habilitado por padrão. Consulte o Section 20.7, “Basic Kdump configuration” para obter mais informações.
Se você instalou o módulo de aplicativos da área de trabalho, o sistema é inicializado no destino , com suporte a rede, multiusuário e gerenciador de exibição. Alterne para se não precisar efetuar login pelo gerenciador de exibição.
Veja as informações detalhadas do hardware clicando em . Na tela resultante, é possível também mudar as . Consulte o Seção 9.15.10, “” para obter mais informações.
2.14 Inicie a instalação. #
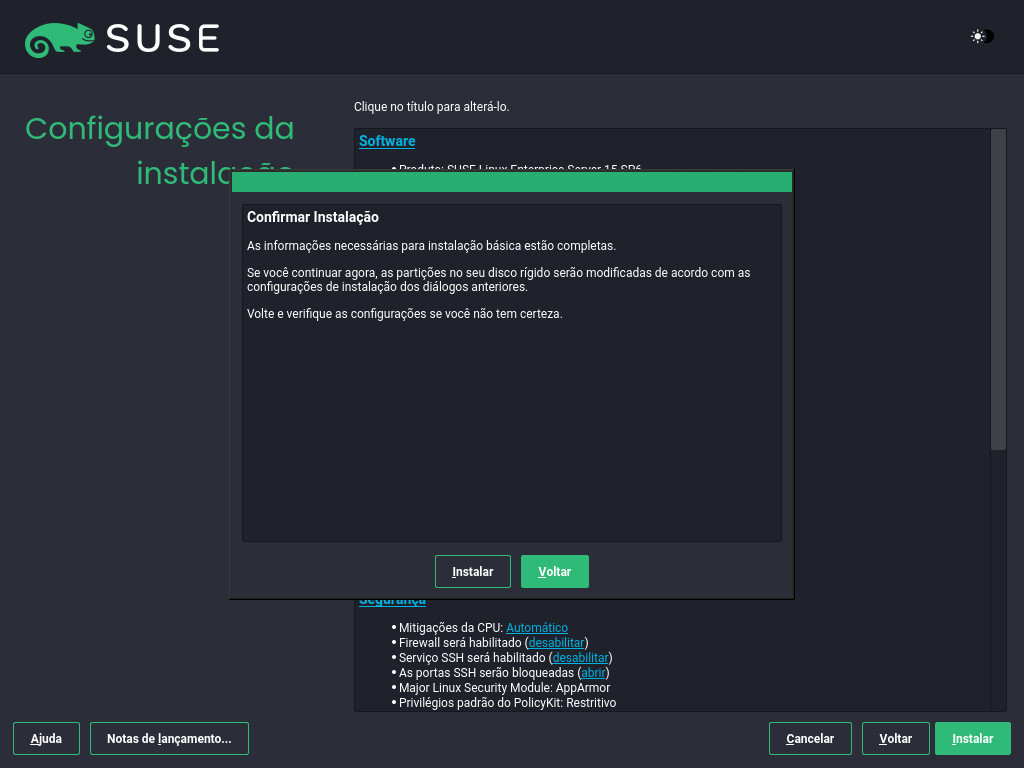
Após finalizar a configuração do sistema na tela , clique em . Dependendo da seleção de software, pode ser necessário concordar com contratos de licença antes de aparecer a tela de confirmação da instalação. Até este momento, nenhuma mudança foi feita no seu sistema. Depois que você clicar em pela segunda vez, será iniciado o processo de instalação.
2.15 O processo de instalação #
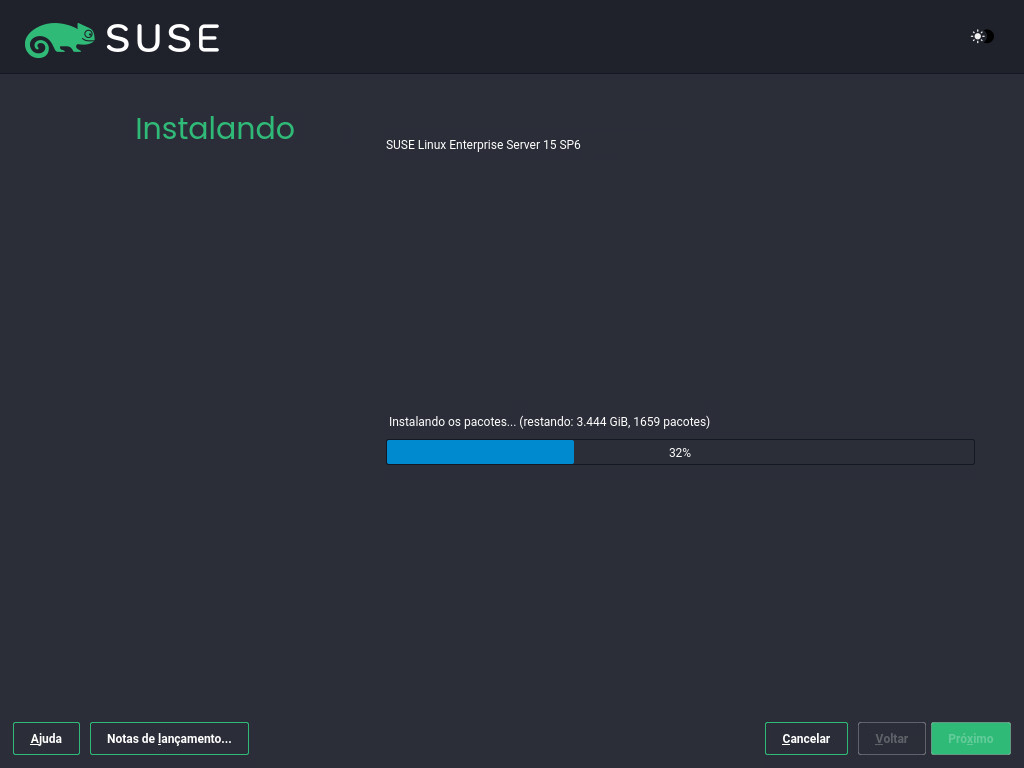
Durante a instalação, o andamento é mostrado. Após o término da rotina de instalação, o computador será reinicializado no sistema instalado.
3 Informações legais #
Copyright © 2006- 2025 SUSE LLC e colaboradores. Todos os direitos reservados.
Permissão concedida para copiar, distribuir e/ou modificar este documento sob os termos da Licença GNU de Documentação Livre, Versão 1.2 ou (por sua opção) versão 1.3; com a Seção Invariante sendo estas informações de copyright e a licença. Uma cópia da versão 1.2 da licença está incluída na seção intitulada “GNU Free Documentation License” (Licença GNU de Documentação Livre).
Para ver as marcas registradas da SUSE, visite https://www.suse.com/company/legal/. Todas as marcas comerciais de terceiros pertencem a seus respectivos proprietários. Os símbolos de marca registrada (®, ™ etc.) indicam as marcas registradas da SUSE e de suas afiliadas. Os asteriscos (*) indicam marcas registradas de terceiros.
Todas as informações deste manual foram compiladas com a maior atenção possível aos detalhes. Entretanto, isso não garante uma precisão absoluta. A SUSE LLC, suas afiliadas, os autores ou tradutores não serão responsáveis por possíveis erros nem pelas consequências resultantes de tais erros.
4 GNU Free Documentation License #
Copyright (C) 2000, 2001, 2002 Free Software Foundation, Inc. 51 Franklin St, Fifth Floor, Boston, MA 02110-1301 USA. Everyone is permitted to copy and distribute verbatim copies of this license document, but changing it is not allowed.
0. PREAMBLE #
The purpose of this License is to make a manual, textbook, or other functional and useful document "free" in the sense of freedom: to assure everyone the effective freedom to copy and redistribute it, with or without modifying it, either commercially or non-commercially. Secondarily, this License preserves for the author and publisher a way to get credit for their work, while not being considered responsible for modifications made by others.
This License is a kind of "copyleft", which means that derivative works of the document must themselves be free in the same sense. It complements the GNU General Public License, which is a copyleft license designed for free software.
We have designed this License to use it for manuals for free software, because free software needs free documentation: a free program should come with manuals providing the same freedoms that the software does. But this License is not limited to software manuals; it can be used for any textual work, regardless of subject matter or whether it is published as a printed book. We recommend this License principally for works whose purpose is instruction or reference.
1. APPLICABILITY AND DEFINITIONS #
This License applies to any manual or other work, in any medium, that contains a notice placed by the copyright holder saying it can be distributed under the terms of this License. Such a notice grants a world-wide, royalty-free license, unlimited in duration, to use that work under the conditions stated herein. The "Document", below, refers to any such manual or work. Any member of the public is a licensee, and is addressed as "you". You accept the license if you copy, modify or distribute the work in a way requiring permission under copyright law.
A "Modified Version" of the Document means any work containing the Document or a portion of it, either copied verbatim, or with modifications and/or translated into another language.
A "Secondary Section" is a named appendix or a front-matter section of the Document that deals exclusively with the relationship of the publishers or authors of the Document to the Document's overall subject (or to related matters) and contains nothing that could fall directly within that overall subject. (Thus, if the Document is in part a textbook of mathematics, a Secondary Section may not explain any mathematics.) The relationship could be a matter of historical connection with the subject or with related matters, or of legal, commercial, philosophical, ethical or political position regarding them.
The "Invariant Sections" are certain Secondary Sections whose titles are designated, as being those of Invariant Sections, in the notice that says that the Document is released under this License. If a section does not fit the above definition of Secondary then it is not allowed to be designated as Invariant. The Document may contain zero Invariant Sections. If the Document does not identify any Invariant Sections then there are none.
The "Cover Texts" are certain short passages of text that are listed, as Front-Cover Texts or Back-Cover Texts, in the notice that says that the Document is released under this License. A Front-Cover Text may be at most 5 words, and a Back-Cover Text may be at most 25 words.
A "Transparent" copy of the Document means a machine-readable copy, represented in a format whose specification is available to the general public, that is suitable for revising the document straightforwardly with generic text editors or (for images composed of pixels) generic paint programs or (for drawings) some widely available drawing editor, and that is suitable for input to text formatters or for automatic translation to a variety of formats suitable for input to text formatters. A copy made in an otherwise Transparent file format whose markup, or absence of markup, has been arranged to thwart or discourage subsequent modification by readers is not Transparent. An image format is not Transparent if used for any substantial amount of text. A copy that is not "Transparent" is called "Opaque".
Examples of suitable formats for Transparent copies include plain ASCII without markup, Texinfo input format, LaTeX input format, SGML or XML using a publicly available DTD, and standard-conforming simple HTML, PostScript or PDF designed for human modification. Examples of transparent image formats include PNG, XCF and JPG. Opaque formats include proprietary formats that can be read and edited only by proprietary word processors, SGML or XML for which the DTD and/or processing tools are not generally available, and the machine-generated HTML, PostScript or PDF produced by some word processors for output purposes only.
The "Title Page" means, for a printed book, the title page itself, plus such following pages as are needed to hold, legibly, the material this License requires to appear in the title page. For works in formats which do not have any title page as such, "Title Page" means the text near the most prominent appearance of the work's title, preceding the beginning of the body of the text.
A section "Entitled XYZ" means a named subunit of the Document whose title either is precisely XYZ or contains XYZ in parentheses following text that translates XYZ in another language. (Here XYZ stands for a specific section name mentioned below, such as "Acknowledgements", "Dedications", "Endorsements", or "History".) To "Preserve the Title" of such a section when you modify the Document means that it remains a section "Entitled XYZ" according to this definition.
The Document may include Warranty Disclaimers next to the notice which states that this License applies to the Document. These Warranty Disclaimers are considered to be included by reference in this License, but only as regards disclaiming warranties: any other implication that these Warranty Disclaimers may have is void and has no effect on the meaning of this License.
2. VERBATIM COPYING #
You may copy and distribute the Document in any medium, either commercially or non-commercially, provided that this License, the copyright notices, and the license notice saying this License applies to the Document are reproduced in all copies, and that you add no other conditions whatsoever to those of this License. You may not use technical measures to obstruct or control the reading or further copying of the copies you make or distribute. However, you may accept compensation in exchange for copies. If you distribute a large enough number of copies you must also follow the conditions in section 3.
You may also lend copies, under the same conditions stated above, and you may publicly display copies.
3. COPYING IN QUANTITY #
If you publish printed copies (or copies in media that commonly have printed covers) of the Document, numbering more than 100, and the Document's license notice requires Cover Texts, you must enclose the copies in covers that carry, clearly and legibly, all these Cover Texts: Front-Cover Texts on the front cover, and Back-Cover Texts on the back cover. Both covers must also clearly and legibly identify you as the publisher of these copies. The front cover must present the full title with all words of the title equally prominent and visible. You may add other material on the covers in addition. Copying with changes limited to the covers, as long as they preserve the title of the Document and satisfy these conditions, can be treated as verbatim copying in other respects.
If the required texts for either cover are too voluminous to fit legibly, you should put the first ones listed (as many as fit reasonably) on the actual cover, and continue the rest onto adjacent pages.
If you publish or distribute Opaque copies of the Document numbering more than 100, you must either include a machine-readable Transparent copy along with each Opaque copy, or state in or with each Opaque copy a computer-network location from which the general network-using public has access to download using public-standard network protocols a complete Transparent copy of the Document, free of added material. If you use the latter option, you must take reasonably prudent steps, when you begin distribution of Opaque copies in quantity, to ensure that this Transparent copy will remain thus accessible at the stated location until at least one year after the last time you distribute an Opaque copy (directly or through your agents or retailers) of that edition to the public.
It is requested, but not required, that you contact the authors of the Document well before redistributing any large number of copies, to give them a chance to provide you with an updated version of the Document.
4. MODIFICATIONS #
You may copy and distribute a Modified Version of the Document under the conditions of sections 2 and 3 above, provided that you release the Modified Version under precisely this License, with the Modified Version filling the role of the Document, thus licensing distribution and modification of the Modified Version to whoever possesses a copy of it. In addition, you must do these things in the Modified Version:
Use in the Title Page (and on the covers, if any) a title distinct from that of the Document, and from those of previous versions (which should, if there were any, be listed in the History section of the Document). You may use the same title as a previous version if the original publisher of that version gives permission.
List on the Title Page, as authors, one or more persons or entities responsible for authorship of the modifications in the Modified Version, together with at least five of the principal authors of the Document (all of its principal authors, if it has fewer than five), unless they release you from this requirement.
State on the Title page the name of the publisher of the Modified Version, as the publisher.
Preserve all the copyright notices of the Document.
Add an appropriate copyright notice for your modifications adjacent to the other copyright notices.
Include, immediately after the copyright notices, a license notice giving the public permission to use the Modified Version under the terms of this License, in the form shown in the Addendum below.
Preserve in that license notice the full lists of Invariant Sections and required Cover Texts given in the Document's license notice.
Include an unaltered copy of this License.
Preserve the section Entitled "History", Preserve its Title, and add to it an item stating at least the title, year, new authors, and publisher of the Modified Version as given on the Title Page. If there is no section Entitled "History" in the Document, create one stating the title, year, authors, and publisher of the Document as given on its Title Page, then add an item describing the Modified Version as stated in the previous sentence.
Preserve the network location, if any, given in the Document for public access to a Transparent copy of the Document, and likewise the network locations given in the Document for previous versions it was based on. These may be placed in the "History" section. You may omit a network location for a work that was published at least four years before the Document itself, or if the original publisher of the version it refers to gives permission.
For any section Entitled "Acknowledgements" or "Dedications", Preserve the Title of the section, and preserve in the section all the substance and tone of each of the contributor acknowledgements and/or dedications given therein.
Preserve all the Invariant Sections of the Document, unaltered in their text and in their titles. Section numbers or the equivalent are not considered part of the section titles.
Delete any section Entitled "Endorsements". Such a section may not be included in the Modified Version.
Do not retitle any existing section to be Entitled "Endorsements" or to conflict in title with any Invariant Section.
Preserve any Warranty Disclaimers.
If the Modified Version includes new front-matter sections or appendices that qualify as Secondary Sections and contain no material copied from the Document, you may at your option designate some or all of these sections as invariant. To do this, add their titles to the list of Invariant Sections in the Modified Version's license notice. These titles must be distinct from any other section titles.
You may add a section Entitled "Endorsements", provided it contains nothing but endorsements of your Modified Version by various parties--for example, statements of peer review or that the text has been approved by an organization as the authoritative definition of a standard.
You may add a passage of up to five words as a Front-Cover Text, and a passage of up to 25 words as a Back-Cover Text, to the end of the list of Cover Texts in the Modified Version. Only one passage of Front-Cover Text and one of Back-Cover Text may be added by (or through arrangements made by) any one entity. If the Document already includes a cover text for the same cover, previously added by you or by arrangement made by the same entity you are acting on behalf of, you may not add another; but you may replace the old one, on explicit permission from the previous publisher that added the old one.
The author(s) and publisher(s) of the Document do not by this License give permission to use their names for publicity for or to assert or imply endorsement of any Modified Version.
5. COMBINING DOCUMENTS #
You may combine the Document with other documents released under this License, under the terms defined in section 4 above for modified versions, provided that you include in the combination all of the Invariant Sections of all of the original documents, unmodified, and list them all as Invariant Sections of your combined work in its license notice, and that you preserve all their Warranty Disclaimers.
The combined work need only contain one copy of this License, and multiple identical Invariant Sections may be replaced with a single copy. If there are multiple Invariant Sections with the same name but different contents, make the title of each such section unique by adding at the end of it, in parentheses, the name of the original author or publisher of that section if known, or else a unique number. Make the same adjustment to the section titles in the list of Invariant Sections in the license notice of the combined work.
In the combination, you must combine any sections Entitled "History" in the various original documents, forming one section Entitled "History"; likewise combine any sections Entitled "Acknowledgements", and any sections Entitled "Dedications". You must delete all sections Entitled "Endorsements".
6. COLLECTIONS OF DOCUMENTS #
You may make a collection consisting of the Document and other documents released under this License, and replace the individual copies of this License in the various documents with a single copy that is included in the collection, provided that you follow the rules of this License for verbatim copying of each of the documents in all other respects.
You may extract a single document from such a collection, and distribute it individually under this License, provided you insert a copy of this License into the extracted document, and follow this License in all other respects regarding verbatim copying of that document.
7. AGGREGATION WITH INDEPENDENT WORKS #
A compilation of the Document or its derivatives with other separate and independent documents or works, in or on a volume of a storage or distribution medium, is called an "aggregate" if the copyright resulting from the compilation is not used to limit the legal rights of the compilation's users beyond what the individual works permit. When the Document is included in an aggregate, this License does not apply to the other works in the aggregate which are not themselves derivative works of the Document.
If the Cover Text requirement of section 3 is applicable to these copies of the Document, then if the Document is less than one half of the entire aggregate, the Document's Cover Texts may be placed on covers that bracket the Document within the aggregate, or the electronic equivalent of covers if the Document is in electronic form. Otherwise they must appear on printed covers that bracket the whole aggregate.
8. TRANSLATION #
Translation is considered a kind of modification, so you may distribute translations of the Document under the terms of section 4. Replacing Invariant Sections with translations requires special permission from their copyright holders, but you may include translations of some or all Invariant Sections in addition to the original versions of these Invariant Sections. You may include a translation of this License, and all the license notices in the Document, and any Warranty Disclaimers, provided that you also include the original English version of this License and the original versions of those notices and disclaimers. In case of a disagreement between the translation and the original version of this License or a notice or disclaimer, the original version will prevail.
If a section in the Document is Entitled "Acknowledgements", "Dedications", or "History", the requirement (section 4) to Preserve its Title (section 1) will typically require changing the actual title.
9. TERMINATION #
You may not copy, modify, sublicense, or distribute the Document except as expressly provided for under this License. Any other attempt to copy, modify, sublicense or distribute the Document is void, and will automatically terminate your rights under this License. However, parties who have received copies, or rights, from you under this License will not have their licenses terminated so long as such parties remain in full compliance.
10. FUTURE REVISIONS OF THIS LICENSE #
The Free Software Foundation may publish new, revised versions of the GNU Free Documentation License from time to time. Such new versions will be similar in spirit to the present version, but may differ in detail to address new problems or concerns. See https://www.gnu.org/copyleft/.
Each version of the License is given a distinguishing version number. If the Document specifies that a particular numbered version of this License "or any later version" applies to it, you have the option of following the terms and conditions either of that specified version or of any later version that has been published (not as a draft) by the Free Software Foundation. If the Document does not specify a version number of this License, you may choose any version ever published (not as a draft) by the Free Software Foundation.
ADDENDUM: How to use this License for your documents #
Copyright (c) YEAR YOUR NAME.
Permission is granted to copy, distribute and/or modify this document
under the terms of the GNU Free Documentation License, Version 1.2
or any later version published by the Free Software Foundation;
with no Invariant Sections, no Front-Cover Texts, and no Back-Cover Texts.
A copy of the license is included in the section entitled “GNU
Free Documentation License”.
If you have Invariant Sections, Front-Cover Texts and Back-Cover Texts, replace the “with...Texts.” line with this:
with the Invariant Sections being LIST THEIR TITLES, with the
Front-Cover Texts being LIST, and with the Back-Cover Texts being LIST.
If you have Invariant Sections without Cover Texts, or some other combination of the three, merge those two alternatives to suit the situation.
If your document contains nontrivial examples of program code, we recommend releasing these examples in parallel under your choice of free software license, such as the GNU General Public License, to permit their use in free software.
