15 Access control lists #
The cluster administration tools like CRM Shell (crmsh) or
Hawk2 can be used by root or any user in the group
haclient. By default, these
users have full read/write access. To limit access or assign more
fine-grained access rights, you can use Access control
lists (ACLs).
Access control lists consist of an ordered set of access rules. Each rule allows read or write access or denies access to a part of the cluster configuration. Rules are typically combined to produce a specific role, then users may be assigned to a role that matches their tasks.
This ACL documentation only applies if your CIB is validated with the CIB
syntax version pacemaker-2.0 or higher. For details on
how to check this and upgrade the CIB version, see
Note: Upgrading the CIB syntax version.
15.1 Requirements and prerequisites #
Before you start using ACLs on your cluster, make sure the following conditions are fulfilled:
Ensure you have the same users on all nodes in your cluster, either by using NIS, Active Directory, or by manually adding the same users to all nodes.
All users for whom you want to modify access rights with ACLs must belong to the
haclientgroup.All users need to run
crmshby its absolute path/usr/sbin/crm.If non-privileged users want to run
crmsh, theirPATHvariable needs to be extended with/usr/sbin.
ACLs are an optional feature. By default, use of ACLs is disabled.
If ACLs are not enabled,
rootand all users belonging to thehaclientgroup have full read/write access to the cluster configuration.Even if ACLs are enabled and configured, both
rootand the default CRM ownerhaclusteralways have full access to the cluster configuration.
15.2 Conceptual overview #
Access control lists consist of an ordered set of access rules. Each rule allows read or write access or denies access to a part of the cluster configuration. Rules are typically combined to produce a specific role, then users may be assigned to a role that matches their tasks. An ACL role is a set of rules which describe access rights to CIB. A rule consists of the following:
an access right like
read,write, ordenya specification where to apply the rule. This specification can be a type, an ID reference, or an XPath expression. XPath is a language for selecting nodes in an XML document. Refer to http://en.wikipedia.org/wiki/XPath.
Usually, it is convenient to bundle ACLs into roles and assign a specific role to system users (ACL targets). There are these methods to create ACL roles:
Section 15.7, “Setting ACL rules via XPath expressions”. You need to know the structure of the underlying XML to create ACL rules.
Section 15.8, “Setting ACL rules via abbreviations”. Create a shorthand syntax and ACL rules to apply to the matched objects.
15.3 Enabling use of ACLs in your cluster #
Before you can start configuring ACLs, you need to
enable use of ACLs. To do so, use the following
command in the crmsh:
#crmconfigure property enable-acl=true
Alternatively, use Hawk2 as described in Procedure 15.1, “Enabling use of ACLs with Hawk2”.
Log in to Hawk2:
https://HAWKSERVER:7630/
In the left navigation bar, select to display the global cluster options and their current values.
Below click the empty drop-down box and select to add the parameter. It is added with its default value
No.Set its value to
Yesand apply your changes.
15.4 Creating a read-only monitor role #
The following subsections describe how to configure read-only access
by defining a monitor role either in Hawk2
or CRM Shell.
15.4.1 Creating a read-only monitor role with Hawk2 #
The following procedures show how to configure read-only access to the
cluster configuration by defining a monitor role and
assigning it to a user. Alternatively, you can use crmsh to do so,
as described in Procedure 15.4, “Adding a monitor role and assigning a user with crmsh”.
Log in to Hawk2:
https://HAWKSERVER:7630/
In the left navigation bar, select .
Click .
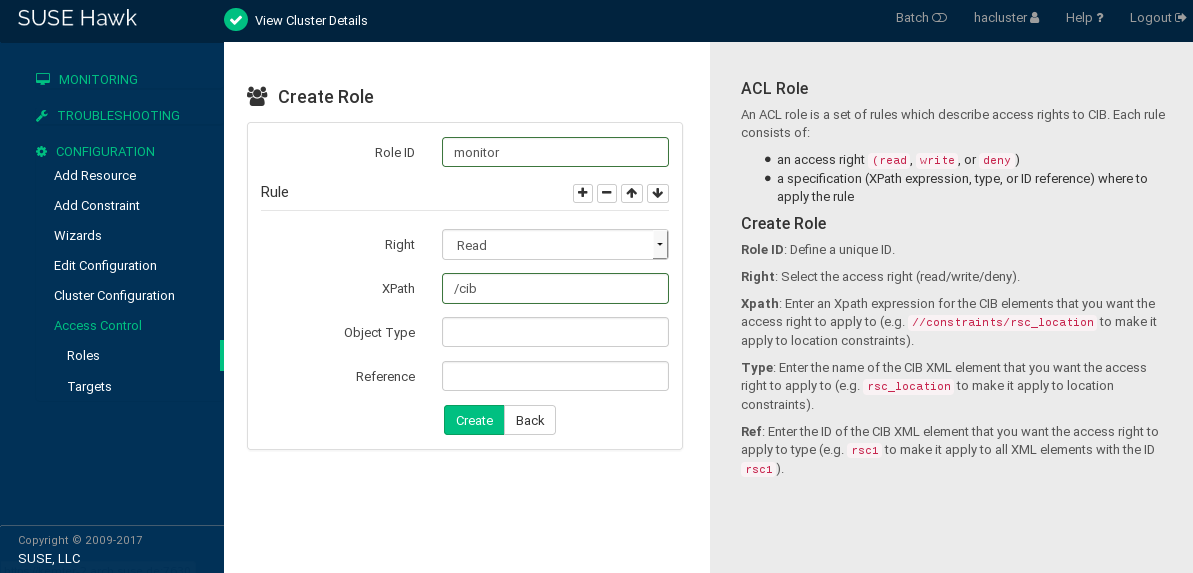
Enter a unique , for example,
monitor.As access , select
Read.As , enter the XPath expression
/cib.Click .
This creates a new role with the name
monitor, sets thereadrights and applies this to all elements in the CIB by using the XPath expression/cib.If necessary, add more rules by clicking the plus icon and specifying the respective parameters.
Sort the individual rules by using the arrow up or down buttons.
To assign the role we created in Procedure 15.2 to a system user (target), proceed as follows:
Log in to Hawk2:
https://HAWKSERVER:7630/
In the left navigation bar, select .
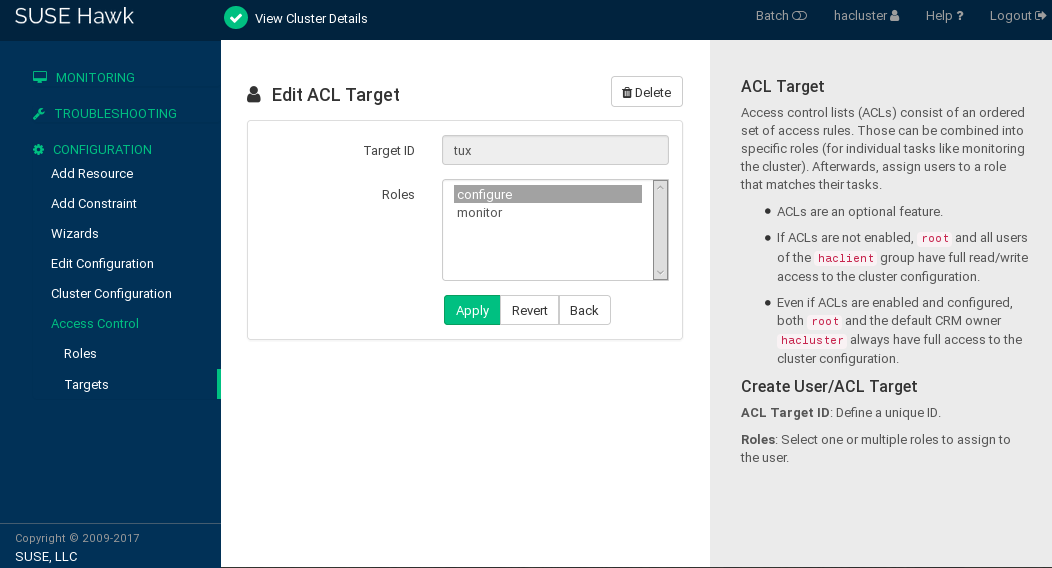
To create a system user (ACL Target), click and enter a unique , for example,
tux. Make sure this user belongs to thehaclientgroup.To assign a role to the target, select one or multiple .
In our example, select the
monitorrole you created in Procedure 15.2.Confirm your choice.
To configure access rights for resources or constraints, you can also use the abbreviated syntax as explained in Section 15.8, “Setting ACL rules via abbreviations”.
15.4.2 Creating a read-only monitor role with crmsh #
The following procedure shows how to configure a read-only access to the
cluster configuration by defining a monitor role and
assigning it to a user.
crmsh #Log in as
root.Start the interactive mode of
crmsh:#crmconfigurecrm(live)configure#Define your ACL role(s):
Use the
rolecommand to define a new role:crm(live)configure#rolemonitor read xpath:"/cib"The previous command creates a new role with the name
monitor, sets thereadrights and applies it to all elements in the CIB by using the XPath expression/cib. If necessary, you can add more access rights and XPath arguments.Add additional roles as needed.
Assign your roles to one or multiple ACL targets, which are the corresponding system users. Make sure they belong to the
haclientgroup.crm(live)configure#acl_targettux monitorCheck your changes:
crm(live)configure#showCommit your changes:
crm(live)configure#commit
To configure access rights for resources or constraints, you can also use the abbreviated syntax as explained in Section 15.8, “Setting ACL rules via abbreviations”.
15.5 Removing a user #
The following subsections describe how to remove an existing user from
ACL either in Hawk2 or crmsh.
15.5.1 Removing a user with Hawk2 #
To remove a user from ACL, proceed as follows:
Log in to Hawk2:
https://HAWKSERVER:7630/
In the left navigation bar, select .
To remove a system user (ACL target), click the garbage bin icon under the column.
Confirm the dialog box.
15.5.2 Removing a user with crmsh #
To remove a user from ACL, replace the placeholder USER with the name of the user:
#crmconfigure delete USERNAME
As an alternative, you can use the edit subcommand:
#crmconfigure edit USERNAME
15.6 Removing an existing role #
The following subsections describe how to remove an existing role in either Hawk2 or crmsh.
Keep in mind, no user should belong to this role. If there is still a reference to a user in the role, the role cannot be deleted. Delete the references to users first, before you delete the role.
15.6.1 Removing an existing role with Hawk2 #
To remove a role, proceed as follows:
Log in to Hawk2:
https://HAWKSERVER:7630/
In the left navigation bar, select .
To remove a role, click the garbage bin icon under the column.
Confirm the dialog box. If an error message appears, make sure your role is “empty” and does not reference users.
15.6.2 Removing an existing role with crmsh #
To remove an existing role, replace the placeholder ROLE with the name of the role:
#crmconfigure delete ROLE
15.7 Setting ACL rules via XPath expressions #
To manage ACL rules via XPath, you need to know the structure of the underlying XML. Retrieve the structure with the following command that shows your cluster configuration in XML (see Example 15.1):
#crmconfigure show xml
<cib>
  <!-- ... -->
  <configuration>
    <crm_config>
       <cluster_property_set id="cib-bootstrap-options">
        <nvpair name="stonith-enabled" value="true" id="cib-bootstrap-options-stonith-enabled"/>
       [...]
      </cluster_property_set>
    </crm_config>
    <nodes>
      <node id="175704363" uname="alice"/>
      <node id="175704619" uname="bob"/>
    </nodes>
    <resources> [...]  </resources>
    <constraints/>
    <rsc_defaults> [...] </rsc_defaults>
    <op_defaults> [...] </op_defaults>
  <configuration>
</cib>
With the XPath language you can locate nodes in this XML document. For
example, to select the root node (cib) use the XPath
expression /cib. To locate the global cluster
configurations, use the XPath expression
/cib/configuration/crm_config.
As an example, Table 15.1, “Operator role—access types and XPath expressions” shows the parameters (access type and XPath expression) to create an “operator” role. Users with this role can only execute the tasks mentioned in the second column—they cannot reconfigure any resources (for example, change parameters or operations), nor change the configuration of colocation or order constraints.
|
Type |
XPath/Explanation |
|---|---|
|
Write |
//crm_config//nvpair[@name='maintenance-mode'] Turn cluster maintenance mode on or off. |
|
Write |
//op_defaults//nvpair[@name='record-pending'] Choose whether pending operations are recorded. |
|
Write |
//nodes/node//nvpair[@name='standby'] Set node in online or standby mode. |
|
Write |
//resources//nvpair[@name='target-role'] Start, stop, promote, or demote any resource. |
|
Write |
//resources//nvpair[@name='maintenance'] Select whether a resource should be put in maintenance mode or not. |
|
Write |
//constraints/rsc_location Migrate/move resources from one node to another. |
|
Read |
/cib View the status of the cluster. |
15.8 Setting ACL rules via abbreviations #
For users who do not want to deal with the XML structure, there is an easier method.
For example, consider the following XPath:
//*[@id="rsc1"]
which locates all the XML nodes with the ID rsc1.
The abbreviated syntax is written like this:
ref:"rsc1"
This also works for constraints. Here is the verbose XPath:
//constraints/rsc_location
The abbreviated syntax is written like this:
type:"rsc_location"
The abbreviated syntax can be used in crmsh and Hawk2. The CIB
daemon knows how to apply the ACL rules to the matching objects.

