16 Network device bonding #
For many systems, it is desirable to implement network connections that comply to more than the standard data security or availability requirements of a typical Ethernet device. In these cases, several Ethernet devices can be aggregated to a single bonding device.
The configuration of the bonding device is done by means of bonding module
options. The behavior is determined through the mode of the bonding
device. By default, this is mode=active-backup,
which means that a different device will become active if the primary
device fails.
When using Corosync, the bonding device is not managed by the cluster software. Therefore, the bonding device must be configured on each cluster node that might possibly need to access the bonding device.
16.1 Configuring bonding devices with YaST #
To configure a bonding device, you need to have multiple Ethernet devices that can be aggregated to a single bonding device. Proceed as follows:
Start YaST as
rootand select › .In the , switch to the tab, which shows the available devices.
Check if the Ethernet devices to be aggregate to a bonding device have an IP address assigned. If yes, change it:
Select the device to change and click .
In the tab of the dialog that opens, select the option .
Click to return to the tab in the dialog.
To add a new bonding device:
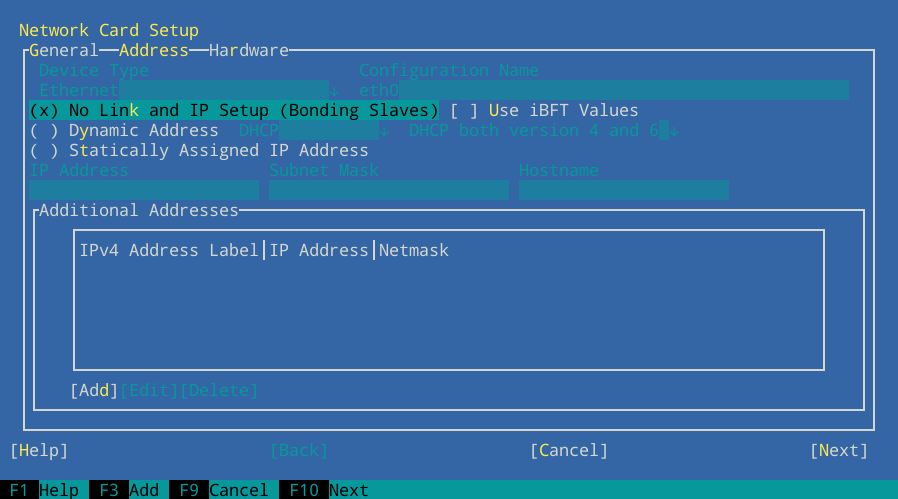
Click and set the to . Proceed with .
Select how to assign the IP address to the bonding device. Three methods are at your disposal:
No Link and IP Setup (Bonding Slaves)
Dynamic Address (with DHCP or Zeroconf)
Statically assigned IP Address
Use the method that is appropriate for your environment. If Corosync manages virtual IP addresses, select and assign an IP address to the interface.
Switch to the tab.
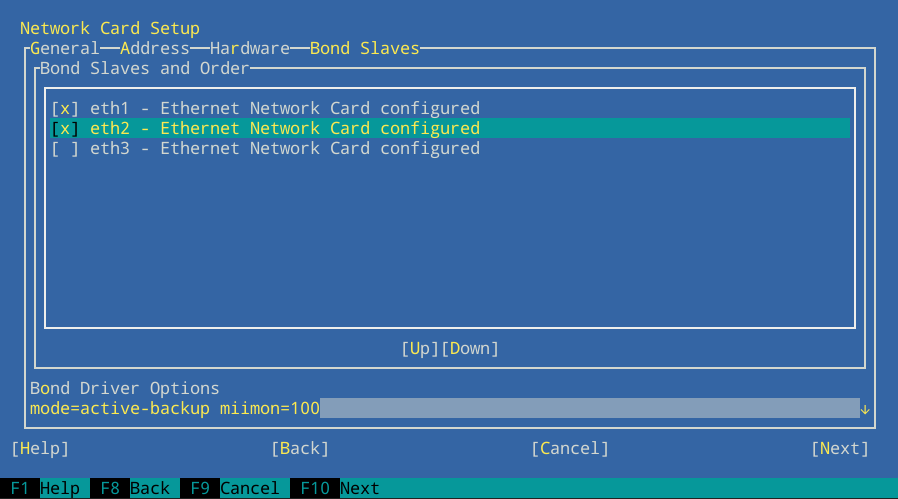
To select the Ethernet devices that you want to include into the bond, activate the check box in front of the respective devices.
Edit the . The following modes are available:
balance-rrProvides load balancing and fault tolerance, at the cost of out-of-order packet transmission. This may cause delays, for example, for TCP reassembly.
active-backupProvides fault tolerance.
balance-xorProvides load balancing and fault tolerance.
broadcastProvides fault tolerance.
802.3adProvides dynamic link aggregation if supported by the connected switch.
balance-tlbProvides load balancing for outgoing traffic.
balance-albProvides load balancing for incoming and outgoing traffic, if the network devices used allow the modifying of the network device's hardware address while in use.
Make sure to add the parameter
miimon=100to . Without this parameter, the link is not checked regularly, so the bonding driver might continue to lose packets on a faulty link.
Click and leave YaST with to finish the configuration of the bonding device. YaST writes the configuration to
/etc/sysconfig/network/ifcfg-bondDEVICENUMBER.
16.2 Hotplugging devices into a bond #
Sometimes it is necessary to replace an interface in a bond with
another one, for example, if the respective network device constantly
fails. The solution is to set up hotplugging. It is also
necessary to change the udev rules to match the
device by bus ID instead of by MAC address. This enables you to replace
defective hardware (a network card in the same slot but with a different
MAC address), if the hardware allows for that.
If you prefer manual configuration instead, refer to the SUSE Linux Enterprise Server Administration Guide, chapter Basic Networking, section Hotplugging of Bonding Slaves.
Start YaST as
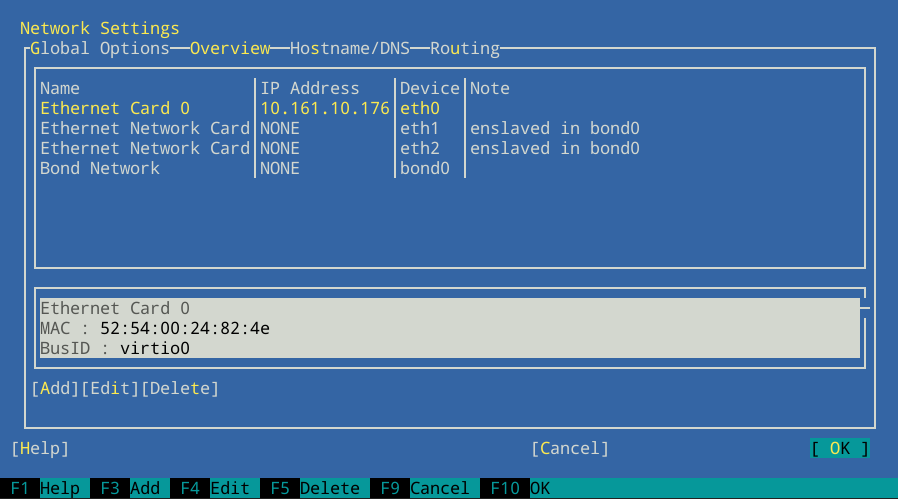
rootand select › .In the , switch to the tab, which shows the already configured devices. If devices are already configured in a bond, the column shows it.
For each of the Ethernet devices that have been aggregated to a bonding device, execute the following steps:
Select the device to change and click . The dialog opens.
Switch to the tab and make sure that is set to
On Hotplug.Switch to the tab.
For the , click and select the option.
Click and to return to the tab in the dialog. If you click the Ethernet device entry now, the bottom pane shows the device's details, including the bus ID.
Click to confirm your changes and leave the network settings.
At boot time, the network setup does not wait for the hotplug devices, but
for the bond to become ready, which needs at least one available device.
When one of the interfaces is removed from the system (unbind from
NIC driver, rmmod of the NIC driver or true PCI
hotplug removal), the Kernel removes it from the bond automatically. When
a new card is added to the system (replacement of the hardware in the
slot), udev renames it by applying the bus-based
persistent name rule and calls ifup for it. The
ifup call automatically joins it into the bond.
16.3 For more information #
All modes and many options are explained in detail in the at https://www.kernel.org/doc/Documentation/networking/bonding.txt.
For High Availability setups, the following options are
especially important: miimon and
use_carrier.


