12 Installation steps #
This chapter describes the procedure in which the data for SUSE Linux Enterprise Micro is copied to the target device. Some basic configuration parameters for the newly installed system are set during the procedure. A graphical user interface will guide you through the installation. The text-mode installation has the same steps but looks different. For information about performing non-interactive automated installations, see AutoYaST Guide.
If you are a first-time user of SUSE Linux Enterprise Micro, you should follow the default YaST proposals in most parts, but you can also adjust the settings as described here to fine-tune your system according to your preferences. Help for each installation step is provided by clicking .
If the installer does not detect your mouse correctly, use →| for navigation, arrow keys to scroll, and Enter to confirm a selection. Various buttons or selection fields contain a letter with an underscore. Use Alt–Letter to select a button or a selection directly instead of navigating there with →|.
12.1 Overview #
This section provides an overview of all installation steps. Each step contains a link to a more detailed description.
At first, YaST performs network configuration. For details, refer to Section 12.2, “Network settings”.
The actual installation starts with language and keyboard selection and the license agreement. For details, refer to Section 12.3, “Language, Keyboard, and License Agreement”.
Accept the license agreement to proceed to the next step.
IBM Z machines need to activate disks. For details, see Section 12.4, “IBM Z: disk activation”.
Register your system. For details, refer to Section 12.5, “Registration”.
Install available extensions. For details, refer to Section 12.6, “Extension and Module Selection”
Configure NTP servers as described in Section 12.7, “NTP Configuration”.
Set a password for the system administrator
root. For details, refer to Section 12.8, “Authentication for the System Administratorroot”.The last installation step is an overview of all installation settings. For details, refer to Section 12.9, “Installation Settings”.
12.2 Network settings #
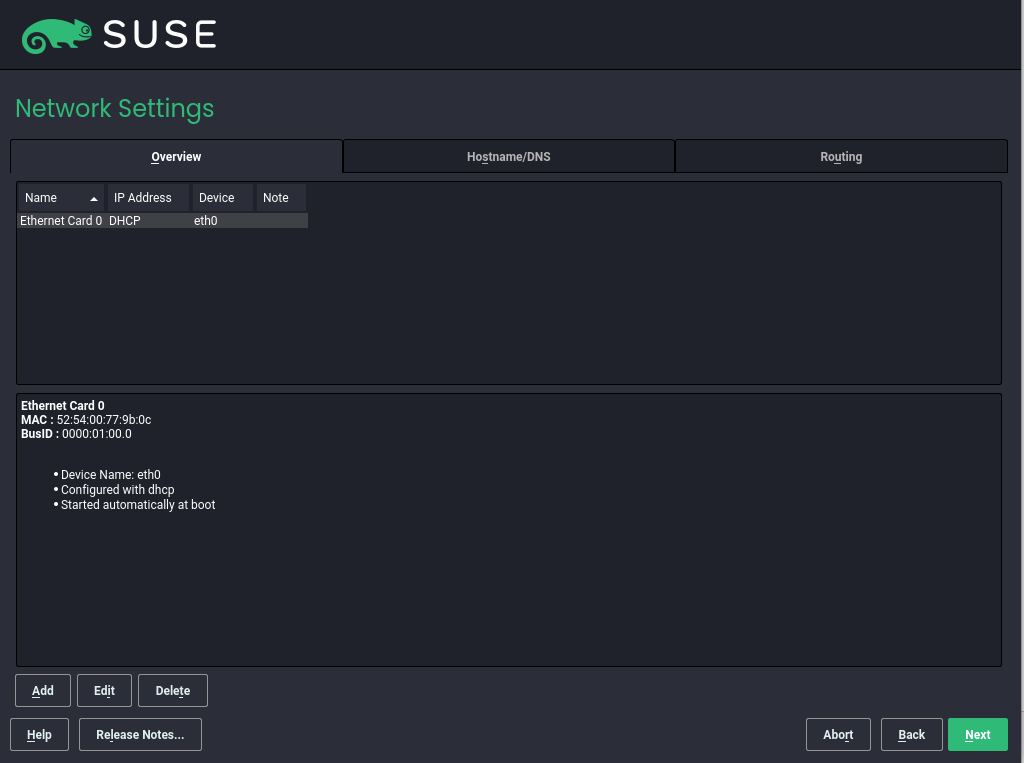
After booting into the installation, the installation routine is set up. During this setup, an attempt to configure at least one network interface with DHCP is made. In case this attempt has failed, the dialog launches now.
Choose a network interface from the list and click to change its settings. Use the tabs to configure DNS and routing. On IBM Z this dialog does not start automatically. It can be started in the step.
In case DHCP was successfully configured during installation setup, you can also access this dialog by clicking at the and the step. It lets you change the automatically provided settings.
If at least one network interface has been configured via boot parameters (see Section 11.3.2, “Configuring the network interface”), automatic DHCP configuration is disabled and the boot parameter configuration is imported and used.
To access a SAN or a local RAID during the installation, you can use the libstorage command line client for this purpose:
Switch to a console with Ctrl–Alt–F2.
Install the libstoragemgmt extension by running
extend libstoragemgmt.Now you have access to the
lsmclicommand. For more information, runlsmcli --help.To return to the installer, press Alt–F7
Supported are Netapp Ontap, all SMI-S compatible SAN providers, and LSI MegaRAID.
12.3 Language, Keyboard, and License Agreement #
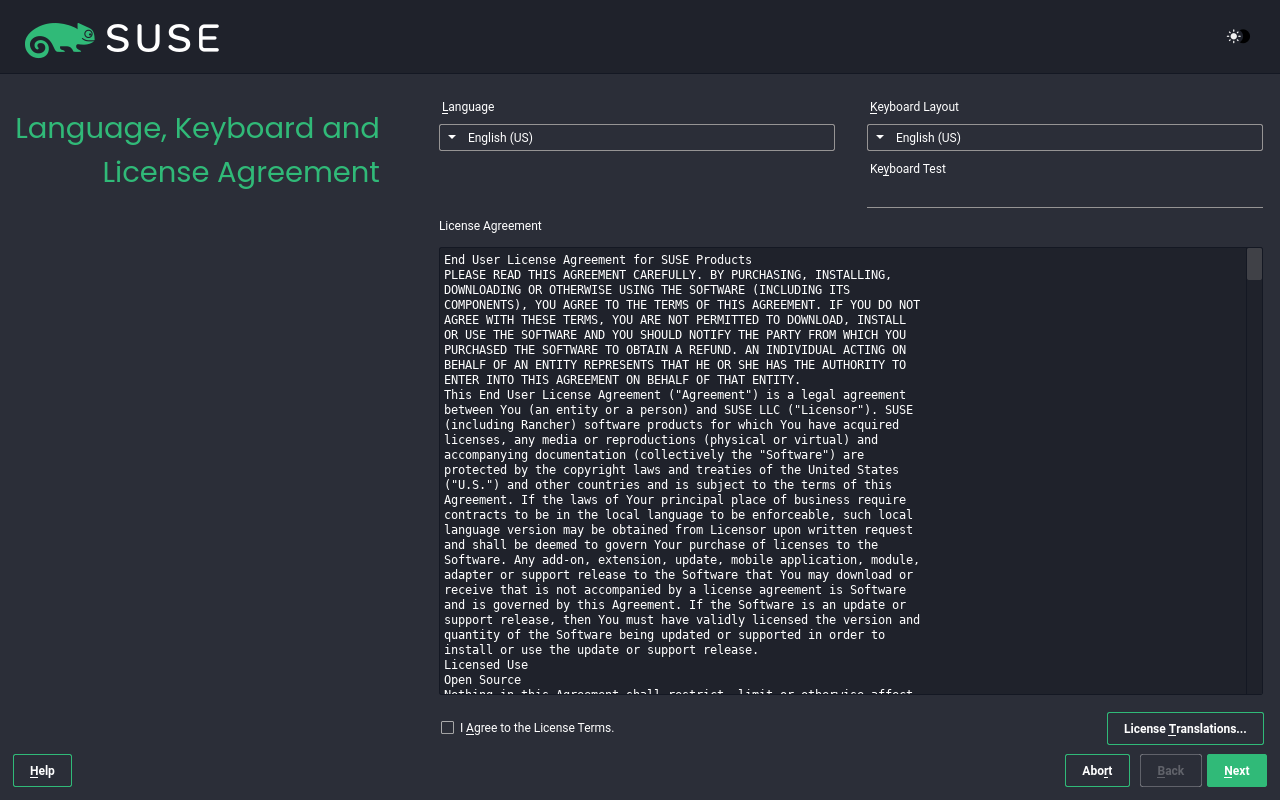
The and settings are initialized with the language you chose on the boot screen. If you did not change the default, it will be English (US). Change the settings here, if necessary.
Changing the language will automatically preselect a corresponding keyboard layout. Override this proposal by selecting a different keyboard layout from the drop-down box. Use the text box to test the layout. The language selected here is also used to assume a time zone for the system clock.
By clicking you can access the SLE Micro release notes in English.
Read the License Agreement. It is presented in the language you have chosen on the boot screen. Translations are available via the › drop-down box. If you agree to the terms, check and click to proceed with the installation. If you do not agree to the license agreement, you cannot install SUSE Linux Enterprise Micro. Click to terminate the installation.
12.4 IBM Z: disk activation #
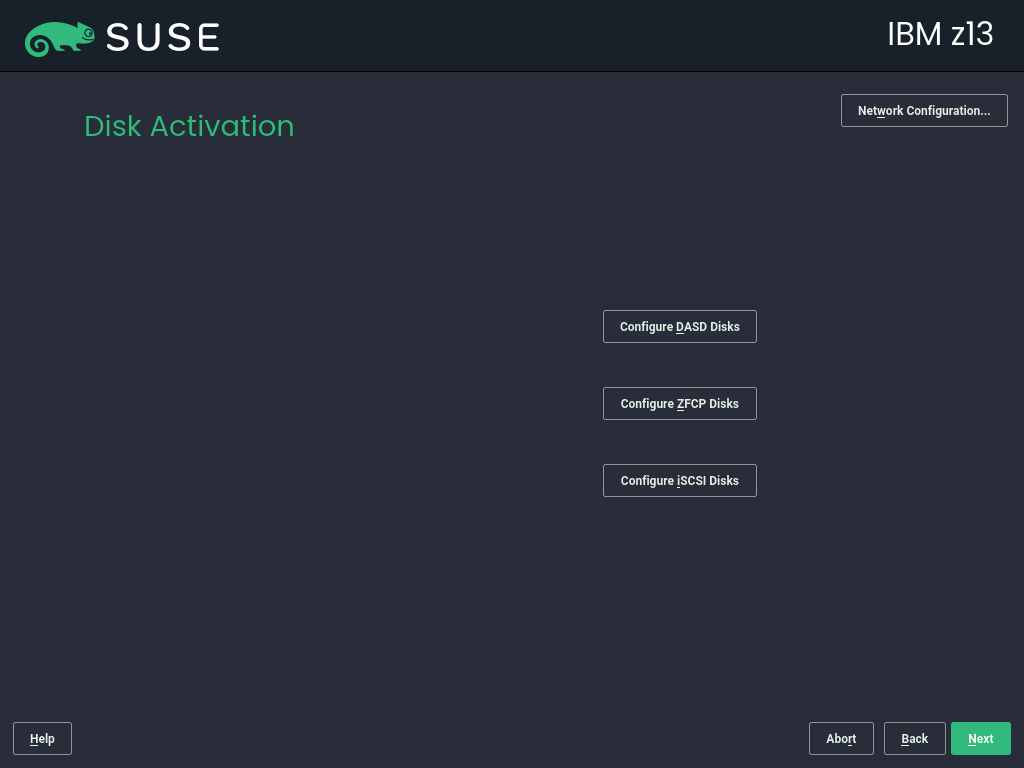
When installing on IBM Z platforms, the language selection dialog is followed by a dialog to configure the attached hard disks.
Select DASD, Fibre Channel Attached SCSI Disks (zFCP), or iSCSI for installation of SUSE Linux Enterprise Micro. The DASD and zFCP configuration buttons are only available if the corresponding devices are attached.
You can also change the in this screen by launching the dialog. Choose a network interface from the list and click to change its settings. Use the tabs to configure DNS and routing.
12.4.1 Configuring DASD disks #
Skip this step if you are not installing on IBM Z hardware.
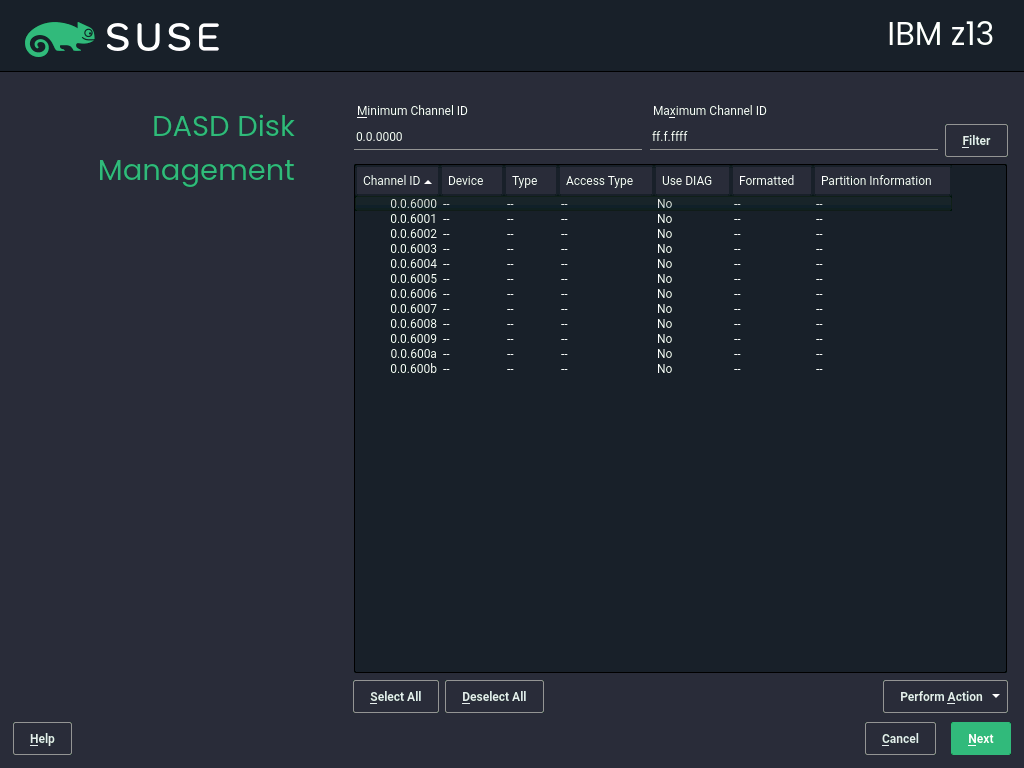
After selecting , an overview lists all available DASDs. To get a clearer picture of the available devices, use the text box located above the list to specify a range of channels to display. To filter the list according to such a range, select .
Specify the DASDs to use for the installation by selecting the corresponding entries in the list. Use to select all DASDs currently displayed. Activate and make the selected DASDs available for the installation by selecting › . To format the DASDs, select › .
12.4.2 Configuring zFCP disks #
Skip this step if you are not installing on IBM Z hardware.
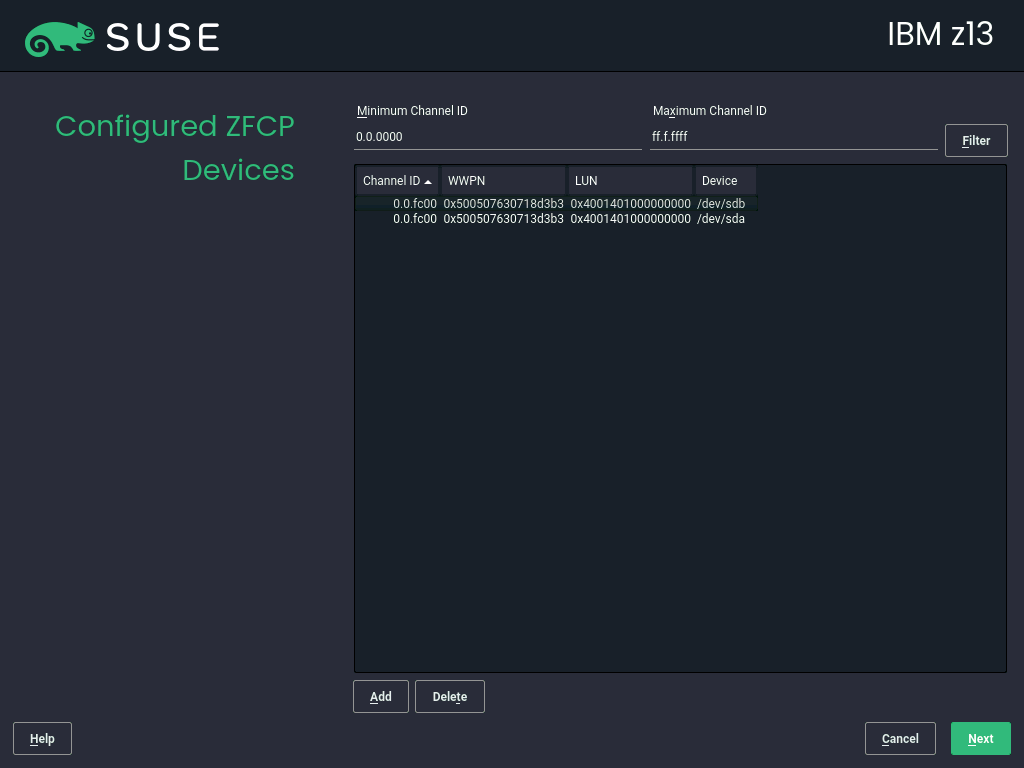
After selecting , a dialog with a list of the zFCP disks available on the system opens. In this dialog, select to open another dialog in which to enter zFCP parameters.
To make a zFCP disk available for the SUSE Linux Enterprise Micro installation, choose an available from the drop-down box. (World Wide Port Number) and (Logical Unit Number) return lists with available WWPNs and FCP-LUNs, respectively, to choose from. Automatic LUN scanning only works with NPIV enabled.
When completed, exit the zFCP dialog with and the general hard disk configuration dialog with to continue with the rest of the configuration.
12.5 Registration #
To get technical support and product updates, you need to register and activate SUSE Linux Enterprise Micro with the SUSE Customer Center or a local registration server. Registering your product at this stage also grants you immediate access to the update repository. This enables you to install the system with the latest updates and patches available.
From this dialog, you can switch to the YaST module by clicking .For details, see Section 12.2, “Network settings”.
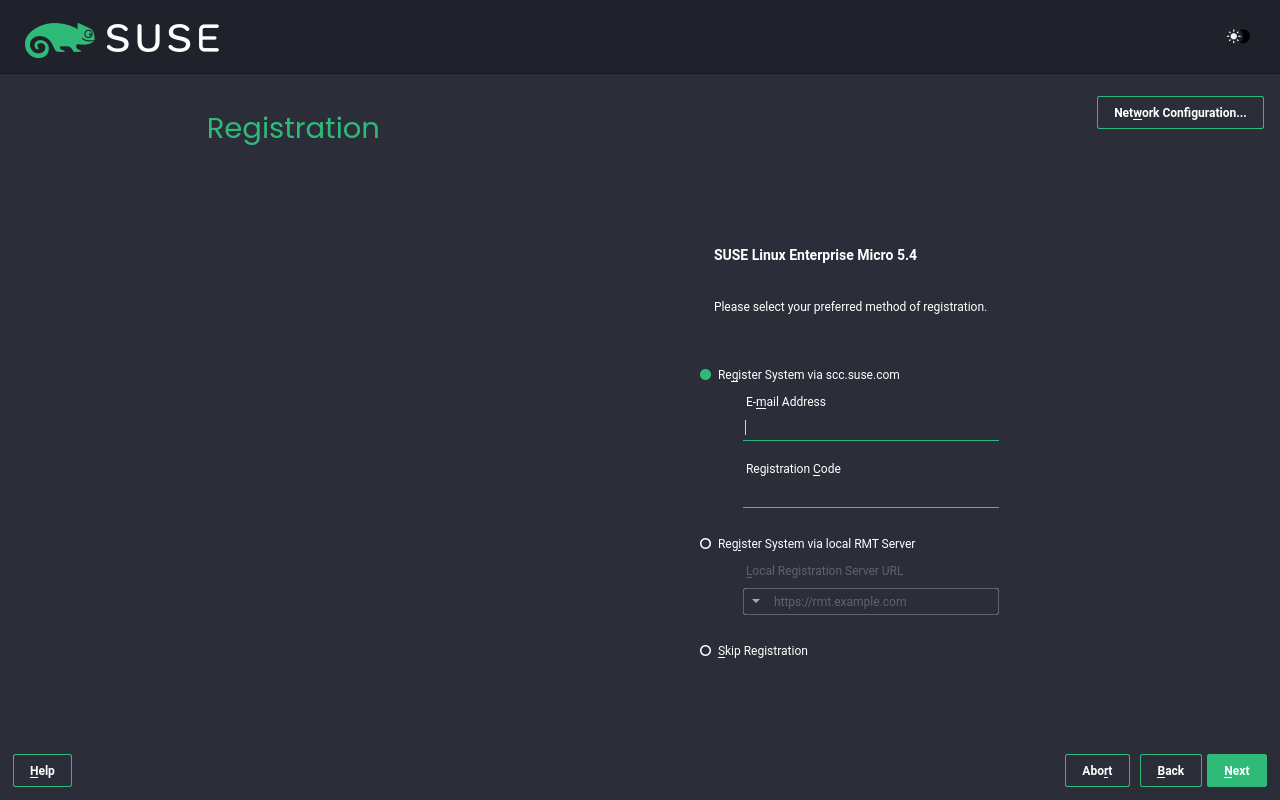
The dialog offers the following possibilities, each described further:
To register with the SUSE Customer Center, enter the associated with your SCC account and the for SUSE Linux Enterprise Micro. Proceed with .
If your organization provides a local registration server, you may alternatively register there. Activate and either choose a URL from the drop-down box or type in an address. Proceed with .
If you want to skip registration or you are offline, click . Accept the warning with and proceed with .
Important: Skipping registrationYour system needs to be registered in order to retrieve updates and to be eligible for support. You can register later, after the installation by using
SUSEConnect, for details, see Section 10.1, “Registration”.
After SUSE Linux Enterprise Micro has been successfully registered, you are asked whether to install the latest available online updates during the installation. If choosing , the system will be installed with the most current packages without having to apply the updates after installation. Activating this option is recommended.
If the system was successfully registered during installation, YaST will disable repositories from local installation media such as CD/DVD or flash disks when the installation has been completed. This prevents problems if the installation source is no longer available and ensures that you always get the latest updates from the online repositories.
12.5.1 Loading registration codes from USB storage #
To make the registration more convenient, you can also store your registration codes on a USB storage device such as a flash disk. YaST will automatically pre-fill the corresponding text box. This is particularly useful when testing the installation or if you need to register many systems or extensions.
Create a file named regcodes.txt or
regcodes.xml on the USB disk. If both are present, the
XML takes precedence.
In that file, identify the product with the name returned by
zypper search --type product and assign it a
registration code as follows:
regcodes.txt #SLEMicro cc36aae1
regcodes.xml #<?xml version="1.0"?>
<profile xmlns="http://www.suse.com/1.0/yast2ns"
xmlns:config="http://www.suse.com/1.0/configns">
<suse_register>
<addons config:type="list">
<addon>
<name>SLEMicro</name>
<reg_code>cc36aae1</reg_code>
</addon>
</addons>
</suse_register>
</profile>Currently flash disks are only scanned during installation or upgrade, but not when registering a running system.
12.6 Extension and Module Selection #
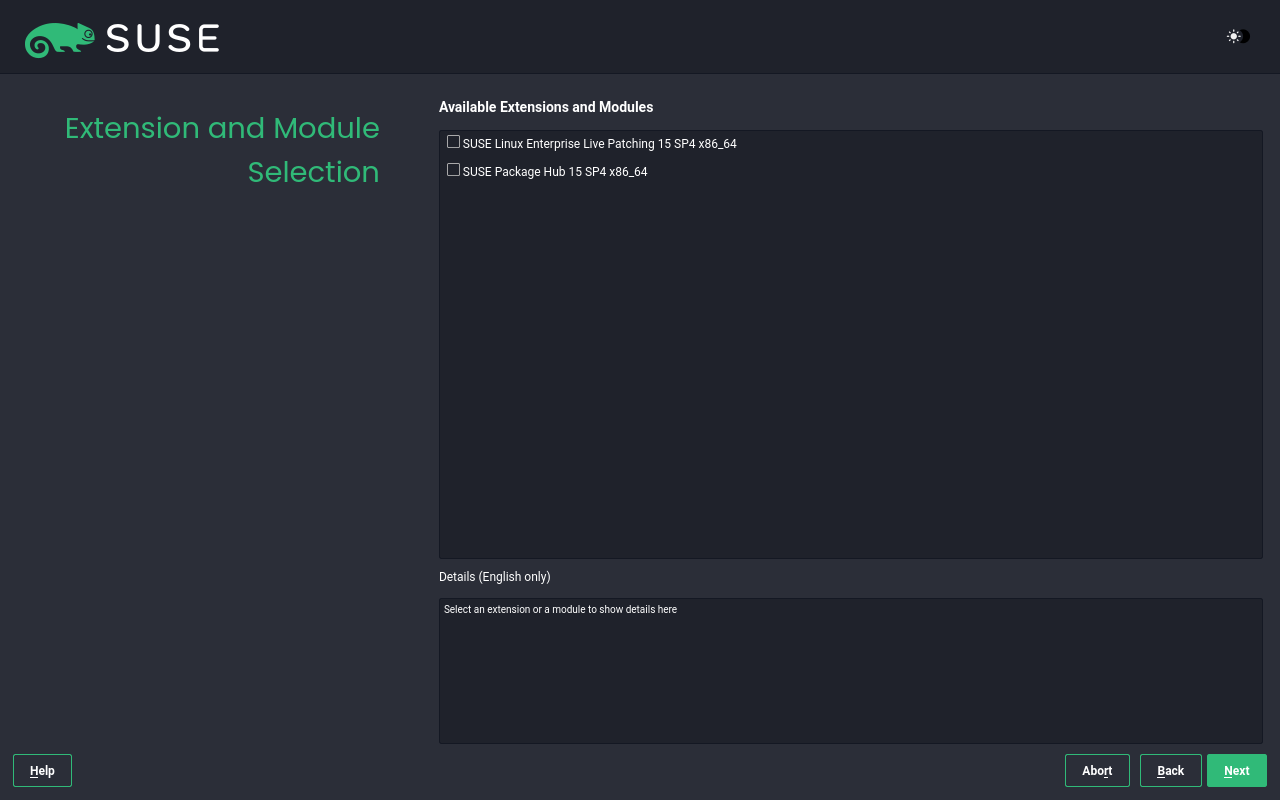
SLE Micro currently offers the following extensions:
SUSE Linux Enterprise Live Patchingextension that enables you to apply critical patches without rebooting your system. Bear in mind that you might need an additional subscription on top of the subscription for SLE Micro.
If you enabled the
SUSE Linux Enterprise Live Patchingextension, you need to configure your system as described in Procedure 10.2, “Completing activation of theSUSE Linux Enterprise Live Patching”.Note: Availability of theSUSE Linux Enterprise Live PatchingextensionThe
SUSE Linux Enterprise Live Patchingextension is available only for the x86 (except for the real-time kernel) and IBM Z architectures.SUSE Package HubA free module that provides access to community-maintained packages. Packages in the Package Hub are approved by SUSE for use on SUSE Linux Enterprise Server, thus the packages might not be installable on SLE Micro.
To enable a module, click the corresponding checkbox and then to proceed.
12.7 NTP Configuration #
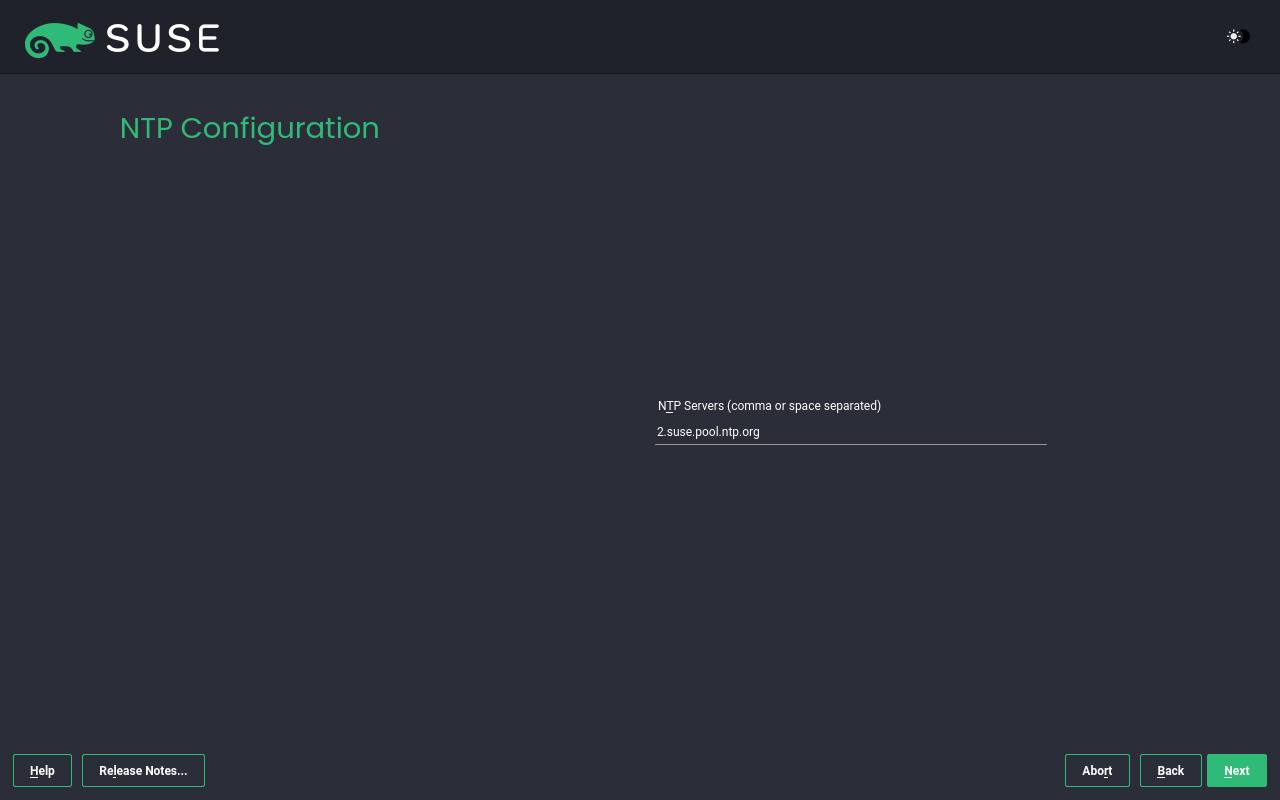
In order to keep time on your system properly synchronized, configure at least one NTP server. You can enter more NTP servers as a comma or space separated list.
12.8 Authentication for the System Administrator root #
root #
Configure a strong password for root. If your root password is
randomly generated, use at least 10 characters. If you set your root
password manually, use a longer password that includes a combination of
uppercase and lowercase letters and numbers. The maximum length for
passwords is 72 characters, and passwords are case-sensitive.
If you want to access the system remotely via SSH using a public key, import a key from a removable storage device or an existing partition. To do so click and select the public SSH key.
Click to proceed to the next installation step.
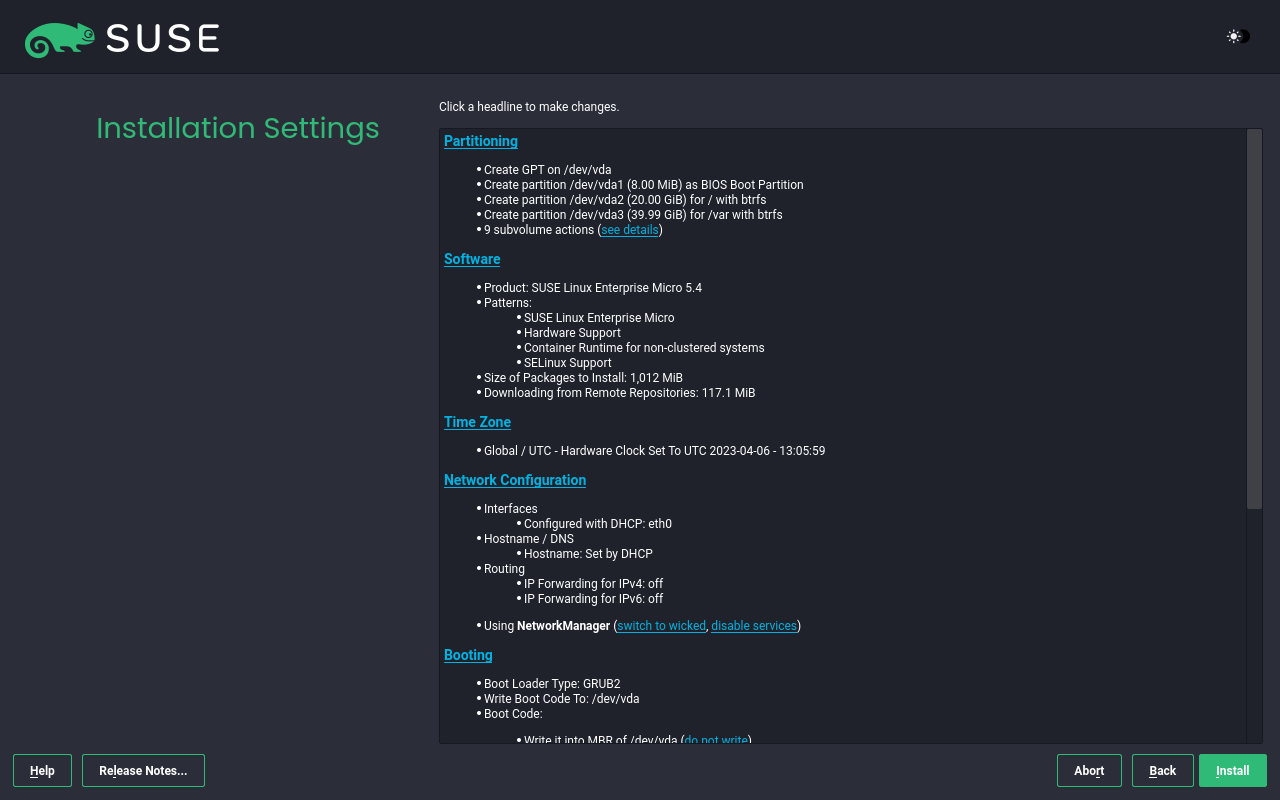
12.9 Installation Settings #
To access a particular setting, click the respective heading. Or some options can be directly changed on the screen by clicking the button next to the option.
12.9.1 Partitioning #
SLE Micro requires Btrfs on the root partition with snapshots and Snapper enabled. Snapper is enabled by default—do not disable it afterwards.
- Custom partitioning on UEFI machines
A UEFI machine requires an EFI system partition that must be mounted to
/boot/efi. This partition must be formatted with theFAT32file system.If an EFI system partition is already present on your system (for example from a previous Windows installation) use it by mounting it to
/boot/efiwithout formatting it.If no EFI system partition is present on your UEFI machine, make sure to create it. The EFI system partition must be a physical partition or RAID 1. Other RAID levels, LVM and other technologies are not supported. It needs to be formatted with the FAT32 file system.
- Custom partitioning and
Snapper If the root partition is larger than 12 GB, SUSE Linux Enterprise Micro by default enables file system snapshots. It is not recommended to use the root partition smaller than 12 GB, because it might cause issues when running SLE Micro.
SUSE Linux Enterprise Micro uses Snapper together with Btrfs for this feature. Btrfs needs to be set up with snapshots enabled for the root partition.
Being able to create system snapshots that enable rollbacks requires important system directories to be mounted on a single partition, for example,
/bootand/usr. Only directories that are excluded from snapshots may reside on separate partitions, for example/usr/local,/var, and/tmp.The installer will automatically create
singlesnapshots during and immediately after the installation.Important: Btrfs snapshots and root partition sizeSnapshots may take considerable storage space. Generally, the older a snapshot is or the larger the change set it covers, the more storage space the snapshot takes. And the more snapshots you keep, the more disk space you need.
To prevent the root partition running full with snapshot data, you need to make sure it is big enough. In case you do frequent updates or other installations, consider at least 40 GB for the root partition.
- Btrfs data volumes
Using Btrfs for data volumes is supported on SUSE Linux Enterprise Micro 5.4. For applications that require Btrfs as a data volume, consider creating a separate file system with quota groups disabled. This is already the default for non-root file systems.
- Btrfs on an encrypted root partition
The default partitioning setup suggests formatting the root partition to Btrfs. To encrypt the root partition, make sure to use the GPT partition table type instead of the MSDOS type. Otherwise the GRUB2 boot loader may not have enough space for the second stage loader.
- IBM Z: Using minidisks in z/VM
If SUSE Linux Enterprise Micro is installed on minidisks in z/VM, which reside on the same physical disk, the access path of the minidisks (/dev/disk/by-id/) is not unique. This is because it represents the ID of the physical disk. If two or more minidisks are on the same physical disk, they all have the same ID.
To avoid problems when mounting minidisks, always mount them either by path or by UUID.
- IBM Z: LVM root file system
If you configure the system with a root file system on LVM or software RAID array, you must place
/boot/ziplon a separate, non-LVM or non-RAID partition, otherwise the system will fail to boot. The recommended size for such a partition is 500 MB and the recommended file system is Ext4. Note that/bootmust be on the same partition as the root file system.- Supported software RAID volumes
Installing to and booting from existing software RAID volumes is supported for Disk Data Format (DDF) volumes and Intel Matrix Storage Manager (IMSM) volumes. IMSM is also known by the following names:
Intel Rapid Storage Technology
Intel Matrix Storage Technology
Intel Application Accelerator / Intel Application Accelerator RAID Edition
Intel Virtual RAID on CPU (Intel VROC, see https://www.intel.com/content/www/us/en/support/articles/000024498/memory-and-storage/ssd-software.html for more details)
- Mount points for FCoE and iSCSI devices
FCoE and iSCSI devices will appear asynchronously during the boot process. While the initrd guarantees that those devices are set up correctly for the root file system, there are no such guarantees for any other file systems or mount points like
/usr. Hence any system mount points like/usror/varare not supported. To use those devices, ensure correct synchronization of the respective services and devices.
In case you need to adjust the partitioning scheme, click the menu to open the dialog box.
The installer creates a proposal for one of the available disks containing a root partition formatted with Btrfs and a swap partition. If one or more swap partitions have been detected on the available hard disks, these partitions will be used. You have several options to proceed:
Click to accept the proposal without any changes and return to the screen.
To adjust the proposal, choose . First, choose which hard disks and partitions to use. In the screen, you can enable Logical Volume Management (LVM) and activate disk encryption. Afterward specify the . You can adjust the file system for the root partition and create a separate home and swap partitions. If you plan to suspend your machine, make sure to create a separate swap partition and check . If the root file system format is Btrfs, you can also enable or disable Btrfs snapshots here.
To create a custom partition setup, click . Select either if you want start with the suggested disk layout, or to ignore the suggested layout and start with the existing layout on the disk. For details, refer to Section 12.9.1.1, “Expert Partitioner”.
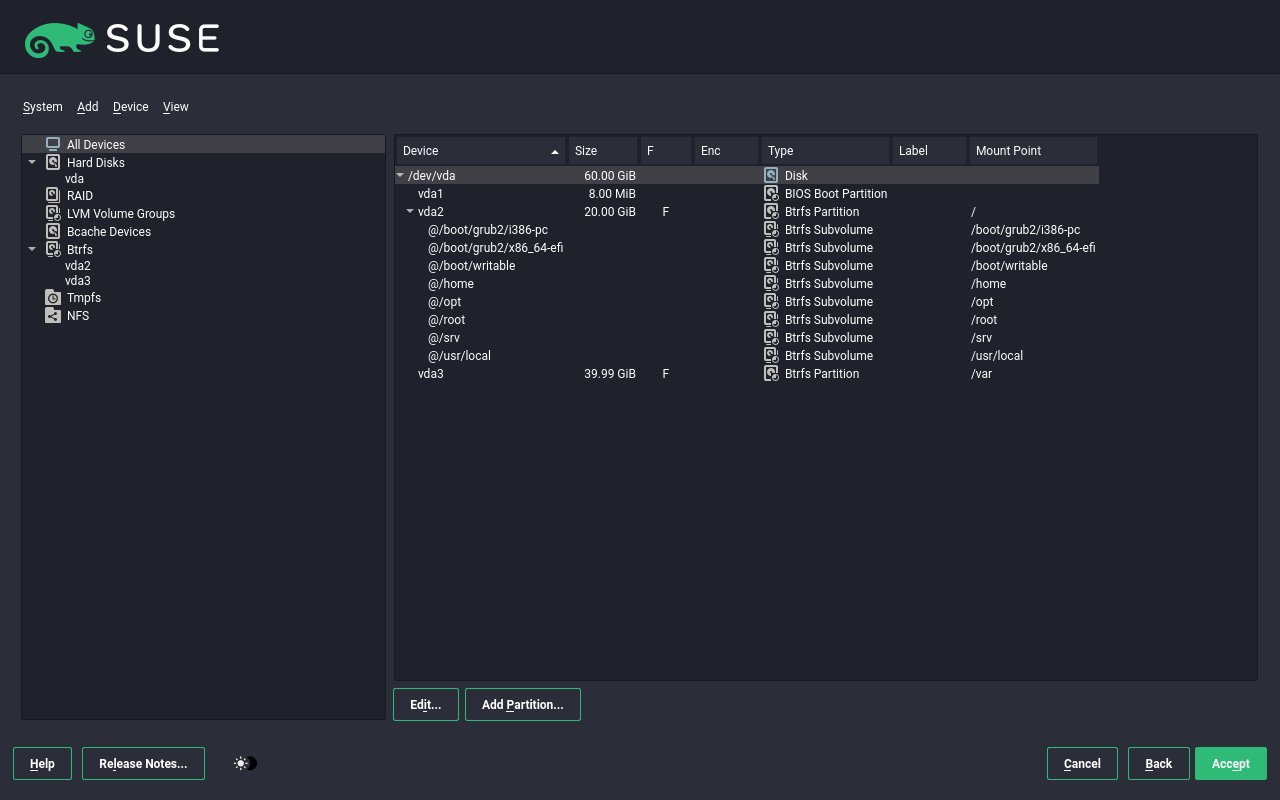
12.9.1.1 Expert Partitioner #
Expert partitioner enables you to set up logical volume management (LVM), configure software RAID and device mapping (DM), encrypt partitions, mount NFS shares and manage tmpfs volumes. To fine-tune settings such as the subvolume and snapshot handling for each Btrfs partition, choose .
All existing or suggested partitions on all connected hard disks are
displayed in the left part of the
dialog. Entire hard disks are listed as devices without numbers, such as
/dev/sda (or
/dev/dasda). Partitions are listed as parts
of these devices, such as
/dev/sda1 (or
/dev/dasda1, respectively). The size, type,
encryption status, file system, and mount point of the hard disks and
their partitions are also displayed. The mount point describes where the
partition appears in the Linux file system tree.
12.9.1.1.1 Partition tables #
SUSE Linux Enterprise Micro allows to use and create different partition tables. In some cases the partition table is called disk label. The partition table is important to the boot process of your computer. To boot your machine from a partition in a newly created partition table, make sure that the table format is supported by the firmware.
To change the partition table, click the relevant disk name in the left part and choose › . You can create the following partition tables:
- Master boot record
The master boot record (MBR) is the legacy partition table used on IBM PCs. It is sometimes also called an MS-DOS partition table. The MBR only supports four primary partitions. If the disk already has an MBR, SUSE Linux Enterprise Micro allows you to create additional partitions in it which can be used as the installation target.
The limit of four partitions can be overcome by creating an extended partition. The extended partition itself is a primary partition and can contain more logical partitions.
- GPT partition table
UEFI computers use a GUID Partition Table (GPT) by default. SUSE Linux Enterprise Micro will create a GPT on a disk if no other partition table exists.
Old BIOS firmware does not support booting from GPT partitions.
You need a GPT partition table to use more than four primary partitions, UEFI Secure Boot or use disks larger than 2 TB.
12.9.1.1.2 Creating partitions #
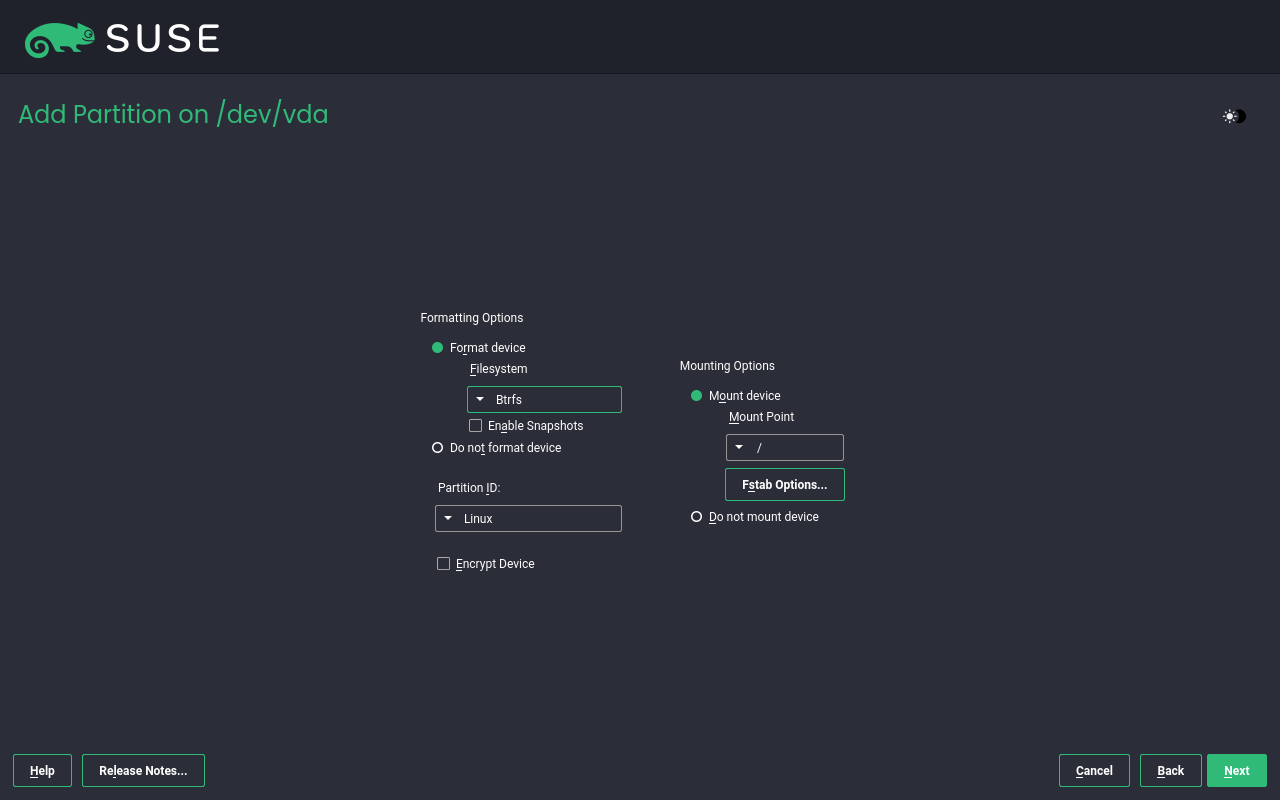
The expert partitioner enables you to add partitions. Bear in mind that the root file system must be formatted to Btrfs and snapshots must be enabled.
The procedure below creates a Btrfs partition with enabled snapshots.
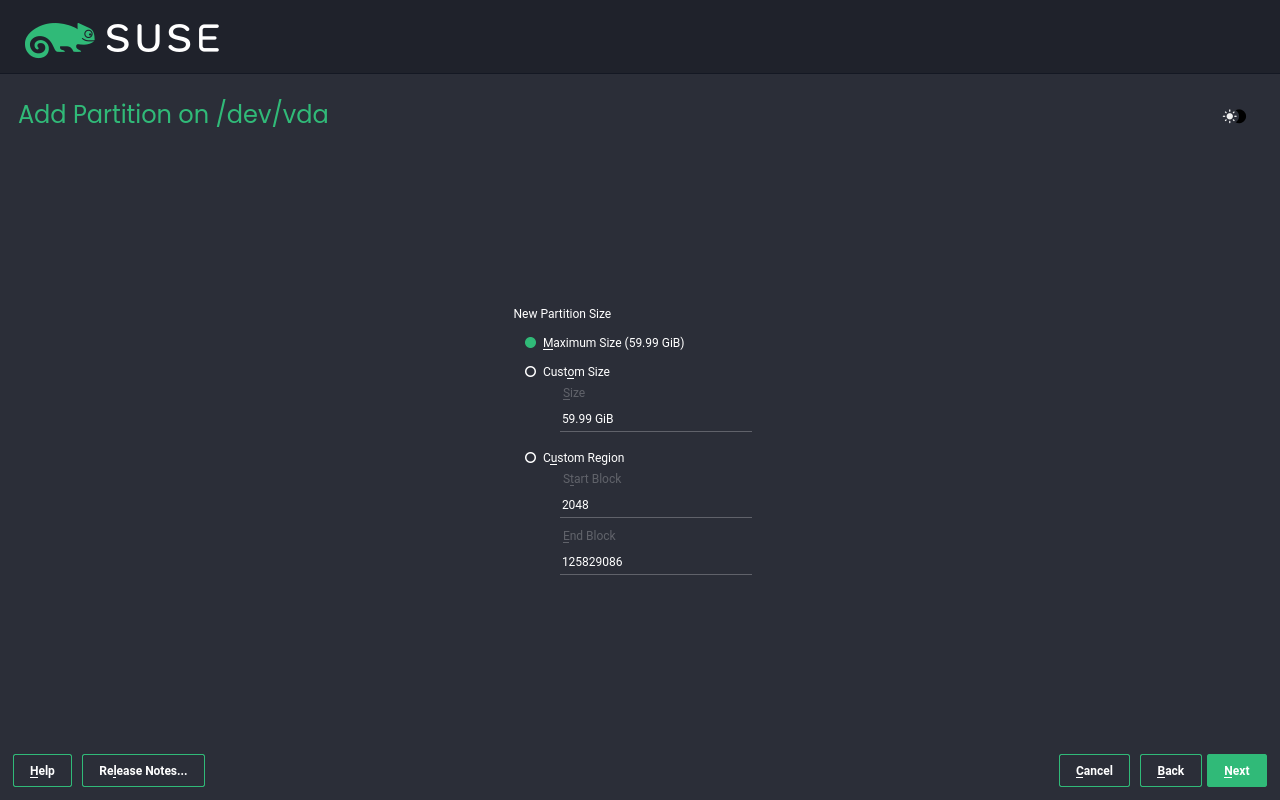
Select the desired hard disk in the left part and click .
Define size of the partition or define the region of disk for the partition. Proceed with
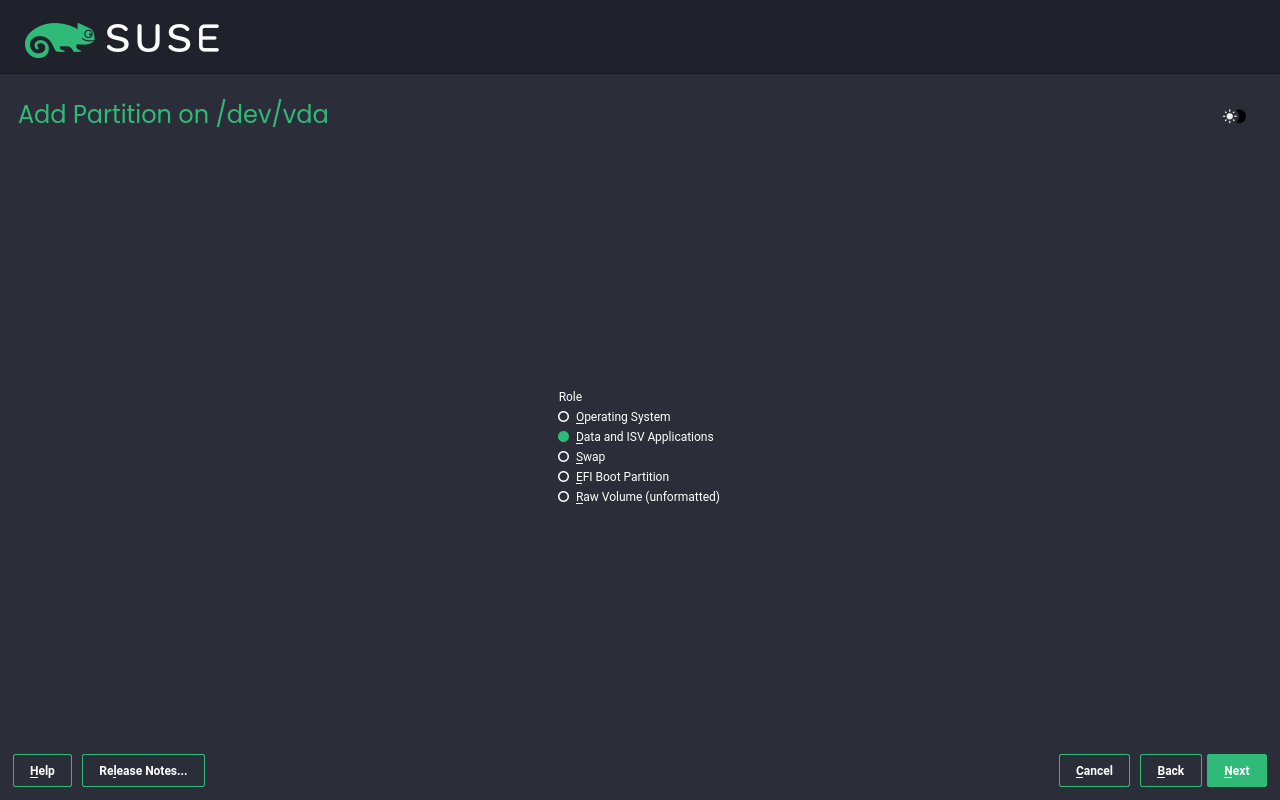
Select a role:
Format and mount the partition as needed and proceed with :
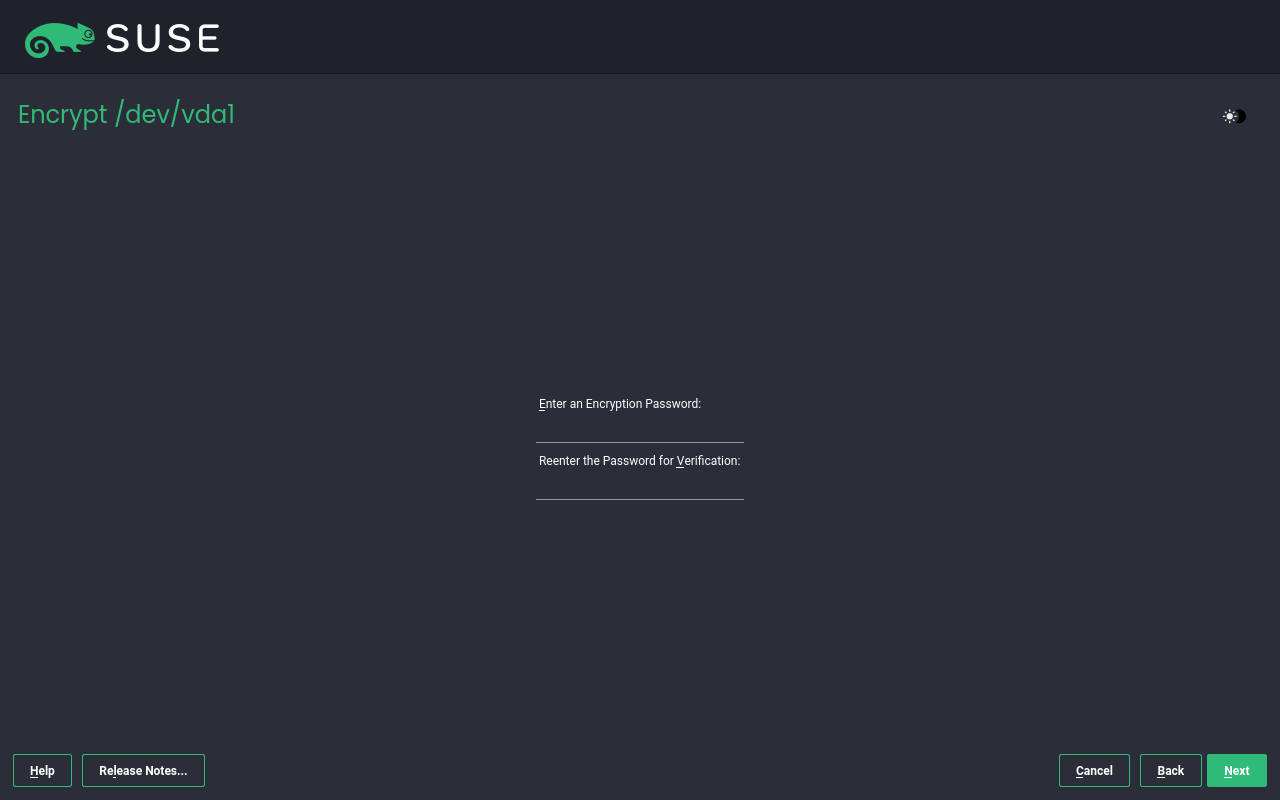
(Optional) If you chose to encrypt the partition, enter the encryption password and complete the process with :
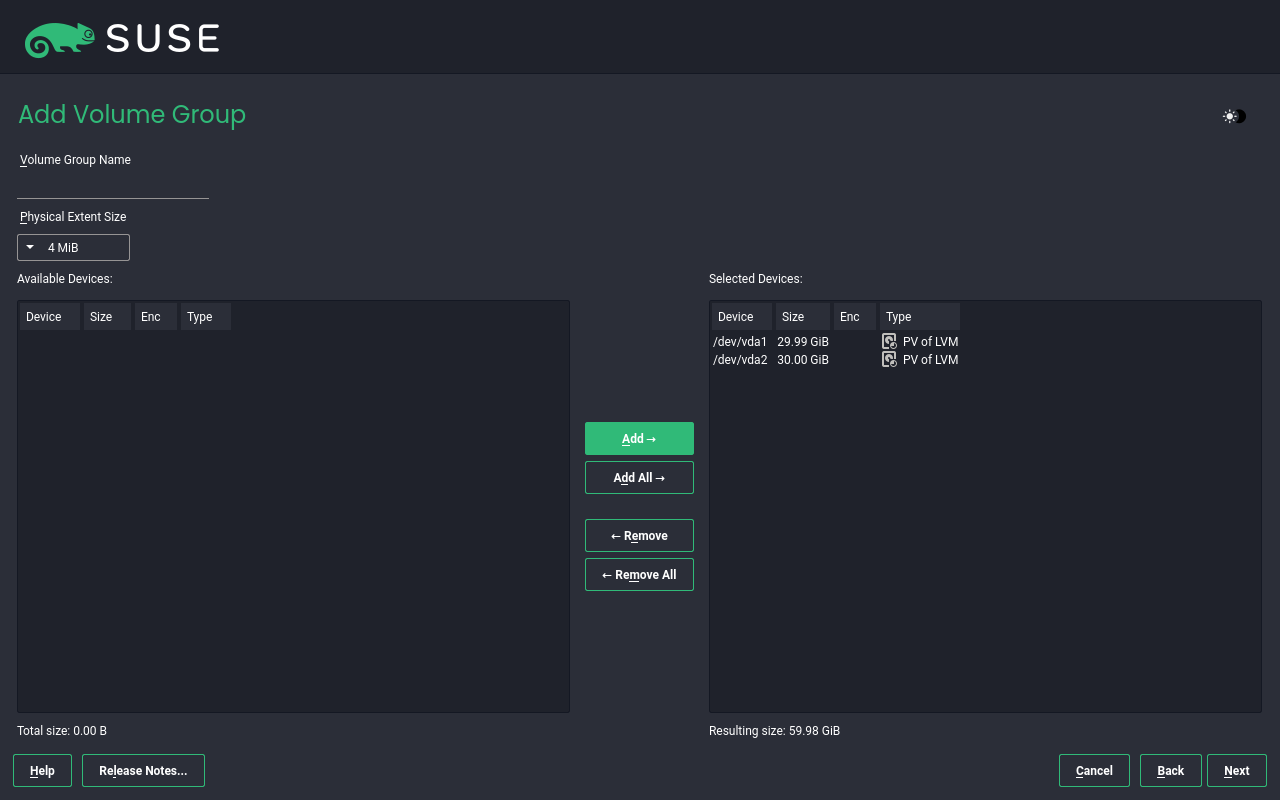
12.9.1.1.3 Creating volume groups #
To create a volume group follow these steps:
12.9.1.1.4 Creating RAIDs #
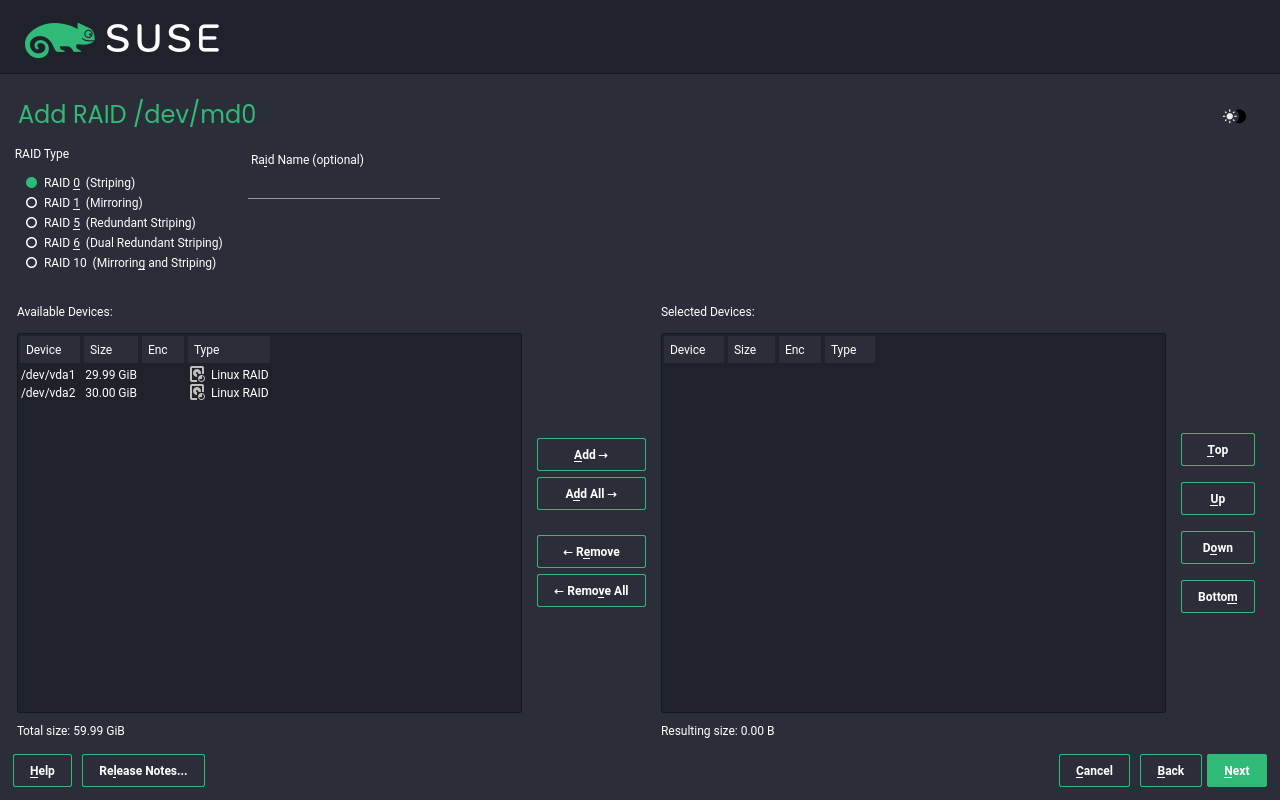
SLE Micro supports the following RAID levels: 0, 1, 5, 6 and 10. To create a RAID follow proceed as follows:
Create partitions (the count of partitions depend on the RAID level) with these parameters:
The partitions have the role assigned.
The partitions are not formatted to any file system.
The partitions are not mounted.
The partitions have the
Linux RAID.
Click in the left pane and then click . The dialog box opens.
Choose the partitions and add them to the RAID. Select RAID level and optionally you can name the RAID. Proceed with .
Select the . The default value is usually sufficient. Click .
In the select the created RAID and click .
Select a role of the RAID and click .
Format and mount the device and optionally you can select that the RAID will be encrypted.
12.9.2 Software #
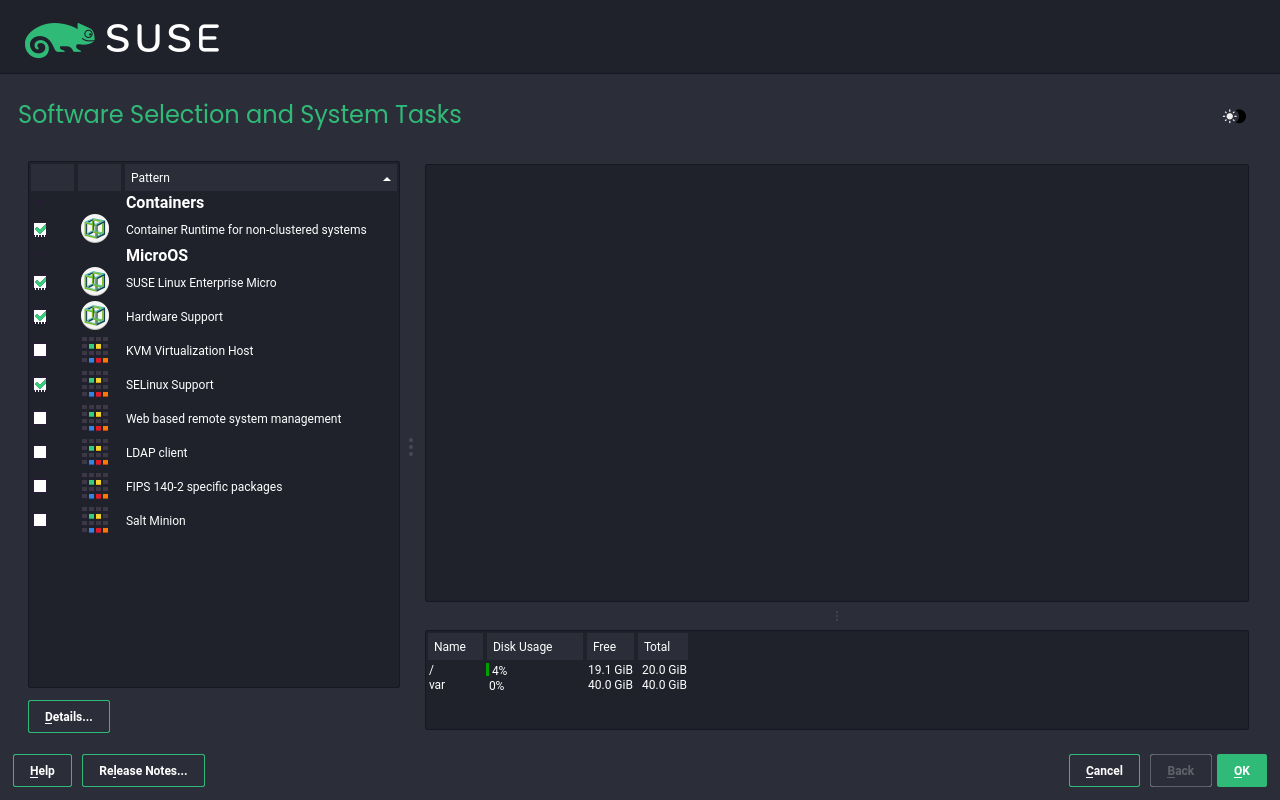
SUSE Linux Enterprise Micro contains several software patterns for various application purposes. Click to open the screen where you can modify the pattern selection according to your needs. Select a pattern from the list and see a description in the right-hand part of the window.
In this menu you can select the Web based remote system
managment pattern that will install Cockpit
system. Cockpit is a web monitoring tool that enables you to administer
your system. For details, refer to Section 2, “Getting Cockpit”.
Here you can also select the KVM Virtualization Host
pattern to install packages required to run SLE Micro as a KVM host server
(Xen is not supported). However, you should consider the limitations of
SLE Micro running as a KVM host server; for details, refer to
virtualization
limits and support.
Each pattern contains several software packages needed for specific functions (for example Podman). For a more detailed selection based on software packages to install, select to switch to the YaST Software Manager.
12.9.3 Timezone #
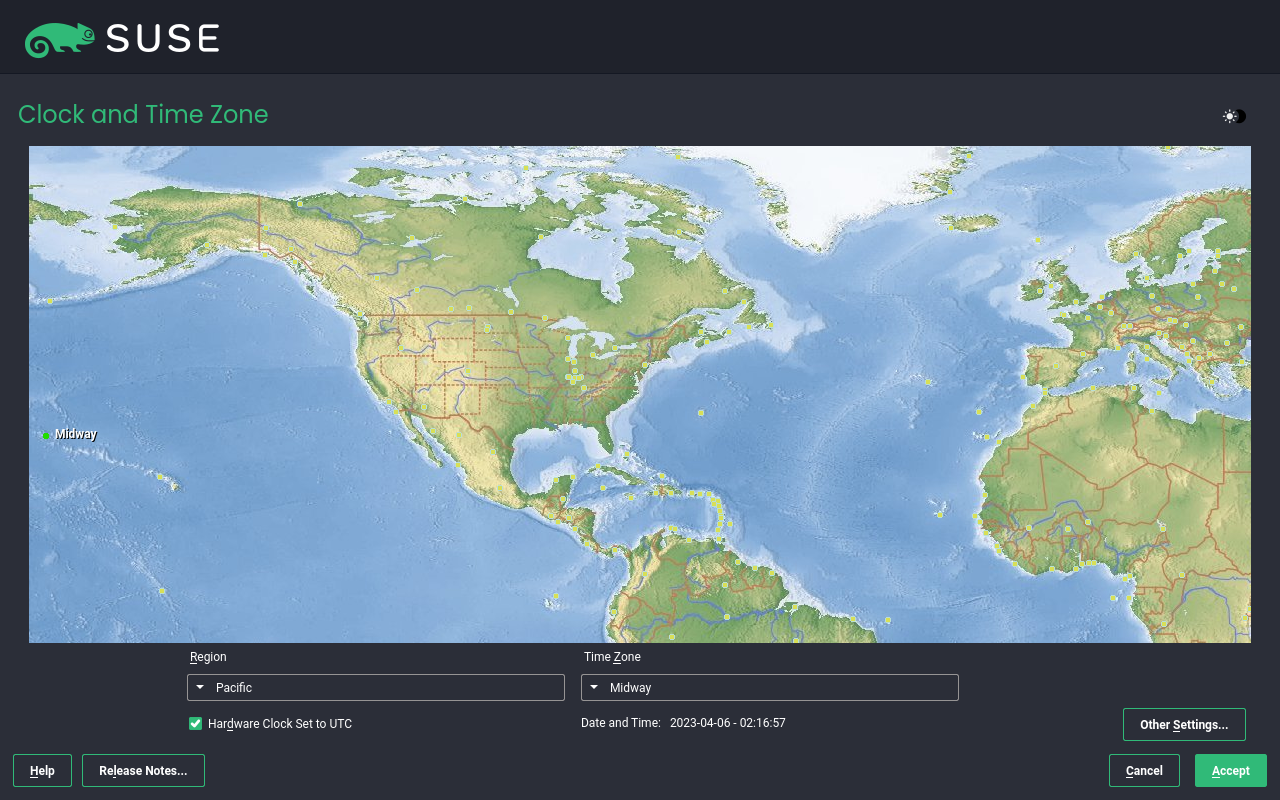
By default, the time is synchronized by using the NTP servers you provided in the previous steps of the installation procedure. You can select the region and time zone either by clicking a particular place on the map or by selecting a region and time zone in the drop-down menus.
The switch from standard time to daylight saving time (and vice versa) can only be performed automatically when the hardware clock (CMOS clock) is set to UTC. This also applies if you use automatic time synchronization with NTP, because automatic synchronization will only be performed if the time difference between the hardware and system clock is less than 15 minutes.
Since a wrong system time can cause serious problems, it is strongly recommended to always set the hardware clock to UTC.
The button enables you to set the date and time manually or configure NTP servers synchronization.
If you want to set the time and date manually, click the button and select .
Since the operating system is not allowed to change time and date directly, the option is not available on IBM Z.
12.9.4 Network Configuration #
Network is automatically configured at the beginning of the installation process, but if it is necessary you can change the configuration by clicking . A dialog box opens, for details refer to Section 12.2, “Network settings”.
SLE Micro uses NetworkManager by default, but you can switch to wicked by clicking . Bear in mind that after the installation is complete, you cannot switch the network managing service to NetworkManager.
12.9.5 Booting #
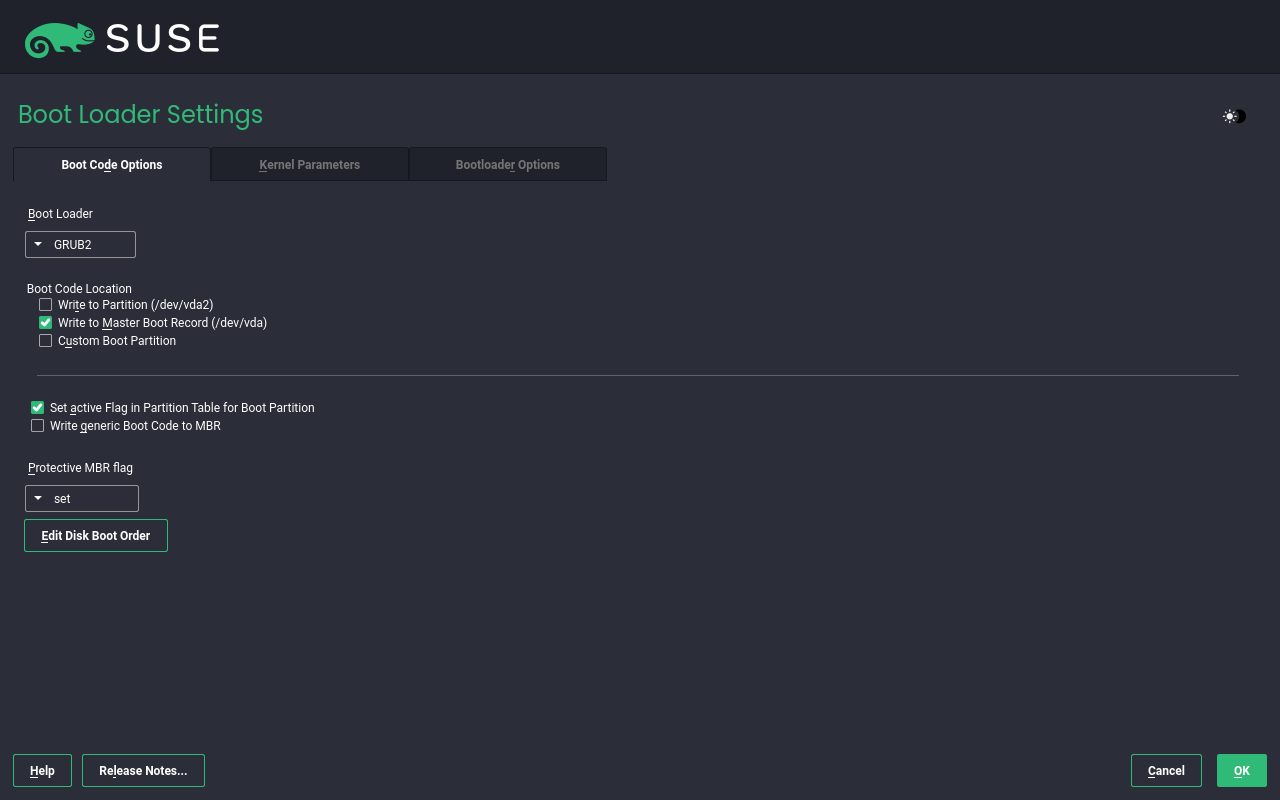
The installer proposes a boot configuration for your system. Other operating systems found on your computer, such as Microsoft Windows or other Linux installations, will automatically be detected and added to the boot loader. However, SUSE Linux Enterprise Micro will be booted by default. Normally, you can leave these settings unchanged. If you need a custom setup, modify the proposal according to your needs.
Booting a configuration where /boot resides on a
software RAID 1 device is supported, but it requires installing the boot
loader into the MBR ( › ). Having
/boot on software RAID devices with a level other
than RAID 1 is not supported.
12.9.6 Kdump #
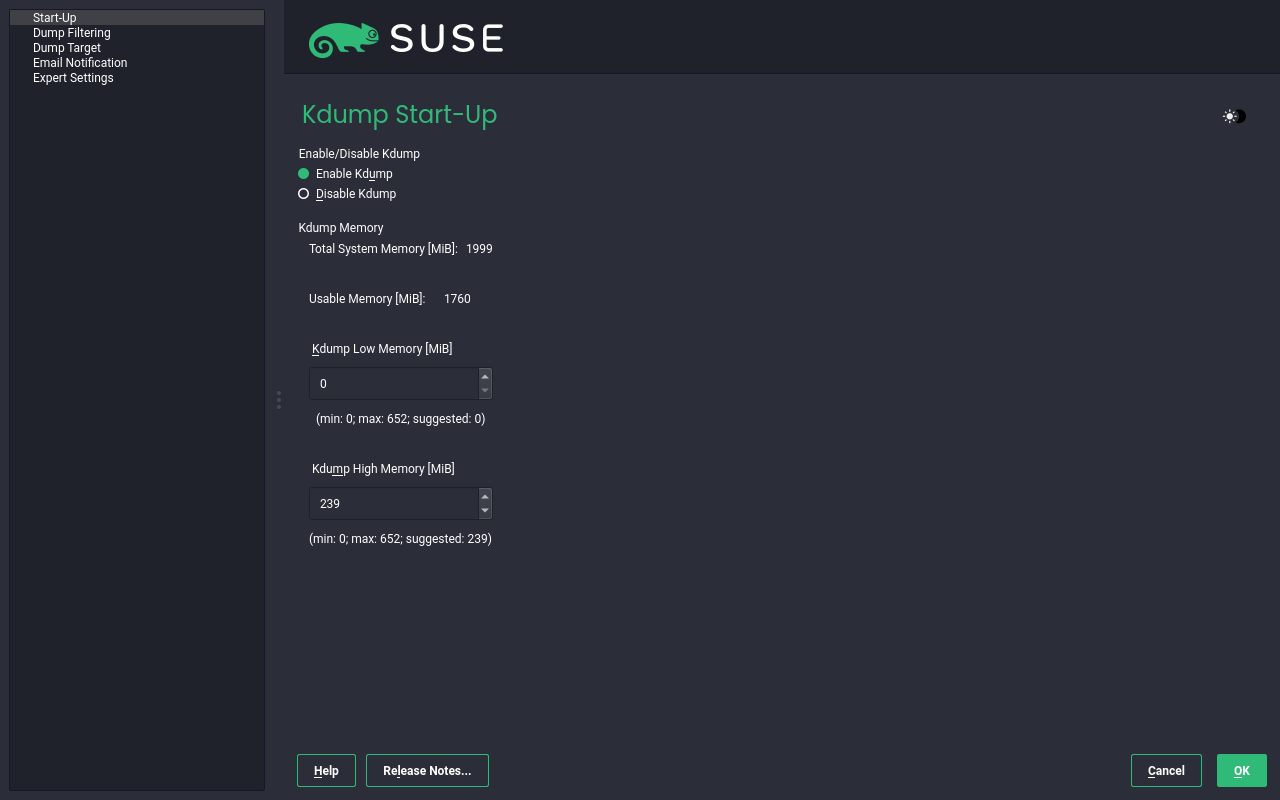
Using Kdump, you can save a dump of the kernel (in case of a crash) to analyze what went wrong. By default, Kdump is enabled. By clicking you open a dialog box for configuring Kdump.
- Start-Up
Here you can disable Kdump and configure the amount of memory reserved for Kdump. Usually you do not have to change the prefilled values.
- Dump Filtering
Dump filtering enables you to select which pages will be included in the Kdump, and to define the format of of Kdump.
- Dump Target
You can select a local directory or you can save KDump to a remote location. If you prefer a remote location, you also need to configure connection details according to the respective protocol.
- Email Notifications
To receive email notifications if an event occurs, specify an email address.
- Expert Settings
This option enables you to define command-line parameters, custom kernel dump and other advanced settings related to Kdump.
12.9.7 System #
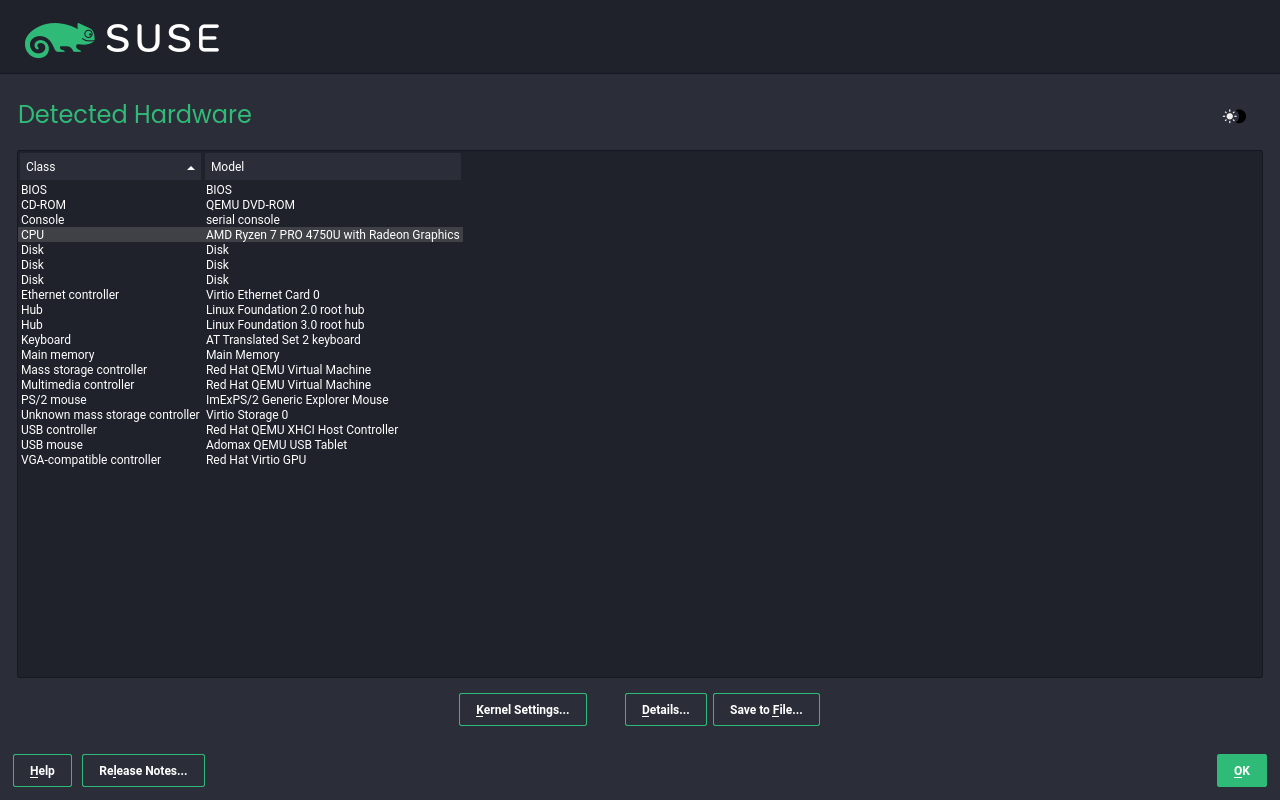
This screen lists all the hardware information the installer could obtain about your computer. When opened for the first time, the hardware detection is started. Depending on your system, this may take some time. Select any item in the list and click to see detailed information about the selected item. Use to save a detailed list to either the local file system or a removable device.
Advanced users can also change the and kernel settings by choosing . A screen with two tabs opens:
Each kernel driver contains a list of device IDs of all devices it supports. If a new device is not in any driver's database, the device is treated as unsupported, even if it can be used with an existing driver. You can add PCI IDs to a device driver here. Only advanced users should attempt to do so.
To add an ID, click and select whether to enter the data, or whether to choose from a list. Enter the required data. The is the directory name from
/sys/bus/pci/drivers—if empty, the name is used as the directory name. Existing entries can be managed with and .Activating the item, will let you issue basic commands (such as rebooting the system or writing kernel dumps) in case the system crashes. Enabling these keys is recommended when doing kernel development. Refer to https://www.kernel.org/doc/html/latest/admin-guide/sysrq.html for details.
12.9.8 Security #
Using firewall along with Podman may result in missing Podman-related firewall
rules after reloading the firewalld service. Therefore,
it is recommended to keep the firewall in its default
setting (disabled) if you intend to use Podman.
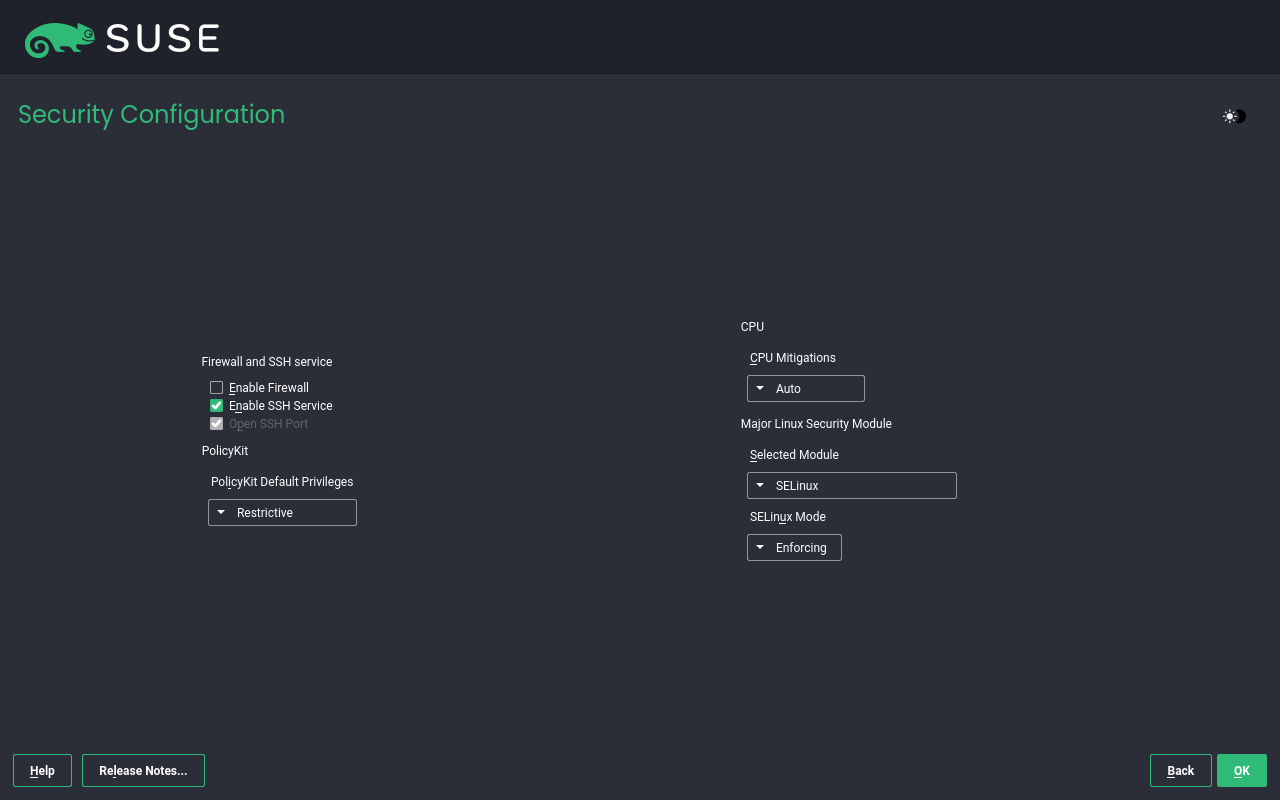
You can enable the firewall or disable the SSH service directly by clicking
the respective button. Clicking on the button next to opens the
dialog box, where you can change kernel parameters including the
CPU mitigations configuration.
The refer to kernel boot command line parameters for software mitigations that have been deployed to prevent CPU side-channel attacks. You can configure the following values:
- Auto
All CPU side channel mitigations are enabled as they are detected based on the CPU type. The auto-detection handles both unaffected older CPUs and unaffected newly released CPUs and transparently disables mitigations. This options leave SMT enabled.
- Off
All CPU side channel mitigations are disabled. While this option gives the higher performance, it also bears the highest risk. Do not use this setting where there is a risk of untrusted code.
- Auto + No Smt
All CPU side channel mitigations are enabled as they are detected based on the CPU type. Additionally the symmetric multi-threading of the CPU is disabled if necessary, for instance to mitigate the L1 Terminal Fault side channel issue.
- Manually
CPU mitigations are detected manually.
By default, the firewall is disabled. Click to change the default.
The SSH service is enabled by default. Click to change the setting. If you disable the SSH service, you will not be able to login to your system remotely. The SSH port (22) is open by default.
The default SELinux option is . You can change the value by clicking and selecting another option in the menu.
In the dialog box, you can also select PolicyKit privileges in the dropdown menu.
