Introduction
In a lot of enterprise environments, servers or VMs running on premises do not have direct Internet access. Instead, the connection to external services is done through a HTTP(S) proxy for security reasons. This tutorial shows you how to set up an SUSE® Rancher Prime: OS Manager deployment in such an environment.
|
This guide will not cover the Rancher installation behind a proxy. It’s a different use case and you can find the detailed documentation at the Installing SUSE Rancher Prime behind an HTTP Proxy page. |
|
For this documentation, we assume you are using a SUSE family system (like SLE Micro), so proxy settings have to be written in |
Proxy settings must be configured in the following locations:
-
Machine Registration Endpoint
-
SeedImage resource
-
SUSE® Rancher Prime: OS Manager cluster configuration
The elemental-system-agent needs proxy settings to reach the Rancher Manager.
To achieve that, you need to fill the cloud-init section of the Machine Registration Endpoint.
-
CLI
-
UI
apiVersion: elemental.cattle.io/v1beta1
kind: MachineRegistration
metadata:
  name: my-nodes
  namespace: fleet-default
spec:
  config:
    cloud-config:
      write_files:
      - path: /etc/sysconfig/proxy
        append: true
        content: |
          PROXY_ENABLED="yes"
          HTTP_PROXY=http://<MY_PROXY>:<MY_PORT>
          HTTPS_PROXY=https://<MY_PROXY>:<MY_PORT>
          NO_PROXY="localhost, 127.0.0.1"
      users:
        - name: root
          passwd: root
    elemental:
      install:
        reboot: true
        device: /dev/sda
        debug: true
      registration:
        emulate-tpm: true
SUSE® Rancher Prime: OS Manager-register
SUSE® Rancher Prime: OS Manager-register is the first communication endpoint between the new host and Rancher Manager, this is the first place where proxy settings need to be set.
|
At the time of writing, it’s only possible to configure proxy settings for the ISO with the CLI. The proxy settings aren’t implemented in the UI. |
The process happens when you boot your SUSE® Rancher Prime: OS Manager ISO for the first time, in order to configure the proxy settings you have to include a cloud-init definition in the ISO.
To do that, you have to create a SeedImage definition.
apiVersion: elemental.cattle.io/v1beta1
kind: SeedImage
metadata:
  name: ...
  namespace: ...
spec:
  baseImage: registry.suse.com/suse/sle-micro-iso/5.5:2.0.2
  cloud-config:
    write_files:
    - path: /etc/sysconfig/proxy
      append: true
      content: |
        PROXY_ENABLED="yes"
        HTTP_PROXY=http://<MY_PROXY>:<MY_PORT>
        HTTPS_PROXY=https://<MY_PROXY>:<MY_PORT>
        NO_PROXY="localhost, 127.0.0.1"
  registrationRef:
    apiVersion: elemental.cattle.io/v1beta1
    kind: MachineRegistration
    name: ...
    namespace: ...
Apply the YAML with kubectl and then, print your SeedImage definition to get the URL to download it:
kubectl apply -f <my_seedimage_yaml_file>
kubectl get seedimage <seed_image_name> -n <namespace> -o yaml
Boot the ISO and you should see your new system appears in Machine inventory.
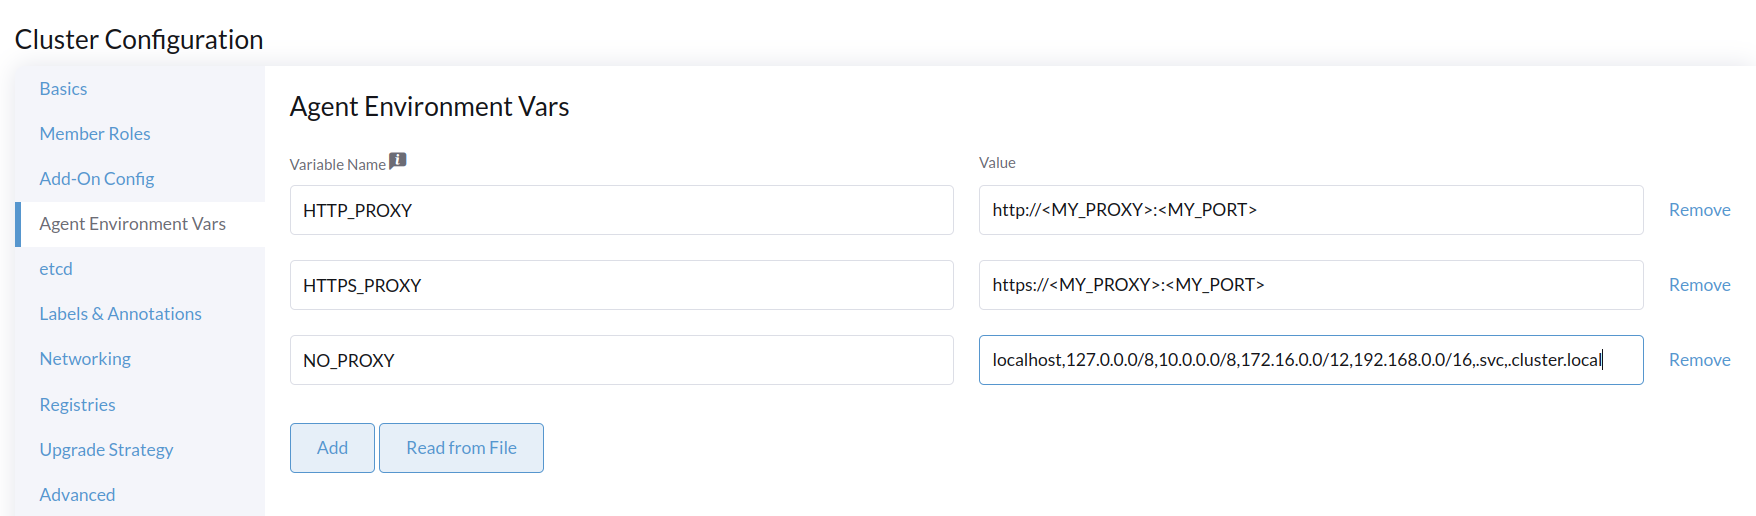
Create SUSE® Rancher Prime: OS Manager cluster
For this step, you can use either the UI or CLI.
-
CLI
-
UI
kind: Cluster
apiVersion: provisioning.cattle.io/v1
metadata:
  name: my-cluster
  namespace: fleet-default
spec:
  agentEnvVars:
  - name: HTTP_PROXY
    value: http://<MY_PROXY>:<MY_PORT>
  - name: HTTPS_PROXY
    value: https://<MY_PROXY>:<MY_PORT>
  - name: NO_PROXY
    value: localhost,127.0.0.0/8,10.0.0.0/8,172.16.0.0/12,192.168.0.0/16,.svc,.cluster.local
  rkeConfig:
    machineGlobalConfig:
      etcd-expose-metrics: false
      profile: null
    machinePools:
      - controlPlaneRole: true
        etcdRole: true
        machineConfigRef:
          apiVersion: elemental.cattle.io/v1beta1
          kind: MachineInventorySelectorTemplate
          name: my-machine-selector
        name: pool1
        quantity: 1
        unhealthyNodeTimeout: 0s
        workerRole: true
    machineSelectorConfig:
      - config:
          protect-kernel-defaults: false
    registries: {}
  kubernetesVersion: v1.24.8+k3s1