15 Fibre Channel Storage over Ethernet Networks: FCoE #
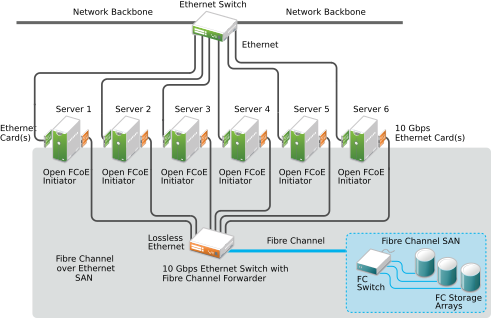
Many enterprise data centers rely on Ethernet for their LAN and data traffic, and on Fibre Channel networks for their storage infrastructure. Open Fibre Channel over Ethernet (FCoE) Initiator software allows servers with Ethernet adapters to connect to a Fibre Channel storage subsystem over an Ethernet network. This connectivity was previously reserved exclusively for systems with Fibre Channel adapters over a Fibre Channel fabric. The FCoE technology reduces complexity in the data center by aiding network convergence. This helps to preserve your existing investments in a Fibre Channel storage infrastructure and to simplify network management.
Open-FCoE allows you to run the Fibre Channel protocols on the host, instead
of on proprietary hardware on the host bus adapter. It is targeted for 10
Gbps (gigabit per second) Ethernet adapters, but can work on any Ethernet
adapter that supports pause frames. The initiator software provides a Fibre
Channel protocol processing module and an Ethernet-based transport module.
The Open-FCoE module acts as a low-level driver for SCSI. The Open-FCoE
transport uses net_device to send and receive packets.
Data Center Bridging (DCB) drivers provide the quality of service for FCoE.
FCoE is an encapsulation protocol that moves the Fibre Channel protocol traffic over Ethernet connections without changing the Fibre Channel frame. This allows your network security and traffic management infrastructure to work the same with FCoE as it does with Fibre Channel.
You might choose to deploy FCoE in your enterprise if the following conditions exist:
Your enterprise already has a Fibre Channel storage subsystem and administrators with Fibre Channel skills and knowledge.
You are deploying 10 Gbps Ethernet in the network.
This section describes how to set up FCoE in your network.
15.1 Configuring FCoE Interfaces during the Installation #
The YaST installation for SUSE Linux Enterprise Server allows you to configure FCoE disks
during the operating system installation if FCoE is enabled at the switch
for the connections between the server and the Fibre Channel storage
infrastructure. Some system BIOS types can automatically detect the FCoE
disks, and report the disks to the YaST Installation software. However,
automatic detection of FCoE disks is not supported by all BIOS types. To
enable automatic detection in this case, you can add the
withfcoe option to the kernel command line when you begin
the installation:
withfcoe=1
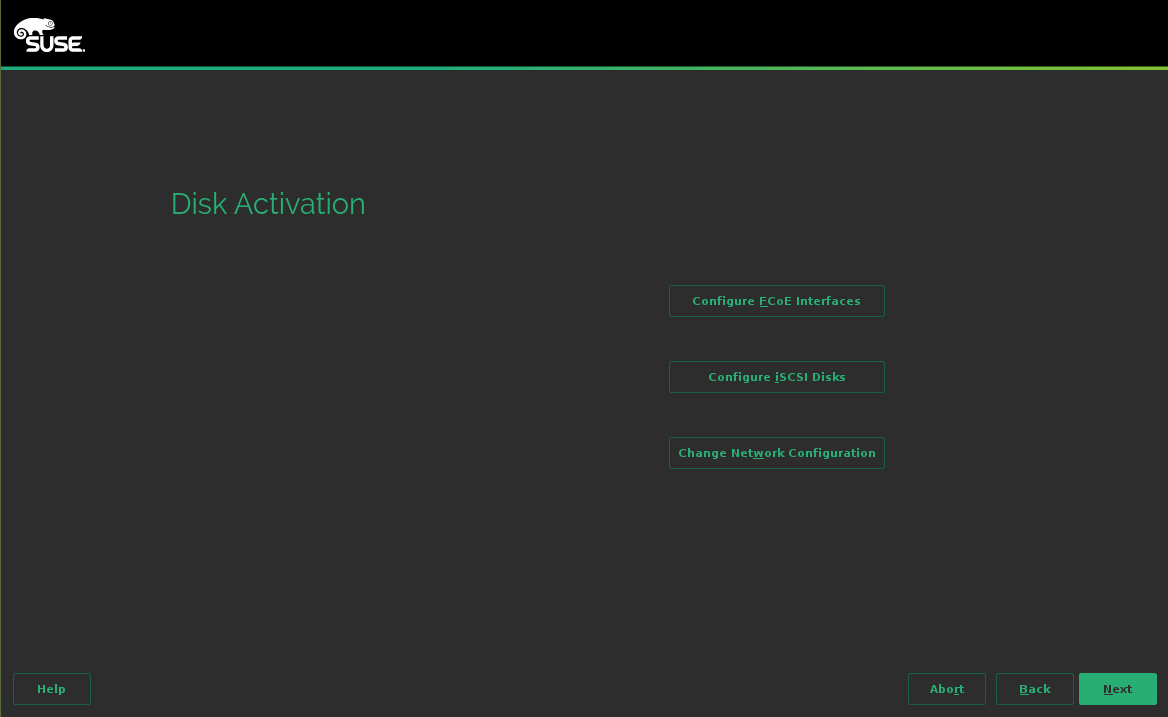
When the FCoE disks are detected, the YaST installation offers the option to configure FCoE instances at that time. On the Disk Activation page, select to access the FCoE configuration. For information about configuring the FCoE interfaces, see Section 15.3, “Managing FCoE Services with YaST”.
FCoE devices will appear asynchronously during the
boot process. While the initrd guarantees that those devices are
set up correctly for the root file system, there are no such
guarantees for any other file systems or mount points like
/usr. Hence any system mount points like
/usr or /var are not
supported. To use those devices, ensure correct
synchronization of the respective services and devices.
15.2 Installing FCoE and the YaST FCoE Client #
You can set up FCoE disks in your storage infrastructure by enabling FCoE at the switch for the connections to a server. If FCoE disks are available when the SUSE Linux Enterprise Server operating system is installed, the FCoE Initiator software is automatically installed at that time.
If the FCoE Initiator software and the YaST FCoE Client software are not installed, use the following procedure to manually install them with the following command:
sudo zypper in yast2-fcoe-client fcoe-utils
Alternatively, use the YaST Software Manager to install the packages listed above.
15.3 Managing FCoE Services with YaST #
You can use the YaST FCoE Client Configuration option to create,
configure, and remove FCoE interfaces for the FCoE disks in your Fibre
Channel storage infrastructure. To use this option, the FCoE Initiator
service (the fcoemon daemon) and the
Link Layer Discovery Protocol agent daemon
(llpad) must be installed and
running, and the FCoE connections must be enabled at the FCoE-capable
switch.
Launch YaST and select › .
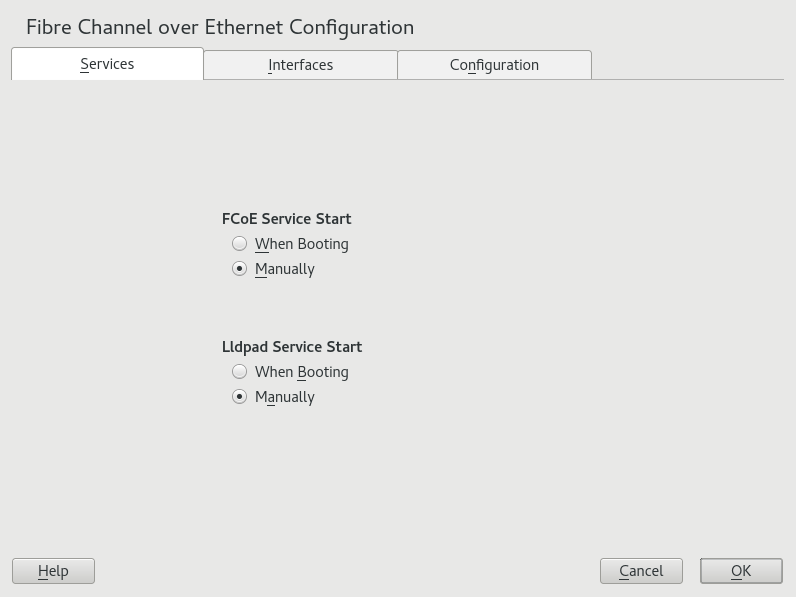
On the tab, view or modify the FCoE service and Lldpad (Link Layer Discovery Protocol agent daemon) service start time as necessary.
FCoE Service Start: Specifies whether to start the Fibre Channel over Ethernet service
fcoemondaemon at the server boot time or manually. The daemon controls the FCoE interfaces and establishes a connection with thellpaddaemon. The values are (default) or .Lldpad Service Start: Specifies whether to start the Link Layer Discovery Protocol agent
llpaddaemon at the server boot time or manually. Thellpaddaemon informs thefcoemondaemon about the Data Center Bridging features and the configuration of the FCoE interfaces. The values are (default) or .
If you modify a setting, click to save and apply the change.
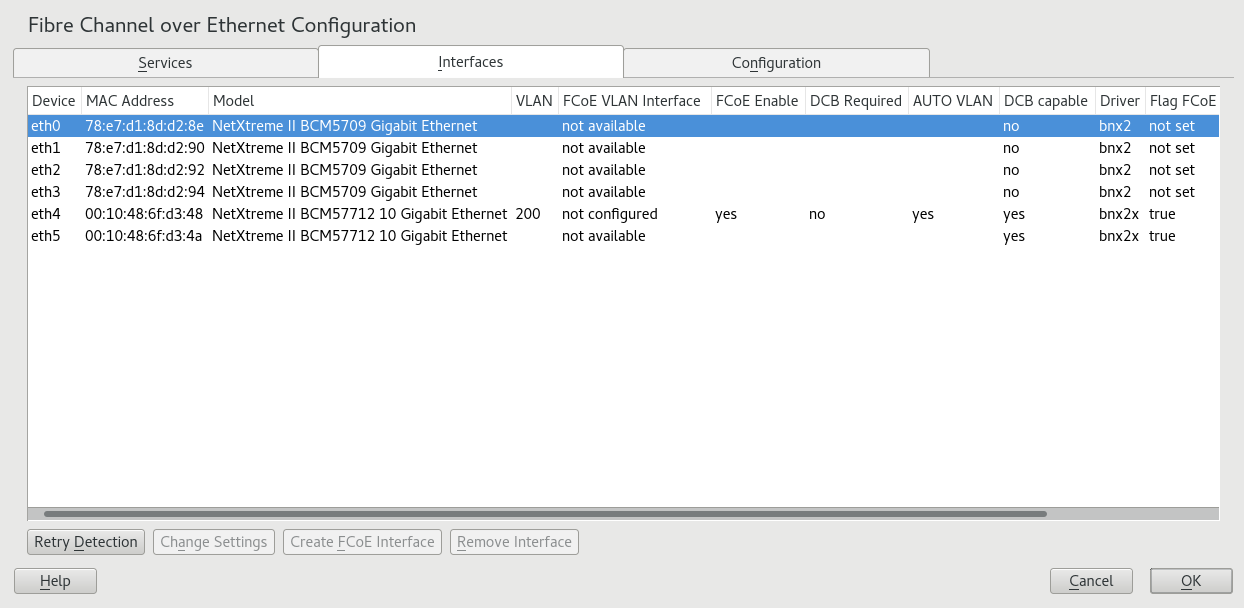
On the tab, view information about all detected network adapters on the server, including information about VLAN and FCoE configuration. You can also create an FCoE VLAN interface, change settings for an existing FCoE interface, or remove an FCoE interface.
Use the column to determine whether FCoE is available or not:
- Interface Name
If a name is assigned to the interface, such as
eth4.200, FCoE is available on the switch, and the FCoE interface is activated for the adapter.- Not Configured:
If the status is , FCoE is enabled on the switch, but an FCoE interface has not been activated for the adapter. Select the adapter, then click to activate the interface on the adapter.
- Not Available:
If the status is , FCoE is not possible for the adapter because FCoE has not been enabled for that connection on the switch.
To set up an FCoE-enabled adapter that has not yet been configured, select it and click . Confirm the query with .
The adapter is now listed with an interface name in the column.
To change the settings for an adapter that is already configured, select it from the list, then click .
The following options can be configured:
Enable or disable the creation of FCoE instances for the adapter.
Specifies whether Data Center Bridging is required for the adapter (usually this is the case).
Specifies whether the
fcoemondaemon creates the VLAN interfaces automatically.
If you modify a setting, click to save and apply the change. The settings are written to the
/etc/fcoe/cfg-ethXfile. Thefcoemondaemon reads the configuration files for each FCoE interface when it is initialized.To remove an interface that is already configured, select it from the list. Click and to confirm. The FCoE Interface value changes to .
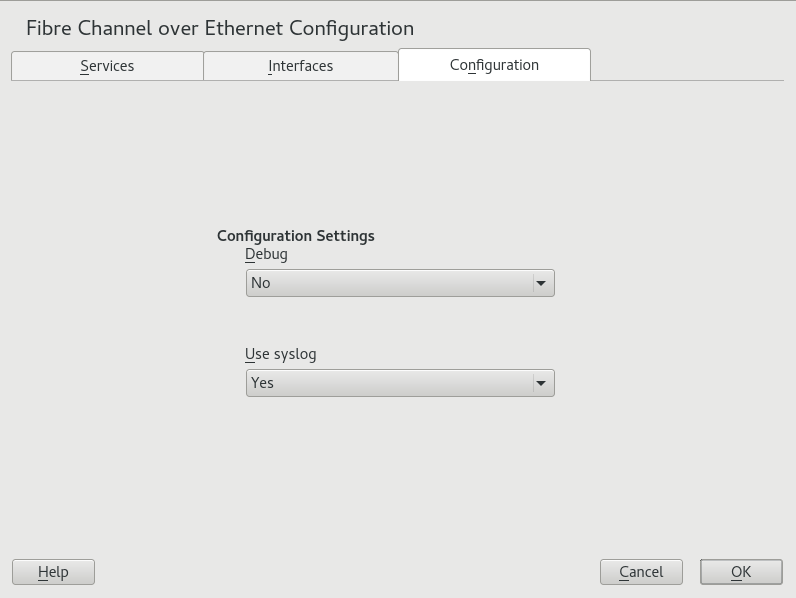
On the tab, view or modify the general settings for the FCoE system service. You can enable or disable debugging messages from the FCoE service script and the
fcoemondaemon and specify whether messages are sent to the system log.Click to save and apply changes.
15.4 Configuring FCoE with Commands #
Open a terminal.
Use YaST to configure the Ethernet network interface card, such as
eth2.Start the Link Layer Discovery Protocol agent daemon (
llpad).
Open a terminal.
Enable Data Center Bridging on your Ethernet adapter.
tux >dcbtool sc eth2 dcb on Version: 2 Command: Set Config Feature: DCB State Port: eth2 Status: SuccessfulEnable and set the Priority Flow Control (PFC) settings for Data Center Bridging.
sudo dcbtool sc eth<x> pfc e:1 a:1 w:1
Argument setting values are:
- e:<0|1>
Controls feature enablement.
- a:<0|1>
Controls whether the feature is advertised via Data Center Bridging Exchange protocol to the peer.
- w:<0|1>
Controls whether the feature is willing to change its operational configuration based on what is received from the peer.
Enable the Data Center Bridging to accept the switch’s priority setting for FCoE.
tux >sudo dcbtool sc eth2 app:fcoe e:1 Version: 2 Command: Set Config Feature: Application FCoE Port: eth2 Status: SuccessfulCopy the default FCoE configuration file to
/etc/fcoe/cfg-eth2.sudo cp /etc/fcoe/cfg-ethx /etc/fcoe/cfg-eth2
Start the FCoE Initiator service.
systemctl start fcoe.service
Set up the Link Layer Discovery Protocol agent daemon (
llpad) and the FCoE Initiator service to start when booting.systemctl enable llpad fcoe
15.5 Managing FCoE Instances with the FCoE Administration Tool #
The fcoeadm utility is the Fibre Channel over Ethernet
(FCoE) management tool. It can be used to create, destroy, and reset an FCoE
instance on a given network interface. The fcoeadm
utility sends commands to a running
fcoemon process via a socket
interface. For information about fcoemon, see the
man 8 fcoemon.
The fcoeadm utility allows you to query the FCoE
instances about the following:
Interfaces
Target LUNs
Port statistics
The fcoeadm utility is part of the
fcoe-utils package. The general syntax for the command
looks like the following:
fcoeadm
  [-c|--create] [<ethX>]
  [-d|--destroy] [<ethX>]
  [-r|--reset] [<ethX>]
  [-S|--Scan] [<ethX>]
  [-i|--interface] [<ethX>]
  [-t|--target] [<ethX>]
  [-l|--lun] [<ethX>]
  [-s|--stats <ethX>] [<interval>]
  [-v|--version]
  [-h|--help]
Refer to man 8 fcoeadm for details.
Examples#
fcoeadm -c eth2.101Create an FCoE instance on eth2.101.
fcoeadm -d eth2.101Destroy an FCoE instance on eth2.101.
fcoeadm -i eth3Show information about all FCoE instances on interface
eth3. If no interface is specified, information for all interfaces that have FCoE instances created will be shown. The following example shows information on connection eth0.201:tux >sudo fcoeadm -i eth0.201 Description: 82599EB 10-Gigabit SFI/SFP+ Network Connection Revision: 01 Manufacturer: Intel Corporation Serial Number: 001B219B258C Driver: ixgbe 3.3.8-k2 Number of Ports: 1 Symbolic Name: fcoe v0.1 over eth0.201 OS Device Name: host8 Node Name: 0x1000001B219B258E Port Name: 0x2000001B219B258E FabricName: 0x2001000573D38141 Speed: 10 Gbit Supported Speed: 10 Gbit MaxFrameSize: 2112 FC-ID (Port ID): 0x790003 State: Onlinefcoeadm -l eth3.101Show detailed information about all LUNs discovered on connection eth3.101. If no connection is specified, information about all LUNs discovered on all FCoE connections will be shown.
fcoeadm -r eth2.101Reset the FCoE instance on eth2.101.
fcoeadm -s eth3 3Show statistical information about a specific eth3 port that has FCoE instances, at an interval of three seconds. The statistics are displayed one line per time interval. If no interval is given, the default of one second is used.
fcoeadm -t eth3Show information about all discovered targets from a given eth3 port having FCoE instances. After each discovered target, any associated LUNs are listed. If no instance is specified, targets from all ports that have FCoE instances are shown. The following example shows information of targets from the eth0.201 connection:
tux >sudo fcoeadm -t eth0.201 Interface: eth0.201 Roles: FCP Target Node Name: 0x200000D0231B5C72 Port Name: 0x210000D0231B5C72 Target ID: 0 MaxFrameSize: 2048 OS Device Name: rport-8:0-7 FC-ID (Port ID): 0x79000C State: Online LUN ID Device Name Capacity Block Size Description ------ ----------- ---------- ---------- ---------------------------- 40 /dev/sdqi 792.84 GB 512 IFT DS S24F-R2840-4 (rev 386C) 72 /dev/sdpk 650.00 GB 512 IFT DS S24F-R2840-4 (rev 386C) 168 /dev/sdgy 1.30 TB 512 IFT DS S24F-R2840-4 (rev 386C)
15.6 Additional Information #
For information, see the follow documentation:
For information about the Open-FCoE service daemon, see the
fcoemon(8)man page.For information about the Open-FCoE Administration tool, see the
fcoeadm(8)man page.For information about the Data Center Bridging Configuration tool, see the
dcbtool(8)man page.For information about the Link Layer Discovery Protocol agent daemon, see the
lldpad(8)man page.For general information, see the Open-FCoE home page: http://www.open-fcoe.org/dokuwiki/start.
