14 Mass Storage over IP Networks: iSCSI #
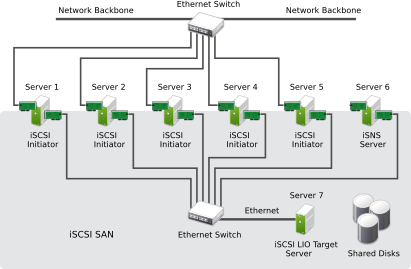
One of the primary tasks of a computer center, or any site that supports servers, is to provide adequate disk capacity. Fibre Channel is often used for this purpose. iSCSI (Internet SCSI) solutions provide a lower-cost alternative to Fibre Channel that can leverage commodity servers and Ethernet networking equipment. Linux iSCSI provides iSCSI initiator and iSCSI LIO target software for connecting Linux servers to central storage systems.
LIO (http://linux-iscsi.org) is the standard open source multiprotocol SCSI target for Linux. LIO replaced the STGT (SCSI Target) framework as the standard unified storage target in Linux with Linux kernel version 2.6.38 and later. In SUSE Linux Enterprise Server 12 the iSCSI LIO Target Server replaces the iSCSI Target Server from previous versions.
iSCSI is a storage networking protocol that simplifies data transfers of SCSI packets over TCP/IP networks between block storage devices and servers. iSCSI target software runs on the target server and defines the logical units as iSCSI target devices. iSCSI initiator software runs on different servers and connects to the target devices to make the storage devices available on that server.
The iSCSI LIO target server and iSCSI initiator servers communicate by sending SCSI packets at the IP level in your LAN. When an application running on the initiator server starts an inquiry for an iSCSI LIO target device, the operating system produces the necessary SCSI commands. The SCSI commands are then embedded in IP packets and encrypted as necessary by software that is commonly known as the iSCSI initiator. The packets are transferred across the internal IP network to the corresponding iSCSI remote station, called the iSCSI LIO target server, or simply the iSCSI target.
Many storage solutions provide access over iSCSI, but it is also possible to run a Linux server that provides an iSCSI target. In this case, it is important to set up a Linux server that is optimized for file system services. The iSCSI target accesses block devices in Linux. Therefore, it is possible to use RAID solutions to increase disk space and a lot of memory to improve data caching. For more information about RAID, also see Chapter 7, Software RAID Configuration.
14.1 Installing the iSCSI LIO Target Server and iSCSI Initiator #
While the iSCSI initiator is installed by default (packages
open-iscsi and
yast2-iscsi-client), the iSCSI LIO
target packages need to be installed manually.
It is not supported to run iSCSI target software and iSCSI initiator software on the same server in a production environment.
To install the iSCSI LIO Target Server, run the following command in a terminal:
sudo zypper in yast2-iscsi-lio-server
In case you need to install the iSCSI initiator or any of its dependencies,
run the command sudo zypper in yast2-iscsi-client.
Alternatively, use the YaST Software Management module for installation.
Any packages required in addition to the ones mentioned above will either be automatically pulled in by the installer, or be installed when you first run the respective YaST module.
14.2 Setting Up an iSCSI LIO Target Server #
This section describes how to use YaST to configure an iSCSI LIO Target Server and set up iSCSI LIO target devices. You can use any iSCSI initiator software to access the target devices.
14.2.1 iSCSI LIO Target Service Start-up and Firewall Settings #
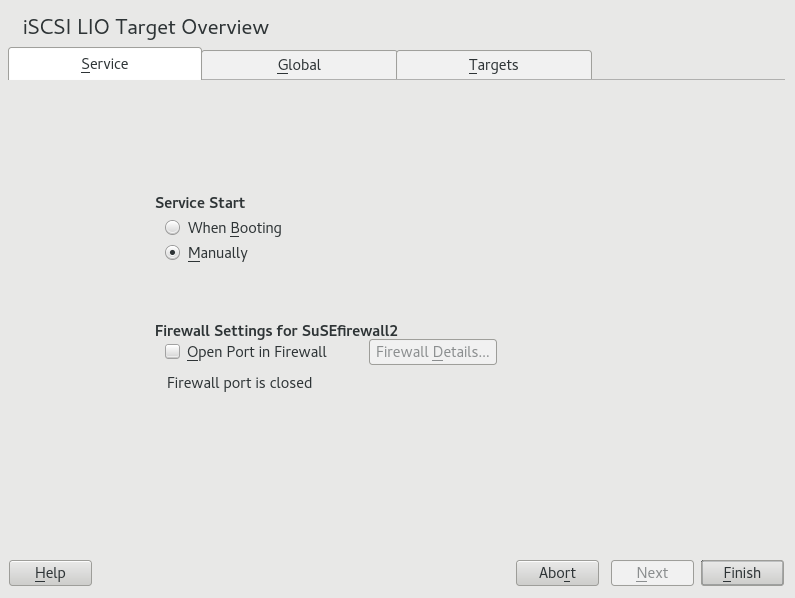
The iSCSI LIO Target service is by default configured to be started manually. You can configure the service to start automatically at boot time. If you use a firewall on the server and you want the iSCSI LIO targets to be available to other computers, you must open a port in the firewall for each adapter that you want to use for target access. TCP port 3260 is the port number for the iSCSI protocol, as defined by IANA (Internet Assigned Numbers Authority).
Start YaST and launch › .
Switch to the tab.
Under , specify how you want the iSCSI LIO target service to be started:
When Booting: The service starts automatically on server restart.
Manually: (Default) You must start the service manually after a server restart by running
sudo systemctl start target. The target devices are not available until you start the service.
If you use a firewall on the server and you want the iSCSI LIO targets to be available to other computers, open port 3260 in the firewall for each adapter interface that you want to use for target access. If the port is closed for all of the network interfaces, the iSCSI LIO targets are not available to other computers.
If you do not use a firewall on the server, the firewall settings are disabled. In this case skip the following steps and leave the configuration dialog with or switch to another tab to continue with the configuration.
On the tab, select the check box to enable the firewall settings.
Click to view or configure the network interfaces to use. All available network interfaces are listed, and all are selected by default. Deselect all interfaces on which the port should not be opened. Save your settings with .
Click to save and apply the iSCSI LIO Target service settings.
14.2.2 Configuring Authentication for Discovery of iSCSI LIO Targets and Initiators #
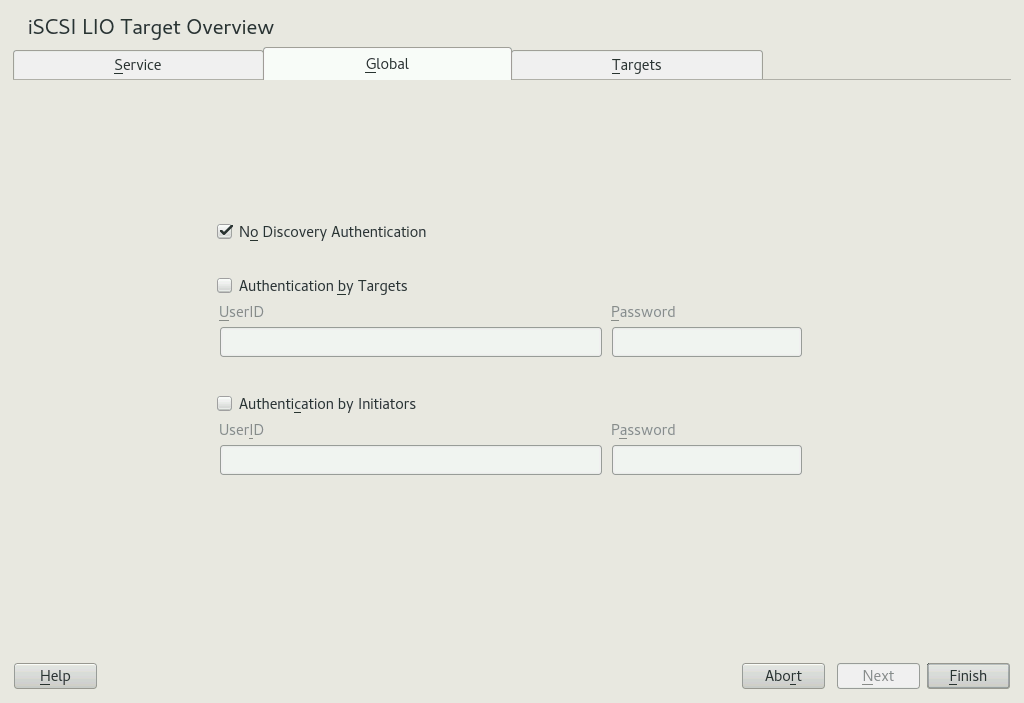
The iSCSI LIO Target Server software supports the PPP-CHAP (Point-to-Point Protocol Challenge Handshake Authentication Protocol), a three-way authentication method defined in the Internet Engineering Task Force (IETF) RFC 1994 (https://datatracker.ietf.org/doc/html/rfc1994). The server uses this authentication method for the discovery of iSCSI LIO targets and initiators, not for accessing files on the targets. If you do not want to restrict the access to the discovery, use . The option is enabled by default. Without requiring authentication all iSCSI LIO targets on this server can be discovered by any iSCSI initiator on the same network.
If authentication is needed for a more secure configuration, you can use incoming authentication, outgoing authentication, or both. requires an iSCSI initiator to prove that it has the permissions to run a discovery on the iSCSI LIO target. The initiator must provide the incoming user name and password. requires the iSCSI LIO target to prove to the initiator that it is the expected target. The iSCSI LIO target must provide the outgoing user name and password to the iSCSI initiator. The password needs to be different for incoming and outgoing discovery. If authentication for discovery is enabled, its settings apply to all iSCSI LIO target groups.
We recommend that you use authentication for target and initiator discovery in production environments for security reasons.
To configure authentication preferences for iSCSI LIO targets:
Start YaST and launch › .
Switch to the tab.
By default, authentication is disabled (). To enable Authentication, select , or both.
Provide credentials for the selected authentication method(s). The user name and password pair must be different for incoming and outgoing discovery.
Click to save and apply the settings.
14.2.3 Preparing the Storage Space #
Before you configure LUNs for your iSCSI Target servers, you must prepare the storage you want to use. You can use the entire unformatted block device as a single LUN, or you can subdivide a device into unformatted partitions and use each partition as a separate LUN. The iSCSI target configuration exports the LUNs to iSCSI initiators.
You can use the Partitioner in YaST or the command line to set up the partitions. Refer to Abschnitt 12.1, „Verwenden der YaST-Partitionierung“ for details. iSCSI LIO targets can use unformatted partitions with Linux, Linux LVM, or Linux RAID file system IDs.
After you set up a device or partition for use as an iSCSI target, you never access it directly via its local path. Do not mount the partitions on the target server.
14.2.3.1 Partitioning Devices in a Virtual Environment #
You can use a virtual machine guest server as an iSCSI LIO Target Server. This section describes how to assign partitions to a Xen virtual machine. You can also use other virtual environments that are supported by SUSE Linux Enterprise Server.
In a Xen virtual environment, you must assign the storage space you want to use for the iSCSI LIO target devices to the guest virtual machine, then access the space as virtual disks within the guest environment. Each virtual disk can be a physical block device, such as an entire disk, partition, or volume, or it can be a file-backed disk image where the virtual disk is a single image file on a larger physical disk on the Xen host server. For the best performance, create each virtual disk from a physical disk or a partition. After you set up the virtual disks for the guest virtual machine, start the guest server, then configure the new blank virtual disks as iSCSI target devices by following the same process as for a physical server.
File-backed disk images are created on the Xen host server, then
assigned to the Xen guest server. By default, Xen stores file-backed
disk images in the
/var/lib/xen/images/VM_NAME
directory, where VM_NAME
is the name of the virtual machine.
14.2.4 Setting Up an iSCSI LIO Target Group #
You can use YaST to configure iSCSI LIO target devices. YaST uses APIs
provided by the lio-utils software. iSCSI LIO targets
can use unformatted partitions with Linux, Linux LVM, or Linux RAID file
system IDs.
Before you begin, create the unformatted partitions that you want to use as iSCSI LIO targets as described in Section 14.2.3, “Preparing the Storage Space”.
Start YaST and launch › .
Switch to the tab.
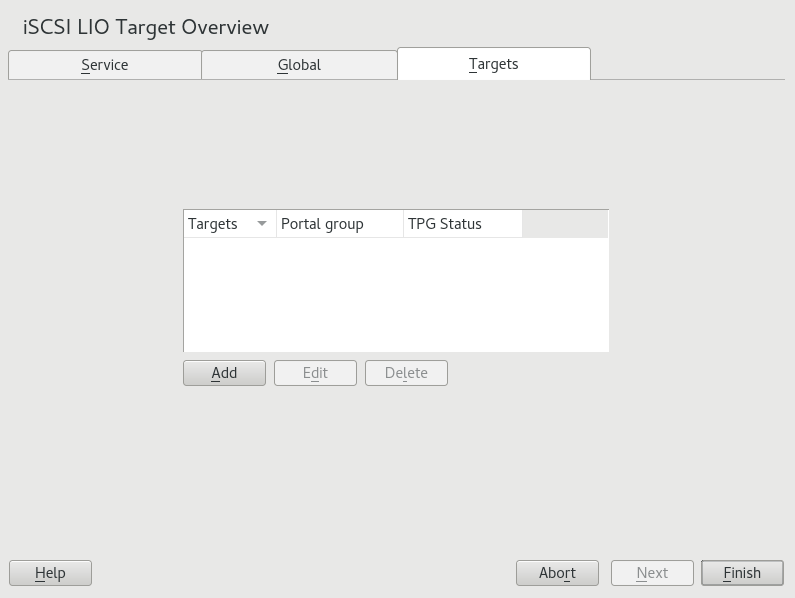
Click , then define a new iSCSI LIO target group and devices:
The iSCSI LIO Target software automatically completes the , , , , and fields. is selected by default.
If you have multiple network interfaces, use the IP address drop-down box to select the IP address of the network interface to use for this target group. To make the server accessible under all addresses, choose .
Deselect if you do not want to require initiator authentication for this target group (not recommended).
Click . Enter the path of the device or partition or to add it. Optionally specify a name, then click . The LUN number is automatically generated, beginning with 0. A name is automatically generated if you leave the field empty.
(Optional) Repeat the previous steps to add more targets to this target group.
After all desired targets have been added to the group, click .
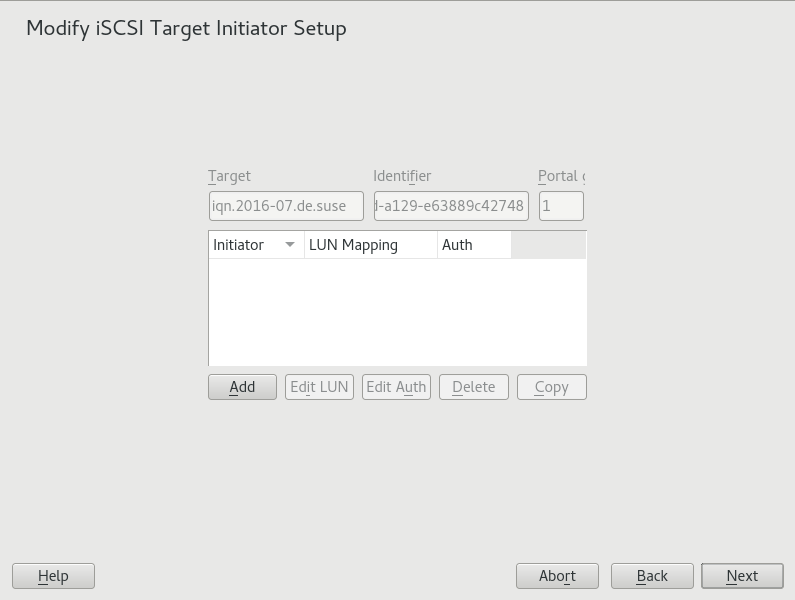
On the page, configure information for the initiators that are permitted to access LUNs in the target group:
After you specify at least one initiator for the target group, the , , , and buttons are enabled. You can use or to add more initiators for the target group:
Modify iSCSI Target: Options #Add: Add a new initiator entry for the selected iSCSI LIO target group.
Edit LUN: Configure which LUNs in the iSCSI LIO target group to map to a selected initiator. You can map each of the allocated targets to a preferred initiator.
Edit Auth: Configure the preferred authentication method for a selected initiator. You can specify no authentication, or you can configure incoming authentication, outgoing authentication, or both.
Delete: Remove a selected initiator entry from the list of initiators allocated to the target group.
Copy: Add a new initiator entry with the same LUN mappings and authentication settings as a selected initiator entry. This allows you to easily allocate the same shared LUNs, in turn, to each node in a cluster.
Click , specify the initiator name, select or deselect the check box, then click to save the settings.
Select an initiator entry, click , modify the LUN mappings to specify which LUNs in the iSCSI LIO target group to allocate to the selected initiator, then click to save the changes.
If the iSCSI LIO target group consists of multiple LUNs, you can allocate one or multiple LUNs to the selected initiator. By default, each of the available LUNs in the group are assigned to an initiator LUN.
To modify the LUN allocation, perform one or more of the following actions:
Add: Click to create a new entry, then use the drop-down box to map a target LUN to it.
Delete: Select the entry, then click to remove a target LUN mapping.
Change: Select the entry, then use the drop-down box to select which Target LUN to map to it.
Typical allocation plans include the following:
A single server is listed as an initiator. All of the LUNs in the target group are allocated to it.
You can use this grouping strategy to logically group the iSCSI SAN storage for a given server.
Multiple independent servers are listed as initiators. One or multiple target LUNs are allocated to each server. Each LUN is allocated to only one server.
You can use this grouping strategy to logically group the iSCSI SAN storage for a given department or service category in the data center.
Each node of a cluster is listed as an initiator. All of the shared target LUNs are allocated to each node. All nodes are attached to the devices, but for most file systems, the cluster software locks a device for access and mounts it on only one node at a time. Shared file systems (such as OCFS2) make it possible for multiple nodes to concurrently mount the same file structure and to open the same files with read and write access.
You can use this grouping strategy to logically group the iSCSI SAN storage for a given server cluster.
Select an initiator entry, click , specify the authentication settings for the initiator, then click to save the settings.
You can require , or you can configure , , or both. You can specify only one user name and password pair for each initiator. The credentials can be different for incoming and outgoing authentication for an initiator. The credentials can be different for each initiator.
Repeat the previous steps for each iSCSI initiator that can access this target group.
After the initiator assignments are configured, click .
Click to save and apply the settings.
14.2.5 Modifying an iSCSI LIO Target Group #
You can modify an existing iSCSI LIO target group as follows:
Add or remove target LUN devices from a target group
Add or remove initiators for a target group
Modify the initiator LUN-to-target LUN mappings for an initiator of a target group
Modify the user name and password credentials for an initiator authentication (incoming, outgoing, or both)
To view or modify the settings for an iSCSI LIO target group:
Start YaST and launch › .
Switch to the tab.
Select the iSCSI LIO target group to be modified, then click .
On the Modify iSCSI Target LUN Setup page, add LUNs to the target group, edit the LUN assignments, or remove target LUNs from the group. After all desired changes have been made to the group, click .
For option information, see Modify iSCSI Target: Options.
On the Modify iSCSI Target Initiator Setup page, configure information for the initiators that are permitted to access LUNs in the target group. After all desired changes have been made to the group, click .
Click to save and apply the settings.
14.2.6 Deleting an iSCSI LIO Target Group #
Deleting an iSCSI LIO target group removes the definition of the group, and the related setup for initiators, including LUN mappings and authentication credentials. It does not destroy the data on the partitions. To give initiators access again, you can allocate the target LUNs to a different or new target group, and configure the initiator access for them.
Start YaST and launch › .
Switch to the tab.
Select the iSCSI LIO target group to be deleted, then click .
When you are prompted, click to confirm the deletion, or click to cancel it.
Click to save and apply the settings.
14.3 Configuring iSCSI Initiator #
The iSCSI initiator can be used to connect to any iSCSI target. This is not restricted to the iSCSI target solution explained in Section 14.2, “Setting Up an iSCSI LIO Target Server”. The configuration of iSCSI initiator involves two major steps: the discovery of available iSCSI targets and the setup of an iSCSI session. Both can be done with YaST.
14.3.1 Using YaST for the iSCSI Initiator Configuration #
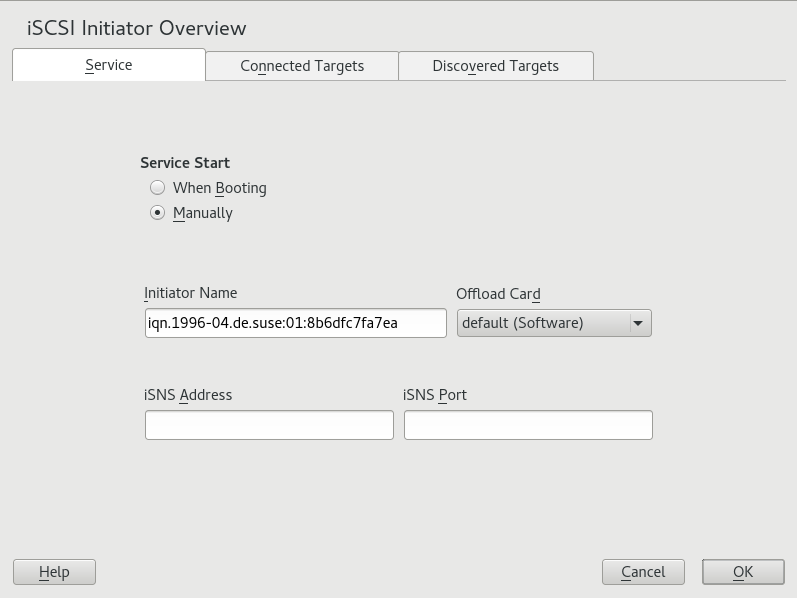
The iSCSI Initiator Overview in YaST is divided into three tabs:
- Service:
The tab can be used to enable the iSCSI initiator at boot time. It also offers to set a unique and an iSNS server to use for the discovery.
- Connected Targets:
The tab gives an overview of the currently connected iSCSI targets. Like the tab, it also gives the option to add new targets to the system.
- Discovered Targets:
The tab provides the possibility of manually discovering iSCSI targets in the network.
14.3.1.1 Configuring the iSCSI Initiator #
Start YaST and launch › .
Switch to the tab.
Under , specify how you want the iSCSI initiator service to be started:
When Booting: The service starts automatically on server restart.
Manually: (Default) You must start the service manually after a server restart by running
sudo systemctl start iscsi iscsid.
Specify or verify the .
Specify a well-formed iSCSI qualified name (IQN) for the iSCSI initiator on this server. The initiator name must be globally unique on your network. The IQN uses the following general format:
iqn.yyyy-mm.com.mycompany:n1:n2
where n1 and n2 are alphanumeric characters. For example:
iqn.1996-04.de.suse:01:a5dfcea717a
The is automatically completed with the corresponding value from the
/etc/iscsi/initiatorname.iscsifile on the server.If the server has iBFT (iSCSI Boot Firmware Table) support, the is completed with the corresponding value in the IBFT, and you are not able to change the initiator name in this interface. Use the BIOS Setup to modify it instead. The iBFT is a block of information containing various parameters useful to the iSCSI boot process, including iSCSI target and initiator descriptions for the server.
Use either of the following methods to discover iSCSI targets on the network.
iSNS: To use iSNS (Internet Storage Name Service) for discovering iSCSI targets, continue with Section 14.3.1.2, “Discovering iSCSI Targets by Using iSNS”.
Discovered Targets: To discover iSCSI target devices manually, continue with Section 14.3.1.3, “Discovering iSCSI Targets Manually”.
14.3.1.2 Discovering iSCSI Targets by Using iSNS #
Before you can use this option, you must have already installed and configured an iSNS server in your environment. For information, see Chapter 13, iSNS for Linux.
In YaST, select, then select the tab.
Specify the IP address of the iSNS server and port. The default port is 3205.
Click to save and apply your changes.
14.3.1.3 Discovering iSCSI Targets Manually #
Repeat the following process for each of the iSCSI target servers that you want to access from the server where you are setting up the iSCSI initiator.
In YaST, select , then select the tab.
Click to open the iSCSI Initiator Discovery dialog.
Enter the IP address and change the port if needed. The default port is 3260.
If authentication is required, deselect , then specify the credentials for or .
Click to start the discovery and connect to the iSCSI target server.
If credentials are required, after a successful discovery, use to activate the target.
You are prompted for authentication credentials to use the selected iSCSI target.
Click to finish the configuration.
The target now appears in and the virtual iSCSI device is now available.
Click to save and apply your changes.
You can find the local device path for the iSCSI target device by using the
lsscsicommand.
14.3.1.4 Setting the Start-up Preference for iSCSI Target Devices #
In YaST, select, then select the tab to view a list of the iSCSI target devices that are currently connected to the server.
Select the iSCSI target device that you want to manage.
Click to modify the setting:
Automatic: This option is used for iSCSI targets that are to be connected when the iSCSI service itself starts up. This is the typical configuration.
Onboot: This option is used for iSCSI targets that are to be connected during boot; that is, when root (
/) is on iSCSI. As such, the iSCSI target device will be evaluated from the initrd on server boots. This option is ignored on platforms that cannot boot from iSCSI, such as IBM IBM Z. Therefore it should not be used on these platforms; use instead.Click to save and apply your changes.
14.3.2 Setting Up the iSCSI Initiator Manually #
Both the discovery and the configuration of iSCSI connections require a
running iscsid. When running the discovery the first time, the internal
database of the iSCSI initiator is created in the directory
/etc/iscsi/.
If your discovery is password protected, provide the authentication
information to iscsid. Because the internal database does not exist when
doing the first discovery, it cannot be used now. Instead, the
configuration file /etc/iscsid.conf must be edited to
provide the information. To add your password information for the
discovery, add the following lines to the end of
/etc/iscsid.conf:
discovery.sendtargets.auth.authmethod = CHAP
discovery.sendtargets.auth.username = USERNAME
discovery.sendtargets.auth.password = PASSWORD
The discovery stores all received values in an internal persistent database. In addition, it displays all detected targets. Run this discovery with the following command:
sudo iscsiadm -m discovery --type=st --portal=TARGET_IPThe output should look like the following:
10.44.171.99:3260,1 iqn.2006-02.com.example.iserv:systems
To discover the available targets on an iSNS server, use
the following command:
sudo iscsiadm --mode discovery --type isns --portal TARGET_IP
For each target defined on the iSCSI target, one line appears. For more information about the stored data, see Section 14.3.3, “The iSCSI Initiator Databases”.
The special --login option of iscsiadm
creates all needed devices:
sudo iscsiadm -m node -n iqn.2006-02.com.example.iserv:systems --login
The newly generated devices show up in the output of
lsscsi and can now be mounted.
14.3.3 The iSCSI Initiator Databases #
All information that was discovered by the iSCSI initiator is stored in two
database files that reside in /etc/iscsi. There is one
database for the discovery of targets and one for the discovered nodes.
When accessing a database, you first must select if you want to get your
data from the discovery or from the node database. Do this with the
-m discovery and -m node parameters of
iscsiadm. Using iscsiadm with one of
these parameters gives an overview of the stored records:
tux > sudo iscsiadm -m discovery
10.44.171.99:3260,1 iqn.2006-02.com.example.iserv:systems
The target name in this example is
iqn.2006-02.com.example.iserv:systems. This name is
needed for all actions that relate to this special data set. To examine the
content of the data record with the ID
iqn.2006-02.com.example.iserv:systems, use the following
command:
tux > sudo iscsiadm -m node --targetname iqn.2006-02.com.example.iserv:systems
node.name = iqn.2006-02.com.example.iserv:systems
node.transport_name = tcp
node.tpgt = 1
node.active_conn = 1
node.startup = manual
node.session.initial_cmdsn = 0
node.session.reopen_max = 32
node.session.auth.authmethod = CHAP
node.session.auth.username = joe
node.session.auth.password = ********
node.session.auth.username_in = EMPTY
node.session.auth.password_in = EMPTY
node.session.timeo.replacement_timeout = 0
node.session.err_timeo.abort_timeout = 10
node.session.err_timeo.reset_timeout = 30
node.session.iscsi.InitialR2T = No
node.session.iscsi.ImmediateData = Yes
....
To edit the value of one of these variables, use the command
iscsiadm with the update operation. For
example, if you want iscsid to log in to the iSCSI target when it
initializes, set the variable node.startup to the value
automatic:
sudo iscsiadm -m node -n iqn.2006-02.com.example.iserv:systems \
-p ip:port --op=update --name=node.startup --value=automatic
Remove obsolete data sets with the delete operation. If
the target iqn.2006-02.com.example.iserv:systems is no
longer a valid record, delete this record with the following command:
sudo iscsiadm -m node -n iqn.2006-02.com.example.iserv:systems \
-p ip:port --op=delete
Use this option with caution because it deletes the record without any additional confirmation prompt.
To get a list of all discovered targets, run the sudo iscsiadm -m
node command.
14.4 Using iSCSI Disks when Installing #
Booting from an iSCSI disk on AMD64/Intel 64 and IBM POWER architectures is supported when iSCSI-enabled firmware is used.
To use iSCSI disks during installation, it is necessary to add the following parameter to the boot option line:
withiscsi=1
During installation, an additional screen appears that provides the option to attach iSCSI disks to the system and use them in the installation process.
iSCSI devices will appear asynchronously during the
boot process. While the initrd guarantees that those devices are
set up correctly for the root file system, there are no such
guarantees for any other file systems or mount points like
/usr. Hence any system mount points like
/usr or /var are not
supported. To use those devices, ensure correct
synchronization of the respective services and devices.
14.5 Troubleshooting iSCSI #
This section describes some known issues and possible solutions for iSCSI target and iSCSI initiator issues.
14.5.1 Portal Error When Setting Up Target LUNs on an iSCSI LIO Target Server #
When adding or editing an iSCSI LIO target group, you get an error:
Problem setting network portal IP_ADDRESS:3260
The /var/log/YasT2/y2log log file contains the
following error:
find: `/sys/kernel/config/target/iscsi': No such file or directory
This problem occurs if the iSCSI LIO Target Server software is not
currently running. To resolve this issue, exit YaST, manually start iSCSI
LIO at the command line with systemctl start target,
then try again.
You can also enter the following to check if configfs,
iscsi_target_mod, and target_core_mod
are loaded. A sample response is shown.
tux > sudo lsmod | grep iscsi
iscsi_target_mod      295015  0
target_core_mod       346745  4
iscsi_target_mod,target_core_pscsi,target_core_iblock,target_core_file
configfs               35817  3 iscsi_target_mod,target_core_mod
scsi_mod              231620  16
iscsi_target_mod,target_core_pscsi,target_core_mod,sg,sr_mod,mptctl,sd_mod,
scsi_dh_rdac,scsi_dh_emc,scsi_dh_alua,scsi_dh_hp_sw,scsi_dh,libata,mptspi,
mptscsih,scsi_transport_spi
14.5.2 iSCSI LIO Targets Are Not Visible from Other Computers #
If you use a firewall on the target server, you must open the iSCSI port that you are using to allow other computers to see the iSCSI LIO targets. For information, see Section 14.2.1, “iSCSI LIO Target Service Start-up and Firewall Settings”.
14.5.3 Data Packets Dropped for iSCSI Traffic #
A firewall might drop packets if it gets too busy. The default for the SUSE Firewall is to drop packets after three minutes. If you find that iSCSI traffic packets are being dropped, you can consider configuring the SUSE Firewall to queue packets instead of dropping them when it gets too busy.
14.5.4 Using iSCSI Volumes with LVM #
Use the troubleshooting tips in this section when using LVM on iSCSI targets.
14.5.4.1 Check if the iSCSI Initiator Discovery Occurs at Boot #
When you set up the iSCSI Initiator, ensure that you enable discovery at boot time so that udev can discover the iSCSI devices at boot time and set up the devices to be used by LVM.
14.5.4.2 Check that iSCSI Target Discovery Occurs at Boot #
Remember that udev provides the default setup for
devices. Ensure that all of the applications that create devices are
started at boot time so that udev can recognize and
assign devices for them at system start-up. If the application or service
is not started until later, udev does not create the
device automatically as it would at boot time.
14.5.5 iSCSI Targets Are Mounted When the Configuration File Is Set to Manual #
When Open-iSCSI starts, it can mount the targets even if the
node.startup option is set to manual in the
/etc/iscsi/iscsid.conf file if you manually modified
the configuration file.
Check the
/etc/iscsi/nodes/TARGET_NAME/IP_ADDRESS,PORT/default
file. It contains a node.startup setting that overrides
the /etc/iscsi/iscsid.conf file. Setting the mount
option to manual by using the YaST interface also sets
node.startup = manual in the
/etc/iscsi/nodes/TARGET_NAME/IP_ADDRESS,PORT/default
files.
14.6 iSCSI LIO Target Terminology #
- backstore
A physical storage object that provides the actual storage underlying an iSCSI endpoint.
- CDB (command descriptor block)
The standard format for SCSI commands. CDBs are commonly 6, 10, or 12 bytes long, though they can be 16 bytes or of variable length.
- CHAP (Challenge Handshake Authentication Protocol)
A point-to-point protocol (PPP) authentication method used to confirm the identity of one computer to another. After the Link Control Protocol (LCP) connects the two computers, and the CHAP method is negotiated, the authenticator sends a random Challenge to the peer. The peer issues a cryptographically hashed Response that depends upon the Challenge and a secret key. The authenticator verifies the hashed Response against its own calculation of the expected hash value, and either acknowledges the authentication or terminates the connection. CHAP is defined in the RFC 1994.
- CID (connection identifier)
A 16‐bit number, generated by the initiator, that uniquely identifies a connection between two iSCSI devices. This number is presented during the login phase.
- endpoint
The combination of an iSCSI Target Name with an iSCSI TPG (IQN + Tag).
- EUI (extended unique identifier)
A 64‐bit number that uniquely identifies every device in the world. The format consists of 24 bits that are unique to a given company, and 40 bits assigned by the company to each device it builds.
- initiator
The originating end of an SCSI session. Typically a controlling device such as a computer.
- IPS (Internet Protocol storage)
The class of protocols or devices that use the IP protocol to move data in a storage network. FCIP (Fibre Channel over Internet Protocol), iFCP (Internet Fibre Channel Protocol), and iSCSI (Internet SCSI) are all examples of IPS protocols.
- IQN (iSCSI qualified name)
A name format for iSCSI that uniquely identifies every device in the world (for example:
iqn.5886.com.acme.tapedrive.sn‐a12345678).- ISID (initiator session identifier)
A 48‐bit number, generated by the initiator, that uniquely identifies a session between the initiator and the target. This value is created during the login process, and is sent to the target with a Login PDU.
- MCS (multiple connections per session)
A part of the iSCSI specification that allows multiple TCP/IP connections between an initiator and a target.
- MPIO (multipath I/O)
A method by which data can take multiple redundant paths between a server and storage.
- network portal
The combination of an iSCSI endpoint with an IP address plus a TCP (Transmission Control Protocol) port. TCP port 3260 is the port number for the iSCSI protocol, as defined by IANA (Internet Assigned Numbers Authority).
- SAM (SCSI architectural model)
A document that describes the behavior of SCSI in general terms, allowing for different types of devices communicating over various media.
- target
The receiving end of an SCSI session, typically a device such as a disk drive, tape drive, or scanner.
- target group (TG)
A list of SCSI target ports that are all treated the same when creating views. Creating a view can help simplify LUN (logical unit number) mapping. Each view entry specifies a target group, host group, and a LUN.
- target port
The combination of an iSCSI endpoint with one or more LUNs.
- target port group (TPG)
A list of IP addresses and TCP port numbers that determines which interfaces a specific iSCSI target will listen to.
- target session identifier (TSID)
A 16‐bit number, generated by the target, that uniquely identifies a session between the initiator and the target. This value is created during the login process, and is sent to the initiator with a Login Response PDU (protocol data units).
14.7 Additional Information #
The iSCSI protocol has been available for several years. There are many reviews comparing iSCSI with SAN solutions, benchmarking performance, and there also is documentation describing hardware solutions. Important sources of more information about open-iscsi are:
The Open-iSCSI Project (http://www.open-iscsi.com/)
The online documentation and man pages for
iscsiadm,iscsid,ietd.conf, andietdand the example configuration file/etc/iscsid.conf.
