Guía de inicio rápido de la instalación #
Esta guía de inicio rápido le guiará paso a paso a través de la instalación de SUSE® Linux Enterprise Server 15 SP6.
1 Bienvenido a SUSE Linux Enterprise Server #
Lleve a cabo los siguientes procedimientos para instalar el producto en todas las plataformas de hardware compatibles. Se presupone que ha arrancado o realizado la IPL correctamente en el sistema de instalación. Para obtener instrucciones sobre la instalación y estrategias de distribución más detalladas, consulte el Guía de distribución. Para los preparativos específicos de cada plataforma necesarios para el arranque o IPL en el sistema de instalación, consulte las partes siguientes de la guía mencionada:
1.1 Instalador unificado #
A partir de SUSE Linux Enterprise Server 15, el medio de instalación consiste únicamente en el instalador unificado, un sistema mínimo para instalar, actualizar y registrar los productos base de SUSE Linux Enterprise. Durante la instalación, puede añadir funciones seleccionando los módulos y extensiones que se deben instalar en el instalador unificado.
1.2 Instalación sin conexión o sin registro #
El medio de instalación por defecto, SLE-15-SP6-Online-ARCH-GM-media1.iso, está optimizado para el tamaño correspondiente y no contiene ningún módulo ni extensión. Por lo tanto, la instalación necesita acceso de red para registrar el producto y recuperar datos del repositorio para los módulos y las extensiones.
Para realizar la instalación sin registrar el sistema, utilice la imagen SLE-15-SP6-Full-ARCH-GM-media1.iso de https://www.suse.com/download/sles/ y consulte el Sección 9.7.3, “Instalación sin registro” para obtener instrucciones.
Utilice el comando siguiente para copiar el contenido de la imagen de instalación en una memoria USB extraíble.
>sudodd if=IMAGE of=FLASH_DISK bs=4M && sync
IMAGE debe sustituirse por la vía al archivo de imagen SLE-15-SP6-Online-ARCH-GM-media1.iso o SLE-15-SP6-Full-ARCH-GM-media1.iso. FLASH_DISK debe sustituirse por el dispositivo de memoria USB. Para identificar el dispositivo, insértelo y ejecute:
# grep -Ff <(hwinfo --disk --short) <(hwinfo --usb --short)
disk:
  /dev/sdc             General USB Flash Disk
Asegúrese de que el tamaño del dispositivo sea suficiente para la imagen deseada. Puede comprobar el tamaño del dispositivo con:
# fdisk -l /dev/sdc | grep -e "^/dev"
     /dev/sdc1  *     2048 31490047 31488000  15G 83 Linux
En este ejemplo, el dispositivo tiene una capacidad de 15 GB. El comando que se debe utilizar para SLE-15-SP6-Full-ARCH-GM-media1.iso sería:
dd if=SLE-15-SP6-Full-ARCH-GM-media1.iso of=/dev/sdc bs=4M && sync
El dispositivo no debe estar montado cuando ejecute el comando dd. ¡Tenga en cuenta que se borrarán todos los datos que contenga la partición!
2 El proceso de instalación #
Para instalar SUSE Linux Enterprise Server, arranque o realice la IPL en el instalador desde el medio del instalador unificado e inicie la instalación.
2.1 Selección de idioma, teclado y productos #
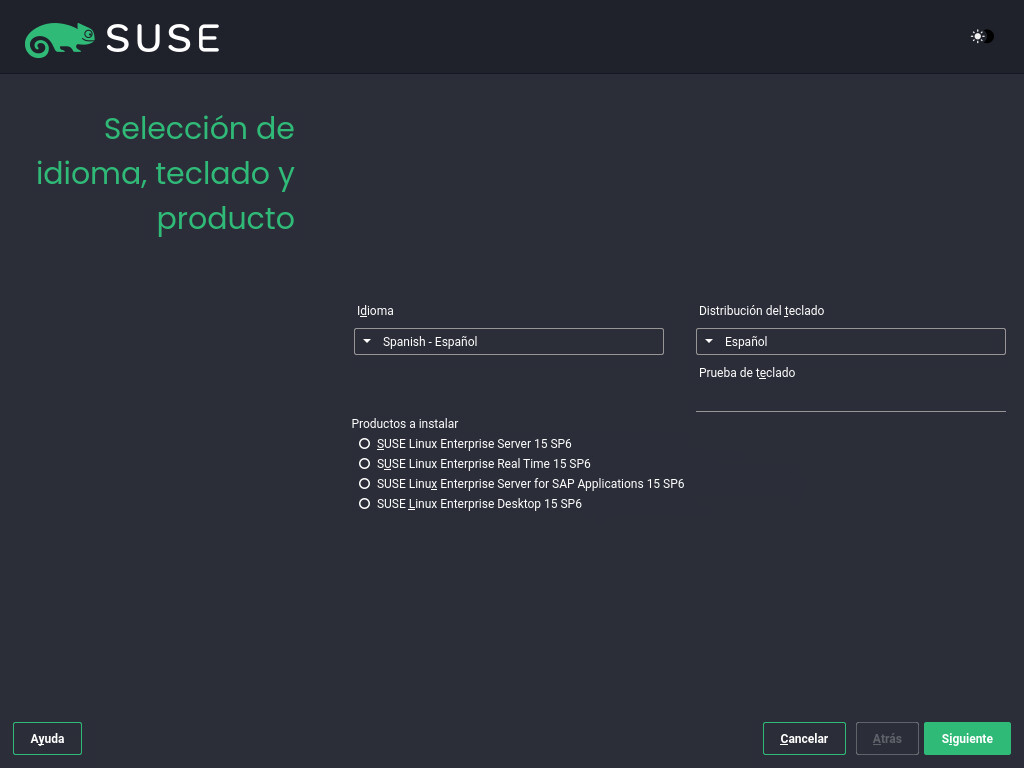
La configuración de y se inicializará con el idioma que elija en la pantalla de arranque. Si no ha modificado los valores por defecto, será English (US). Modifique los valores si es necesario. Utilice el recuadro de texto para probar la distribución.
El instalador unificado permite instalar todos los productos base de SUSE Linux Enterprise:
SUSE Linux Enterprise Server 15 SP6 (tratado aquí)
SUSE Linux Enterprise Desktop 15 SP6 (para obtener instrucciones de instalación, consulte https://documentation.suse.com/sled/)
SUSE Linux Enterprise Real Time 15 SP6 (para obtener instrucciones de instalación, consulte https://documentation.suse.com/sle-rt/)
SUSE Linux Enterprise Server for SAP Applications 15 SP6 (para obtener instrucciones de instalación, consulte https://documentation.suse.com/sles-sap)
SUSE Manager Server 5.0 (para obtener instrucciones de instalación, consulte https://documentation.suse.com/suma/)
SUSE Manager Proxy 5.0 (para obtener instrucciones de instalación, consulte https://documentation.suse.com/suma/)
SUSE Manager Retail Branch Server 5.0 (para obtener instrucciones de instalación, consulte https://documentation.suse.com/suma-retail)
Seleccione un producto para instalarlo. Debe tener un código de registro para el producto correspondiente. En este documento se entiende que ha elegido SUSE Linux Enterprise Server. Haga clic en .
Si tiene dificultades para leer las etiquetas del instalador, puede cambiar los colores y el tema del widget.
Haga clic en el botón o pulse Mayús–F3 para abrir un recuadro de diálogo de selección de tema.Seleccione un tema de la lista y cierre el recuadro de diálogo.
Mayús–F4 cambia al esquema de color para usuarios con problemas de visión. Pulse de nuevo los botones para volver al esquema por defecto.
2.2 Acuerdo de licencia #
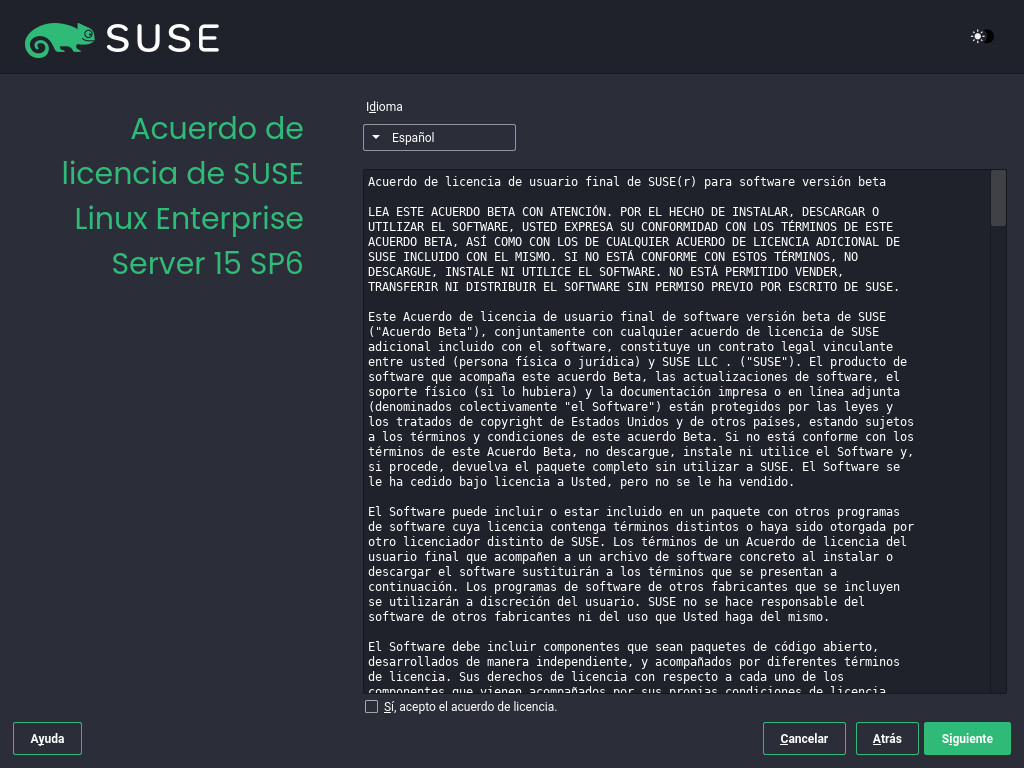
Lea el acuerdo de licencia. Se muestra en el idioma que ha elegido en la pantalla de arranque. Las traducciones están disponibles a través del recuadro desplegable de la licencia. Debe aceptar el acuerdo marcando la opción para poder instalar SUSE Linux Enterprise Server. Haga clic en
2.3 Configuración de la red #
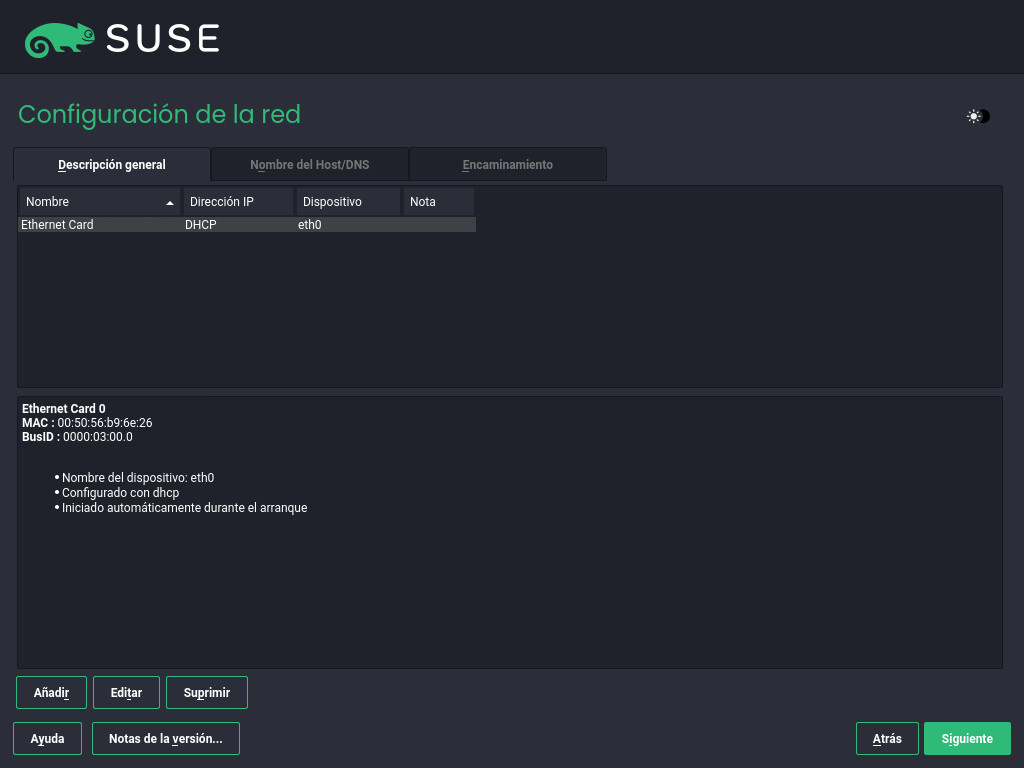
Se realiza un análisis del sistema en el que el programa de instalación busca dispositivos de almacenamiento e intenta localizar otros sistemas instalados. Si la red se ha configurado automáticamente mediante DHCP durante el inicio de la instalación, se mostrará el paso de registro.
Si la red no se ha configurado, se abrirá el recuadro de diálogo Seleccione una interfaz de red en la lista y elija la opción para configurarla. También puede seleccionar para añadir una manualmente. Consulte el Sección 9.6, “Configuración de red” y el Section 23.4, “Configuring a network connection with YaST” para obtener más información. Si prefiere realizar una instalación sin acceso de red, omita este paso sin hacer ningún cambio y seleccione para continuar.
2.4 IBM Z: activación de disco #
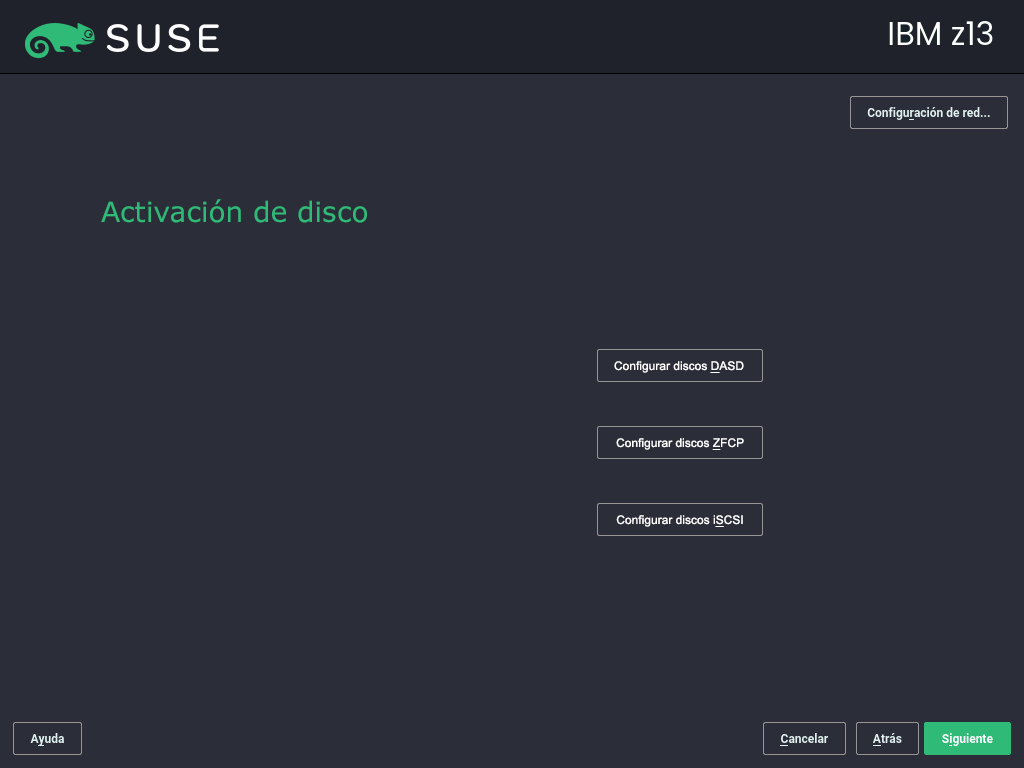
Omita este paso si no va a realizar la instalación en hardware IBM Z.
Configure los discos duros conectados. Para instalar SUSE Linux Enterprise Server, seleccione un disco DASD, SCSI Fibre Channel conectado (zFCP) o iSCSI. Los botones de configuración DASD y zFCP solo están disponibles si se conectan los dispositivos correspondientes. Haga clic en para configurar el tipo de disco seleccionado. Para obtener más información, consulte el Sección 9.5, “IBM Z: activación de disco”.
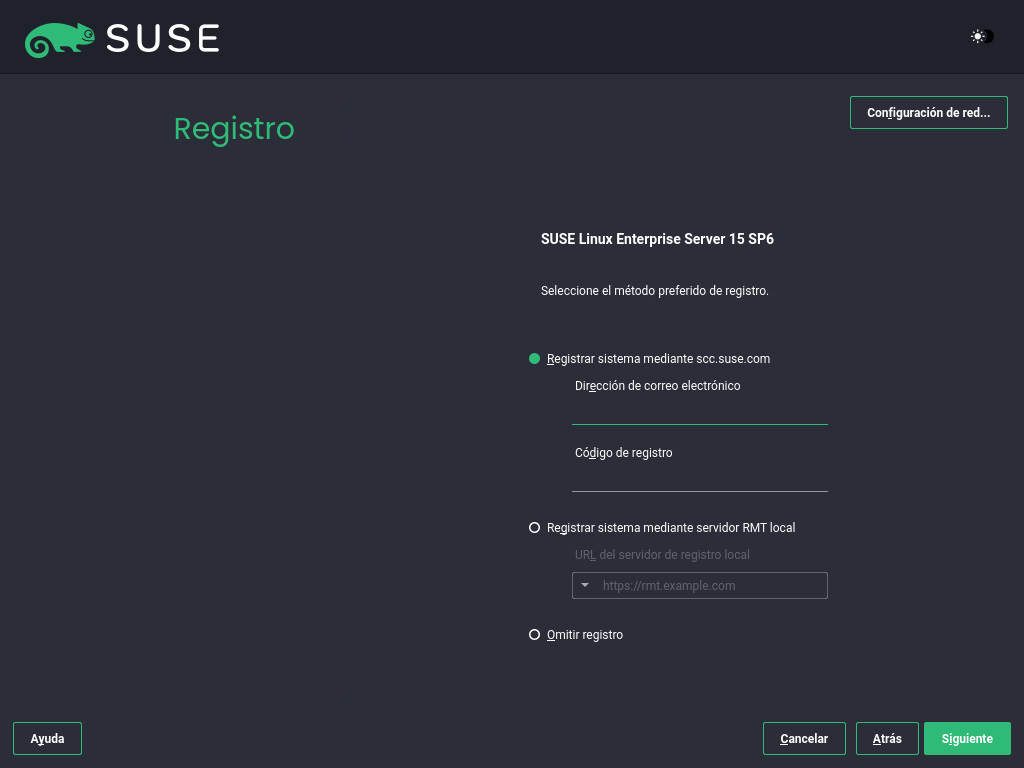
2.5 Registro #
Para obtener asistencia técnica y actualizaciones de los productos, debe registrar y activar SUSE Linux Enterprise Server en el Centro de servicios al cliente de SUSE o en un servidor de registro local. Si registra su producto en esta etapa de la instalación, disfrutará de acceso inmediato al repositorio de actualización. De esta forma, podrá instalar el sistema con las actualizaciones y los parches más recientes disponibles.
Al registrarse, los repositorios y las dependencias de los módulos y extensiones se cargan desde el servidor de registro.
Para registrarse en el Centro de servicios al cliente de SUSE, introduzca la asociada a su cuenta del Centro de servicios al cliente de SUSE y el de SUSE Linux Enterprise Server. Haga clic en
Si su organización cuenta con un servidor de registro local, puede realizar el registro en él si lo prefiere. Active y seleccione una URL en el recuadro desplegable o escriba una dirección. Haga clic en
Si no está conectado o desea omitir el registro, seleccione Seleccione para aceptar la advertencia y haga clic en
Importante: omisión del registroEs necesario registrar el sistema y las extensiones para que pueda obtener las actualizaciones y recibir asistencia técnica. Solo es posible omitir el registro al realizar la instalación desde la imagen
SLE-15-SP6-Full-ARCH-GM-media1.iso.Si no realiza el registro durante la instalación, puede hacerlo en cualquier momento desde el sistema en ejecución. Para ello, ejecute › o la herramienta de línea de comandos
SUSEConnect.
Si SUSE Linux Enterprise Server se ha registrado correctamente, se le pedirá que instale las últimas actualizaciones en línea disponibles durante la instalación. Si selecciona el sistema se instalará con los paquetes más recientes sin necesidad de aplicar las actualizaciones después de la instalación. Se recomienda activar esta opción.
Por defecto, el cortafuegos de SUSE Linux Enterprise Server solo bloquea las conexiones entrantes. Si el sistema se encuentra detrás de otro cortafuegos que bloquea el tráfico saliente, asegúrese de permitir las conexiones a https://scc.suse.com/ y https://updates.suse.com en los puertos 80 y 443 para recibir actualizaciones.
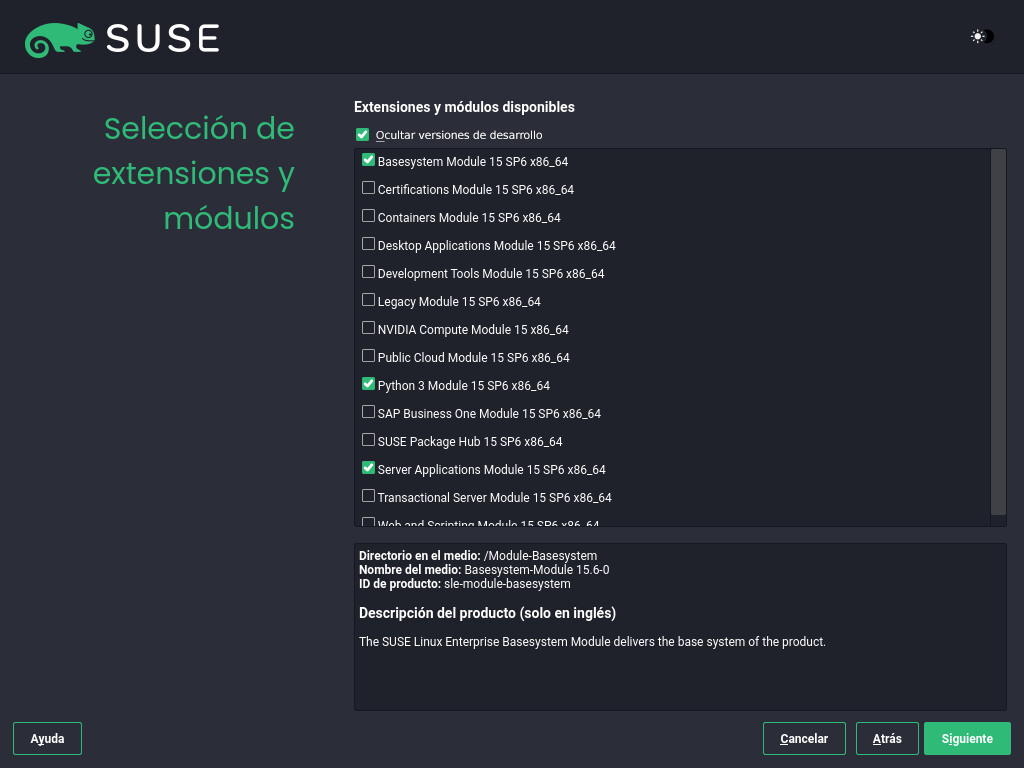
2.6 Selección de extensiones y módulos #
Después de registrar el sistema correctamente, el programa de instalación mostrará los módulos y las extensiones disponibles para SUSE Linux Enterprise Server. Los módulos son componentes que permiten personalizar el producto según sus necesidades. Se incluyen en la suscripción a SUSE Linux Enterprise Server. Las extensiones añaden nuevas funciones al producto. Se deben adquirir por separado.
La disponibilidad de ciertos módulos o extensiones depende del producto que haya seleccionado en el primer paso de la instalación. Para consultar información sobre los módulos y sus ciclos de vida, seleccione un módulo para ver el texto descriptivo. Encontrará información más detallada en Modules and Extensions Quick Start.
La selección de módulos afecta indirectamente al ámbito de la instalación, ya que define qué orígenes de software (repositorios) están disponibles para la instalación y el sistema en ejecución.
Los módulos y extensiones disponibles para SUSE Linux Enterprise Server son los siguientes:
- Módulo de sistema base
Este módulo añade un sistema básico al instalador unificado. Es necesario para todos los demás módulos y extensiones. El ámbito de una instalación que solo contenga el sistema base es similar al patrón de instalación minimal system de las versiones anteriores de SUSE Linux Enterprise Server. Este módulo está seleccionado por defecto para la instalación y no se puede deseleccionar.
Dependencias: ninguna
- Módulo de certificaciones
Contiene los paquetes de certificación FIPS.
Dependencias: sistema base
- Módulo de contenedores
Incluye herramientas y componentes auxiliares para los contenedores.
Dependencias: sistema base
- Módulo de herramientas de escritorio
Añade al sistema una interfaz gráfica de usuario y aplicaciones de escritorio esenciales.
Dependencias: sistema base
- Módulo de herramientas de desarrollo
Contiene los compiladores (incluido gcc) y las bibliotecas necesarias para compilar y depurar aplicaciones. Sustituye al kit de desarrollo de software (SDK) anterior.
Dependencias: sistema base, aplicaciones de escritorio
- Módulo de informática de alto rendimiento (HPC)
Proporciona herramientas específicas que se utilizan habitualmente para cargas de trabajo intensivas y de alto rendimiento.
Dependencias: sistema base
- Módulo legado
Ayuda a migrar aplicaciones de versiones anteriores de SUSE Linux Enterprise Server y otros sistemas a SLES 15 SP6, proporcionando paquetes que ya no están disponibles en SUSE Linux Enterprise. Los paquetes de este módulo se seleccionan según los requisitos de migración y el nivel de complejidad de la configuración.
Se recomienda seleccionar este módulo al realizar la migración desde una versión anterior del producto.
Dependencias: sistema base, aplicaciones de servidor
- Módulo de computación de NVIDIA
Contiene los controladores NVIDIA CUDA (Compute Unified Device Architecture).
El software de este módulo lo proporciona NVIDIA en virtud del CUDA End User License Agreement y no es compatible con SUSE.
Dependencias: sistema base
- Módulo Public Cloud
Contiene todas las herramientas necesarias para crear imágenes para distribuir SUSE Linux Enterprise Server en entornos de nube como Amazon Web Services (AWS), Microsoft Azure, Google Compute Platform u OpenStack.
Dependencias: sistema base, aplicaciones de servidor
- Módulo de Python 3
Este módulo contiene la versión más reciente de los paquetes de Python 3 seleccionados.
Dependencias: sistema base
- SAP Business One Server
Este módulo contiene paquetes y configuraciones de sistema específicas para SAP Business One Server. Su mantenimiento y asistencia se proporcionan mediante la suscripción al producto SUSE Linux Enterprise Server.
Dependencias: sistema base, aplicaciones de servidor, aplicaciones de escritorio, herramientas de desarrollo
- Módulo de aplicaciones de servidor
Añade funciones de servidor, con servicios de red como el servidor DHCP, el servidor de nombres o el servidor Web. Este módulo está seleccionado por defecto para la instalación. No se recomienda deseleccionarlo.
Dependencias: sistema base
- SUSE Linux Enterprise High Availability
Añade compatibilidad con agrupación en clúster para configuraciones críticas a SUSE Linux Enterprise Server. Esta extensión requiere una clave de licencia independiente.
Dependencias: sistema base, aplicaciones de servidor
- SUSE Linux Enterprise Live Patching
Añade compatibilidad con la aplicación de parches críticos sin necesidad de apagar el sistema. Esta extensión requiere una clave de licencia independiente.
Dependencias: sistema base, aplicaciones de servidor
- SUSE Linux Enterprise Workstation Extension
Amplía la funcionalidad de SUSE Linux Enterprise Server con paquetes de SUSE Linux Enterprise Desktop, por ejemplo, otras aplicaciones de escritorio (paquete de oficina, cliente de correo electrónico, editor de gráficos, etc.) y bibliotecas. Permite combinar ambos productos para crear una estación de trabajo completa. Esta extensión requiere una clave de licencia independiente.
Dependencias: sistema base, aplicaciones de escritorio
- SUSE Package Hub
Ofrece acceso a paquetes para SUSE Linux Enterprise Server mantenidos por la comunidad de openSUSE. Estos paquetes se proporcionan sin asistencia de nivel 3 y no interfieren con la compatibilidad de SUSE Linux Enterprise Server. Para obtener más información, consulte https://packagehub.suse.com/.
Dependencias: sistema base
- Módulo del servidor de transacciones
Añade compatibilidad para las actualizaciones transaccionales. Las actualizaciones se aplican en el sistema todas juntas en una sola transacción o no se aplican. Esto sucede sin que el sistema en ejecución se vea afectado. Si no se puede llevar a cabo una actualización, o si se considera que una actualización correcta no es compatible o es incorrecta por cualquier motivo, puede descartarse para devolver el sistema de inmediato a su estado funcional anterior.
Dependencias: sistema base
- Módulo Web y de guiones
Contiene paquetes destinados a un servidor Web en ejecución.
Dependencias: sistema base, aplicaciones de servidor
Algunos módulos dependen de la instalación de otros. Por lo tanto, es posible que al seleccionar un módulo, se seleccionen otros automáticamente para cumplir las dependencias.
Dependiendo del producto, el servidor de registro puede marcar módulos y extensiones según la configuración recomendada. Las extensiones y los módulos recomendados se preseleccionan para la instalación y el registro. Para evitar la instalación de estas recomendaciones, anule su selección manualmente.
Seleccione los módulos y las extensiones que desea instalar y haga clic en En caso de que haya elegido una o más extensiones, se le pedirá que introduzca los códigos de registro correspondientes. En función de su elección, puede que deba aceptar otros acuerdos de licencia.
Cuando se realiza una instalación sin conexión desde SLE-15-SP6-Full-ARCH-GM-media1.iso, solo se selecciona por defecto el . Para instalar el conjunto completo de paquetes por defecto de SUSE Linux Enterprise Server, seleccione además el .
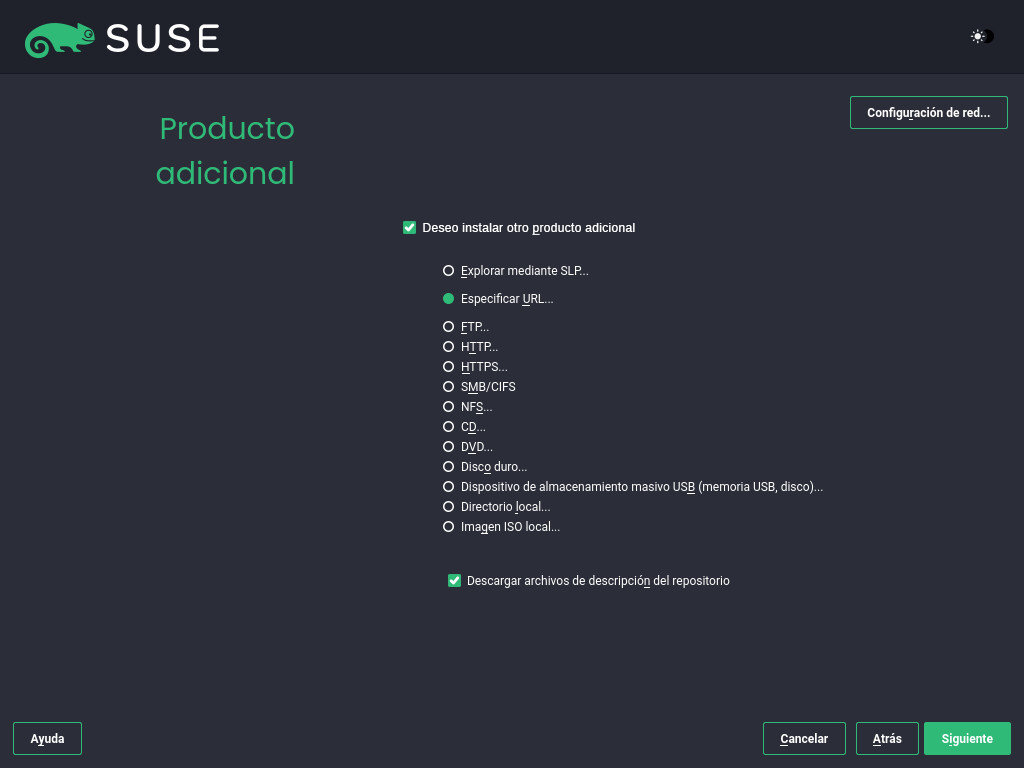
2.7 Producto adicional #
El recuadro de diálogo permite añadir orígenes de software adicionales (denominados “repositorios”) a SUSE Linux Enterprise Server que no proporciona el Centro de servicios al cliente de SUSE. Estos productos adicionales pueden ser productos y controladores de otros fabricantes o software complementario para el sistema.
También puede añadir repositorios de actualizaciones de controladores mediante el recuadro de diálogo Las actualizaciones de controladores de SUSE Linux Enterprise se proporcionan en https://drivers.suse.com/. Estos controladores se han creado mediante el programa SUSE SolidDriver.
Si desea omitir este paso, seleccione . En caso contrario, active la opción . Especifique un tipo de soporte, una vía local o un recurso de red donde se encuentre el repositorio y siga las instrucciones de la pantalla.
Marque para descargar los archivos de descripción del repositorio inmediatamente. Si se desactiva, se descargarán después de iniciarse la instalación. Seleccione e inserte un soporte, si fuera necesario. En función del contenido del producto, puede ser necesario aceptar otros acuerdos de licencia. Haga clic en Si ha seleccionado un producto adicional que requiere una clave de registro, se le pedirá que la introduzca antes de continuar con el paso siguiente.
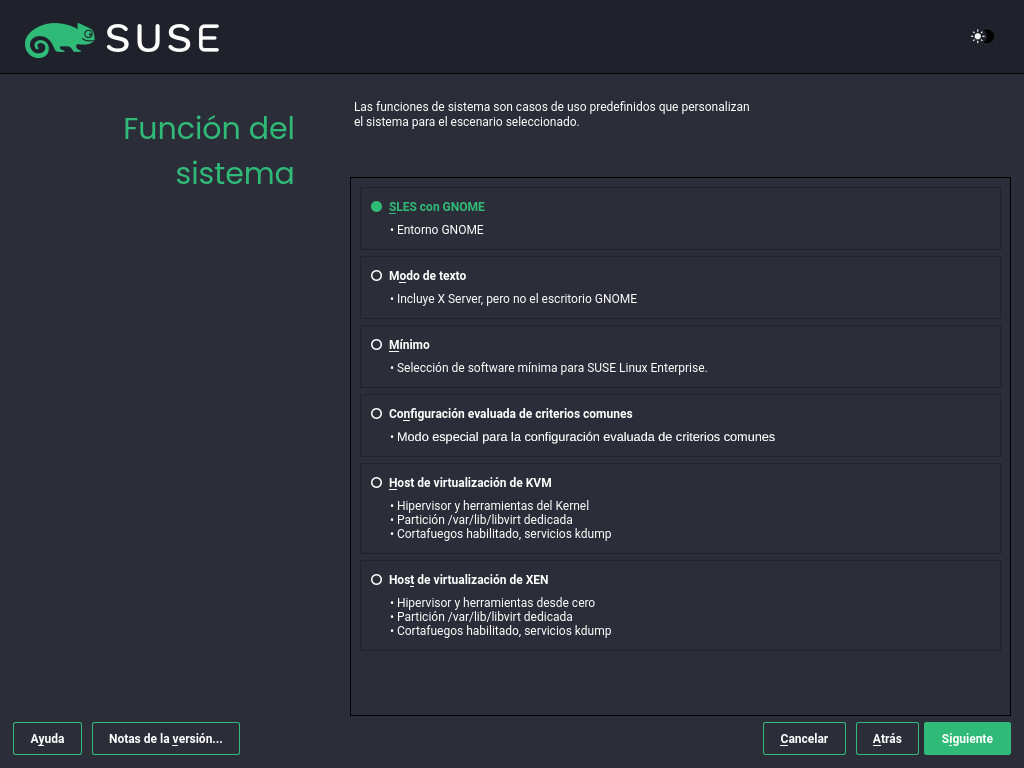
2.8 Función del sistema #
La disponibilidad de las funciones del sistema depende de la selección de módulos y extensiones. Las funciones del sistema definen, por ejemplo, el conjunto de patrones de software que se preseleccionan para la instalación. Consulte la descripción que aparecerá en pantalla para seleccionar la opción deseada. Seleccione una función y haga clic en . Si en los módulos habilitados solo hay una función adecuada para los productos base respectivos, o no hay ninguna función adecuada, se omitirá el recuadro de diálogo
A partir de ahora, las notas de la versión se pueden ver desde cualquier pantalla durante el proceso de instalación seleccionando
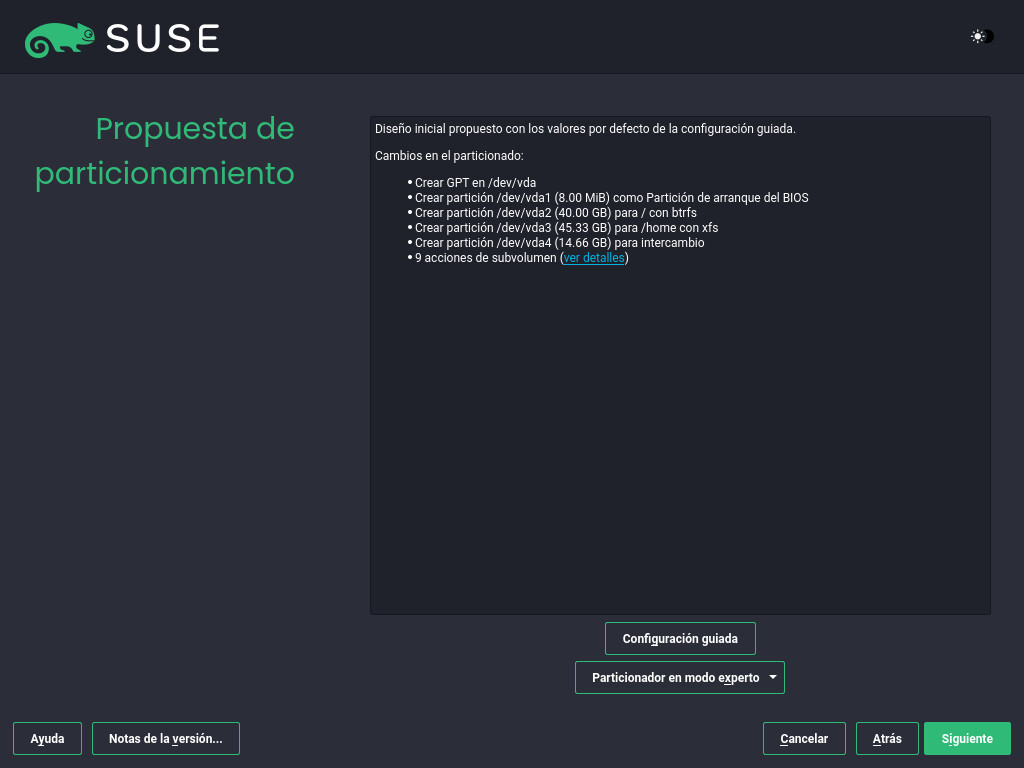
2.9 Propuesta de particionamiento #
Revise la configuración propuesta por el sistema para la partición. Si fuera necesario, cámbiela. Tiene las opciones siguientes:
Se iniciará un asistente que permite ajustar la propuesta de particionamiento. Las opciones disponibles dependerán de la configuración del sistema. En caso de que contenga más de un disco duro, puede elegir qué discos desea utilizar y dónde colocar la partición raíz. Si los discos ya contienen particiones, decida si desea eliminarlas o modificar su tamaño.
En los pasos siguientes, también puede añadir compatibilidad con LVM y cifrado de disco. Puede cambiar el sistema de archivos para la partición raíz y decidir si desea o no tener una partición "home" independiente.
Abre el descrito en el Sección 11.1, “Uso del ”. Esta función le proporciona un control completo sobre la configuración de particionamiento y le permite crear una configuración personalizada. Esta opción está diseñada para expertos.
Tenga en cuenta que, en el caso de las particiones, el espacio del disco se mide en unidades binarias, en lugar de en unidades decimales. Por ejemplo, si introduce tamaños de 1GB, 1GiB o 1G, todos significan 1 GiB (gibibyte), en lugar de 1 GB (gigabyte).
- Binario
1 GiB = 1 073 741 824 bytes.
- Decimal
1 GB = 1 000 000 000 bytes.
- Diferencia
1 GiB ≈ 1,07 GB.
Para aceptar la configuración propuesta sin cambios, haga clic en para continuar.
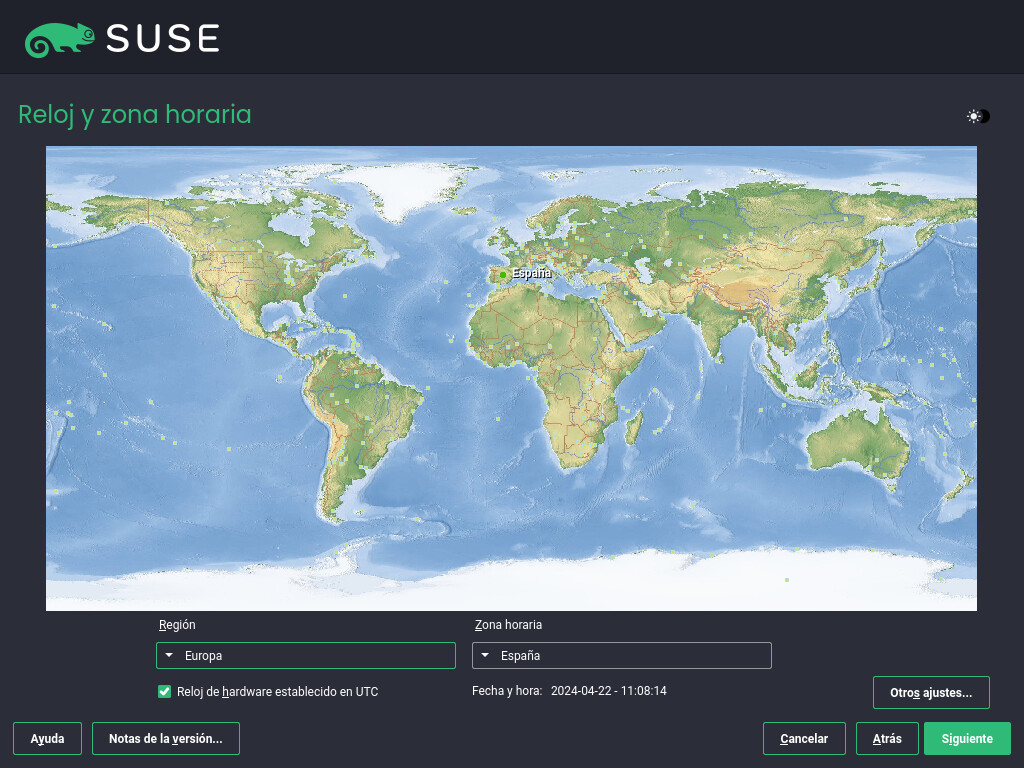
2.10 Reloj y zona horaria #
Seleccione el reloj y la zona horaria que se deben utilizar en el sistema. Para ajustar manualmente la hora o para configurar un servidor NTP que se encargue de la sincronización de la hora, seleccione Consulte el Sección 9.12, “Reloj y zona horaria” para obtener más información. Haga clic en
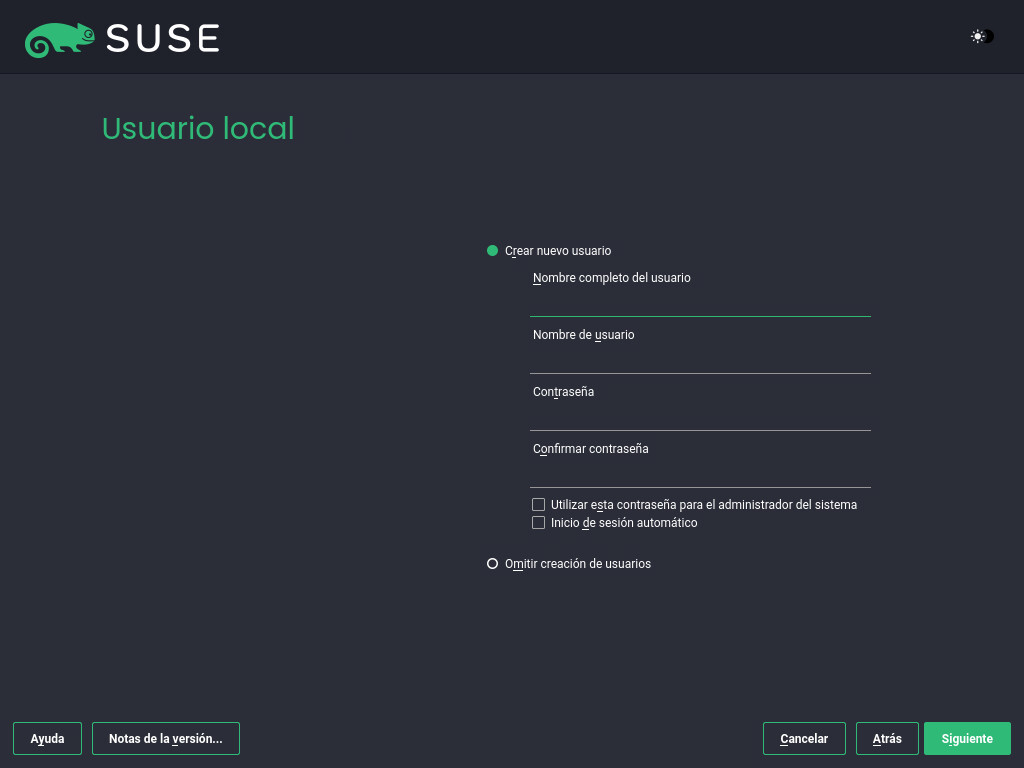
2.11 Usuario local #
Para crear un usuario local, escriba el nombre y los apellidos en el campo el nombre de entrada en el campo y en el campo indique el valor correspondiente.
La contraseña debe contener un mínimo de ocho caracteres, entre los que deben figurar números y letras mayúsculas y minúsculas. Las contraseñas puede tener 72 caracteres como máximo; cabe recordar que distinguen entre mayúsculas y minúsculas.
Por motivos de seguridad, se recomienda encarecidamente no habilitar la opción . Tampoco y proporcionar en su lugar una contraseña de usuario root en el paso de instalación siguiente.
Si instala en un sistema en el que haya una instalación anterior de Linux, puede . Haga clic en para obtener una lista de las cuentas de usuario disponibles. Seleccione uno o varios usuarios.
En un entorno donde los usuarios se gestionen de forma centralizada (por ejemplo, con NIS o LDAP), puede omitir la creación de usuarios locales. Seleccione en tal caso.
Haga clic en
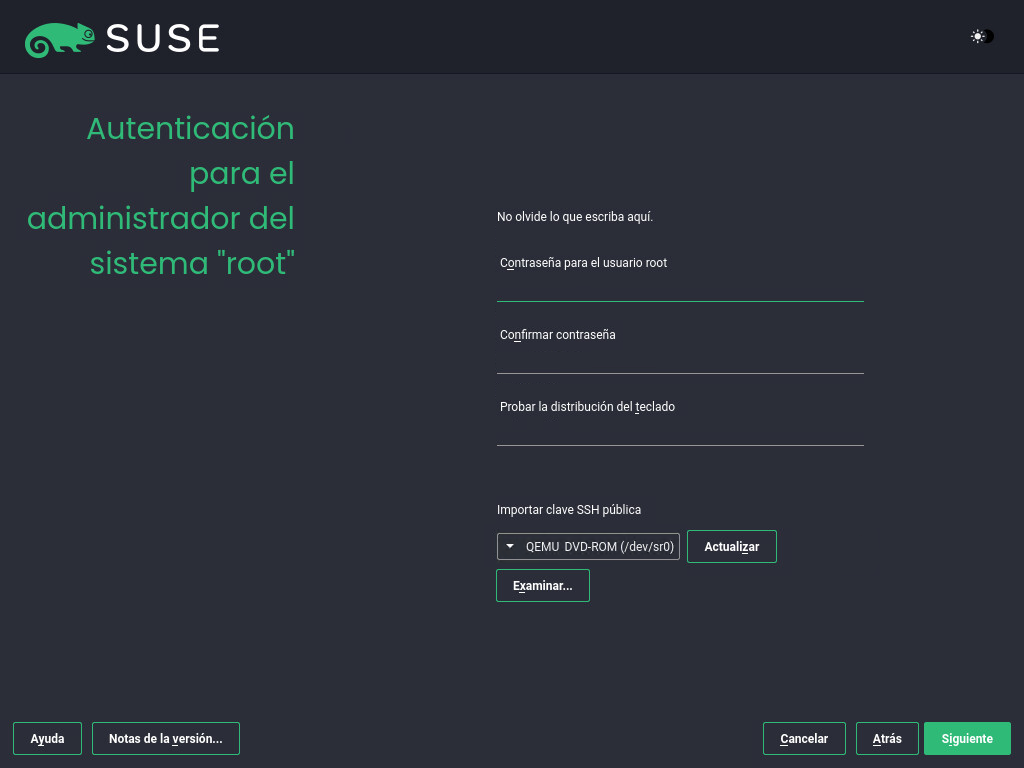
2.12 Autenticación para el administrador del sistema “root” #
Indique una contraseña para el administrador del sistema (denominado usuario root) o proporcione una clave SSH pública. Si lo desea, puede utilizar ambos elementos.
Dado que el usuario root cuenta con amplios permisos, la contraseña se debe elegir con cuidado. No debe olvidar nunca la contraseña del usuario root. Tras introducirla aquí, no podrá recuperarla.
Se recomienda utilizar solo caracteres ASCII del alfabeto de EE.UU. En caso de error del sistema o si hay que iniciar el sistema en modo de rescate, puede que el teclado disponible no esté en otro idioma.
Si desea acceder al sistema de forma remota a través de SSH mediante una clave pública, importe una clave desde un medios extraíble o una partición existente. Consulte el Sección 9.14, “Autenticación para el administrador del sistema root” para obtener más información.
Continúe con .
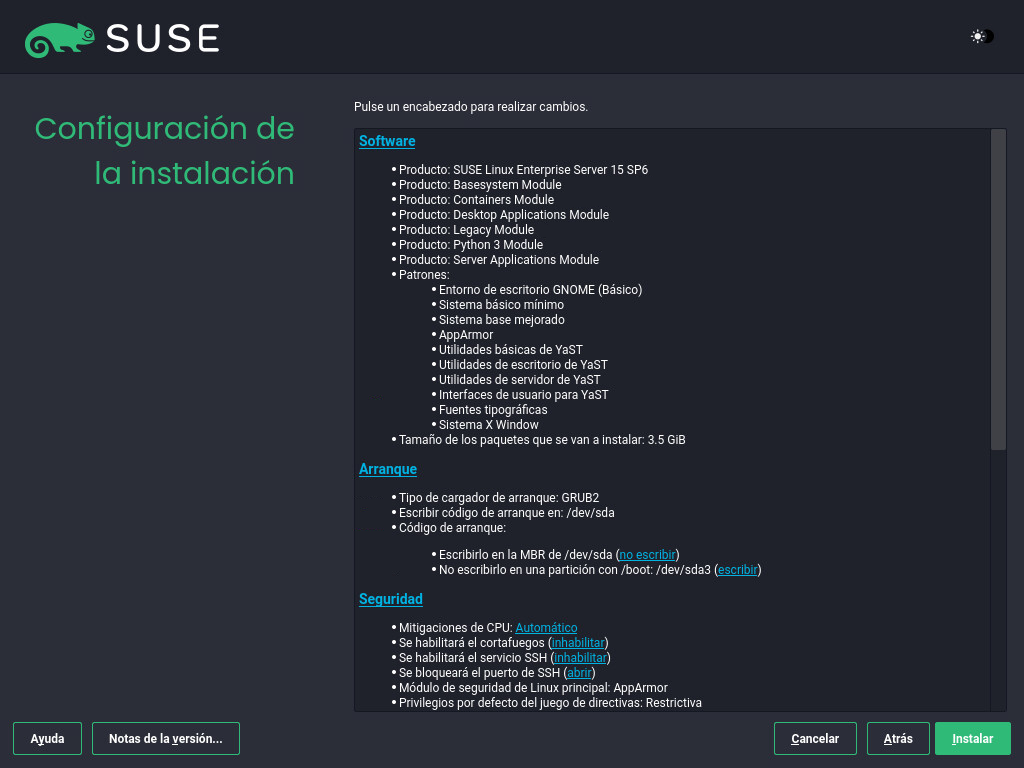
2.13 Configuración de la instalación #
Use la pantalla para revisar y, si fuera necesario, cambiar los valores de instalación propuestos oportunos. Se muestra la configuración actual para cada ajuste. Para cambiarla, haga clic en el encabezado correspondiente. Algunos ajustes, como el cortafuegos o SSH, se pueden cambiar directamente haciendo clic en sus enlaces.
Los cambios que se pueden hacer aquí también se pueden realizar más tarde en el sistema instalado. Sin embargo, si necesita acceder de forma remota directamente después de la instalación, puede que tenga que abrir el puerto SSH en los ajustes de
El ámbito de la instalación se define a partir de los módulos y las extensiones que ha elegido para la instalación. Sin embargo, dependiendo de la selección, no todos los paquetes disponibles de un módulo se seleccionarán para la instalación.
Al hacer clic en se abre la ventana donde puede cambiar el software elegido seleccionando o deseleccionando patrones. Cada patrón incluye varios paquetes de software necesarios para funciones específicas (por ejemplo, ). Para poder seleccionar con más detalle los paquetes de software que se deben instalar, seleccione . Consulte el Chapter 8, Installing or removing software para obtener más información.
Esta sección muestra la configuración del cargador de arranque. Solo se recomienda cambiar los valores por defecto si es estrictamente necesario. Consulte el Chapter 18, The boot loader GRUB 2 para obtener más detalles.
hace referencia a los parámetros de la línea de comandos de arranque del núcleo relativas a las mitigaciones de software que se han distribuido para evitar ataques de canal lateral de la CPU. Haga clic en la entrada seleccionada para elegir una opción distinta. Para obtener información, consulte el .
Por defecto, el está habilitado en todas las interfaces de red configuradas. Para inhabilitar
firewalldpor completo, haga clic en (no recomendado). Consulte el Chapter 23, Masquerading and firewalls para obtener información de la configuración.Nota: ajustes del cortafuegos para recibir actualizacionesPor defecto, el cortafuegos de SUSE Linux Enterprise Server solo bloquea las conexiones entrantes. Si el sistema se encuentra detrás de otro cortafuegos que bloquea el tráfico saliente, asegúrese de permitir las conexiones a
https://scc.suse.com/yhttps://updates.suse.comen los puertos 80 y 443 para recibir actualizaciones.El está habilitado por defecto, pero su puerto (el 22) está cerrado en el cortafuegos. Haga clic en para abrir el puerto o en para inhabilitar el servicio. Tenga en cuenta que si SSH está inhabilitado, las entradas remotas no serán posibles. Consulte el Chapter 22, Securing network operations with OpenSSH para obtener más información.
El por defecto es . Para inhabilitarlo, seleccione como módulo en los ajustes de
Haga clic para la directiva de seguridad
Defense Information Systems Agency STIG. Si algún ajuste de instalación es incompatible con la directiva, se le pedirá que lo modifique. Algunos ajustes se pueden ajustar automáticamente, mientras que otros requieren la intervención del usuario.Al habilitar un perfil de seguridad, se habilita una solución SCAP completa en el primer arranque. También puede realizar un proceso de o y corregir manualmente el sistema más adelante con OpenSCAP. Para obtener más información, consulte el Sección 9.15.4, “”.
Muestra la configuración actual de la red. Por defecto,
wickedse utiliza para instalaciones de servidor y NetworkManager para cargas de trabajo de escritorio. Haga clic en para cambiar la configuración. Para obtener información, consulte el Section 23.4, “Configuring a network connection with YaST”.Importante: compatibilidad con NetworkManagerSUSE solo admite NetworkManager para cargas de trabajo de escritorio con SLED o la extensión de estación de trabajo. Todas las certificaciones de servidor se realizan con la herramienta de configuración de red
wicked, y el uso de NetworkManager puede invalidarlas. NetworkManager no es compatible con SUSE para cargas de trabajo de servidor.Kdump guarda la imagen de la memoria (“volcado del núcleo”) en el sistema de archivos en caso de que el núcleo se detenga por fallo. Esto le permite depurar el archivo de volcado para buscar las causas del fallo. Kdump está preconfigurado y habilitado por defecto. Consulte el Section 20.7, “Basic Kdump configuration” para obtener más información.
Si ha instalado el módulo de aplicaciones de escritorio, el sistema arrancará en el modo y admitirá las funciones de red, multiusuario y de gestor de pantalla. Cambie a si no necesita iniciar sesión mediante el gestor de visualización.
Para consultar la información detallada del hardware, haga clic en En la pantalla que se abre también puede cambiar los consulte el Sección 9.15.10, “” para obtener más información.
2.14 Inicio de la instalación #
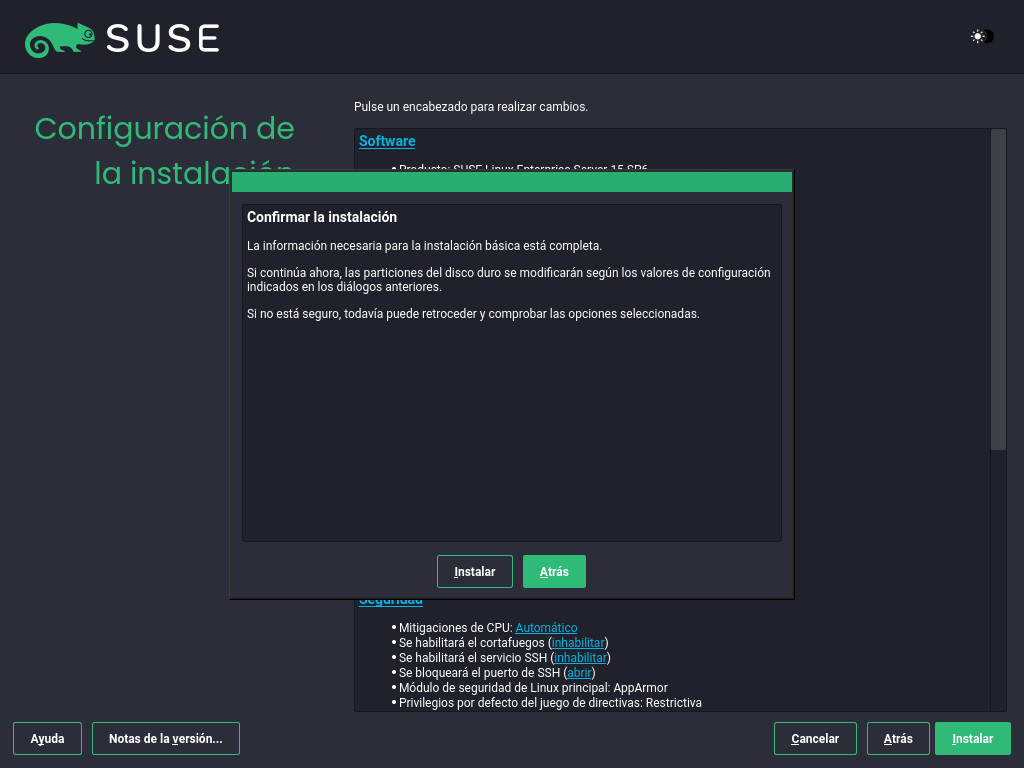
Cuando finalice la configuración del sistema en la pantalla , haga clic en . Según la selección de software realizada, quizás deba aceptar acuerdos de licencia antes de que aparezca la pantalla de confirmación de la instalación. Hasta este momento, no se ha realizado cambio alguno en el sistema. Cuando haga clic en por segunda vez, el proceso de instalación se iniciará.
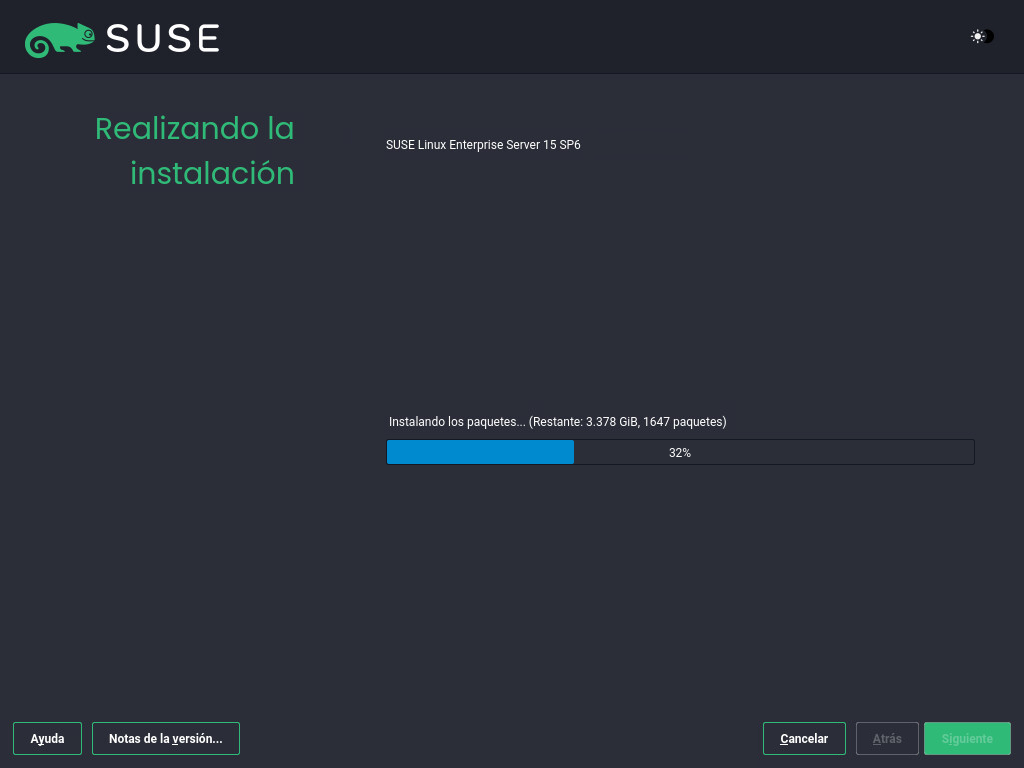
2.15 El proceso de instalación #
Durante la instalación, se muestra el progreso. Cuando finalice la rutina de instalación, el equipo se reiniciará para abrir el sistema instalado.
3 Información legal #
Copyright © 2006 – 2025 SUSE LLC y colaboradores. Reservados todos los derechos.
Está permitido copiar, distribuir y modificar este documento según los términos de la licencia de documentación gratuita GNU, versión 1.2 o (según su criterio) versión 1.3. Esta información de copyright y licencia deberán permanecer inalterados. En la sección titulada “GNU Free Documentation License” (Licencia de documentación gratuita GNU) se incluye una copia de la versión 1.2 de la licencia.
Para obtener información sobre las marcas comerciales de SUSE, consulte https://www.suse.com/company/legal/. Todas las marcas comerciales de otros fabricantes son propiedad de sus respectivas empresas. Los símbolos de marcas comerciales (®, ™, etc.) indican marcas comerciales de SUSE y sus afiliados. Los asteriscos (*) indican marcas comerciales de otros fabricantes.
Toda la información recogida en esta publicación se ha compilado prestando toda la atención posible al más mínimo detalle. Sin embargo, esto no garantiza una precisión total. Ni SUSE LLC, ni sus filiales, ni los autores o traductores serán responsables de los posibles errores o las consecuencias que de ellos pudieran derivarse.
4 GNU Free Documentation License #
Copyright (C) 2000, 2001, 2002 Free Software Foundation, Inc. 51 Franklin St, Fifth Floor, Boston, MA 02110-1301 USA. Everyone is permitted to copy and distribute verbatim copies of this license document, but changing it is not allowed.
0. PREAMBLE #
The purpose of this License is to make a manual, textbook, or other functional and useful document "free" in the sense of freedom: to assure everyone the effective freedom to copy and redistribute it, with or without modifying it, either commercially or non-commercially. Secondarily, this License preserves for the author and publisher a way to get credit for their work, while not being considered responsible for modifications made by others.
This License is a kind of "copyleft", which means that derivative works of the document must themselves be free in the same sense. It complements the GNU General Public License, which is a copyleft license designed for free software.
We have designed this License to use it for manuals for free software, because free software needs free documentation: a free program should come with manuals providing the same freedoms that the software does. But this License is not limited to software manuals; it can be used for any textual work, regardless of subject matter or whether it is published as a printed book. We recommend this License principally for works whose purpose is instruction or reference.
1. APPLICABILITY AND DEFINITIONS #
This License applies to any manual or other work, in any medium, that contains a notice placed by the copyright holder saying it can be distributed under the terms of this License. Such a notice grants a world-wide, royalty-free license, unlimited in duration, to use that work under the conditions stated herein. The "Document", below, refers to any such manual or work. Any member of the public is a licensee, and is addressed as "you". You accept the license if you copy, modify or distribute the work in a way requiring permission under copyright law.
A "Modified Version" of the Document means any work containing the Document or a portion of it, either copied verbatim, or with modifications and/or translated into another language.
A "Secondary Section" is a named appendix or a front-matter section of the Document that deals exclusively with the relationship of the publishers or authors of the Document to the Document's overall subject (or to related matters) and contains nothing that could fall directly within that overall subject. (Thus, if the Document is in part a textbook of mathematics, a Secondary Section may not explain any mathematics.) The relationship could be a matter of historical connection with the subject or with related matters, or of legal, commercial, philosophical, ethical or political position regarding them.
The "Invariant Sections" are certain Secondary Sections whose titles are designated, as being those of Invariant Sections, in the notice that says that the Document is released under this License. If a section does not fit the above definition of Secondary then it is not allowed to be designated as Invariant. The Document may contain zero Invariant Sections. If the Document does not identify any Invariant Sections then there are none.
The "Cover Texts" are certain short passages of text that are listed, as Front-Cover Texts or Back-Cover Texts, in the notice that says that the Document is released under this License. A Front-Cover Text may be at most 5 words, and a Back-Cover Text may be at most 25 words.
A "Transparent" copy of the Document means a machine-readable copy, represented in a format whose specification is available to the general public, that is suitable for revising the document straightforwardly with generic text editors or (for images composed of pixels) generic paint programs or (for drawings) some widely available drawing editor, and that is suitable for input to text formatters or for automatic translation to a variety of formats suitable for input to text formatters. A copy made in an otherwise Transparent file format whose markup, or absence of markup, has been arranged to thwart or discourage subsequent modification by readers is not Transparent. An image format is not Transparent if used for any substantial amount of text. A copy that is not "Transparent" is called "Opaque".
Examples of suitable formats for Transparent copies include plain ASCII without markup, Texinfo input format, LaTeX input format, SGML or XML using a publicly available DTD, and standard-conforming simple HTML, PostScript or PDF designed for human modification. Examples of transparent image formats include PNG, XCF and JPG. Opaque formats include proprietary formats that can be read and edited only by proprietary word processors, SGML or XML for which the DTD and/or processing tools are not generally available, and the machine-generated HTML, PostScript or PDF produced by some word processors for output purposes only.
The "Title Page" means, for a printed book, the title page itself, plus such following pages as are needed to hold, legibly, the material this License requires to appear in the title page. For works in formats which do not have any title page as such, "Title Page" means the text near the most prominent appearance of the work's title, preceding the beginning of the body of the text.
A section "Entitled XYZ" means a named subunit of the Document whose title either is precisely XYZ or contains XYZ in parentheses following text that translates XYZ in another language. (Here XYZ stands for a specific section name mentioned below, such as "Acknowledgements", "Dedications", "Endorsements", or "History".) To "Preserve the Title" of such a section when you modify the Document means that it remains a section "Entitled XYZ" according to this definition.
The Document may include Warranty Disclaimers next to the notice which states that this License applies to the Document. These Warranty Disclaimers are considered to be included by reference in this License, but only as regards disclaiming warranties: any other implication that these Warranty Disclaimers may have is void and has no effect on the meaning of this License.
2. VERBATIM COPYING #
You may copy and distribute the Document in any medium, either commercially or non-commercially, provided that this License, the copyright notices, and the license notice saying this License applies to the Document are reproduced in all copies, and that you add no other conditions whatsoever to those of this License. You may not use technical measures to obstruct or control the reading or further copying of the copies you make or distribute. However, you may accept compensation in exchange for copies. If you distribute a large enough number of copies you must also follow the conditions in section 3.
You may also lend copies, under the same conditions stated above, and you may publicly display copies.
3. COPYING IN QUANTITY #
If you publish printed copies (or copies in media that commonly have printed covers) of the Document, numbering more than 100, and the Document's license notice requires Cover Texts, you must enclose the copies in covers that carry, clearly and legibly, all these Cover Texts: Front-Cover Texts on the front cover, and Back-Cover Texts on the back cover. Both covers must also clearly and legibly identify you as the publisher of these copies. The front cover must present the full title with all words of the title equally prominent and visible. You may add other material on the covers in addition. Copying with changes limited to the covers, as long as they preserve the title of the Document and satisfy these conditions, can be treated as verbatim copying in other respects.
If the required texts for either cover are too voluminous to fit legibly, you should put the first ones listed (as many as fit reasonably) on the actual cover, and continue the rest onto adjacent pages.
If you publish or distribute Opaque copies of the Document numbering more than 100, you must either include a machine-readable Transparent copy along with each Opaque copy, or state in or with each Opaque copy a computer-network location from which the general network-using public has access to download using public-standard network protocols a complete Transparent copy of the Document, free of added material. If you use the latter option, you must take reasonably prudent steps, when you begin distribution of Opaque copies in quantity, to ensure that this Transparent copy will remain thus accessible at the stated location until at least one year after the last time you distribute an Opaque copy (directly or through your agents or retailers) of that edition to the public.
It is requested, but not required, that you contact the authors of the Document well before redistributing any large number of copies, to give them a chance to provide you with an updated version of the Document.
4. MODIFICATIONS #
You may copy and distribute a Modified Version of the Document under the conditions of sections 2 and 3 above, provided that you release the Modified Version under precisely this License, with the Modified Version filling the role of the Document, thus licensing distribution and modification of the Modified Version to whoever possesses a copy of it. In addition, you must do these things in the Modified Version:
Use in the Title Page (and on the covers, if any) a title distinct from that of the Document, and from those of previous versions (which should, if there were any, be listed in the History section of the Document). You may use the same title as a previous version if the original publisher of that version gives permission.
List on the Title Page, as authors, one or more persons or entities responsible for authorship of the modifications in the Modified Version, together with at least five of the principal authors of the Document (all of its principal authors, if it has fewer than five), unless they release you from this requirement.
State on the Title page the name of the publisher of the Modified Version, as the publisher.
Preserve all the copyright notices of the Document.
Add an appropriate copyright notice for your modifications adjacent to the other copyright notices.
Include, immediately after the copyright notices, a license notice giving the public permission to use the Modified Version under the terms of this License, in the form shown in the Addendum below.
Preserve in that license notice the full lists of Invariant Sections and required Cover Texts given in the Document's license notice.
Include an unaltered copy of this License.
Preserve the section Entitled "History", Preserve its Title, and add to it an item stating at least the title, year, new authors, and publisher of the Modified Version as given on the Title Page. If there is no section Entitled "History" in the Document, create one stating the title, year, authors, and publisher of the Document as given on its Title Page, then add an item describing the Modified Version as stated in the previous sentence.
Preserve the network location, if any, given in the Document for public access to a Transparent copy of the Document, and likewise the network locations given in the Document for previous versions it was based on. These may be placed in the "History" section. You may omit a network location for a work that was published at least four years before the Document itself, or if the original publisher of the version it refers to gives permission.
For any section Entitled "Acknowledgements" or "Dedications", Preserve the Title of the section, and preserve in the section all the substance and tone of each of the contributor acknowledgements and/or dedications given therein.
Preserve all the Invariant Sections of the Document, unaltered in their text and in their titles. Section numbers or the equivalent are not considered part of the section titles.
Delete any section Entitled "Endorsements". Such a section may not be included in the Modified Version.
Do not retitle any existing section to be Entitled "Endorsements" or to conflict in title with any Invariant Section.
Preserve any Warranty Disclaimers.
If the Modified Version includes new front-matter sections or appendices that qualify as Secondary Sections and contain no material copied from the Document, you may at your option designate some or all of these sections as invariant. To do this, add their titles to the list of Invariant Sections in the Modified Version's license notice. These titles must be distinct from any other section titles.
You may add a section Entitled "Endorsements", provided it contains nothing but endorsements of your Modified Version by various parties--for example, statements of peer review or that the text has been approved by an organization as the authoritative definition of a standard.
You may add a passage of up to five words as a Front-Cover Text, and a passage of up to 25 words as a Back-Cover Text, to the end of the list of Cover Texts in the Modified Version. Only one passage of Front-Cover Text and one of Back-Cover Text may be added by (or through arrangements made by) any one entity. If the Document already includes a cover text for the same cover, previously added by you or by arrangement made by the same entity you are acting on behalf of, you may not add another; but you may replace the old one, on explicit permission from the previous publisher that added the old one.
The author(s) and publisher(s) of the Document do not by this License give permission to use their names for publicity for or to assert or imply endorsement of any Modified Version.
5. COMBINING DOCUMENTS #
You may combine the Document with other documents released under this License, under the terms defined in section 4 above for modified versions, provided that you include in the combination all of the Invariant Sections of all of the original documents, unmodified, and list them all as Invariant Sections of your combined work in its license notice, and that you preserve all their Warranty Disclaimers.
The combined work need only contain one copy of this License, and multiple identical Invariant Sections may be replaced with a single copy. If there are multiple Invariant Sections with the same name but different contents, make the title of each such section unique by adding at the end of it, in parentheses, the name of the original author or publisher of that section if known, or else a unique number. Make the same adjustment to the section titles in the list of Invariant Sections in the license notice of the combined work.
In the combination, you must combine any sections Entitled "History" in the various original documents, forming one section Entitled "History"; likewise combine any sections Entitled "Acknowledgements", and any sections Entitled "Dedications". You must delete all sections Entitled "Endorsements".
6. COLLECTIONS OF DOCUMENTS #
You may make a collection consisting of the Document and other documents released under this License, and replace the individual copies of this License in the various documents with a single copy that is included in the collection, provided that you follow the rules of this License for verbatim copying of each of the documents in all other respects.
You may extract a single document from such a collection, and distribute it individually under this License, provided you insert a copy of this License into the extracted document, and follow this License in all other respects regarding verbatim copying of that document.
7. AGGREGATION WITH INDEPENDENT WORKS #
A compilation of the Document or its derivatives with other separate and independent documents or works, in or on a volume of a storage or distribution medium, is called an "aggregate" if the copyright resulting from the compilation is not used to limit the legal rights of the compilation's users beyond what the individual works permit. When the Document is included in an aggregate, this License does not apply to the other works in the aggregate which are not themselves derivative works of the Document.
If the Cover Text requirement of section 3 is applicable to these copies of the Document, then if the Document is less than one half of the entire aggregate, the Document's Cover Texts may be placed on covers that bracket the Document within the aggregate, or the electronic equivalent of covers if the Document is in electronic form. Otherwise they must appear on printed covers that bracket the whole aggregate.
8. TRANSLATION #
Translation is considered a kind of modification, so you may distribute translations of the Document under the terms of section 4. Replacing Invariant Sections with translations requires special permission from their copyright holders, but you may include translations of some or all Invariant Sections in addition to the original versions of these Invariant Sections. You may include a translation of this License, and all the license notices in the Document, and any Warranty Disclaimers, provided that you also include the original English version of this License and the original versions of those notices and disclaimers. In case of a disagreement between the translation and the original version of this License or a notice or disclaimer, the original version will prevail.
If a section in the Document is Entitled "Acknowledgements", "Dedications", or "History", the requirement (section 4) to Preserve its Title (section 1) will typically require changing the actual title.
9. TERMINATION #
You may not copy, modify, sublicense, or distribute the Document except as expressly provided for under this License. Any other attempt to copy, modify, sublicense or distribute the Document is void, and will automatically terminate your rights under this License. However, parties who have received copies, or rights, from you under this License will not have their licenses terminated so long as such parties remain in full compliance.
10. FUTURE REVISIONS OF THIS LICENSE #
The Free Software Foundation may publish new, revised versions of the GNU Free Documentation License from time to time. Such new versions will be similar in spirit to the present version, but may differ in detail to address new problems or concerns. See https://www.gnu.org/copyleft/.
Each version of the License is given a distinguishing version number. If the Document specifies that a particular numbered version of this License "or any later version" applies to it, you have the option of following the terms and conditions either of that specified version or of any later version that has been published (not as a draft) by the Free Software Foundation. If the Document does not specify a version number of this License, you may choose any version ever published (not as a draft) by the Free Software Foundation.
ADDENDUM: How to use this License for your documents #
Copyright (c) YEAR YOUR NAME.
Permission is granted to copy, distribute and/or modify this document
under the terms of the GNU Free Documentation License, Version 1.2
or any later version published by the Free Software Foundation;
with no Invariant Sections, no Front-Cover Texts, and no Back-Cover Texts.
A copy of the license is included in the section entitled “GNU
Free Documentation License”.
If you have Invariant Sections, Front-Cover Texts and Back-Cover Texts, replace the “with...Texts.” line with this:
with the Invariant Sections being LIST THEIR TITLES, with the
Front-Cover Texts being LIST, and with the Back-Cover Texts being LIST.
If you have Invariant Sections without Cover Texts, or some other combination of the three, merge those two alternatives to suit the situation.
If your document contains nontrivial examples of program code, we recommend releasing these examples in parallel under your choice of free software license, such as the GNU General Public License, to permit their use in free software.
