Kurzanleitung zur Installation #
Diese Kurzanleitung führt Sie Schritt für Schritt durch die Installation von SUSE Linux Enterprise Server 15 SP6.
1 Willkommen beim SUSE Linux Enterprise Server #
Mit den nachfolgenden Verfahren installieren Sie das Produkt auf allen unterstützten Hardware-Plattformen. Hierbei wird vorausgesetzt, dass Sie /IPLed erfolgreich in das Installationssystem gebootet haben. Ausführlichere Installationsanweisungen und weitere Informationen zu Bereitstellungsstrategien finden Sie im Installationshandbuch. Plattformspezifische Vorbereitungen für den Boot- oder IPL-Vorgang in das Installationssystem finden Sie in den folgenden Teilen des oben genannten Handbuchs:
1.1 Der Unified Installer #
Ab SUSE Linux Enterprise Server 15 besteht das Installationsmedium nur noch aus dem Unified Installer, einem minimalistischen System für die Installation, Aktualisierung und Registrierung von Basisprodukten zu SUSE Linux Enterprise Server. Während der Installation können Sie Module und Erweiterungen auswählen, die zusätzlich zum Unified Installer installiert werden sollen.
1.2 Installation offline oder ohne Registrierung #
Das Standard-Installationsmedium SLE-15-SP6-Online-ARCH-GM-media1.iso ist größenmäßig optimiert und enthält keine Module und Erweiterungen. Daher ist für die Installation Netzwerkzugriff erforderlich, um das Produkt zu registrieren und Repository-Daten für Module und Erweiterungen abzurufen.
Nutzen Sie für eine Installation ohne Registrierung das SLE-15-SP6-Full-ARCH-GM-media1.iso-Image von https://www.suse.com/download/sles/. Weitere Informationen finden Sie unter Abschnitt 9.7.3, „Installation ohne Registrierung“.
Kopieren Sie mit folgendem Kommando den Inhalt des Installations-Image auf einen Flash-Wechseldatenträger.
>sudodd if=IMAGE of=FLASH_DISK bs=4M && sync
IMAGE muss durch den Pfad zur Image-Datei SLE-15-SP6-Online-ARCH-GM-media1.iso oder SLE-15-SP6-Full-ARCH-GM-media1.iso ersetzt werden. FLASH_DISK muss durch das Flash-Gerät ersetzt werden. Legen Sie das Gerät zur Identifizierung ein und führen Sie folgendes Kommando aus:
# grep -Ff <(hwinfo --disk --short) <(hwinfo --usb --short)
disk:
  /dev/sdc             General USB Flash Disk
Stellen Sie sicher, dass die Größe des Geräts für das gewünschte Image ausreicht. Die Größe des Geräts prüfen Sie mit:
# fdisk -l /dev/sdc | grep -e "^/dev"
     /dev/sdc1  *     2048 31490047 31488000  15G 83 Linux
In diesem Beispiel hat das Gerät eine Kapazität von 15 GB. Das Kommando für die SLE-15-SP6-Full-ARCH-GM-media1.iso wäre:
dd if=SLE-15-SP6-Full-ARCH-GM-media1.iso of=/dev/sdc bs=4M && sync
Außerdem darf das Gerät beim Ausführen des Kommandos dd nicht eingehängt sein. Denken Sie daran, dass alle Daten in der Partition gelöscht werden.
2 Installationsvorgang #
Zur Installation von SUSE Linux Enterprise Server führen Sie vom Unified Installer einen Boot- oder IPL-Vorgang in das Installationsprogramm aus und starten Sie die Installation.
2.1 Auswahl der Sprache, der Tastaturbelegung und des Produkts #
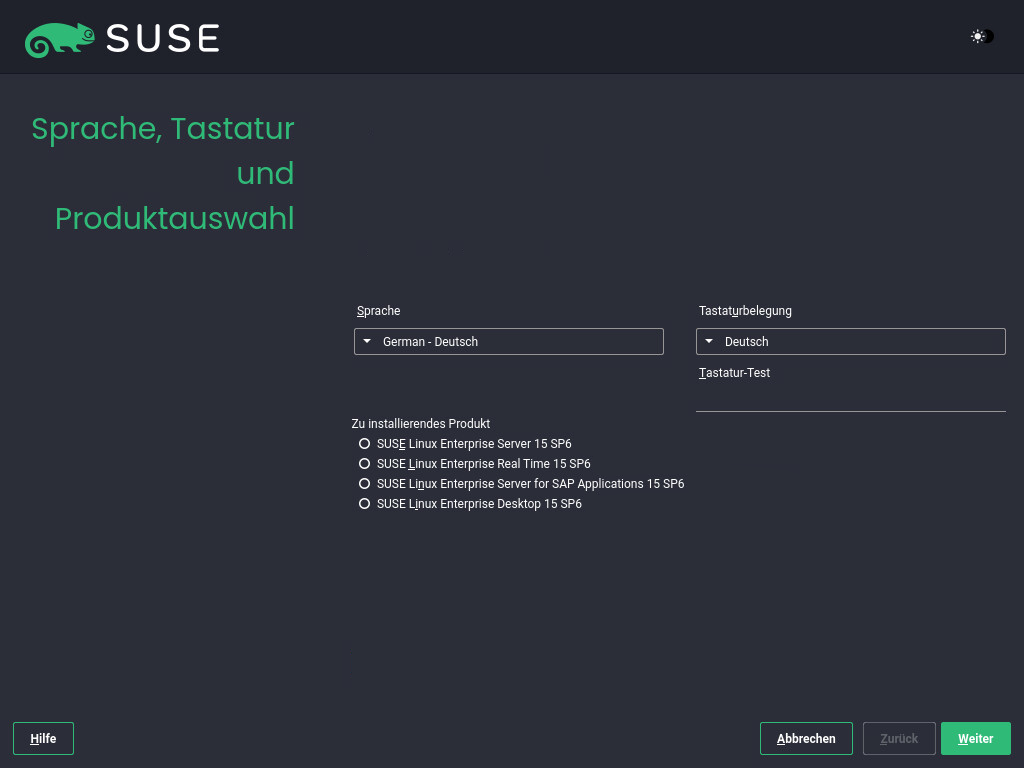
Die Einstellungen für und werden gemäß der Sprache initialisiert, die Sie im Boot-Bildschirm ausgewählt haben. Wenn Sie die Standardeinstellung nicht geändert haben, gelten die Einstellungen für Englisch (US). Ändern Sie die Einstellungen hier bei Bedarf. Testen Sie die Tastaturbelegung im Feld
Mit dem Unified Installer lassen sich alle SUSE Linux Enterprise-Basisprodukte installieren:
SUSE Linux Enterprise Server 15 SP6 (hier behandelt)
SUSE Linux Enterprise Desktop 15 SP6 (Installationsanleitung verfügbar unter https://documentation.suse.com/sled/)
SUSE Linux Enterprise Real Time 15 SP6 (Installationsanleitung verfügbar unter https://documentation.suse.com/sle-rt/)
SUSE Linux Enterprise Server for SAP Applications 15 SP6 (Installationsanleitung verfügbar unter https://documentation.suse.com/sles-sap)
SUSE Manager Server 5.0 (Installationsanleitung verfügbar unter https://documentation.suse.com/suma/)
SUSE Manager Proxy 5.0 (Installationsanleitung verfügbar unter https://documentation.suse.com/suma/)
SUSE Manager Retail Branch Server 5.0 (Installationsanleitung verfügbar unter https://documentation.suse.com/suma-retail)
Wählen Sie ein Produkt zur Installation aus. Sie benötigen einen Registrierungscode für das jeweilige Produkt. In diesem Dokument wird vorausgesetzt, dass Sie SUSE Linux Enterprise Server ausgewählt haben. Fahren Sie mit fort.
Wenn Sie Schwierigkeiten beim Lesen der Bezeichnungen im Installationsprogramm haben, können Sie die Widget-Farben und das Thema ändern.
Klicken Sie auf die Schaltfläche oder drücken Sie Umschalttaste–F3, um ein Dialogfeld zur Themenauswahl zu öffnen.Wählen Sie ein Thema in der Liste aus und Sie das Dialogfeld.
Umschalttaste–F4 schaltet das Farbschema für sehbehinderte Benutzer um. Drücken Sie die Tasten erneut, um zum Standardschema zurückzukehren.
2.2 Lizenzvereinbarung #
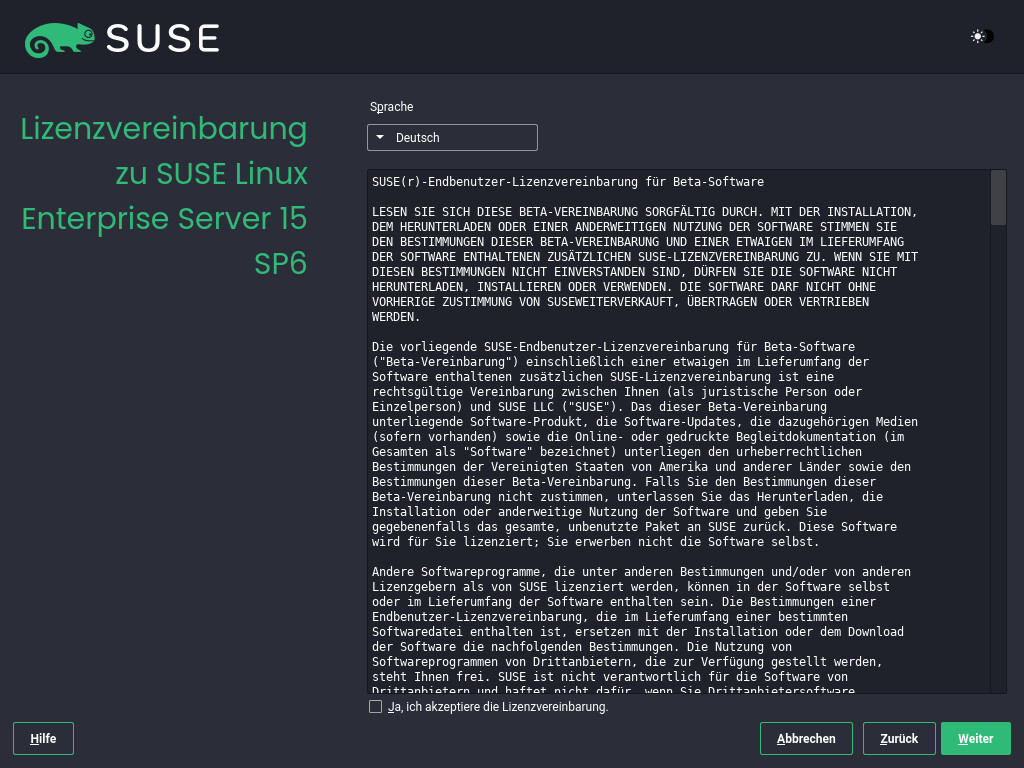
Lesen Sie die Lizenzvereinbarung. Die Anzeige erfolgt in der Sprache, die Sie im Boot-Bildschirm ausgewählt haben. Über das Dropdown-Feld für die können Sie eine Übersetzung abrufen. Um installieren zu können, müssen Sie diese Vereinbarung mit Ja, ich akzeptiere die Lizenzvereinbarung akzeptieren. Fahren Sie mit fort.
2.3 Netzwerkeinstellungen #
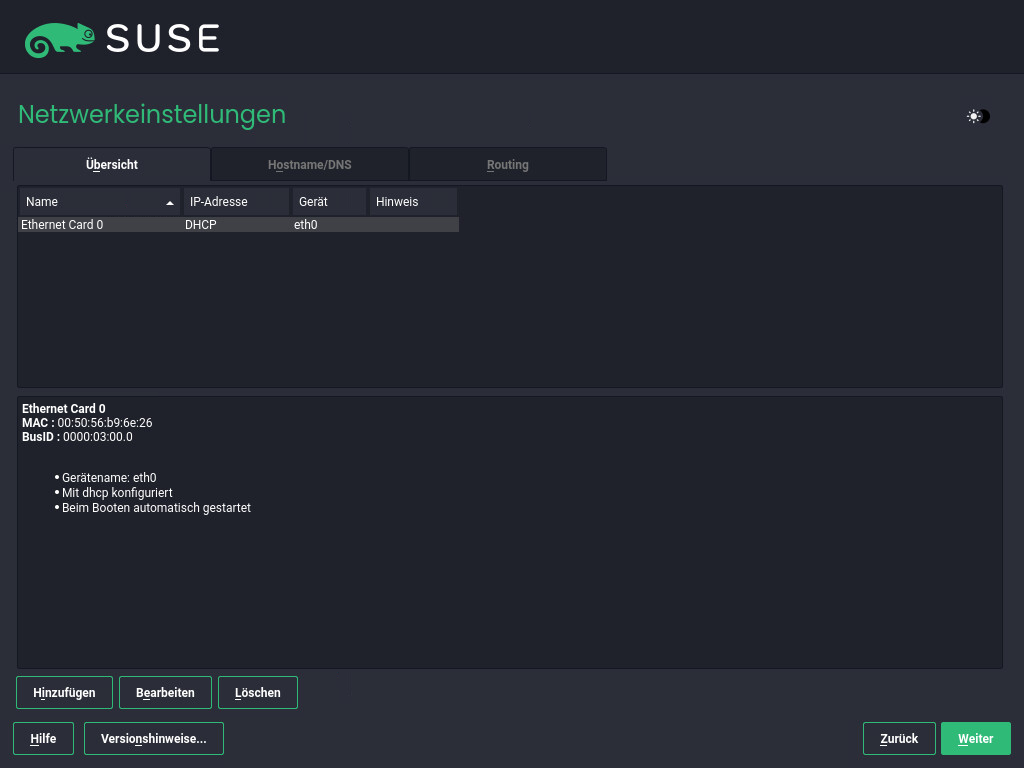
Es wird eine Systemanalyse durchgeführt, bei der das Installationsprogramm die Speichergeräte ermittelt und nach weiteren installierten Systemen sucht. Falls das Netzwerk beim Starten der Installation automatisch über DHCP konfiguriert wurde, gelangen Sie zum Registrierungsschritt.
Falls das Netzwerk noch nicht konfiguriert wurde, wird das Dialogfeld geöffnet. Wählen Sie eine Netzwerkschnittstelle in der Liste aus und konfigurieren Sie sie mit . Alternativ können Sie eine Schnittstelle manuell . Weitere Informationen finden Sie im Abschnitt 9.6, „Netzwerkeinstellungen“ und Abschnitt 23.4, „Konfigurieren von Netzwerkverbindungen mit YaST“. Soll die Installation ohne Netzwerkzugriff ausgeführt werden, nehmen Sie hier keine Änderungen vor, sondern überspringen Sie diesen Schritt mit .
2.4 IBM Z: Datenträgeraktivierung #
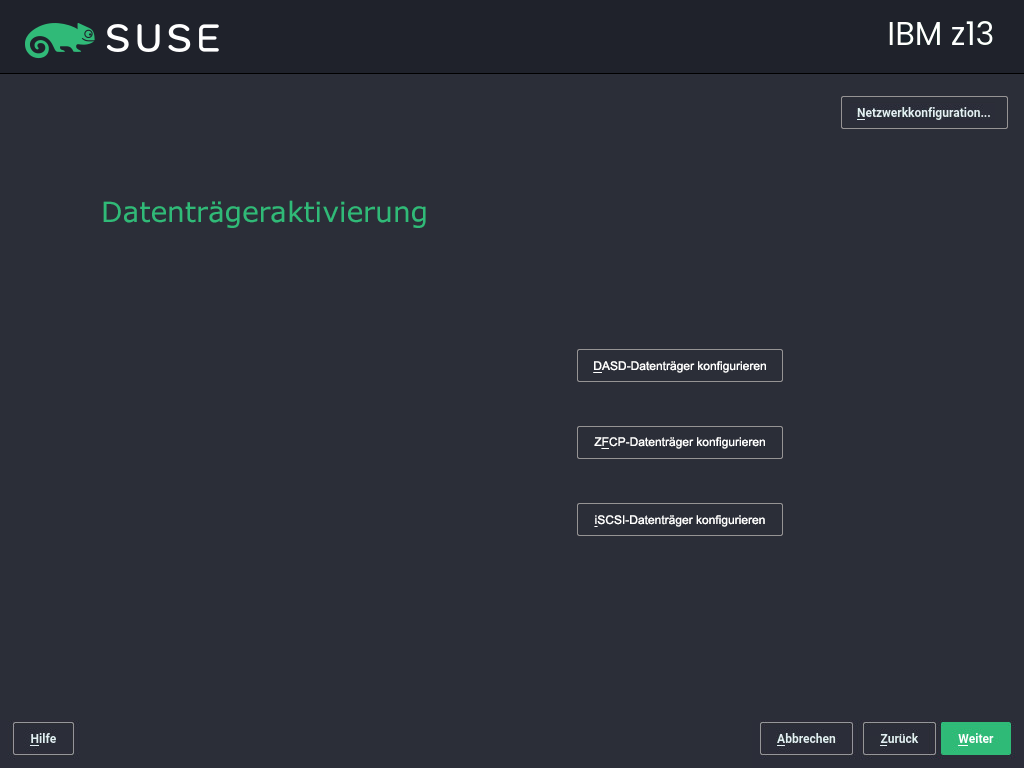
Überspringen Sie diesen Schritt, wenn Sie die Installation nicht auf IBM Z-Hardware ausführen.
Konfigurieren Sie die angeschlossenen Festplatten. Wählen Sie DASD, per Fiber-Channel angeschlossene SCSI-Platten (ZFCP) oder iSCSI für die Installation von SUSE Linux Enterprise Server. Die Schaltflächen für die DASD- und die zFCP-Konfiguration sind nur dann verfügbar, wenn die entsprechenden Geräte angeschlossen sind. Klicken Sie auf und richten Sie den ausgewählten Festplattentyp ein. Weitere Informationen hierzu finden Sie im Abschnitt 9.5, „IBM Z: Datenträgeraktivierung“.
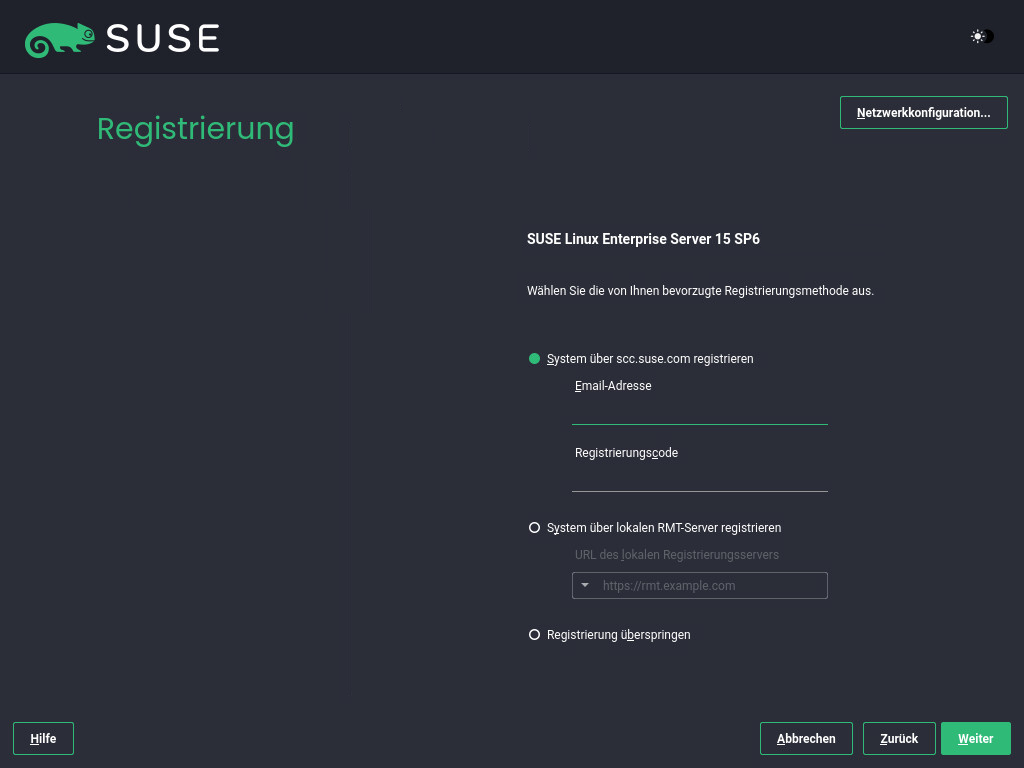
2.5 Registrierung #
Für technischen Support und Produktaktualisierungen müssen Sie SUSE Linux Enterprise Server beim SUSE Customer Center oder bei einem lokalen Registrierungsserver registrieren und aktivieren. Wenn Sie das Produkt zu diesem Zeitpunkt registrieren, erhalten Sie außerdem den sofortigen Zugriff auf das Aktualisierungs-Repository. Damit können Sie das System mit den aktuellen Aktualisierungen und Patches installieren.
Bei der Registrierung werden die Repositorys und Abhängigkeiten für Module und Erweiterungen vom Registrierungsserver geladen.
Zur Registrierung beim SUSE Customer Center geben Sie die ein, die mit Ihrem SUSE Customer Center-Konto verknüpft ist, sowie den für SUSE Linux Enterprise Server. Fahren Sie mit fort.
Wenn Ihr Unternehmen einen lokalen Registrierungsserver bereitstellt, können Sie sich alternativ dort registrieren. Aktivieren Sie und wählen Sie eine Adresse im Dropdown-Feld aus oder geben Sie eine URL ein. Fahren Sie mit fort.
Wenn Sie offline arbeiten oder die Registrierung überspringen möchten, aktivieren Sie . Bestätigen Sie die Warnmeldung mit und klicken Sie auf .
Wichtig: Überspringen der RegistrierungDas System und die Erweiterungen müssen registriert werden, damit Sie Aktualisierungen abrufen und Support in Anspruch nehmen können. Die Registrierung kann nur übersprungen werden, wenn die Installation von der Image-Datei
SLE-15-SP6-Full-ARCH-GM-media1.isoaus ausgeführt wird.Falls Sie die Registrierung nicht bei der Installation durchführen, können Sie sie jederzeit später aus dem laufenden System heraus nachholen. Führen Sie dazu die › oder das Kommandozeilen-Tool
SUSEConnectaus.
Sobald SUSE Linux Enterprise Server ordnungsgemäß registriert wurde, werden Sie gefragt, ob die aktuell verfügbaren Online-Aktualisierungen während der Installation ebenfalls installiert werden sollen. Wenn Sie wählen, wird das System mit den aktuellsten Paketen installiert, und es ist nicht erforderlich, nach der Installation die Updates anzuwenden. Es wird empfohlen, diese Option zu aktivieren.
Standardmäßig blockiert die Firewall von SUSE Linux Enterprise Server nur eingehende Verbindungen. Wenn sich Ihr System hinter einer anderen Firewall befindet, die ausgehenden Datenverkehr blockiert, stellen Sie sicher, dass Sie Verbindungen mit https://scc.suse.com/ und https://updates.suse.com über die Ports 80 und 443 zulassen, um Aktualisierungen zu erhalten.
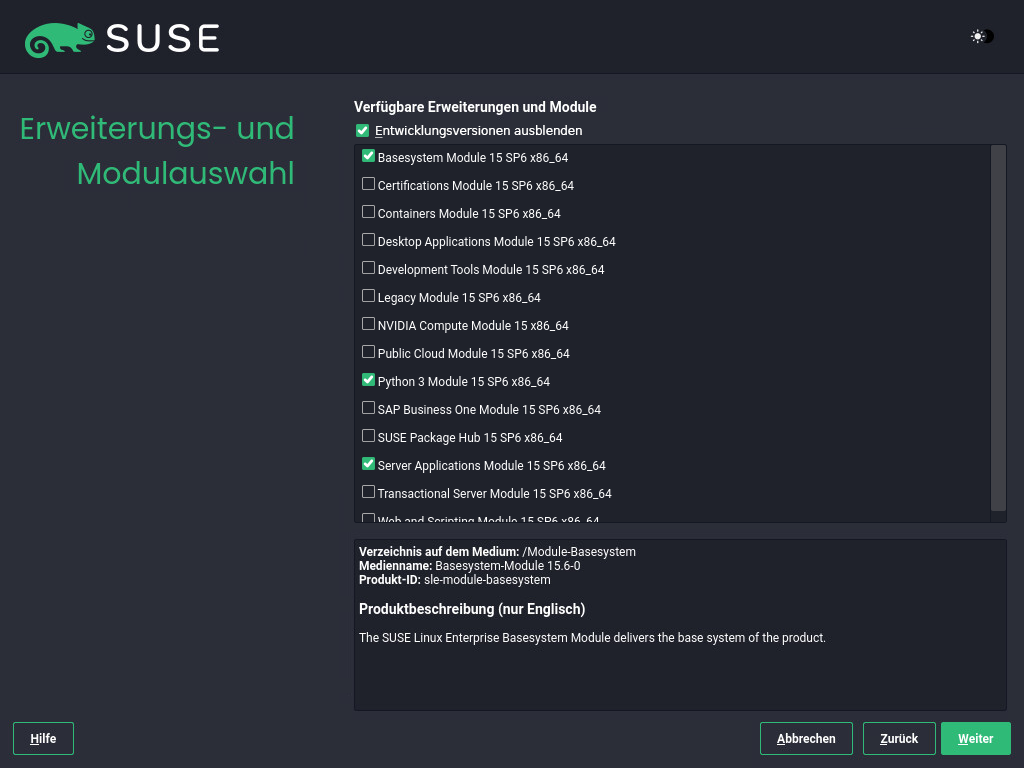
2.6 Auswahl der Erweiterungen und Module #
Sobald das System erfolgreich registriert wurde, werden im Installationsprogramm die Module und Erweiterungen angezeigt, die für SUSE Linux Enterprise Server zur Auswahl stehen. Mit Modulen können Sie das Produkt an Ihre Anforderungen anpassen. Sie sind Ihrem SUSE Linux Enterprise Server-Abonnement enthalten. Erweiterungen liefern zusätzliche Funktionen für Ihr Produkt. Sie müssen separat erworben werden.
Die verfügbaren Module oder Erweiterungen ergeben sich aus dem Produkt, das Sie im ersten Schritt dieser Installation ausgewählt haben. Wenn Sie ein Modul auswählen, erhalten Sie eine Beschreibung der Module und deren Lebenszyklen. Weitere Informationen finden Sie in der Modules and Extensions Quick Start.
Die Auswahl von Modulen wirkt sich indirekt auf den Umfang der Installation aus, da hiermit die Software-Quellen (Repositorys) definiert werden, die für die Installation und im laufenden System bereitstehen.
Die folgenden Module und Erweiterungen stehen für SUSE Linux Enterprise Server zur Auswahl:
- Basesystem Module
Dieses Modul ergänzt den Unified Installer mit einem Basissystem. Dies ist für alle anderen Module und Erweiterungen erforderlich. Der Umfang einer Installation, die lediglich das Basissystem umfasst, ist mit dem Installationsschema minimal system früherer Versionen von SUSE Linux Enterprise Server vergleichbar. Dieses Modul wird standardmäßig zur Installation ausgewählt und dessen Auswahl sollte nicht aufgehoben werden.
Abhängigkeiten: keine
- Certifications Module
Enthält die FIPS-Zertifizierungspakete.
Abhängigkeiten: Basesystem
- Containers Module
Unterstützung und Tools für Container.
Abhängigkeiten: Basesystem
- Desktop Applications Module
Fügt eine grafische Benutzeroberfläche und grundlegende Desktop-Anwendungen zum System hinzu.
Abhängigkeiten: Basesystem
- Development Tools Module
Enthält Compiler (einschließlich gcc) und Bibliotheken, die erforderlich sind, um Anwendungen zu kompilieren und eine Fehlersuche durchzuführen. Ersetzt das frühere Softwareentwicklungskit (SDK).
Abhängigkeiten: Basesystem, Desktop Applications
- Hochleistungscomputing-Modul
Stellt spezielle Tools bereit, die häufig für leistungsstarke, numerisch intensive Arbeitslasten verwendet werden.
Abhängigkeiten: Basesystem
- Legacy Module
Unterstützt Sie bei der Migration von Anwendungen aus früheren Versionen von SUSE Linux Enterprise Server und anderen Systemen zu SLES 15 SP6. Dazu werden Pakete bereitgestellt, die in SUSE Linux Enterprise nicht mehr enthalten sind. Die Pakete in diesem Modul werden auf der Grundlage der Anforderungen für die Migration und des Komplexitätsgrads der Konfiguration ausgewählt.
Dieses Modul wird bei der Migration von einer früheren Produktversion empfohlen.
Abhängigkeiten: Basesystem, Server Applications
- NVIDIA Compute Module
Enthält die NVIDIA CUDA(Compute Unified Device Architecture)-Treiber.
Die Software in diesem Modul wird von NVIDIA unter der CUDA End User License Agreement bereitgestellt und von SUSE nicht unterstützt.
Abhängigkeiten: Basesystem
- Public Cloud-Modul
Enthält alle erforderlichen Tools zum Erstellen von Images für die Bereitstellung von SUSE Linux Enterprise Server in Cloud-Umgebungen, z. B. Amazon Web Services (AWS), Microsoft Azure, Google Compute Platform oder OpenStack.
Abhängigkeiten: Basesystem, Server Applications
- Python 3 Module
Dieses Modul enthält die neueste Version der ausgewählten Python 3-Pakete.
Abhängigkeiten: Basesystem
- SAP Business One Server
Dieses Modul enthält Pakete und Systemkonfigurationen speziell für SAP Business One Server. Es wird im Rahmen des SUSE Linux Enterprise Server-Produktabonnements gewartet und unterstützt.
Abhängigkeiten: Basesystem, Server Applications, Desktop Applications, Development Tools
- Server Applications Module
Serverfunktionen in Form von Netzwerkdiensten wie DHCP-Server, Nameserver oder Webserver. Dieses Modul wird standardmäßig zur Installation ausgewählt und es wird davon abgeraten, die Auswahl aufzuheben.
Abhängigkeiten: Basesystem
- SUSE Linux Enterprise High Availability
Clustering-Unterstützung für unternehmenswichtige Einrichtungen von SUSE Linux Enterprise Server. Für diese Erweiterung ist ein separater Lizenzschlüssel erforderlich.
Abhängigkeiten: Basesystem, Server Applications
- SUSE Linux Enterprise Live Patching
Unterstützung für kritisches Patching, ohne das System herunterfahren zu müssen. Für diese Erweiterung ist ein separater Lizenzschlüssel erforderlich.
Abhängigkeiten: Basesystem, Server Applications
- SUSE Linux Enterprise Workstation Extension
Erweitert die Funktionalität von SUSE Linux Enterprise Server durch Pakete aus SUSE Linux Enterprise Desktop, wie zum Beispiel zusätzliche Desktop-Anwendungen (Office-Suite, Email-Client, grafischer Editor usw.) und Bibliotheken. Die beiden Produkte lassen sich zu einer Arbeitsstation mit großem Funktionsumfang kombinieren. Für diese Erweiterung ist ein separater Lizenzschlüssel erforderlich.
Abhängigkeiten: Basesystem, Desktop Applications
- SUSE Package Hub
Zugriff auf Pakete für SUSE Linux Enterprise Server, die von der openSUSE-Community gepflegt werden. Diese Pakete bieten keine L3-Unterstützung und wirken sich nicht auf die Unterstützbarkeit von SUSE Linux Enterprise Server aus. Weitere Informationen finden Sie im https://packagehub.suse.com/.
Abhängigkeiten: Basesystem
- Transactional Server Module
Fügt die Unterstützung für Transaktionsaktualisierungen hinzu. Aktualisierungen werden entweder insgesamt in einer einzigen Transaktion auf das System angewendet oder gar nicht. Das laufende System wird dadurch nicht beeinflusst. Wenn eine Aktualisierung nicht durchgeführt werden kann oder wenn eine erfolgreiche Aktualisierung als nicht kompatibel oder anderweitig falsch erachtet wird, kann sie verworfen werden. Das System wird dadurch sofort in den früheren Funktionszustand versetzt.
Abhängigkeiten: Basesystem
- Web and Scripting Module
Pakete für einen laufenden Webserver.
Abhängigkeiten: Basesystem, Server Applications
Einige Module sind abhängig von der Installation anderer Module. Wenn Sie also ein Modul auswählen, werden unter Umständen weitere Module ausgewählt, sodass die entsprechenden Abhängigkeiten erfüllt werden.
Je nach Produkt kennzeichnet der Registrierungsserver ggf. bestimmte Module und Erweiterungen als Empfehlung. Empfohlene Module und Erweiterungen sind bereits zur Registrierung und Installation ausgewählt. Wenn diese Empfehlungen nicht installiert werden sollen, heben Sie die Auswahl manuell auf.
Wählen Sie die zu installierenden Module und Erweiterungen aus und fahren Sie fort mit . Falls Sie mindestens eine Erweiterung ausgewählt haben, werden Sie aufgefordert, die entsprechenden Registrierungscodes einzugeben. Je nach Auswahl müssen Sie auch zusätzliche Lizenzvereinbarungen akzeptieren.
Bei einer Offline-Installation von SLE-15-SP6-Full-ARCH-GM-media1.iso wird nur das standardmäßig ausgewählt. Wählen Sie zur Installation des kompletten Standard-Paketsatzes von SUSE Linux Enterprise Server zusätzlich das .
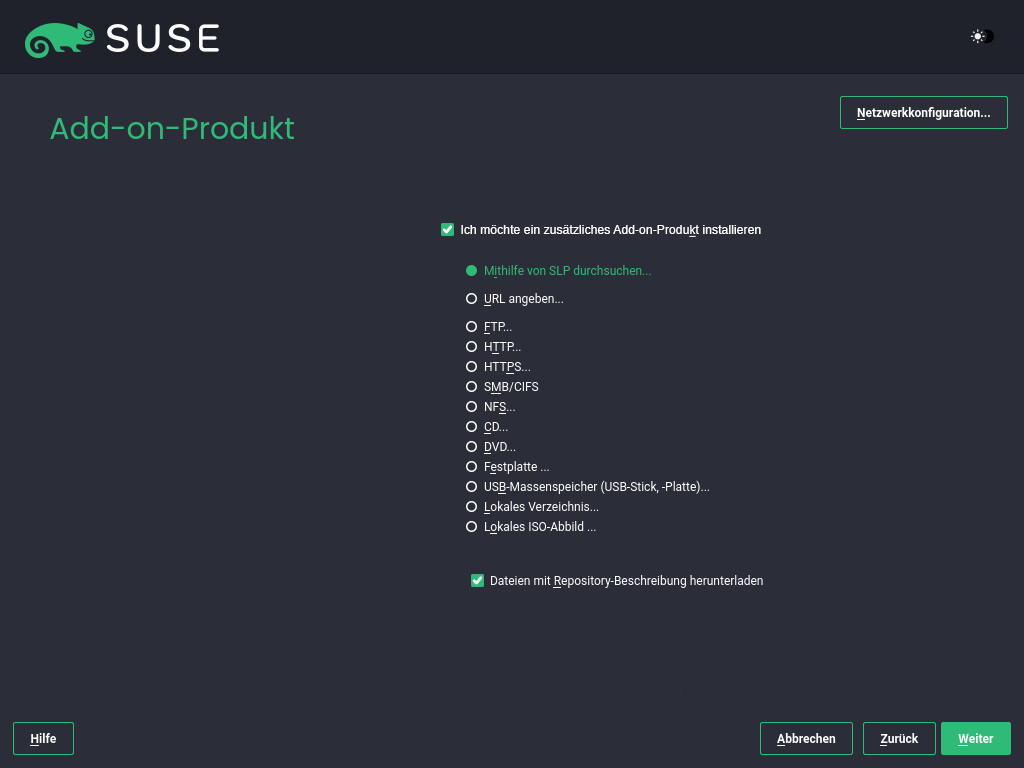
2.7 Add-on-Produkt #
Im Dialogfeld können Sie weitere Software-Quellen (sogenannte „Repositorys“) in SUSE Linux Enterprise Server aufnehmen, die nicht vom SUSE Customer Center bereitgestellt werden. Diese Add-on-Produkte können Produkte von Drittanbietern und Treiber oder andere Zusatzsoftware für Ihr System enthalten.
Im Dialogfeld können Sie weitere Repositorys für Treiberaktualisierungen hinzufügen. Treiberaktualisierungen für SUSE Linux Enterprise finden Sie im https://drivers.suse.com/. Diese Treiber wurden über das SUSE SolidDriver-Programm erstellt.
Wenn Sie diesen Schritt überspringen möchten, klicken Sie auf . Ansonsten aktivieren Sie die Option . Geben Sie einen Medientyp, einen lokalen Pfad oder eine Netzwerkressource an, auf der das Repository gehostet wird, und befolgen Sie die Anweisungen auf dem Bildschirm.
Aktivieren Sie , um die Dateien, die das Repository beschreiben, sofort herunterzuladen. Wenn diese Option deaktiviert ist, erfolgt der Download nach Beginn der Installation. Fahren Sie fort mit , und legen Sie ein Speichermedium ein, falls erforderlich. Je nach Inhalt des Produkts müssen Sie möglicherweise zusätzliche Lizenzvereinbarungen akzeptieren. Fahren Sie mit fort. Wenn Sie ein Add-On-Produkt ausgewählt haben, für das ein Registrierungsschlüssel erforderlich ist, werden Sie aufgefordert, diesen Schlüssel einzugeben, bevor Sie zum nächsten Schritt übergehen können.
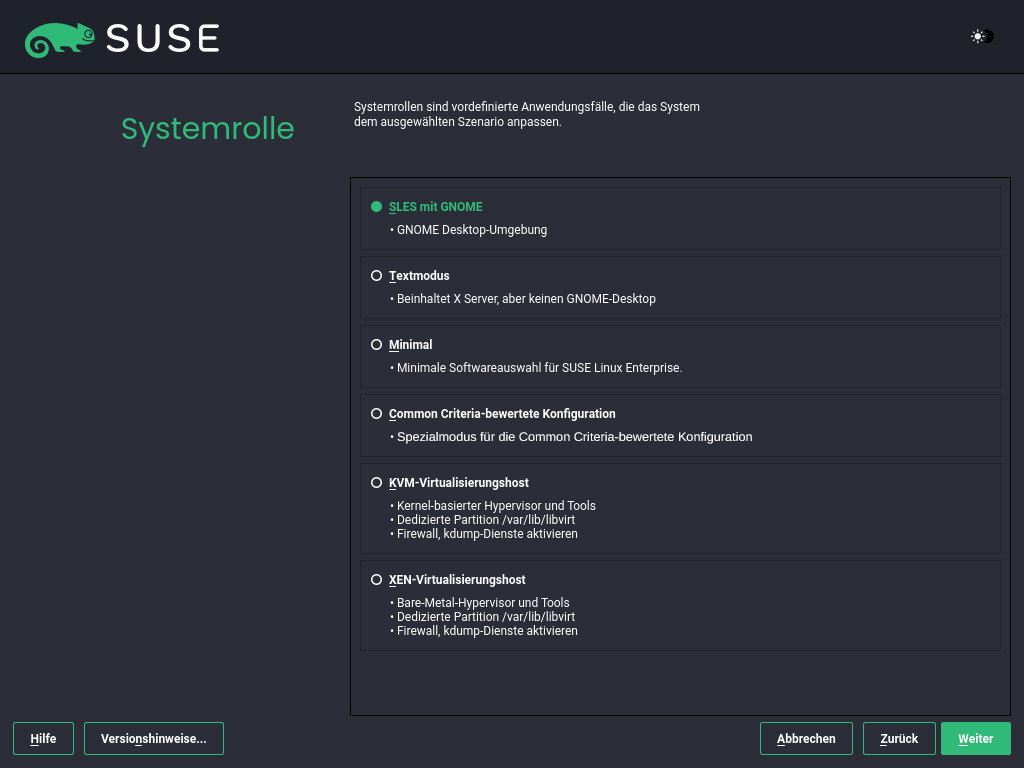
2.8 Systemrolle #
Die Verfügbarkeit von Systemrollen ist abhängig von den ausgewählten Modulen und Erweiterungen. Systemrollen definieren beispielsweise den Satz der Software-Schemata, die vorab für die Installation ausgewählt werden. Treffen Sie Ihre Entscheidung anhand der Beschreibung auf dem Bildschirm. Wählen Sie eine Rolle aus und klicken Sie auf . Wenn in den aktivierten Modulen nur eine oder keine Rolle für das entsprechende Basisprodukt geeignet ist, wird das Dialogfeld nicht angezeigt.
Von diesem Zeitpunkt an können die Versionshinweise von jedem Bildschirm im Installationsvorgang aus mit der Option abgerufen werden.
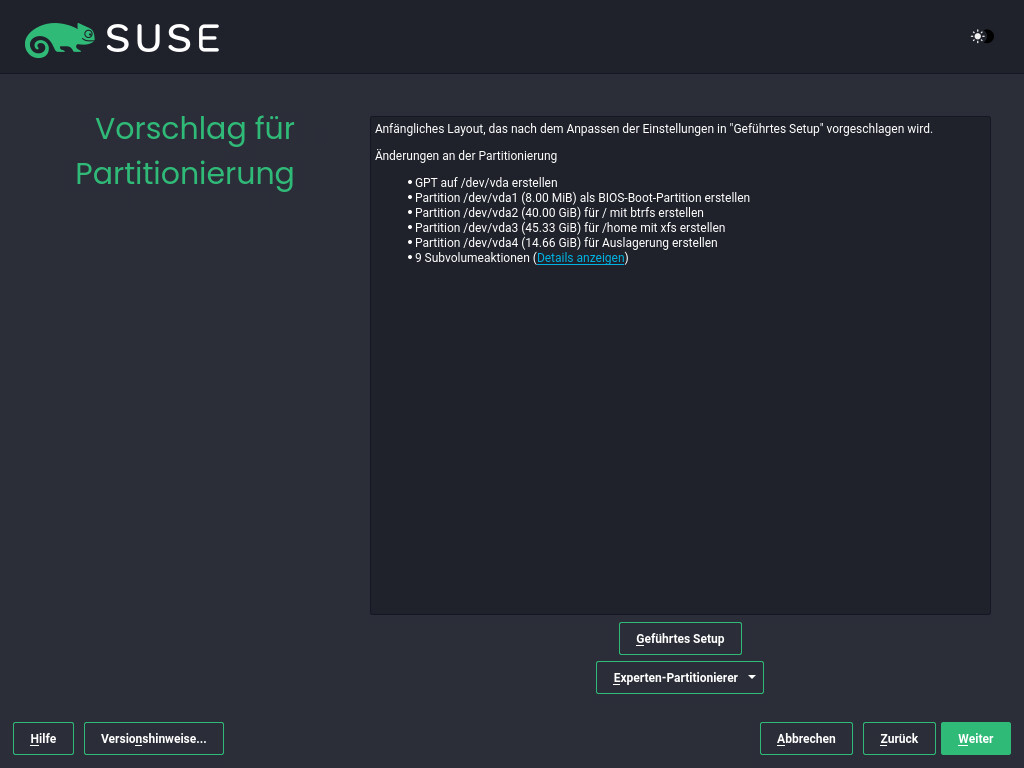
2.9 Vorgeschlagene Partitionierung #
Überprüfen Sie die Partitionseinrichtung, die das System vorschlägt. Nehmen Sie bei Bedarf die gewünschten Änderungen vor. Die folgenden Optionen stehen Ihnen zur Verfügung:
Startet einen Assistenten, in dem Sie den Partitionsvorschlag verfeinern können. Die verfügbaren Optionen sind abhängig von der Systemeinrichtung. Falls mehrere Festplatten vorhanden sind, können Sie die zu verwendende(n) Festplatte(n) auswählen und den Speicherort für die Stammpartition festlegen. Falls die Festplatte(n) bereits Partitionen enthält/enthalten, geben Sie an, ob diese Partitionen entfernt oder in der Größe verändert werden sollen.
In den nachfolgenden Schritten können Sie außerdem die LVM-Unterstützung und die Festplattenverschlüsselung einbinden. Sie können das Dateisystem für die Stammpartition ändern und auch festlegen, ob eine separate Home-Partition verwendet werden soll oder nicht.
Öffnet das Dialogfeld (siehe Abschnitt 11.1, „Verwenden von “). Hier können Sie die Partitionierungseinrichtung umfassend steuern und eine benutzerdefinierte Einrichtung erstellen. Diese Option richtet sich an Experten.
Beachten Sie, dass Speicherplatz aus Partitionierungsgründen in binären Einheiten statt in dezimalen Einheiten gemessen wird. Wenn Sie beispielsweise Größen von 1GB, 1GiB oder 1G eingeben, werden diese vom System immer als 1 GiB (Gibibyte) behandelt, im Gegensatz zu 1 GB (Gigabyte).
- Binär
1 GiB = 1 073 741 824 Byte.
- Dezimal
1 GB = 1 000 000 000 Byte.
- Differenz
1 GiB ≈ 1,07 GB.
Wenn Sie das vorgeschlagene Setup ohne Änderungen übernehmen möchten, klicken Sie zum Fortfahren auf .
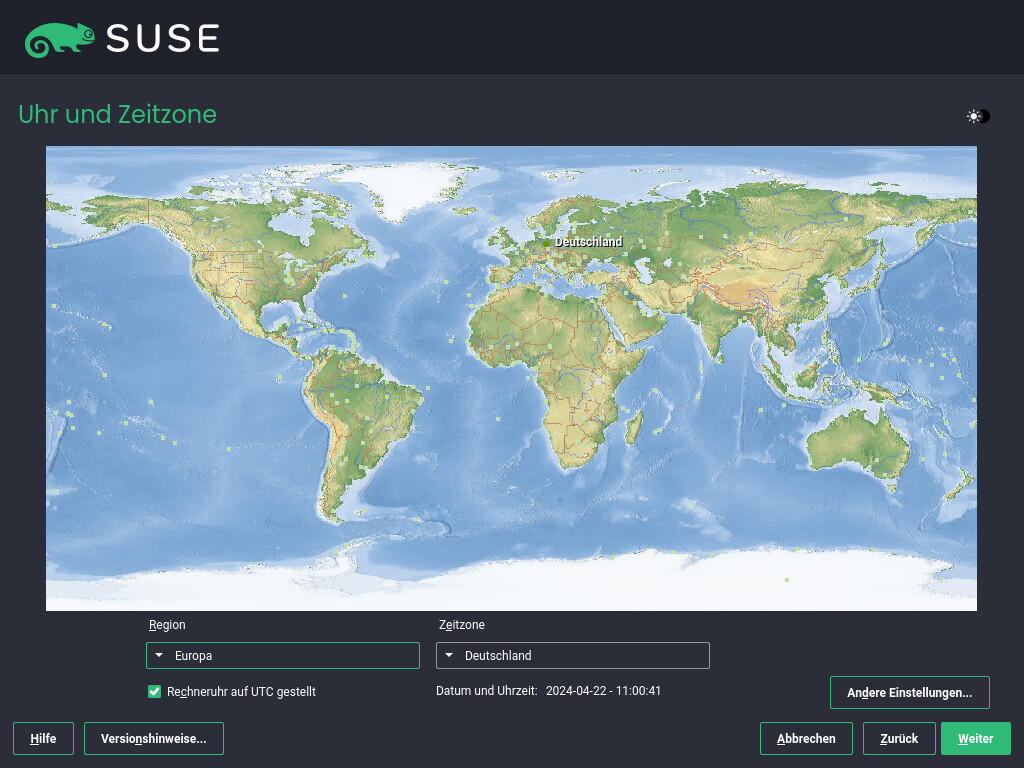
2.10 Uhr und Zeitzone #
Wählen Sie die in Ihrem System zu verwendende Uhreinstellung und Zeitzone aus. Mit können Sie die Uhrzeit manuell einstellen oder einen NTP-Server für die Zeitsynchronisierung auswählen. Ausführliche Informationen erhalten Sie im Abschnitt 9.12, „Uhr und Zeitzone“. Fahren Sie mit fort.
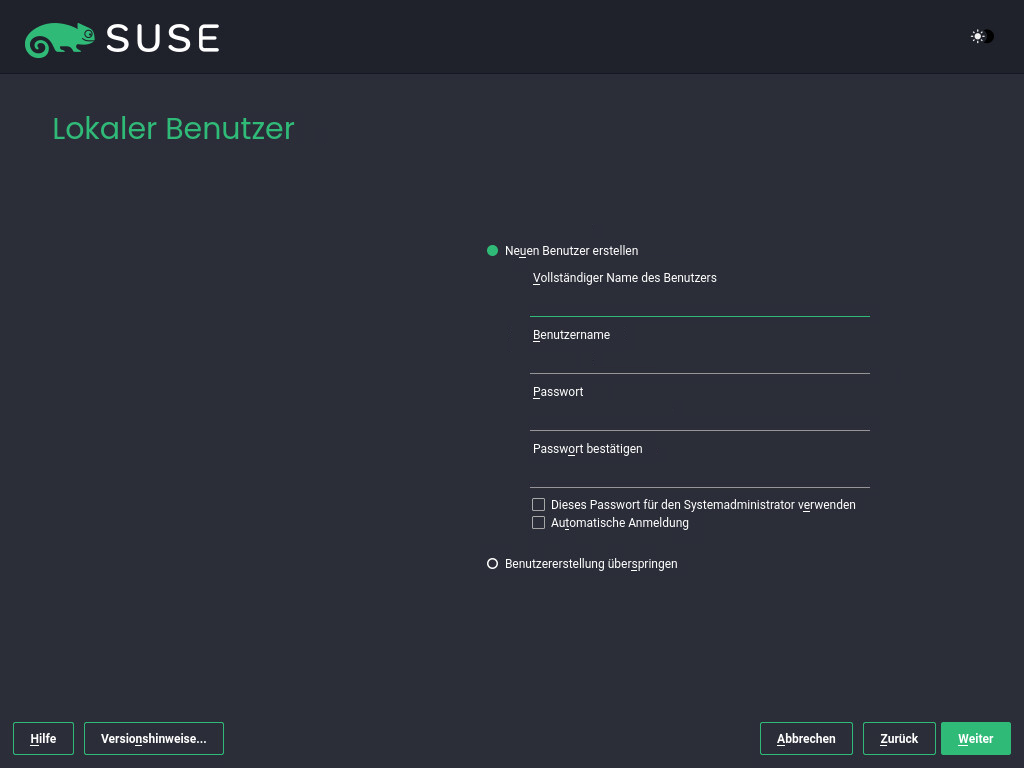
2.11 Lokaler Benutzer #
Zum Erstellen eines lokalen Benutzers geben Sie den Vor- und Nachnamen in das Feld , den Benutzernamen in das Feld und das Passwort in das Feld ein.
Das Passwort sollte mindestens acht Zeichen lang sein und sowohl Groß- als auch Kleinbuchstaben und Zahlen enthalten. Für Passwörter sind maximal 72 Zeichen zulässig und die Groß-/Kleinschreibung ist zu beachten.
Aus Sicherheitsgründen wird außerdem empfohlen, nicht die Option zu aktivieren. Außerdem sollten Sie nicht aktivieren, sondern im nächsten Installationsschritt ein separates root-Passwort festlegen.
Sollten Sie die Installation auf einem System mit einer früheren Linux-Installation vornehmen, können Sie . Klicken Sie auf , um eine Liste der verfügbaren Benutzerkonten zu erhalten. Wählen Sie einen oder mehrere Benutzer aus.
In einer Umgebung mit zentraler Benutzerverwaltung (beispielsweise durch NIS oder LDAP) sollte die Erstellung von lokalen Benutzern eventuell übersprungen werden. Wählen Sie in diesem Fall aus.
Fahren Sie mit fort.
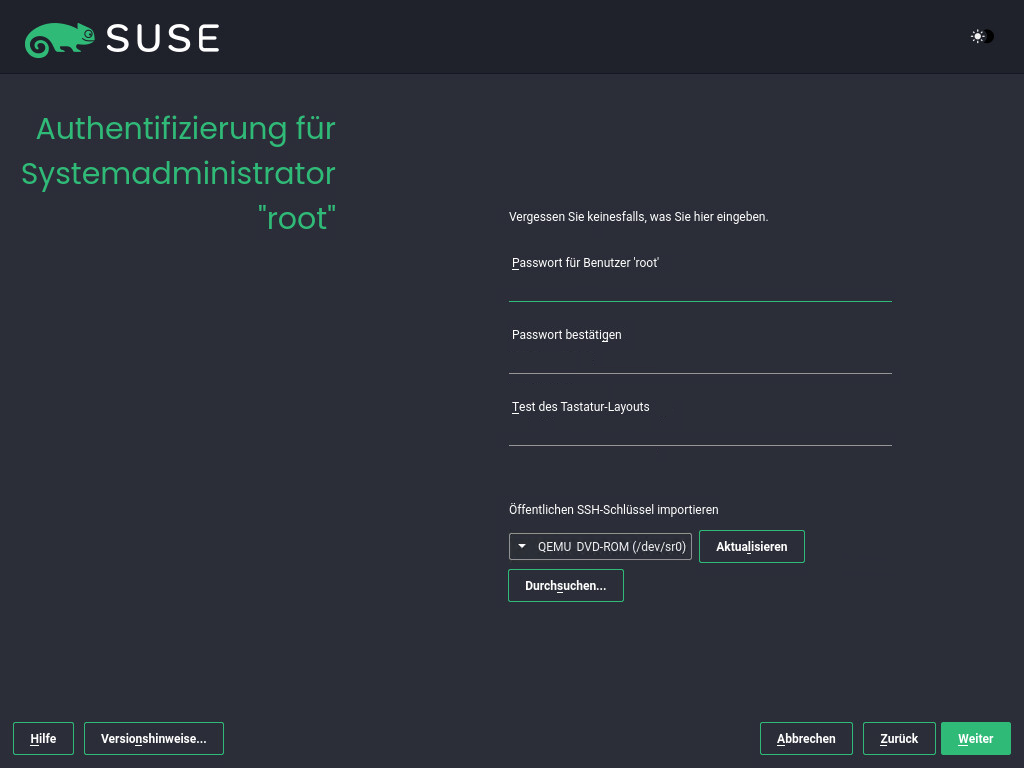
2.12 Authentifizierung für den Systemadministrator-„root“ #
Tippen Sie ein Passwort für den Systemadministrator ein (als root-Benutzer bezeichnet) oder geben Sie einen öffentlichen SSH-Schlüssel an. Wenn Sie möchten, können Sie auch beides verwenden.
Da der root-Benutzer mit umfangreichen Berechtigungen ausgestattet ist, sollte das Passwort sorgfältig ausgewählt werden. Merken Sie sich das root-Passwort. Nachdem Sie es hier eingegeben haben, kann es nicht mehr abgerufen werden.
Es wird empfohlen, nur US ASCII-Zeichen zu verwenden. Wenn ein Systemfehler auftritt oder das System im Rettungsmodus gestartet werden muss, stehen die landesspezifischen Tastaturbelegungen unter Umständen nicht zur Verfügung.
Wenn Sie über SSH mit einem öffentlichen Schlüssel aus der Ferne auf das System zugreifen möchten, importieren Sie einen Schlüssel von einem Wechseldatenträger oder einer vorhandenen Partition. Weitere Informationen zu diesem Thema finden Sie unter Abschnitt 9.14, „Authentifizierung für den Systemadministrator-root“.
Fahren Sie mit fort.
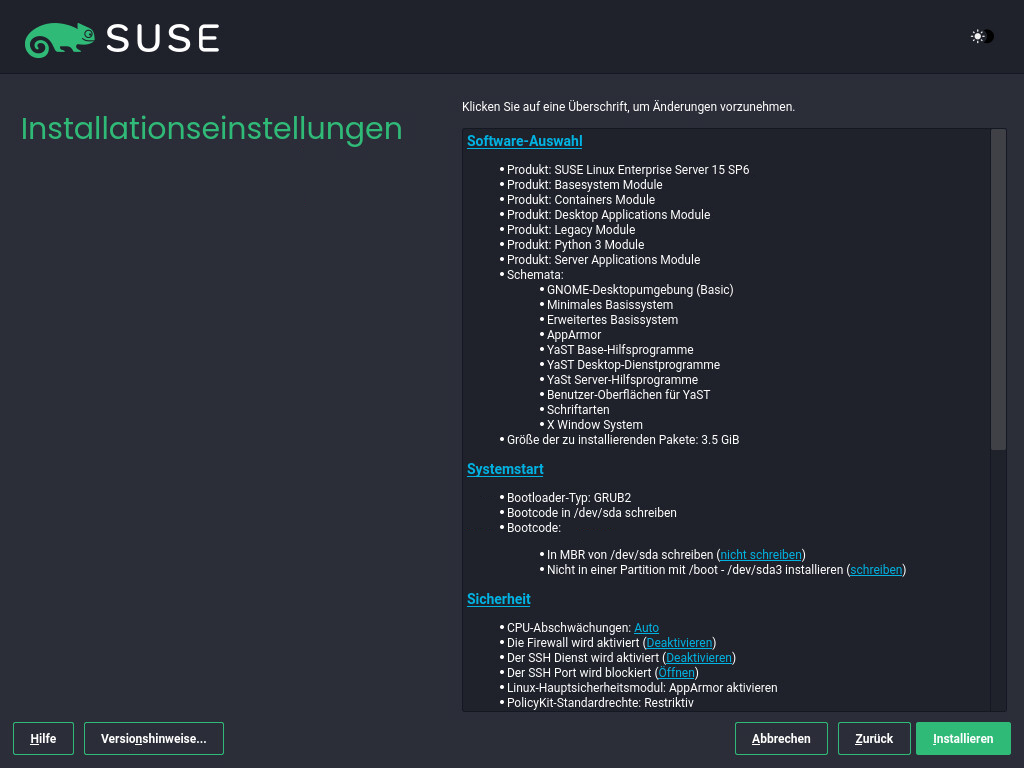
2.13 Installationseinstellungen #
Prüfen Sie die vorgeschlagenen Installationseinstellungen im Bildschirm und nehmen Sie ggf. Änderungen vor. Für jede Einstellung wird die aktuelle Konfiguration angezeigt. Zum Ändern klicken Sie auf die Überschrift. Einige Einstellungen, wie Firewall oder SSH, können Sie unmittelbar über die entsprechenden Links ändern.
Die hier vorgenommenen Änderungen können auch noch später auf dem installierten System erledigt werden. Wenn Sie jedoch direkt nach der Installation Fernzugriff benötigen, müssen Sie möglicherweise den SSH-Port in den Einstellungen für die öffnen.
Der Installationsumfang ergibt sich aus den Modulen und Erweiterungen, die Sie für diese Installation ausgewählt haben. Je nach Auswahl werden jedoch nicht alle Pakete, die sich in einem Modul befinden, auch zur Installation ausgewählt.
Mit gelangen Sie zum Bildschirm , in dem Sie die gewünschten Schemas auswählen oder deaktivieren können. Jedes Schema enthält eine Reihe von Softwarepaketen, die für bestimmte Funktionen erforderlich sind (beispielsweise ). Sie erhalten eine detailliertere Auswahl auf Basis der zu installierenden Softwarepakete, wenn Sie auf . Weitere Informationen zu diesem Thema finden Sie unter Kapitel 8, Installieren bzw. Entfernen von Software.
In diesem Abschnitt wird die Boot-Loader-Konfiguration beschrieben. Die Standardeinstellungen sollten nur geändert werden, wenn dies unbedingt erforderlich ist. Weitere Informationen finden Sie im Kapitel 18, Der Bootloader GRUB 2.
Die gelten für Kernel-Boot-Befehlszeilenparameter für Software-Mitigationen, die zur Vorbeugung von CPU-Seitenkanalangriffen bereitgestellt wurden. Zum Auswählen einer anderen Option klicken Sie auf den ausgewählten Eintrag. Weitere Informationen finden Sie im .
Standardmäßig ist die auf allen konfigurierten Netzwerkschnittstellen aktiviert. Klicken Sie auf , um
firewalldvollständig zu deaktivieren (nicht empfohlen). Detaillierte Informationen zur Konfiguration finden Sie in Chapter 23, Masquerading and firewalls.Anmerkung: Firewall-Einstellungen zum Erhalten von AktualisierungenStandardmäßig blockiert die Firewall von SUSE Linux Enterprise Server nur eingehende Verbindungen. Wenn sich Ihr System hinter einer anderen Firewall befindet, die ausgehenden Datenverkehr blockiert, stellen Sie sicher, dass Sie Verbindungen mit
https://scc.suse.com/undhttps://updates.suse.comüber die Ports 80 und 443 zulassen, um Aktualisierungen zu erhalten.Der ist standardmäßig aktiviert, aber sein Port (22) ist in der Firewall geschlossen. Klicken Sie auf , um den Port zu öffnen, oder auf , um den Dienst zu deaktivieren. Beachten Sie, dass Fernanmeldungen nicht möglich sind, wenn SSH deaktiviert ist. Weitere Informationen finden Sie im Chapter 22, Securing network operations with OpenSSH.
Das standardmäßige lautet . Wenn Sie es deaktivieren möchten, wählen Sie in den Einstellungen für die als Modul
Klicken Sie, um die Sicherheitsrichtlinie
Defense Information Systems Agency STIGzu . Wenn Installationseinstellungen nicht mit der Richtlinie kompatibel sind, werden Sie aufgefordert, sie dementsprechend zu bearbeiten. Einige Einstellungen können automatisch angepasst werden, für manche ist eine Benutzereingabe erforderlich.Zur Anwendung der Sicherheitsprofile wird beim ersten Start eine vollständige SCAP-Behebung durchgeführt. Sie können auch (nur prüfen) oder (nichts tun) durchführen und Fehler im System später mit OpenSCAP beheben. Weitere Informationen hierzu finden Sie im Abschnitt 9.15.4, „“.
Zeigt die aktuelle Netzwerkkonfiguration an. Standardmäßig wird
wickedfür Serverinstallationen und NetworkManager für Desktop-Workloads verwendet. Klicken Sie zum Ändern der Einstellungen auf Weitere Informationen finden Sie im Abschnitt 23.4, „Konfigurieren von Netzwerkverbindungen mit YaST“.Wichtig: Unterstützung für NetworkManagerSUSE unterstützt NetworkManager nur für Desktop-Workloads mit SLED oder der Workstation-Erweiterung. Alle Serverzertifizierungen werden mit
wickedals Netzwerkkonfigurationswerkzeug vorgenommen und die Verwendung von NetworkManager kann die Zertifizierungen unter Umständen ungültig machen. NetworkManager wird von SUSE nicht für Server-Arbeitslasten unterstützt.Für den Fall, dass der Kernel ausfällt, speichert Kdump das Speicherabbild („Core-Dump“) im Dateisystem. Durch Debuggen der Dump-Datei können Sie dann die Ursache für den Ausfall ermitteln. Kdump ist standardmäßig vorkonfiguriert und aktiviert. Weitere Informationen zu diesem Thema finden Sie unter Section 20.7, “Basic Kdump configuration”.
Wenn Sie das Desktop Applications Module installiert haben, bootet das System in das Ziel (mit Netzwerk-, Mehrbenutzer- und Anzeigemanager-Unterstützung). Falls keine Anmeldung über den Display-Manager erforderlich ist, wechseln Sie zu .
Mit erhalten Sie ausführliche Hardware-Informationen. Im zugehörigen Bildschirm können Sie außerdem die ändern. Weitere Informationen hierzu finden Sie im Abschnitt 9.15.10, „“.
2.14 Starten Sie die Installation #
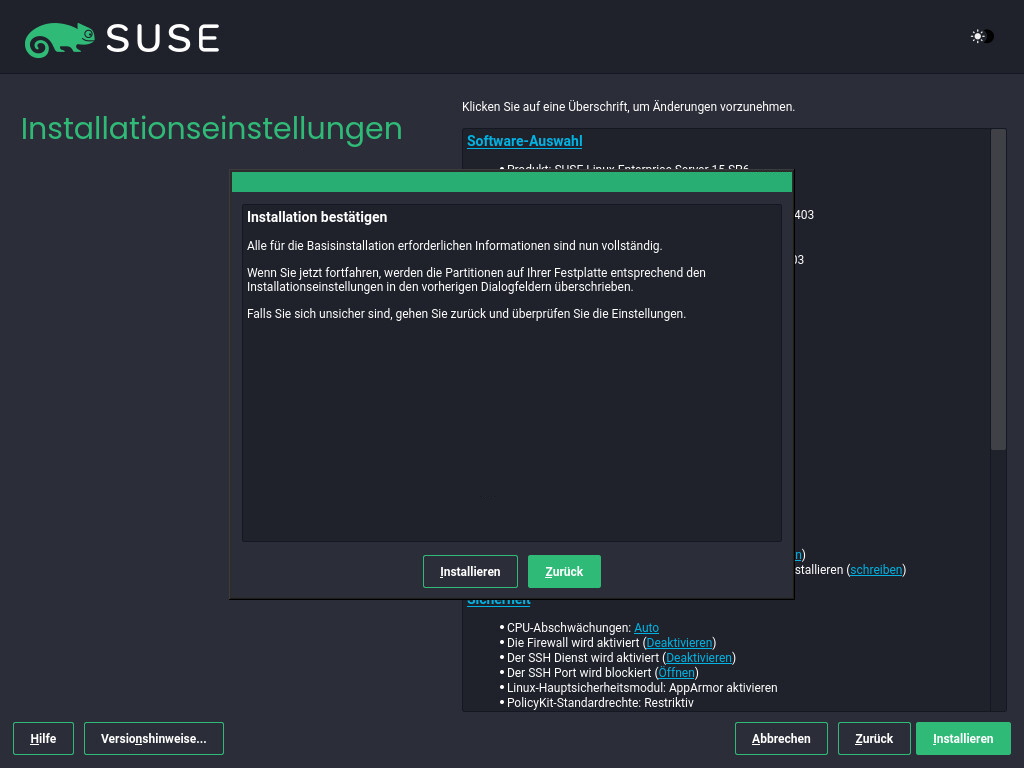
Wenn Sie die Systemkonfiguration im Bildschirm abgeschlossen haben, klicken Sie auf . Je nach Software-Auswahl müssen Sie ggf. Lizenzvereinbarungen akzeptieren, bevor der Bildschirm zur Installationsbetätigung geöffnet wird. Bis jetzt sind noch keine Änderungen am System erfolgt. Die Installation wird gestartet, sobald Sie ein zweites Mal auf klicken.
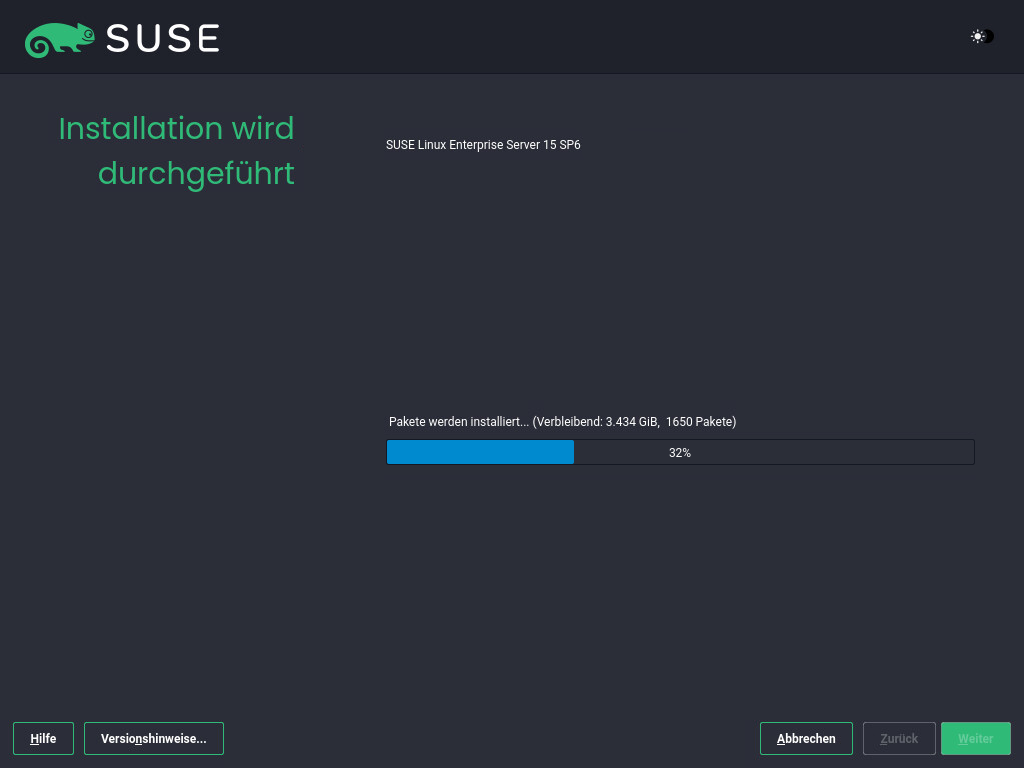
2.15 Installationsvorgang #
Während der Installation wird der Fortschritt angezeigt. Nach Abschluss der Installationsroutine wird der Computer im installierten System neu gestartet.
3 Rechtliche Hinweise #
Copyright © 2006– 2025 SUSE LLC und Mitwirkende. Alle Rechte vorbehalten.
Es wird die Genehmigung erteilt, dieses Dokument unter den Bedingungen der GNU Free Documentation License, Version 1.2 oder (optional) Version 1.3 zu vervielfältigen, zu verbreiten und/oder zu verändern; die unveränderlichen Abschnitte hierbei sind der Urheberrechtshinweis und die Lizenzbedingungen. Eine Kopie dieser Lizenz (Version 1.2) finden Sie im Abschnitt „GNU Free Documentation License“.
Die SUSE Marken finden Sie im https://www.suse.com/company/legal/. Alle anderen Marken von Drittanbietern sind Besitz ihrer jeweiligen Eigentümer. Markensymbole (®, ™ usw.) kennzeichnen Marken von SUSE und ihren Tochtergesellschaften. Sternchen (*) kennzeichnen Marken von Drittanbietern.
Alle Informationen in diesem Buch wurden mit größter Sorgfalt zusammengestellt. Auch hierdurch kann jedoch keine hundertprozentige Richtigkeit gewährleistet werden. Weder SUSE LLC noch ihre Tochtergesellschaften noch die Autoren noch die Übersetzer können für mögliche Fehler und deren Folgen haftbar gemacht werden.
4 GNU Free Documentation License #
Copyright (C) 2000, 2001, 2002 Free Software Foundation, Inc. 51 Franklin St, Fifth Floor, Boston, MA 02110-1301 USA. Everyone is permitted to copy and distribute verbatim copies of this license document, but changing it is not allowed.
0. PREAMBLE #
The purpose of this License is to make a manual, textbook, or other functional and useful document "free" in the sense of freedom: to assure everyone the effective freedom to copy and redistribute it, with or without modifying it, either commercially or non-commercially. Secondarily, this License preserves for the author and publisher a way to get credit for their work, while not being considered responsible for modifications made by others.
This License is a kind of "copyleft", which means that derivative works of the document must themselves be free in the same sense. It complements the GNU General Public License, which is a copyleft license designed for free software.
We have designed this License to use it for manuals for free software, because free software needs free documentation: a free program should come with manuals providing the same freedoms that the software does. But this License is not limited to software manuals; it can be used for any textual work, regardless of subject matter or whether it is published as a printed book. We recommend this License principally for works whose purpose is instruction or reference.
1. APPLICABILITY AND DEFINITIONS #
This License applies to any manual or other work, in any medium, that contains a notice placed by the copyright holder saying it can be distributed under the terms of this License. Such a notice grants a world-wide, royalty-free license, unlimited in duration, to use that work under the conditions stated herein. The "Document", below, refers to any such manual or work. Any member of the public is a licensee, and is addressed as "you". You accept the license if you copy, modify or distribute the work in a way requiring permission under copyright law.
A "Modified Version" of the Document means any work containing the Document or a portion of it, either copied verbatim, or with modifications and/or translated into another language.
A "Secondary Section" is a named appendix or a front-matter section of the Document that deals exclusively with the relationship of the publishers or authors of the Document to the Document's overall subject (or to related matters) and contains nothing that could fall directly within that overall subject. (Thus, if the Document is in part a textbook of mathematics, a Secondary Section may not explain any mathematics.) The relationship could be a matter of historical connection with the subject or with related matters, or of legal, commercial, philosophical, ethical or political position regarding them.
The "Invariant Sections" are certain Secondary Sections whose titles are designated, as being those of Invariant Sections, in the notice that says that the Document is released under this License. If a section does not fit the above definition of Secondary then it is not allowed to be designated as Invariant. The Document may contain zero Invariant Sections. If the Document does not identify any Invariant Sections then there are none.
The "Cover Texts" are certain short passages of text that are listed, as Front-Cover Texts or Back-Cover Texts, in the notice that says that the Document is released under this License. A Front-Cover Text may be at most 5 words, and a Back-Cover Text may be at most 25 words.
A "Transparent" copy of the Document means a machine-readable copy, represented in a format whose specification is available to the general public, that is suitable for revising the document straightforwardly with generic text editors or (for images composed of pixels) generic paint programs or (for drawings) some widely available drawing editor, and that is suitable for input to text formatters or for automatic translation to a variety of formats suitable for input to text formatters. A copy made in an otherwise Transparent file format whose markup, or absence of markup, has been arranged to thwart or discourage subsequent modification by readers is not Transparent. An image format is not Transparent if used for any substantial amount of text. A copy that is not "Transparent" is called "Opaque".
Examples of suitable formats for Transparent copies include plain ASCII without markup, Texinfo input format, LaTeX input format, SGML or XML using a publicly available DTD, and standard-conforming simple HTML, PostScript or PDF designed for human modification. Examples of transparent image formats include PNG, XCF and JPG. Opaque formats include proprietary formats that can be read and edited only by proprietary word processors, SGML or XML for which the DTD and/or processing tools are not generally available, and the machine-generated HTML, PostScript or PDF produced by some word processors for output purposes only.
The "Title Page" means, for a printed book, the title page itself, plus such following pages as are needed to hold, legibly, the material this License requires to appear in the title page. For works in formats which do not have any title page as such, "Title Page" means the text near the most prominent appearance of the work's title, preceding the beginning of the body of the text.
A section "Entitled XYZ" means a named subunit of the Document whose title either is precisely XYZ or contains XYZ in parentheses following text that translates XYZ in another language. (Here XYZ stands for a specific section name mentioned below, such as "Acknowledgements", "Dedications", "Endorsements", or "History".) To "Preserve the Title" of such a section when you modify the Document means that it remains a section "Entitled XYZ" according to this definition.
The Document may include Warranty Disclaimers next to the notice which states that this License applies to the Document. These Warranty Disclaimers are considered to be included by reference in this License, but only as regards disclaiming warranties: any other implication that these Warranty Disclaimers may have is void and has no effect on the meaning of this License.
2. VERBATIM COPYING #
You may copy and distribute the Document in any medium, either commercially or non-commercially, provided that this License, the copyright notices, and the license notice saying this License applies to the Document are reproduced in all copies, and that you add no other conditions whatsoever to those of this License. You may not use technical measures to obstruct or control the reading or further copying of the copies you make or distribute. However, you may accept compensation in exchange for copies. If you distribute a large enough number of copies you must also follow the conditions in section 3.
You may also lend copies, under the same conditions stated above, and you may publicly display copies.
3. COPYING IN QUANTITY #
If you publish printed copies (or copies in media that commonly have printed covers) of the Document, numbering more than 100, and the Document's license notice requires Cover Texts, you must enclose the copies in covers that carry, clearly and legibly, all these Cover Texts: Front-Cover Texts on the front cover, and Back-Cover Texts on the back cover. Both covers must also clearly and legibly identify you as the publisher of these copies. The front cover must present the full title with all words of the title equally prominent and visible. You may add other material on the covers in addition. Copying with changes limited to the covers, as long as they preserve the title of the Document and satisfy these conditions, can be treated as verbatim copying in other respects.
If the required texts for either cover are too voluminous to fit legibly, you should put the first ones listed (as many as fit reasonably) on the actual cover, and continue the rest onto adjacent pages.
If you publish or distribute Opaque copies of the Document numbering more than 100, you must either include a machine-readable Transparent copy along with each Opaque copy, or state in or with each Opaque copy a computer-network location from which the general network-using public has access to download using public-standard network protocols a complete Transparent copy of the Document, free of added material. If you use the latter option, you must take reasonably prudent steps, when you begin distribution of Opaque copies in quantity, to ensure that this Transparent copy will remain thus accessible at the stated location until at least one year after the last time you distribute an Opaque copy (directly or through your agents or retailers) of that edition to the public.
It is requested, but not required, that you contact the authors of the Document well before redistributing any large number of copies, to give them a chance to provide you with an updated version of the Document.
4. MODIFICATIONS #
You may copy and distribute a Modified Version of the Document under the conditions of sections 2 and 3 above, provided that you release the Modified Version under precisely this License, with the Modified Version filling the role of the Document, thus licensing distribution and modification of the Modified Version to whoever possesses a copy of it. In addition, you must do these things in the Modified Version:
Use in the Title Page (and on the covers, if any) a title distinct from that of the Document, and from those of previous versions (which should, if there were any, be listed in the History section of the Document). You may use the same title as a previous version if the original publisher of that version gives permission.
List on the Title Page, as authors, one or more persons or entities responsible for authorship of the modifications in the Modified Version, together with at least five of the principal authors of the Document (all of its principal authors, if it has fewer than five), unless they release you from this requirement.
State on the Title page the name of the publisher of the Modified Version, as the publisher.
Preserve all the copyright notices of the Document.
Add an appropriate copyright notice for your modifications adjacent to the other copyright notices.
Include, immediately after the copyright notices, a license notice giving the public permission to use the Modified Version under the terms of this License, in the form shown in the Addendum below.
Preserve in that license notice the full lists of Invariant Sections and required Cover Texts given in the Document's license notice.
Include an unaltered copy of this License.
Preserve the section Entitled "History", Preserve its Title, and add to it an item stating at least the title, year, new authors, and publisher of the Modified Version as given on the Title Page. If there is no section Entitled "History" in the Document, create one stating the title, year, authors, and publisher of the Document as given on its Title Page, then add an item describing the Modified Version as stated in the previous sentence.
Preserve the network location, if any, given in the Document for public access to a Transparent copy of the Document, and likewise the network locations given in the Document for previous versions it was based on. These may be placed in the "History" section. You may omit a network location for a work that was published at least four years before the Document itself, or if the original publisher of the version it refers to gives permission.
For any section Entitled "Acknowledgements" or "Dedications", Preserve the Title of the section, and preserve in the section all the substance and tone of each of the contributor acknowledgements and/or dedications given therein.
Preserve all the Invariant Sections of the Document, unaltered in their text and in their titles. Section numbers or the equivalent are not considered part of the section titles.
Delete any section Entitled "Endorsements". Such a section may not be included in the Modified Version.
Do not retitle any existing section to be Entitled "Endorsements" or to conflict in title with any Invariant Section.
Preserve any Warranty Disclaimers.
If the Modified Version includes new front-matter sections or appendices that qualify as Secondary Sections and contain no material copied from the Document, you may at your option designate some or all of these sections as invariant. To do this, add their titles to the list of Invariant Sections in the Modified Version's license notice. These titles must be distinct from any other section titles.
You may add a section Entitled "Endorsements", provided it contains nothing but endorsements of your Modified Version by various parties--for example, statements of peer review or that the text has been approved by an organization as the authoritative definition of a standard.
You may add a passage of up to five words as a Front-Cover Text, and a passage of up to 25 words as a Back-Cover Text, to the end of the list of Cover Texts in the Modified Version. Only one passage of Front-Cover Text and one of Back-Cover Text may be added by (or through arrangements made by) any one entity. If the Document already includes a cover text for the same cover, previously added by you or by arrangement made by the same entity you are acting on behalf of, you may not add another; but you may replace the old one, on explicit permission from the previous publisher that added the old one.
The author(s) and publisher(s) of the Document do not by this License give permission to use their names for publicity for or to assert or imply endorsement of any Modified Version.
5. COMBINING DOCUMENTS #
You may combine the Document with other documents released under this License, under the terms defined in section 4 above for modified versions, provided that you include in the combination all of the Invariant Sections of all of the original documents, unmodified, and list them all as Invariant Sections of your combined work in its license notice, and that you preserve all their Warranty Disclaimers.
The combined work need only contain one copy of this License, and multiple identical Invariant Sections may be replaced with a single copy. If there are multiple Invariant Sections with the same name but different contents, make the title of each such section unique by adding at the end of it, in parentheses, the name of the original author or publisher of that section if known, or else a unique number. Make the same adjustment to the section titles in the list of Invariant Sections in the license notice of the combined work.
In the combination, you must combine any sections Entitled "History" in the various original documents, forming one section Entitled "History"; likewise combine any sections Entitled "Acknowledgements", and any sections Entitled "Dedications". You must delete all sections Entitled "Endorsements".
6. COLLECTIONS OF DOCUMENTS #
You may make a collection consisting of the Document and other documents released under this License, and replace the individual copies of this License in the various documents with a single copy that is included in the collection, provided that you follow the rules of this License for verbatim copying of each of the documents in all other respects.
You may extract a single document from such a collection, and distribute it individually under this License, provided you insert a copy of this License into the extracted document, and follow this License in all other respects regarding verbatim copying of that document.
7. AGGREGATION WITH INDEPENDENT WORKS #
A compilation of the Document or its derivatives with other separate and independent documents or works, in or on a volume of a storage or distribution medium, is called an "aggregate" if the copyright resulting from the compilation is not used to limit the legal rights of the compilation's users beyond what the individual works permit. When the Document is included in an aggregate, this License does not apply to the other works in the aggregate which are not themselves derivative works of the Document.
If the Cover Text requirement of section 3 is applicable to these copies of the Document, then if the Document is less than one half of the entire aggregate, the Document's Cover Texts may be placed on covers that bracket the Document within the aggregate, or the electronic equivalent of covers if the Document is in electronic form. Otherwise they must appear on printed covers that bracket the whole aggregate.
8. TRANSLATION #
Translation is considered a kind of modification, so you may distribute translations of the Document under the terms of section 4. Replacing Invariant Sections with translations requires special permission from their copyright holders, but you may include translations of some or all Invariant Sections in addition to the original versions of these Invariant Sections. You may include a translation of this License, and all the license notices in the Document, and any Warranty Disclaimers, provided that you also include the original English version of this License and the original versions of those notices and disclaimers. In case of a disagreement between the translation and the original version of this License or a notice or disclaimer, the original version will prevail.
If a section in the Document is Entitled "Acknowledgements", "Dedications", or "History", the requirement (section 4) to Preserve its Title (section 1) will typically require changing the actual title.
9. TERMINATION #
You may not copy, modify, sublicense, or distribute the Document except as expressly provided for under this License. Any other attempt to copy, modify, sublicense or distribute the Document is void, and will automatically terminate your rights under this License. However, parties who have received copies, or rights, from you under this License will not have their licenses terminated so long as such parties remain in full compliance.
10. FUTURE REVISIONS OF THIS LICENSE #
The Free Software Foundation may publish new, revised versions of the GNU Free Documentation License from time to time. Such new versions will be similar in spirit to the present version, but may differ in detail to address new problems or concerns. See https://www.gnu.org/copyleft/.
Each version of the License is given a distinguishing version number. If the Document specifies that a particular numbered version of this License "or any later version" applies to it, you have the option of following the terms and conditions either of that specified version or of any later version that has been published (not as a draft) by the Free Software Foundation. If the Document does not specify a version number of this License, you may choose any version ever published (not as a draft) by the Free Software Foundation.
ADDENDUM: How to use this License for your documents #
Copyright (c) YEAR YOUR NAME.
Permission is granted to copy, distribute and/or modify this document
under the terms of the GNU Free Documentation License, Version 1.2
or any later version published by the Free Software Foundation;
with no Invariant Sections, no Front-Cover Texts, and no Back-Cover Texts.
A copy of the license is included in the section entitled “GNU
Free Documentation License”.
If you have Invariant Sections, Front-Cover Texts and Back-Cover Texts, replace the “with...Texts.” line with this:
with the Invariant Sections being LIST THEIR TITLES, with the
Front-Cover Texts being LIST, and with the Back-Cover Texts being LIST.
If you have Invariant Sections without Cover Texts, or some other combination of the three, merge those two alternatives to suit the situation.
If your document contains nontrivial examples of program code, we recommend releasing these examples in parallel under your choice of free software license, such as the GNU General Public License, to permit their use in free software.
