Operations Guide
- 1 Operations Overview
- 2 Tutorials
- 3 Third-Party Integrations
- 4 Managing Identity
- 5 Managing Compute
- 6 Managing ESX
- 7 Managing Block Storage
- 8 Managing Object Storage
- 9 Managing Networking
- 10 Managing the Dashboard
- 11 Managing Orchestration
- 12 Managing Monitoring, Logging, and Usage Reporting
- 13 System Maintenance
- 14 Backup and Restore
- 15 Troubleshooting Issues
4 Managing Identity
- 4.1 The Identity Service
- 4.2 Supported Upstream Keystone Features
- 4.3 Understanding Domains, Projects, Users, Groups, and Roles
- 4.4 Identity Service Token Validation Example
- 4.5 Configuring the Identity Service
- 4.6 Retrieving the Admin Password
- 4.7 Changing Service Passwords
- 4.8 Reconfiguring the Identity Service
- 4.9 Integrating LDAP with the Identity Service
- 4.10 Keystone-to-Keystone Federation
- 4.11 Configuring Web Single Sign-On
- 4.12 Identity Service Notes and Limitations
The Identity service provides the structure for user authentication to your cloud.
4.1 The Identity Service #
This topic explains the purpose and mechanisms of the identity service.
The HPE Helion OpenStack Identity service, based on the OpenStack Keystone API, is responsible for providing UserID authentication and access authorization to enable organizations to achieve their access security and compliance objectives and successfully deploy OpenStack. In short, the Identity Service is the gateway to the rest of the OpenStack services.
4.1.1 Which version of the Keystone Identity service should you use? #
Use Identity API version 3.0. Identity API v2.0 is deprecated. Many features such as LDAP integration and fine-grained access control will not work with v2.0. Below are a few more questions you may have regarding versions.
Why does the Keystone identity catalog still show version 2.0?
Tempest tests still use the v2.0 API. They are in the process of migrating to v3.0. We will remove the v2.0 version once tempest has migrated the tests. The Identity catalog has v2.0 version just to support tempest migration.
Will the Keystone identity v3.0 API work if the identity catalog has only the v2.0 endpoint?
Identity v3.0 does not rely on the content of the catalog. It will continue to work regardless of the version of the API in the catalog.
Which CLI client should you use?
You should use the OpenStack CLI, not the Keystone CLI as it is deprecated. The Keystone CLI does not support v3.0 API, only the OpenStack CLI supports the v3.0 API.
4.1.2 Authentication #
The authentication function provides the initial login function to OpenStack. Keystone supports multiple sources of authentication, including a native or built-in authentication system. The Keystone native system can be used for all user management functions for proof of concept deployments or small deployments not requiring integration with a corporate authentication system, but it lacks some of the advanced functions usually found in user management systems such as forcing password changes. The focus of the Keystone native authentication system is to be the source of authentication for OpenStack-specific users required for the operation of the various OpenStack services. These users are stored by Keystone in a default domain; the addition of these IDs to an external authentication system is not required.
Keystone is more commonly integrated with external authentication systems such as OpenLDAP or Microsoft Active Directory. These systems are usually centrally deployed by organizations to serve as the single source of user management and authentication for all in-house deployed applications and systems requiring user authentication. In addition to LDAP and Microsoft Active Directory, support for integration with Security Assertion Markup Language (SAML)-based identity providers from companies such as Ping, CA, IBM, Oracle, and others is also nearly "production-ready".
Keystone also provides architectural support via the underlying Apache deployment for other types of authentication systems such as Multi-Factor Authentication. These types of systems typically require driver support and integration from the respective provider vendors.
Note
While support for Identity Providers and Multi-factor authentication is available in Keystone, it has not yet been certified by the HPE Helion OpenStack engineering team and is an experimental feature in HPE Helion OpenStack.
LDAP-compatible directories such as OpenLDAP and Microsoft Active Directory are recommended alternatives to using the Keystone local authentication. Both methods are widely used by organizations and are integrated with a variety of other enterprise applications. These directories act as the single source of user information within an organization. Keystone can be configured to authenticate against an LDAP-compatible directory on a per-domain basis.
Domains, as explained in Section 4.3, “Understanding Domains, Projects, Users, Groups, and Roles”, can be configured so that based on the user ID, a incoming user is automatically mapped to a specific domain. This domain can then be configured to authenticate against a specific LDAP directory. The user credentials provided by the user to Keystone are passed along to the designated LDAP source for authentication. This communication can be optionally configured to be secure via SSL encryption. No special LDAP administrative access is required, and only read-only access is needed for this configuration. Keystone will not add any LDAP information. All user additions, deletions, and modifications are performed by the application's front end in the LDAP directories. After a user has been successfully authenticated, he is then assigned to the groups, roles, and projects defined by the Keystone domain or project administrators. This information is stored within the Keystone service database.
Another form of external authentication provided by the Keystone service is via integration with SAML-based Identity Providers (IdP) such as Ping Identity, IBM Tivoli, and Microsoft Active Directory Federation Server. A SAML-based identity provider provides authentication that is often called "single sign-on". The IdP server is configured to authenticate against identity sources such as Active Directory and provides a single authentication API against multiple types of downstream identity sources. This means that an organization could have multiple identity storage sources but a single authentication source. In addition, if a user has logged into one such source during a defined session time frame, they do not need to re-authenticate within the defined session. Instead, the IdP will automatically validate the user to requesting applications and services.
A SAML-based IdP authentication source is configured with Keystone on a per-domain basis similar to the manner in which native LDAP directories are configured. Extra mapping rules are required in the configuration that define which Keystone group an incoming UID is automatically assigned to. This means that groups need to be defined in Keystone first, but it also removes the requirement that a domain or project admin assign user roles and project membership on a per-user basis. Instead, groups are used to define project membership and roles and incoming users are automatically mapped to Keystone groups based on their upstream group membership. This provides a very consistent role-based access control (RBAC) model based on the upstream identity source. The configuration of this option is fairly straightforward. IdP vendors such as Ping and IBM are contributing to the maintenance of this function and have also produced their own integration documentation. Microsoft Active Directory Federation Services (ADFS) is used for functional testing and future documentation.
The third Keystone-supported authentication source is known as Multi-Factor Authentication (MFA). MFA typically requires an external source of authentication beyond a login name and password, and can include options such as SMS text, a temporal token generator, a fingerprint scanner, etc. Each of these types of MFA are usually specific to a particular MFA vendor. The Keystone architecture supports an MFA-based authentication system, but this has not yet been certified or documented for HPE Helion OpenStack.
4.1.3 Authorization #
The second major function provided by the Keystone service is access authorization that determines what resources and actions are available based on the UserID, the role of the user, and the projects that a user is provided access to. All of this information is created, managed, and stored by Keystone. These functions are applied via the Horizon web interface, the OpenStack command-line interface, or the direct Keystone API.
Keystone provides support for organizing users via three entities including:
- Domains
Domains provide the highest level of organization. Domains are intended to be used as high-level containers for multiple projects. A domain can represent different tenants, companies or organizations for an OpenStack cloud deployed for public cloud deployments or represent major business units, functions, or any other type of top-level organization unit in an OpenStack private cloud deployment. Each domain has at least one Domain Admin assigned to it. This Domain Admin can then create multiple projects within the domain and assign the project admin role to specific project owners. Each domain created in an OpenStack deployment is unique and the projects assigned to a domain cannot exist in another domain.
- Projects
Projects are entities within a domain that represent groups of users, each user role within that project, and how many underlying infrastructure resources can be consumed by members of the project.
- Groups
Groups are an optional function and provide the means of assigning project roles to multiple users at once.
Keystone also provides the means to create and assign roles to groups of users or individual users. The role names are created and user assignments are made within Keystone. The actual function of a role is defined currently per each OpenStack service via scripts. When a user requests access to an OpenStack service, his access token contains information about his assigned project membership and role for that project. This role is then matched to the service-specific script and the user is allowed to perform functions within that service defined by the role mapping.
4.2 Supported Upstream Keystone Features #
4.2.1 OpenStack upstream features that are enabled by default in HPE Helion OpenStack 8 #
The following supported Keystone features are enabled by default in the HPE Helion OpenStack 8 release.
| Name | User/Admin | Note: API support only. No CLI/UI support |
|---|---|---|
| Implied Roles | Admin | https://blueprints.launchpad.net/keystone/+spec/implied-roles |
| Domain-Specific Roles | Admin | https://blueprints.launchpad.net/keystone/+spec/domain-specific-roles |
Implied rules
To allow for the practice of hierarchical permissions in user roles, this feature enables roles to be linked in such a way that they function as a hierarchy with role inheritance.
When a user is assigned a superior role, the user will also be assigned all roles implied by any subordinate roles. The hierarchy of the assigned roles will be expanded when issuing the user a token.
Domain-specific roles
This feature extends the principle of implied roles to include a set of roles that are specific to a domain. At the time a token is issued, the domain-specific roles are not included in the token, however, the roles that they map to are.
4.2.2 OpenStack upstream features that are disabled by default in HPE Helion OpenStack 8 #
The following is a list of features which are fully supported in the HPE Helion OpenStack 8 release, but are disabled by default. Customers can run a playbook to enable the features.
| Name | User/Admin | Reason Disabled |
|---|---|---|
| Support multiple LDAP backends via per-domain configuration | Admin | Needs explicit configuration. |
| WebSSO | User and Admin | Needs explicit configuration. |
| Keystone-to-Keystone (K2K) federation | User and Admin | Needs explicit configuration. |
| Fernet token provider | User and Admin | Needs explicit configuration. |
| Domain-specific config in SQL | Admin | Domain specific configuration options can be stored in SQL instead of configuration files, using the new REST APIs. |
Multiple LDAP backends for each domain
This feature allows identity backends to be configured on a domain-by-domain basis. Domains will be capable of having their own exclusive LDAP service (or multiple services). A single LDAP service can also serve multiple domains, with each domain in a separate subtree.
To implement this feature, individual domains will require domain-specific configuration files. Domains that do not implement this feature will continue to share a common backend driver.
WebSSO
This feature enables the Keystone service to provide federated identity services through a token-based single sign-on page. This feature is disabled by default, as it requires explicit configuration.
Keystone-to-Keystone (K2K) federation
This feature enables separate Keystone instances to federate identities among the instances, offering inter-cloud authorization. This feature is disabled by default, as it requires explicit configuration.
Fernet token provider
Provides tokens in the fernet format. This is an experimental feature and is disabled by default.
Domain-specific config in SQL
Using the new REST APIs, domain-specific configuration options can be stored in a SQL database instead of in configuration files.
4.2.3 Stack upstream features that have been specifically disabled in HPE Helion OpenStack 8 #
The following is a list of extensions which are disabled by default in HPE Helion OpenStack 8, according to Keystone policy.
| Target Release | Name | User/Admin | Reason Disabled |
|---|---|---|---|
| TBD | Endpoint Filtering | Admin |
This extension was implemented to facilitate service activation. However, due to lack of enforcement at the service side, this feature is only half effective right now. |
| TBD | Endpoint Policy | Admin |
This extension was intended to facilitate policy (policy.json) management and enforcement. This feature is useless right now due to lack of the needed middleware to utilize the policy files stored in Keystone. |
| TBD | OATH 1.0a | User and Admin |
Complexity in workflow. Lack of adoption. Its alternative, Keystone Trust, is enabled by default. HEAT is using Keystone Trust. |
| TBD | Revocation Events | Admin |
For PKI token only and PKI token is disabled by default due to usability concerns. |
| TBD | OS CERT | Admin |
For PKI token only and PKI token is disabled by default due to usability concerns. |
| TBD | PKI Token | Admin |
PKI token is disabled by default due to usability concerns. |
| TBD | Driver level caching | Admin |
Driver level caching is disabled by default due to complexity in setup. |
| TBD | Tokenless Authz | Admin |
Tokenless authorization with X.509 SSL client certificate. |
| TBD | TOTP Authentication | User |
Not fully baked. Has not been battle-tested. |
| TBD | is_admin_project | Admin |
No integration with the services. |
4.3 Understanding Domains, Projects, Users, Groups, and Roles #
The identity service uses these concepts for authentication within your cloud and these are descriptions of each of them.
The HPE Helion OpenStack 8 identity service uses OpenStack Keystone and the concepts of domains, projects, users, groups, and roles to manage authentication. This page describes how these work together.
4.3.1 Domains, Projects, Users, Groups, and Roles #
Most large business organizations use an identity system such as Microsoft Active Directory to store and manage their internal user information. A variety of applications such as HR systems are, in turn, used to manage the data inside of Active Directory. These same organizations often deploy a separate user management system for external users such as contractors, partners, and customers. Multiple authentication systems are then deployed to support multiple types of users.
An LDAP-compatible directory such as Active Directory provides a top-level organization or domain component. In this example, the organization is called Acme. The domain component (DC) is defined as acme.com. Underneath the top level domain component are entities referred to as organizational units (OU). Organizational units are typically designed to reflect the entity structure of the organization. For example, this particular schema has 3 different organizational units for the Marketing, IT, and Contractors units or departments of the Acme organization. Users (and other types of entities like printers) are then defined appropriately underneath each organizational entity. The Keystone domain entity can be used to match the LDAP OU entity; each LDAP OU can have a corresponding Keystone domain created. In this example, both the Marketing and IT domains represent internal employees of Acme and use the same authentication source. The Contractors domain contains all external people associated with Acme. UserIDs associated with the Contractor domain are maintained in a separate user directory and thus have a different authentication source assigned to the corresponding Keystone-defined Contractors domain.
A public cloud deployment usually supports multiple, separate organizations. Keystone domains can be created to provide a domain per organization with each domain configured to the underlying organization's authentication source. For example, the ABC company would have a Keystone domain created called "abc". All users authenticating to the "abc" domain would be authenticated against the authentication system provided by the ABC organization; in this case ldap://ad.abc.com
4.3.2 Domains #
A domain is a top-level container targeted at defining major organizational entities.
Domains can be used in a multi-tenant OpenStack deployment to segregate projects and users from different companies in a public cloud deployment or different organizational units in a private cloud setting.
Domains provide the means to identify multiple authentication sources.
Each domain is unique within an OpenStack implementation.
Multiple projects can be assigned to a domain but each project can only belong to a single domain.
Each domain and project have an assigned admin.
Domains are created by the "admin" service account and domain admins are assigned by the "admin" user.
The "admin" UserID (UID) is created during the Keystone installation, has the "admin" role assigned to it, and is defined as the "Cloud Admin". This UID is created using the "magic" or "secret" admin token found in the default 'keystone.conf' file installed during HPE Helion OpenStack keystone installation after the Keystone service has been installed. This secret token should be removed after installation and the "admin" password changed.
The "default" domain is created automatically during the HPE Helion OpenStack Keystone installation.
The "default" domain contains all OpenStack service accounts that are installed during the HPE Helion OpenStack keystone installation process.
No users but the OpenStack service accounts should be assigned to the "default" domain.
Domain admins can be any UserID inside or outside of the domain.
4.3.3 Domain Administrator #
A UUID is a domain administrator for a given domain if that UID has a domain-scoped token scoped for the given domain. This means that the UID has the "admin" role assigned to it for the selected domain.
The Cloud Admin UID assigns the domain administrator role for a domain to a selected UID.
A domain administrator can create and delete local users who have authenticated against Keystone. These users will be assigned to the domain belonging to the domain administrator who creates the UserID.
A domain administrator can only create users and projects within her assigned domains.
A domain administrator can assign the "admin" role of their domains to another UID or revoke it; each UID with the "admin" role for a specified domain will be a co-administrator for that domain.
A UID can be assigned to be the domain admin of multiple domains.
A domain administrator can assign non-admin roles to any users and groups within their assigned domain, including projects owned by their assigned domain.
A domain admin UID can belong to projects within their administered domains.
Each domain can have a different authentication source.
The domain field is used during the initial login to define the source of authentication.
The "List Users" function can only be executed by a UID with the domain admin role.
A domain administrator can assign a UID from outside of their domain the "domain admin" role but it is assumed that the domain admin would know the specific UID and would not need to list users from an external domain.
A domain administrator can assign a UID from outside of their domain the "project admin" role for a specific project within their domain but it is assumed that the domain admin would know the specific UID and would not need to list users from an external domain.
4.3.4 Projects #
The domain administrator creates projects within his assigned domain and assigns the project admin role to each project to a selected UID. A UID is a project administrator for a given project if that UID has a project-scoped token scoped for the given project. There can be multiple projects per domain. The project admin sets the project quota settings, adds/deletes users and groups to and from the project, and defines the user/group roles for the assigned project. Users can be belong to multiple projects and have different roles on each project. Users are assigned to a specific domain and a default project. Roles are assigned per project.
4.3.5 Users and Groups #
Each user belongs to one domain only. Domain assignments are defined either by the domain configuration files or by a domain administrator when creating a new, local (user authenticated against Keystone) user. There is no current method for "moving" a user from one domain to another. A user can belong to multiple projects within a domain with a different role assignment per project. A group is a collection of users. Users can be assigned to groups either by the project admin or automatically via mappings if an external authentication source is defined for the assigned domain. Groups can be assigned to multiple projects within a domain and have different roles assigned to the group per project. A group can be assigned the "admin" role for a domain or project. All members of the group will be an "admin" for the selected domain or project.
4.3.6 Roles #
Service roles represent the functionality used to implement the OpenStack role based access control (RBAC), model used to manage access to each OpenStack service. Roles are named and assigned per user or group for each project by the identity service. Role definition and policy enforcement are defined outside of the identity service independently by each OpenStack service. The token generated by the identity service for each user authentication contains the role assigned to that user for a particular project. When a user attempts to access a specific OpenStack service, the role is parsed by the service, compared to the service-specific policy file, and then granted the resource access defined for that role by the service policy file.
Each service has its own service policy file with the /etc/[SERVICE_CODENAME]/policy.json file name format where [SERVICE_CODENAME] represents a specific OpenStack service name. For example, the OpenStack Nova service would have a policy file called /etc/nova/policy.json. With Service policy files can be modified and deployed to control nodes from the Cloud Lifecycle Manager. Administrators are advised to validate policy changes before checking in the changes to the site branch of the local git repository before rolling the changes into production. Do not make changes to policy files without having a way to validate them.
The policy files are located at the following site branch locations on the Cloud Lifecycle Manager.
~/openstack/ardana/ansible/roles/GLA-API/templates/policy.json.j2
~/openstack/ardana/ansible/roles/ironic-common/files/policy.json
~/openstack/ardana/ansible/roles/KEYMGR-API/templates/policy.json
~/openstack/ardana/ansible/roles/heat-common/files/policy.json
~/openstack/ardana/ansible/roles/CND-API/templates/policy.json
~/openstack/ardana/ansible/roles/nova-common/files/policy.json
~/openstack/ardana/ansible/roles/CEI-API/templates/policy.json.j2
~/openstack/ardana/ansible/roles/neutron-common/templates/policy.json.j2
For test and validation, policy files can be modified in a non-production
environment from the ~/scratch/ directory. For a specific
policy file, run a search for policy.json. To deploy policy changes for a
service, run the service specific reconfiguration playbook (for example,
nova-reconfigure.yml). For a complete list of reconfiguration playbooks,
change directories to ~/scratch/ansible/next/ardana/ansible
and run this command:
ardana > ls | grep reconfigure
A read-only role named project_observer is explicitly
created in HPE Helion OpenStack 8. Any user who is granted this role can use
list_project.
4.4 Identity Service Token Validation Example #
The following diagram illustrates the flow of typical Identity Service (Keystone) requests/responses between HPE Helion OpenStack services and the Identity service. It shows how Keystone issues and validates tokens to ensure the identity of the caller of each service.
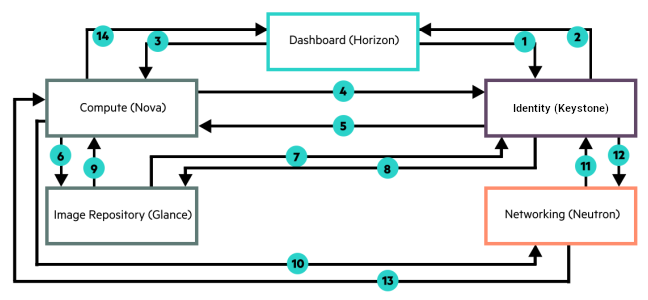
Horizon sends an HTTP authentication request to Keystone for user credentials.
Keystone validates the credentials and replies with token.
Horizon sends a POST request, with token to Nova to start provisioning a virtual machine.
Nova sends token to Keystone for validation.
Keystone validates the token.
Nova forwards a request for an image with the attached token.
Glance sends token to Keystone for validation.
Keystone validates the token.
Glance provides image-related information to Nova.
Nova sends request for networks to Neutron with token.
Neutron sends token to Keystone for validation.
Keystone validates the token.
Neutron provides network-related information to Nova.
Nova reports the status of the virtual machine provisioning request.
4.5 Configuring the Identity Service #
4.5.1 What is the Identity service? #
The HPE Helion OpenStack Identity service, based on the OpenStack Keystone API, provides UserID authentication and access authorization to help organizations achieve their access security and compliance objectives and successfully deploy OpenStack. In short, the Identity service is the gateway to the rest of the OpenStack services.
The identity service is installed automatically by the Cloud Lifecycle Manager (just after MySQL and RabbitMQ). When your cloud is up and running, you can customize Keystone in a number of ways, including integrating with LDAP servers. This topic describes the default configuration. See Section 4.8, “Reconfiguring the Identity Service” for changes you can implement. Also see Section 4.9, “Integrating LDAP with the Identity Service” for information on integrating with an LDAP provider.
4.5.2 Which version of the Keystone Identity service should you use? #
Note that you should use identity API version 3.0. Identity API v2.0 was has been deprecated. Many features such as LDAP integration and fine-grained access control will not work with v2.0. The following are a few questions you may have regarding versions.
Why does the Keystone identity catalog still show version 2.0?
Tempest tests still use the v2.0 API. They are in the process of migrating to v3.0. We will remove the v2.0 version once tempest has migrated the tests. The Identity catalog has version 2.0 just to support tempest migration.
Will the Keystone identity v3.0 API work if the identity catalog has only the v2.0 endpoint?
Identity v3.0 does not rely on the content of the catalog. It will continue to work regardless of the version of the API in the catalog.
Which CLI client should you use?
You should use the OpenStack CLI, not the Keystone CLI, because it is deprecated. The Keystone CLI does not support the v3.0 API; only the OpenStack CLI supports the v3.0 API.
4.5.3 Authentication #
The authentication function provides the initial login function to OpenStack. Keystone supports multiple sources of authentication, including a native or built-in authentication system. You can use the Keystone native system for all user management functions for proof-of-concept deployments or small deployments not requiring integration with a corporate authentication system, but it lacks some of the advanced functions usually found in user management systems such as forcing password changes. The focus of the Keystone native authentication system is to be the source of authentication for OpenStack-specific users required to operate various OpenStack services. These users are stored by Keystone in a default domain; the addition of these IDs to an external authentication system is not required.
Keystone is more commonly integrated with external authentication systems such as OpenLDAP or Microsoft Active Directory. These systems are usually centrally deployed by organizations to serve as the single source of user management and authentication for all in-house deployed applications and systems requiring user authentication. In addition to LDAP and Microsoft Active Directory, support for integration with Security Assertion Markup Language (SAML)-based identity providers from companies such as Ping, CA, IBM, Oracle, and others is also nearly "production-ready."
Keystone also provides architectural support through the underlying Apache deployment for other types of authentication systems, such as multi-factor authentication. These types of systems typically require driver support and integration from the respective providers.
Note
While support for Identity providers and multi-factor authentication is available in Keystone, it has not yet been certified by the HPE Helion OpenStack engineering team and is an experimental feature in HPE Helion OpenStack.
LDAP-compatible directories such as OpenLDAP and Microsoft Active Directory are recommended alternatives to using Keystone local authentication. Both methods are widely used by organizations and are integrated with a variety of other enterprise applications. These directories act as the single source of user information within an organization. You can configure Keystone to authenticate against an LDAP-compatible directory on a per-domain basis.
Domains, as explained in Section 4.3, “Understanding Domains, Projects, Users, Groups, and Roles”, can be configured so that, based on the user ID, an incoming user is automatically mapped to a specific domain. You can then configure this domain to authenticate against a specific LDAP directory. User credentials provided by the user to Keystone are passed along to the designated LDAP source for authentication. You can optionally configure this communication to be secure through SSL encryption. No special LDAP administrative access is required, and only read-only access is needed for this configuration. Keystone will not add any LDAP information. All user additions, deletions, and modifications are performed by the application's front end in the LDAP directories. After a user has been successfully authenticated, that user is then assigned to the groups, roles, and projects defined by the Keystone domain or project administrators. This information is stored in the Keystone service database.
Another form of external authentication provided by the Keystone service is through integration with SAML-based identity providers (IdP) such as Ping Identity, IBM Tivoli, and Microsoft Active Directory Federation Server. A SAML-based identity provider provides authentication that is often called "single sign-on." The IdP server is configured to authenticate against identity sources such as Active Directory and provides a single authentication API against multiple types of downstream identity sources. This means that an organization could have multiple identity storage sources but a single authentication source. In addition, if a user has logged into one such source during a defined session time frame, that user does not need to reauthenticate within the defined session. Instead, the IdP automatically validates the user to requesting applications and services.
A SAML-based IdP authentication source is configured with Keystone on a per-domain basis similar to the manner in which native LDAP directories are configured. Extra mapping rules are required in the configuration that define which Keystone group an incoming UID is automatically assigned to. This means that groups need to be defined in Keystone first, but it also removes the requirement that a domain or project administrator assign user roles and project membership on a per-user basis. Instead, groups are used to define project membership and roles and incoming users are automatically mapped to Keystone groups based on their upstream group membership. This strategy provides a consistent role-based access control (RBAC) model based on the upstream identity source. The configuration of this option is fairly straightforward. IdP vendors such as Ping and IBM are contributing to the maintenance of this function and have also produced their own integration documentation. HPE is using the Microsoft Active Directory Federation Services (AD FS) for functional testing and future documentation.
The third Keystone-supported authentication source is known as multi-factor authentication (MFA). MFA typically requires an external source of authentication beyond a login name and password, and can include options such as SMS text, a temporal token generator, or a fingerprint scanner. Each of these types of MFAs are usually specific to a particular MFA vendor. The Keystone architecture supports an MFA-based authentication system, but this has not yet been certified or documented for HPE Helion OpenStack.
4.5.4 Authorization #
Another major function provided by the Keystone service is access authorization that determines which resources and actions are available based on the UserID, the role of the user, and the projects that a user is provided access to. All of this information is created, managed, and stored by Keystone. These functions are applied through the Horizon web interface, the OpenStack command-line interface, or the direct Keystone API.
Keystone provides support for organizing users by using three entities:
- Domains
Domains provide the highest level of organization. Domains are intended to be used as high-level containers for multiple projects. A domain can represent different tenants, companies, or organizations for an OpenStack cloud deployed for public cloud deployments or it can represent major business units, functions, or any other type of top-level organization unit in an OpenStack private cloud deployment. Each domain has at least one Domain Admin assigned to it. This Domain Admin can then create multiple projects within the domain and assign the project administrator role to specific project owners. Each domain created in an OpenStack deployment is unique and the projects assigned to a domain cannot exist in another domain.
- Projects
Projects are entities within a domain that represent groups of users, each user role within that project, and how many underlying infrastructure resources can be consumed by members of the project.
- Groups
Groups are an optional function and provide the means of assigning project roles to multiple users at once.
Keystone also makes it possible to create and assign roles to groups of users or individual users. Role names are created and user assignments are made within Keystone. The actual function of a role is defined currently for each OpenStack service via scripts. When users request access to an OpenStack service, their access tokens contain information about their assigned project membership and role for that project. This role is then matched to the service-specific script and users are allowed to perform functions within that service defined by the role mapping.
4.5.5 Default settings #
Identity service configuration settings
The identity service configuration options are described in the OpenStack documentation on the Keystone Configuration Options page on the OpenStack site.
Default domain and service accounts
The "default" domain is automatically created during the installation to contain the various required OpenStack service accounts, including the following:
neutron
glance
swift-monitor
ceilometer
swift
monasca-agent
glance-swift
swift-demo
nova
monasca
logging
demo
heat
cinder
admin
These are required accounts and are used by the underlying OpenStack services. These accounts should not be removed or reassigned to a different domain. These "default" domain should be used only for these service accounts.
For details on how to create additional users, see Book “User Guide”, Chapter 4 “Cloud Admin Actions with the Command Line”.
4.5.6 Preinstalled roles #
The following are the preinstalled roles. You can create additional roles by UIDs with the "admin" role. Roles are defined on a per-service basis (more information is available at Manage projects, users, and roles on the OpenStack website).
| Role | Description |
|---|---|
| admin |
The "superuser" role. Provides full access to all HPE Helion OpenStack services across all domains and projects. This role should be given only to a cloud administrator. |
| _member_ |
A general role that enables a user to access resources within an assigned project including creating, modifying, and deleting compute, storage, and network resources. |
You can find additional information on these roles in each service policy
stored in the /etc/PROJECT/policy.json files where
PROJECT is a placeholder for an OpenStack service. For example, the Compute
(Nova) service roles are stored in the
/etc/nova/policy.json file. Each service policy file
defines the specific API functions available to a role label.
4.6 Retrieving the Admin Password #
The admin password will be used to access the dashboard and Operations Console as well as allow you to authenticate to use the command-line tools and API.
In a default HPE Helion OpenStack 8 installation there is a randomly generated password for the Admin user created. These steps will show you how to retrieve this password.
4.6.1 Retrieving the Admin Password #
You can retrieve the randomly generated Admin password by using this command on the Cloud Lifecycle Manager:
ardana > cat ~/service.osrc
In this example output, the value for OS_PASSWORD is the
Admin password:
ardana > cat ~/service.osrc
unset OS_DOMAIN_NAME
export OS_IDENTITY_API_VERSION=3
export OS_AUTH_VERSION=3
export OS_PROJECT_NAME=admin
export OS_PROJECT_DOMAIN_NAME=Default
export OS_USERNAME=admin
export OS_USER_DOMAIN_NAME=Default
export OS_PASSWORD=SlWSfwxuJY0
export OS_AUTH_URL=https://10.13.111.145:5000/v3
export OS_ENDPOINT_TYPE=internalURL
# OpenstackClient uses OS_INTERFACE instead of OS_ENDPOINT
export OS_INTERFACE=internal
export OS_CACERT=/etc/ssl/certs/ca-certificates.crt
export OS_COMPUTE_API_VERSION=2
4.7 Changing Service Passwords #
HPE Helion OpenStack provides a process for changing the default service passwords, including your admin user password, which you may want to do for security or other purposes.
You can easily change the inter-service passwords used for authenticating communications between services in your HPE Helion OpenStack deployment, promoting better compliance with your organization’s security policies. The inter-service passwords that can be changed include (but are not limited to) Keystone, MariaDB, RabbitMQ, Cloud Lifecycle Manager cluster, Monasca and Barbican.
The general process for changing the passwords is to:
Indicate to the configuration processor which password(s) you want to change, and optionally include the value of that password
Run the configuration processor to generate the new passwords (you do not need to run
git addbefore this)Run ready-deployment
Check your password name(s) against the tables included below to see which high-level credentials-change playbook(s) you need to run
Run the appropriate high-level credentials-change playbook(s)
4.7.1 Password Strength #
Encryption passwords supplied to the configuration processor for use with Ansible Vault and for encrypting the configuration processor’s persistent state must have a minimum length of 12 characters and a maximum of 128 characters. Passwords must contain characters from each of the following three categories:
Uppercase characters (A-Z)
Lowercase characters (a-z)
Base 10 digits (0-9)
Service Passwords that are automatically generated by the configuration processor are chosen from the 62 characters made up of the 26 uppercase, the 26 lowercase, and the 10 numeric characters, with no preference given to any character or set of characters, with the minimum and maximum lengths being determined by the specific requirements of individual services.
Important
It is possible to use special characters in passwords. However, the
$ character must be escaped by entering it twice. For
example: the password foo$bar must be specified as foo$$bar.
4.7.2 Telling the configuration processor which password(s) you want to change #
In HPE Helion OpenStack 8, the configuration processor will produce metadata about
each of the passwords (and other variables) that it generates in the file
~/openstack/my_cloud/info/private_data_metadata_ccp.yml. A
snippet of this file follows. Expand the header to see the file:
4.7.3 private_data_metadata_ccp.yml #
metadata_proxy_shared_secret:
  metadata:
  - clusters:
    - cluster1
    component: nova-metadata
    consuming-cp: ccp
    cp: ccp
  version: '2.0'
mysql_admin_password:
  metadata:
  - clusters:
    - cluster1
    component: ceilometer
    consumes: mysql
    consuming-cp: ccp
    cp: ccp
  - clusters:
    - cluster1
    component: heat
    consumes: mysql
    consuming-cp: ccp
    cp: ccp
  - clusters:
    - cluster1
    component: keystone
    consumes: mysql
    consuming-cp: ccp
    cp: ccp
  - clusters:
    - cluster1
    - compute
    component: nova
    consumes: mysql
    consuming-cp: ccp
    cp: ccp
  - clusters:
    - cluster1
    component: cinder
    consumes: mysql
    consuming-cp: ccp
    cp: ccp
  - clusters:
    - cluster1
    component: glance
    consumes: mysql
    consuming-cp: ccp
    cp: ccp
  - clusters:
    - cluster1
    - compute
    component: neutron
    consumes: mysql
    consuming-cp: ccp
    cp: ccp
  - clusters:
    - cluster1
    component: horizon
    consumes: mysql
    consuming-cp: ccp
    cp: ccp
  version: '2.0'
mysql_barbican_password:
  metadata:
  - clusters:
    - cluster1
    component: barbican
    consumes: mysql
    consuming-cp: ccp
    cp: ccp
  version: '2.0'
For each variable, there is a metadata entry for each pair of services that
use the variable including a list of the clusters on which the service
component that consumes the variable (defined as "component:" in
private_data_metadata_ccp.yml above) runs.
Note above that the variable mysql_admin_password is used by a number of
service components, and the service that is consumed in each case is mysql,
which in this context refers to the MariaDB instance that is part of the
product.
4.7.4 Steps to change a password #
First, make sure that you have a copy of
private_data_metadata_ccp.yml. If you
do not, generate one to run the configuration processor:
ardana >cd ~/openstack/ardana/ansibleardana >ansible-playbook -i hosts/localhost config-processor-run.yml
Make a copy of the private_data_metadata_ccp.yml file and
place it into the ~/openstack/change_credentials directory:
ardana > cp ~/openstack/my_cloud/info/private_data_metadata_control-plane-1.yml \
 ~/openstack/change_credentials/
Edit the copied file in ~/openstack/change_credentials
leaving only those passwords you intend to change. All entries in this
template file should be deleted except for those
passwords.
Important
If you leave other passwords in that file that you do not want to change, they will be regenerated and no longer match those in use which could disrupt operations.
Note
It is required that you change passwords in batches of each category listed below.
For example, the snippet below would result in the configuration processor generating new random values for keystone_backup_password, keystone_ceilometer_password, and keystone_cinder_password:
keystone_backup_password:
  metadata:
  - clusters:
    - cluster0
    - cluster1
    - compute
    component: freezer-agent
    consumes: keystone-api
    consuming-cp: ccp
    cp: ccp
  version: '2.0'
keystone_ceilometer_password:
  metadata:
  - clusters:
    - cluster1
    component: ceilometer-common
    consumes: keystone-api
    consuming-cp: ccp
    cp: ccp
  version: '2.0'
keystone_cinder_password:
  metadata:
  - clusters:
    - cluster1
    component: cinder-api
    consumes: keystone-api
    consuming-cp: ccp
    cp: ccp
  version: '2.0'
4.7.5 Specifying password value #
Optionally, you can specify a value for the password by including a "value:" key and value at the same level as metadata:
keystone_backup_password:
    value: 'new_password'
    metadata:
    - clusters:
        - cluster0
        - cluster1
        - compute
        component: freezer-agent
        consumes: keystone-api
        consuming-cp: ccp
        cp: ccp
      version: '2.0'
Note that you can have multiple files in openstack/change_credentials. The configuration processor will only read files that end in .yml or .yaml.
Note
If you have specified a password value in your credential change file, you may want to encrypt it using ansible-vault. If you decide to encrypt with ansible-vault, make sure that you use the encryption key you have already used when running the configuration processor.
To encrypt a file using ansible-vault, execute:
ardana >cd ~/openstack/change_credentialsardana >ansible-vault encrypt credential change file ending in .yml or .yaml
Be sure to provide the encryption key when prompted. Note that if you have specified the wrong ansible-vault password, the configuration-processor will error out with a message like the following:
################################################## Reading Persistent State ##################################################

################################################################################
# The configuration processor failed.
# PersistentStateCreds: User-supplied creds file test1.yml was not parsed properly
################################################################################
4.7.6 Running the configuration processor to change passwords #
The directory openstack/change_credentials is not managed by git, so to rerun the configuration processor to generate new passwords and prepare for the next deployment just enter the following commands:
ardana >cd ~/openstack/ardana/ansibleardana >ansible-playbook -i hosts/localhost config-processor-run.ymlardana >ansible-playbook -i hosts/localhost ready-deployment.yml
Note
The files that you placed in
~/openstack/change_credentials should be removed
once you have run the configuration processor because the old password
values and new password values will be stored in the configuration
processor's persistent state.
Note that if you see output like the following after running the configuration processor:
################################################################################
# The configuration processor completed with warnings.
# PersistentStateCreds: User-supplied password name 'blah' is not valid
################################################################################
this tells you that the password name you have supplied, 'blah,' does not exist. A failure to correctly parse the credentials change file will result in the configuration processor erroring out with a message like the following:
################################################## Reading Persistent State ##################################################

################################################################################
# The configuration processor failed.
# PersistentStateCreds: User-supplied creds file test1.yml was not parsed properly
################################################################################
Once you have run the configuration processor to change passwords, an
information file
~/openstack/my_cloud/info/password_change.yml similar to the
private_data_metadata_ccp.yml is written to tell you which
passwords have been changed, including metadata but not including the
values.
4.7.7 Password change playbooks and tables #
Once you have completed the steps above to change password(s) value(s) and then prepare for the deployment that will actually switch over to the new passwords, you will need to run some high-level playbooks. The passwords that can be changed are grouped into six categories. The tables below list the password names that belong in each category. The categories are:
- Keystone
Playbook: ardana-keystone-credentials-change.yml
- RabbitMQ
Playbook: ardana-rabbitmq-credentials-change.yml
- MariaDB
Playbook: ardana-reconfigure.yml
- Cluster:
Playbook: ardana-cluster-credentials-change.yml
- Monasca:
Playbook: monasca-reconfigure-credentials-change.yml
- Other:
Playbook: ardana-other-credentials-change.yml
It is recommended that you change passwords in batches; in other words, run through a complete password change process for each batch of passwords, preferably in the above order. Once you have followed the process indicated above to change password(s), check the names against the tables below to see which password change playbook(s) you should run.
Changing identity service credentials
The following table lists identity service credentials you can change.
| Keystone credentials |
|---|
Password name
barbican_admin_password
barbican_service_password
keystone_admin_pwd
keystone_admin_token
keystone_backup_password
keystone_ceilometer_password
keystone_cinder_password
keystone_cinderinternal_password
keystone_demo_pwd
keystone_designate_password
keystone_freezer_password
keystone_glance_password
keystone_glance_swift_password
keystone_heat_password
keystone_magnum_password
keystone_monasca_agent_password
keystone_monasca_password
keystone_neutron_password
keystone_nova_password
keystone_octavia_password
keystone_swift_dispersion_password
keystone_swift_monitor_password
keystone_swift_password
logging_keystone_password
nova_monasca_password |
The playbook to run to change Keystone credentials is
ardana-keystone-credentials-change.yml. Execute the
following commands to make the changes:
ardana >cd ~/scratch/ansible/next/ardana/ansible/ardana >ansible-playbook -i hosts/verb_hosts ardana-keystone-credentials-change.yml
Changing RabbitMQ credentials
The following table lists the RabbitMQ credentials you can change.
| RabbitMQ credentials |
|---|
Password name
ops_mon_rmq_password
rmq_barbican_password
rmq_ceilometer_password
rmq_cinder_password
rmq_designate_password
rmq_keystone_password
rmq_magnum_password
rmq_monasca_monitor_password
rmq_nova_password
rmq_octavia_password
rmq_service_password |
The playbook to run to change RabbitMQ credentials is
ardana-rabbitmq-credentials-change.yml. Execute the
following commands to make the changes:
ardana >cd ~/scratch/ansible/next/ardana/ansible/ardana >ansible-playbook -i hosts/verb_hosts ardana-rabbitmq-credentials-change.yml
Changing MariaDB credentials
The following table lists the MariaDB credentials you can change.
| MariaDB credentials |
|---|
Password name
mysql_admin_password
mysql_barbican_password
mysql_clustercheck_pwd
mysql_designate_password
mysql_magnum_password
mysql_monasca_api_password
mysql_monasca_notifier_password
mysql_monasca_thresh_password
mysql_octavia_password
mysql_powerdns_password
mysql_root_pwd
mysql_service_pwd
mysql_sst_password
ops_mon_mdb_password
mysql_monasca_transform_password
mysql_nova_api_password
password |
The playbook to run to change MariaDB credentials is
ardana-reconfigure.yml. To make the changes, execute the
following commands:
ardana >cd ~/scratch/ansible/next/ardana/ansible/ardana >ansible-playbook -i hosts/verb_hosts ardana-reconfigure.yml
Changing cluster credentials
The following table lists the cluster credentials you can change.
| cluster credentials |
|---|
Password name
haproxy_stats_password
keepalive_vrrp_password |
The playbook to run to change cluster credentials is
ardana-cluster-credentials-change.yml. To make changes,
execute the following commands:
ardana >cd ~/scratch/ansible/next/ardana/ansible/ardana >ansible-playbook -i hosts/verb_hosts ardana-cluster-credentials-change.yml
Changing Monasca credentials
The following table lists the Monasca credentials you can change.
| Monasca credentials |
|---|
Password name
mysql_monasca_api_password
mysql_monasca_persister_password
monitor_user_password
cassandra_monasca_api_password
cassandra_monasca_persister_password |
The playbook to run to change Monasca credentials is
monasca-reconfigure-credentials-change.yml. To make the
changes, execute the following commands:
ardana >cd ~/scratch/ansible/next/ardana/ansible/ardana >ansible-playbook -i hosts/verb_hosts monasca-reconfigure-credentials-change.yml
Changing other credentials
The following table lists the other credentials you can change.
| Other credentials |
|---|
Password name
logging_beaver_password
logging_api_password
logging_monitor_password
logging_kibana_password |
The playbook to run to change these credentials is
ardana-other-credentials-change.yml. To make the changes,
execute the following commands:
ardana >cd ~/scratch/ansible/next/ardana/ansible/ardana >ansible-playbook -i hosts/verb_hosts ardana-other-credentials-change.yml
4.7.8 Changing RADOS Gateway Credential #
To change the keystone credentials of RADOS Gateway, follow the preceding
steps documented in Section 4.7, “Changing Service Passwords” by modifying the
keystone_rgw_password section in
private_data_metadata_ccp.yml file in
Section 4.7.4, “Steps to change a password” or
Section 4.7.5, “Specifying password value”.
4.7.9 Immutable variables #
The values of certain variables are immutable, which means that once they have been generated by the configuration processor they cannot be changed. These variables are:
barbican_master_kek_db_plugin
swift_hash_path_suffix
swift_hash_path_prefix
mysql_cluster_name
heartbeat_key
erlang_cookie
The configuration processor will not re-generate the values of the above passwords, nor will it allow you to specify a value for them. In addition to the above variables, the following are immutable in HPE Helion OpenStack 8:
All ssh keys generated by the configuration processor
All UUIDs generated by the configuration processor
metadata_proxy_shared_secret
horizon_secret_key
ceilometer_metering_secret
4.8 Reconfiguring the Identity Service #
4.8.1 Updating the Keystone Identity Service #
This topic explains configuration options for the Identity service.
HPE Helion OpenStack lets you perform updates on the following parts of the Identity service configuration:
Any content in the main keystone configuration file:
/etc/keystone/keystone.conf. This lets you manipulate Keystone configuration parameters. Next, continue with Section 4.8.2, “Updating the Main Identity Service Configuration File”.Updating certain configuration options and enabling features, such as:
Verbosity of logs being written to Keystone log files.
Process counts for the Apache2 WSGI module, separately for admin and public Keystone interfaces.
Enabling/disabling auditing.
Enabling/disabling Fernet tokens.
For more information, see Section 4.8.3, “Enabling Identity Service Features”.
Creating and updating domain-specific configuration files: /etc/keystone/domains/keystone.<domain_name>.conf. This lets you integrate Keystone with one or more external authentication sources, such as LDAP server. See the topic on Section 4.9, “Integrating LDAP with the Identity Service”.
4.8.2 Updating the Main Identity Service Configuration File #
The main Keystone Identity service configuration file (/etc/keystone/keystone.conf), located on each control plane server, is generated from the following template file located on a Cloud Lifecycle Manager:
~/openstack/my_cloud/config/keystone/keystone.conf.j2Modify this template file as appropriate. See Keystone Liberty documentation for full descriptions of all settings. This is a Jinja2 template, which expects certain template variables to be set. Do not change values inside double curly braces:
{{ }}.
Note
HPE Helion OpenStack 8 has the following token expiration setting, which differs from the upstream value
3600:[token] expiration = 14400
After you modify the template, commit the change to the local git repository, and rerun the configuration processor / deployment area preparation playbooks (as suggested in Book “Installing with Cloud Lifecycle Manager”, Chapter 10 “Using Git for Configuration Management”):
ardana >cd ~/openstackardana >git checkout siteardana >git add my_cloud/config/keystone/keystone.conf.j2ardana >git commit -m "Adjusting some parameters in keystone.conf"ardana >cd ~/openstack/ardana/ansibleardana >ansible-playbook -i hosts/localhost config-processor-run.ymlardana >ansible-playbook -i hosts/localhost ready-deployment.ymlRun the reconfiguration playbook in the deployment area:
ardana >cd ~/scratch/ansible/next/ardana/ansibleardana >ansible-playbook -i hosts/verb_hosts keystone-reconfigure.yml
4.8.3 Enabling Identity Service Features #
To enable or disable Keystone features, do the following:
Adjust respective parameters in ~/openstack/my_cloud/config/keystone/keystone_deploy_config.yml
Commit the change into local git repository, and rerun the configuration processor/deployment area preparation playbooks (as suggested in Book “Installing with Cloud Lifecycle Manager”, Chapter 10 “Using Git for Configuration Management”):
ardana >cd ~/openstackardana >git checkout siteardana >git add my_cloud/config/keystone/keystone_deploy_config.ymlardana >git commit -m "Adjusting some WSGI or logging parameters for keystone"ardana >cd ~/openstack/ardana/ansibleardana >ansible-playbook -i hosts/localhost config-processor-run.ymlardana >ansible-playbook -i hosts/localhost ready-deployment.ymlRun the reconfiguration playbook in the deployment area:
ardana >cd ~/scratch/ansible/next/ardana/ansibleardana >ansible-playbook -i hosts/verb_hosts keystone-reconfigure.yml
4.8.4 Fernet Tokens #
HPE Helion OpenStack 8 supports Fernet tokens by default. The benefit of using Fernet tokens is that tokens are not persisted in a database, which is helpful if you want to deploy the Keystone Identity service as one master and multiple slaves; only roles, projects, and other details will need to be replicated from master to slaves, not the token table.
Note
Tempest does not work with Fernet tokens in HPE Helion OpenStack 8. If Fernet tokens are enabled, do not run token tests in Tempest.
Note
During reconfiguration when switching to a Fernet token provider or during
Fernet key rotation, you may see a warning in
keystone.log stating [fernet_tokens]
key_repository is world readable: /etc/keystone/fernet-keys/.
This is expected. You can safely ignore this message. For other Keystone
operations, you will not see this warning. Directory permissions are
actually set to 600 (read/write by owner only), not world readable.
Fernet token-signing key rotation is being handled by a cron job, which is configured on one of the controllers. The controller with the Fernet token-signing key rotation cron job is also known as the Fernet Master node. By default, the Fernet token-signing key is being rotated once every 24 hours. The Fernet token-signing keys are distributed from the Fernet Master node to the rest of the controllers at each rotation. Therefore, the Fernet token-signing keys are consistent for all the controlers at all time.
When enabling Fernet token provider the first time, specific steps are needed to set up the necessary mechanisms for Fernet token-signing key distributions.
Set
keystone_configure_fernettoTruein~/openstack/my_cloud/config/keystone/keystone_deploy_config.yml.Run the following commands to commit your change in Git and enable Fernet:
ardana >git add my_cloud/config/keystone/keystone_deploy_config.ymlardana >git commit -m "enable Fernet token provider"ardana >cd ~/openstack/ardana/ansibleardana >ansible-playbook -i hosts/localhost config-processor-run.ymlardana >ansible-playbook -i hosts/localhost ready-deployment.ymlardana >cd ~/scratch/ansible/next/ardana/ansibleardana >ansible-playbook -i hosts/verb_hosts keystone-deploy.yml
When the Fernet token provider is enabled, a Fernet Master alarm definition
is also created on Monasca to monitor the Fernet Master node. If the Fernet
Master node is offline or unreachable, a CRITICAL alarm
will be raised for the Cloud Admin to take corrective actions. If the Fernet
Master node is offline for a prolonged period of time, Fernet token-signing
key rotation will not be performed. This may introduce security risks to the
cloud. The Cloud Admin must take immediate actions to resurrect the Fernet
Master node.
4.9 Integrating LDAP with the Identity Service #
4.9.1 Integrating with an external LDAP server #
The Keystone identity service provides two primary functions: user authentication and access authorization. The user authentication function validates a user's identity. Keystone has a very basic user management system that can be used to create and manage user login and password credentials but this system is intended only for proof of concept deployments due to the very limited password control functions. The internal identity service user management system is also commonly used to store and authenticate OpenStack-specific service account information.
The recommended source of authentication is external user management systems such as LDAP directory services. The identity service can be configured to connect to and use external systems as the source of user authentication. The identity service domain construct is used to define different authentication sources based on domain membership. For example, cloud deployment could consist of as few as two domains:
The default domain that is pre-configured for the service account users that are authenticated directly against the identity service internal user management system
A customer-defined domain that contains all user projects and membership definitions. This domain can then be configured to use an external LDAP directory such as Microsoft Active Directory as the authentication source.
HPE Helion OpenStack can support multiple domains for deployments that support multiple tenants. Multiple domains can be created with each domain configured to either the same or different external authentication sources. This deployment model is known as a "per-domain" model.
There are currently two ways to configure "per-domain" authentication sources:
File store – each domain configuration is created and stored in separate text files. This is the older and current default method for defining domain configurations.
Database store – each domain configuration can be created using either the identity service manager utility (recommenced) or a Domain Admin API (from OpenStack.org), and the results are stored in the identity service MariaDB database. This database store is a new method introduced in the OpenStack Kilo release and now available in HPE Helion OpenStack.
Instructions for initially creating per-domain configuration files and then migrating to the Database store method via the identity service manager utility are provided as follows.
4.9.2 Set up domain-specific driver configuration - file store #
To update configuration to a specific LDAP domain:
Ensure that the following configuration options are in the main configuration file template: ~/openstack/my_cloud/config/keystone/keystone.conf.j2
[identity]
domain_specific_drivers_enabled = True
domain_configurations_from_database = False
Create a YAML file that contains the definition of the LDAP server connection. The sample file below is already provided as part of the Cloud Lifecycle Manager in the Book “Installing with Cloud Lifecycle Manager”, Chapter 10 “Using Git for Configuration Management”. It is available on the Cloud Lifecycle Manager in the following file:
~/openstack/my_cloud/config/keystone/keystone_configure_ldap_sample.yml
Save a copy of this file with a new name, for example:
~/openstack/my_cloud/config/keystone/keystone_configure_ldap_my.yml
Note
Please refer to the LDAP section of the Keystone configuration example for OpenStack for the full option list and description.
Below are samples of YAML configurations for identity service LDAP certificate settings, optimized for Microsoft Active Directory server.
Sample YAML configuration keystone_configure_ldap_my.yml
---
keystone_domainldap_conf:

    # CA certificates file content.
    # Certificates are stored in Base64 PEM format. This may be entire LDAP server
    # certificate (in case of self-signed certificates), certificate of authority
    # which issued LDAP server certificate, or a full certificate chain (Root CA
    # certificate, intermediate CA certificate(s), issuer certificate).
    #
    cert_settings:
      cacert: |
        -----BEGIN CERTIFICATE-----

        certificate appears here

        -----END CERTIFICATE-----

    # A domain will be created in MariaDB with this name, and associated with ldap back end.
    # Installer will also generate a config file named /etc/keystone/domains/keystone.<domain_name>.conf
    #
    domain_settings:
      name: ad
      description: Dedicated domain for ad users

    conf_settings:
      identity:
         driver: ldap


      # For a full list and description of ldap configuration options, please refer to
      # https://github.com/openstack/keystone/blob/master/etc/keystone.conf.sample or
      # http://docs.openstack.org/liberty/config-reference/content/keystone-configuration-file.html.
      #
      # Please note:
      #  1. LDAP configuration is read-only. Configuration which performs write operations (i.e. creates users, groups, etc)
      #     is not supported at the moment.
      #  2. LDAP is only supported for identity operations (reading users and groups from LDAP). Assignment
      #     operations with LDAP (i.e. managing roles, projects) are not supported.
      #  3. LDAP is configured as non-default domain. Configuring LDAP as a default domain is not supported.
      #
      ldap:
        url: ldap://ad.hpe.net
        suffix: DC=hpe,DC=net
        query_scope: sub
        user_tree_dn: CN=Users,DC=hpe,DC=net
        user : CN=admin,CN=Users,DC=hpe,DC=net
        password: REDACTED
        user_objectclass: user
        user_id_attribute: cn
        user_name_attribute: cn
        group_tree_dn: CN=Users,DC=hpe,DC=net
        group_objectclass: group
        group_id_attribute: cn
        group_name_attribute: cn
        use_pool: True
        user_enabled_attribute: userAccountControl
        user_enabled_mask: 2
        user_enabled_default: 512
        use_tls: True
        tls_req_cert: demand
        # if you are configuring multiple LDAP domains, and LDAP server certificates are issued
        # by different authorities, make sure that you place certs for all the LDAP backend domains in the
        # cacert parameter as seen in this sample yml file so that all the certs are combined in a single CA file
        # and every LDAP domain configuration points to the combined CA file.
        # Note:
        # 1. Please be advised that every time a new ldap domain is configured, the single CA file gets overwritten
        # and hence ensure that you place certs for all the LDAP backend domains in the cacert parameter.
        # 2. There is a known issue on one cert per CA file per domain when the system processes
        # concurrent requests to multiple LDAP domains. Using the single CA file with all certs combined
        # shall get the system working properly*.

        tls_cacertfile: /etc/keystone/ssl/certs/all_ldapdomains_ca.pem

        # The issue is in the underlying SSL library. Upstream is not investing in python-ldap package anymore.
        # It is also not python3 compliant.
keystone_domain_MSAD_conf: # CA certificates file content. # Certificates are stored in Base64 PEM format. This may be entire LDAP server # certificate (in case of self-signed certificates), certificate of authority # which issued LDAP server certificate, or a full certificate chain (Root CA # certificate, intermediate CA certificate(s), issuer certificate). # cert_settings: cacert: | -----BEGIN CERTIFICATE----- certificate appears here -----END CERTIFICATE----- # A domain will be created in MariaDB with this name, and associated with ldap back end. # Installer will also generate a config file named /etc/keystone/domains/keystone.<domain_name>.conf # domain_settings: name: msad description: Dedicated domain for msad users conf_settings: identity: driver: ldap # For a full list and description of ldap configuration options, please refer to # https://github.com/openstack/keystone/blob/master/etc/keystone.conf.sample or # http://docs.openstack.org/liberty/config-reference/content/keystone-configuration-file.html. # # Please note: # 1. LDAP configuration is read-only. Configuration which performs write operations (i.e. creates users, groups, etc) # is not supported at the moment. # 2. LDAP is only supported for identity operations (reading users and groups from LDAP). Assignment # operations with LDAP (i.e. managing roles, projects) are not supported. # 3. LDAP is configured as non-default domain. Configuring LDAP as a default domain is not supported. # ldap: # If the url parameter is set to ldap then typically use_tls should be set to True. If # url is set to ldaps, then use_tls should be set to False url: ldaps://10.16.22.5 use_tls: False query_scope: sub user_tree_dn: DC=l3,DC=local # this is the user and password for the account that has access to the AD server user: administrator@l3.local password: OpenStack123 user_objectclass: user # For a default Active Directory schema this is where to find the user name, openldap uses a different value user_id_attribute: userPrincipalName user_name_attribute: sAMAccountName group_tree_dn: DC=l3,DC=local group_objectclass: group group_id_attribute: cn group_name_attribute: cn # An upstream defect requires use_pool to be set false use_pool: False user_enabled_attribute: userAccountControl user_enabled_mask: 2 user_enabled_default: 512 tls_req_cert: allow # Referals may contain urls that can't be resolved and will cause timeouts, ignore them chase_referrals: False # if you are configuring multiple LDAP domains, and LDAP server certificates are issued # by different authorities, make sure that you place certs for all the LDAP backend domains in the # cacert parameter as seen in this sample yml file so that all the certs are combined in a single CA file # and every LDAP domain configuration points to the combined CA file. # Note: # 1. Please be advised that every time a new ldap domain is configured, the single CA file gets overwritten # and hence ensure that you place certs for all the LDAP backend domains in the cacert parameter. # 2. There is a known issue on one cert per CA file per domain when the system processes # concurrent requests to multiple LDAP domains. Using the single CA file with all certs combined # shall get the system working properly. tls_cacertfile: /etc/keystone/ssl/certs/all_ldapdomains_ca.pemAs suggested in Book “Installing with Cloud Lifecycle Manager”, Chapter 10 “Using Git for Configuration Management”, commit the new file to the local git repository, and rerun the configuration processor and ready deployment playbooks:
ardana >cd ~/openstackardana >git checkout siteardana >git add my_cloud/config/keystone/keystone_configure_ldap_my.ymlardana >git commit -m "Adding LDAP server integration config"ardana >cd ~/openstack/ardana/ansibleardana >ansible-playbook -i hosts/localhost config-processor-run.ymlardana >ansible-playbook -i hosts/localhost ready-deployment.ymlRun the reconfiguration playbook in a deployment area, passing the YAML file created in the previous step as a command-line option:
ardana >cd ~/scratch/ansible/next/ardana/ansibleardana >ansible-playbook -i hosts/verb_hosts keystone-reconfigure.yml -e@~/openstack/my_cloud/config/keystone/keystone_configure_ldap_my.ymlFollow these same steps for each LDAP domain with which you are integrating the identity service, creating a YAML file for each and running the reconfigure playbook once for each additional domain.
Ensure that a new domain was created for LDAP (Microsoft AD in this example) and set environment variables for admin level access
ardana >source keystone.osrcGet a list of domains
ardana >openstack domain listAs output here:
+----------------------------------+---------+---------+----------------------------------------------------------------------+
| ID                               | Name    | Enabled | Description                                                          |
+----------------------------------+---------+---------+----------------------------------------------------------------------+
| 6740dbf7465a4108a36d6476fc967dbd | heat    | True    | Owns users and projects created by heat                              |
| default                          | Default | True    | Owns users and tenants (i.e. projects) available on Identity API v2. |
| b2aac984a52e49259a2bbf74b7c4108b | ad      | True    | Dedicated domain for users managed by Microsoft AD server            |
+----------------------------------+---------+---------+----------------------------------------------------------------------+
Note
LDAP domain is read-only. This means that you cannot create new user or group records in it.
Once the LDAP user is granted the appropriate role, he can authenticate within the specified domain. Set environment variables for admin-level access
ardana >source keystone.osrcGet user record within the ad (Active Directory) domain
ardana >openstack user show testuser1 --domain adNote the output:
+-----------+------------------------------------------------------------------+
| Field     | Value                                                            |
+-----------+------------------------------------------------------------------+
| domain_id | 143af847018c4dc7bd35390402395886                                 |
| id        | e6d8c90abdc4510621271b73cc4dda8bc6009f263e421d8735d5f850f002f607 |
| name      | testuser1                                                        |
+-----------+------------------------------------------------------------------+
Now, get list of LDAP groups:
ardana >openstack group list --domain adHere you see testgroup1 and testgroup2:
+------------------------------------------------------------------+------------+
|  ID                                                              | Name       |
+------------------------------------------------------------------+------------+
|  03976b0ea6f54a8e4c0032e8f756ad581f26915c7e77500c8d4aaf0e83afcdc6| testgroup1 |
7ba52ee1c5829d9837d740c08dffa07ad118ea1db2d70e0dc7fa7853e0b79fcf   | testgroup2 |
+------------------------------------------------------------------+------------+
Create a new role. Note that the role is not bound to the domain.
ardana >openstack role create testrole1Testrole1 has been created:
+-------+----------------------------------+
| Field | Value                            |
+-------+----------------------------------+
| id    | 02251585319d459ab847409dea527dee |
| name  | testrole1                        |
+-------+----------------------------------+
Grant the user a role within the domain by executing the code below. Note that due to a current OpenStack CLI limitation, you must use the user ID rather than the user name when working with a non-default domain.
ardana >openstack role add testrole1 --user e6d8c90abdc4510621271b73cc4dda8bc6009f263e421d8735d5f850f002f607 --domain adVerify that the role was successfully granted, as shown here:
ardana >openstack role assignment list --user e6d8c90abdc4510621271b73cc4dda8bc6009f263e421d8735d5f850f002f607 --domain ad +----------------------------------+------------------------------------------------------------------+-------+---------+----------------------------------+ | Role | User | Group | Project | Domain | +----------------------------------+------------------------------------------------------------------+-------+---------+----------------------------------+ | 02251585319d459ab847409dea527dee | e6d8c90abdc4510621271b73cc4dda8bc6009f263e421d8735d5f850f002f607 | | | 143af847018c4dc7bd35390402395886 | +----------------------------------+------------------------------------------------------------------+-------+---------+----------------------------------+Authenticate (get a domain-scoped token) as a new user with a new role. The --os-* command-line parameters specified below override the respective OS_* environment variables set by the keystone.osrc script to provide admin access. To ensure that the command below is executed in a clean environment, you may want log out from the node and log in again.
ardana >openstack --os-identity-api-version 3 \ --os-username testuser1 \ --os-password testuser1_password \ --os-auth-url http://10.0.0.6:35357/v3 \ --os-domain-name ad \ --os-user-domain-name ad \ token issueHere is the result:
+-----------+------------------------------------------------------------------+
| Field     | Value                                                            |
+-----------+------------------------------------------------------------------+
| domain_id | 143af847018c4dc7bd35390402395886                                 |
| expires   | 2015-09-09T21:36:15.306561Z                                      |
| id        | 6f8f9f1a932a4d01b7ad9ab061eb0917                                 |
| user_id   | e6d8c90abdc4510621271b73cc4dda8bc6009f263e421d8735d5f850f002f607 |
+-----------+------------------------------------------------------------------+
Users can also have a project within the domain and get a project-scoped token. To accomplish this, set environment variables for admin level access:
ardana >source keystone.osrcThen create a new project within the domain:
ardana >openstack project create testproject1 --domain adThe result shows that they have been created:
+-------------+----------------------------------+
| Field       | Value                            |
+-------------+----------------------------------+
| description |                                  |
| domain_id   | 143af847018c4dc7bd35390402395886 |
| enabled     | True                             |
| id          | d065394842d34abd87167ab12759f107 |
| name        | testproject1                     |
+-------------+----------------------------------+
Grant the user a role with a project, re-using the role created in the previous example. Note that due to a current OpenStack CLI limitation, you must use user ID rather than user name when working with a non-default domain.
ardana >openstack role add testrole1 --user e6d8c90abdc4510621271b73cc4dda8bc6009f263e421d8735d5f850f002f607 --project testproject1Verify that the role was successfully granted by generating a list:
ardana >openstack role assignment list --user e6d8c90abdc4510621271b73cc4dda8bc6009f263e421d8735d5f850f002f607 --project testproject1The output shows the result:
+----------------------------------+------------------------------------------------------------------+-------+----------------------------------+--------+
| Role                             | User                                                             | Group | Project                          | Domain |
+----------------------------------+------------------------------------------------------------------+-------+----------------------------------+--------+
| 02251585319d459ab847409dea527dee | e6d8c90abdc4510621271b73cc4dda8bc6009f263e421d8735d5f850f002f607 |       | d065394842d34abd87167ab12759f107 |        |
+----------------------------------+------------------------------------------------------------------+-------+----------------------------------+--------+
Authenticate (get a project-scoped token) as the new user with a new role. The --os-* command line parameters specified below override their respective OS_* environment variables set by keystone.osrc to provide admin access. To ensure that the command below is executed in a clean environment, you may want log out from the node and log in again. Note that both the --os-project-domain-name and --os-project-user-name parameters are needed to verify that both user and project are not in the default domain.
ardana >openstack --os-identity-api-version 3 \ --os-username testuser1 \ --os-password testuser1_password \ --os-auth-url http://10.0.0.6:35357/v3 \ --os-project-name testproject1 \ --os-project-domain-name ad \ --os-user-domain-name ad \ token issueBelow is the result:
+------------+------------------------------------------------------------------+
| Field      | Value                                                            |
+------------+------------------------------------------------------------------+
| expires    | 2015-09-09T21:50:49.945893Z                                      |
| id         | 328e18486f69441fb13f4842423f52d1                                 |
| project_id | d065394842d34abd87167ab12759f107                                 |
| user_id    | e6d8c90abdc4510621271b73cc4dda8bc6009f263e421d8735d5f850f002f607 |
+------------+------------------------------------------------------------------+
4.9.3 Set up or switch to domain-specific driver configuration using a database store #
To make the switch, execute the steps below. Remember, you must have already set up the configuration for a file store as explained in Section 4.9.2, “Set up domain-specific driver configuration - file store”, and it must be working properly.
Ensure that the following configuration options are set in the main configuration file, ~/openstack/my_cloud/config/keystone/keystone.conf.j2:
[identity]
domain_specific_drivers_enabled = True
domain_configurations_from_database = True

[domain_config]
driver = sql
Once the template is modified, commit the change to the local git repository, and rerun the configuration processor / deployment area preparation playbooks (as suggested at Using Git for Configuration Management):
ardana >cd ~/openstackardana >git checkout siteardana >git add -AVerify that the files have been added using git status:
ardana >git statusThen commit the changes:
ardana >git commit -m "Use Domain-Specific Driver Configuration - Database Store: more description here..."Next, run the configuration processor and ready deployment playbooks:
ardana >cd ~/openstack/ardana/ansibleardana >ansible-playbook -i hosts/localhost config-processor-run.ymlardana >ansible-playbook -i hosts/localhost ready-deployment.ymlRun the reconfiguration playbook in a deployment area:
ardana >cd ~/scratch/ansible/next/ardana/ansibleardana >ansible-playbook -i hosts/verb_hosts keystone-reconfigure.ymlUpload the domain-specific config files to the database if they have not been loaded. If they have already been loaded and you want to switch back to database store mode, then skip this upload step and move on to step 5.
Go to one of the controller nodes where Keystone is deployed.
Verify that domain-specific driver configuration files are located under the directory (default /etc/keystone/domains) with the format: keystone.<domain name>.conf Use the Keystone manager utility to load domain-specific config files to the database. There are two options for uploading the files:
Option 1: Upload all configuration files to the SQL database:
ardana >keystone-manage domain_config_upload --allOption 2: Upload individual domain-specific configuration files by specifying the domain name one by one:
ardana >keystone-manage domain_config_upload --domain-name domain nameHere is an example:
keystone-manage domain_config_upload --domain-name ad
Note that the Keystone manager utility does not upload the domain-specific driver configuration file the second time for the same domain. For the management of the domain-specific driver configuration in the database store, you may refer to OpenStack Identity API - Domain Configuration.
Verify that the switched domain driver configuration for LDAP (Microsoft AD in this example) in the database store works properly. Then set the environment variables for admin level access:
ardana >source ~/keystone.osrcGet a list of domain users:
ardana >openstack user list --domain adNote the three users returned:
+------------------------------------------------------------------+------------+
| ID                                                               | Name       |
+------------------------------------------------------------------+------------+
| e7dbec51ecaf07906bd743debcb49157a0e8af557b860a7c1dadd454bdab03fe | testuser1  |
| 8a09630fde3180c685e0cd663427e8638151b534a8a7ccebfcf244751d6f09bd | testuser2  |
| ea463d778dadcefdcfd5b532ee122a70dce7e790786678961420ae007560f35e | testuser3  |
+------------------------------------------------------------------+------------+
Get user records within the ad domain:
ardana >openstack user show testuser1 --domain adHere testuser1 is returned:
+-----------+------------------------------------------------------------------+
| Field     | Value                                                            |
+-----------+------------------------------------------------------------------+
| domain_id | 143af847018c4dc7bd35390402395886                                 |
| id        | e6d8c90abdc4510621271b73cc4dda8bc6009f263e421d8735d5f850f002f607 |
| name      | testuser1                                                        |
+-----------+------------------------------------------------------------------+
Get a list of LDAP groups:
ardana >openstack group list --domain adNote that testgroup1 and testgroup2 are returned:
+------------------------------------------------------------------+------------+
| ID                                                               | Name       |
+------------------------------------------------------------------+------------+
| 03976b0ea6f54a8e4c0032e8f756ad581f26915c7e77500c8d4aaf0e83afcdc6 | testgroup1 |
| 7ba52ee1c5829d9837d740c08dffa07ad118ea1db2d70e0dc7fa7853e0b79fcf | testgroup2 |
+------------------------------------------------------------------+------------+
Note
LDAP domain is read-only. This means that you cannot create new user or group records in it.
4.9.4 Domain-specific driver configuration. Switching from a database to a file store #
Following is the procedure to switch a domain-specific driver configuration from a database store to a file store. It is assumed that:
The domain-specific driver configuration with a database store has been set up and is working properly.
Domain-specific driver configuration files with the format: keystone.<domain name>.conf have already been located and verified in the specific directory (by default, /etc/keystone/domains/) on all of the controller nodes.
Ensure that the following configuration options are set in the main configuration file template in ~/openstack/my_cloud/config/keystone/keystone.conf.j2:
[identity]
 domain_specific_drivers_enabled = True
 domain_configurations_from_database = False

[domain_config]
# driver = sql
Once the template is modified, commit the change to the local git repository, and rerun the configuration processor / deployment area preparation playbooks (as suggested at Using Git for Configuration Management):
ardana >cd ~/openstackardana >git checkout siteardana >git add -AVerify that the files have been added using git status, then commit the changes:
ardana >git statusardana >git commit -m "Domain-Specific Driver Configuration - Switch From Database Store to File Store: more description here..."Then run the configuration processor and ready deployment playbooks:
ardana >cd ~/openstack/ardana/ansibleardana >ansible-playbook -i hosts/localhost config-processor-run.ymlardana >ansible-playbook -i hosts/localhost ready-deployment.ymlRun reconfiguration playbook in a deployment area:
ardana >cd ~/scratch/ansible/next/ardana/ansibleardana >ansible-playbook -i hosts/verb_hosts keystone-reconfigure.ymlVerify that the switched domain driver configuration for LDAP (Microsoft AD in this example) using file store works properly: Set environment variables for admin level access
ardana >source ~/keystone.osrcGet list of domain users:
ardana >openstack user list --domain adHere you see the three users:
+------------------------------------------------------------------+------------+
| ID                                                               | Name       |
+------------------------------------------------------------------+------------+
| e7dbec51ecaf07906bd743debcb49157a0e8af557b860a7c1dadd454bdab03fe | testuser1  |
| 8a09630fde3180c685e0cd663427e8638151b534a8a7ccebfcf244751d6f09bd | testuser2  |
| ea463d778dadcefdcfd5b532ee122a70dce7e790786678961420ae007560f35e | testuser3  |
+------------------------------------------------------------------+------------+
Get user records within the ad domain:
ardana >openstack user show testuser1 --domain adHere is the result:
+-----------+------------------------------------------------------------------+
| Field     | Value                                                            |
+-----------+------------------------------------------------------------------+
| domain_id | 143af847018c4dc7bd35390402395886                                 |
| id        | e6d8c90abdc4510621271b73cc4dda8bc6009f263e421d8735d5f850f002f607 |
| name      | testuser1                                                        |
+-----------+------------------------------------------------------------------+
Get a list of LDAP groups:
ardana >openstack group list --domain adHere are the groups returned:
+------------------------------------------------------------------+------------+
| ID                                                               | Name       |
+------------------------------------------------------------------+------------+
| 03976b0ea6f54a8e4c0032e8f756ad581f26915c7e77500c8d4aaf0e83afcdc6 | testgroup1 |
| 7ba52ee1c5829d9837d740c08dffa07ad118ea1db2d70e0dc7fa7853e0b79fcf | testgroup2 |
+------------------------------------------------------------------+------------+
Note: Note: LDAP domain is read-only. This means that you can not create new user or group record in it.
4.9.5 Update LDAP CA certificates #
There is a chance that LDAP CA certificates may expire or for some reason not work anymore. Below are steps to update the LDAP CA certificates on the identity service side. Follow the steps below to make the updates.
Locate the file keystone_configure_ldap_certs_sample.yml
~/openstack/my_cloud/config/keystone/keystone_configure_ldap_certs_sample.yml
Save a copy of this file with a new name, for example:
~/openstack/my_cloud/config/keystone/keystone_configure_ldap_certs_all.yml
Edit the file and specify the correct single file path name for the ldap certificates. This file path name has to be consistent with the one defined in tls_cacertfile of the domain-specific configuration. Edit the file and populate or update it with LDAP CA certificates for all LDAP domains.
As suggested in Book “Installing with Cloud Lifecycle Manager”, Chapter 10 “Using Git for Configuration Management”, add the new file to the local git repository:
ardana >cd ~/openstackardana >git checkout siteardana >git add -AVerify that the files have been added using git status and commit the file:
ardana >git statusardana >git commit -m "Update LDAP CA certificates: more description here..."Then run the configuration processor and ready deployment playbooks:
ardana >cd ~/openstack/ardana/ansibleardana >ansible-playbook -i hosts/localhost config-processor-run.ymlardana >ansible-playbook -i hosts/localhost ready-deployment.ymlRun the reconfiguration playbook in the deployment area:
ardana >cd ~/scratch/ansible/next/ardana/ansibleardana >ansible-playbook -i hosts/verb_hosts keystone-reconfigure.yml -e@~/openstack/my_cloud/config/keystone/keystone_configure_ldap_certs_all.yml
4.9.6 Limitations #
HPE Helion OpenStack 8 domain-specific configuration:
No Global User Listing: Once domain-specific driver configuration is enabled, listing all users and listing all groups are not supported operations. Those calls require a specific domain filter and a domain-scoped token for the target domain.
You cannot have both a file store and a database store for domain-specific driver configuration in a single identity service instance. Once a database store is enabled within the identity service instance, any file store will be ignored, and vice versa.
The identity service allows a list limit configuration to globally set the maximum number of entities that will be returned in an identity collection per request but it does not support per-domain list limit setting at this time.
Each time a new domain is configured with LDAP integration the single CA file gets overwritten. Ensure that you place certs for all the LDAP back-end domains in the cacert parameter. Detailed CA file inclusion instructions are provided in the comments of the sample YAML configuration file
keystone_configure_ldap_my.yml(Section 4.9.2, “Set up domain-specific driver configuration - file store”).LDAP is only supported for identity operations (reading users and groups from LDAP).
Keystone assignment operations from LDAP records such as managing or assigning roles and projects, are not currently supported.
The HPE Helion OpenStack 'default' domain is pre-configured to store service account users and is authenticated locally against the identity service. Domains configured for external LDAP integration are non-default domains.
When using the current OpenStackClient CLI you must use the user ID rather than the user name when working with a non-default domain.
Each LDAP connection with the identity service is for read-only operations. Configurations that require identity service write operations (to create users, groups, etc.) are not currently supported.
LDAP is only supported for identity operations (reading users and groups from LDAP). Keystone assignment operations from LDAP records such as managing or assigning roles and projects, are not currently supported.
When using the current OpenStackClient CLI you must use the user ID rather than the user name when working with a non-default domain.
HPE Helion OpenStack 8 API-based domain-specific configuration management
No GUI dashboard for domain-specific driver configuration management
API-based Domain specific config does not check for type of option.
API-based Domain specific config does not check for option values supported.
API-based Domain config method does not provide retrieval of default values of domain-specific configuration options.
Status: Domain-specific driver configuration database store is a non-core feature for HPE Helion OpenStack 8.
Note
When integrating with an external identity provider, cloud security is dependent upon the security of that identify provider. You should examine the security of the identity provider, and in particular the SAML 2.0 token generation process and decide what security properties you need to ensure adequate security of your cloud deployment. More information about SAML can be found at https://www.owasp.org/index.php/SAML_Security_Cheat_Sheet.
4.10 Keystone-to-Keystone Federation #
This topic explains how you can use one instance of Keystone as an identity provider and one as a service provider.
4.10.1 What Is Keystone-to-Keystone Federation? #
Identity federation lets you configure HPE Helion OpenStack using existing identity management systems such as an LDAP directory as the source of user access authentication. The Keystone-to-Keystone federation (K2K) function extends this concept for accessing resources in multiple, separate HPE Helion OpenStack clouds. You can configure each cloud to trust the authentication credentials of other clouds to provide the ability for users to authenticate with their home cloud and to access authorized resources in another cloud without having to reauthenticate with the remote cloud. This function is sometimes referred to as "single sign-on" or SSO.
The HPE Helion OpenStack cloud that provides the initial user authentication is called the identity provider (IdP). The identity provider cloud can support domain-based authentication against external authentication sources including LDAP-based directories such as Microsoft Active Directory. The identity provider creates the user attributes, known as assertions, which are used to automatically authenticate users with other HPE Helion OpenStack clouds.
An HPE Helion OpenStack cloud that provides resources is called a service provider (SP). A service provider cloud accepts user authentication assertions from the identity provider and provides access to project resources based on the mapping file settings developed for each service provider cloud. The following are characteristics of a service provider:
Each service provider cloud has a unique set of projects, groups, and group role assignments that are created and managed locally.
The mapping file consists a set of rules that define user group membership.
The mapping file enables the ability to auto-assign incoming users to a specific group. Project membership and access are defined by group membership.
Project quotas are defined locally by each service provider cloud.
Keystone-to-Keystone federation is supported and enabled in HPE Helion OpenStack 8 using configuration parameters in specific Ansible files. Instructions are provided to define and enable the required configurations.
Support for Keystone-to-Keystone federation happens on the API level, and you must implement it using your own client code by calling the supported APIs. Python-keystoneclient has supported APIs to access the K2K APIs.
Example 4.1: k2kclient.py #
The following k2kclient.py file is an example, and the request diagram Figure 4.1, “Keystone Authentication Flow” explains the flow of client requests.
import json
import os
import requests

import xml.dom.minidom

from keystoneclient.auth.identity import v3
from keystoneclient import session

class K2KClient(object):

    def __init__(self):
        # IdP auth URL
        self.auth_url = "http://192.168.245.9:35357/v3/"
        self.project_name = "admin"
        self.project_domain_name = "Default"
        self.username = "admin"
        self.password = "vvaQIZ1S"
        self.user_domain_name = "Default"
        self.session = requests.Session()
        self.verify = False
        # identity provider Id
        self.idp_id = "z420_idp"
        # service provider Id
        self.sp_id = "z620_sp"
        #self.sp_ecp_url = "https://16.103.149.44:8443/Shibboleth.sso/SAML2/ECP"
        #self.sp_auth_url = "https://16.103.149.44:8443/v3"

    def v3_authenticate(self):
        auth = v3.Password(auth_url=self.auth_url,
                           username=self.username,
                           password=self.password,
                           user_domain_name=self.user_domain_name,
                           project_name=self.project_name,
                           project_domain_name=self.project_domain_name)

        self.auth_session = session.Session(session=requests.session(),
                                       auth=auth, verify=self.verify)
        auth_ref = self.auth_session.auth.get_auth_ref(self.auth_session)
        self.token = self.auth_session.auth.get_token(self.auth_session)

    def _generate_token_json(self):
        return {
            "auth": {
                "identity": {
                    "methods": [
                        "token"
                    ],
                    "token": {
                        "id": self.token
                    }
                },
                "scope": {
                    "service_provider": {
                        "id": self.sp_id
                    }
                }
            }
        }

    def get_saml2_ecp_assertion(self):
        token = json.dumps(self._generate_token_json())
        url = self.auth_url + 'auth/OS-FEDERATION/saml2/ecp'
        r = self.session.post(url=url,
                              data=token,
                              verify=self.verify)
        if not r.ok:
            raise Exception("Something went wrong, %s" % r.__dict__)
        self.ecp_assertion = r.text

    def _get_sp_url(self):
        url = self.auth_url + 'OS-FEDERATION/service_providers/' + self.sp_id
        r = self.auth_session.get(
           url=url,
           verify=self.verify)
        if not r.ok:
            raise Exception("Something went wrong, %s" % r.__dict__)

        sp = json.loads(r.text)[u'service_provider']
        self.sp_ecp_url = sp[u'sp_url']
        self.sp_auth_url = sp[u'auth_url']

    def _handle_http_302_ecp_redirect(self, response, method, **kwargs):
        location = self.sp_auth_url + '/OS-FEDERATION/identity_providers/' + self.idp_id + '/protocols/saml2/auth'
        return self.auth_session.request(location, method, authenticated=False, **kwargs)

    def exchange_assertion(self):
        """Send assertion to a Keystone SP and get token."""
        self._get_sp_url()
        print("SP ECP Url:%s" % self.sp_ecp_url)
        print("SP Auth Url:%s" % self.sp_auth_url)
        #self.sp_ecp_url = 'https://16.103.149.44:8443/Shibboleth.sso/SAML2/ECP'
        r = self.auth_session.post(
            self.sp_ecp_url,
            headers={'Content-Type': 'application/vnd.paos+xml'},
            data=self.ecp_assertion,
            authenticated=False, redirect=False)
        r = self._handle_http_302_ecp_redirect(r, 'GET',
            headers={'Content-Type': 'application/vnd.paos+xml'})
        self.fed_token_id = r.headers['X-Subject-Token']
        self.fed_token = r.text

if __name__ == "__main__":
    client = K2KClient()
    client.v3_authenticate()
    client.get_saml2_ecp_assertion()
    client.exchange_assertion()
    print('Unscoped token_id: %s' % client.fed_token_id)
    print('Unscoped token body:
%s' % client.fed_token)
4.10.2 Setting Up a Keystone Provider #
To set up Keystone as a service provider, follow these steps.
Create a config file called
k2k.ymlwith the following parameters and place it in any directory on your Cloud Lifecycle Manager, such as /tmp.keystone_trusted_idp: k2k keystone_sp_conf: shib_sso_idp_entity_id: <protocol>://<idp_host>:<port>/v3/OS-FEDERATION/saml2/idp shib_sso_application_entity_id: http://service_provider_uri_entityId target_domain: name: domain1 description: my domain target_project: name: project1 description: my project target_group: name: group1 description: my group role: name: service idp_metadata_file: /tmp/idp_metadata.xml identity_provider: id: my_idp_id description: This is the identity service provider. mapping: id: mapping1 rules_file: /tmp/k2k_sp_mapping.json protocol: id: saml2 attribute_map: - name: name1 id: id1The following are descriptions of each of the attributes.
Attribute Definition keystone_trusted_idp A flag to indicate if this configuration is used for Keystone-to-Keystone or WebSSO. The value can be either k2k or adfs.
keystone_sp_conf shib_sso_idp_entity_id The identity provider URI used as an entity Id to identity the IdP. You shoud use the following value: <protocol>://<idp_host>:<port>/v3/OS-FEDERATION/saml2/idp.
shib_sso_application_entity_id The service provider URI used as an entity Id. It can be any URI here for Keystone-to-Keystone.
target_domain A domain where the group will be created.
name Any domain name. If it does not exist, it will be created or updated.
description Any description.
target_project A project scope of the group.
name Any project name. If it does not exist, it will be created or updated.
description Any description. target_group A group will be created from target_domain.
name Any group name. If it does not exist, it will be created or updated.
description Any description. role A role will be assigned on target_project. This role impacts the IdP user scoped token permission on the service provider side.
name Must be an existing role. idp_metadata_file A reference to the IdP metadata file that validates the SAML2 assertion.
identity_provider A supported IdP. id Any Id. If it does not exist, it will be created or updated. This Id needs to be shared with the client so that the right mapping will be selected.
description Any description. mapping A mapping in JSON format that maps a federated user to a corresponding group.
id Any Id. If it does not exist, it will be created or updated.
rules_file A reference to the file that has the mapping in JSON.
protocol The supported federation protocol.
id Security Assertion Markup Language 2.0 (SAML2) is the only supported protocol for K2K.
attribute_map A shibboleth mapping that defines additional attributes to map the attributes from the SAML2 assertion to the K2K mapping that the service provider understands. K2K does not require any additional attribute mapping.
name An attribute name from the SAML2 assertion. id An Id that the preceding name will be mapped to. Create a metadata file that is referenced from
k2k.yml, such as/tmp/idp_metadata.xml. The content of the metadata file comes from the identity provider and can be found in/etc/keystone/idp_metadata.xml.Create a mapping file that is referenced in k2k.yml, shown previously. An example is
/tmp/k2k_sp_mapping.json. You can see the reference in bold in the preceding k2k.yml example. The following is an example of the mapping file.[ { "local": [ { "user": { "name": "{0}" } }, { "group": { "name": "group1", "domain":{ "name": "domain1" } } } ], "remote":[{ "type": "openstack_user" }, { "type": "Shib-Identity-Provider", "any_one_of":[ "https://idp_host:5000/v3/OS-FEDERATION/saml2/idp" ] } ] } ]You can find more information on how the K2K mapping works at http://docs.openstack.org.
Go to
~/stack/scratch/ansible/next/ardana/ansibleand run the following playbook to enable the service provider:ardana >ansible-playbook -i hosts/verb_hosts keystone-reconfigure.yml -e@/tmp/k2k.yml
Setting Up an Identity Provider
To set up Keystone as an identity provider, follow these steps:
Create a config file
k2k.ymlwith the following parameters and place it in any directory on your Cloud Lifecycle Manager, such as/tmp. Note that the certificate and key here are excerpted for space.keystone_k2k_idp_conf: service_provider: - id: my_sp_id description: This is service provider. sp_url: https://sp_host:5000 auth_url: https://sp_host:5000/v3 signer_cert: -----BEGIN CERTIFICATE----- MIIDmDCCAoACCQDS+ZDoUfr cIzANBgkqhkiG9w0BAQsFADCBjDELMAkGA1UEBhMC\ nVVMxEzARBgNVB AgMCkNhbGlmb3JuaWExEjAQBgNVBAcMCVN1bm55dmFsZTEMMAoG\ ... nOpKEvhlMsl5I/tle -----END CERTIFICATE----- signer_key: -----BEGIN RSA PRIVATE KEY----- MIIEowIBAAKCAQEA1gRiHiwSO6L5PrtroHi/f17DQBOpJ1KMnS9FOHS ...The following are descriptions of each of the attributes under keystone_k2k_idp_conf
- service_provider
One or more service providers can be defined. If it does not exist, it will be created or updated.
- id
Any Id. If it does not exist, it will be created or updated. This Id needs to be shared with the client so that it knows where the service provider is.
- description
Any description.
- sp_url
Service provider base URL.
- auth_url
Service provider auth URL.
- signer_cert
Content of self-signed certificate that is embedded in the metadata file. We recommend setting the validity for a longer period of time, such as 3650 days (10 years).
- signer_key
A private key that has a key size of 2048 bits.
Create a private key and a self-signed certificate. The command-line tool, openssl, is required to generate the keys and certificates. If the system does not have it, you must install it.
Create a private key of size 2048.
ardana >openssl genrsa -out myidp.key 2048Generate a certificate request named myidp.csr. When prompted, choose CommonName for the server's hostname.
ardana >openssl req -new -key myidp.key -out myidp.csrGenerate a self-signed certificate named myidp.cer.
ardana >openssl x509 -req -days 3650 -in myidp.csr -signkey myidp.key -out myidp.cer
Go to
~/scratch/ansible/next/ardana/ansibleand run the following playbook to enable the service provider in Keystone:ardana >ansible-playbook -i hosts/verb_hosts keystone-reconfigure.yml -e@/tmp/k2k.yml
4.10.3 Test It Out #
You can use the script listed earlier, k2kclient.py
(Example 4.1, “k2kclient.py”), as an example for the end-to-end flows. To run
k2kclient.py, follow these steps:
A few parameters must be changed in the beginning of
k2kclient.py. For example, enter your specific URL, project name, and user name, as follows:# IdP auth URL self.auth_url = "http://idp_host:5000/v3/" self.project_name = "my_project_name" self.project_domain_name = "my_project_domain_name" self.username = "test" self.password = "mypass" self.user_domain_name = "my_domain" # identity provider Id that is defined in the SP config self.idp_id = "my_idp_id" # service provider Id that is defined in the IdP config self.sp_id = "my_sp_id"
Install python-keystoneclient along with its dependencies.
Run the
k2kclient.pyscript. An unscoped token will be returned from the service provider.
At this point, the domain or project scope of the unscoped taken can be discovered by sending the following URLs:
ardana >curl -k -X GET -H "X-Auth-Token: unscoped token" \ https://<sp_public_endpoint>:5000/v3/OS-FEDERATION/domainsardana >curl -k -X GET -H "X-Auth-Token: unscoped token" \ https://<sp_public_endpoint:5000/v3/OS-FEDERATION/projects
4.10.4 Inside Keystone-to-Keystone Federation #
K2K federation places a lot of responsibility with the user. The complexity is apparent from the following diagram.
Users must first authenticate to their home or local cloud, or local identity provider Keystone instance to obtain a scoped token.
Users must discover which service providers (or remote clouds) are available to them by querying their local cloud.
For a given remote cloud, users must discover which resources are available to them by querying the remote cloud for the projects they can scope to.
To talk to the remote cloud, users must first exchange, with the local cloud, their locally scoped token for a SAML2 assertion to present to the remote cloud.
Users then present the SAML2 assertion to the remote cloud. The remote cloud applies its mapping for the incoming SAML2 assertion to map each user to a local ephemeral persona (such as groups) and issues an unscoped token.
Users query the remote cloud for the list of projects they have access to.
Users then rescope their token to a given project.
Users now have access to the resources owned by the project.
The following diagram illustrates the flow of authentication requests.
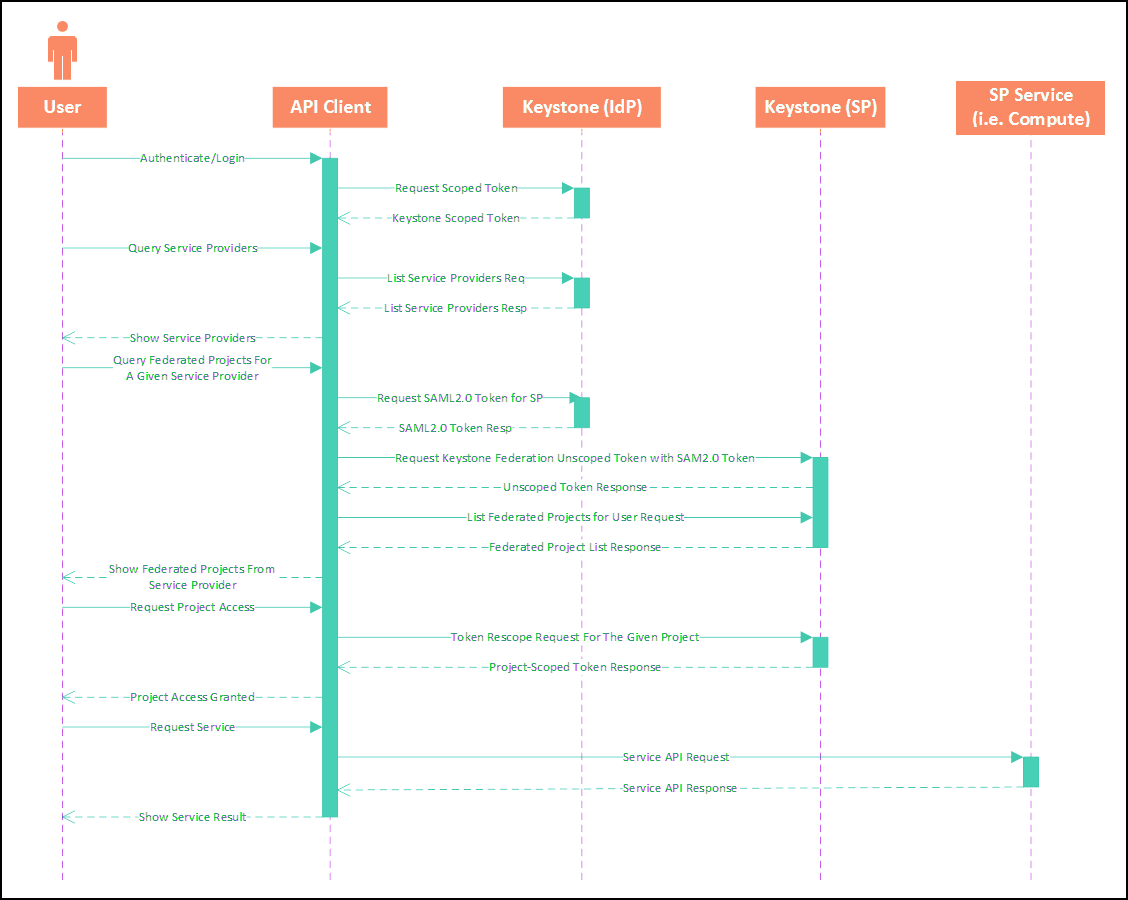
Figure 4.1: Keystone Authentication Flow #
4.10.5 Additional Testing Scenarios #
The following tests assume one identity provider and one service provider.
Test Case 1: Any federated user in the identity provider maps to a single designated group in the service provider
On the identity provider side:
hostname=myidp.com
username=user1
On the service provider side:
group=group1
group_domain_name=domain1
'group1' scopes to 'project1'
Mapping used:
testcase1_1.json
testcase1_1.json
[
  {
    "local": [
      {
        "user": {
          "name": "{0}"
        }
      },
      {
        "group": {
           "name": "group1",
           "domain":{
             "name": "domain1"
           }
        }
      }
    ],
    "remote":[{
      "type": "openstack_user"
    },
    {
      "type": "Shib-Identity-Provider",
      "any_one_of":[
         "https://myidp.com:5000/v3/OS-FEDERATION/saml2/idp"
      ]
     }
    ]
   }
]
Expected result: The federated user will scope to project1.
Test Case 2: A federated user in a specific domain in the identity provider maps to two different groups in the service provider
On the identity provider side:
hostname=myidp.com
username=user1
user_domain_name=Default
On the service provider side:
group=group1
group_domain_name=domain1
'group1' scopes to 'project1' group=group2
group_domain_name=domain2
'group2' scopes to 'project2'
Mapping used:
testcase1_2.json
testcase1_2.json
[
  {
    "local": [
      {
        "user": {
          "name": "{0}"
        }
      },
      {
        "group": {
           "name": "group1",
           "domain":{
             "name": "domain1"
           }
        }
      }
    ],
    "remote":[{
      "type": "openstack_user"
    },
    {
      "type": "Shib-Identity-Provider",
      "any_one_of":[
         "https://myidp.com:5000/v3/OS-FEDERATION/saml2/idp"
      ]
     }
    ]
   }
  {
    "local": [
      {
        "user": {
          "name": "{0}"
        }
      },
      {
        "group": {
           "name": "group2",
           "domain":{
             "name": "domain2"
           }
        }
      }
    ],
    "remote":[{
      "type": "openstack_user"
    },
    {
      "type": "openstack_user_domain",
      "any_one_of": [
          "Default"
      ]
    },
    {
      "type": "Shib-Identity-Provider",
      "any_one_of":[
         "https://myidp.com:5000/v3/OS-FEDERATION/saml2/idp"
      ]
     }
    ]
   }
]
Expected result: The federated user will scope to both project1 and project2.
Test Case 3: A federated user with a specific project in the identity provider maps to a specific group in the service provider
On the identity provider side:
hostname=myidp.com
username=user4
user_project_name=test1
On the service provider side:
group=group4
group_domain_name=domain4
'group4' scopes to 'project4'
Mapping used:
testcase1_3.json
testcase1_3.json
[
  {
    "local": [
      {
        "user": {
          "name": "{0}"
        }
      },
      {
        "group": {
           "name": "group4",
           "domain":{
             "name": "domain4"
           }
        }
      }
    ],
    "remote":[{
      "type": "openstack_user"
    },
    {
      "type": "openstack_project",
      "any_one_of": [
          "test1"
      ]
    },
    {
      "type": "Shib-Identity-Provider",
      "any_one_of":[
         "https://myidp.com:5000/v3/OS-FEDERATION/saml2/idp"
      ]
     }
    ]
   },
  {
    "local": [
      {
        "user": {
          "name": "{0}"
        }
      },
      {
        "group": {
           "name": "group5",
           "domain":{
             "name": "domain5"
           }
        }
      }
    ],
    "remote":[{
      "type": "openstack_user"
    },
    {
      "type": "openstack_roles",
      "not_any_of": [
          "_member_"
      ]
    },
    {
      "type": "Shib-Identity-Provider",
      "any_one_of":[
         "https://myidp.com:5000/v3/OS-FEDERATION/saml2/idp"
      ]
     }
    ]
   }
]
Expected result: The federated user will scope to project4.
Test Case 4: A federated user with a specific role in the identity provider maps to a specific group in the service provider
On the identity provider side:
hostname=myidp.com, username=user5, role_name=_member_
On the service provider side:
group=group5, group_domain_name=domain5, 'group5' scopes to 'project5'
Mapping used:
testcase1_3.json
testcase1_3.json
[
  {
    "local": [
      {
        "user": {
          "name": "{0}"
        }
      },
      {
        "group": {
           "name": "group4",
           "domain":{
             "name": "domain4"
           }
        }
      }
    ],
    "remote":[{
      "type": "openstack_user"
    },
    {
      "type": "openstack_project",
      "any_one_of": [
          "test1"
      ]
    },
    {
      "type": "Shib-Identity-Provider",
      "any_one_of":[
         "https://myidp.com:5000/v3/OS-FEDERATION/saml2/idp"
      ]
     }
    ]
   },
  {
    "local": [
      {
        "user": {
          "name": "{0}"
        }
      },
      {
        "group": {
           "name": "group5",
           "domain":{
             "name": "domain5"
           }
        }
      }
    ],
    "remote":[{
      "type": "openstack_user"
    },
    {
      "type": "openstack_roles",
      "not_any_of": [
          "_member_"
      ]
    },
    {
      "type": "Shib-Identity-Provider",
      "any_one_of":[
         "https://myidp.com:5000/v3/OS-FEDERATION/saml2/idp"
      ]
     }
    ]
   }
]
Expected result: The federated user will scope to project5.
Test Case 5: Retain the previous scope for a federated user
On the identity provider side:
hostname=myidp.com, username=user1, user_domain_name=Default
On the service provider side:
group=group1, group_domain_name=domain1, 'group1' scopes to 'project1'
Mapping used:
testcase1_1.json
testcase1_1.json
[
  {
    "local": [
      {
        "user": {
          "name": "{0}"
        }
      },
      {
        "group": {
           "name": "group1",
           "domain":{
             "name": "domain1"
           }
        }
      }
    ],
    "remote":[{
      "type": "openstack_user"
    },
    {
      "type": "Shib-Identity-Provider",
      "any_one_of":[
         "https://myidp.com:5000/v3/OS-FEDERATION/saml2/idp"
      ]
     }
    ]
   }
]
Expected result: The federated user will scope to project1. Later, we would like to scope federated users who have the default domain in the identity provider to project2 in addition to project1.
On the identity provider side:
hostname=myidp.com, username=user1, user_domain_name=Default
On the service provider side:
group=group1
group_domain_name=domain1
'group1' scopes to 'project1' group=group2
group_domain_name=domain2
'group2' scopes to 'project2'
Mapping used:
testcase1_2.json
testcase1_2.json
[
  {
    "local": [
      {
        "user": {
          "name": "{0}"
        }
      },
      {
        "group": {
           "name": "group1",
           "domain":{
             "name": "domain1"
           }
        }
      }
    ],
    "remote":[{
      "type": "openstack_user"
    },
    {
      "type": "Shib-Identity-Provider",
      "any_one_of":[
         "https://myidp.com:5000/v3/OS-FEDERATION/saml2/idp"
      ]
     }
    ]
   }
  {
    "local": [
      {
        "user": {
          "name": "{0}"
        }
      },
      {
        "group": {
           "name": "group2",
           "domain":{
             "name": "domain2"
           }
        }
      }
    ],
    "remote":[{
      "type": "openstack_user"
    },
    {
      "type": "openstack_user_domain",
      "any_one_of": [
          "Default"
      ]
    },
    {
      "type": "Shib-Identity-Provider",
      "any_one_of":[
         "https://myidp.com:5000/v3/OS-FEDERATION/saml2/idp"
      ]
     }
    ]
   }
]
Expected result: The federated user will scope to project1 and project2.
Test Case 6: Scope a federated user to a domain
On the identity provider side:
hostname=myidp.com, username=user1
On the service provider side:
group=group1, group_domain_name=domain1, 'group1' scopes to 'project1'
Mapping used:
testcase1_1.json
testcase1_1.json
[
  {
    "local": [
      {
        "user": {
          "name": "{0}"
        }
      },
      {
        "group": {
           "name": "group1",
           "domain":{
             "name": "domain1"
           }
        }
      }
    ],
    "remote":[{
      "type": "openstack_user"
    },
    {
      "type": "Shib-Identity-Provider",
      "any_one_of":[
         "https://myidp.com:5000/v3/OS-FEDERATION/saml2/idp"
      ]
     }
    ]
   }
]
Expected result:
The federated user will scope to project1.
User uses CLI/Curl to assign any existing role to group1 on domain1.
User uses CLI/Curl to remove project1 scope from group1.
Final result: The federated user will scope to domain1.
Test Case 7: Test five remote attributes for mapping
Test all five different remote attributes, as follows, with similar test cases as noted previously.
openstack_user
openstack_user_domain
openstack_roles
openstack_project
openstack_project_domain
The attribute openstack_user does not make much sense for testing because it is mapped only to a specific username. The preceding test cases have already covered the attributes openstack_user_domain, openstack_roles, and openstack_project.
Note that similar tests have also been run for two identity providers with one service provider, and for one identity provider with two service providers.
4.10.6 Known Issues and Limitations #
Keep the following points in mind:
When a user is disabled in the identity provider, the issued federated token from the service provider still remains valid until the token is expired based on the Keystone expiration setting.
An already issued federated token will retain its scope until its expiration. Any changes in the mapping on the service provider will not impact the scope of an already issued federated token. For example, if an already issued federated token was mapped to group1 that has scope on project1, and mapping is changed to group2 that has scope on project2, the prevously issued federated token still has scope on project1.
Access to service provider resources is provided only through the python-keystone CLI client or the Keystone API. No Horizon web interface support is currently available.
Domains, projects, groups, roles, and quotas are created per the service provider cloud. Support for federated projects, groups, roles, and quotas is currently not available.
Keystone-to-Keystone federation and WebSSO cannot be configured by putting both sets of configuration attributes in the same config file; they will overwrite each other. Consequently, they need to be configured individually.
Scoping the federated user to a domain is not supported by default in the playbook. Please follow the steps at Section 4.10.7, “Scope Federated User to Domain”.
4.10.7 Scope Federated User to Domain #
Use the following steps to scope a federated user to a domain:
On the IdP side, set
hostname=myidp.comandusername=user1.On the service provider side, set:
group=group1,group_domain_name=domain1, group1 scopes to project1.Mapping used: testcase1_1.json.
testcase1_1.json
[
  {
    "local": [
      {
        "user": {
          "name": "{0}"
        }
      },
      {
        "group": {
           "name": "group1",
           "domain":{
             "name": "domain1"
           }
        }
      }
    ],
    "remote":[{
      "type": "openstack_user"
    },
    {
      "type": "Shib-Identity-Provider",
      "any_one_of":[
         "https://myidp.com:5000/v3/OS-FEDERATION/saml2/idp"
      ]
     }
    ]
   }
]
Expected result: The federated user will scope to project1. Use CLI/Curl to assign any existing role to group1 on domain1. Use CLI/Curl to remove project1 scope from group1.
Result: The federated user will scope to domain1.
4.11 Configuring Web Single Sign-On #
This topic explains how to implement web single sign-on.
4.11.1 What is WebSSO? #
WebSSO, or web single sign-on, is a method for web browsers to receive current authentication information from an identity provider system without requiring a user to log in again to the application displayed by the browser. Users initially access the identity provider web page and supply their credentials. If the user successfully authenticates with the identity provider, the authentication credentials are then stored in the user’s web browser and automatically provided to all web-based applications, such as the Horizon dashboard in HPE Helion OpenStack 8. If users have not yet authenticated with an identity provider or their credentials have timed out, they are automatically redirected to the identity provider to renew their credentials.
4.11.2 Limitations #
The WebSSO function supports only Horizon web authentication. It is not supported for direct API or CLI access.
WebSSO works only with Fernet token provider. See Section 4.8.4, “Fernet Tokens”.
The HPE Helion OpenStack WebSSO function was tested with Microsoft Active Directory Federation Services (AD FS). The instructions provided are pertinent to AD FS and are intended to provide a sample configuration for deploying WebSSO with an external identity provider. If you have a different identity provider such as Ping Identity or IBM Tivoli, consult with those vendors for specific instructions for those products.
Only WebSSO federation using the SAML method is supported in HPE Helion OpenStack 8 . OpenID-based federation is not currently supported.
WebSSO has a change password option in User Settings, but note that this function is not accessible for users authenticating with external systems such as LDAP or SAML Identity Providers.
4.11.3 Enabling WebSSO #
HPE Helion OpenStack 8 provides WebSSO support for the Horizon web interface. This support requires several configuration steps including editing the Horizon configuration file as well as ensuring that the correct Keystone authentication configuration is enabled to receive the authentication assertions provided by the identity provider.
The following is the workflow that depicts how Horizon and Keystone supports WebSSO if no current authentication assertion is available.
Horizon redirects the web browser to the Keystone endpoint.
Keystone automatically redirects the web browser to the correct identity provider authentication web page based on the Keystone configuration file.
The user authenticates with the identity provider.
The identity provider automatically redirects the web browser back to the Keystone endpoint.
Keystone generates the required Javascript code to POST a token back to Horizon.
Keystone automatically redirects the web browser back to Horizon and the user can then access projects and resources assigned to the user.
The following diagram provides more details on the WebSSO authentication workflow.
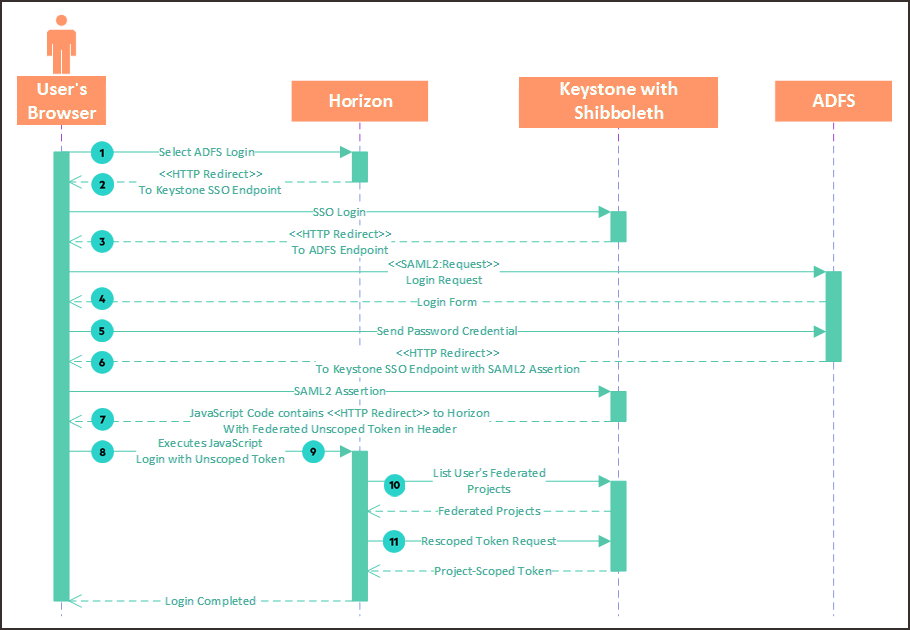
Note that the Horizon dashboard service never talks directly to the Keystone identity service until the end of the sequence, after the federated unscoped token negotiation has completed. The browser interacts with the Horizon dashboard service, the Keystone identity service, and AD FS on their respective public endpoints.
The following sequence of events is depicted in the diagram.
The user's browser reaches the Horizon dashboard service's login page. The user selects AD FS login from the drop-down menu.
The Horizon dashboard service issues an HTTP Redirect (301) to redirect the browser to the Keystone identity service's (public) SAML2 Web SSO endpoint (/auth/OS-FEDERATION/websso/saml2). The endpoint is protected by Apache mod_shib (shibboleth).
The browser talks to the Keystone identity service. Because the user's browser does not have an active session with AD FS, the Keystone identity service issues an HTTP Redirect (301) to the browser, along with the required SAML2 request, to the AD FS endpoint.
The browser talks to AD FS. AD FS returns a login form. The browser presents it to the user.
The user enters credentials (such as username and password) and submits the form to AD FS.
Upon successful validation of the user's credentials, AD FS issues an HTTP Redirect (301) to the browser, along with the SAML2 assertion, to the Keystone identity service's (public) SAML2 endpoint (/auth/OS-FEDERATION/websso/saml2).
The browser talks to the Keystone identity service. the Keystone identity service validates the SAML2 assertion and issues a federated unscoped token. the Keystone identity service returns JavaScript code to be executed by the browser, along with the federated unscoped token in the headers.
Upon execution of the JavaScript code, the browser is redirected to the Horizon dashboard service with the federated unscoped token in the header.
The browser talks to the Horizon dashboard service with the federated unscoped token.
With the unscoped token, the Horizon dashboard service talks to the Keystone identity service's (internal) endpoint to get a list of projects the user has access to.
The Horizon dashboard service rescopes the token to the first project in the list. At this point, the user is successfully logged in.
4.11.4 Prerequisites #
4.11.4.1 Creating AD FS metadata #
For information about creating Active Directory Federation Services metadata, see the section To create edited AD FS 2.0 metadata with an added scope element of https://technet.microsoft.com/en-us/library/gg317734.
On the AD FS computer, use a browser such as Internet Explorer to view
https://<adfs_server_hostname>/FederationMetadata/2007-06/FederationMetadata.xml.On the File menu, click Save as, and then navigate to the Windows desktop and save the file with the name adfs_metadata.xml. Make sure to change the Save as type drop-down box to All Files (*.*).
Use Windows Explorer to navigate to the Windows desktop, right-click adfs_metadata.xml, and then click Edit.
In Notepad, insert the following XML in the first element. Before editing, the EntityDescriptor appears as follows:
<EntityDescriptor ID="abc123" entityID=http://WIN-CAICP35LF2I.vlan44.domain/adfs/services/trust xmlns="urn:oasis:names:tc:SAML:2.0:metadata" >
After editing, it should look like this:
<EntityDescriptor ID="abc123" entityID="http://WIN-CAICP35LF2I.vlan44.domain/adfs/services/trust" xmlns="urn:oasis:names:tc:SAML:2.0:metadata" xmlns:shibmd="urn:mace:shibboleth:metadata:1.0">
In Notepad, on the Edit menu, click Find. In Find what, type IDPSSO, and then click Find Next.
Insert the following XML in this section: Before editing, the IDPSSODescriptor appears as follows:
<IDPSSODescriptor protocolSupportEnumeration="urn:oasis:names:tc:SAML:2.0:protocol"><KeyDescriptor use="encryption">
After editing, it should look like this:
<IDPSSODescriptor protocolSupportEnumeration="urn:oasis:names:tc:SAML:2.0:protocol"><Extensions><shibmd:Scope regexp="false">vlan44.domain</shibmd:Scope></Extensions><KeyDescriptor use="encryption">
Delete the metadata document signature section of the file (the bold text shown in the following code). Because you have edited the document, the signature will now be invalid. Before editing the signature appears as follows:
<EntityDescriptor ID="abc123" entityID="http://FSWEB.contoso.com/adfs/services/trust" xmlns="urn:oasis:names:tc:SAML:2.0:metadata" xmlns:shibmd="urn:mace:shibboleth:metadata:1.0">
<ds:Signature xmlns:ds="http://www.w3.org/2000/09/xmldsig#">
    SIGNATURE DATA
</ds:Signature>
<RoleDescriptor xsi:type=…>
After editing it should look like this:
<EntityDescriptor ID="abc123" entityID="http://FSWEB.contoso.com/adfs/services/trust" xmlns="urn:oasis:names:tc:SAML:2.0:metadata" xmlns:shibmd="urn:mace:shibboleth:metadata:1.0">
<RoleDescriptor xsi:type=…>
Save and close adfs_metadata.xml.
Copy adfs_metadata.xml to the Cloud Lifecycle Manager node in your preferred location. Here it is /tmp.
4.11.4.2 Setting Up WebSSO #
Start by creating a config file adfs_config.yml with the
following parameters and place it in any directory on your Cloud Lifecycle Manager,
such as /tmp.
keystone_trusted_idp: adfs
keystone_sp_conf:
    idp_metadata_file: /tmp/adfs_metadata.xml
    shib_sso_application_entity_id: http://sp_uri_entityId
    shib_sso_idp_entity_id: http://default_idp_uri_entityId
    target_domain:
        name: domain1
        description: my domain
    target_project:
        name: project1
        description: my project
    target_group:
        name: group1
        description: my group
    role:
        name: service
    identity_provider:
        id: adfs_idp1
        description: This is the AD FS identity provider.
    mapping:
        id: mapping1
        rules_file: adfs_mapping.json
    protocol:
        id: saml2
    attribute_map:
        -
          name: http://schemas.xmlsoap.org/claims/Group
          id: ADFS_GROUP
        -
          name: urn:oid:1.3.6.1.4.1.5923.1.1.1.6
          id: ADFS_LOGIN
A sample config file like this exists in roles/KEY-API/files/samples/websso/keystone_configure_adfs_sample.yml. Here are some detailed descriptions for each of the config options:
keystone_trusted_idp: A flag to indicate if this configuration is used for WebSSO or K2K. The value can be either 'adfs' or 'k2k'.
keystone_sp_conf:
    shib_sso_idp_entity_id: The AD FS URI used as an entity Id to identity the IdP.
    shib_sso_application_entity_id: The Service Provider URI used as a entity Id. It can be any URI here for Websso as long as it is unique to the SP.
    target_domain: A domain where the group will be created from.
        name: Any domain name. If it does not exist, it will be created or be updated.
        description: Any description.
    target_project: A project scope that the group has.
        name: Any project name. If it does not exist, it will be created or be updated.
        description: Any description.
    target_group: A group will be created from 'target_domain'.
        name: Any group name. If it does not exist, it will be created or be updated.
        description: Any description.
    role: A role will be assigned on 'target_project'. This role impacts the idp user scoped token permission at sp side.
        name: It has to be an existing role.
    idp_metadata_file: A reference to the AD FS metadata file that validates the SAML2 assertion.
    identity_provider: An AD FS IdP
        id: Any Id. If it does not exist, it will be created or be updated. This Id needs to be shared with the client so that the right mapping will be selected.
        description: Any description.
    mapping: A mapping in json format that maps a federated user to a corresponding group.
        id: Any Id. If it does not exist, it will be created or be updated.
        rules_file: A reference to the file that has the mapping in json.
    protocol: The supported federation protocol.
        id: 'saml2' is the only supported protocol for Websso.
    attribute_map: A shibboleth mapping defined additional attributes to map the attributes from the SAML2 assertion to the Websso mapping that SP understands.
        -
          name: An attribute name from the SAML2 assertion.
          id: An Id that the above name will be mapped to.
In the preceding config file, /tmp/adfs_config.yml, make sure the idp_metadata_file references the previously generated AD FS metadata file. In this case:
idp_metadata_file: /tmp/adfs_metadata.xml
Create a mapping file that is referenced from the preceding config file, such as /tmp/adfs_sp_mapping.json. rules_file: /tmp/adfs_sp_mapping.json. The following is an example of the mapping file, existing in roles/KEY-API/files/samples/websso/adfs_sp_mapping.json:
[
             {
               "local": [{
                     "user": {
                         "name": "{0}"
                     }
                 }],
                 "remote": [{
                     "type": "ADFS_LOGIN"
                 }]
              },
              {
                "local": [{
                    "group": {
                        "id": "GROUP_ID"
                    }
                }],
                "remote": [{
                    "type": "ADFS_GROUP",
                "any_one_of": [
                    "Domain Users"
                    ]
                }]
              }
 ]
You can find more details about how the WebSSO mapping works at http://docs.openstack.org. Also see Section 4.11.4.3, “Mapping rules” for more information.
Go to ~/scratch/ansible/next/ardana/ansible and run the following playbook to enable WebSSO in the Keystone identity service:
ansible-playbook -i hosts/verb_hosts keystone-reconfigure.yml -e@/tmp/adfs_config.yml
Enable WebSSO in the Horizon dashboard service by setting horizon_websso_enabled flag to True in roles/HZN-WEB/defaults/main.yml and then run the horizon-reconfigure playbook:
ardana >ansible-playbook -i hosts/verb_hosts horizon-reconfigure.yml
4.11.4.3 Mapping rules #
One IdP-SP has only one mapping. The last mapping that the customer
configures will be the one used and will overwrite the old mapping setting.
Therefore, if the example mapping adfs_sp_mapping.json is used, the
following behavior is expected because it maps the federated user only to
the one group configured in
keystone_configure_adfs_sample.yml.
Configure domain1/project1/group1, mapping1; websso login horizon, see project1;
Then reconfigure: domain1/project2/group1. mapping1, websso login horizon, see project1 and project2;
Reconfigure: domain3/project3/group3; mapping1, websso login horizon, only see project3; because now the IDP mapping maps the federated user to group3, which only has priviliges on project3.
If you need a more complex mapping, you can use a custom mapping file, which needs to be specified in keystone_configure_adfs_sample.yml -> rules_file.
You can use different attributes of the AD FS user in order to map to different or multiple groups.
An example of a more complex mapping file is adfs_sp_mapping_multiple_groups.json, as follows.
adfs_sp_mapping_multiple_groups.json
[
  {
    "local": [
      {
        "user": {
          "name": "{0}"
        }
      },
      {
        "group": {
           "name": "group1",
           "domain":{
             "name": "domain1"
           }
        }
      }
    ],
    "remote":[{
      "type": "ADFS_LOGIN"
    },
    {
      "type": "ADFS_GROUP",
      "any_one_of":[
         "Domain Users"
      ]
     }
    ]
   },
  {
    "local": [
      {
        "user": {
          "name": "{0}"
        }
      },
      {
        "group": {
           "name": "group2",
           "domain":{
             "name": "domain2"
           }
        }
      }
    ],
    "remote":[{
      "type": "ADFS_LOGIN"
    },
    {
      "type": "ADFS_SCOPED_AFFILIATION",
      "any_one_of": [
          "member@contoso.com"
      ]
    },
    ]
   }
]
The adfs_sp_mapping_multiple_groups.json must be run together with keystone_configure_mutiple_groups_sample.yml, which adds a new attribute for the shibboleth mapping. That file is as follows:
keystone_configure_mutiple_groups_sample.yml
#
# Licensed under the Apache License, Version 2.0 (the "License"); you may
# not use this file except in compliance with the License. You may obtain
# a copy of the License at
#
# http://www.apache.org/licenses/LICENSE-2.0
#
# Unless required by applicable law or agreed to in writing, software
# distributed under the License is distributed on an "AS IS" BASIS, WITHOUT
# WARRANTIES OR CONDITIONS OF ANY KIND, either express or implied. See the
# License for the specific language governing permissions and limitations
# under the License.
#
---

keystone_trusted_idp: adfs
keystone_sp_conf:
    identity_provider:
        id: adfs_idp1
        description: This is the AD FS identity provider.
    idp_metadata_file: /opt/stack/adfs_metadata.xml

    shib_sso_application_entity_id: http://blabla
    shib_sso_idp_entity_id: http://WIN-CAICP35LF2I.vlan44.domain/adfs/services/trust

    target_domain:
        name: domain2
        description: my domain

    target_project:
        name: project6
        description: my project

    target_group:
        name: group2
        description: my group

    role:
        name: admin

    mapping:
        id: mapping1
        rules_file: /opt/stack/adfs_sp_mapping_multiple_groups.json

    protocol:
        id: saml2

    attribute_map:
        -
          name: http://schemas.xmlsoap.org/claims/Group
          id: ADFS_GROUP
        -
          name: urn:oid:1.3.6.1.4.1.5923.1.1.1.6
          id: ADFS_LOGIN
        -
          name: urn:oid:1.3.6.1.4.1.5923.1.1.1.9
          id: ADFS_SCOPED_AFFILIATION
4.11.5 Setting up the AD FS server as the identity provider #
For AD FS to be able to communicate with the Keystone identity service, you need to add the Keystone identity service as a trusted relying party for AD FS and also specify the user attributes that you want to send to the Keystone identity service when users authenticate via WebSSO.
For more information, see the Microsoft AD FS wiki, section "Step 2: Configure AD FS 2.0 as the identity provider and shibboleth as the Relying Party".
Log in to the AD FS server.
Add a relying party using metadata
From Server Manager Dashboard, click Tools on the upper right, then ADFS Management.
Right-click ADFS, and then select Add Relying Party Trust.
Click Start, leave the already selected option
Import data about the relying party published online or on a local network.In the Federation metadata address field, type
<keystone_publicEndpoint>/Shibboleth.sso/Metadata(your Keystone identity service Metadata endpoint), and then click Next. You can also import metadata from a file. Create a file with the content of the result of the following curl commandcurl <keystone_publicEndpoint>/Shibboleth.sso/Metadata
and then choose this file for importing the metadata for the relying party.
In the Specify Display Name page, choose a proper name to identify this trust relationship, and then click Next.
On the Choose Issuance Authorization Rules page, leave the default Permit all users to access the relying party selected, and then click Next.
Click Next, and then click Close.
Edit claim rules for relying party trust
The Edit Claim Rules dialog box should already be open. If not, In the ADFS center pane, under Relying Party Trusts, right-click your newly created trust, and then click Edit Claim Rules.
On the Issuance Transform Rules tab, click Add Rule.
On the Select Rule Template page, select Send LDAP Attributes as Claims, and then click Next.
On the Configure Rule page, in the Claim rule name box, type Get Data.
In the Attribute Store list, select Active Directory.
In the Mapping of LDAP attributes section, create the following mappings.
LDAP Attribute Outgoing Claim Type Token-Groups – Unqualified Names Group User-Principal-Name UPN Click Finish.
On the Issuance Transform Rules tab, click Add Rule.
On the Select Rule Template page, select Send Claims Using a Custom Rule, and then click Next.
In the Configure Rule page, in the Claim rule name box, type Transform UPN to epPN.
In the Custom Rule window, type or copy and paste the following:
c:[Type == "http://schemas.xmlsoap.org/ws/2005/05/identity/claims/upn"]
=> issue(Type = "urn:oid:1.3.6.1.4.1.5923.1.1.1.6", Value = c.Value, Properties["http://schemas.xmlsoap.org/ws/2005/05/identity/claimproperties/attributename"] = "urn:oasis:names:tc:SAML:2.0:attrname-format:uri");
Click Finish.
On the Issuance Transform Rules tab, click Add Rule.
On the Select Rule Template page, select Send Claims Using a Custom Rule, and then click Next.
On the Configure Rule page, in the Claim rule name box, type Transform Group to epSA.
In the Custom Rule window, type or copy and paste the following:
c:[Type == "http://schemas.xmlsoap.org/claims/Group", Value == "Domain Users"]
=> issue(Type = "urn:oid:1.3.6.1.4.1.5923.1.1.1.9", Value = "member@contoso.com", Properties["http://schemas.xmlsoap.org/ws/2005/05/identity/claimproperties/attributename"] = "urn:oasis:names:tc:SAML:2.0:attrname-format:uri");
Click Finish, and then click OK.
This list of Claim Rules is just an example and can be modified or enhanced based on the customer's necessities and AD FS setup specifics.
Create a sample user on the AD FS server
From the Server Manager Dashboard, click Tools on the upper right, then Active Directory Users and Computer.
Right click User, then New, and then User.
Follow the on-screen instructions.
You can test the Horizon dashboard service "Login with ADFS" by opening a
browser at the Horizon dashboard service URL and choose
Authenticate using: ADFS Credentials. You should be
redirected to the ADFS login page and be able to log into the Horizon
dashboard service with your ADFS credentials.
4.12 Identity Service Notes and Limitations #
4.12.1 Notes #
This topic describes limitations of and important notes pertaining to the identity service. Domains
Domains can be created and managed by the Horizon web interface, Keystone API and OpenStackClient CLI.
The configuration of external authentication systems requires the creation and usage of Domains.
All configurations are managed by creating and editing specific configuration files.
End users can authenticate to a particular project and domain via the Horizon web interface, Keystone API and OpenStackClient CLI.
A new Horizon login page that requires a Domain entry is now installed by default.
Keystone-to-Keystone Federation
Keystone-to-Keystone (K2K) Federation provides the ability to authenticate once with one cloud and then use these credentials to access resources on other federated clouds.
All configurations are managed by creating and editing specific configuration files.
Multi-Factor Authentication (MFA)
The Keystone architecture provides support for MFA deployments.
MFA provides the ability to deploy non-password based authentication; for example: token providing hardware and text messages.
Hierarchical Multitenancy
Provides the ability to create sub-projects within a Domain-Project hierarchy.
4.12.2 Limitations #
Authentication with external authentication systems (LDAP, Active Directory (AD) or Identity Providers)
No Horizon web portal support currently exists for the creation and management of external authentication system configurations.
Integration with LDAP services HPE Helion OpenStack 8 domain-specific configuration:
No Global User Listing: Once domain-specific driver configuration is enabled, listing all users and listing all groups are not supported operations. Those calls require a specific domain filter and a domain-scoped token for the target domain.
You cannot have both a file store and a database store for domain-specific driver configuration in a single identity service instance. Once a database store is enabled within the identity service instance, any file store will be ignored, and vice versa.
The identity service allows a list limit configuration to globally set the maximum number of entities that will be returned in an identity collection per request but it does not support per-domain list limit setting at this time.
Each time a new domain is configured with LDAP integration the single CA file gets overwritten. Ensure that you place certs for all the LDAP back-end domains in the cacert parameter. Detailed CA file inclusion instructions are provided in the comments of the sample YAML configuration file
keystone_configure_ldap_my.yml(see Section 4.9.2, “Set up domain-specific driver configuration - file store”).LDAP is only supported for identity operations (reading users and groups from LDAP).
Keystone assignment operations from LDAP records such as managing or assigning roles and projects, are not currently supported.
The HPE Helion OpenStack 'default' domain is pre-configured to store service account users and is authenticated locally against the identity service. Domains configured for external LDAP integration are non-default domains.
When using the current OpenStackClient CLI you must use the user ID rather than the user name when working with a non-default domain.
Each LDAP connection with the identity service is for read-only operations. Configurations that require identity service write operations (to create users, groups, etc.) are not currently supported.
LDAP is only supported for identity operations (reading users and groups from LDAP). Keystone assignment operations from LDAP records such as managing or assigning roles and projects, are not currently supported.
When using the current OpenStackClient CLI you must use the user ID rather than the user name when working with a non-default domain.
HPE Helion OpenStack 8 API-based domain-specific configuration management
No GUI dashboard for domain-specific driver configuration management
API-based Domain specific config does not check for type of option.
API-based Domain specific config does not check for option values supported.
API-based Domain config method does not provide retrieval of default values of domain-specific configuration options.
Status: Domain-specific driver configuration database store is a non-core feature for HPE Helion OpenStack 8.
4.12.3 Keystone-to-Keystone federation #
When a user is disabled in the identity provider, the issued federated token from the service provider still remains valid until the token is expired based on the Keystone expiration setting.
An already issued federated token will retain its scope until its expiration. Any changes in the mapping on the service provider will not impact the scope of an already issued federated token. For example, if an already issued federated token was mapped to group1 that has scope on project1, and mapping is changed to group2 that has scope on project2, the prevously issued federated token still has scope on project1.
Access to service provider resources is provided only through the python-keystone CLI client or the Keystone API. No Horizon web interface support is currently available.
Domains, projects, groups, roles, and quotas are created per the service provider cloud. Support for federated projects, groups, roles, and quotas is currently not available.
Keystone-to-Keystone federation and WebSSO cannot be configured by putting both sets of configuration attributes in the same config file; they will overwrite each other. Consequently, they need to be configured individually.
Scoping the federated user to a domain is not supported by default in the playbook. To enable it, see the steps in Section 4.10.7, “Scope Federated User to Domain”.
No Horizon web portal support currently exists for the creation and management of federation configurations.
All end user authentication is available only via the Keystone API and OpenStackClient CLI.
Additional information can be found at http://docs.openstack.org.
WebSSO
The WebSSO function supports only Horizon web authentication. It is not supported for direct API or CLI access.
WebSSO works only with Fernet token provider. See Section 4.8.4, “Fernet Tokens”.
The HPE Helion OpenStack WebSSO function was tested with Microsoft Active Directory Federation Services (ADFS). The instructions provided are pertinent to ADFS and are intended to provide a sample configuration for deploying WebSSO with an external identity provider. If you have a different identity provider such as Ping Identity or IBM Tivoli, consult with those vendors for specific instructions for those products.
Only WebSSO federation using the SAML method is supported in HPE Helion OpenStack 8 . OpenID-based federation is not currently supported.
WebSSO has a change password option in User Settings, but note that this function is not accessible for users authenticating with external systems such as LDAP or SAML Identity Providers.
Multi-factor authentication (MFA)
HPE Helion OpenStack MFA support is a custom configuration requiring Professional Services support.
MFA drivers are not included with HPE Helion OpenStack and need to be provided by a specific MFA vendor.
Additional information can be found at http://docs.openstack.org/security-guide/content/identity-authentication-methods.html#identity-authentication-methods-external-authentication-methods.
Hierarchical multitenancy
This function requires additional support from various OpenStack services to be functional. It is a non-core function in HPE Helion OpenStack and is not ready for either proof of concept or production deployments.
Additional information can be found at http://specs.openstack.org/openstack/keystone-specs/specs/juno/hierarchical_multitenancy.html.
Missing quota information for compute resources
Note
An error message that will appear in the default Horizon page if you are running a Swift-only deployment (no Compute service). In this configuration, you will not see any quota information for Compute resources and will see the following error message:
The Compute service is not installed or is not configured properly. No information is available for Compute resources. This error message is expected as no Compute service is configured for this deployment. Please ignore the error message.
The following is the benchmark of the performance that is based on 150 concurrent requests and run for 10 minute periods of stable load time.
| Operation | In HPE Helion OpenStack 8 (secs/request) | In HPE Helion OpenStack 8 3.0 (secs/request) |
|---|---|---|
| Token Creation | 0.86 | 0.42 |
| Token Validation | 0.47 | 0.41 |
Considering that token creation operations do not happen as frequently as token validation operations, you are likely to experience less of a performance problem regardless of the extended time for token creation.
4.12.4 System cron jobs need setup #
Keystone relies on two cron jobs to periodically clean up expired tokens and for token revocation. The following is how the cron jobs appear on the system:
1 1 * * * /opt/stack/service/keystone/venv/bin/keystone-manage token_flush
1 1,5,10,15,20 * * * /opt/stack/service/keystone/venv/bin/revocation_cleanup.sh
By default, the two cron jobs are enabled on controller node 1 only, not on the other two nodes. When controller node 1 is down or has failed for any reason, these two cron jobs must be manually set up on one of the other two nodes.