6 Managing Compute #
Information about managing and configuring the Compute service.
6.1 Managing Compute Hosts using Aggregates and Scheduler Filters #
OpenStack nova has the concepts of availability zones and host aggregates that enable you to segregate your compute hosts. Availability zones are used to specify logical separation within your cloud based on the physical isolation or redundancy you have set up. Host aggregates are used to group compute hosts together based upon common features, such as operation system. For more information, read this topic.
OpenStack nova has the concepts of availability zones and host aggregates that enable you to segregate your Compute hosts. Availability zones are used to specify logical separation within your cloud based on the physical isolation or redundancy you have set up. Host aggregates are used to group compute hosts together based upon common features, such as operation system. For more information, see Scaling and Segregating your Cloud.
The nova scheduler also has a filter scheduler, which supports both filtering and weighting to make decisions on where new compute instances should be created. For more information, see Filter Scheduler and Scheduling.
This document is going to show you how to set up both a nova host aggregate and configure the filter scheduler to further segregate your compute hosts.
6.1.1 Creating a nova Aggregate #
These steps will show you how to create a nova aggregate and how to add a compute host to it. You can run these steps on any machine that contains the OpenStackClient that also has network access to your cloud environment. These requirements are met by the Cloud Lifecycle Manager.
Log in to the Cloud Lifecycle Manager.
Source the administrative creds:
ardana >source ~/service.osrcList your current nova aggregates:
ardana >openstack aggregate listCreate a new nova aggregate with this syntax:
ardana >openstack aggregate create AGGREGATE-NAMEIf you wish to have the aggregate appear as an availability zone, then specify an availability zone with this syntax:
ardana >openstack aggregate create AGGREGATE-NAME AVAILABILITY-ZONE-NAMESo, for example, if you wish to create a new aggregate for your SUSE Linux Enterprise compute hosts and you wanted that to show up as the
SLEavailability zone, you could use this command:ardana >openstack aggregate create SLE SLEThis would produce an output similar to this:
+----+------+-------------------+-------+------------------+
| Id | Name | Availability Zone | Hosts | Metadata
+----+------+-------------------+-------+--------------------------+
| 12 | SLE  | SLE               |       | 'availability_zone=SLE'
+----+------+-------------------+-------+--------------------------+
Next, you need to add compute hosts to this aggregate so you can start by listing your current hosts. You can view the current list of hosts running running the
computeservice like this:ardana >openstack hypervisor listYou can then add host(s) to your aggregate with this syntax:
ardana >openstack aggregate add host AGGREGATE-NAME HOSTThen you can confirm that this has been completed by listing the details of your aggregate:
openstack aggregate show AGGREGATE-NAME
You can also list out your availability zones using this command:
ardana >openstack availability zone list
6.1.2 Using nova Scheduler Filters #
The nova scheduler has two filters that can help with differentiating between different compute hosts that we'll describe here.
| Filter | Description |
|---|---|
| AggregateImagePropertiesIsolation |
Isolates compute hosts based on image properties and aggregate metadata. You can use commas to specify multiple values for the same property. The filter will then ensure at least one value matches. |
| AggregateInstanceExtraSpecsFilter |
Checks that the aggregate metadata satisfies any extra specifications
associated with the instance type. This uses
|
Using the AggregateImagePropertiesIsolation Filter
Log in to the Cloud Lifecycle Manager.
Edit the
~/openstack/my_cloud/config/nova/nova.conf.j2file and addAggregateImagePropertiesIsolationto the scheduler_filters section. Example below, in bold:# Scheduler ... scheduler_available_filters = nova.scheduler.filters.all_filters scheduler_default_filters = AvailabilityZoneFilter,RetryFilter,ComputeFilter, DiskFilter,RamFilter,ImagePropertiesFilter,ServerGroupAffinityFilter, ServerGroupAntiAffinityFilter,ComputeCapabilitiesFilter,NUMATopologyFilter, AggregateImagePropertiesIsolation ...Optionally, you can also add these lines:
aggregate_image_properties_isolation_namespace = <a prefix string>
aggregate_image_properties_isolation_separator = <a separator character>
(defaults to
.)If these are added, the filter will only match image properties starting with the name space and separator - for example, setting to
my_name_spaceand:would mean the image propertymy_name_space:image_type=SLEmatches metadataimage_type=SLE, butan_other=SLEwould not be inspected for a match at all.If these are not added all image properties will be matched against any similarly named aggregate metadata.
Add image properties to images that should be scheduled using the above filter
Commit the changes to git:
ardana >git add -Aardana >git commit -a -m "editing nova schedule filters"Run the configuration processor:
ardana >cd ~/openstack/ardana/ansibleardana >ansible-playbook -i hosts/localhost config-processor-run.ymlRun the ready deployment playbook:
ardana >cd ~/openstack/ardana/ansibleardana >ansible-playbook -i hosts/localhost ready-deployment.ymlRun the nova reconfigure playbook:
ardana >cd ~/scratch/ansible/next/ardana/ansibleardana >ansible-playbook -i hosts/verb_hosts nova-reconfigure.yml
Using the AggregateInstanceExtraSpecsFilter Filter
Log in to the Cloud Lifecycle Manager.
Edit the
~/openstack/my_cloud/config/nova/nova.conf.j2file and addAggregateInstanceExtraSpecsFilterto the scheduler_filters section. Example below, in bold:# Scheduler ... scheduler_available_filters = nova.scheduler.filters.all_filters scheduler_default_filters = AvailabilityZoneFilter,RetryFilter,ComputeFilter, DiskFilter,RamFilter,ImagePropertiesFilter,ServerGroupAffinityFilter, ServerGroupAntiAffinityFilter,ComputeCapabilitiesFilter,NUMATopologyFilter, AggregateInstanceExtraSpecsFilter ...There is no additional configuration needed because the following is true:
The filter assumes
:is a separatorThe filter will match all simple keys in extra_specs plus all keys with a separator if the prefix is
aggregate_instance_extra_specs- for example,image_type=SLEandaggregate_instance_extra_specs:image_type=SLEwill both be matched against aggregate metadataimage_type=SLE
Add
extra_specsto flavors that should be scheduled according to the above.Commit the changes to git:
ardana >git add -Aardana >git commit -a -m "Editing nova scheduler filters"Run the configuration processor:
ardana >cd ~/openstack/ardana/ansibleardana >ansible-playbook -i hosts/localhost config-processor-run.ymlRun the ready deployment playbook:
ardana >cd ~/openstack/ardana/ansibleardana >ansible-playbook -i hosts/localhost ready-deployment.ymlRun the nova reconfigure playbook:
ardana >cd ~/scratch/ansible/next/ardana/ansibleardana >ansible-playbook -i hosts/verb_hosts novan-reconfigure.yml
6.2 Using Flavor Metadata to Specify CPU Model #
Libvirt is a collection of software used in OpenStack to
manage virtualization. It has the ability to emulate a host CPU model in a
guest VM. In SUSE OpenStack Cloud nova, the ComputeCapabilitiesFilter limits this
ability by checking the exact CPU model of the compute host against the
requested compute instance model. It will only pick compute hosts that have
the cpu_model requested by the instance model, and if the
selected compute host does not have that cpu_model, the
ComputeCapabilitiesFilter moves on to find another compute host that matches,
if possible. Selecting an unavailable vCPU model may cause nova to fail
with no valid host found.
To assist, there is a nova scheduler filter that captures
cpu_models as a subset of a particular CPU family. The
filter determines if the host CPU model is capable of emulating the guest
CPU model by maintaining the mapping of the vCPU models and comparing it with
the host CPU model.
There is a limitation when a particular cpu_model is
specified with hw:cpu_model via a compute flavor: the
cpu_mode will be set to custom. This
mode ensures that a persistent guest virtual machine will see the same
hardware no matter what host physical machine the guest virtual machine is
booted on. This allows easier live migration of virtual machines. Because of
this limitation, only some of the features of a CPU are exposed to the guest.
Requesting particular CPU features is not supported.
6.2.1 Editing the flavor metadata in the horizon dashboard #
These steps can be used to edit a flavor's metadata in the horizon
dashboard to add the extra_specs for a
cpu_model:
Access the horizon dashboard and log in with admin credentials.
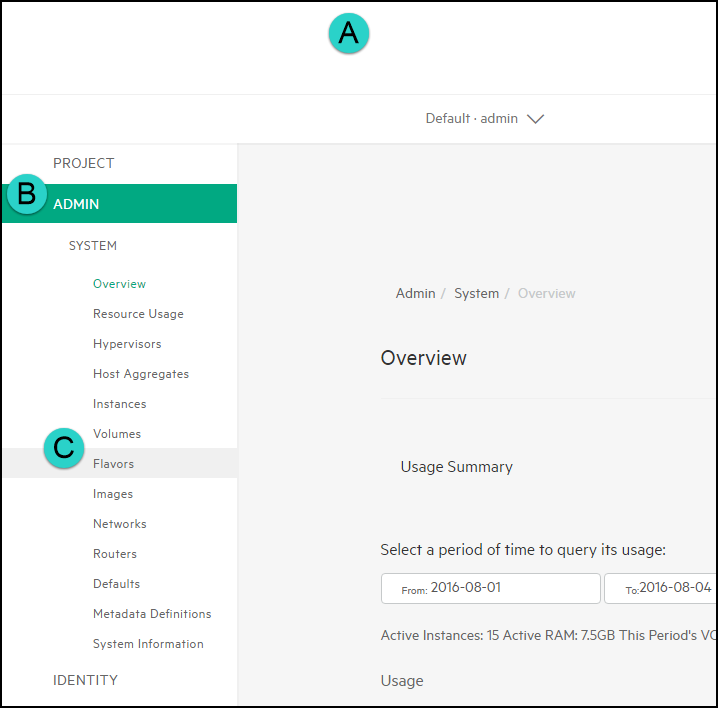
Access the Flavors menu by (A) clicking on the menu button, (B) navigating to the Admin section, and then (C) clicking on Flavors:
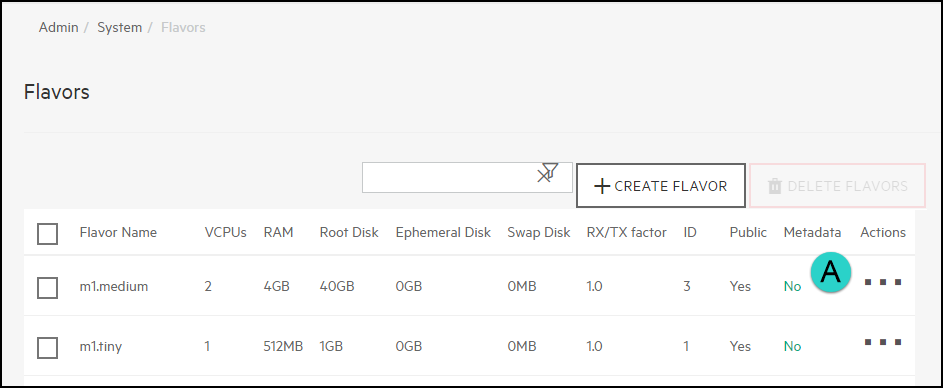
In the list of flavors, choose the flavor you wish to edit and click on the entry under the Metadata column:
NoteYou can also create a new flavor and then choose that one to edit.
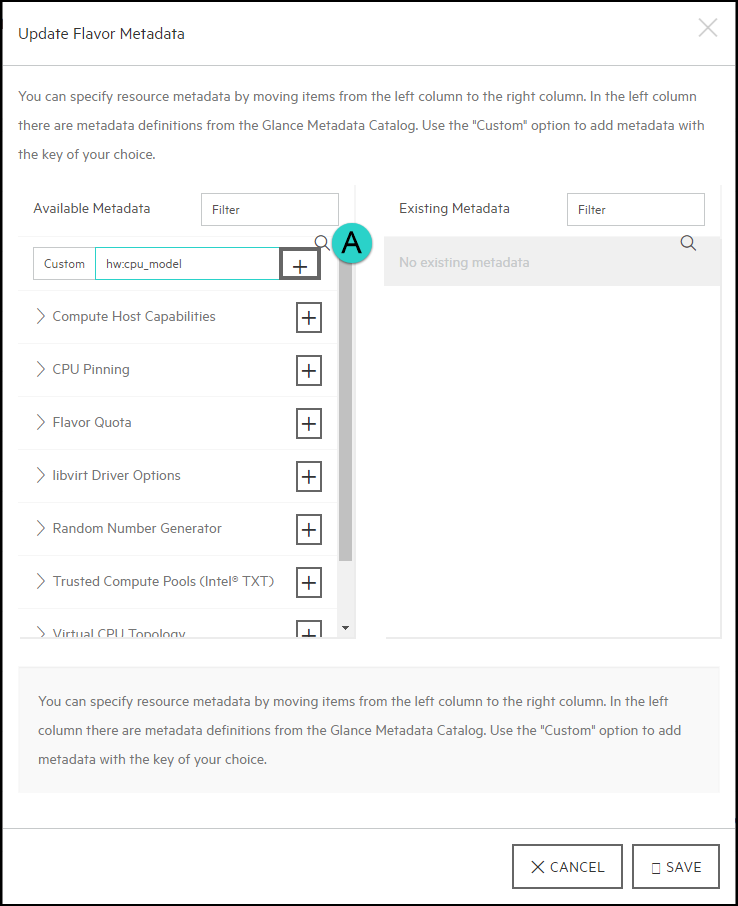
In the Custom field, enter
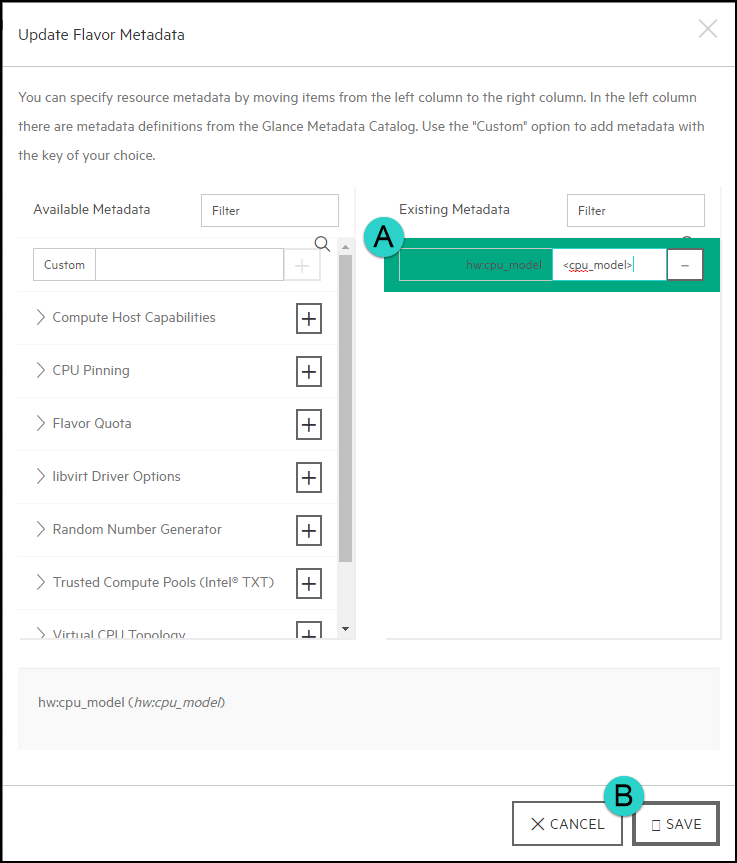
hw:cpu_modeland then click on the+(plus) sign to continue:Then you will want to enter the CPU model into the field that you wish to use and then click Save:
6.3 Forcing CPU and RAM Overcommit Settings #
SUSE OpenStack Cloud supports overcommitting of CPU and RAM resources on compute nodes. Overcommitting is a technique of allocating more virtualized CPUs and/or memory than there are physical resources.
The default settings for this are:
| Setting | Default Value | Description |
|---|---|---|
| cpu_allocation_ratio | 16 |
Virtual CPU to physical CPU allocation ratio which affects all CPU filters. This configuration specifies a global ratio for CoreFilter. For AggregateCoreFilter, it will fall back to this configuration value if no per-aggregate setting found. Note
This can be set per-compute, or if set to |
| ram_allocation_ratio | 1.0 |
Virtual RAM to physical RAM allocation ratio which affects all RAM filters. This configuration specifies a global ratio for RamFilter. For AggregateRamFilter, it will fall back to this configuration value if no per-aggregate setting found. Note
This can be set per-compute, or if set to |
| disk_allocation_ratio | 1.0 |
This is the virtual disk to physical disk allocation ratio used by the disk_filter.py script to determine if a host has sufficient disk space to fit a requested instance. A ratio greater than 1.0 will result in over-subscription of the available physical disk, which can be useful for more efficiently packing instances created with images that do not use the entire virtual disk,such as sparse or compressed images. It can be set to a value between 0.0 and 1.0 in order to preserve a percentage of the disk for uses other than instances. Note
This can be set per-compute, or if set to |
6.3.1 Changing the overcommit ratios for your entire environment #
If you wish to change the CPU and/or RAM overcommit ratio settings for your entire environment then you can do so via your Cloud Lifecycle Manager with these steps.
Log in to the Cloud Lifecycle Manager.
Edit the nova configuration settings located in this file:
~/openstack/my_cloud/config/nova/nova.conf.j2
Add or edit the following lines to specify the ratios you wish to use:
cpu_allocation_ratio = 16
ram_allocation_ratio = 1.0
Commit your configuration to the Git repository (Chapter 22, Using Git for Configuration Management), as follows:
ardana >cd ~/openstack/ardana/ansibleardana >git add -Aardana >git commit -m "setting nova overcommit settings"Run the configuration processor:
ardana >cd ~/openstack/ardana/ansibleardana >ansible-playbook -i hosts/localhost config-processor-run.ymlUpdate your deployment directory:
ardana >cd ~/openstack/ardana/ansibleardana >ansible-playbook -i hosts/localhost ready-deployment.ymlRun the nova reconfigure playbook:
ardana >cd ~/scratch/ansible/next/ardana/ansibleardana >ansible-playbook -i hosts/verb_hosts nova-reconfigure.yml
6.4 Enabling the Nova Resize and Migrate Features #
The nova resize and migrate features are disabled by default. If you wish to utilize these options, these steps will show you how to enable it in your cloud.
The two features below are disabled by default:
Resize - this feature allows you to change the size of a Compute instance by changing its flavor. See the OpenStack User Guide for more details on its use.
Migrate - read about the differences between "live" migration (enabled by default) and regular migration (disabled by default) in Section 15.1.3.3, “Live Migration of Instances”.
These two features are disabled by default because they require passwordless SSH access between Compute hosts with the user having access to the file systems to perform the copy.
6.4.1 Enabling Nova Resize and Migrate #
If you wish to enable these features, use these steps on your lifecycle
manager. This will deploy a set of public and private SSH keys to the
Compute hosts, allowing the nova user SSH access between
each of your Compute hosts.
Log in to the Cloud Lifecycle Manager.
Run the nova reconfigure playbook:
ardana >cd ~/scratch/ansible/next/ardana/ansibleardana >ansible-playbook -i hosts/verb_hosts nova-reconfigure.yml --extra-vars nova_migrate_enabled=trueTo ensure that the resize and migration options show up in the horizon dashboard, run the horizon reconfigure playbook:
ardana >cd ~/scratch/ansible/next/ardana/ansibleardana >ansible-playbook -i hosts/verb_hosts horizon-reconfigure.yml
6.4.2 Disabling Nova Resize and Migrate #
This feature is disabled by default. However, if you have previously enabled
it and wish to re-disable it, you can use these steps on your lifecycle
manager. This will remove the set of public and private SSH keys that were
previously added to the Compute hosts, removing the nova
users SSH access between each of your Compute hosts.
Log in to the Cloud Lifecycle Manager.
Run the nova reconfigure playbook:
ardana >cd ~/scratch/ansible/next/ardana/ansibleardana >ansible-playbook -i hosts/verb_hosts nova-reconfigure.yml --extra-vars nova_migrate_enabled=falseTo ensure that the resize and migrate options are removed from the horizon dashboard, run the horizon reconfigure playbook:
ardana >cd ~/scratch/ansible/next/ardana/ansibleardana >ansible-playbook -i hosts/verb_hosts horizon-reconfigure.yml
6.5 Enabling ESX Compute Instance(s) Resize Feature #
The resize of ESX compute instance is disabled by default. If you want to utilize this option, these steps will show you how to configure and enable it in your cloud.
The following feature is disabled by default:
Resize - this feature allows you to change the size of a Compute instance by changing its flavor. See the OpenStack User Guide for more details on its use.
6.5.1 Procedure #
If you want to configure and re-size ESX compute instance(s), perform the following steps:
Log in to the Cloud Lifecycle Manager.
Edit the
~ /openstack/my_cloud/config/nova/nova.conf.j2to add the following parameter under Policy:# Policy allow_resize_to_same_host=True
Commit your configuration:
ardana >cd ~/openstack/ardana/ansibleardana >git add -Aardana >git commit -m "<commit message>"Run the configuration processor:
ardana >cd ~/openstack/ardana/ansibleardana >ansible-playbook -i hosts/localhost config-processor-run.ymlUpdate your deployment directory:
ardana >cd ~/openstack/ardana/ansibleardana >ansible-playbook -i hosts/localhost ready-deployment.ymlBy default the nova resize feature is disabled. To enable nova resize, refer to Section 6.4, “Enabling the Nova Resize and Migrate Features”.
By default an ESX console log is not set up. For more details about Hypervisor setup, refer to the OpenStack documentation.
6.6 GPU passthrough #
GPU passthrough for SUSE OpenStack Cloud provides the nova instance direct access to the GPU device for increased performance.
This section demonstrates the steps to pass through a Nvidia GPU card supported by SUSE OpenStack Cloud,
Resizing the VM to the same host with the same PCI card is not supported with PCI passthrough.
The following steps are necessary to leverage PCI passthrough on a SUSE OpenStack Cloud 9 Compute Node: preparing the Compute Node, preparing nova via the input model updates and glance. Ensure you follow the below procedures in sequence:
There should be no kernel drivers or binaries with direct access to the PCI device. If there are kernel modules, ensure they are blacklisted.
For example, it is common to have a
nouveaudriver from when the node was installed. This driver is a graphics driver for Nvidia-based GPUs. It must be blacklisted as shown in this example:ardana >echo 'blacklist nouveau' >> /etc/modprobe.d/nouveau-default.confThe file location and its contents are important, however the name of the file is your choice. Other drivers can be blacklisted in the same manner, including Nvidia drivers.
On the host,
iommu_groupsis necessary and may already be enabled. To check if IOMMU is enabled, run the following commands:root #virt-host-validate ..... QEMU: Checking if IOMMU is enabled by kernel : WARN (IOMMU appears to be disabled in kernel. Add intel_iommu=on to kernel cmdline arguments) .....To modify the kernel command line as suggested in the warning, edit
/etc/default/gruband appendintel_iommu=onto theGRUB_CMDLINE_LINUX_DEFAULTvariable. Run:root #update-bootloaderReboot to enable
iommu_groups.After the reboot, check that IOMMU is enabled:
root #virt-host-validate ..... QEMU: Checking if IOMMU is enabled by kernel : PASS .....Confirm IOMMU groups are available by finding the group associated with your PCI device (for example Nvidia GPU):
ardana >lspci -nn | grep -i nvidia 84:00.0 3D controller [0302]: NVIDIA Corporation GV100GL [Tesla V100 PCIe 16GB] [10de:1db4] (rev a1)In this example,
84:00.0is the address of the PCI device. The vendorID is10de. The product ID is1db4.Confirm that the devices are available for passthrough:
ardana >ls -ld /sys/kernel/iommu_groups/*/devices/*84:00.?/ drwxr-xr-x 3 root root 0 Nov 19 17:00 /sys/kernel/iommu_groups/56/devices/0000:84:00.0/
6.6.1 Preparing nova via the input model updates #
To implement the required configuration, log into the Cloud Lifecycle Manager node and update the Cloud Lifecycle Manager model files to enable GPU passthrough for compute nodes.
Edit servers.yml
Add the pass-through section after the definition of
servers section in the servers.yml file.
The following example shows only the relevant sections:
        ---
        product:
        version: 2

        baremetal:
        netmask: 255.255.255.0
        subnet: 192.168.100.0


        servers:
        .
        .
        .
        .

          - id: compute-0001
            ip-addr: 192.168.75.5
            role: COMPUTE-ROLE
            server-group: RACK3
            nic-mapping: HP-DL360-4PORT
            ilo-ip: ****
            ilo-user: ****
            ilo-password: ****
            mac-addr: ****
          .
          .
          .

          - id: compute-0008
            ip-addr: 192.168.75.7
            role: COMPUTE-ROLE
            server-group: RACK2
            nic-mapping: HP-DL360-4PORT
            ilo-ip: ****
            ilo-user: ****
            ilo-password: ****
            mac-addr: ****

        pass-through:
          servers:
            - id: compute-0001
              data:
                gpu:
                  - vendor_id: 10de
                    product_id: 1db4
                    bus_address: 0000:84:00.0
                    pf_mode: type-PCI
                    name: a1
                  - vendor_id: 10de
                    product_id: 1db4
                    bus_address: 0000:85:00.0
                    pf_mode: type-PCI
                    name: b1
            - id: compute-0008
              data:
                gpu:
                  - vendor_id: 10de
                    product_id: 1db4
                    pf_mode: type-PCI
                    name: c1
Check out the site branch of the local git repository and change to the correct directory:
ardana >cd ~/openstackardana >git checkout siteardana >cd ~/openstack/my_cloud/definition/data/Open the file containing the servers list, for example
servers.yml, with your chosen editor. Save the changes to the file and commit to the local git repository:ardana >git add -AConfirm that the changes to the tree are relevant changes and commit:
ardana >git statusardana >git commit -m "your commit message goes here in quotes"Enable your changes by running the necessary playbooks:
ardana >cd ~/openstack/ardana/ansibleardana >ansible-playbook -i hosts/localhost config-processor-run.ymlardana >ansible-playbook -i hosts/localhost ready-deployment.ymlardana >cd ~/scratch/ansible/next/ardana/ansibleIf you are enabling GPU passthrough for your compute nodes during your initial installation, run the following command:
ardana >ansible-playbook -i hosts/verb_hosts site.ymlIf you are enabling GPU passthrough for your compute nodes post-installation, run the following command:
ardana >ansible-playbook -i hosts/verb_hosts nova-reconfigure.yml
The above procedure updates the configuration for the nova api, nova compute and scheduler as defined in https://docs.openstack.org/nova/rocky/admin/pci-passthrough.html.
The following is the PCI configuration for the compute0001
node using the above example post-playbook run:
        [pci]
        passthrough_whitelist = [{"address": "0000:84:00.0"}, {"address": "0000:85:00.0"}]
        alias = {"vendor_id": "10de", "name": "a1", "device_type": "type-PCI", "product_id": "1db4"}
        alias = {"vendor_id": "10de", "name": "b1", "device_type": "type-PCI", "product_id": "1db4"}
The following is the PCI configuration for compute0008
node using the above example post-playbook run:
        [pci]
        passthrough_whitelist = [{"vendor_id": "10de", "product_id": "1db4"}]
        alias = {"vendor_id": "10de", "name": "c1", "device_type": "type-PCI", "product_id": "1db4"}
After running the site.yml playbook above,
reboot the compute nodes that are configured with Intel PCI devices.
6.6.2 Create a flavor #
For GPU passthrough, set the pci_passthrough:alias
property. You can do so for an existing flavor or create a new flavor
as shown in the example below:
ardana >openstack flavor create --ram 8192 --disk 100 --vcpu 8 gpuflavorardana >openstack flavor set gpuflavor --property "pci_passthrough:alias"="a1:1"
Here the a1 references the alias name as provided
in the model while the 1 tells nova that a single GPU
should be assigned.
Boot an instance using the flavor created above:
ardana > openstack server create --flavor gpuflavor --image sles12sp4 --key-name key --nic net-id=$net_id gpu-instance-16.7 Configuring the Image Service #
The Image service, based on OpenStack glance, works out of the box and does not need any special configuration. However, we show you how to enable glance image caching as well as how to configure your environment to allow the glance copy-from feature if you choose to do so. A few features detailed below will require some additional configuration if you choose to use them.
glance images are assigned IDs upon creation, either automatically or specified by the user. The ID of an image should be unique, so if a user assigns an ID which already exists, a conflict (409) will occur.
This only becomes a problem if users can publicize or share images with
others. If users can share images AND cannot publicize images then your
system is not vulnerable. If the system has also been purged (via
glance-manage db purge) then it is possible for deleted
image IDs to be reused.
If deleted image IDs can be reused then recycling of public and shared images becomes a possibility. This means that a new (or modified) image can replace an old image, which could be malicious.
If this is a problem for you, please contact Sales Engineering.
6.7.1 How to enable glance image caching #
In SUSE OpenStack Cloud 9, by default, the glance image caching option is not enabled. You have the option to have image caching enabled and these steps will show you how to do that.
The main benefits to using image caching is that it will allow the glance service to return the images faster and it will cause less load on other services to supply the image.
In order to use the image caching option you will need to supply a logical volume for the service to use for the caching.
If you wish to use the glance image caching option, you will see the
section below in your
~/openstack/my_cloud/definition/data/disks_controller.yml
file. You will specify the mount point for the logical volume you wish to
use for this.
Log in to the Cloud Lifecycle Manager.
Edit your
~/openstack/my_cloud/definition/data/disks_controller.ymlfile and specify the volume and mount point for yourglance-cache. Here is an example:# glance cache: if a logical volume with consumer usage glance-cache # is defined glance caching will be enabled. The logical volume can be # part of an existing volume group or a dedicated volume group. - name: glance-vg physical-volumes: - /dev/sdx logical-volumes: - name: glance-cache size: 95% mount: /var/lib/glance/cache fstype: ext4 mkfs-opts: -O large_file consumer: name: glance-api usage: glance-cacheIf you are enabling image caching during your initial installation, prior to running
site.ymlthe first time, then continue with the installation steps. However, if you are making this change post-installation then you will need to commit your changes with the steps below.Commit your configuration to the Git repository (Chapter 22, Using Git for Configuration Management), as follows:
ardana >cd ~/openstack/ardana/ansibleardana >git add -Aardana >git commit -m "My config or other commit message"Run the configuration processor:
ardana >cd ~/openstack/ardana/ansibleardana >ansible-playbook -i hosts/localhost config-processor-run.ymlUpdate your deployment directory:
ardana >cd ~/openstack/ardana/ansibleardana >ansible-playbook -i hosts/localhost ready-deployment.ymlRun the glance reconfigure playbook:
ardana >cd ~/scratch/ansible/next/ardana/ansibleardana >ansible-playbook -i hosts/verb_hosts glance-reconfigure.yml
An existing volume image cache is not properly deleted when cinder detects the source image has changed. After updating any source image, delete the cache volume so that the cache is refreshed.
The volume image cache must be deleted before trying to use the associated
source image in any other volume operations. This includes creating bootable
volumes or booting an instance with create volume enabled
and the updated image as the source image.
6.7.2 Allowing the glance copy-from option in your environment #
When creating images, one of the options you have is to copy the image from
a remote location to your local glance store. You do this by specifying the
--copy-from option when creating the image. To use this
feature though you need to ensure the following conditions are met:
The server hosting the glance service must have network access to the remote location that is hosting the image.
There cannot be a proxy between glance and the remote location.
The glance v1 API must be enabled, as v2 does not currently support the
copy-fromfunction.The http glance store must be enabled in the environment, following the steps below.
Enabling the HTTP glance Store
Log in to the Cloud Lifecycle Manager.
Edit the
~/openstack/my_cloud/config/glance/glance-api.conf.j2file and addhttpto the list of glance stores in the[glance_store]section as seen below in bold:[glance_store] stores = {{ glance_stores }}, httpCommit your configuration to the Git repository (Chapter 22, Using Git for Configuration Management), as follows:
ardana >cd ~/openstack/ardana/ansibleardana >git add -Aardana >git commit -m "My config or other commit message"Run the configuration processor:
ardana >cd ~/openstack/ardana/ansibleardana >ansible-playbook -i hosts/localhost config-processor-run.ymlUpdate your deployment directory:
ardana >cd ~/openstack/ardana/ansibleardana >ansible-playbook -i hosts/localhost ready-deployment.ymlRun the glance reconfigure playbook:
ardana >cd ~/scratch/ansible/next/ardana/ansibleardana >ansible-playbook -i hosts/verb_hosts glance-reconfigure.ymlRun the horizon reconfigure playbook:
ardana >cd ~/scratch/ansible/next/ardana/ansibleardana >ansible-playbook -i hosts/verb_hosts horizon-reconfigure.yml


