41 Gathering System Information for Support #
For a quick overview of all relevant system information of a machine,
SUSE Linux Enterprise Server offers the
hostinfo package. It also helps
system administrators to check for tainted kernels (that are not supported)
or any third-party packages installed on a machine.
In case of problems, a detailed system report may be created with either
the supportconfig command line tool or the YaST
module. Both will collect information about the
system such as: current kernel version, hardware, installed packages,
partition setup, and much more. The result is a TAR archive of files. After
opening a Service Request (SR), you can upload the TAR archive to Global
Technical Support. It will help to locate the issue you reported and to
assist you in solving the problem.
Additionally, you can analyze the supportconfig output
for known issues to help resolve problems faster. For this purpose,
SUSE Linux Enterprise Server provides both an appliance and a command line tool for
Supportconfig Analysis (SCA).
41.1 Displaying Current System Information #
For a quick and easy overview of all relevant system information when
logging in to a server, use the package
hostinfo. After it has been
installed on a machine, the console displays the following information to
any root user that logs in to this machine:
hostinfo When Logging In as root #Hostname: earth Current As Of: Fri 28 Sep 2018 03:18:57 PM CEST Distribution: SUSE Linux Enterprise Server 12 -Service Pack: 4 Architecture: x86_64 Kernel Version: 4.12.14-94.37-default -Installed: Mon 24 Sep 2018 10:43:46 AM CEST -Status: Not Tainted Last Updated Package: Fri 28 Sep 2018 03:18:55 PM CEST -Patches Needed: 0 -Security: 0 -3rd Party Packages: 0 IPv4 Address: eth0 192.168.1.1 Total/Free/+Cache Memory: 1812/360/1275 MB (70% Free) Hard Disk: /dev/sda 32 GB
In case the output shows a tainted kernel status, see
Section 41.6, “Support of Kernel Modules” for more details.
41.2 Collecting System Information with Supportconfig #
To create a TAR archive with detailed system information that you can hand
over to Global Technical Support, use either the
supportconfig command line tool directly or the YaST
module. The command line tool is provided by the
package supportutils which is installed by default.
The YaST module is also based on the command
line tool.
41.2.1 Creating a Service Request Number #
Supportconfig archives can be generated at any time. However, for handing over the supportconfig data to Global Technical Support, you need to generate a service request number first. You will need it to upload the archive to support.
To create a service request, go to https://scc.suse.com/support/requests and follow the instructions on the screen. Write down your 12-digit service request number.
SUSE and Micro Focus treat system reports as confidential data. For details about our privacy commitment, see https://www.suse.com/company/policies/privacy/.
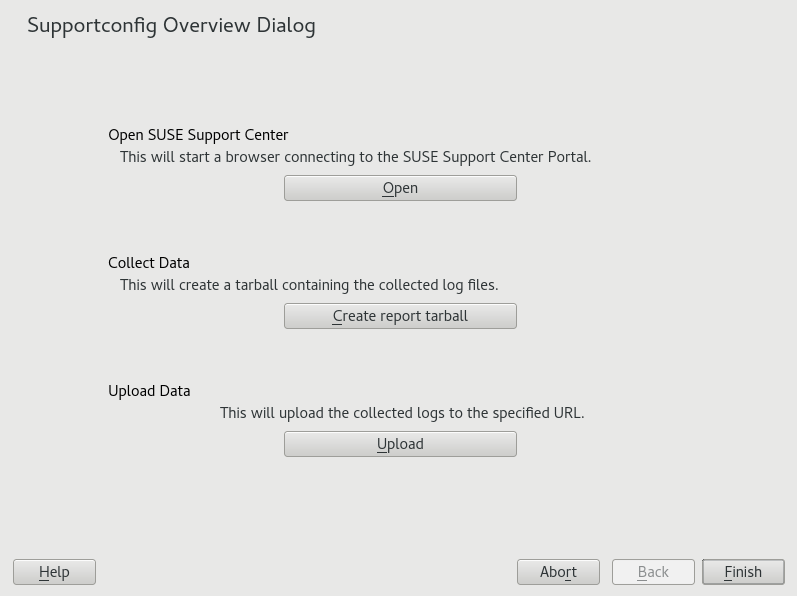
41.2.2 Creating a Supportconfig Archive with YaST #
To use YaST to gather your system information, proceed as follows:
Start YaST and open the module.
Click .
In the next window, select one of the supportconfig options from the radio button list. is preselected by default. If you want to test the report function first, use . For some background information on the other options, refer to the
supportconfigman page.Proceed with .
Enter your contact information. It will be written to a file called
basic-environment.txtand included in the archive to be created.If you want to submit the archive to Global Technical Support at the end of the information collection process, is required. YaST automatically proposes an upload server.
If you want to submit the archive later on, you can leave the empty for now.
Proceed with .
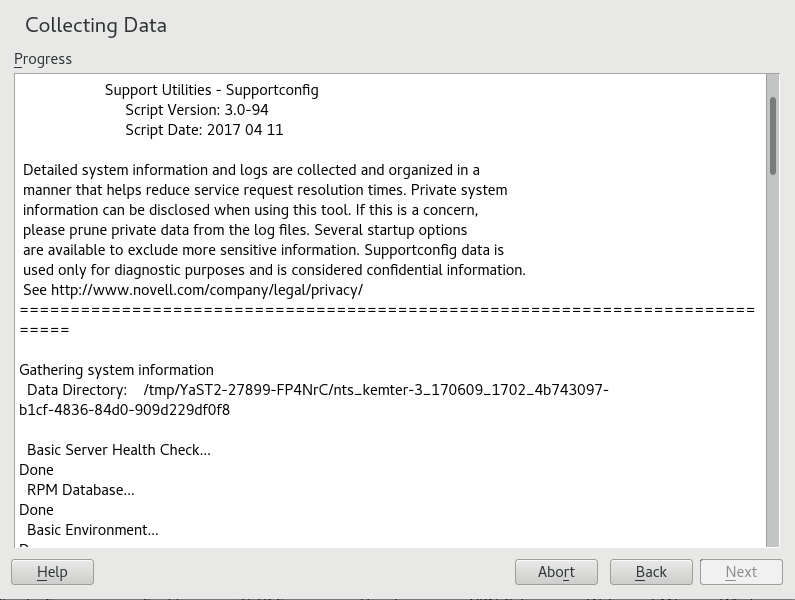
The information gathering begins.
After the process is finished, continue with .
Review the data collection: Select the of a log file to view its contents in YaST. To remove any files you want excluded from the TAR archive before submitting it to support, use . Continue with .
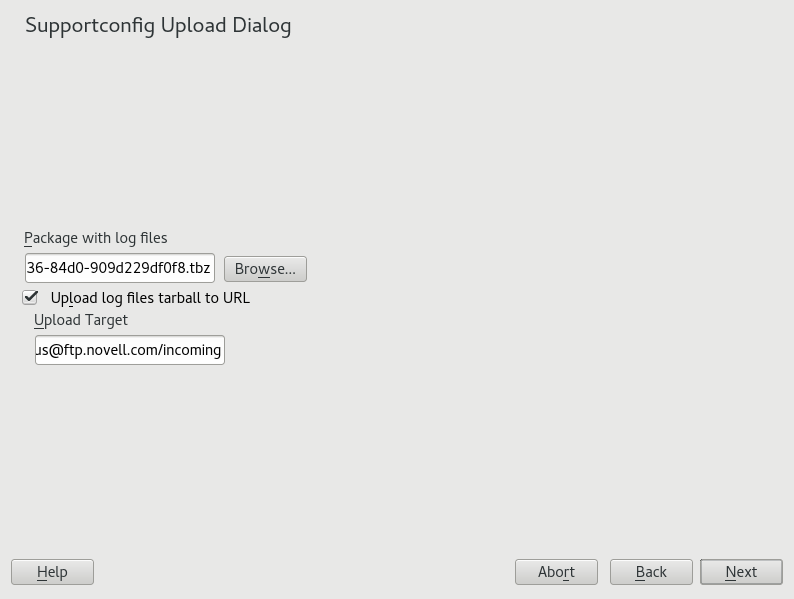
Save the TAR archive. If you started the YaST module as
rootuser, by default YaST proposes to save the archive to/var/log(otherwise, to your home directory). The file name format isnts_HOST_DATE_TIME.tbz.If you want to upload the archive to support directly, make sure is activated. The shown here is the one that YaST proposes in Step 5.
If you want to skip the upload, deactivate .
Confirm your changes to close the YaST module.
41.2.3 Creating a Supportconfig Archive from Command Line #
The following procedure shows how to create a supportconfig archive, but without submitting it to support directly. For uploading it, you need to run the command with certain options as described in Procedure 41.2, “Submitting Information to Support from Command Line”.
Open a shell and become
root.Run
supportconfigwithout any options. This gathers the default system information.Wait for the tool to complete the operation.
The default archive location is
/var/log, with the file name format beingnts_HOST_DATE_TIME.tbz
41.2.4 Common Supportconfig Options #
The supportconfig utility is usually called without any
options. Display a list of all options with
supportconfig -h or refer to the man
page. The following list gives a brief overview of some common use cases:
- Reducing the Size of the Information Being Gathered
Use the minimal option (
-m):supportconfig -m
- Limiting the Information to a Specific Topic
If you have already localized a problem with the default
supportconfigoutput and have found that it relates to a specific area or feature set only, you should limit the collected information to the specific area for the nextsupportconfigrun. For example, if you detected problems with LVM and want to test a recent change that you did to the LVM configuration, it makes sense to gather the minimum supportconfig information around LVM only:supportconfig -i LVM
For a complete list of feature keywords that you can use for limiting the collected information to a specific area, run
supportconfig -F
- Including Additional Contact Information in the Output:
supportconfig -E tux@example.org -N "Tux Penguin" -O "Penguin Inc." ...
(all in one line)
- Collecting Already Rotated Log Files
supportconfig -l
This is especially useful in high logging environments or after a kernel crash when syslog rotates the log files after a reboot.
41.3 Submitting Information to Global Technical Support #
Use the YaST module or the
supportconfig command line utility to submit system
information to the Global Technical Support. When you experience a server
issue and want the support's assistance, you will need to open a service
request first. For details, see
Section 41.2.1, “Creating a Service Request Number”.
The following examples use 12345678901 as a placeholder for your service request number. Replace 12345678901 with the service request number you created in Section 41.2.1, “Creating a Service Request Number”.
The following procedure assumes that you have already created a supportconfig archive, but have not uploaded it yet. Make sure to have included your contact information in the archive as described in Section 41.2.2, “Creating a Supportconfig Archive with YaST”, Step 4. For instructions on how to generate and submit a supportconfig archive in one go, see Section 41.2.2, “Creating a Supportconfig Archive with YaST”.
Start YaST and open the module.
Click .
In specify the path to the existing supportconfig archive or for it.
YaST automatically proposes an upload server.
Proceed with .
Click .
The following procedure assumes that you have already created a supportconfig archive, but have not uploaded it yet. For instructions on how to generate and submit a supportconfig archive in one go, see Section 41.2.2, “Creating a Supportconfig Archive with YaST”.
Servers with Internet connectivity:
To use the default upload target, run:
supportconfig -ur 12345678901
For the secure upload target, use the following:
supportconfig -ar 12345678901
Servers without Internet connectivity
Run the following:
supportconfig -r 12345678901
Manually upload the
/var/log/nts_SR12345678901*tbzarchive to one of our FTP servers. For more information, see the man page ofsupportconfig.
After the TAR archive arrives in the incoming directory of our FTP server, it becomes automatically attached to your service request.
41.4 Analyzing System Information #
System reports created with supportconfig can be analyzed
for known issues to help resolve problems faster. For this purpose,
SUSE Linux Enterprise Server provides both an appliance and a command line tool for
Supportconfig Analysis (SCA). The SCA appliance is a
server-side tool which is non-interactive. The SCA tool
(scatool) runs on the client-side and is executed from
command line. Both tools analyze supportconfig archives from affected
servers. The initial server analysis takes place on the SCA appliance or the
workstation on which scatool is running. No analysis cycles happen on the
production server.
Both the appliance and the command line tool additionally need product-specific patterns that enable them to analyze the supportconfig output for the associated products. Each pattern is a script that parses and evaluates a supportconfig archive for one known issue. The patterns are available as RPM packages.
For example, if you want to analyze supportconfig archives that have been
generated on a SUSE Linux Enterprise 11 machine, you need to install the package
sca-patterns-sle11 together with
the SCA tool (or on the machine that you want to use as the SCA appliance
server). To analyze supportconfig archives generated on a SUSE Linux Enterprise 10 machine,
you need the package
sca-patterns-sle10.
You can also develop your own patterns as briefly described in Section 41.4.3, “Developing Custom Analysis Patterns”.
41.4.1 SCA Command Line Tool #
The SCA command line tool lets you analyze a local machine using both
supportconfig and the analysis patterns for the specific
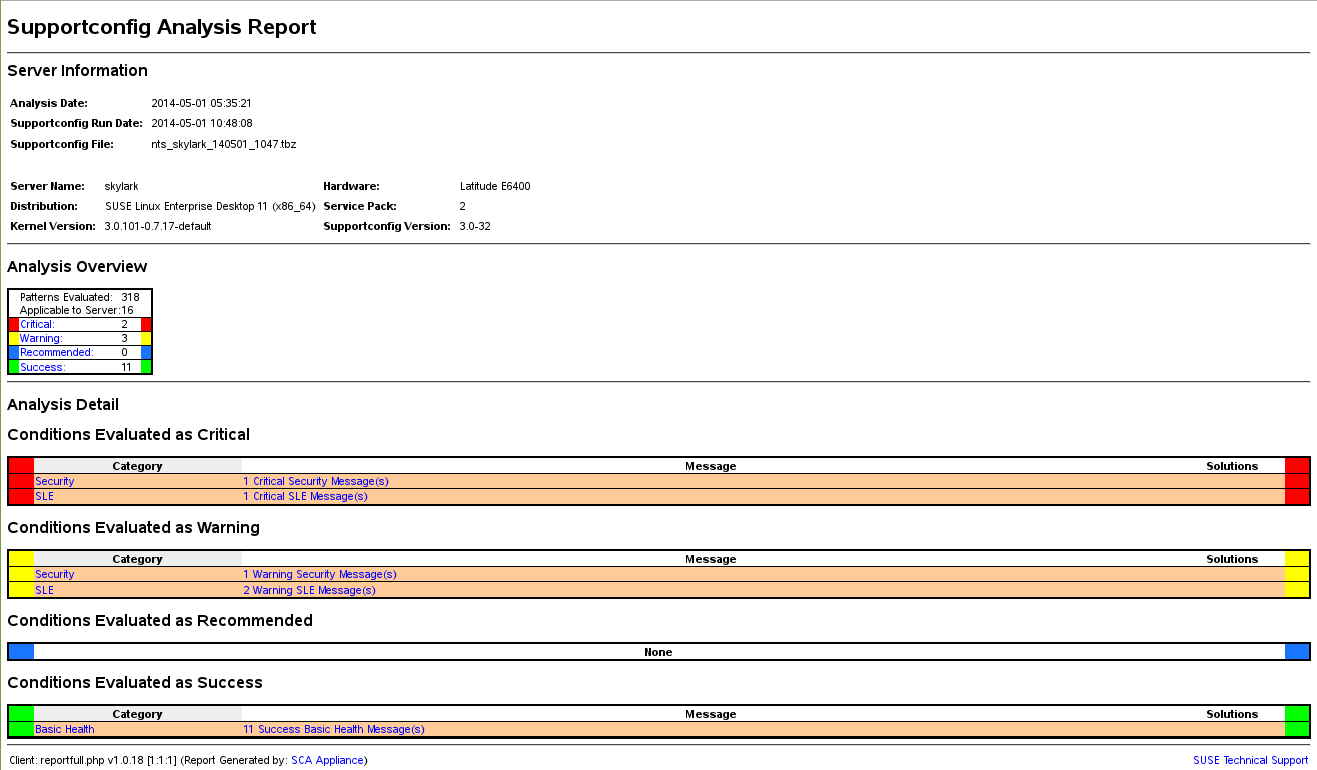
product that is installed on the local machine. The tool creates an HTML
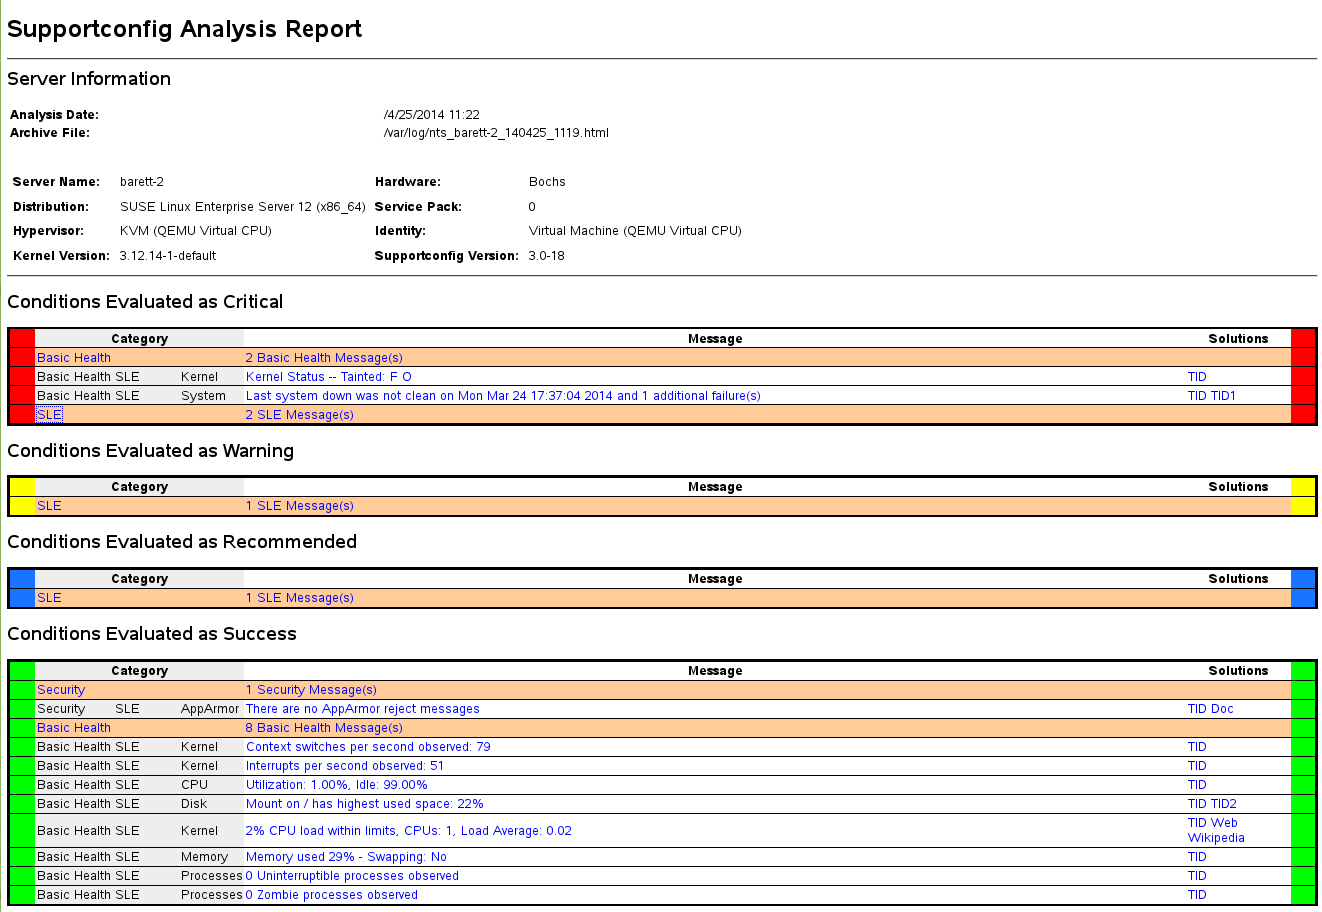
report showing its analysis results. For an example, see
Figure 41.1, “HTML Report Generated by SCA Tool”.
The scatool command is provided by the
sca-server-report package. It is
not installed by default. Additionally, you need the
sca-patterns-base package and any
of the product-specific
sca-patterns-* packages that
matches the product installed on the machine where you want to run the
scatool command.
Execute the scatool command either as root user or
with sudo. When calling the SCA tool, you can either
analyze an existing supportconfig TAR archive or you can
let it generate and analyze a new archive in one go. The tool also provides
an interactive console (with tab completion) and the possibility to run
supportconfig on an external machine and to execute the
subsequent analysis on the local machine.
Find some example commands below:
sudo scatool-sCalls
supportconfigand generates a new supportconfig archive on the local machine. Analyzes the archive for known issues by applying the SCA analysis patterns that match the installed product. Displays the path to the HTML report that is generated from the results of the analysis. It is usually written to the same directory where the supportconfig archive can be found.sudo scatool-s-o/opt/sca/reports/Same as
sudo scatool-s, only that the HTML report is written to the path specified with-o.sudo scatool-aPATH_TO_TARBALL_OR_DIRAnalyzes the specified supportconfig archive file (or the specified directory to where the supportconfig archive has been extracted). The generated HTML report is saved in the same location as the supportconfig archive or directory.
sudo scatool-aSLES_SERVER.COMPANY.COMEstablishes an SSH connection to an external server SLES_SERVER.COMPANY.COM and runs
supportconfigon the server. The supportconfig archive is then copied back to the local machine and is analyzed there. The generated HTML report is saved to the default/var/logdirectory. (Only the supportconfig archive is created on SLES_SERVER.COMPANY.COM).sudo scatool-cStarts the interactive console for
scatool. Press →| twice to see the available commands.
For further options and information, run sudo scatool -h
or see the scatool man page.
41.4.2 SCA Appliance #
If you decide to use the SCA appliance for analyzing the supportconfig archives, you need to configure a dedicated server (or virtual machine) as the SCA appliance server. The SCA appliance server can then be used to analyze supportconfig archives from all machines in your enterprise running SUSE Linux Enterprise Server or SUSE Linux Enterprise Desktop. You can simply upload supportconfig archives to the appliance server for analysis. Interaction is not required. In a MariaDB database, the SCA appliance keeps track of all supportconfig archives that have been analyzed . You can read the SCA reports directly from the appliance Web interface. Alternatively, you can have the appliance send the HTML report to any administrative user via e-mail. For details, see Section 41.4.2.5.4, “Sending SCA Reports via E-Mail”.
41.4.2.1 Installation Quick Start #
To install and set up the SCA appliance in a very fast way from the command line, follow the instructions here. The procedure is intended for experts and focuses on the bare installation and setup commands. For more information, refer to the more detailed description in Section 41.4.2.2, “Prerequisites” to Section 41.4.2.3, “Installation and Basic Setup”.
Web and LAMP Pattern
Web and Scripting Module (you must register the machine to be able to select this module).
root Privileges Required
All commands in the following procedure must be run as root.
After the appliance is set up and running, no more manual interaction is required. This way of setting up the appliance is therefore ideal for using cron jobs to create and upload supportconfig archives.
On the machine on which to install the appliance, log in to a console and execute the following commands:
zypper install sca-appliance-* sca-patterns-* vsftpd
systemctl enable apache2
systemctl start apache2
systemctl enable vsftpd
systemctl start vsftpd
yast ftp-server
In YaST FTP Server, select › › › › to .
Execute the following commands:
systemctl enable mysql
systemctl start mysql
mysql_secure_installation
setup-sca -f
The mysql_secure_installation will create a MariaDB
rootpassword.
This way of setting up the appliance requires manual interaction when typing the SSH password.
On the machine on which to install the appliance, log in to a console.
Execute the following commands:
zypper install sca-appliance-* sca-patterns-*
systemctl enable apache2
systemctl start apache2
sudo systemctl enable mysql
systemctl start mysql
mysql_secure_installation
setup-sca
41.4.2.2 Prerequisites #
To run an SCA appliance server, you need the following prerequisites:
All
sca-appliance-*packages.The
sca-patterns-basepackage. Additionally, any of the product-specificsca-patterns-*for the type of supportconfig archives that you want to analyze with the appliance.Apache
PHP
MariaDB
anonymous FTP server (optional)
41.4.2.3 Installation and Basic Setup #
As listed in Section 41.4.2.2, “Prerequisites”, the SCA appliance has several dependencies on other packages. Therefore you need do so some preparations before installing and setting up the SCA appliance server:
For Apache and MariaDB, install the
WebandLAMPinstallation patterns.Set up Apache, MariaDB, and optionally an anonymous FTP server. For more information, see Chapter 33, The Apache HTTP Server and Chapter 34, Setting Up an FTP Server with YaST.
Configure Apache and MariaDB to start at boot time:
sudo systemctl enable apache2 mysql
Start both services:
sudo systemctl start apache2 mysql
Now you can install the SCA appliance and set it up as described in Procedure 41.5, “Installing and Configuring the SCA Appliance”.
After installing the packages, use the setup-sca
script for the basic configuration of the MariaDB administration and
report database that is used by the SCA appliance.
It can be used to configure the following options you have for uploading the supportconfig archives from your machines to the SCA appliance:
scpanonymous FTP server
Install the appliance and the SCA base-pattern library:
sudo zypper install sca-appliance-* sca-patterns-base
Additionally, install the pattern packages for the types of supportconfig archives you want to analyze. For example, if you have SUSE Linux Enterprise Server 11 and SUSE Linux Enterprise Server 12 servers in your environment, install both the
sca-patterns-sle11andsca-patterns-sle12packages.To install all available patterns:
zypper install sca-patterns-*
For basic setup of the SCA appliance, use the
setup-scascript. How to call it depends on how you want to upload the supportconfig archives to the SCA appliance server:If you have configured an anonymous FTP server that uses the
/srv/ftp/uploaddirectory, execute the setup script with the-foption and follow the instructions on the screen:setup-sca -f
Note: FTP Server Using Another DirectoryIf your FTP server uses another directory than
/srv/ftp/upload, adjust the following configuration files first to make them point to the correct directory:/etc/sca/sdagent.confand/etc/sca/sdbroker.conf.If you want to upload supportconfig files to the
/tmpdirectory of the SCA appliance server viascp, call the setup script without any parameters and follow the instructions on the screen:setup-sca
The setup script runs a few checks regarding its requirements and configures the needed components. It will prompt you for two passwords: the MySQL
rootpassword of the MariaDB that you have set up, and a Web user password with which to log in to the Web interface of the SCA appliance.Enter the existing MariaDB
rootpassword. It will allow the SCA appliance to connect to the MariaDB.Define a password for the Web user. It will be written to
/srv/www/htdocs/sca/web-config.phpand will be set as the password for the userscdiag. Both user name and password can be changed at any time later, see Section 41.4.2.5.1, “Password for the Web Interface”.
After successful installation and setup, the SCA appliance is ready for use, see Section 41.4.2.4, “Using the SCA Appliance”. However, you should modify some options such as changing the password for the Web interface, changing the source for the SCA pattern updates, enabling archiving mode or configuring e-mail notifications. For details on that, see Section 41.4.2.5, “Customizing the SCA Appliance”.
As the reports on the SCA appliance server contain security-relevant information of the machines whose supportconfig archives have been analyzed, make sure to protect the data on the SCA appliance server against unauthorized access.
41.4.2.4 Using the SCA Appliance #
You can upload existing supportconfig archives to the SCA appliance manually or create new supportconfig archives and upload them to the SCA appliance in one step. Uploading can be done via FTP or SCP. For both, you need to know the URL where the SCA appliance can be reached. For upload via FTP, an FTP server needs to be configured for the SCA appliance, see Procedure 41.5, “Installing and Configuring the SCA Appliance”.
41.4.2.4.1 Uploading Supportconfig Archives to the SCA Appliance #
For creating a supportconfig archive and uploading it via (anonymous) FTP:
sudo supportconfig -U “ftp://SCA-APPLIANCE.COMPANY.COM/upload”
For creating a supportconfig archive and uploading it via SCP:
sudo supportconfig -U “scp://SCA-APPLIANCE.COMPANY.COM/tmp”
You will be prompted for the
rootuser password of the server running the SCA appliance.If you want to manually upload one or multiple archives, copy the existing archive files (usually located at
/var/log/nts_*.tbz) to the SCA appliance. As target, use either the appliance server's/tmpdirectory or the/srv/ftp/uploaddirectory (if FTP is configured for the SCA appliance server).
41.4.2.4.2 Viewing SCA Reports #
SCA reports can be viewed from any machine that has a browser installed and can access the report index page of the SCA appliance.
Start a Web browser and make sure that JavaScript and cookies are enabled.
As a URL, enter the report index page of the SCA appliance.
https://sca-appliance.company.com/sca
If in doubt, ask your system administrator.
You will be prompted for a user name and a password to log in.
Figure 41.2: HTML Report Generated by SCA Appliance #After logging in, click the date of the report you want to read.
Click the category first to expand it.
In the column, click an individual entry. This opens the corresponding article in the SUSE Knowledgebase. Read the proposed solution and follow the instructions.
If the column of the shows any additional entries, click them. Read the proposed solution and follow the instructions.
Check the SUSE Knowledge base (https://www.suse.com/support/kb/) for results that directly relate to the problem identified by SCA. Work at resolving them.
Check for results that can be addressed proactively to avoid future problems.
41.4.2.5 Customizing the SCA Appliance #
The following sections show how to change the password for the Web interface, how to change the source for the SCA pattern updates, how to enable archiving mode, and how to configure e-mail notifications.
41.4.2.5.1 Password for the Web Interface #
The SCA Appliance Web interface requires a user name and password for
logging in. The default user name is scdiag and the
default password is linux (if not specified otherwise,
see Procedure 41.5, “Installing and Configuring the SCA Appliance”). Change the default password
to a secure password at the earliest possibility. You can also modify the
user name.
Log in as
rootuser at the system console of the SCA appliance server.Open
/srv/www/htdocs/sca/web-config.phpin an editor.Change the values of
$usernameand$passwordas desired.Save the file and exit.
41.4.2.5.2 Updates of SCA Patterns #
By default, all sca-patterns-*
packages are updated regularly by a root cron job that executes the
sdagent-patterns script nightly, which in turn runs
zypper update sca-patterns-*. A regular system update
will update all SCA appliance and pattern packages. To update the SCA
appliance and patterns manually, run:
sudo zypper update sca-*
The updates are installed from the SUSE Linux Enterprise 12 SP5 update
repository by default. You can change the source for the updates to an
SMT server, if desired. When sdagent-patterns runs
zypper update sca-patterns-*, it gets the updates from
the currently configured update channel. If that channel is located on an
SMT server, the packages will be pulled from there.
Log in as
rootuser at the system console of the SCA appliance server.Open
/etc/sca/sdagent-patterns.confin an editor.Change the entry
UPDATE_FROM_PATTERN_REPO=1
to
UPDATE_FROM_PATTERN_REPO=0
Save the file and exit. The machine does not require any restart to apply the change.
41.4.2.5.3 Archiving Mode #
All supportconfig archives are deleted from the SCA appliance after they have been analyzed and their results have been stored in the MariaDB database. However, for troubleshooting purposes it can be useful to keep copies of supportconfig archives from a machine. By default, archiving mode is disabled.
Log in as
rootuser at the system console of the SCA appliance server.Open
/etc/sca/sdagent.confin an editor.Change the entry
ARCHIVE_MODE=0
to
ARCHIVE_MODE=1
Save the file and exit. The machine does not require any restart to apply the change.
After having enabled archive mode, the SCA appliance will save the
supportconfig files to the /var/log/archives/saved
directory, instead of deleting them.
41.4.2.5.4 Sending SCA Reports via E-Mail #
The SCA appliance can e-mail a report HTML file for each supportconfig
analyzed. This feature is disabled by default. When enabling it, you can
define a list of e-mail addresses to which the reports should be sent,
and define a level of status messages that trigger the sending of reports
(STATUS_NOTIFY_LEVEL).
STATUS_NOTIFY_LEVEL #- $STATUS_OFF
Deactivate sending of HTML reports.
- $STATUS_CRITICAL
Send only SCA reports that include a CRITICAL.
- $STATUS_WARNING
Send only SCA reports that include a WARNING or CRITICAL.
- $STATUS_RECOMMEND
Send only SCA reports that include a RECOMMEND, WARNING or CRITICAL.
- $STATUS_SUCCESS
Send SCA reports that include a SUCCESS, RECOMMEND, WARNING or CRITICAL.
Log in as
rootuser at the system console of the SCA appliance server.Open
/etc/sca/sdagent.confin an editor.Search for the entry
STATUS_NOTIFY_LEVEL. By default, it is set to$STATUS_OFF(e-mail notifications are disabled).To enable e-mail notifications, change
$STATUS_OFFto the level of status messages that you want to have e-mail reports for, for example:STATUS_NOTIFY_LEVEL=$STATUS_SUCCESS
For details, see Possible Values for
STATUS_NOTIFY_LEVEL.To define the list of recipients to which the reports should be sent:
Search for the entry
EMAIL_REPORT='root'.Replace
rootwith a list of e-mail addresses to which SCA reports should be sent. The e-mail addresses must be separated by spaces. For example:EMAIL_REPORT='tux@my.company.com wilber@your.company.com'
Save the file and exit. The machine does not require any restart to apply the changes. All future SCA reports will be e-mailed to the specified addresses.
41.4.2.6 Backing Up and Restoring the Database #
To back up and restore the MariaDB database that stores the SCA reports,
use the scadb command as described below.
Log in as
rootuser at the system console of the server running the SCA appliance.Put the appliance into maintenance mode by executing:
scadb maint
Start the backup with:
scadb backup
The data is saved to a TAR archive:
sca-backup-*sql.gz.If you are using the pattern creation database to develop your own patterns (see Section 41.4.3, “Developing Custom Analysis Patterns”), back up this data, too:
sdpdb backup
The data is saved to a TAR archive:
sdp-backup-*sql.gz.Copy the following data to another machine or an external storage medium:
sca-backup-*sql.gzsdp-backup-*sql.gz/usr/lib/sca/patterns/local(only needed if you have created custom patterns)
Reactivate the SCA appliance with:
scadb reset agents
To restore the database from your backup, proceed as follows:
Log in as
rootuser at the system console of the server running the SCA appliance.Copy the newest
sca-backup-*sql.gzandsdp-backup-*sql.gzTAR archives to the SCA appliance server.To decompress the files, run:
gzip -d *-backup-*sql.gz
To import the data into the database, execute:
scadb import sca-backup-*sql
If you are using the pattern creation database to create your own patterns, also import the following data with:
sdpdb import sdp-backup-*sql
If you are using custom patterns, also restore
/usr/lib/sca/patterns/localfrom your backup data.Reactivate the SCA appliance with:
scadb reset agents
Update the pattern modules in the database with:
sdagent-patterns -u
41.4.3 Developing Custom Analysis Patterns #
The SCA appliance comes with a complete pattern development environment
(the SCA Pattern Database) that enables you to develop your own, custom
patterns. Patterns can be written in any programming language. To make them
available for the supportconfig analysis process, they need to be saved to
/usr/lib/sca/patterns/local and to be made executable.
Both the SCA appliance and the SCA tool will then run the custom patterns
against new supportconfig archives as part of the analysis report. For
detailed instructions on how to create (and test) your own patterns, see
https://www.suse.com/c/blog/sca-pattern-development/.
41.5 Gathering Information during the Installation #
During the installation, supportconfig is not available.
However, you can collect log files from YaST by using
save_y2logs. This command will create a
.tar.xz archive in the directory
/tmp.
If issues appear very early during installation, you may be able to gather
information from the log file created by
linuxrc. linuxrc is a small command
that runs before YaST starts. This log file is available at
/var/log/linuxrc.log.
The log files available during the installation are not available in the installed system anymore. Properly save the installation log files while the installer is still running.
41.6 Support of Kernel Modules #
An important requirement for every enterprise operating system is the level
of support you receive for your environment. Kernel modules are the most
relevant connector between hardware (“controllers”) and the
operating system. Every kernel module in SUSE Linux Enterprise has a
supported flag that can take three possible values:
“yes”, thus
supported“external”, thus
supported(empty, not set), thus
unsupported
The following rules apply:
All modules of a self-recompiled kernel are by default marked as unsupported.
Kernel modules supported by SUSE partners and delivered using
SUSE SolidDriver Programare marked “external”.If the
supportedflag is not set, loading this module will taint the kernel. Tainted kernels are not supported. Unsupported Kernel modules are included in an extra RPM package (kernel-FLAVOR-extra) that is only available for SUSE Linux Enterprise Desktop and the SUSE Linux Enterprise Workstation Extension. Those kernels will not be loaded by default (FLAVOR=default|xen|...). In addition, these unsupported modules are not available in the installer, and thekernel-FLAVOR-extrapackage is not part of the SUSE Linux Enterprise media.Kernel modules not provided under a license compatible to the license of the Linux kernel will also taint the kernel. For details, see
/usr/src/linux/Documentation/sysctl/kernel.txtand the state of/proc/sys/kernel/tainted.
41.6.1 Technical Background #
Linux kernel: The value of
/proc/sys/kernel/unsupporteddefaults to2on SUSE Linux Enterprise 12 SP5 (do not warn in syslog when loading unsupported modules). This default is used in the installer and in the installed system. See/usr/src/linux/Documentation/sysctl/kernel.txtfor more information.modprobe: Themodprobeutility for checking module dependencies and loading modules appropriately checks for the value of thesupportedflag. If the value is “yes” or “external” the module will be loaded, otherwise it will not. For information on how to override this behavior, see Section 41.6.2, “Working with Unsupported Modules”.Note: SupportSUSE does not generally support the removal of storage modules via
modprobe -r.
41.6.2 Working with Unsupported Modules #
While general supportability is important, situations can occur where loading an unsupported module is required (for example, for testing or debugging purposes, or if your hardware vendor provides a hotfix).
To override the default, edit
/etc/modprobe.d/10-unsupported-modules.confand change the value of the variableallow_unsupported_modulesto1. If an unsupported module is needed in the initrd, do not forget to rundracut-fto update the initrd.If you only want to try loading a module once, you can use the
--allow-unsupported-modulesoption withmodprobe. For more information, see themodprobeman page.During installation, unsupported modules may be added through driver update disks, and they will be loaded. To enforce loading of unsupported modules during boot and afterward, use the kernel command line option
oem-modules. While installing and initializing thesuse-module-toolspackage, the kernel flagTAINT_NO_SUPPORT(/proc/sys/kernel/tainted) will be evaluated. If the kernel is already tainted,allow_unsupported_moduleswill be enabled. This will prevent unsupported modules from failing in the system being installed. If no unsupported modules are present during installation and the other special kernel command line option (oem-modules=1) is not used, the default still is to disallow unsupported modules.
Remember that loading and running unsupported modules will make the kernel and the whole system unsupported by SUSE.
41.7 For More Information #
man supportconfig—Thesupportconfigman page.man supportconfig.conf—The man page of the supportconfig configuration file.man scatool—Thescatoolman page.man scadb—Thescadbman page.man setup-sca—Thesetup-scaman page.https://mariadb.com/kb/en/—The MariaDB documentation.
http://httpd.apache.org/docs/ and Chapter 33, The Apache HTTP Server—Documentation about the Apache Web server.
Chapter 34, Setting Up an FTP Server with YaST—Documentation of how to set up an FTP server.
https://www.suse.com/c/blog/sca-pattern-development/—Instructions on how to create (and test) your own SCA patterns.
https://www.suse.com/c/blog/basic-server-health-check-supportconfig/—A Basic Server Health Check with Supportconfig.
https://community.microfocus.com/img/gw/groupwise/w/groupwise/34308/create-your-own-supportconfig-plugin—Create Your Own Supportconfig Plugin.
https://www.suse.com/c/blog/creating-a-central-supportconfig-repository/—Creating a Central Supportconfig Repository.
