21 Installing with the Install UI #
SUSE OpenStack Cloud comes with a GUI-based installation wizard for first-time cloud installations. It will guide you through the configuration process and deploy your cloud based on the custom configuration you provide. The Install UI will start with a set of example cloud configurations for you to choose from. Based on your cloud choice, you can refine your configuration to match your needs using Install UI widgets. You can also directly edit your model configuration files.
The Install UI is only for initial deployments. It will not function properly after your cloud has been deployed successfully, whether it was from the CLI or with the Install UI.
When you are satisfied with your configuration and the Install UI has validated your configuration successfully, you can then deploy the cloud into your environment. Deploying the cloud will version-control your configuration into a git repository and provide you with live progress of your deployment.
With the Install UI, you have the option of provisioning SLES12-SP4 to IPMI-capable machines described in your configuration files. Provisioning machines with the Install UI will also properly configure them for Ansible access.
The Install UI is designed to make the initial installation process simpler, more accurate, and faster than manual installation.
21.1 Prepare for Cloud Installation #
Review the Chapter 14, Pre-Installation Checklist about recommended pre-installation tasks.
Prepare the Cloud Lifecycle Manager node. The Cloud Lifecycle Manager must be accessible either directly or via
ssh, and have SUSE Linux Enterprise Server 12 SP4 installed. All nodes must be accessible to the Cloud Lifecycle Manager. If the nodes do not have direct access to online Cloud subscription channels, the Cloud Lifecycle Manager node will need to host the Cloud repositories.If you followed the installation instructions for Cloud Lifecycle Manager server (see Chapter 15, Installing the Cloud Lifecycle Manager server), SUSE OpenStack Cloud software should already be installed. Double-check whether SUSE Linux Enterprise and SUSE OpenStack Cloud are properly registered at the SUSE Customer Center by starting YaST and running › .
If you have not yet installed SUSE OpenStack Cloud, do so by starting YaST and running › › . Choose and follow the on-screen instructions. Make sure to register SUSE OpenStack Cloud during the installation process and to install the software pattern
patterns-cloud-ardana.tux >sudo zypper -n in patterns-cloud-ardanaEnsure the SUSE OpenStack Cloud media repositories and updates repositories are made available to all nodes in your deployment. This can be accomplished either by configuring the Cloud Lifecycle Manager server as an SMT mirror as described in Chapter 16, Installing and Setting Up an SMT Server on the Cloud Lifecycle Manager server (Optional) or by syncing or mounting the Cloud and updates repositories to the Cloud Lifecycle Manager server as described in Chapter 17, Software Repository Setup.
Configure passwordless
sudofor the user created when setting up the node (as described in Section 15.4, “Creating a User”). Note that this is not the userardanathat will be used later in this procedure. In the following we assume you named the usercloud. Run the commandvisudoas userrootand add the following line to the end of the file:CLOUD ALL = (root) NOPASSWD:ALL
Make sure to replace CLOUD with your user name choice.
Set the password for the user
ardana:tux >sudo passwd ardanaBecome the user
ardana:tux >su - ardanaPlace a copy of the SUSE Linux Enterprise Server 12 SP4
.isoin theardanahome directory,var/lib/ardana, and rename it tosles12sp4.iso.Install the templates, examples, and working model directories:
ardana >/usr/bin/ardana-init
21.2 Preparing to Run the Install UI #
Before you launch the Install UI to install your cloud, do the following:
Gather the following details from the servers that will make up your cloud:
Server names
IP addresses
Server roles
PXE MAC addresses
PXE IP addresses
PXE interfaces
IPMI IP address, username, password
Choose an input model from Chapter 9, Example Configurations. No action other than an understanding of your needs is necessary at this point. In the Install UI you will indicate which input model you wish to deploy.
Before you use the Install UI to install your cloud, you may install the operating system, SLES, on your nodes (servers) if you choose. Otherwise, the Install UI will install it for you.
If you are installing the operating system on all nodes yourself, you must do so using the SLES image included in the SUSE OpenStack Cloud 9 package.
In SUSE OpenStack Cloud 9, a local git repository is used to track configuration changes; the Configuration Processor (CP) uses this repository. Use of a git workflow means that your configuration history is maintained, making rollbacks easier and keeping a record of previous configuration settings. The git repository also provides a way for you to merge changes that you pull down as “upstream” updates (that is, updates from SUSE). It also allows you to manage your own configuration changes.
The git repository is installed by the Cloud Lifecycle Manager on the Cloud Lifecycle Manager node.
Using the Install UI does not require the use of the git repository. After the installation, it may be useful to know more about Chapter 22, Using Git for Configuration Management.
21.3 Optional: Creating a CSV File to Import Server Data #
Before beginning the installation, you can create a CSV file with your server information to import directly into the Install UI to avoid entering it manually on the page.
The following table shows the fields needed for your CSV file.
| Field | Required | Required for OS Provisioning | Aliases |
| Server ID | Yes | Yes | server_id, id |
| IP Address | Yes | Yes | ip, ip_address, ip_addr |
| MAC Address | Yes | Yes | mac, mac_address, mac_addr |
| IPMI IP Address | No | Yes | ipmi_ip, ipmi_ip_address |
| IPMI User | No | Yes | ipmi_user, user |
| IPMI Password | No | Yes | ipmi_password, password |
| Server Role | No | No | server_role, role |
| Server Group | No | No | server_group, group |
| NIC Mapping | No | No | server_nic_map, nic_map, nic_mapping |
The aliases are all the valid names that can be used in the CSV file for the
column header for a given field. Field names are not case sensitive. You can
use either (space) or - (hyphen) in
place of underscore for a field name.
An example CSV file could be:
id,ip-addr,mac-address,server-group,nic-mapping,server-role,ipmi-ip,ipmi-user
controller1,192.168.110.3,b2:72:8d:ac:7c:6f,RACK1,HP-DL360-4PORT,CONTROLLER-ROLE,192.168.109.3,admin
myserver4,10.2.10.24,00:14:22:01:23:44,AZ1,,,,
21.4 Optional: Importing Certificates for SUSE Manager and HPE OneView #
If you intend to use SUSE Manager or HPE OneView to add servers, certificates for those services must be accessible to the Install UI.
Use the following steps to import a SUSE Manager certificate.
Retrieve the
.pemfile from the SUSE Manager.curl -k https://SUSE_MANAGER_IP:PORT/pub/RHN-ORG-TRUSTED-SSL-CERT > PEM_NAME.pem
Copy the
.pemfile to the proper location on the Cloud Lifecycle Manager.cd /etc/pki/trust/anchors sudo cp ~/PEM_NAME.pem .
Install the certificate.
sudo update-ca-certificates
Add SUSE Manager host IP address if SUSE Manager.test.domain is not reachable by DNS.
sudo vi /etc/hosts
Add SUSE Manager host IP address SUSE Manager.test.domain. For example:
10.10.10.10 SUSE Manager.test.domain
Use the following steps to import an HPE OneView certificate.
Retrieve the
sessionID.curl -k -H "X-Api-Version:500" -H "Content-Type: application/json" \ -d '{"userName":ONEVIEW_USER, "password":ONEVIEW_PASSWORD, \ "loginMsgAck":"true"}' https://ONEVIEW_MANAGER_URL:PORT/rest/login-sessionsThe response will be similar to:
{"partnerData":{},"sessionID":"LTYxNjA1O1NjkxMHcI1b2ypaGPscErUOHrl7At3-odHPmR"}Retrieve a Certificate Signing Request (CSR) using the sessionID from Step 1.
curl -k -i -H "X-Api-Version:500" -H sessionID \
ONEVIEW_MANAGER_URL/rest/certificates/ca \
> CA_NAME.csr
Follow instructions in the HPE OneView User Guide to validate the CSR and obtain a signed certificate (CA_NAME
.crt).Copy the
.crtfile to the proper location on the Cloud Lifecycle Manager.cd /etc/pki/trust/anchors sudo cp ~/data/CA_NAME.crt .
Install the certificate.
sudo update-ca-certificates
Follow instructions in your HPE OneView User Guide to import the CA_NAME.crt certificate into HPE OneView.
Add HPE OneView host IP address if HPE OneView.test.domain is not reachable by DNS.
sudo vi /etc/hosts
Add HPE OneView host IP address HPE OneView.test.domain For example:
10.84.84.84 HPE OneView.test.domain
21.5 Running the Install UI #
The Install UI must run continuously without stopping for authentication at any step. When using the Install UI it is required to launch the Cloud Lifecycle Manager with the following command:
ARDANA_INIT_AUTO=1 /usr/bin/ardana-init
Deploying the cloud to your servers will reconfigure networking and firewall
rules on your cloud servers. To avoid problems with these networking changes
when using the Install UI, we recommend you run a browser directly on your
Cloud Lifecycle Manager node and point it to http://localhost:9085.
If you cannot run a browser on the Cloud Lifecycle Manager node to perform the install, you can run a browser from a Linux-based computer in your MANAGEMENT network. However, firewall rules applied during cloud deployment will block access to the Install UI. To avoid blocking the connection, you can use the Install UI via an SSH tunnel to the Cloud Lifecycle Manager server. This will allow SSH connections through the MANAGEMENT network when you reach the "Review Configuration Files" step of the install process.
To open an SSH tunnel from your Linux-based computer in your MANAGEMENT network to the Cloud Lifecycle Manager:
Open a new terminal and enter the following command:
ssh -N -L 8080:localhost:9085 ardana@MANAGEMENT IP address of Cloud Lifecycle Manager
The user name and password should be what was set in Section 15.5.2, “Installing the SUSE OpenStack Cloud Extension”. There will be no prompt after you have logged in.
Leave this terminal session open to keep the SSH tunnel open and running. This SSH tunnel will forward connections from your Linux-based computer directly to the Cloud Lifecycle Manager, bypassing firewall restrictions.
On your local computer (the one you are tunneling from), point your browser to
http://localhost:8080.If the connection is interrupted, refresh your browser.
If you use an SSH tunnel to connect to the Install UI, there is an
important note in the "Review Configuration Files" step about modifying
firewall_rules.yml to allow SSH connections on the
MANAGEMENT network.
Overview#
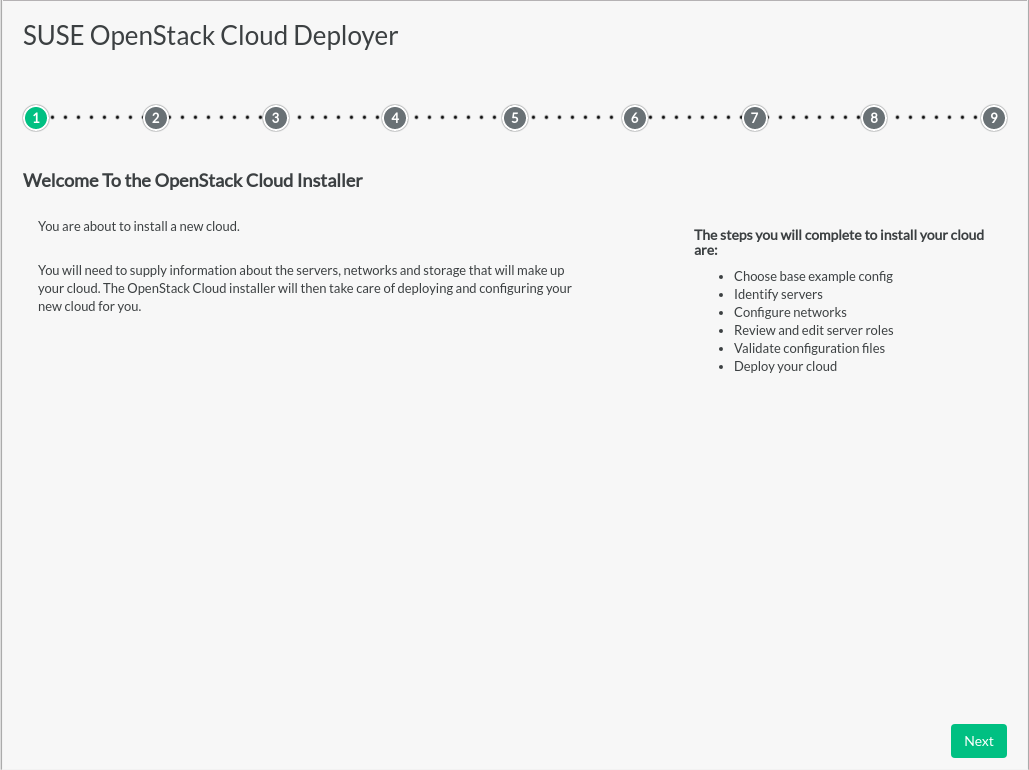
The first page of the Install UI shows the general installation process and a reminder to gather some information before beginning. Clicking the button brings up the page.
Choose an OpenStack Cloud Model#
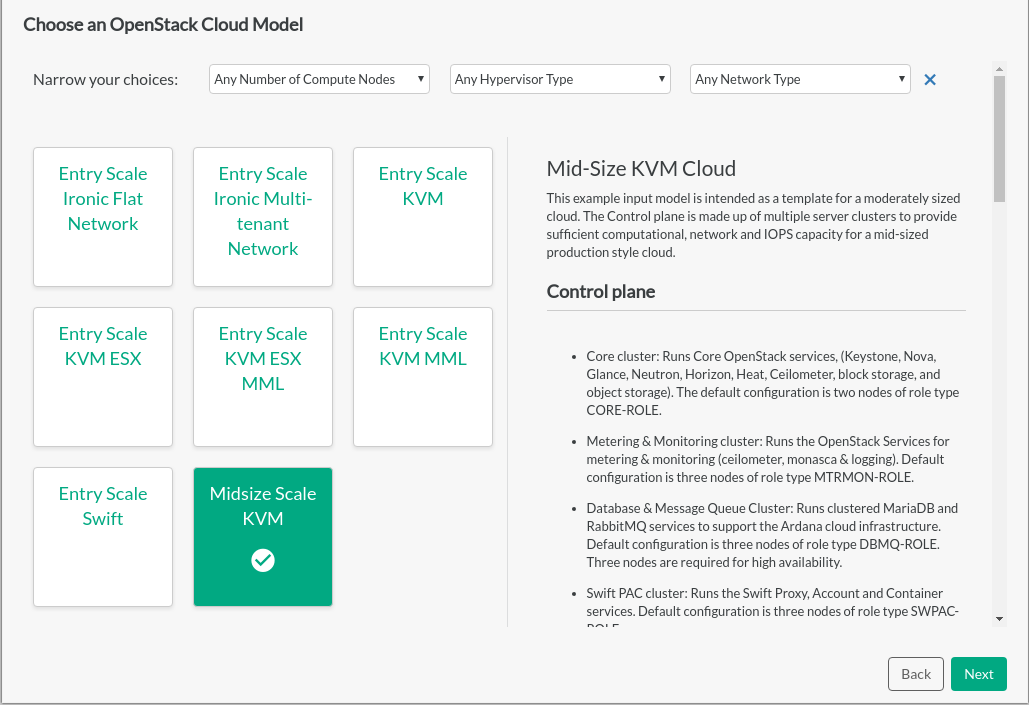
The input model choices are displayed on this page. Details of each model can be seen on the right by clicking the model name on the left. If you have already decided some aspects of your cloud environment, models can be filtered using the dropdown selections. Narrowing a parameter affects the range of choices of models and changes other dropdown choices to only those that are compatible.
Selecting a model will determine the base template from which the cloud will be deployed. Models can be adjusted later in the process, though selecting the closest match to your requirements reduces the effort required to deploy your cloud.
If you select any ESX model, extra manual steps are required to avoid configuration failures. While installing an ESX model with the Install UI, you will be asked for interfaces related to ESX and OVSvApp. Those interfaces must be defined before being entered in the Install UI. Instructions are available at Section 27.3, “Overview of ESXi and OVSvApp”.
Installing a Stand-alone Deployer
If you are using the Install UI to install a stand-alone deployer, select that model, which was created previously in Chapter 20, Preparing for Stand-Alone Deployment.
Continue with the remaining Install UI steps to finish installing the stand-alone deployer.
Cloud Model to Deploy#
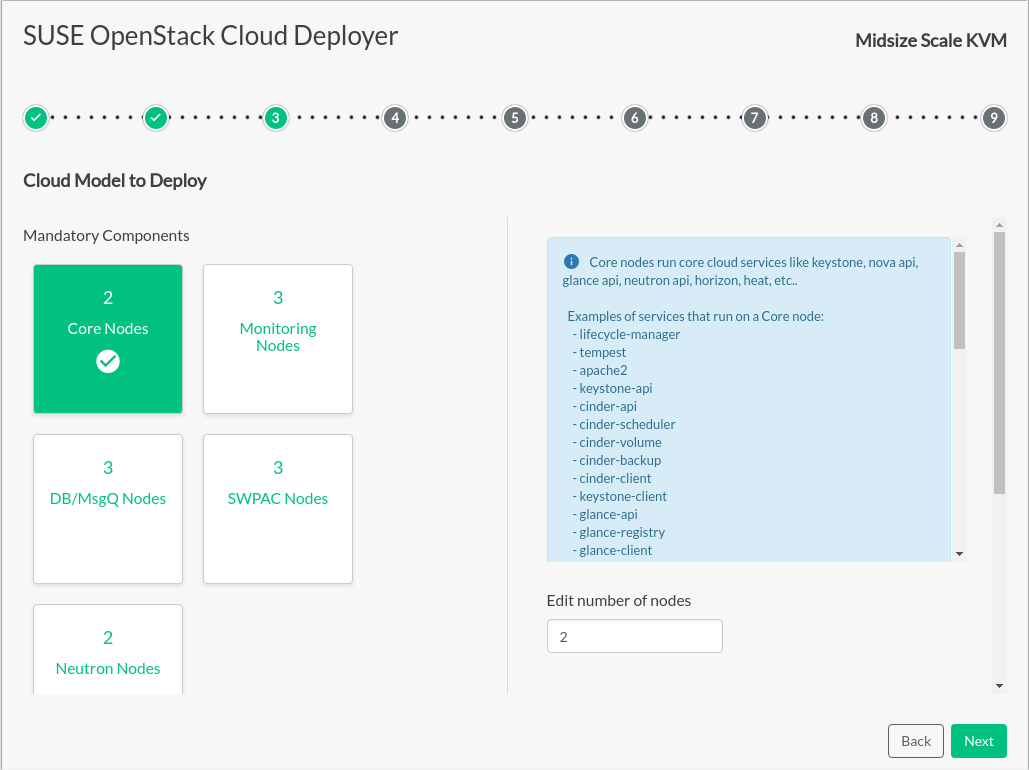
Based on the cloud example selected on the previous page, more detail is shown about that cloud configuration and the components that will be deployed. If you go back and select a different model, the deployment process restarts from the beginning. Any configuration changes you have made will be deleted.
Mandatory components have assigned quantities. We strongly suggest not changing those quantities to avoid potential problems later in the installation process.
Additional components can be adjusted within the parameters shown.
The number of nodes (servers) dedicated to each server role can be adjusted. Most input models are designed to support High Availability and to distribute OpenStack services appropriately.
Adding Servers and Assigning Server Roles#
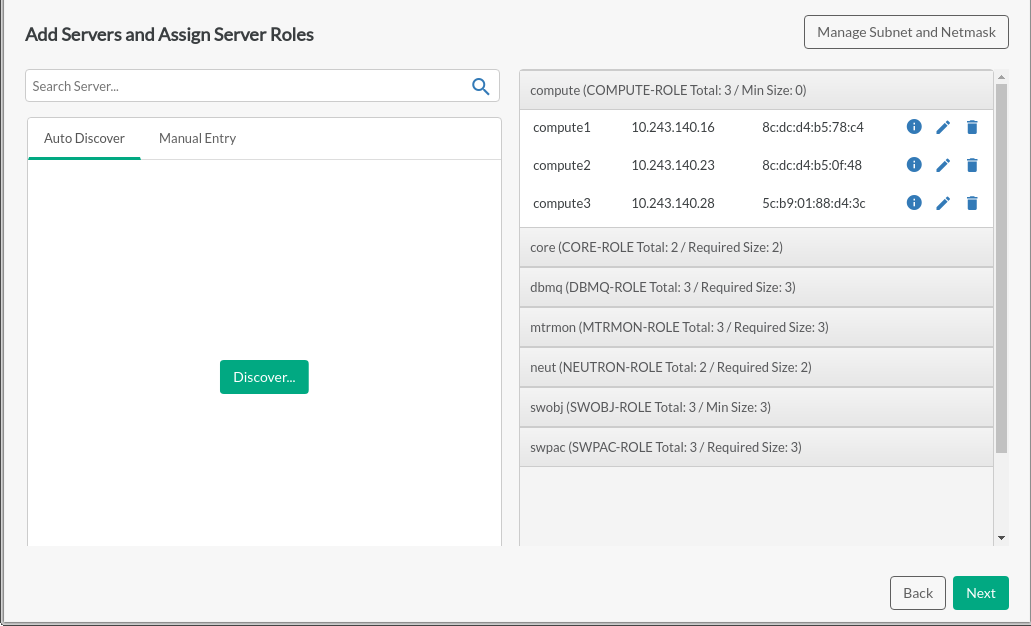
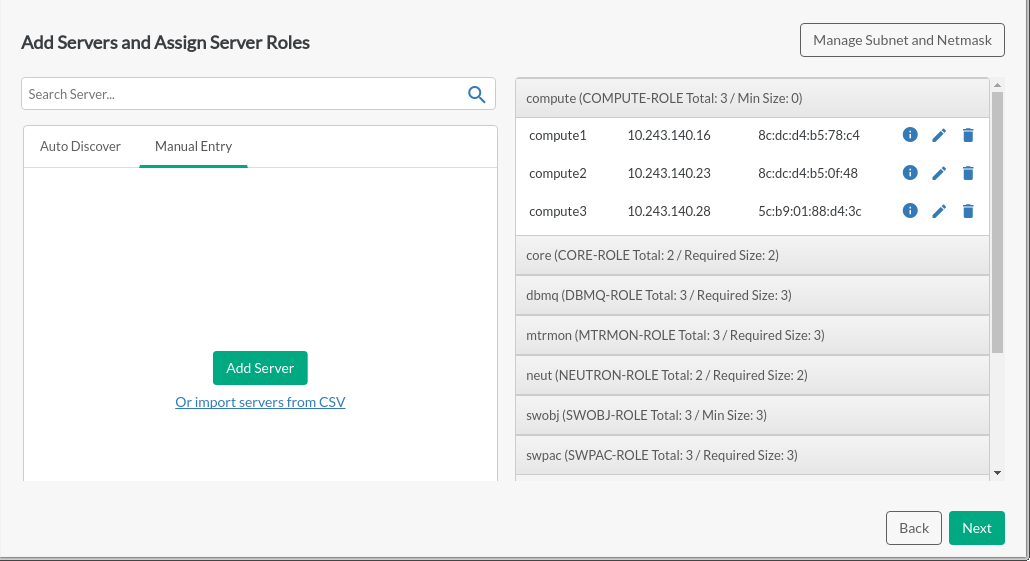
This page provides more detail about the number and assignment of each type of node based on the information from the previous page (any changes must be made there).
Components that do not meet the required parameters will be shown in red in the accordion bar. Missing required fields and duplicate server names will also be red, as will the accordion bar. The button will be disabled.
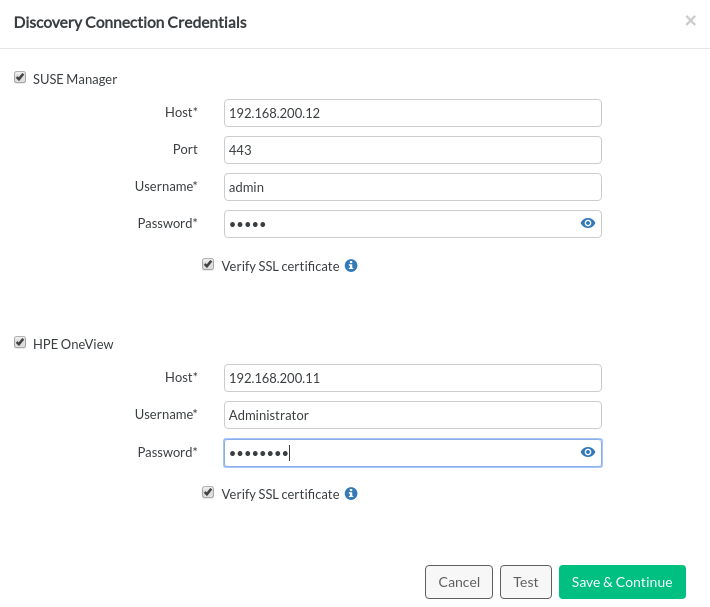
Servers may be discovered using SUSE Manager, HPE OneView, or both. Ensure that the certificates are accessible, as described in Section 21.4, “Optional: Importing Certificates for SUSE Manager and HPE OneView”. Clicking the button will prompt for access credentials to the system management software to be used for discovery. Certificates can be verified by checking . After validating credentials, Discovery will retrieve a list of known servers from SUSE Manager and/or HPE OneView and allow access to server details on those management platforms.
You can drag and drop to move servers from the left to the right in order to assign server roles, from right to left, or up and down in the accordion bar.
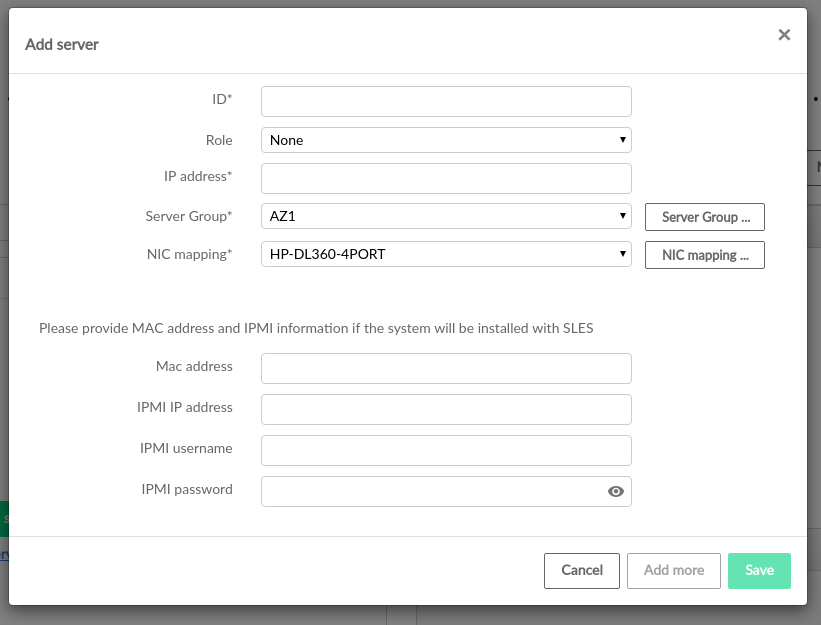
Server information may also be entered manually or imported via CSV in the tab. The format for CSV entry is described in Section 21.3, “Optional: Creating a CSV File to Import Server Data”. The server assignment list includes placeholder server details that can be edited to reflect real hardware, or can be removed and replaced with discovered or manually added systems.
For more information about server roles, see Section 5.2.4, “Server Roles”.
Subnet and netmask values should be set on this page as they may impact the IP addresses being assigned to various servers.
Choose servers on which SLES will be installed#
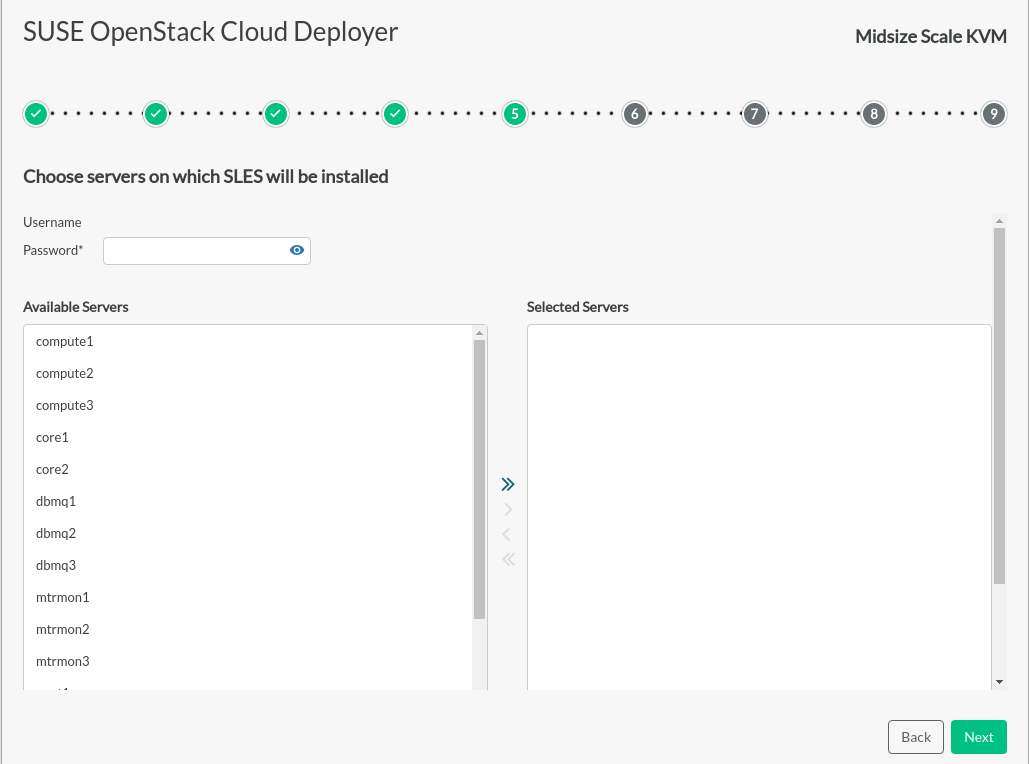
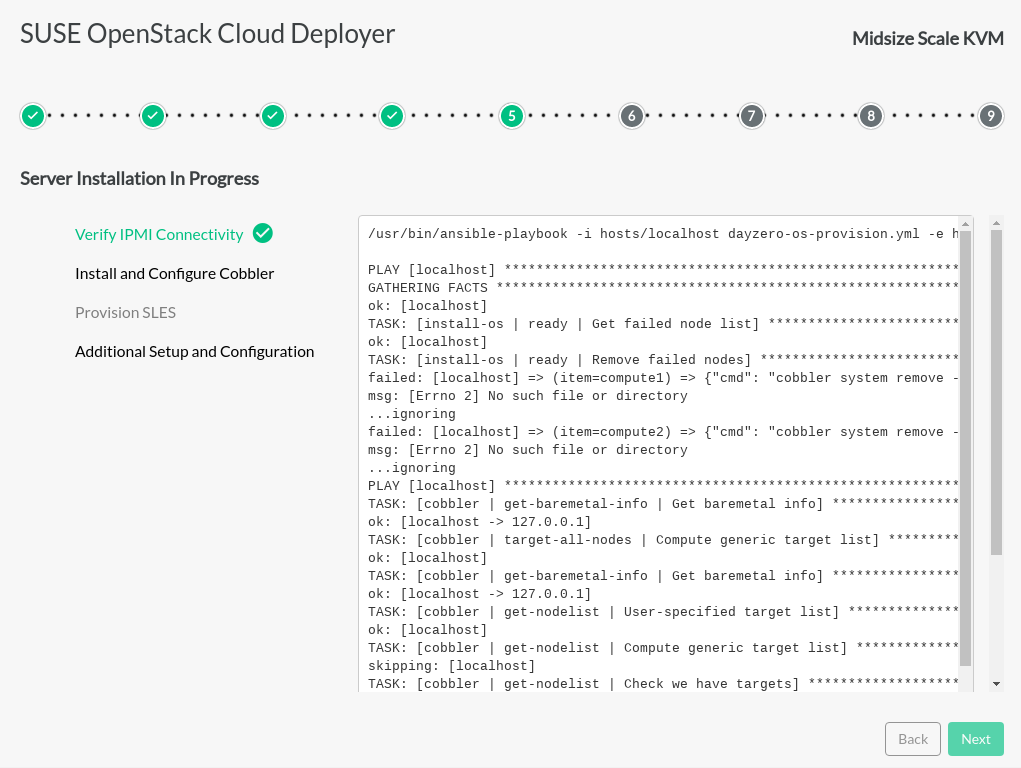
If an OS has not previously been installed on the servers that make up the cloud configuration, the OS installation page allows for Cobbler to deploy SLES on servers in the cloud configuration. Enter password, select servers and click to deploy SLES to these servers. An installation log and progress indicators will be displayed.
Server and Role Summary#
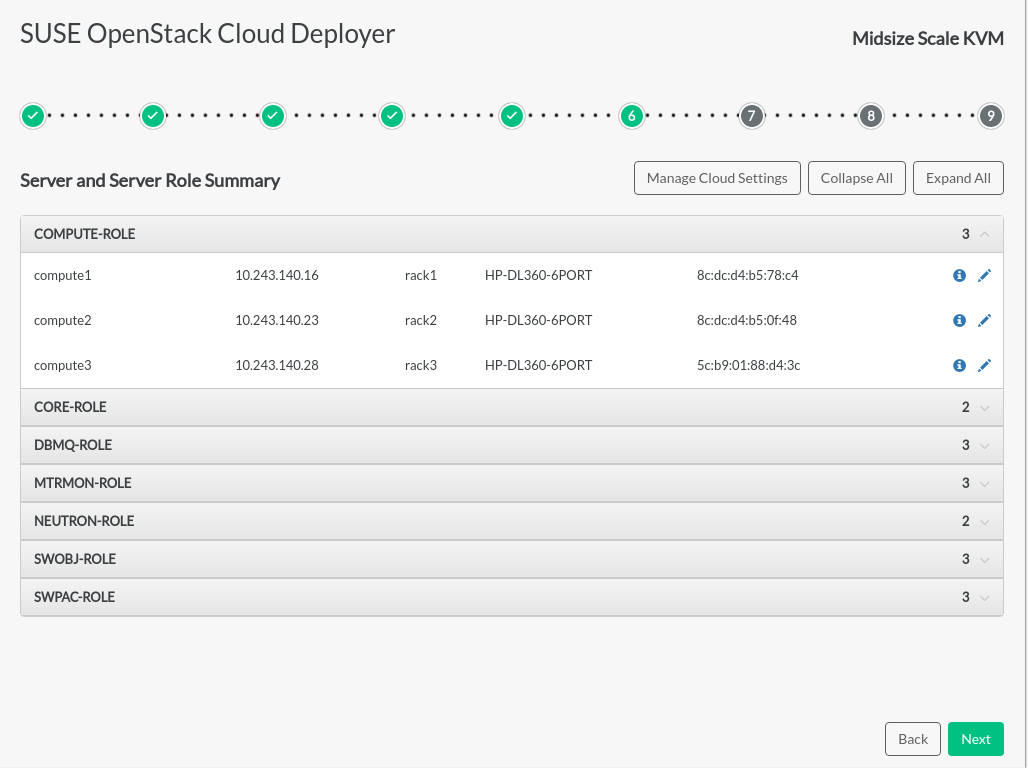
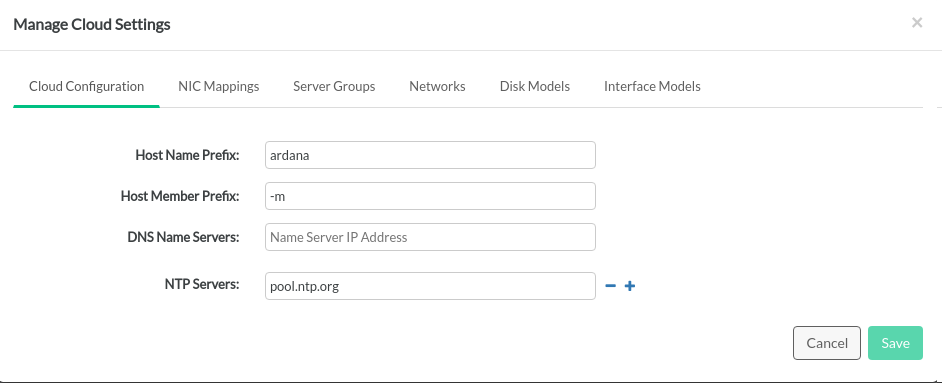
When the OS installation is complete, a Server and Server Role Summary page is displayed. It shows which servers have been assigned to each role, and provides an opportunity to edit the server configurations. Various cloud components can be configured by clicking on the button. Incorrect information will be shown in red.
Below is the list of what can be changed within the Install UI, followed by a list of customizations that can only be changed by directly editing the files on the page. Anything changed directly in the files themselves during the Install UI process will be overwritten by values you have entered with the Install UI.
Changes to the following items can be made:
servers (including SLES installation configuration)
networks
disk models
interface models
NIC mappings
NTP servers
name servers
tags in network groups
Changes to the following items can only be made by manually editing the
associated .yml files on the page of the Install UI:
server groups
server roles
network groups
firewall rules
DNS, SMTP, firewall settings (
cloudConfig.yml)control planes
Directly changing files may cause the configuration to fail validation. During the process of installing with the Install UI, any changes should be made with the tools provided within the Install UI.
Review Configuration Files#
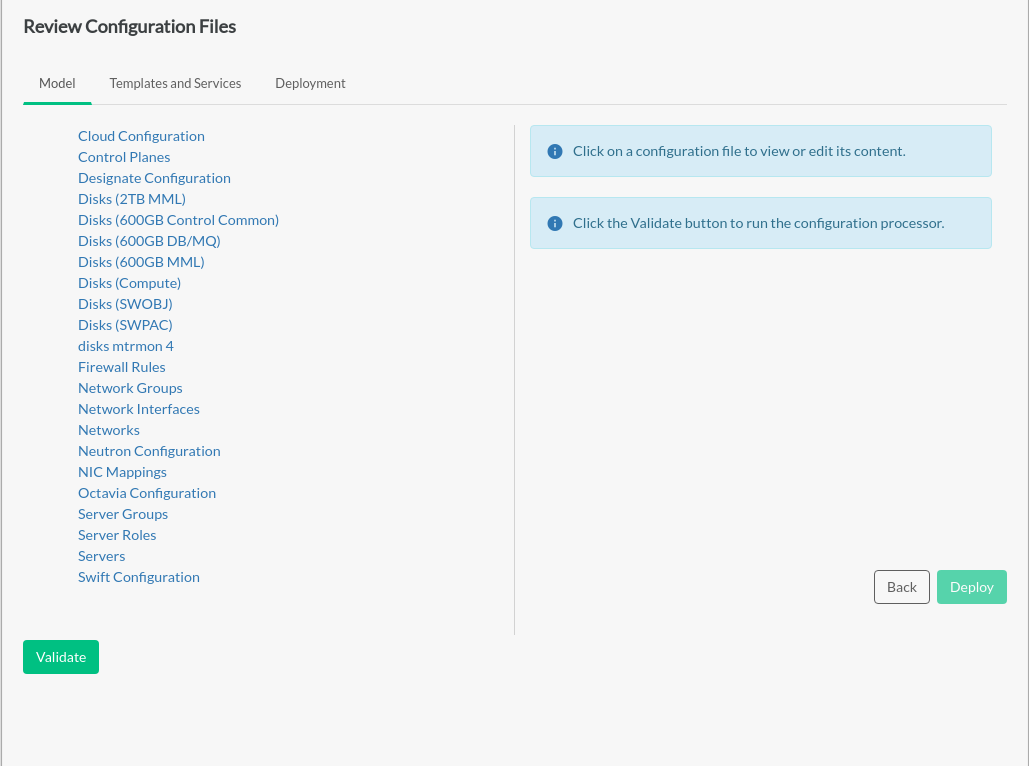
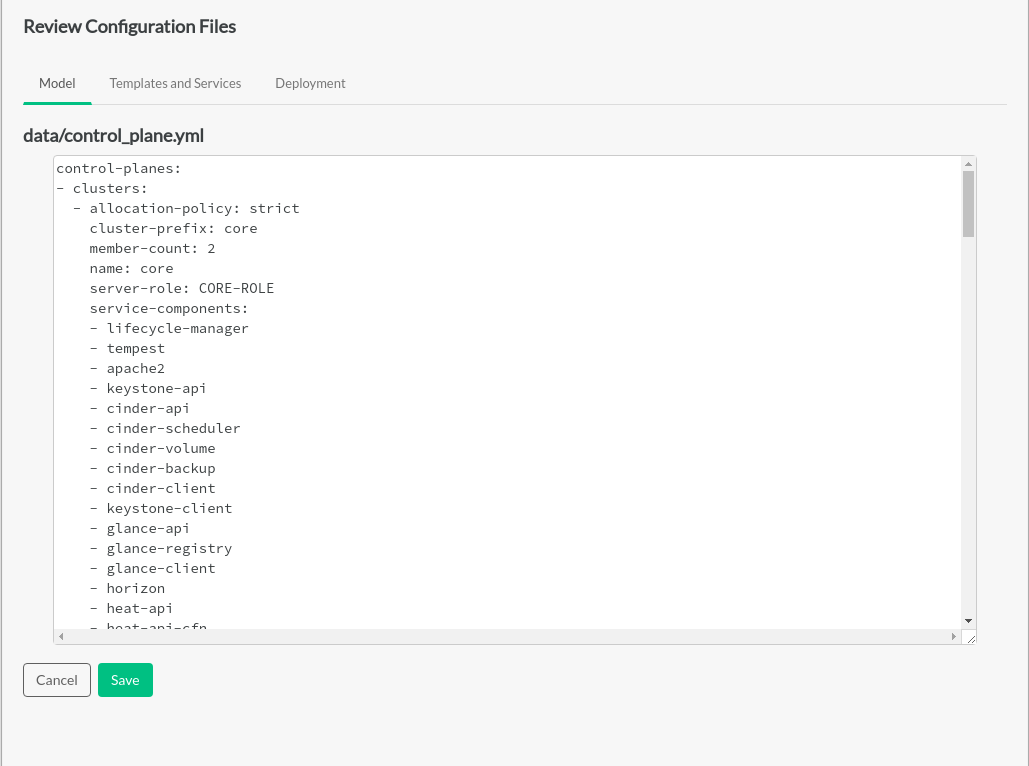
Advanced editing of the cloud configuration can be done on the
Review Configuration Files page. Individual
.yml and .j2 files can be edited
directly with the embedded editor in the and
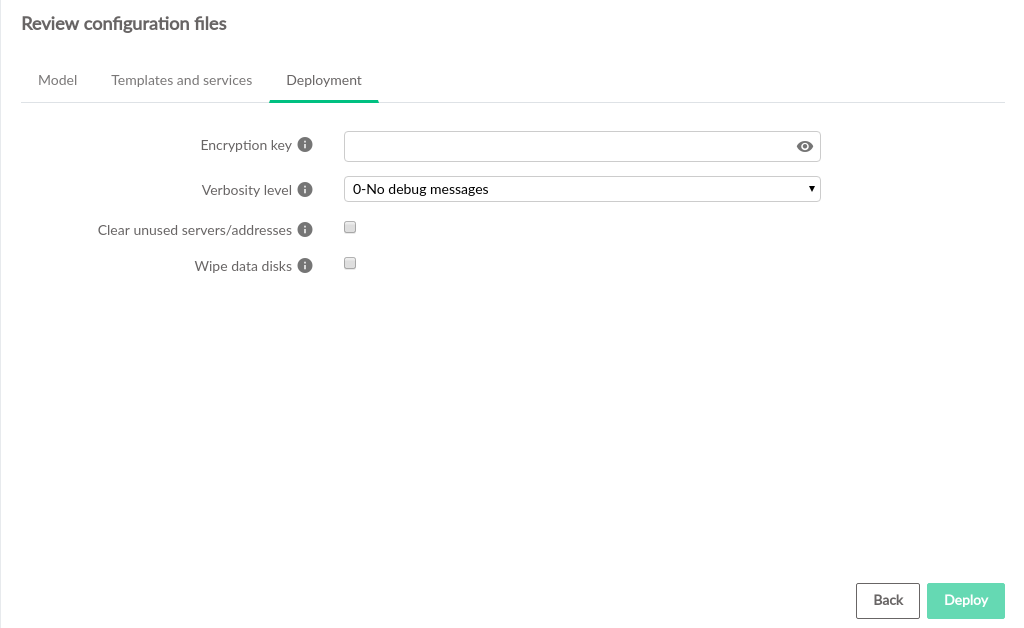
tabs. The
tab contains the items , and .
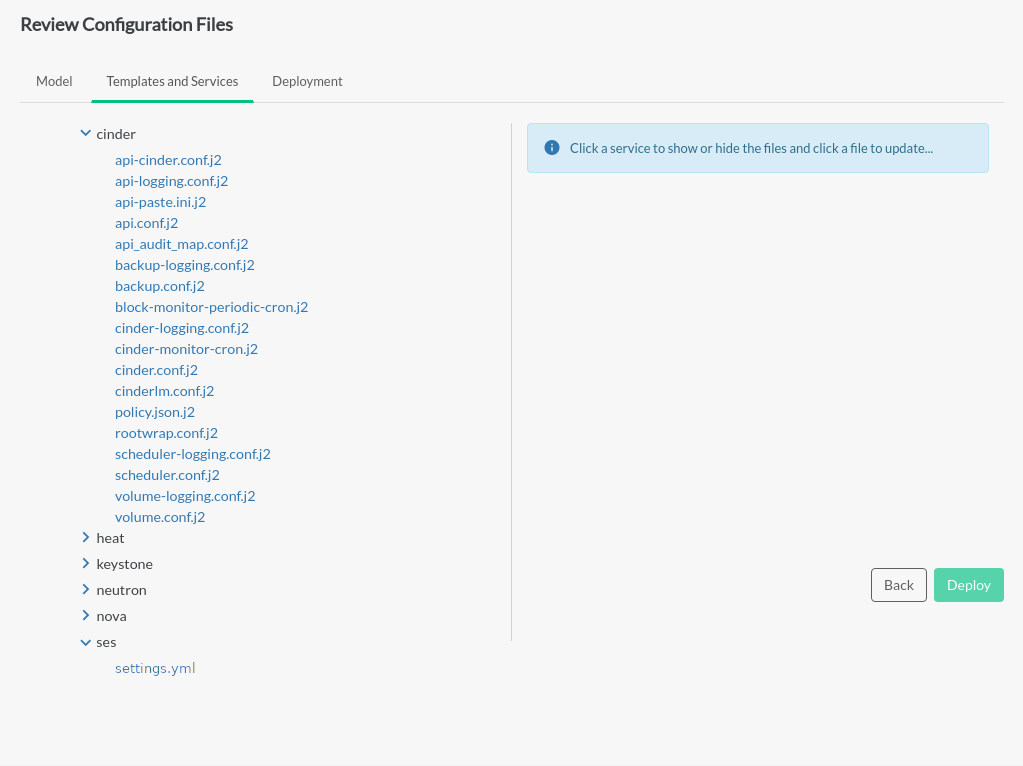
This page also provides the ability to set up SUSE Enterprise Storage Integration during initial deployment.
If you are using an SSH tunnel to connect to the Install UI, you will need to make an extra modification here to allow SSH connections through the firewall:
While on the Review Configuration Files page, click on the tab.
Click .
Uncomment the
SSHsection (remove the#at the beginning of the line for the- name: SSHsection).If you do not have such a
- name: SSHsection, manually add the following under thefirewall-rules:section:name: SSH network-groups: - MANAGEMENT rules: - type: allow remote-ip-prefix: 0.0.0.0/0 port-range-min: 22 port-range-max: 22 protocol: tcp
Configure SUSE Enterprise Storage During Initial Deployment
A link to the settings.yml file is available under the
ses selection on the tab.
To set up SUSE Enterprise Storage Integration:
Click on the link to edit the
settings.ymlfile.Uncomment the
ses_config_pathparameter, specify the location on the deployer host containing theses_config.ymlfile, and save thesettings.ymlfile.If the
ses_config.ymlfile does not yet exist in that location on the deployer host, a new link will appear for uploading a file from your local workstation.When
ses_config.ymlis present on the deployer host, it will appear in thesessection of the tab and can be edited directly there.
Manual edits to your configuration files outside of the Install UI may not be reflected in the Install UI. If you make changes to any files directly, refresh the browser to make sure changes are seen by the Install UI.
Before performing the deployment, the configuration must be validated by clicking the button below the list of configuration files on the tab. This ensures the configuration will be successful before the actual configuration process runs and possibly fails. The button also commits any changes. If there are issues with the validation, the configuration processor will provide detailed information about the causes. When validation completes successfully, a message will be displayed that the model is valid. If either validation or commit fail, the button is disabled.
Clicking the button starts the actual deployment process.
Cloud Deployment in Progress#
General progress steps are shown on the left. Detailed activity is shown on the right.
To start the deployment process, the Install UI runs scripts and playbooks based on the actual final configuration. Completed operations are green, black means in process, gray items are not started yet.
The log stream on the right shows finished states. If there are any failures, the log stream will show the errors and the button will be disabled. The and buttons are disabled during the deployment process.
The log files in ~/ardana/.ansible/ansible.log and
/var/cache/ardana_installer/ have debugging
information.
/var/cache/ardana_installer/log/ardana-service/ardana-service.logis created and used during the deployment step.Each of the time-stamped files in
/var/cache/ardana_installer/log/ardana-service/logs/*.logshows the output of a single Ansible playbook run invoked during the UI installation process and the log output for each of those runs.The
~/ardana/.ansible/ansible.logfile is the output of all Ansible playbook runs. This includes the logs from/var/cache/ardana_installer/log/ardana-service/logs/*.log.
When the deployment process is complete, all items on the left will be green. Some deployments will not include all steps shown if they do not apply to the selected input model. In such a situation, those unneeded steps will remain gray.
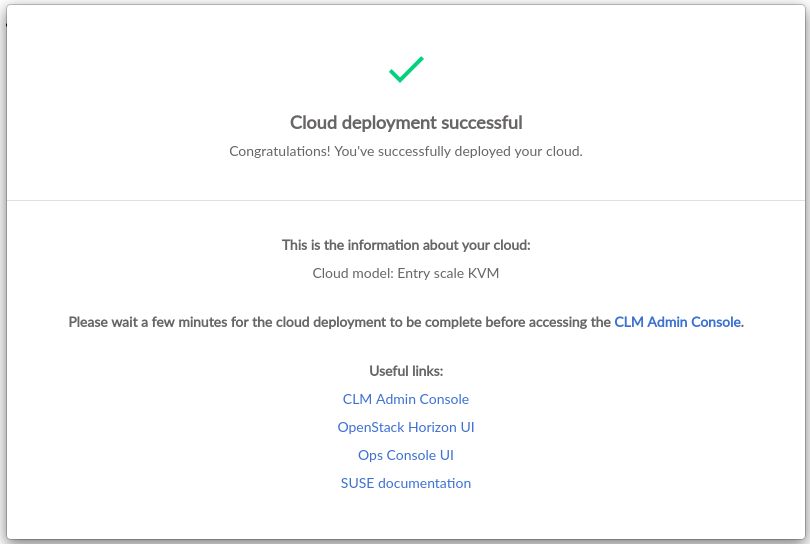
The button will be enabled when deployment is successful.
Clicking will display the Cloud Deployment
Successful page with information about the deployment, including
the chosen input model and links to cloud management tools.
After installation is complete, shutdown the Install UI by logging into the Cloud Lifecycle Manager and running the following commands:
cd ~/openstack/ardana/ansible
ansible-playbook -i hosts/localhost installui-stop.yml
After deployment, continue to Chapter 38, Post Installation Tasks and Chapter 44, Other Common Post-Installation Tasks.
To understand cloud configuration more thoroughly and to learn how to make changes later, see:

