
Proxy Migration from 4.3 to 5.1
1. Requirements and considerations
To migrate a SUSE Manager 4.3 Proxy to SUSE Multi-Linux Manager 5.1, you require a new machine with SL Micro 6.1 or SUSE Linux Enterprise Server 15 SP7 and mgrpxy installed.
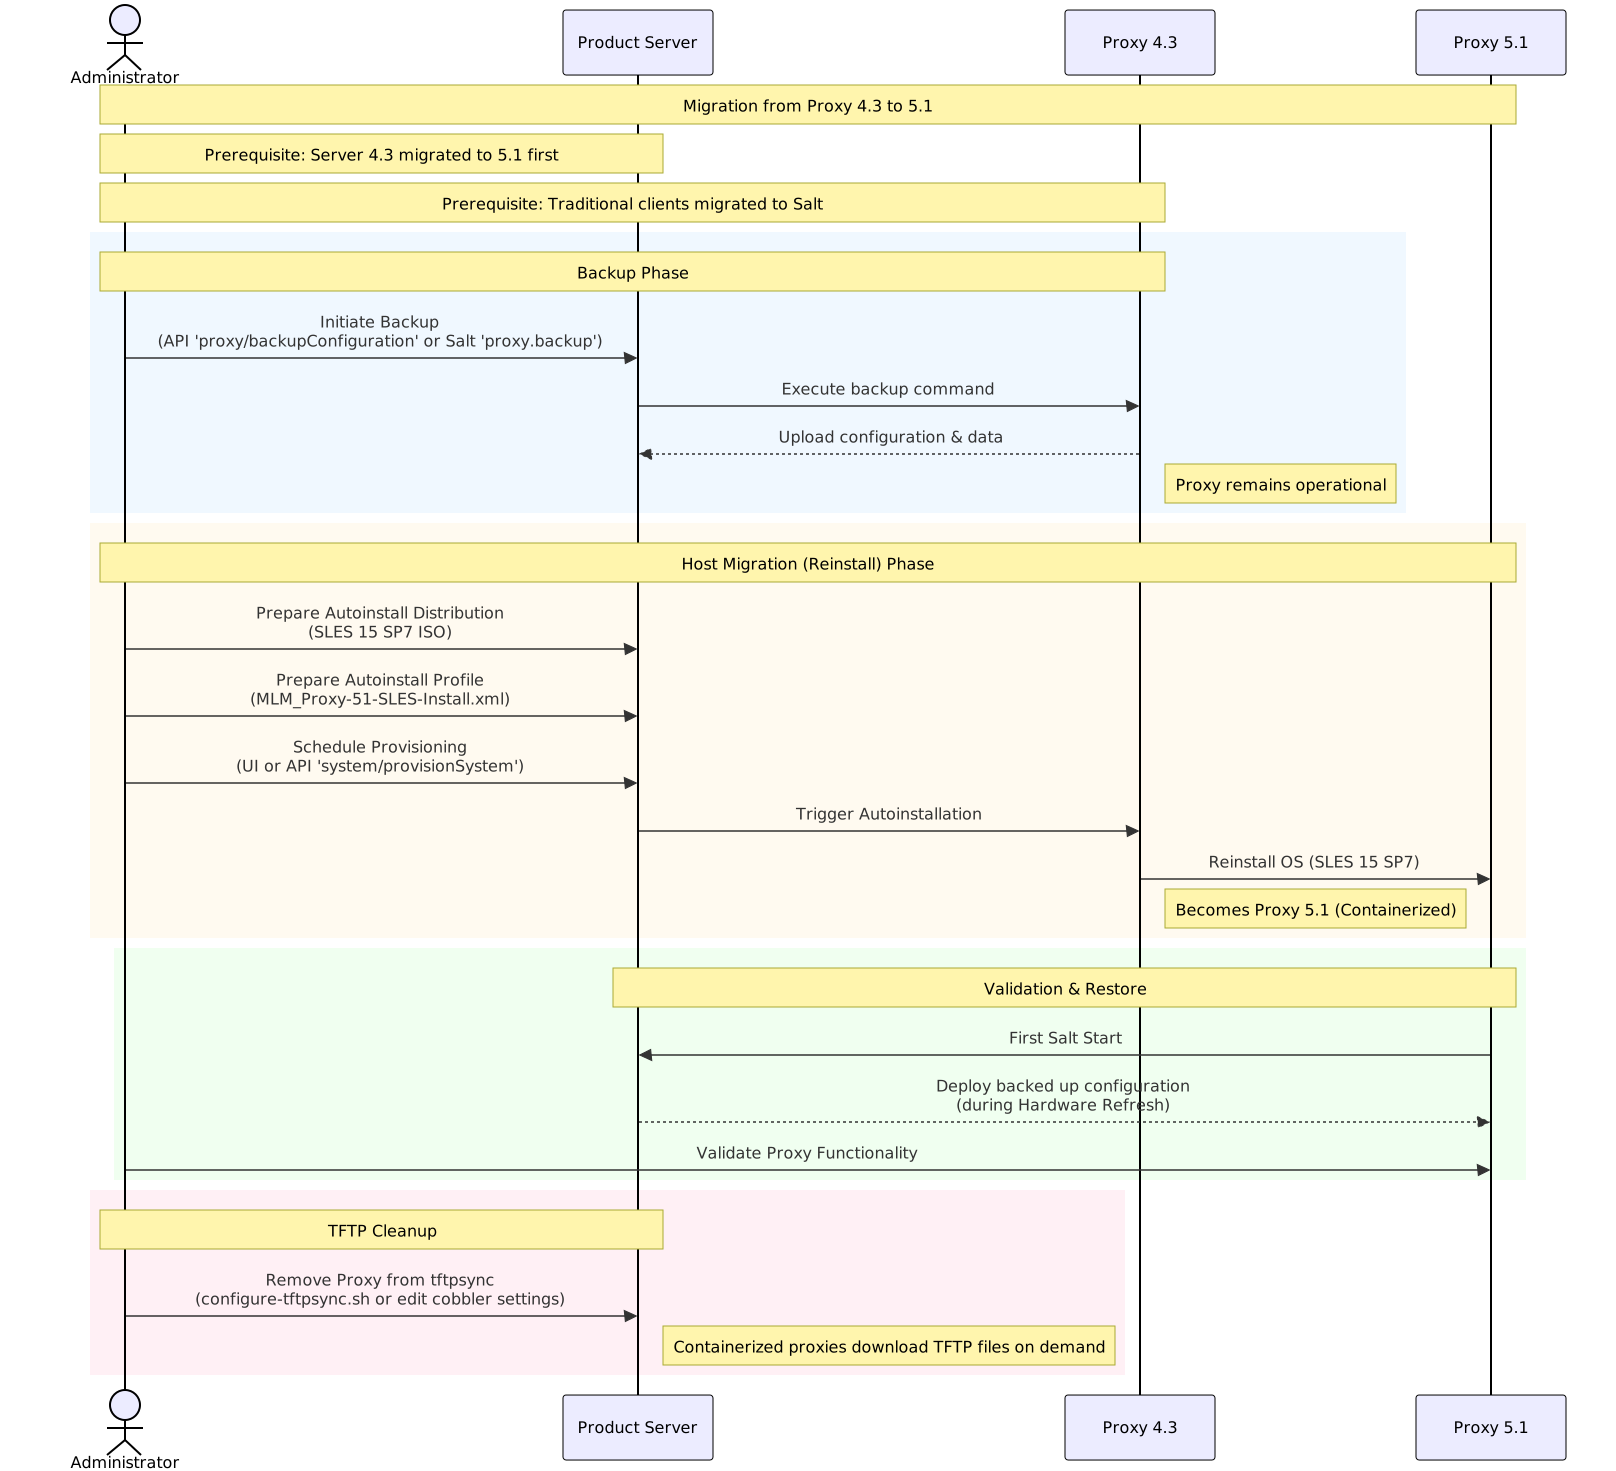
An in-place migration from SUSE Manager 4.3 to 5.1 requires host operating system reinstallation, regardless of whether the chosen host operating system is SL Micro 6.1 or SUSE Linux Enterprise Server 15 SP7.
Before migrating from SUSE Manager 4.3 to 5.1, any existing traditional clients including the traditional proxies must be migrated to Salt. For more information about migrating traditional SUSE Multi-Linux Manager 4.3 clients to Salt clients, see https://documentation.suse.com/suma/4.3/en/suse-manager/client-configuration/contact-methods-migrate-traditional.html.
Traditional contact protocol is no longer supported in SUSE Multi-Linux Manager 5.0 and later.
Before migrating a SUSE Manager 4.3 Proxy to SUSE Multi-Linux Manager 5.1, the SUSE Manager 4.3 Server needs to be migrated first, see SUSE Multi-Linux Manager Server Migration to a Containerized Environment.
2. Introduction
In SUSE Multi-Linux Manager 5.1, the proxy can be deployed using two different methods:
-
containerized running on Podman
-
containerized running on k3s
In SUSE Multi-Linux Manager 5.1, RPM based support was removed, and only the containerized version running with podman or k3s is supported.
The management of the containerized proxy running with Podman is done using the mgrpxy tool.
3. Backup existing SUSE Multi-Linux Manager Proxy data
SUSE Multi-Linux Manager for Retail 5.1.2 includes automated backup-migration procedure for both kinds of SUSE Multi-Linux Manager Proxy variants. This procedure collects all required data and uploads them to the SUSE Multi-Linux Manager Server. For SUSE Multi-Linux Manager Retail Branch Server this tool also creates and migrates Saltboot related entities, see Migrating from SUSE Multi-Linux Manager Retail Branch Server 4.3.
There are multiple ways how to initiate SUSE Multi-Linux Manager Proxy 4.3 migration:
-
API call
Replace
$proxyidby a server id of the branch proxy, or multiple server ids separated by a comma.mgrctl api login mgrctl api post proxy/backupConfiguration '{\"sids\":[$proxyid]}' -
Salt call
Replace
$proxyin command below by branch proxy minion id or-L proxyminionid1,proxyminionid2,…when addressing multiple branch proxies.salt $proxy proxy.backup
|
It is recommended to do a manual backup of the proxy as well, particularly if there are custom modifications present. |
|
SUSE Multi-Linux Manager Proxy remain operational after backup step as before, however migrate the server host as soon as possible after backup step is performed to prevent potential inconsistencies. |
4. Deploy a new SUSE Multi-Linux Manager Proxy
SUSE Multi-Linux Manager Proxy host operating system can be either SUSE Linux Enterprise Server 15 SP7 or SL Micro 6.1. This guide however considers only SUSE Linux Enterprise Server 15 SP7 for AutoYAST based installation. SL Micro 6.1 will require manual redeployment, see SUSE Multi-Linux Manager 5.1 Proxy Deployment
4.1. Prepare autoinstallation distribution based on SUSE Linux Enterprise Server 15 SP7
-
Download or obtain SUSE Linux Enterprise Server 15 SP7 installation ISO to the server host
-
Use
mgradm distribution copy $path_to_the_isoto copy installation files to the container -
Register the autoinstallation distribution, see Autoinstallable Distributions.
4.2. Prepare autoinstallation profile
For more information, see Autoinstallation Profiles.
-
Create an autoinstallation profile based previously created distribution. As a profile use profile provided at https://github.com/SUSE/manager-build-profiles/blob/master/AutoYaST/SUSE-Multi-Linux-Manager/SUSE%20Multi-Linux%20Manager%20Proxy/MLM_Proxy-51-SLES-Install.xml
-
Once profile is created, switch to
Variablestab and fill in required variables:org='organization_id' distrotree='autoinstallation_distribution_label_from_previous_step' channel_prefix='clm_channel_prefix' or blank for SCC channels registration_key='activation_key_for_post_upgrade'
-
In tab
Autoinstallation Fileyou can see complete rendered profile for additional inspection
4.3. Provision autoinstallation of the proxy
Schedule an autoinstallation on the old SUSE Multi-Linux Manager Proxy 4.3 using the profile created in previous step.
-
Use Web UI interface
Provisioningtab at theSystemview of migrating branch server -
Or use API call
system/provisionSystemto schedule the migration. For example execute following snippet from the SUSE Multi-Linux Manager host:mgrctl api login mgrctl api post system/provisionSystem '{\"sid\":$proxyid,\"profileName\":\"$profileName\"}'
5. Validate proxy functionality
After migration is finished and salt is started first time, backed up proxy configuration is automatically deployed during Hardware refresh step.
After finishing all onboarding steps, validate required proxy functionality
6. TFTP files synchronization
Containerized proxies do not use tftpsync mechanism to transfer tftproot files. Instead these files are transparently downloaded and cached on demand.
To prevent false positive errors during cobbler sync run, migrated 4.3 proxies need to be removed from tftpsync mechanism.
If you previously configured a 4.3 proxy to receive TFTP files, one of the following configuration option is required:
|
To get to a shell inside the container, run on the container host: mgrctl term |
In the SUSE Multi-Linux Manager 5.1 server container, run configure-tftpsync.sh with the list of remaining 4.3 proxies as arguments.
If no 4.3 proxies remain, run configure-tftpsync.sh with no arguments.
In the SUSE Multi-Linux Manager 5.1 server container, manually remove the relevant proxy from the proxies setting in the /etc/cobbler/settings.yaml file.
If there are no 4.3 proxies remaining, then manually remove the proxies list completely.