
4.3から5.1へのプロキシの移行
1. 要件と考慮事項
To migrate a SUSE Manager 4.3 Proxy to SUSE Multi-Linux Manager 5.1, you require a new machine with SL Micro 6.1 or SUSE Linux Enterprise Server 15 SP7 and mgrpxy installed.
選択したホストオペレーティングシステムがSL Micro 6.1またはSUSE Linux Enterprise Server 15 SP7のいずれであっても、SUSE Manager 4.3から5.1へのインプレース移行には、ホストオペレーティングシステムの再インストールが必要です。
SUSE Manager 4.3から5.1に移行する前に、従来のプロキシを含む既存の従来のクライアントをSaltに移行する必要があります。従来のSUSE Multi-Linux Manager 4.3クライアントからSaltクライアントへの移行の詳細については、https://documentation.suse.com/suma/4.3/en/suse-manager/client-configuration/contact-methods-migrate-traditional.htmlを参照してください。
従来の接続プロトコルは、SUSE Multi-Linux Manager 5.0以降ではサポートされなくなりました。
SUSE Manager 4.3プロキシをSUSE Multi-Linux Manager 5.1に移行する前に、まずSUSE Manager 4.3サーバを移行する必要があります。コンテナ化された環境へのSUSE Multi-Linux Managerサーバの移行を参照してください。
2. 概要
SUSE Multi-Linux Manager 5.1では、次の2つの方法を使用してプロキシを配備できます。
-
Podman上でコンテナ化して実行
-
k3s上でコンテナ化して実行
In SUSE Multi-Linux Manager 5.1, RPM based support was removed, and only the containerized version running with podman or k3s is supported. The management of the containerized proxy running with Podman is done using the mgrpxy tool.
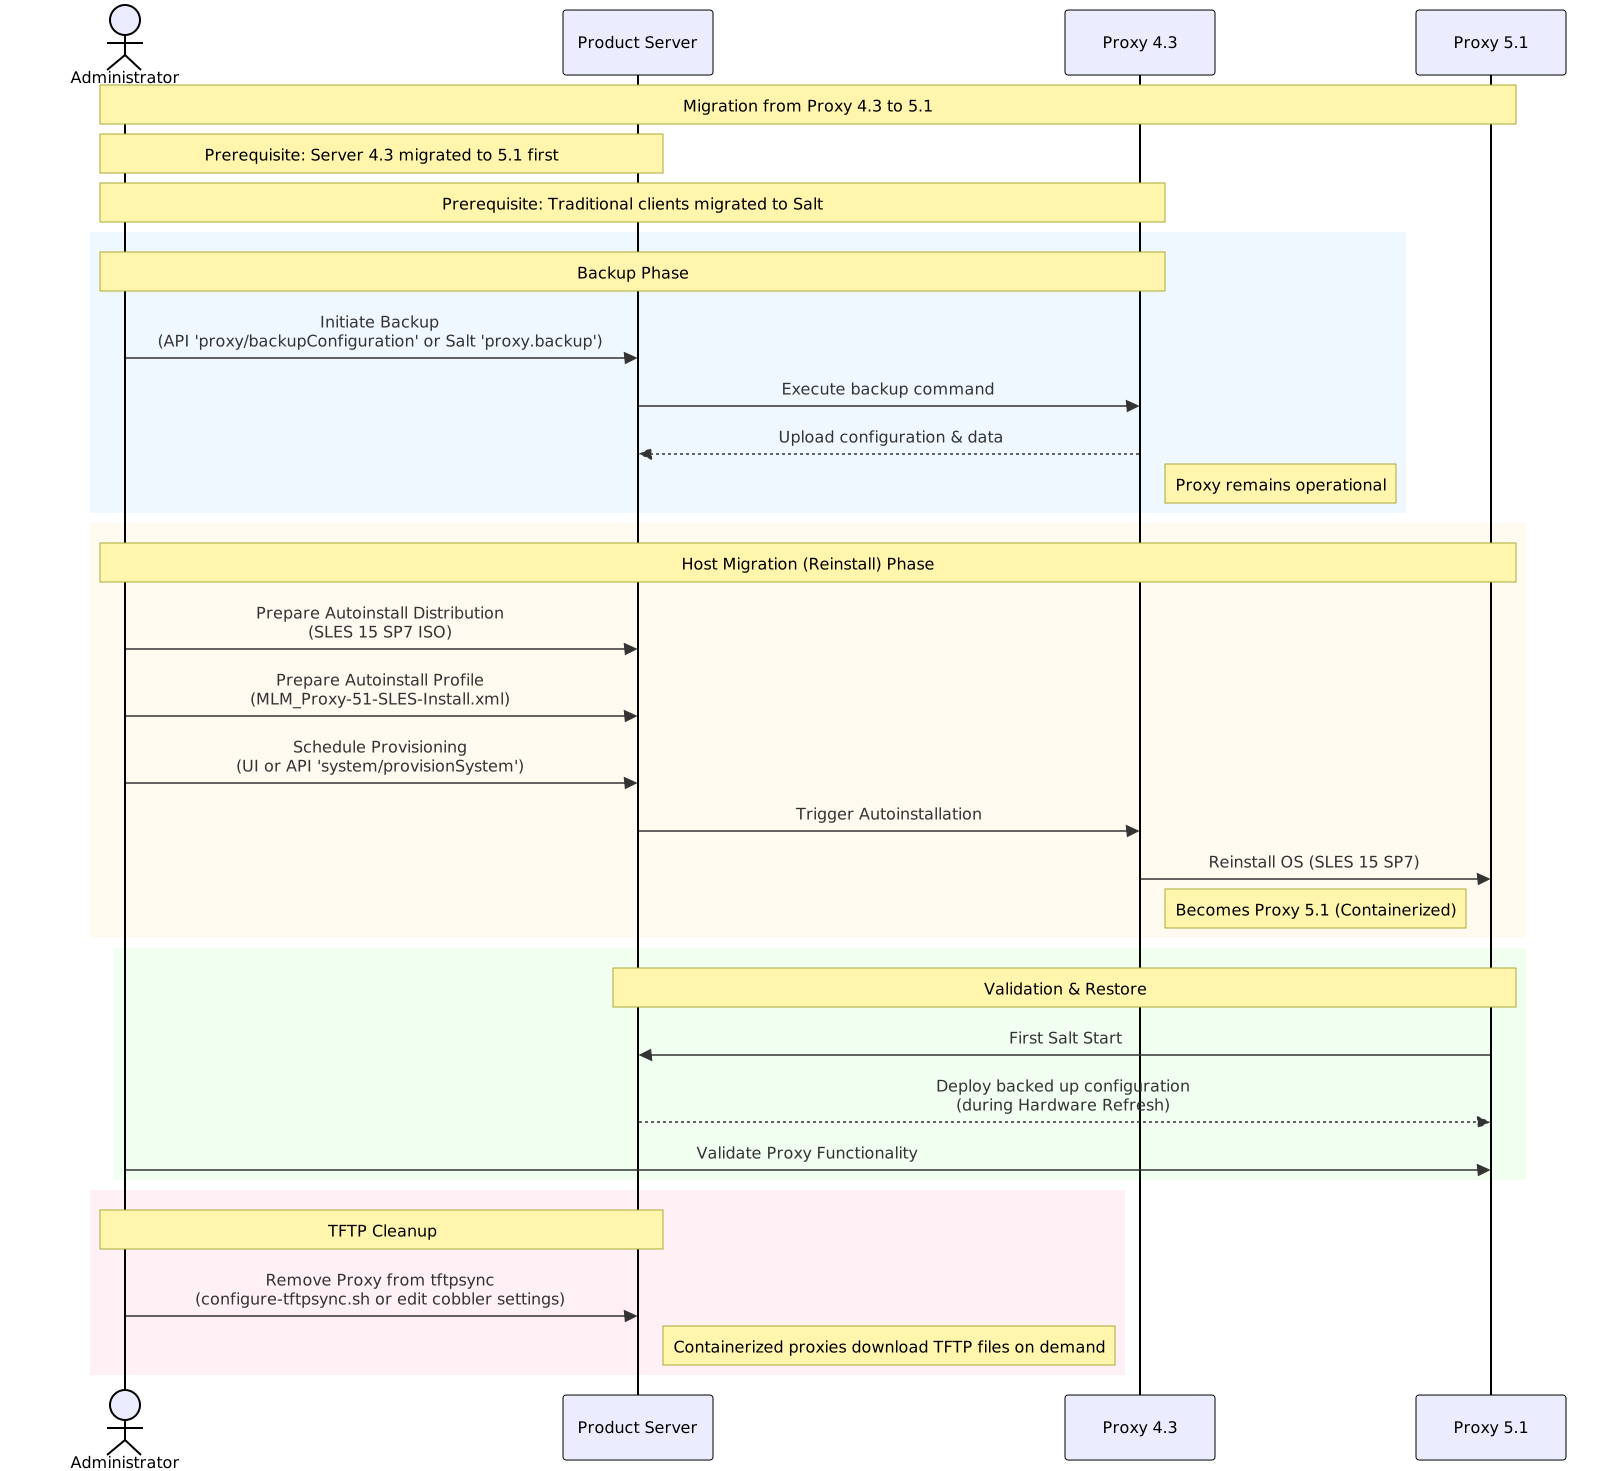
3. 既存のSUSE Multi-Linux Manager Proxyデータのバックアップ
SUSE Multi-Linux Manager for Retail 5.1.2には、両方の種類のSUSE Multi-Linux Manager Proxyバリアントに対応した自動バックアップ移行プロシージャが含まれています。このプロシージャでは、すべての必要なデータを収集し、SUSE Multi-Linux Managerサーバにアップロードします。 SUSE Multi-Linux Manager Retail Branch Serverの場合、このツールはSaltboot関連エンティティの作成と移行も行います。Migrating from SUSE Multi-Linux Manager Retail Branch Server 4.3を参照してください。
SUSE Multi-Linux Manager Proxy 4.3の移行を開始する方法は複数あります。
-
API呼び出し
Replace
$proxyidby a server id of the branch proxy, or multiple server ids separated by a comma.mgrctl api login mgrctl api post proxy/backupConfiguration '{\"sids\":[$proxyid]}' -
Salt呼び出し
Replace
$proxyin command below by branch proxy minion id or-L proxyminionid1,proxyminionid2,…when addressing multiple branch proxies.salt $proxy proxy.backup
|
特にカスタム変更がある場合は、プロキシの手動バックアップも実行することをお勧めします。 |
|
SUSE Multi-Linux Manager Proxyはバックアップステップ後も以前と同様に動作し続けますが、潜在的な不整合を防ぐために、バックアップステップの実行後できるだけ早くサーバホストを移行してください。 |
4. 新しいSUSE Multi-Linux Manager Proxyの配備
You can either upgrade the existing host to SUSE Linux Enterprise Server 15 SP7 using AutoYaST, or perform a fresh installation of SL Micro 6.1.
4.1. Upgrade to SUSE Linux Enterprise Server 15 SP7 using AutoYaST
Create and use AutoYAST profiles to migrate or reinstall the proxy host.
4.1.1. SUSE Linux Enterprise Server 15 SP7に基づく自動インストールディストリビューションの準備
-
SUSE Linux Enterprise Server 15 SP7インストールISOをサーバホストにダウンロードまたは取得します。
-
Use
mgradm distribution copy $path_to_the_isoto copy installation files to the container -
自動インストールディストリビューションを登録します。自動インストールのディストリビューションを参照してください。
4.1.2. 自動インストールプロファイルの準備
詳細については、自動インストールプロファイルを参照してください。
以前に作成したディストリビューションに基づいて自動インストールプロファイルを作成します。 プロファイルには、https://github.com/SUSE/manager-build-profiles/blob/master/AutoYaST/SUSE-Multi-Linux-Manager/SUSE%20Multi-Linux%20Manager%20Proxy/MLM_Proxy-51-SLES-Install.xmlで提供されているプロファイルを使用します。
- Once profile is created, switch to Variables tab and fill in required variables:
+
org='organization_id'
distrotree='autoinstallation_distribution_label_from_previous_step'
channel_prefix='clm_channel_prefix' or blank for SCC channels
registration_key='activation_key_for_post_upgrade'
-
In tab
Autoinstallation Fileyou can see complete rendered profile for additional inspection
4.1.3. プロキシの自動インストールのプロビジョニング
以前のステップで作成したプロファイルを使用して、古いSUSE Multi-Linux Manager Proxy 4.3における自動インストールをスケジュールします。
-
Use Web UI interface
Provisioningtab at theSystemview of migrating branch server -
Or use API call
system/provisionSystemto schedule the migration. For example execute following snippet from the SUSE Multi-Linux Manager host:mgrctl api login mgrctl api post system/provisionSystem '{\"sid\":$proxyid,\"profileName\":\"$profileName\"}'
4.2. Reinstall with SL Micro 6.1
SL Micro 6.1 requires a fresh installation on the host.
|
Perform the backup of the existing 4.3 Proxy before proceeding with the host reinstallation. For more information see 既存のSUSE Multi-Linux Manager Proxyデータのバックアップ. |
4.3. SL Micro 6.1ホストの準備
4.3.1. インストールメディアのダウンロード
https://www.suse.com/download/sle-micro/でSL Micro 6.1のインストールメディアを見つけて、適切なメディアファイルをダウンロードします。
Prepare a DVD or USB flash drive with the downloaded
.isoimage for installation.
4.3.2. SL Micro 6.1のインストール
マシン(仮想または物理)の準備の詳細については、SL Micro配備ガイドを参照してください。
SLE Micro 6.1のインストールイメージを含むDVDまたはUSBフラッシュドライブ(USBディスクまたはキー)を挿入します。
システムをブートまたは再起動します。
Use the arrow keys to select
Installation.キーボードと言語を調整します。
Click the
checkboxto accept the license agreement.Click
Nextto continue.登録はスキップします。SL Micro 6.1エンタイトルメントは、SUSE Multi-Linux Managerエンタイトルメント内に含まれているため、別途登録コードは必要ありません。
次へをクリックして続行します。
On the
NTP Configurationpage click Next.On the
Authentication for the Systempage enter a password for the root user. Click Next.On the
Installation Settingspage click Install.
これで、拡張機能としてのSL Micro 6.1とSUSE Multi-Linux Manager 5.1のインストールが完了しました。
4.3.3. システムの更新
rootとしてログインします。
transactional-updateを実行します。
transactional-update再起動します。
|
SL Microはデフォルトで自己更新するように設計されており、更新を適用すると再起動します。ただし、SUSE Multi-Linux Manager環境ではこの動作は望ましくありません。サーバの自動更新を防ぐには、SUSE Multi-Linux Managerでブートストラッププロセス中にtransactional-updateのタイマを無効にします。 SL Microのデフォルトの動作を使用したい場合は、次のコマンドを実行してタイマを有効にします。 |
4.3.4. Register and deploy the proxy
Once the host is prepared, register the new SL Micro 6.1 system to the SUSE Multi-Linux Manager Server as a client. It is recommended to use the same minion ID as the original 4.3 Proxy. For more information, see クライアントの登録.
On the SUSE Multi-Linux Manager Server, generate the proxy configuration for the new proxy server. For more information, see installation-and-upgrade:container-deployment/mlm/proxy-deployment-mlm.adoc#generate-proxy-config.
Transfer the configuration to the SL Micro 6.1 host and install the proxy:
mgrpxy install podman config.tar.gzStart the proxy:
mgrpxy startOnce the proxy is operational, the SUSE Multi-Linux Manager Server will automatically deploy the backed up configuration during the next
Hardware Refreshstep.
|
You need to accept the Salt key manualy to allow autoinstallation to continue. |
5. プロキシ機能の検証
After migration is finished and salt is started first time, backed up proxy configuration is automatically deployed during Hardware refresh step.
すべてのオンボーディングステップが完了したら、必要なプロキシ機能を検証します。
6. TFTPファイルの同期
コンテナ化されたプロキシは、tftprootファイルの転送にtftpsyncメカニズムを使用しません。代わりにこれらのファイルは、要求に応じて透過的にダウンロードされキャッシュされます。
To prevent false positive errors during cobbler sync run, migrated 4.3 proxies need to be removed from tftpsync mechanism.
以前にTFTPファイルを受信するように4.3プロキシを設定していた場合は、以下の設定オプションのいずれかが必要です。
|
コンテナ内のシェルに移動するには、コンテナホストで次のコマンドを実行します。 mgrctl term |
In the SUSE Multi-Linux Manager 5.1 server container, run configure-tftpsync.sh with the list of remaining 4.3 proxies as arguments. If no 4.3 proxies remain, run configure-tftpsync.sh with no arguments.
In the SUSE Multi-Linux Manager 5.1 server container, manually remove the relevant proxy from the proxies setting in the /etc/cobbler/settings.yaml file. If there are no 4.3 proxies remaining, then manually remove the proxies list completely.