
Migrating from SUSE Multi-Linux Manager Retail Branch Server 4.3
This guide describes how to migrate one or more SUSE Multi-Linux Manager Retail Branch Server Servers from SUSE Multi-Linux Manager Branch Server 4.3 to the SUSE Multi-Linux Manager Retail Branch Server 5.1
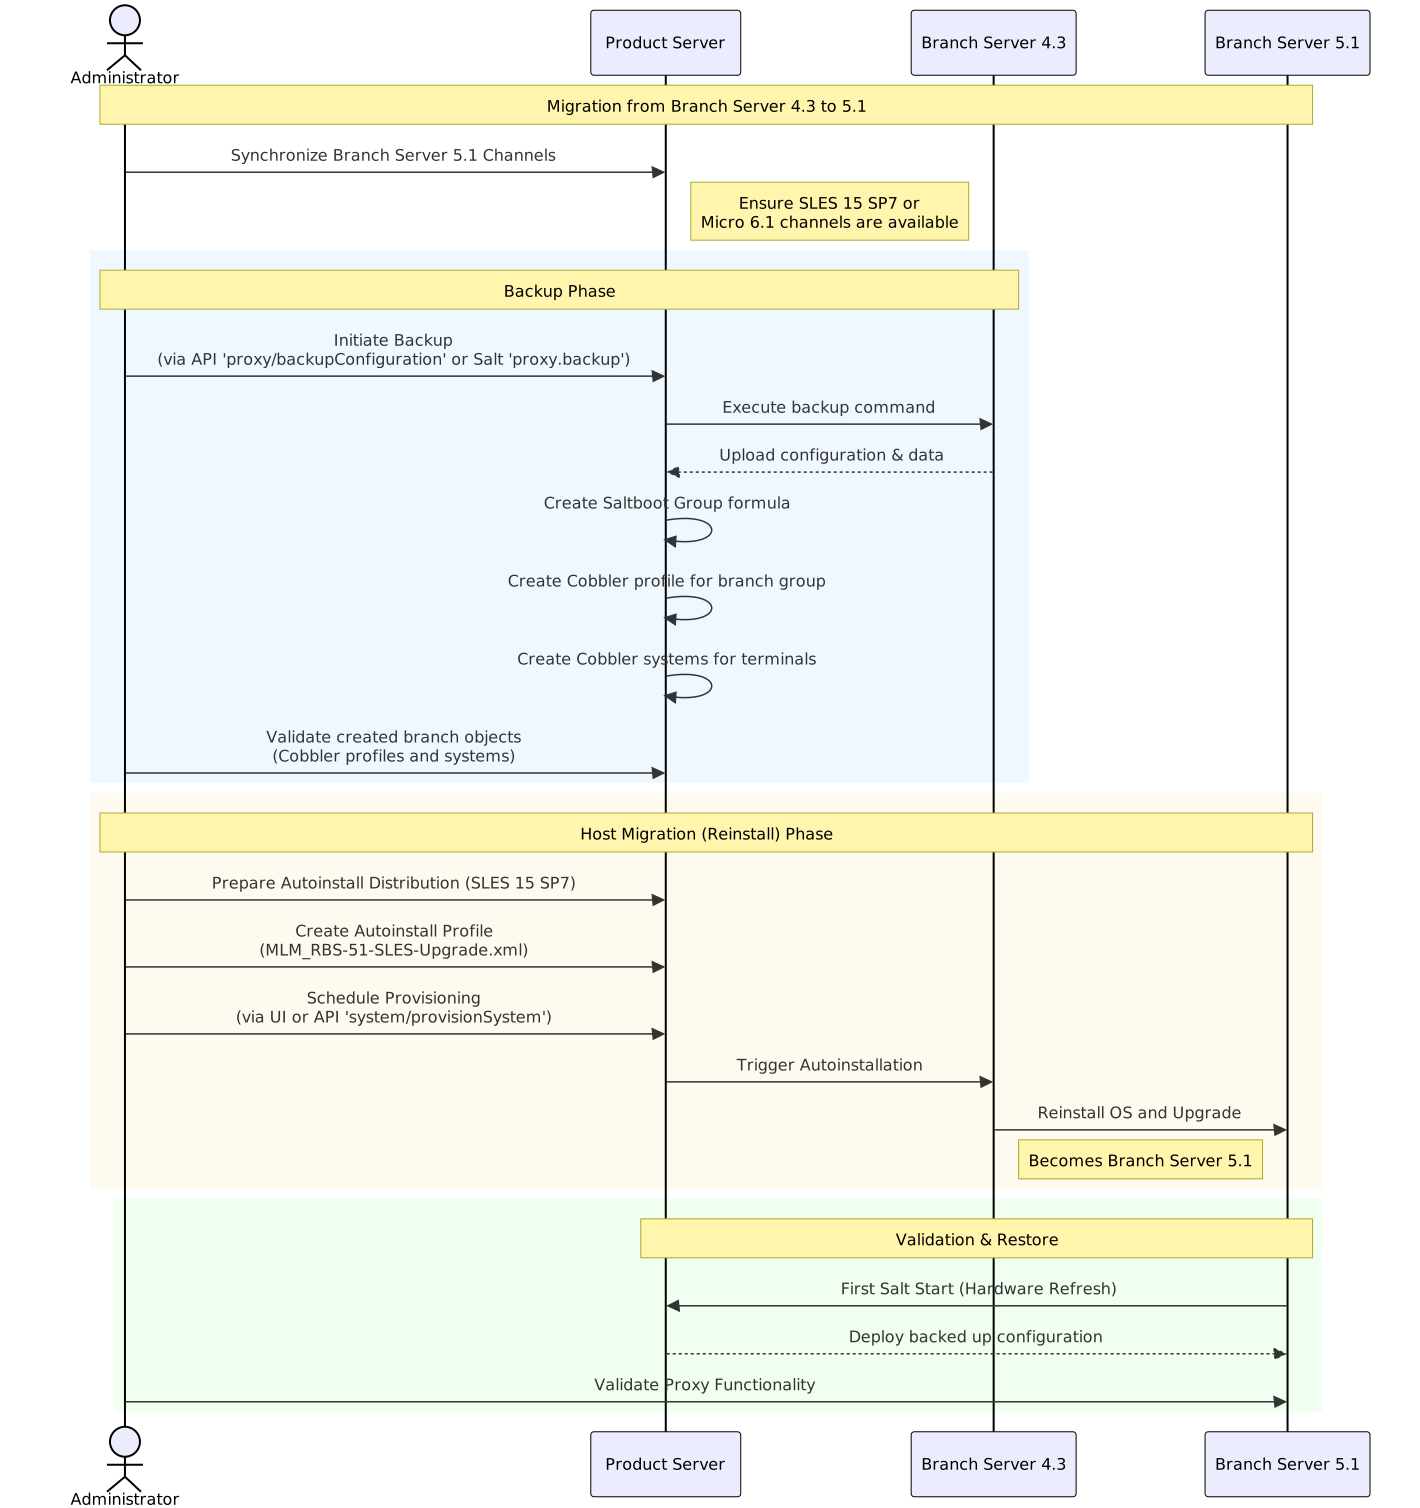
1. Overview
-
Synchronize SUSE Multi-Linux Manager Retail Branch Server channels
-
Backup existing SUSE Multi-Linux Manager for Retail 4.3 Branch Server Proxy
-
Validate branch objects were created
-
Migrate Branch Server Proxy host
-
Validate proxy functionality
2. Synchronize SUSE Multi-Linux Manager Retail Branch Server channels
See SUSE Multi-Linux Managerプロキシデプロイメント how to synchronize product channels for a proxy systems.
Depending on the host operating system:
-
SUSE Linux Micro 6.1usesSUSE Multi-Linux Manager Retail Branch Server Extension 5.1channels -
SUSE Linux Enterprise Server 15 SP7usesSUSE Multi-Linux Manager Retail Branch Server Extension for SLE 5.1channels
3. Backup existing SUSE Multi-Linux Manager Retail Branch Server 4.3
SUSE Multi-Linux Manager for Retail 5.1.2 includes automated backup-migration procedure for both kinds of SUSE Multi-Linux Manager Proxy variants. This procedure collects all required data and uploads them to the SUSE Multi-Linux Manager Server. For SUSE Multi-Linux Manager Retail Branch Server this tool also creates and migrates Saltboot related entities.
|
Squid cache data and POS images are not backed up. Due to change in functionality these data are not migrated and instead redownloaded from the server. See retail-deploy-terminals.adoc#_synchronize_images_to_the_branch_server how to warm up the cache. |
There are multiple ways to initiate SUSE Multi-Linux Manager Retail Branch Server 4.3 migration:
-
API call
Replace
$proxyidby a server id of the branch proxy, or multiple server ids separated by a comma.mgrctl api login mgrctl api post proxy/backupConfiguration '{\"sids\":[$proxyid]}' -
Salt call
Replace
$proxyin command below by branch proxy minion id or-L proxyminionid1,proxyminionid2,…when addressing multiple branch proxies.salt $proxy proxy.backup
|
It is recommended to do a manual backup of the proxy as well, particularly if there are custom modifications present. |
|
SUSE Multi-Linux Manager Retail Branch Server can still be used after backup step as before, however because some formulas were disabled by the backup/migration step, next highstate or image-sync state application will not work properly. Migrate the server host as soon as possible after backup step is performed. |
4. Validate branch objects were created for migrated branches
Backup/migration step will create new Saltboot objects:
-
Saltboot Groupformula with settings from the original formulas is assigned to the branch group. -
New cobbler profile is created for the branch group:
# mgrctl exec -- cobbler profile report --name $branchid:S:$orgid:$orgname
-
New cobbler systems are created for all assigned terminals:
# mgrctl exec -- cobbler system find --kernel-options "MINION_ID_PREFIX=$branchid"
5. Migrate SUSE Multi-Linux Manager Retail Branch Server host
You can either upgrade the existing host to SUSE Linux Enterprise Server 15 SP7 using AutoYaST, or perform a fresh installation of SL Micro 6.1.
5.1. Upgrade to SUSE Linux Enterprise Server 15 SP7 using AutoYaST
Create and use AutoYAST profiles to migrate or reinstall the proxy host.
5.1.1. Prepare autoinstallation distribution based on SUSE Linux Enterprise Server 15 SP7
-
Download or obtain SUSE Linux Enterprise Server 15 SP7 installation ISO to the server host
-
Use
mgradm distribution copy $path_to_the_isoto copy installation files to the container -
Register the autoinstallation distribution, see 自動インストール可能なディストリビューション.
5.1.2. Prepare autoinstallation profile
For more information, see 自動インストールプロファイル.
-
Create an autoinstallation profile based previously created distribution. As a profile use profile provided at https://github.com/SUSE/manager-build-profiles/blob/master/AutoYaST/SUSE-Multi-Linux-Manager/SUSE%20Multi-Linux%20Manager%20Proxy/MLM_RBS-51-SLES-Upgrade.xml
-
Once profile is created, switch to
Variablestab and fill in required variables:org='organization_id' distrotree='autoinstallation_distribution_label_from_previous_step' channel_prefix='clm_channel_prefix' or blank for SCC channels registration_key='activation_key_for_post_upgrade'
-
In tab
Autoinstallation Fileyou can see complete rendered profile for additional inspection
5.1.3. Provision autoinstallation of the proxy
Schedule an autoinstallation on the old SUSE Multi-Linux Manager Branch Server 4.3 using the profile created in previous step.
-
Use Web UI interface
Provisioningtab at theSystemview of migrating branch server -
Or use API call
system/provisionSystemto schedule the migration. For example execute following snippet from the SUSE Multi-Linux Manager host:mgrctl api login mgrctl api post system/provisionSystem '{\"sid\":$proxyid,\"profileName\":\"$profileName\"}'
5.2. Reinstall with SL Micro 6.1
SL Micro 6.1 requires a fresh installation on the host.
|
Perform the backup of the existing 4.3 Branch Server before proceeding with the host reinstallation. For more information see [proxy-backup-43]. |
5.2.1. SL Micro 6.1ホストを準備します。
5.2.1.1. インストールメディアのダウンロード
https://www.suse.com/download/sle-micro/,にあるSL Micro 6.1インストールメディアを見つけて、適切なメディアファイルをダウンロードします。
インストール用にダウンロードした`.iso`イメージを含むDVDまたはUSB フラッシュ ドライブを準備します。
5.2.1.2. SL Micro 6.1をインストールします。
マシン(仮想または物理)の準備に関する詳細は、SL Microデプロイメントガイドを参照してください。
SLE Micro 6.1のインストールイメージを含むDVDまたはUSBフラッシュ ドライブ(USBディスクまたはキー)を挿入します。
システムをブートまたは再起動します。
矢印キーを使用して`Installation`を選択します。
キーボードと言語を調整します。
`checkbox`をクリックして、ライセンス契約を受け入れます。
`Next`をクリックして続行します。
プロキシの登録SL Micro 6.1エンタイトルメントはSUSE Multi-Linux Managerエンタイトルメント内に含まれているため、別途登録コードは必要ありません。
継続するには次へをクリックしてください。
`NTP Configuration`ページで、Nextをクリックします。
`Authentication for the System`ページで、ルートユーザのパスワードを入力します。 次へをクリックします。
`Installation Settings`ページで、Installをクリックします。
これでSL Micro 6.1とSUSE Multi-Linux Manager 5.1の拡張機能のインストールが完了しました。
5.2.1.3. システムの更新
*ルート*としてログインします。
transactional-updateを実行します。
transactional-update再起動します。
|
SL Microはデフォルトで自動的に更新されるように設計されており、更新を適用した後に再起動します。 しかし、この動作はSUSE Multi-Linux Manager環境では望ましくありません。 サーバーで自動更新を防ぐために、SUSE Multi-Linux Managerは起動プロセス中にトランザクション更新タイマーを無効にします。 SL Microのデフォルトの動作を使用したい場合は、次のコマンドを実行してタイマーを有効にします。 |
5.2.2. Register and deploy the proxy
Once the host is prepared, register the new SL Micro 6.1 system to the SUSE Multi-Linux Manager Server as a client. It is recommended to use the same minion ID as the original 4.3 Branch Server. For more information, see クライアントの登録.
On the SUSE Multi-Linux Manager Server, generate the proxy configuration for the new branch server. For more information, see installation-and-upgrade:container-deployment/mlm/proxy-deployment-mlm.adoc#generate-proxy-config.
Transfer the configuration to the SL Micro 6.1 host and install the proxy:
mgrpxy install podman config.tar.gzStart the proxy:
mgrpxy startOnce the proxy is operational, the SUSE Multi-Linux Manager Server will automatically deploy the backed up configuration during the next
Hardware Refreshstep.
6. Validate proxy functionality
After migration is finished and salt is started first time, backed up proxy configuration is automatically deployed during Hardware Refresh step.
After finishing all onboarding steps, validate required proxy functionality.