
4.3에서 5.1로 프록시 마이그레이션
1. 요구 사항 및 고려 사항
SUSE Manager 4.3 프록시를 SUSE Multi-Linux Manager 5.1(으)로 마이그레이션하려면 SL Micro 6.1 또는 SUSE Linux Enterprise Server 15 SP7가 설치되어 있고 `mgrpxy`가 설치된 새로운 머신이 필요합니다.
SUSE Manager 4.3에서 5.1으로의 인플레이스 마이그레이션은 선택한 호스트 운영 체제가 SL Micro 6.1 또는 SUSE Linux Enterprise Server 15 SP7인지와 관계없이 호스트 운영 체제 재설치를 요구합니다.
SUSE Manager 4.3에서 5.1으로 마이그레이션하기 전에 기존 전통 클라이언트와 프록시를 모두 Salt로 마이그레이션해야 합니다. 전통적인 SUSE Multi-Linux Manager 4.3 클라이언트를 Salt 클라이언트로 마이그레이션하는 방법에 대한 자세한 내용은 https://documentation.suse.com/suma/4.3/en/suse-manager/client-configuration/contact-methods-migrate-traditional.html.를 참조하십시오.
전통적인 연락 프로토콜은 SUSE Multi-Linux Manager 5.0 이상에서 더 이상 지원되지 않습니다.
SUSE Manager 4.3 프록시를 SUSE Multi-Linux Manager 5.1로 마이그레이션하기 전에 SUSE Manager 4.3 서버를 먼저 마이그레이션해야 합니다. 자세한 내용은 SUSE Multi-Linux Manager 서버를 컨테이너화된 환경으로 마이그레이션을 참조하십시오.
2. 소개
SUSE Multi-Linux Manager 5.1에서 프록시는 두 가지 방법으로 배포할 수 있습니다:
-
Podman에서 실행 중인 컨테이너화
-
k3s에서 컨테이너화된 실행
SUSE Multi-Linux Manager 5.1에서 RPM 기반 지원이 제거되었으며, podman 또는 k3s로 실행되는 컨테이너화된 버전만 지원됩니다.
Podman으로 실행되는 컨테이너화된 프록시의 관리는 mgrpxy 도구를 사용하여 수행됩니다.
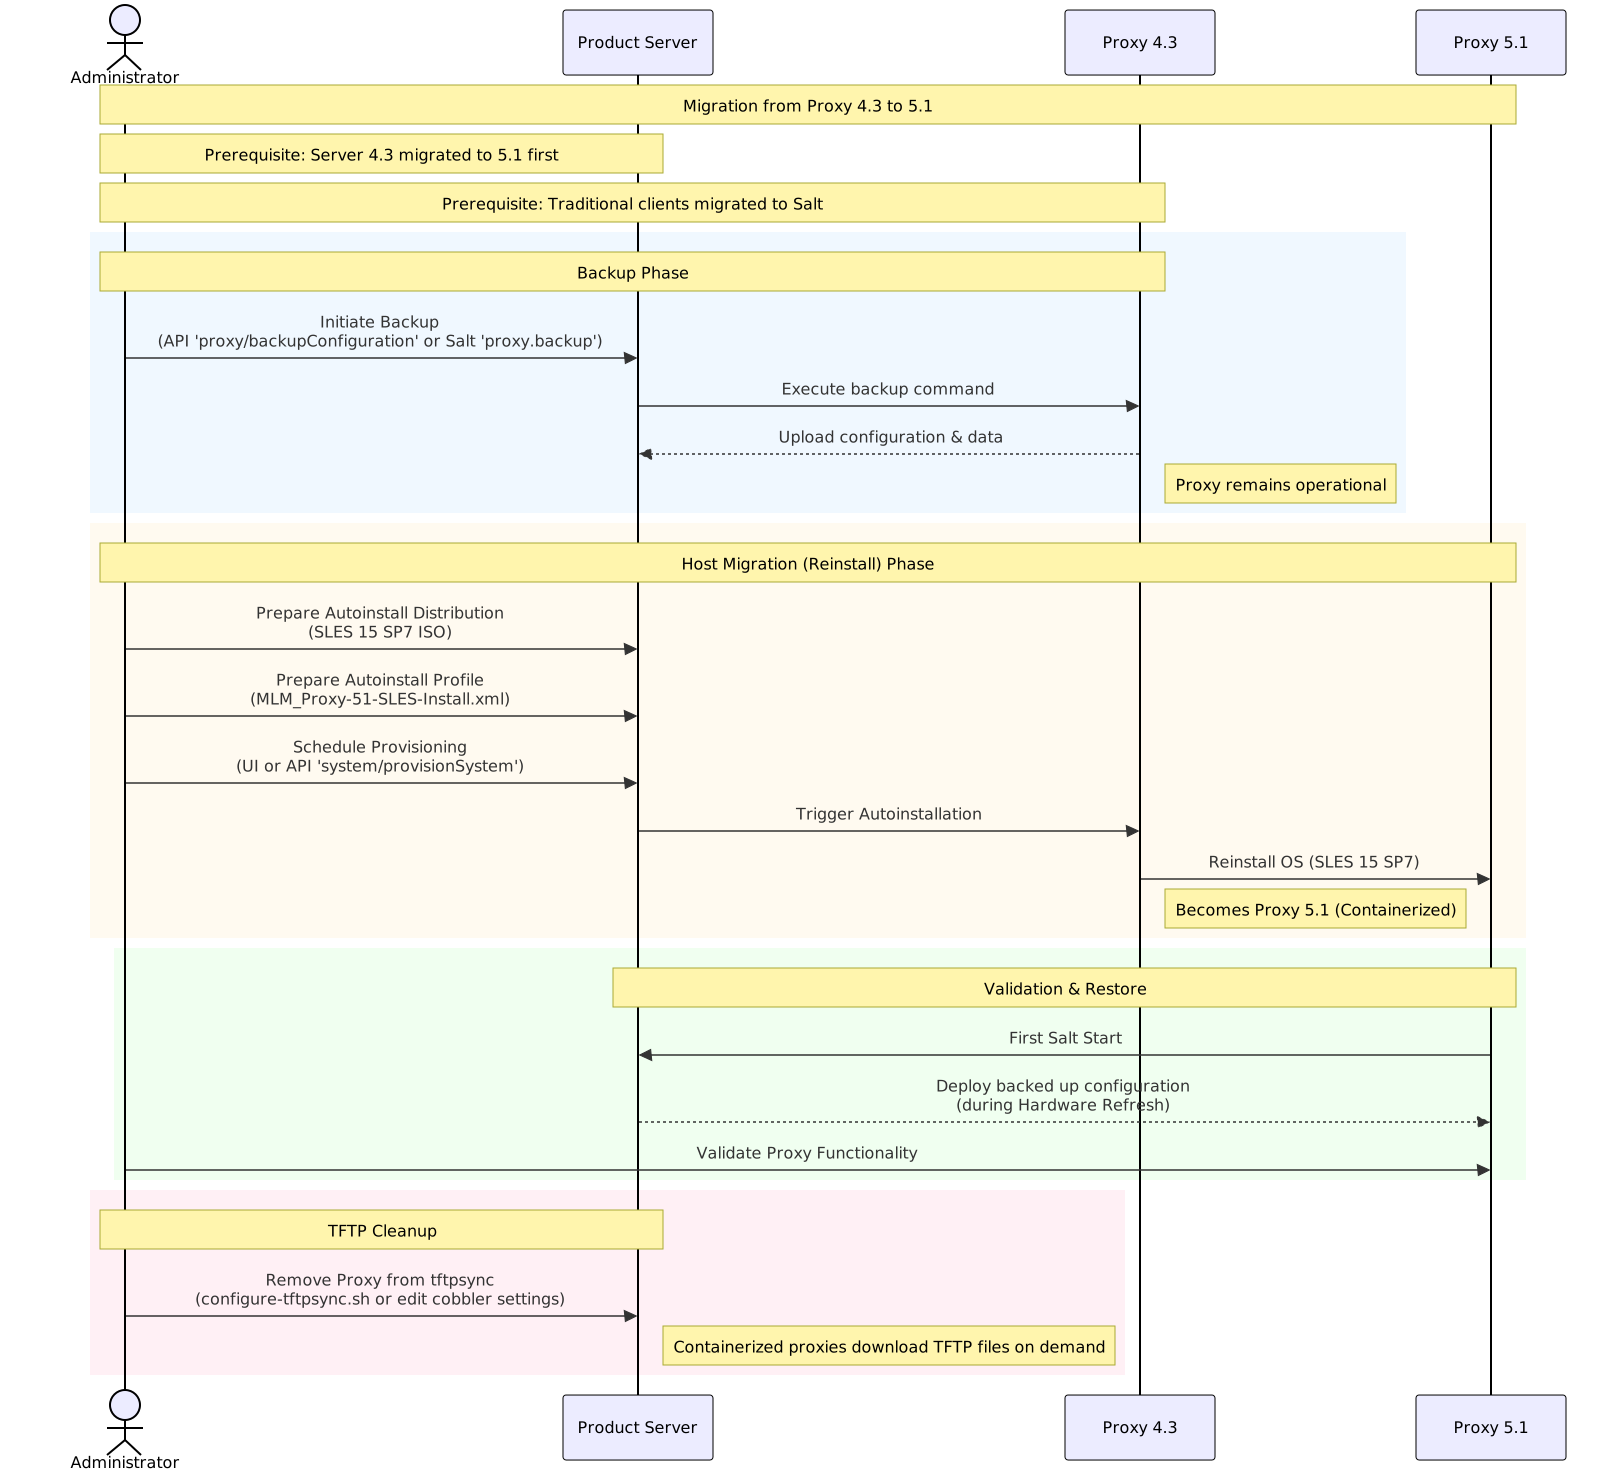
3. 기존 SUSE Multi-Linux Manager Proxy 데이터를 백업합니다.
SUSE Multi-Linux Manager for Retail 5.1.2는 두 가지 종류의 SUSE Multi-Linux Manager Proxy 변형에 대한 자동 백업-마이그레이션 절차를 포함합니다. 이 절차는 모든 필요한 데이터를 수집하고 이를 SUSE Multi-Linux Manager 서버에 업로드합니다. 이 도구는 SUSE Multi-Linux Manager Retail Branch Server에 대해 Saltboot 관련 엔티티를 생성하고 마이그레이션합니다. 자세한 내용은 Migrating from SUSE Multi-Linux Manager Retail Branch Server 4.3을 참조하십시오.
SUSE Multi-Linux Manager Proxy 4.3 마이그레이션을 시작하는 방법은 여러 가지가 있습니다:
-
API 호출
`$proxyid`을(를) 브랜치 프록시의 서버 ID 또는 쉼표로 구분된 여러 서버 ID로 바꿉니다.
mgrctl api login + mgrctl api post proxy/backupConfiguration '{\"sids\":[$proxyid]}' -
Salt 호출
아래 명령에서 `$proxy`을(를) 브랜치 프록시 미니언 ID로, 여러 브랜치 프록시를 처리할 때는 `-L proxyminionid1,proxyminionid2,…`로 바꿉니다.
salt $proxy proxy.backup
|
특히 사용자 정의 수정 사항이 있는 경우 프록시도 수동으로 백업하는 것이 좋습니다. |
|
SUSE Multi-Linux Manager Proxy은(는) 이전과 같이 백업 단계 이후에도 계속 작동하지만, 잠재적인 불일치를 방지하기 위해 백업 단계가 수행된 후 가능한 한 빨리 서버 호스트를 마이그레이션하십시오. |
4. 새로운 SUSE Multi-Linux Manager Proxy을(를) 배포하십시오.
기존 호스트를 AutoYaST를 사용하여 SUSE Linux Enterprise Server 15 SP7로 업그레이드하거나, SL Micro 6.1의 새 설치를 수행할 수 있습니다.
4.1. AutoYaST를 사용하여 SUSE Linux Enterprise Server 15 SP7로 업그레이드하십시오.
프록시 호스트를 마이그레이션하거나 재설치하기 위해 AutoYAST 프로파일을 생성하고 사용하십시오.
4.1.1. SUSE Linux Enterprise Server 15 SP7을(를) 기반으로 자동 설치 배포판을 준비하십시오.
-
서버 호스트에 SUSE Linux Enterprise Server 15 SP7 설치.iso를 다운로드하거나 가져옵니다.
-
`mgradm distribution copy $path_to_the_iso`을(를) 사용하여 설치 파일을 컨테이너로 복사하십시오.
-
자동 설치 배포판을 등록하십시오. 자세한 내용은 자동 설치 가능한 배포판을(를) 참조하십시오.
4.1.2. 설치 미디어에 액세스
자세한 내용은 자동 설치 프로파일을(를) 참조하십시오.
-
이전에 생성된 배포판을 기반으로 자동 설치 프로파일을 생성하십시오. 프로파일로서 https://github.com/SUSE/manager-build-profiles/blob/master/AutoYaST/SUSE-Multi-Linux-Manager/SUSE%20Multi-Linux%20Manager%20Proxy/MLM_Proxy-51-SLES-Install.xml에서 제공된 프로파일을 사용하십시오.
-
프로파일이 생성되면
Variables탭으로 전환하여 필요한 변수를 입력하십시오:org='organization_id' + distrotree='autoinstallation_distribution_label_from_previous_step' + channel_prefix='clm_channel_prefix' 또는 SCC 채널의 경우 비워둡니다. + registration_key='activation_key_for_post_upgrade'
-
Autoinstallation File탭에서 추가 검사를 위해 렌더링된 전체 프로파일을 볼 수 있습니다.
4.1.3. 프록시 자동 설치 프로비저닝
이전 단계에서 생성한 프로파일을 사용하여 기존 SUSE Multi-Linux Manager 프록시 4.3에서 자동 설치를 예약하십시오.
-
마이그레이션 중인 브랜치 서버의
System보기에서 웹 UI 인터페이스Provisioning탭을 사용하십시오. -
또는 API 호출 `system/provisionSystem`을(를) 사용하여 마이그레이션을 예약하십시오. 예를 들어 SUSE Multi-Linux Manager 호스트에서 다음 스니펫을 실행하십시오:
mgrctl api login +
mgrctl api post system/provisionSystem '{\"sid\":$proxyid,\"profileName\":\"$profileName\"}'
4.2. SL Micro 6.1로 재설치하십시오.
SL Micro 6.1은 호스트에서 새로 설치해야 합니다.
|
호스트 재설치 진행 전에 기존 4.3 프록시의 백업을 수행하십시오. 자세한 내용은 기존 SUSE Multi-Linux Manager Proxy 데이터를 백업합니다.을 참조하십시오. |
4.3. SL Micro 6.1 호스트를 준비합니다.
4.3.1. 작업: 설치 미디어 다운로드
https://www.suse.com/download/sle-micro/,에서 SL Micro 6.1 설치 미디어를 찾아 적절한 미디어 파일을 다운로드합니다.
설치를 위해 다운로드한
.iso이미지가 들어 있는 DVD 또는 USB 메모리 키를 준비합니다.
4.3.2. SL Micro 6.1 설치
가상 또는 물리적 머신을 준비하는 방법에 대한 자세한 내용은 SL Micro 배포 가이드를 참조하십시오.
SLE Micro 6.1의 설치 이미지가 들어 있는 DVD 또는 USB 메모리 키(USB 디스크 또는 키)를 삽입합니다.
시스템을 부팅하거나 재부팅합니다.
화살표 키를 사용하여 `Installation`을(를) 선택합니다.
키보드 및 언어를 조정합니다.
라이선스 계약에 동의하려면 `checkbox`을(를) 클릭합니다.
계속하려면 `Next`을(를) 클릭합니다.
프록시 등록 SL Micro 6.1 권한은 SUSE Multi-Linux Manager 권한에 포함되어 있으므로 별도의 활성화 코드가 필요하지 않습니다.
계속하려면 다음을 클릭합니다.
NTP Configuration페이지에서 다음을(를) 클릭합니다.
Authentication for the System페이지에서 루트의 암호를 입력합니다. 다음을 클릭합니다.
Installation Settings페이지에서 설치를 클릭합니다.
이로써 SL Micro 6.1 및 SUSE Multi-Linux Manager 5.1의 확장 프로그램 설치가 완료되었습니다.
4.3.3. 시스템 업데이트
*루트*로 로그인합니다.
트랜잭션 업데이트 실행:
transactional-update재부팅합니다.
|
SL Micro은 기본적으로 자동으로 업데이트되도록 설계되었으며 업데이트 적용 후 재부팅됩니다. 그러나 이 동작은 SUSE Multi-Linux Manager 환경에서는 바람직하지 않습니다. 서버에서 자동 업데이트를 방지하기 위해 SUSE Multi-Linux Manager 부팅 과정 중에 트랜잭션 업데이트 타이머를 비활성화합니다. SL Micro 기본 동작을 사용하려면 다음 명령을 실행하여 타이머를 활성화합니다. |
4.3.4. 프록시를 등록하고 배포하십시오.
호스트가 준비되면 새로운 SL Micro 6.1 시스템을 SUSE Multi-Linux Manager 서버에 클라이언트로 등록하십시오. 원래 4.3 프록시와 동일한 미니언 ID를 사용하는 것이 좋습니다. 자세한 내용은 클라이언트 등록을 참조하십시오.
SUSE Multi-Linux Manager 서버에서 새로운 프록시 서버용 프록시 구성을 생성하십시오. 자세한 내용은 installation-and-upgrade:container-deployment/mlm/proxy-deployment-mlm.adoc#generate-proxy-config을 참조하십시오.
구성을 SL Micro 6.1 호스트로 전송하고 프록시를 설치하십시오:
mgrpxy install podman config.tar.gz프록시를 시작하십시오:
mgrpxy start프록시가 작동하면 SUSE Multi-Linux Manager 서버는 다음
Hardware Refresh단계에서 자동으로 백업된 구성을 배포합니다.
5. 프록시 체인
마이그레이션이 완료되고 Salt가 처음 시작된 후, 백업된 프록시 구성이 Hardware refresh 단계에서 자동으로 배포됩니다.
모든 온보딩 단계를 완료한 후, 필수 프록시 기능을 확인하십시오.
6. TFTP 파일 동기화
컨테이너화된 프록시는 tftpsync 메커니즘을 사용하여 tftproot 파일을 전송하지 않습니다. 대신 이러한 파일은 투명하게 다운로드되고 필요에 따라 캐시됩니다.
cobbler sync 실행 중 오감지 오류를 방지하려면 마이그레이션된 4.3 프록시를 tftpsync 메커니즘에서 제거해야 합니다.
이전 설정에서 TFTP 파일을 수신하도록 4.3 프록시를 구성한 경우, 다음 구성 옵션 중 하나가 필요합니다.
|
컨테이너 내부의 셸로 이동하려면 컨테이너 호스트에서 실행합니다. mgrctl term |
SUSE Multi-Linux Manager 5.1 서버 컨테이너에서 남아 있는 4.3 프록시 목록을 인수로 하여 `configure-tftpsync.sh`를 실행하십시오. 4.3 프록시가 남아 있지 않으면 인수를 지정하지 않고 `configure-tftpsync.sh`를 실행하십시오.
SUSE Multi-Linux Manager 5.1 서버 컨테이너에서 proxies 파일의 /etc/cobbler/settings.yaml 설정에서 관련 프록시를 수동으로 제거하십시오.
4.3 프록시가 남아 있지 않으면 proxies 목록을 수동으로 완전히 제거하십시오.