
Migrating from SUSE Multi-Linux Manager Retail Branch Server 4.3
This guide describes how to migrate one or more SUSE Multi-Linux Manager Retail Branch Server Servers from SUSE Multi-Linux Manager Branch Server 4.3 to the SUSE Multi-Linux Manager Retail Branch Server 5.1
1. Overview
-
Synchronize SUSE Multi-Linux Manager Retail Branch Server channels
-
Backup existing SUSE Multi-Linux Manager for Retail 4.3 Branch Server Proxy
-
Validate branch objects were created
-
Migrate Branch Server Proxy host
-
Validate proxy functionality
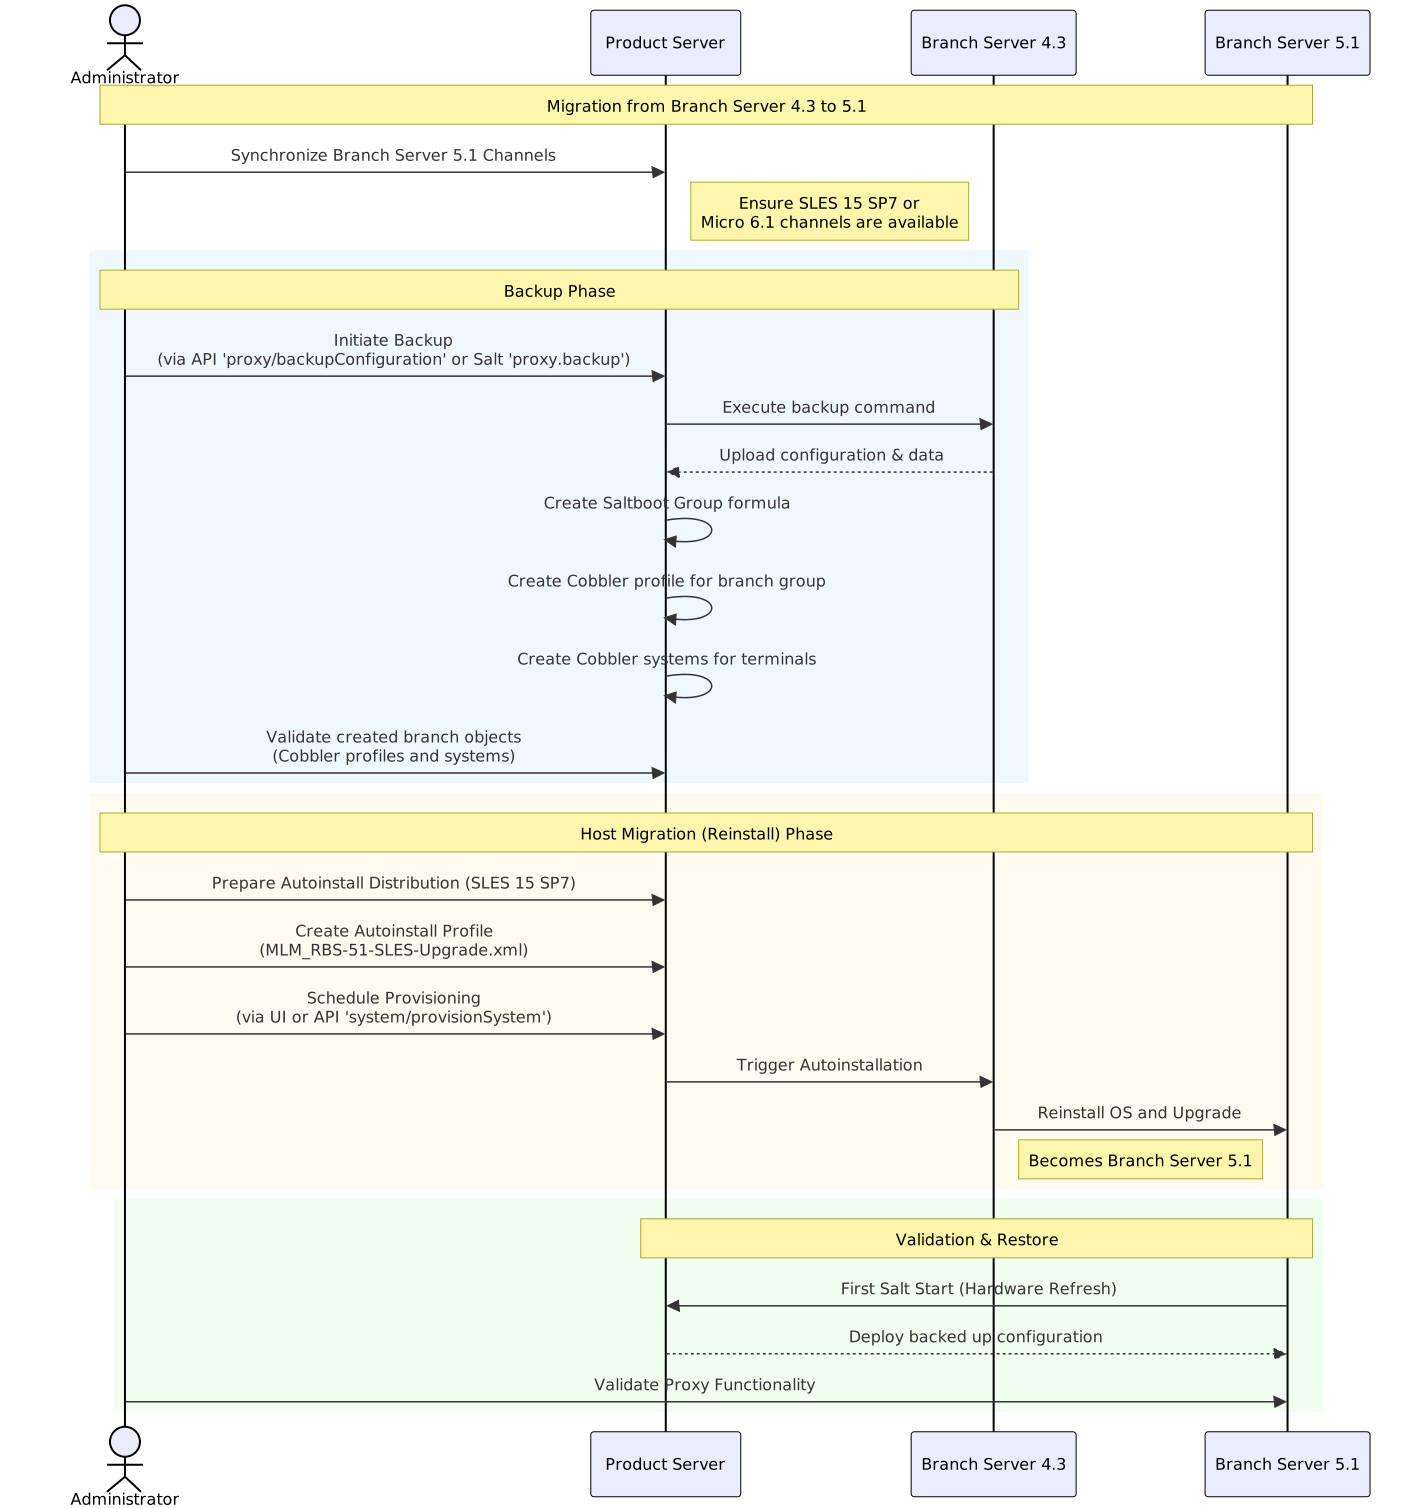
2. Synchronize SUSE Multi-Linux Manager Retail Branch Server channels
See SUSE Multi-Linux Manager 프록시 배포 how to synchronize product channels for a proxy systems.
Depending on the host operating system:
-
SUSE Linux Micro 6.1usesSUSE Multi-Linux Manager Retail Branch Server Extension 5.1channels -
SUSE Linux Enterprise Server 15 SP7usesSUSE Multi-Linux Manager Retail Branch Server Extension for SLE 5.1channels
3. Backup existing SUSE Multi-Linux Manager Retail Branch Server 4.3
SUSE Multi-Linux Manager for Retail 5.1.2 includes automated backup-migration procedure for both kinds of SUSE Multi-Linux Manager Proxy variants. This procedure collects all required data and uploads them to the SUSE Multi-Linux Manager Server. For SUSE Multi-Linux Manager Retail Branch Server this tool also creates and migrates Saltboot related entities.
|
Squid cache data and POS images are not backed up. Due to change in functionality these data are not migrated and instead redownloaded from the server. See retail-deploy-terminals.adoc#_synchronize_images_to_the_branch_server how to warm up the cache. |
There are multiple ways to initiate SUSE Multi-Linux Manager Retail Branch Server 4.3 migration:
-
API call
Replace
$proxyidby a server id of the branch proxy, or multiple server ids separated by a comma.mgrctl api login mgrctl api post proxy/backupConfiguration '{\"sids\":[$proxyid]}' -
Salt call
Replace
$proxyin command below by branch proxy minion id or-L proxyminionid1,proxyminionid2,…when addressing multiple branch proxies.salt $proxy proxy.backup
|
It is recommended to do a manual backup of the proxy as well, particularly if there are custom modifications present. |
|
SUSE Multi-Linux Manager Retail Branch Server can still be used after backup step as before, however because some formulas were disabled by the backup/migration step, next highstate or image-sync state application will not work properly. Migrate the server host as soon as possible after backup step is performed. |
4. Validate branch objects were created for migrated branches
Backup/migration step will create new Saltboot objects:
-
Saltboot Groupformula with settings from the original formulas is assigned to the branch group. -
New cobbler profile is created for the branch group:
# mgrctl exec -- cobbler profile report --name $branchid:S:$orgid:$orgname
-
New cobbler systems are created for all assigned terminals:
# mgrctl exec -- cobbler system find --kernel-options "MINION_ID_PREFIX=$branchid"
5. Migrate SUSE Multi-Linux Manager Retail Branch Server host
You can either upgrade the existing host to SUSE Linux Enterprise Server 15 SP7 using AutoYaST, or perform a fresh installation of SL Micro 6.1.
5.1. Upgrade to SUSE Linux Enterprise Server 15 SP7 using AutoYaST
Create and use AutoYAST profiles to migrate or reinstall the proxy host.
5.1.1. Prepare autoinstallation distribution based on SUSE Linux Enterprise Server 15 SP7
-
Download or obtain SUSE Linux Enterprise Server 15 SP7 installation ISO to the server host
-
Use
mgradm distribution copy $path_to_the_isoto copy installation files to the container -
Register the autoinstallation distribution, see 자동 설치 가능한 배포판.
5.1.2. Prepare autoinstallation profile
For more information, see 자동 설치 프로파일.
-
Create an autoinstallation profile based previously created distribution. As a profile use profile provided at https://github.com/SUSE/manager-build-profiles/blob/master/AutoYaST/SUSE-Multi-Linux-Manager/SUSE%20Multi-Linux%20Manager%20Proxy/MLM_RBS-51-SLES-Upgrade.xml
-
Once profile is created, switch to
Variablestab and fill in required variables:org='organization_id' distrotree='autoinstallation_distribution_label_from_previous_step' channel_prefix='clm_channel_prefix' or blank for SCC channels registration_key='activation_key_for_post_upgrade'
-
In tab
Autoinstallation Fileyou can see complete rendered profile for additional inspection
5.1.3. Provision autoinstallation of the proxy
Schedule an autoinstallation on the old SUSE Multi-Linux Manager Branch Server 4.3 using the profile created in previous step.
-
Use Web UI interface
Provisioningtab at theSystemview of migrating branch server -
Or use API call
system/provisionSystemto schedule the migration. For example execute following snippet from the SUSE Multi-Linux Manager host:mgrctl api login mgrctl api post system/provisionSystem '{\"sid\":$proxyid,\"profileName\":\"$profileName\"}'
5.2. Reinstall with SL Micro 6.1
SL Micro 6.1 requires a fresh installation on the host.
|
Perform the backup of the existing 4.3 Branch Server before proceeding with the host reinstallation. For more information see [proxy-backup-43]. |
5.2.1. SL Micro 6.1 호스트를 준비합니다.
5.2.1.1. 작업: 설치 미디어 다운로드
https://www.suse.com/download/sle-micro/,에서 SL Micro 6.1 설치 미디어를 찾아 적절한 미디어 파일을 다운로드합니다.
설치를 위해 다운로드한
.iso이미지가 들어 있는 DVD 또는 USB 메모리 키를 준비합니다.
5.2.1.2. SL Micro 6.1 설치
가상 또는 물리적 머신을 준비하는 방법에 대한 자세한 내용은 SL Micro 배포 가이드를 참조하십시오.
SLE Micro 6.1의 설치 이미지가 들어 있는 DVD 또는 USB 메모리 키(USB 디스크 또는 키)를 삽입합니다.
시스템을 부팅하거나 재부팅합니다.
화살표 키를 사용하여 `Installation`을(를) 선택합니다.
키보드 및 언어를 조정합니다.
라이선스 계약에 동의하려면 `checkbox`을(를) 클릭합니다.
계속하려면 `Next`을(를) 클릭합니다.
프록시 등록 SL Micro 6.1 권한은 SUSE Multi-Linux Manager 권한에 포함되어 있으므로 별도의 활성화 코드가 필요하지 않습니다.
계속하려면 다음을 클릭합니다.
NTP Configuration페이지에서 다음을(를) 클릭합니다.
Authentication for the System페이지에서 루트의 암호를 입력합니다. 다음을 클릭합니다.
Installation Settings페이지에서 설치를 클릭합니다.
이로써 SL Micro 6.1 및 SUSE Multi-Linux Manager 5.1의 확장 프로그램 설치가 완료되었습니다.
5.2.1.3. 시스템 업데이트
*루트*로 로그인합니다.
트랜잭션 업데이트 실행:
transactional-update재부팅합니다.
|
SL Micro은 기본적으로 자동으로 업데이트되도록 설계되었으며 업데이트 적용 후 재부팅됩니다. 그러나 이 동작은 SUSE Multi-Linux Manager 환경에서는 바람직하지 않습니다. 서버에서 자동 업데이트를 방지하기 위해 SUSE Multi-Linux Manager 부팅 과정 중에 트랜잭션 업데이트 타이머를 비활성화합니다. SL Micro 기본 동작을 사용하려면 다음 명령을 실행하여 타이머를 활성화합니다. |
5.2.2. Register and deploy the proxy
Once the host is prepared, register the new SL Micro 6.1 system to the SUSE Multi-Linux Manager Server as a client. It is recommended to use the same minion ID as the original 4.3 Branch Server. For more information, see 클라이언트 등록.
On the SUSE Multi-Linux Manager Server, generate the proxy configuration for the new branch server. For more information, see installation-and-upgrade:container-deployment/mlm/proxy-deployment-mlm.adoc#generate-proxy-config.
Transfer the configuration to the SL Micro 6.1 host and install the proxy:
mgrpxy install podman config.tar.gzStart the proxy:
mgrpxy startOnce the proxy is operational, the SUSE Multi-Linux Manager Server will automatically deploy the backed up configuration during the next
Hardware Refreshstep.
6. Validate proxy functionality
After migration is finished and salt is started first time, backed up proxy configuration is automatically deployed during Hardware Refresh step.
After finishing all onboarding steps, validate required proxy functionality.