
Migrating from SUSE Multi-Linux Manager Retail Branch Server 4.3
This guide describes how to migrate one or more SUSE Multi-Linux Manager Retail Branch Server Servers from SUSE Multi-Linux Manager Branch Server 4.3 to the SUSE Multi-Linux Manager Retail Branch Server 5.1
1. Overview
-
Synchronize SUSE Multi-Linux Manager Retail Branch Server channels
-
Backup existing SUSE Multi-Linux Manager for Retail 4.3 Branch Server Proxy
-
Validate branch objects were created
-
Migrate Branch Server Proxy host
-
Validate proxy functionality
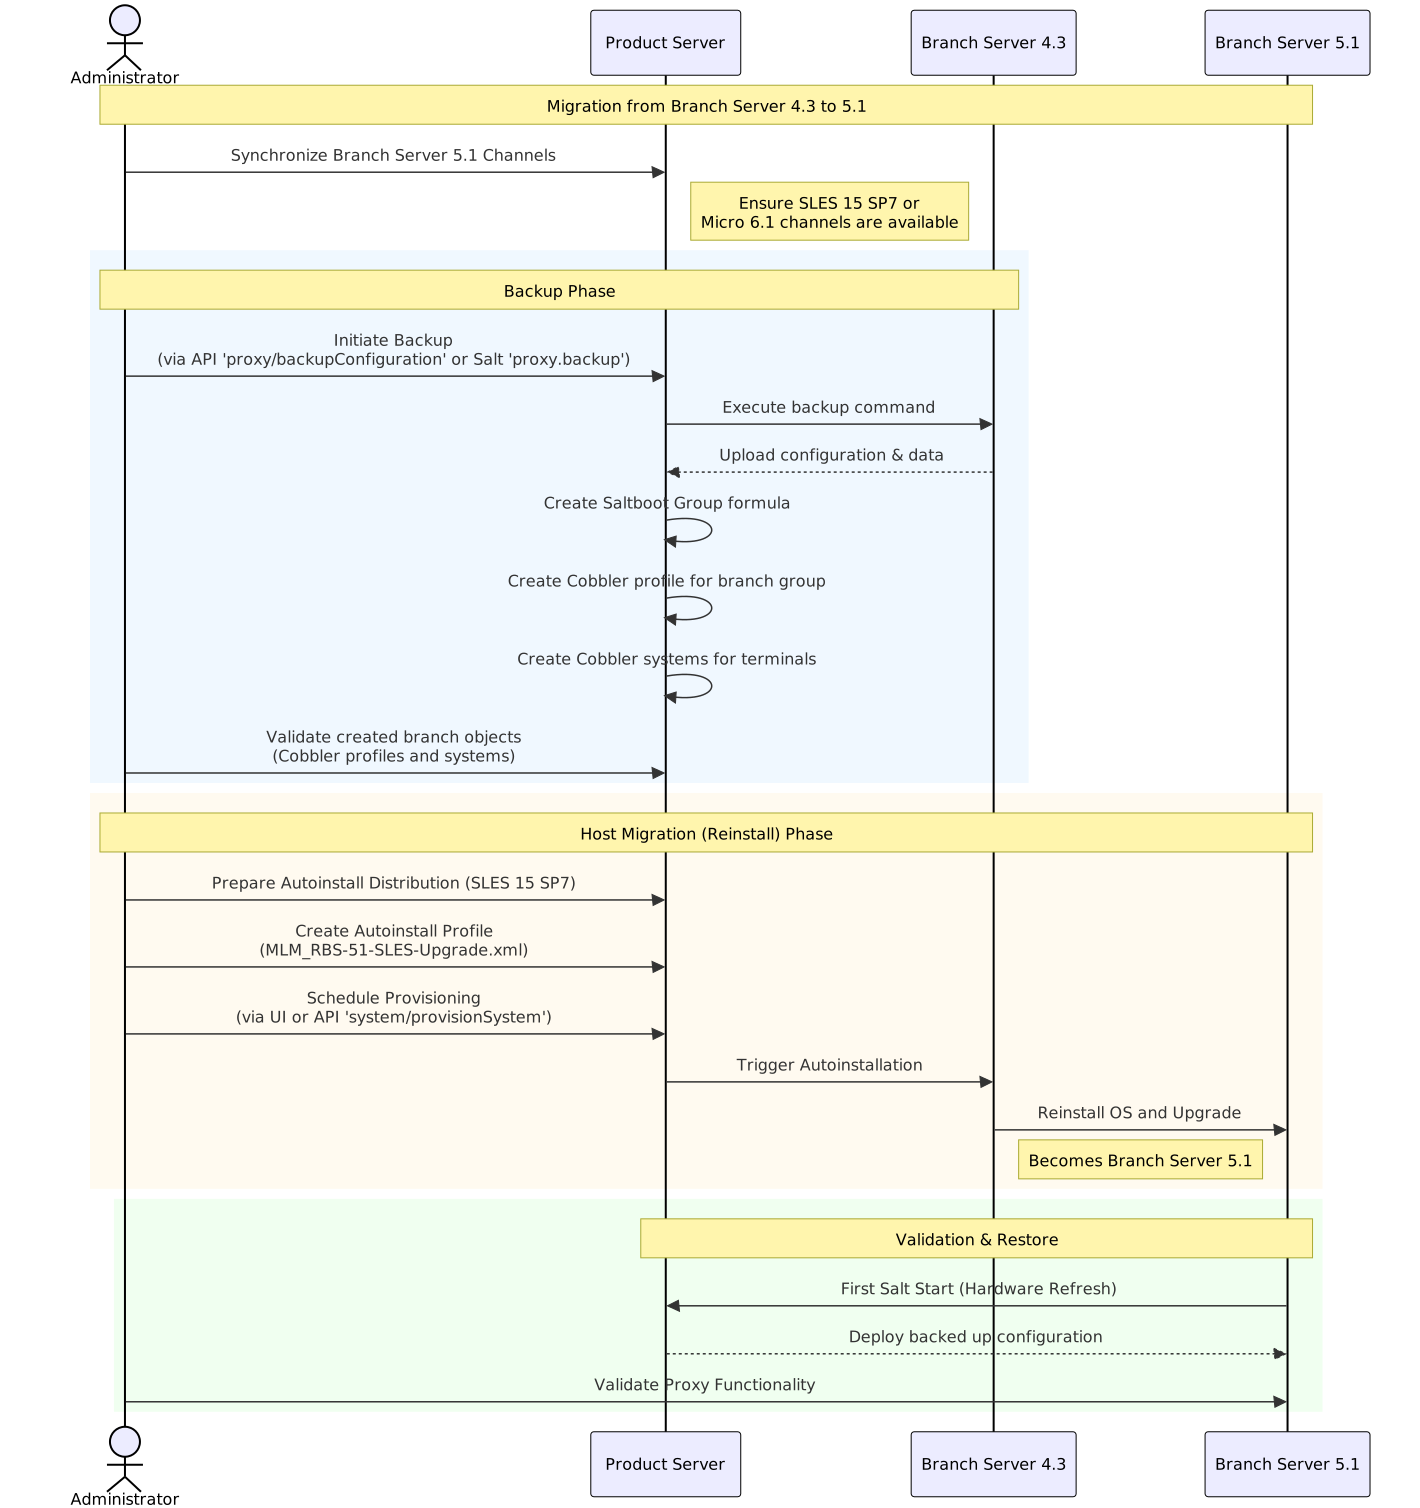
2. Synchronize SUSE Multi-Linux Manager Retail Branch Server channels
See SUSE Multi-Linux Manager 代理部署 how to synchronize product channels for a proxy systems.
Depending on the host operating system:
-
SUSE Linux Micro 6.1usesSUSE Multi-Linux Manager Retail Branch Server Extension 5.1channels -
SUSE Linux Enterprise Server 15 SP7usesSUSE Multi-Linux Manager Retail Branch Server Extension for SLE 5.1channels
3. Backup existing SUSE Multi-Linux Manager Retail Branch Server 4.3
SUSE Multi-Linux Manager for Retail 5.1.2 includes automated backup-migration procedure for both kinds of SUSE Multi-Linux Manager Proxy variants. This procedure collects all required data and uploads them to the SUSE Multi-Linux Manager Server. For SUSE Multi-Linux Manager Retail Branch Server this tool also creates and migrates Saltboot related entities.
|
Squid cache data and POS images are not backed up. Due to change in functionality these data are not migrated and instead redownloaded from the server. See retail-deploy-terminals.adoc#_synchronize_images_to_the_branch_server how to warm up the cache. |
There are multiple ways to initiate SUSE Multi-Linux Manager Retail Branch Server 4.3 migration:
-
API call
Replace
$proxyidby a server id of the branch proxy, or multiple server ids separated by a comma.mgrctl api login mgrctl api post proxy/backupConfiguration '{\"sids\":[$proxyid]}' -
Salt call
Replace
$proxyin command below by branch proxy minion id or-L proxyminionid1,proxyminionid2,…when addressing multiple branch proxies.salt $proxy proxy.backup
|
It is recommended to do a manual backup of the proxy as well, particularly if there are custom modifications present. |
|
SUSE Multi-Linux Manager Retail Branch Server can still be used after backup step as before, however because some formulas were disabled by the backup/migration step, next highstate or image-sync state application will not work properly. Migrate the server host as soon as possible after backup step is performed. |
4. Validate branch objects were created for migrated branches
Backup/migration step will create new Saltboot objects:
-
Saltboot Groupformula with settings from the original formulas is assigned to the branch group. -
New cobbler profile is created for the branch group:
# mgrctl exec -- cobbler profile report --name $branchid:S:$orgid:$orgname
-
New cobbler systems are created for all assigned terminals:
# mgrctl exec -- cobbler system find --kernel-options "MINION_ID_PREFIX=$branchid"
5. Migrate SUSE Multi-Linux Manager Retail Branch Server host
You can either upgrade the existing host to SUSE Linux Enterprise Server 15 SP7 using AutoYaST, or perform a fresh installation of SL Micro 6.1.
5.1. Upgrade to SUSE Linux Enterprise Server 15 SP7 using AutoYaST
Create and use AutoYAST profiles to migrate or reinstall the proxy host.
5.1.1. Prepare autoinstallation distribution based on SUSE Linux Enterprise Server 15 SP7
-
Download or obtain SUSE Linux Enterprise Server 15 SP7 installation ISO to the server host
-
Use
mgradm distribution copy $path_to_the_isoto copy installation files to the container -
Register the autoinstallation distribution, see 可自动安装的发行套件.
5.1.2. Prepare autoinstallation profile
For more information, see 自动安装配置文件.
-
Create an autoinstallation profile based previously created distribution. As a profile use profile provided at https://github.com/SUSE/manager-build-profiles/blob/master/AutoYaST/SUSE-Multi-Linux-Manager/SUSE%20Multi-Linux%20Manager%20Proxy/MLM_RBS-51-SLES-Upgrade.xml
-
Once profile is created, switch to
Variablestab and fill in required variables:org='organization_id' distrotree='autoinstallation_distribution_label_from_previous_step' channel_prefix='clm_channel_prefix' or blank for SCC channels registration_key='activation_key_for_post_upgrade'
-
In tab
Autoinstallation Fileyou can see complete rendered profile for additional inspection
5.1.3. Provision autoinstallation of the proxy
Schedule an autoinstallation on the old SUSE Multi-Linux Manager Branch Server 4.3 using the profile created in previous step.
-
Use Web UI interface
Provisioningtab at theSystemview of migrating branch server -
Or use API call
system/provisionSystemto schedule the migration. For example execute following snippet from the SUSE Multi-Linux Manager host:mgrctl api login mgrctl api post system/provisionSystem '{\"sid\":$proxyid,\"profileName\":\"$profileName\"}'
5.2. Reinstall with SL Micro 6.1
SL Micro 6.1 requires a fresh installation on the host.
|
Perform the backup of the existing 4.3 Branch Server before proceeding with the host reinstallation. For more information see [proxy-backup-43]. |
5.2.1. 准备 SL Micro 6.1 主机
5.2.1.1. 任务:下载安装媒体
在 SL Micro 6.1 找到 安装媒体 https://www.suse.com/download/sle-micro/, 并下载相应的媒体文件。
准备 DVD 或 USB U 盘,并将下载的
.iso映像烧录到其上以进行安装。
5.2.1.2. 安装 SL Micro 6.1
有关准备您的机器(虚拟或物理)的更多信息,请参见 SL Micro 部署指南。
插入包含 SLE Micro 6.1 安装映像的 DVD 或 USB U盘。
引导或重引导您的系统。
使用箭头键选择
Installation。调整键盘和语言。
单击
checkbox以接受许可协议。单击
Next以继续。代理注册SL Micro 6.1 授权包含在 SUSE Multi-Linux Manager 授权中,因此不需要单独的注册代码。
单击 下一步 继续。
在
NTP Configuration页面上,单击 下一步。在
Authentication for the System页面上,输入 root 用户的密码。 单击 下一步。在
Installation Settings页面上,单击 安装。
这结束了 SL Micro 6.1 和 SUSE Multi-Linux Manager 5.1 作为扩展的安装。
5.2.1.3. 更新系统
以 root 身份登录。
运行 transactional-update:
transactional-update重引导。
|
SL Micro 默认情况下设计为自动更新,并将在应用更新后重新启动。 然而,这种行为在 SUSE Multi-Linux Manager 环境中并不理想。 为了防止服务器上的自动更新,SUSE Multi-Linux Manager 在启动过程中禁用事务更新计时器。 如果您希望保留 SL Micro 的默认行为,请运行以下命令来启用计时器: |
5.2.2. Register and deploy the proxy
Once the host is prepared, register the new SL Micro 6.1 system to the SUSE Multi-Linux Manager Server as a client. It is recommended to use the same minion ID as the original 4.3 Branch Server. For more information, see 客户端注册.
On the SUSE Multi-Linux Manager Server, generate the proxy configuration for the new branch server. For more information, see installation-and-upgrade:container-deployment/mlm/proxy-deployment-mlm.adoc#generate-proxy-config.
Transfer the configuration to the SL Micro 6.1 host and install the proxy:
mgrpxy install podman config.tar.gzStart the proxy:
mgrpxy startOnce the proxy is operational, the SUSE Multi-Linux Manager Server will automatically deploy the backed up configuration during the next
Hardware Refreshstep.
6. Validate proxy functionality
After migration is finished and salt is started first time, backed up proxy configuration is automatically deployed during Hardware Refresh step.
After finishing all onboarding steps, validate required proxy functionality.