Push via SSH
Push via SSH is used in environments where traditional clients cannot reach the SUSE Manager Server directly. In this environment, clients are located in a firewall-protected zone called a DMZ. No system within the DMZ is authorized to open a connection to the internal network, including the SUSE Manager Server.
The Push via SSH method creates an encrypted tunnel from the SUSE Manager Server on the internal network to the clients located on the DMZ. After all actions and events are executed, the tunnel is closed.
The server uses SSH to contact the clients at regular intervals, checking in and performing scheduled actions and events.
This contact method works for traditional clients only. For Salt clients, use Push via Salt SSH.
|
Re-installing systems using the provisioning model is not currently supported on clients managed with Push via SSH. |
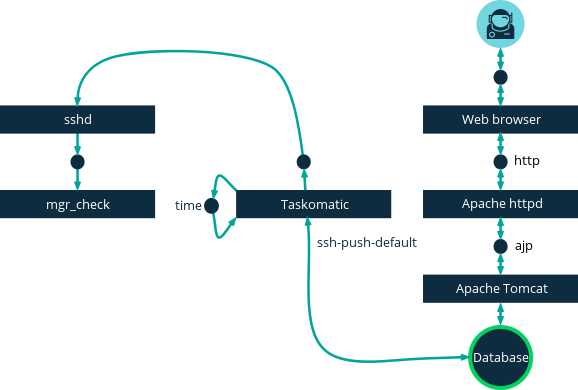
This image demonstrates the push via SSH process path.
All items left of the Taskomatic block represent processes running on the SUSE Manager client.
For tunneling connections via SSH, two available port numbers are required, one for tunneling HTTP and the second for tunneling via HTTPS (HTTP is only necessary during the registration process).
The port numbers used by default are 1232 and 1233.
To overwrite these, you can add two custom port numbers greater than 1024 to /etc/rhn/rhn.conf:
ssh_push_port_http = high_port_1
ssh_push_port_https = high_port_2
If you would like your clients to be contacted using their hostnames instead of an IP address, set this option:
ssh_push_use_hostname = true
It is also possible to adjust the number of threads to use for opening client connections in parallel.
By default two parallel threads are used.
Set taskomatic.ssh_push_workers in /etc/rhn/rhn.conf:
taskomatic.ssh_push_workers = number
For security reasons, you might want to use sudo with SSH, to access the system as an unprivileged user instead of as root.
-
Ensure you have the latest
spacewalk-taskomaticandspacewalk-certs-toolspackages installed on the SUSE Manager Server. -
On each client system, create an appropriate unprivileged user.
-
On each client system, open the
/etc/sudoersfile and comment out these lines:#Defaults targetpw # ask for the password of the target user i.e. root #ALL ALL=(ALL) ALL # WARNING! Only use this together with 'Defaults targetpw'!
-
On each client system, in the
User privilege specificationsection, add these lines:<user> ALL=(ALL) NOPASSWD:/usr/sbin/mgr_check <user> ALL=(ALL) NOPASSWD:/home/<user>/enable.sh <user> ALL=(ALL) NOPASSWD:/home/<user>/bootstrap.sh
-
On each client system, in the
/home/<user>/.bashrcfile, add these lines:PATH=$PATH:/usr/sbin export PATH
-
On the SUSE Manager Server, in the
/etc/rhn/rhn.confconfiguration file, add or amend this line to include the unprivileged username:ssh_push_sudo_user = <user>
Because clients are in the DMZ and cannot reach the server, you need to use the mgr-ssh-push-init tool to register them with the SUSE Manager Server.
To use the tool, you need the client hostname or IP address, and the path to a valid bootstrap script on the SUSE Manager Server. For more information about bootstrapping, see Register Clients with a Bootstrap Script.
The bootstrap script needs to have an activation key associated with it that is configured for Push via SSH. For more information on activation keys, see Activation Keys.
Before you begin, you need to ensure that you have specified which ports to use for SSH tunneling. If you have registered clients before changing the port numbers, they need to be registered again.
|
Clients that are managed with Push via SSH cannot reach the server directly.
When you use the |
-
At the command prompt on the SUSE Manager Server, as root, execute this command:
# mgr-ssh-push-init --client <client> --register \
/srv/www/htdocs/pub/bootstrap/bootstrap_script --tunnel
OPTIONAL: You can remove the
--tunneloption, if you do not want to use tunneling. -
OPTIONAL: When you have defined
ssh_push_sudo_user, you can allow use of the root password by adding the--nottyoption. -
Verify that the SSH connection is active:
# ssh -i /root/.ssh/id_susemanager -R <high_port>:<susemanager>:443 \
<client> zypper ref
You can use the API to manage which contact method to use.
This example Python code sets the contact method to ssh-push.
Valid values are:
-
default(pull) -
ssh-push -
ssh-push-tunnel
client = xmlrpclib.Server(SUMA_HOST + "/rpc/api", verbose=0)
key = client.auth.login(SUMA_LOGIN, SUMA_PASSWORD)
client.system.setDetails(key, 1000012345, {'contact_method' : 'ssh-push'})
If you have a client that has already been registered, and you want to migrate it to use Push via SSH, some extra steps are required.
You can use the mgr-ssh-push-init tool to set up your client.
-
At the command prompt on the SUSE Manager Server, as root, set up the client:
# mgr-ssh-push-init --client <client> \
/srv/www/htdocs/pub/bootstrap/bootstrap_script --tunnel
-
Using the SUSE Manager Web UI, change the client’s contact method to
ssh-pushorssh-push-tunnel. -
OPTIONAL: If you need to edit an existing activation key, you can do so with this command:
client.activationkey.setDetails(key, '1-mykey', {'contact_method' : 'ssh-push'})
You can also use Push via SSH for clients that connect using a proxy. Ensure your proxy is updated before you begin.
-
At the command prompt on the SUSE Manager Proxy, as root, set up the client:
# mgr-ssh-push-init --client <client> \
/srv/www/htdocs/pub/bootstrap/bootstrap_script --tunnel
-
At the command prompt on the SUSE Manager Server, copy the SSH key to the proxy:
mgr-ssh-push-init --client <proxy>