Quick Start: Deploy a SUSE Manager 5.0 Proxy
- 1. Hardware Requirements for the Proxy
- 2. Sync the Parent and Proxy Extension Child channels
- 3. SLE Micro 5.5 Installation
- 4. Create an Activation Key for the Proxy
- 5. Bootstrap the Proxy Host as a Minion
- 6. Generate the Proxy Configuration
- 7. Transfer the Proxy Configuration
- 8. Start the SUSE Manager 5.0 Proxy
This guide outlines the deployment process for the SUSE Manager 5.0 Proxy. This guide presumes you have already successfully deployed a SUSE Manager 5.0 Server. To successfully deploy, you will perform the following actions:
-
Review hardware requirements.
-
Synchronize the SLE Micro 5.5 parent channel and the Proxy extension child channel on the server.
-
Install SLE Micro 5.5 on a bare-metal machine.
-
During the installation, register SLE Micro 5.5 along with the SUSE Manager 5.0 Proxy extension.
-
Create a Salt activation key.
-
Bootstrap the Proxy as a Salt minion.
-
Generate a Proxy configuration.
-
Transfer the Proxy configuration from Server to Proxy
-
Use the Proxy configuration to register the Salt minion as a Proxy with SUSE Manager.
|
Supported operating system for the Proxy Container Host
The supported operating system for the container host is SLE Micro 5.5.
|
1. Hardware Requirements for the Proxy
This table shows the hardware requirements for deploying SUSE Manager Proxy.
| Hardware | Details | Recommendation |
|---|---|---|
CPU |
x86-64, ARM |
Minimum 2 dedicated 64-bit CPU cores |
RAM |
Minimum |
2 GB |
Recommended |
8 GB |
|
Disk Space |
|
Minimum 40 GB |
|
Minimum 100 GB, Storage requirements should be calculated for the number of ISO distribution images, containers, and bootstrap repositories you will use. |
|
|
Minimum 100 GB |
2. Sync the Parent and Proxy Extension Child channels
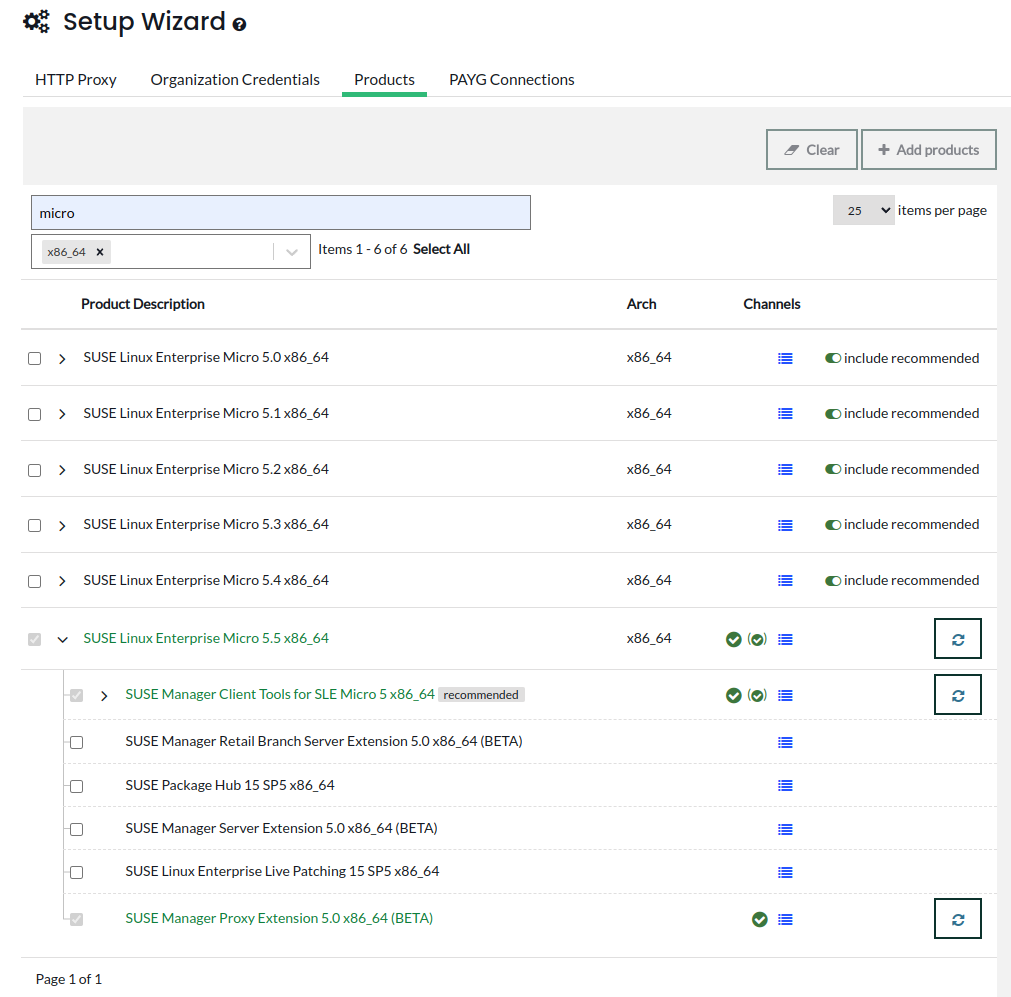
This section presumes that you have already entered your organization credentials under the in the Servers Web UI. Products are listed on the page. This channel must be fully synchronized on the server, with the child channel [systemitem]Proxy as an extension option selected.
-
In the SUSE Manager Web UI select .
-
From the products page enter SLE Micro in the filter field.
-
Next use the dropdown to select the required architecture. For this example x86-64.
-
In the
Product Descriptionfield select the SLE Micro 5.5 checkbox then use the dropdown to select theSUSE Manager Proxy Extension 5.0 x86_64 BETAextension. -
Click the + Add products button.
-
Wait for the sync to complete.
3. SLE Micro 5.5 Installation
-
Locate the SLE Micro 5.5 installation media at https://www.suse.com/download/sle-micro/.
-
You will need an account with SUSE Customer Center and must be logged in to download the ISO.
-
Download the following file:
SLE-Micro-5.5-DVD-x86_64-GM-Media1.iso -
Prepare a USB fash disk or DVD for installation.
-
Insert a DVD or a bootable USB stick containing the installation image for SLE Micro 5.5.
-
Boot or reboot your system.
For detailed documentation on preparing your machines OS (virtual or physical), see SLE Micro 5.5 Deployment Guide.
-
Use the arrow keys to select
Installation. -
Adjust Keyboard and language. Click the
checkboxto accept the License Agreement. -
Click
Nextto continue. -
Select your registration method. For this example we will register the server with SUSE Customer Center.
SUSE Manager 5.0 Proxy as an extensionThe SUSE Manager 5.0 Proxy is registered as an extension. Therefore, in addition to acquiring an SUSE Customer Center registration key for SLE Micro 5.5, you will also need an SUSE Customer Center registration code for the following extension:
-
SUSE Manager 5.0 Proxy
-
-
Enter your SUSE Customer Center Email address.
-
Enter your registration code for SLE Micro 5.5.
-
Click
Nextto continue. -
On the
Extension and Module Selectionpage uncheck the Hide Development Versions checkbox. -
Select the SUSE Manager 5.0 Proxy extension
Checkbox. -
Click
Nextto continue. -
Enter your SUSE Manager 5.0 Proxy extension registration code.
-
Click Next to continue.
-
On the
NTP Configurationpage click Next. -
On the
Authentication for the Systempage enter a password for the root user. Click Next. -
On the
Installation Settingspage click Install.
This concludes installation of SLE Micro 5.5 and SUSE Manager 5.0 Proxy as an extension.
3.1. Update the system
-
Login as root.
-
Run transactional-update:
transactional-update -
Reboot the system.
-
Login as root.
-
Install the container utilities:
Alternatively you may install
mgrpxy-zsh-completionormgrpxy-fish-completion.transactional-update pkg install mgrpxy mgrpxy-bash-completion -
Reboot the system.
4. Create an Activation Key for the Proxy
-
Select then click + Create key.
-
Create an activation key for the proxy host with SLE Micro 5.5 as the parent channel. This key should include all recommended channels and the Proxy as an extension child channel.
-
Proceed to boostrapping the proxy host as a minion.
5. Bootstrap the Proxy Host as a Minion
-
Select .
-
Fill in the fields for your Proxy host.
-
Select the Activation key created in the previous step from the dropdown.
-
Click + Bootstrap.
-
Wait for the Bootstrap process to complete successfully. Check the Salt menu and confirm the Salt minion key is listed and accepted.
-
Reboot the Proxy host.
-
Select the host from the System list and trigger a second reboot after all events are finished to conclude the onboarding.
-
Select the host from the Systems list and apply all patches to update it.
-
Reboot the Proxy host.
6. Generate the Proxy Configuration
The configuration archive of the SUSE Manager Proxy is generated by the SUSE Manager Server. Each additional Proxy requires its own configuration archive.
|
The container host for the SUSE Manager Proxy must be registered as a salt minion to the SUSE Manager Server prior to generating this Proxy configuration. |
You will perform the following tasks:
-
Generate a Proxy configuration file.
-
Transfer the configuration to the Proxy.
-
Start the Proxy with the
mgrpxycommand.
-
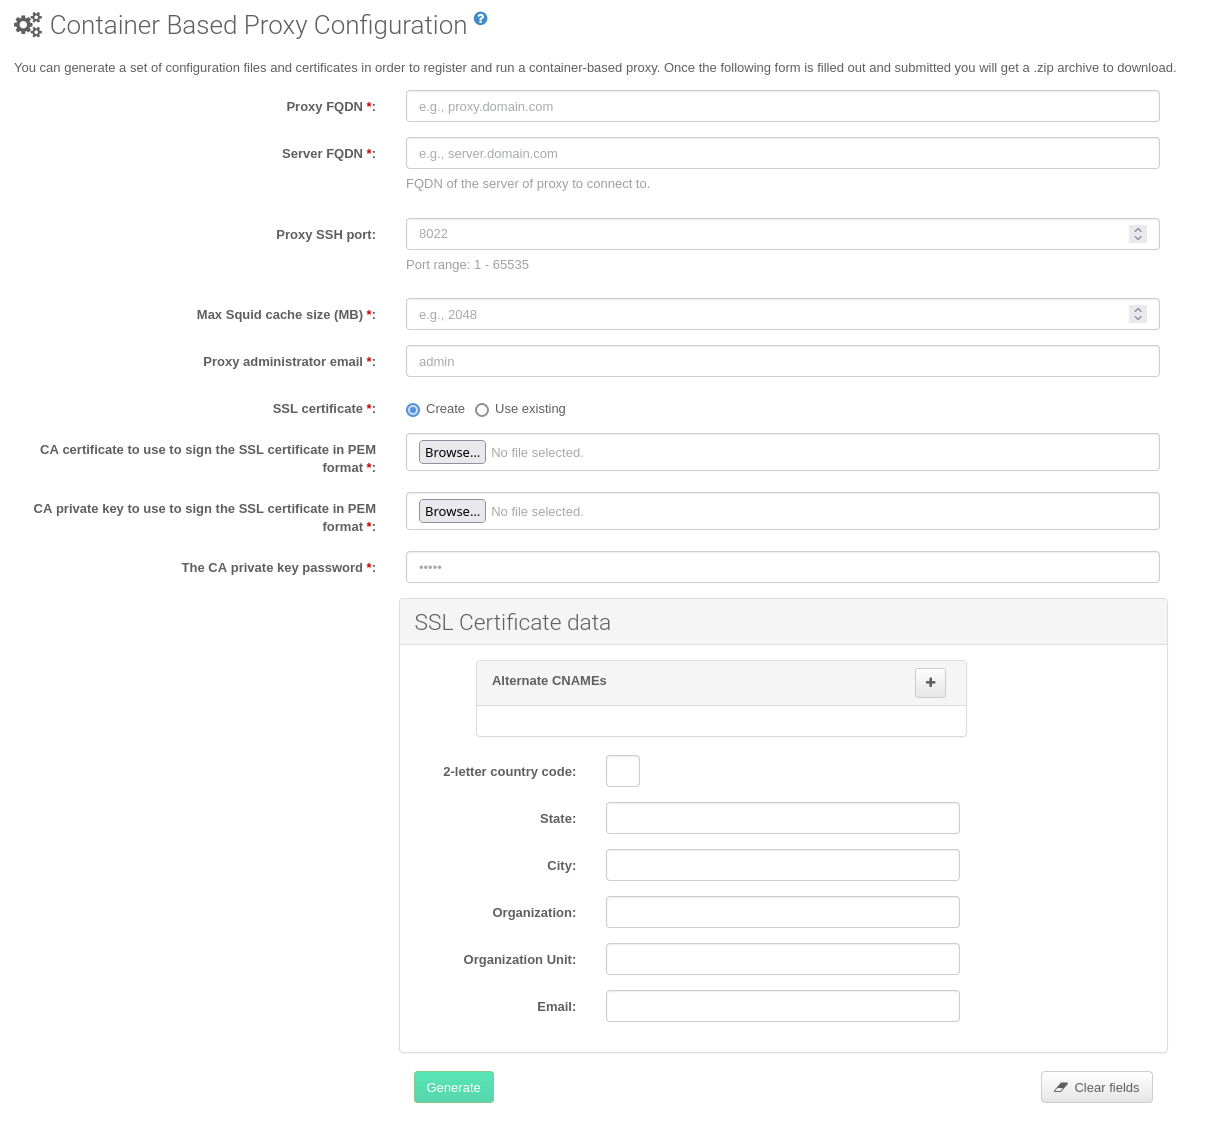
In the Web UI, navigate to and fill the required data:
-
In the
Proxy FQDNfield type fully qualified domain name for the proxy. -
In the
Parent FQDNfield type fully qualified domain name for the SUSE Manager Server or another SUSE Manager Proxy. -
In the
Proxy SSH portfield type SSH port on which SSH service is listening on SUSE Manager Proxy. Recommended is to keep default 8022. -
In the
Max Squid cache size [MB]field type maximal allowed size for Squid cache. Typically this should be at most 60% of available storage for the containers. -
In the
SSL certificateselection list choose if new server certificate should be generated for SUSE Manager Proxy or an existing one should be used. You can consider generated certificates as SUSE Manager builtin (self signed) certificates.Depending on the choice then provide either path to signing CA certificate to generate a new certificate or path to an existing certificate and its key to be used as proxy certificate.
The CA certificates generated on the server are stored in the
/var/lib/containers/storage/volumes/root/ssl-builddirectory.For more information about existing or custom certificates and the concept of corporate and intermediate certificates, see Import SSL Certificates.
-
Click Generate to register new proxy FQDN in SUSE Manager Server and generate configuration archive with details for container host.
-
After a few moments you are presented with file to download. Save this file locally.
7. Transfer the Proxy Configuration
The Web UI generates a configuration archive. This archive needs to be made available on the Proxy container host.
-
Copy the files from the Server container to the Server host OS:
mgrctl cp server:/root/config.tar.gz .
-
Next copy the files from the Server host OS to the Proxy host:
scp config.tar.gz <proxy-FQDN>:/root
-
Install the Proxy with:
mgrpxy install podman config.tar.gz
8. Start the SUSE Manager 5.0 Proxy
Container can now be started with the mgrpxy command:
-
Start the Proxy by calling:
mgrpxy start
-
Check container status by calling:
mgrpxy status
Five SUSE Manager Proxy containers should be present:
-
proxy-salt-broker
-
proxy-httpd
-
proxy-tftpd
-
proxy-squid
-
proxy-ssh
-
And should be part of the proxy-pod container pod.