Deploy SUSE Manager 5.0 Server
This guide outlines the deployment process for the SUSE Manager 5.0 Server. To successfully deploy, you will:
-
Download installation media
-
Install SLE Micro 5.5 on a bare-metal machine.
-
Register SLE Micro 5.5 during installation
-
Register SUSE Manager 5.0 Server as an extension during installation
-
Update the system
-
Deploy the server with
mgradm -
Access the webui and sync your first channel
1. Hardware Requirements for SUSE Manager
This table shows the software and hardware requirements for deploying SUSE Manager Server on your bare metal machine. For the purposes of this guide your machine should have 16GB of RAM, and at least 200 GB of disk space.
| Software and Hardware | Recommended |
|---|---|
Operating System: |
SLE Micro 5.5 |
CPU: |
4 64-bit CPU cores |
RAM: |
16 GB |
Disk Space: |
200 GB |
Channel Requirements |
50 GB per SUSE or openSUSE product 360 GB per Red Hat product |
|
Supported operating system for the Server Container Host
The supported operating system for the container host is SLE Micro 5.5.
|
|
Server deployment mandates the use of a fully qualified domain name (FQDN). In the absence of automatic DNS provision of an FQDN by your router or network, the deployment process will not proceed successfully. An FQDN typically follows the format <host>.<domain>.com. For instance:
For additional details, refer to the section on network requirements in the Installation and Upgrade Guide, available at Network Requirements. |
2. SUSE Manager 5.0 Installation
-
Locate the SUSE Manager 5.0 Server installation media at https://www.suse.com/download/suse-manager/.
-
You will need an account with SUSE Customer Center and must be logged in to download the ISO.
-
Download the following file:
SUSE-Manager-Server.x86_64-SelfInstall.raw.xz -
Prepare a USB flash disk or DVD for installation.
-
Insert a DVD or a bootable USB stick containing the installation image for SUSE Manager 5.0.
-
Boot or reboot your system.
For detailed documentation on preparing your machines OS (virtual or physical), see SLE Micro 5.5 Deployment Guide.
-
On the the configuration welcome screen select
Confirm. -
Select your keyboard layout and confirm your selection.
-
Read the license agreement and click
`Acceptto continue. -
Select your time zone.
-
Enter and confirm a password for root user.
-
Read the statement about SLE Micro registration and click
Acceptto continue.SUSE Manager as an extensionThe SUSE Manager 5.0 container is installed as an extension. Therefore, in addition to acquiring SUSE Customer Center registration keys for SLE Micro 5.5, you will also need SUSE Customer Center registration codes for the following extensions:
-
SUSE Manager 5.0 Server
-
SUSE Manager 5.0 Proxy
-
SUSE Manager 5.0 Retail Branch Server
-
-
Enter your SUSE Customer Center Email address.
-
Enter your registration code for SLE Micro 5.5.
-
Click
Nextto continue. -
On the
Extension and Module Selectionpage uncheck the Hide Development Versions checkbox. -
Select the SUSE Manager 5.0 Server extension
Checkbox. -
Click
Nextto continue. -
Enter your SUSE Manager 5.0 Server extension registration code.
-
Click Next to continue.
-
On the
NTP Configurationpage click Next. -
On the
Authentication for the Systempage enter a password for the root user. Click Next. -
On the
Installation Settingspage click Install.
This concludes installation of SLE Micro 5.5 and SUSE Manager 5.0 Server as an extension.
2.1. Update the system
-
Login as root.
-
Run transactional-update:
transactional-update -
Reboot the system.
-
Login as root.
3. Deploy with mgradm
-
From the terminal run the following command replacing <suma.example.com> with your fully qualified domain name.
mgradm install podman <suma.example.com> -
Enter a certificate and administrator account password when prompted.
The administrator account password must be at least 5 characters and less than 48 characters in length.
-
Press Enter.
-
Enter the email address of the administration account. Press Enter.
-
Wait for deployment to complete.
-
Open a browser and proceed to your servers FQDN, or IP address.
In this guide you learned how to deploy SUSE Manager 5.0 Server as a container.
4. Synchronize with SUSE Customer Center
This section covers synchronizing with SCC from the Web UI and adding your first client channel.
-
In the SUSE Manager Web UI, select .
-
From the
Setup Wizardpage select the Organization Credentials tab. -
Click Add a new credential.
-
In the dialog, enter
UsernameandPassword, and confirm with Save.
When the credentials are confirmed with a green check-mark icon, proceed with Procedure: Synchronizing with SUSE Customer Center.
-
In the Web UI, navigate to .
-
From the
Setup Wizardpage select the SUSE Products tab. If you previously registered with SUSE Customer Center a list of products will populate the table. This operation could take up to a few minutes. You can monitor the progress of the operation in section on the rightRefresh the product catalog from SUSE Customer Center. The table of products lists architecture, channels, and status information. For more information, see Wizard.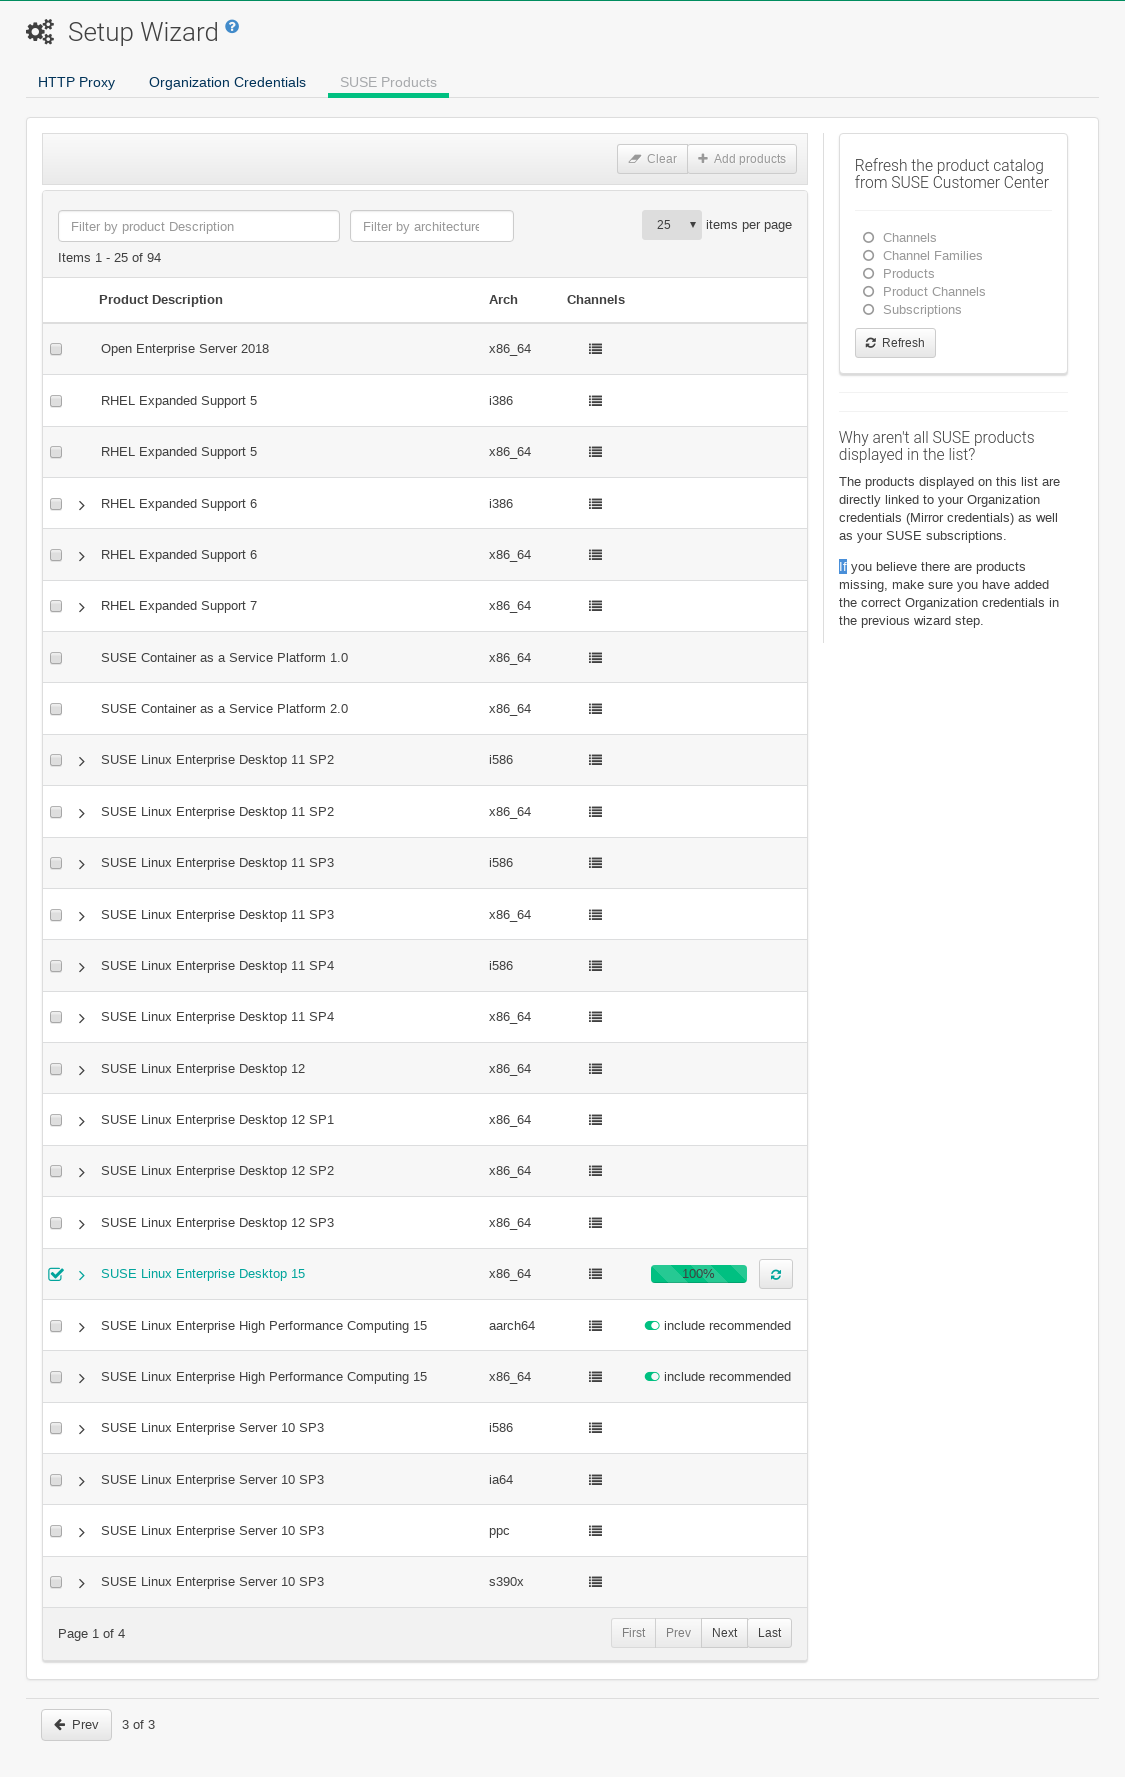
-
Use
Filter by product descriptionandFilter by architectureto filter the list of displayed products. If your SUSE Linux Enterprise client is based onx86_64architecture scroll down the page and select the check box for this channel now.-
Add channels to SUSE Manager by selecting the check box to the left of each channel. Click the arrow symbol to the left of the description to unfold a product and list available modules.
-
Click Add Products at the top of the page to start product synchronization.
-
After adding the channel, SUSE Manager will schedule the channel to be synchronized.
This can take a long time as SUSE Manager will copy channel software sources from the SUSE repositories located at SUSE Customer Center to the local /var/lib/containers/storage/volumes/var-spacewalk/ directory of your server.
When the channel is fully synchronized, the bootstrap repository for it will be automatically created. This is necessary for the successful bootstrapping of a client. This completes the SUSE Manager installation and configuration, with channel preparations for bootstrapping clients.
When the channel synchronization process is complete, you can continue with the client registration. For more instructions, see Client Registration.
5. Entering the container for management
To get to a shell inside the container, run the following on the host:
mgrctl term