
SUSE Multi-Linux Manager 5.2サーバの配備
このガイドでは、 SL Micro 6.2またはSUSE Linux Enterprise Server 15 SP7にSUSE Multi-Linux Manager 5.2コンテナをインストールして設定する方法について説明します。
|
If you want to deploy SUSE Multi-Linux Manager on Kubernetes, see Server Deployment on Kubernetes. |
1. SUSE Multi-Linux Managerのハードウェア要件
These tables shows the software and hardware requirements for deploying SUSE Multi-Linux Manager Server on your bare metal machine.
| Software | Recommended |
|---|---|
Operating System |
SL Micro 6.2 or SUSE Linux Enterprise Server 15 SP7 |
| Hardware | Details | Recommendation |
|---|---|---|
CPU |
x86-64, ARM, ppc64le or s390x |
Minimum 4 dedicated 64-bit CPU cores |
RAM |
Minimum |
16 GB |
Recommended |
32 GB |
|
Disk Space |
|
40 GB |
|
Minimum 150 GB (depending on the number and type of the product*) |
|
|
Minimum 50 GB |
|
Swap space |
Systems can benefit from additional swap space. SUSE recommends using a swap file instead of a swap partition. For more information about swap space, see Swap space. |
8 to 12 GB |
|
サーバコンテナホストでサポートされるオペレーティングシステム
コンテナホストでサポートされているオペレーティングシステムはSL Micro 6.2またはSUSE Linux Enterprise Server 15 SP7です。
|
|
サーバの配備では、必ず完全修飾ドメイン名(FQDN)を使用する必要があります。ルータまたはネットワークにFQDNのDNSの自動プロビジョニング機能がない場合は、配備プロセスは正常に続行されません。FQDNは通常、<host>.<domain>.comの形式に従います。 例:
詳細については、ネットワーク要件のネットワーク要件のセクションを参照してください。 |
2. 永続ボリューム
SUSE Multi-Linux Manager 5.2 defines the required persistent storage volumes by default. These are created during installation by the mgradm tool if they do not already exist.
These volumes are created in /var/lib/containers/storage/volumes/, where Podman stores its volumes by default.
|
推奨事項
外部ストレージデバイスをこのディレクトリにマウントすると、ストレージを簡単に利用できます。ここには、PostgreSQLデータベース、リポジトリのバイナリパッケージ、キャッシュ、オペレーティングシステムのイメージ、自動インストールディストリビューション、および設定ファイルが保存されるため、次の3つの推奨事項があります。
|
コンテナ内の永続ボリュームのリストについては、永続コンテナボリュームを参照してください。
3. SUSE Multi-Linux Managerサーバホストの準備
SUSE Multi-Linux ManagerはSL Micro 6.2またはSUSE Linux Enterprise Server 15 SP7に配備できます。SL Microはトランザクションシステムであり、SUSE Linux Enterprise Serverはフルサーバオペレーティングシステムです。
決定に応じて、SL Micro 6.2ホストの準備またはSUSE Linux Enterprise Server 15 SP7ホストの準備を続行し、選択されていないセクションをスキップしてください。
3.1. SL Micro 6.2ホストの準備
3.1.1. インストールメディアのダウンロード
https://www.suse.com/download/sle-micro/でSL Micro 6.2のインストールメディアを見つけて、適切なメディアファイルをダウンロードします。
Prepare a DVD or USB flash drive with the downloaded
.isoimage for installation.
3.1.2. SL Micro 6.2のインストール
SLE Micro 6.2のインストールイメージを含むDVDまたはUSBフラッシュドライブ(USBディスクまたはキー)を挿入します。
システムをブートまたは再起動します。
Use the arrow keys to select
Installation.キーボードと言語を調整します。
Click the
checkboxto accept the license agreement.Click
Nextto continue.登録方法を選択します。この例では、SUSE Customer Centerを使用してサーバを登録します。
SUSE Multi-Linux Manager 5.2コンテナは拡張機能としてインストールされます。以下のリストから必要な特定の拡張機能に応じて、それぞれに追加のSUSE Customer Center登録コードが必要です。
SUSE Multi-Linux Manager 5.2サーバ
SUSE Multi-Linux Manager 5.2プロキシ
SUSE Multi-Linux Manager 5.2 Retail Branch Server
SL Micro 6.2エンタイトルメントは、SUSE Multi-Linux Managerエンタイトルメント内に含まれているため、別途登録コードは必要ありません。
SUSE Customer Centerの電子メールアドレスを入力します。
SL Micro 6.2の登録コードを入力します。
Click
Nextto continue.To install a proxy, select the SUSE Multi-Linux Manager 5.2 Proxy extension; to install a server, select the SUSE Multi-Linux Manager 5.2 Server extension
Checkbox.Click
Nextto continue.SUSE Multi-Linux Manager 5.2拡張機能の登録コードを入力します。
次へをクリックして続行します。
On the
NTP Configurationpage click Next.On the
Authentication for the Systempage enter a password for the root user. Click Next.On the
Installation Settingspage click Install.
これで、SL Micro 6.2と拡張機能としてのSUSE Multi-Linux Manager 5.2のインストールは完了です。マシン(仮想または物理)の準備の詳細については、SL Micro配備ガイドを参照してください。
3.1.3. オプション: コマンドラインからの登録
SL Micro 6.2のインストール中にSUSE Multi-Linux Manager 5.2を拡張機能として追加した場合は、このプロシージャはスキップして構いません。ただし、オプションで、登録を行なわずに次へ進むボタンを選択することにより、SL Micro 6.2のインストール中に登録をスキップできます。このセクションでは、SL Micro 6.2のインストール後に製品を登録するステップについて説明します。
|
次のステップでは、SUSE Multi-Linux Manager 5.2拡張機能をx86-64アーキテクチャに登録します。そのため、x86-64アーキテクチャの登録コードが必要になります。ARMまたはs390xアーキテクチャを登録する場合は、正しい登録コードを使用してください。 |
次のコマンドで利用可能な拡張機能を一覧表示します。
transactional-update --quiet register --list-extensions利用可能な拡張機能のリストから、インストールしたい拡張機能を選択します。
サーバをインストールする場合は、次のコマンドで SUSE Multi-Linux Manager Server Extension 5.2 x86_64の登録コードを使用します。
transactional-update register -p Multi-Linux-Manager-Server/5.2/x86_64 -r <reg_code>プロキシをインストールする場合は、次のコマンドでSUSE Multi-Linux Manager Proxy Extension 5.2 x86_64の登録コードを使用します。
transactional-update register -p Multi-Linux-Manager-Proxy/5.2/x86_64 -r <reg_code>再起動します。
3.1.4. システムの更新
rootとしてログインします。
transactional-updateを実行します。
transactional-update再起動します。
|
SL Microはデフォルトで自己更新するように設計されており、更新を適用すると再起動します。ただし、SUSE Multi-Linux Manager環境ではこの動作は望ましくありません。サーバの自動更新を防ぐには、SUSE Multi-Linux Managerでブートストラッププロセス中にtransactional-updateのタイマを無効にします。 SL Microのデフォルトの動作を使用したい場合は、次のコマンドを実行してタイマを有効にします。 |
配備を続行するには、カスタム永続ストレージの設定を参照してください。
3.2. SUSE Linux Enterprise Server 15 SP7ホストの準備
または、SUSE Linux Enterprise Server 15 SP7にSUSE Multi-Linux Managerを配備することもできます。
次のプロシージャでは、インストールプロセスの主なステップについて説明します。
3.2.1. SUSE Linux Enterprise ServerにSUSE Multi-Linux Manager拡張機能をインストールする
Locate and download SUSE Linux Enterprise Server 15 SP7
.isoat https://www.suse.com/download/sles/.ホストオペレーティングシステム(SUSE Linux Enterprise Server 15 SP7)と拡張機能の両方の登録コードがあることを確認します。
SUSE Linux Enterprise Server 15 SP7のインストールを開始します。
On the
Language, keyboard and product selectionselect the product to install.On the
License agreementread the agreement and checkI Agree to the License Terms.登録方法を選択します。この例では、SUSEカスタマーセンターにサーバを登録します。
SUSE Customer Centerの電子メールアドレスを入力します。
SUSE Linux Enterprise Server 15 SP7の登録コードを入力します。
Click
Nextto continue.
SUSE Linux Enterprise Server 15 SP7には、有効なSUSE Linux Enterprise Serverサブスクリプションと対応する登録コードが必要であり、この画面で入力する必要があることに注意してください。以下でSUSE Multi-Linux Manager拡張機能の登録コードを入力する必要があります。
In the screen
Extensions and Modules Selectioncheck the following:
サーバをインストールするにはSUSE Multi-Linux Managerサーバ拡張機能を選択し、プロキシをインストールするにはSUSE Multi-Linux Managerプロキシ拡張機能を選択します。
ベースシステムモジュール
Containersモジュール
Click
Nextto continue.SUSE Multi-Linux Manager 5.2拡張機能の登録コードを入力します。
次へをクリックして続行します。
インストールを完了します。
インストールが完了したら、rootとして新しくインストールしたサーバにログインします。
システムを更新します(オプション。インストール時にシステムが更新をダウンロードするように設定されていない場合)。
zypper up再起動します。
3.2.2. オプション: コマンドラインからの登録
SUSE Linux Enterprise Serverインストール時にSUSE Multi-Linux Manager 5.2を拡張機能として追加した場合、このプロシージャはスキップできます。
ただし、オプションで、登録を行なわずに次へ進むボタンを選択することにより、SUSE Linux Enterprise Serverのインストール中に登録をスキップできます。このセクションでは、SUSE Linux Enterprise Serverのインストール後に製品を登録するステップについて説明します。
|
次のステップでは、SUSE Multi-Linux Manager 5.2拡張機能をx86-64アーキテクチャに登録します。そのため、x86-64アーキテクチャの登録コードが必要になります。 ARMまたはs390xアーキテクチャを登録する場合は、正しい登録コードを使用してください。 |
次のコマンドで利用可能な拡張機能を一覧表示します。
SUSEConnect --list-extensionsFrom the list of available extensions, select the one you wish to install.
If installing the Server, use your SUSE Multi-Linux Manager Server Extension 5.2 x86_64 registration code.
For example for SUSE Linux Enterprise 15 SP7, use the following commands:
SUSEConnect -r <regcode>
SUSEConnect -p sle-module-containers/15.7/x86_64
SUSEConnect -p Multi-Linux-Manager-Server-SLE/5.2/x86_64 -r <regcode>
プロキシをインストールする場合は、次のコマンドでSUSE Multi-Linux Manager Proxy Extension 5.2 x86_64の登録コードを使用します。
SUSEConnect -p Multi-Linux-Manager-Proxy-SLE/5.2/x86_64 -r <regcode>
3.2.3. Install and enable podman
podman
rootとしてログインし、製品パッケージをインストールします。
サーバ上:
zypper in podman
zypper in -t product Multi-Linux-Manager-Server-SLE
プロキシ上:
zypper in podman
zypper in -t product Multi-Linux-Manager-Proxy-SLE
Before continuing, make sure that these packages are installed on the target system: *
podmanserver:mgradm,mgradm-bash-completionproxy:mgrpxy,mgrpxy-bash-completionシステムを再起動するか、次のコマンドを実行してPodmanサービスを起動します。
systemctl enable --now podman.service
配備を続行するには、カスタム永続ストレージの設定を参照してください。
4. カスタム永続ストレージの設定
Configuring persistent storage is optional, but it is the only way to avoid serious trouble with container full disk conditions. It is highly recommended to configure custom persistent storage with the mgr-storage-server tool.
For more information, see mgr-storage-server --help. This tool simplifies creating the container storage and database volumes.
このコマンドは次のように使用します。
mgr-storage-server <storage-disk-device> [<database-disk-device>]例:
mgr-storage-server /dev/nvme1n1 /dev/nvme2n1
|
This command will create the persistent storage volumes at 詳細については、以下を参照してください。 |
5. Deploy SUSE Multi-Linux Manager with mgradm
|
自己署名証明書の代わりに、サードパーティSSL証明書を使用する場合は、以下の配備プロシージャの実行時にインポートします。 サードパーティSSL証明書の要件の詳細については、SSL証明書のインポートを参照してください。 |
|
SUSE Multi-Linux Manager server hosts that are hardened for security may restrict execution of files from the 例: SUSE Multi-Linux Managerの更新では、この回避策が不要になるようにツールが変更されます。 |
mgradm-
rootとしてログインします。
-
SUSE Multi-Linux Managerを配備します。
If you use VM images as a migration target, here as the last step, execute the command
mgradm migrateinstead ofmgradm install.SSL証明書の種類(自己署名またはサードパーティ)に応じて、以下のいずれかのコマンドを実行します。
<FQDN>をSUSE Multi-Linux Managerサーバの完全修飾ドメイン名に置き換えます。-
SUSE Multi-Linux Managerで提供される自己署名証明書を使用する場合:
mgradm install <FQDN> -
サードパーティSSL証明書フラグを使用してSSL証明書をインポートする場合(これらすべての証明書が必要なわけではない場合は例を調整可能):
mgradm install <FQDN> \
  --ssl-ca-intermediate <strings> \
  --ssl-ca-root <string> \
  --ssl-server-cert <string> \
  --ssl-server-key <string> \
  --ssl-db-ca-intermediate <strings> \
  --ssl-db-ca-root <string> \
  --ssl-db-cert <string> \
  --ssl-db-key <string>
By default, the TFTP server container is not deployed on the server. For autoinstallation (PXE/TFTP), using a SUSE Multi-Linux Manager Proxy is recommended. If you need to run the TFTP service directly on the server without a proxy (discouraged), append the
--tftpd-enableflag tomgradm install.+
For more information, see
mgradm install --help.実行したコマンドが失敗する場合は、SUSE Multi-Linux Manager 5.2が登録済みであることを確認してください。インストール時に登録をスキップし、ここでコマンドラインから登録する必要がある場合は、次のステップに従ってレジストリにログインします。
set +o history
echo SCC_MIRRORING_PASSWORD | podman login -u "SCC_MIRRORING_USER" --password-stdin registry.suse.com
set -o history
入力を求められたら、SUSE Multi-Linux Manager 5.2の登録キーを使用します。
-
-
入力を求められたら、CAキー(認証局)と管理者アカウントのパスワードを入力します。
管理者アカウントのパスワードは長さ5文字以上、48文字未満である必要があります。
-
Enter (入力)を押します。
-
管理者アカウントの電子メールアドレスを入力します。Enter (入力)を押します。
-
配備が完了するまで待ちます。
-
ブラウザを開き、サーバのFQDNに進みます。
-
Enter your username (default is
admin) and the password you set during the deployment process.
このガイドでは、SUSE Multi-Linux Manager 5.2サーバをコンテナとして配備します。次のセクションに進み、SUSE Customer Centerと同期するために組織の資格情報を追加します。
6. SUSE Customer CenterへのSUSE Multi-Linux Manager 5.2の接続
このセクションでは、Web UIからSCCと同期を取り、最初のクライアントチャンネルを追加する方法について説明します。
-
ブラウザを開き、サーバのFQDNに進みます。
-
Enter your username (default is
admin) and the password you set during the deployment process. -
SUSE Multi-Linux ManagerのWeb UIで、を選択します。
-
From the
Setup Wizardpage select the Organization Credentials tab. -
Add a new credential(新しい資格情報の追加)をクリックします。
-
ブラウザでSUSE Customer Centerにアクセスします。
-
左側のナビゲーションから自分の組織を選択します。
-
ページの上部から[ユーザ]タブを選択し、組織の資格情報を選択します。
-
ミラーリング資格情報をメモします。
-
Back in the SUSE Multi-Linux Manager Web UI enter your
UsernameandPassword, and confirm with Save.
緑色のチェックマークアイコンで資格情報を確認したら、プロシージャ: SUSE Customer Centerと同期するに進みます。
-
Web UIで、に移動します。
-
From the
Setup Wizardpage select theSUSE Productstab. If you recently registered with SUSE Customer Center a list of products will begin populating the table. This operation could take up to a few minutes. You can monitor the progress of the operation in section on the rightRefresh the product catalog from SUSE Customer Center. The table of products lists architecture, channels, and status information. For more information, see Wizard.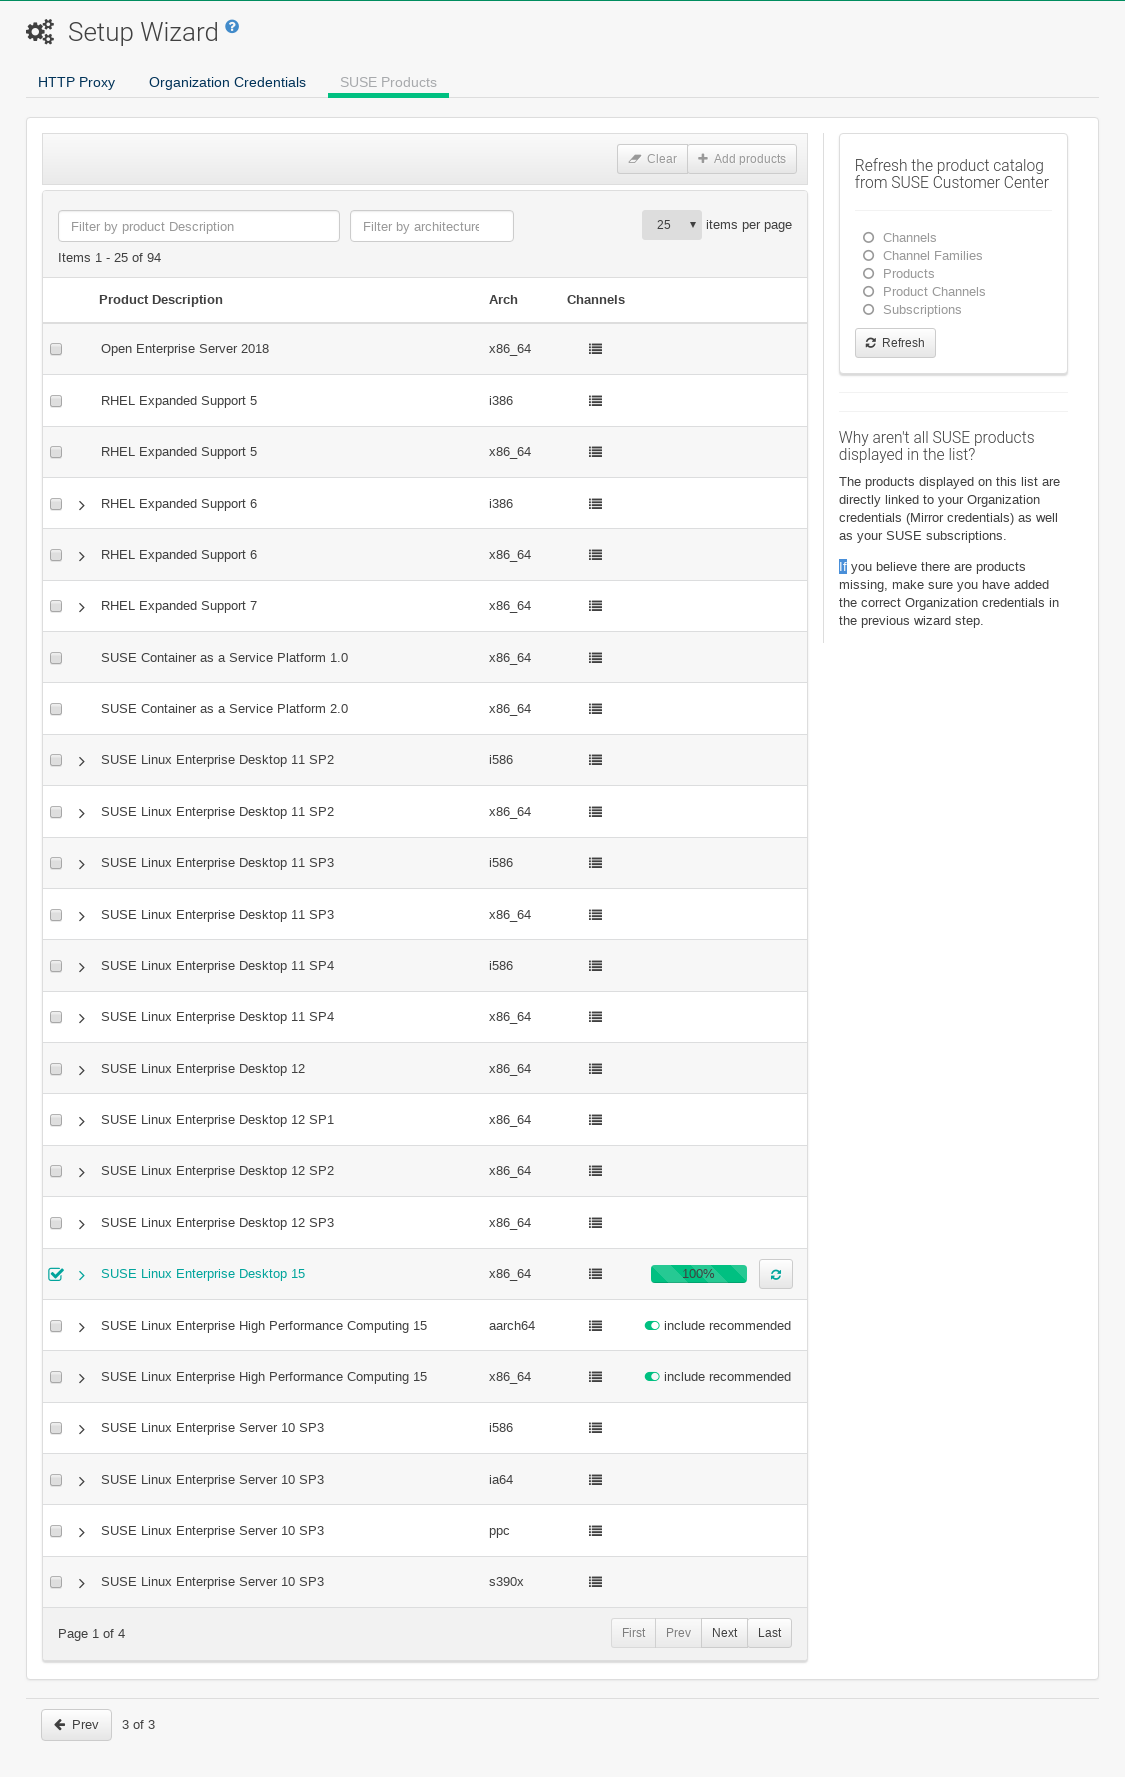
-
Use the
Filter by product descriptionandFilter by architectureto filter the list of displayed products. The channels listed on the Products page provide repositories for clients.-
各チャンネルの左側にあるチェックボックスをオンにして、チャンネルをSUSE Multi-Linux Managerに追加します。説明の左にある矢印をクリックして、製品を展開し、使用できるモジュールを一覧表示します。
-
ページの上部の製品の追加をクリックして、製品の同期を開始します。
-
After adding the channel, SUSE Multi-Linux Manager will schedule the channel to be synchronized. This can take a long time as SUSE Multi-Linux Manager will copy channel software sources from the SUSE repositories located at SUSE Customer Center to the local /var/lib/containers/storage/volumes/var-spacewalk/ directory of your server.
チャンネルが完全に同期されると、そのブートストラップリポジトリが自動的に生成されます。このステップは、クライアントを正常にブートストラップし、チャンネルの同期と配布がクライアント側で正常に機能していることを確認するために非常に重要です。これで、SUSE Multi-Linux Managerのインストールと設定、およびクライアントのブートストラップに必要なチャンネルの準備は完了です。
チャンネル同期プロセスが完了したら、SUSE Multi-Linux Manager 5.2プロキシまたは他のクライアントの登録に進むことができます。
詳細手順については、クライアントの登録を参照してください。
7. 管理のためにコンテナに移動する
コンテナ内のシェルに移動するには、コンテナホストで次のコマンドを実行します。
mgrctl term